Easy Tips for WordPress Beginners to Get Started

WordPress makes it possible for regular folks like you and me to set up and manage our own blogs and websites. We’re so excited when we see our own WordPress Dashboard for the first time. And we hurry to put out our first post to replace the standard Hello World first post from WordPress.
But wait, there are many built-in WordPress features that you should get familiar with. They can make your blogging life easy and delightful. Take time to browse through the many options in the menu on the left, the screen options at the top, the options within the Editor and you’ll be pleasantly surprised at how much you’ve overlooked. So let’s devote this post to discovering the many not-so-apparent options that we can begin to use in our daily WordPress lives.
Let’s get started,
Managing Posts Effortlessly on WordPress
The right corner of the Post Editor is a blessing for bloggers. It helps you manage your posts better in many ways. These options typically include publishing settings, post formats, taxonomies and featured images.
Publish

To schedule posts to appear on selected dates, explore the Publish option. This allows you to choose the exact date and time for publishing your post.
You can also mark the post for review by clicking Pending Review, particularly convenient for a multi author blog.
The Visibility option controls the viewing of content by others. The default setting for this option is Public, which means the whole world can view the post. But you can restrict viewing to a selected few by making it password protected or enabling the private option.
By default, your latest posts appear on top of the page in WordPress. What if you want an evergreen post or one that’s targeted at first timers, to occupy that slot instead ? You can do so by resetting the options under Visibility. Enable the Sticky option for the post, and it will appear and remain on the top of your posts until you disable the sticky option.
As a blogger you’ll know how many revisions a post goes through before it appears for public viewing. It may start as a small scrap or note, and grow over time into a full fledged article, running through many versions in between. If you want to access any of the versions, for whatever reason, just look under Revisions in the Post editor. If you cannot see it right away, enable the setting in Screen Options. By adding a small bit of code in the wp-config.php file (see further down), you can also limit the number of post revisions.
Format

After the publishing settings, you should see a section for Format. Depending on the WordPress theme you’re using you may have a couple or many post formatting options. This formats will style your post differently.
- Standard is a plain text post format
- Aside aligns
- Image, Video, Gallery and Audio formats will feature the respective media at the top of your post
- Quote will style your post as a direct quote
- Link posts will include an option for you to specify an outgoing link to direct a post to (ex: if you write a blurb that XYZ is on sale then link your post to it to take readers directly to the sale)
- Status posts are formatted as status update similar to social media
- Chats appear as conversations
Simply select the format you’d like to use and add your content. Some theme developers will add extra options to posts based on the format (ex: quotes may have options for bold colors or fonts, and videos may have extra options for overlays or image alternatives). You can learn more about WordPress post formats in our guide.
Featured Image
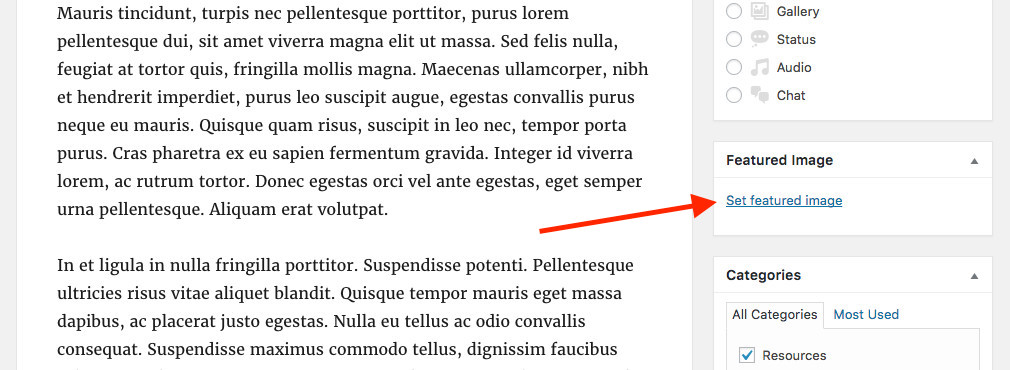
When you create a post you’ll often have the option for a featured image (even with all the various post formats). This image is typically used on your main blog page, as the thumbnail image when your post is displayed as a related post on another article, or as the thumbnail image for any blog modules in your page builder (like blog grids or carousels in Elementor or the WPBaker Visual Composer).
To get started click the link to “Set featured image.”
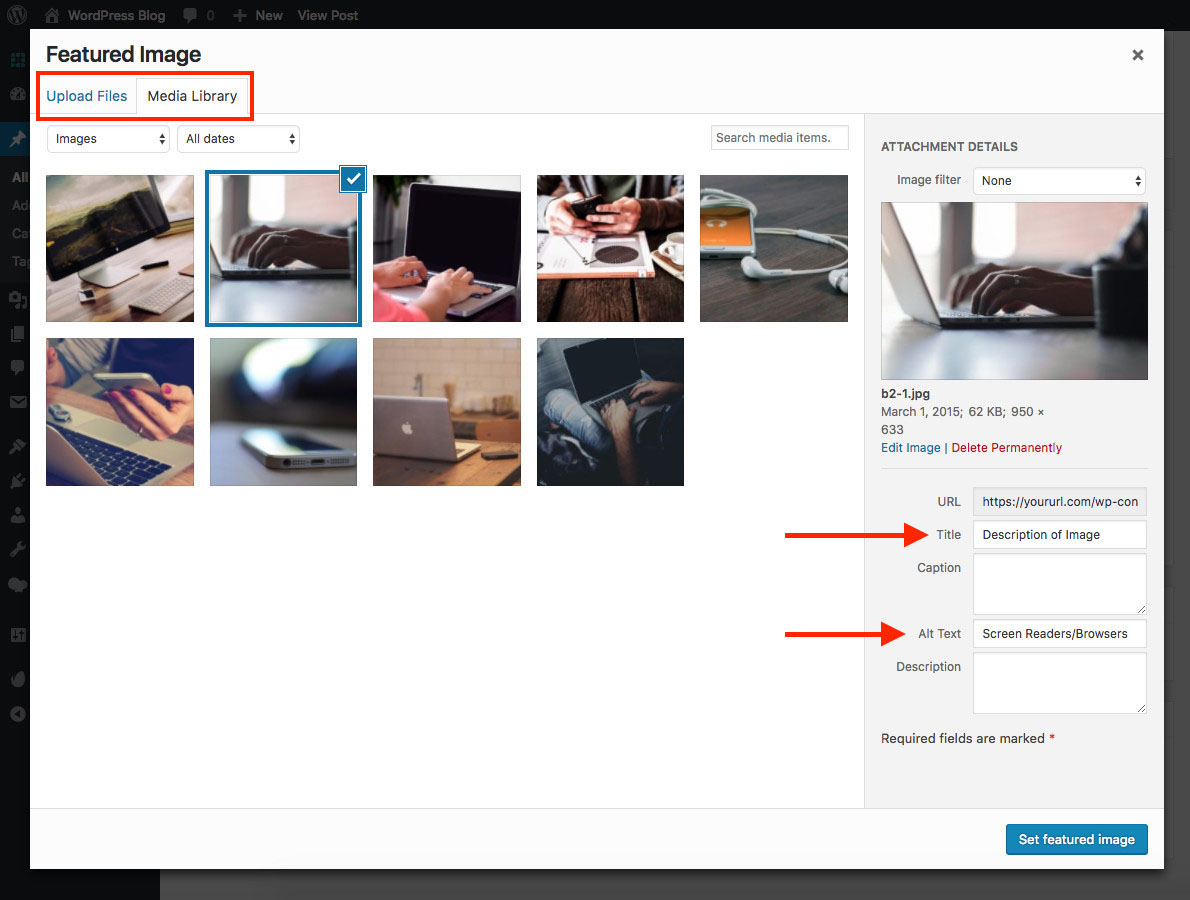
Next, either upload a new image (select it form your computer or drag and drop in the image) or select an image that’s already in your media library. Click the blue button to “Set featured image” and then save your post.
When adding new images it’s important to add the Title to describe the image for search engines and Alt Text to be used by screen readers or browsers. This is for SEO and accessibility reasons. It’s completely fine to use the same description for both just don’t forget to add it.
Categories & Tags
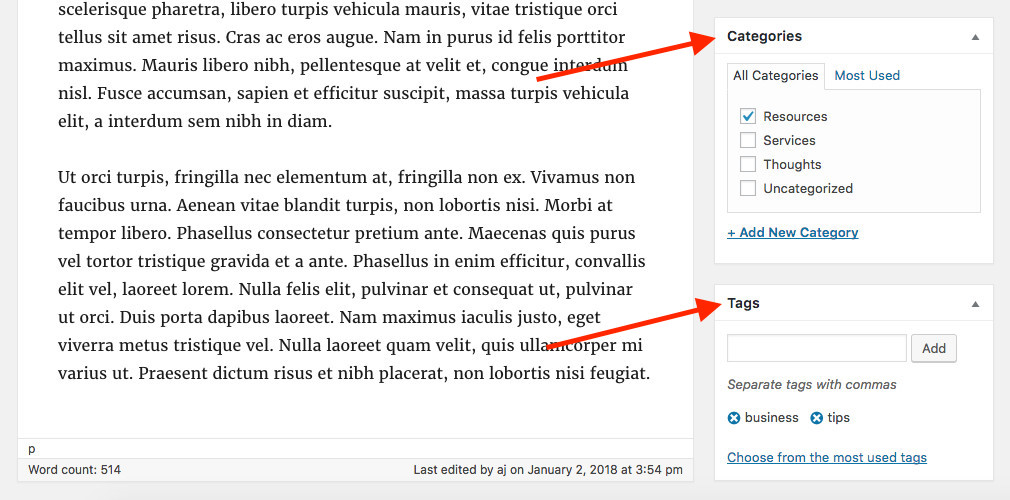
Categories and tags (sometimes collectively referred to as “taxonomies”) are used for grouping content. These are used to help readers (and search engines) navigate your website and find related content. Here’s a quick overview to help:
- Categories are the main groupings for your blog posts (or other post types like staff, portfolio, etc). This should be general definitions of the content. If you were a car review blog these could be the various car brands (Jeep, Toyota, Ford, etc).
- Tags are more specific details that build on the core category. For a car blog this could be technical details like horse power, airbags, colors, year, etc.
If you want to learn more, checkout our guide to WordPress categories and tags plus plugins to enhance (or even automate) them on your website.
Crafting Content
Bloggers spend a fair amount of time in the Post Editor. And there are a number of options within the Editor that help to streamline your work. These handy options in the Visual Editor can make typing content easier,
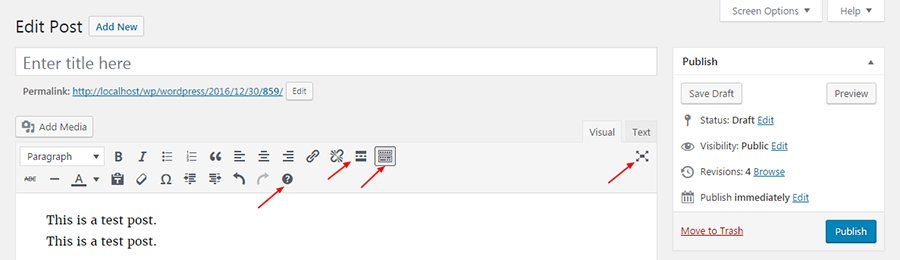
Distraction Free writing: See the fairly large “X” like button just below ‘Text’ in the image below ? Clicking on it causes the side panels and headers to disappear, leaving you a clutter free area to write on. When you click on it again, the original screen is restored.
The Toolbar Toggle: Also called the “Kitchen Sink” is the square button in the upper row of the Toolbar. On clicking, it opens up a second row of options below.
Keyboard shortcuts: After opening the second row of options using the Toolbar Toggle look for the “?” symbol. Clicking on it will display a set of shortcuts built into the editor in a popup. For Example Alt+Shift+2 will give you
Heading 2. But before you start using these shortcuts, you’ll need enable keyboard shortcuts in your user profile. The shortcuts are enabled on a per user basis.
Read More: Another feature useful for creating posts is Read More. This breaks off your first section of text (before your insert the break) as a short excerpt which will be used with your post thumbnail in the blog main page. It garners more attention than a post title and looks stylish on social media. Look for the feature in the Post Editor, place your cursor at the place where you want the excerpt to end and then click on the icon. You can also add a red more point by clicking on the “Text” tab for your content and adding this bit of HTML:
<!--more-->
After that, if you’d like to break a long post into many pages, insert the following code in the Text Editor at the exact point that you want the page to break. You can repeat it as many times as you want to break it into multiple pages (this is good for long/detailed lists and can also help you display more ads).
<!--nextpage-->
Markdown syntax for faster formatting
To use HTML while writing posts, we have to switch to the Text Editor. However, we often prefer to work within the Visual Editor while creating posts. The Markdown syntax helps us to do some HTML formatting without moving out from the Visual Editor.
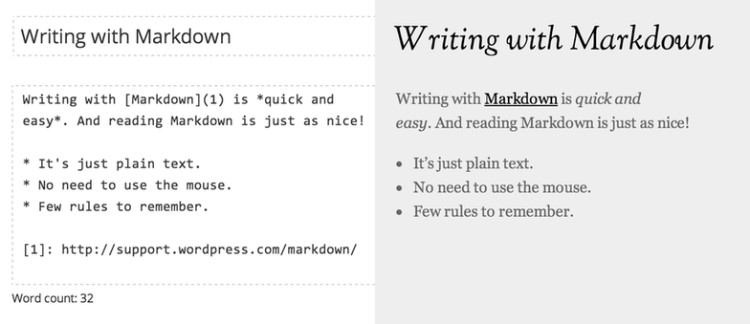
Markdown is simple markup language that converts plain text to HTML code. Special characters like asterisk, underscores and dashes are used, and this is automatically converted into HTML. Earlier versions of WordPress allowed the option of enabling Markdown Syntax under Settings > Writing. But with WordPress 4.3, similar functions are included in the Visual Editor. The syntax functionality is limited in WordPress, and for full Markdown support you’ll need a plugin such as Jetpack or WP Markdown.
Linking
The flow of writing is often disrupted when we have to pause and link some text. Earlier, we had to highlight the text to be linked, open a popup by clicking on the Link icon and paste the URL. The newer versions of WordPress support inline linking. There are lots of ways to create links to increase engagement on your blog, but here are some quick tips to get you started.
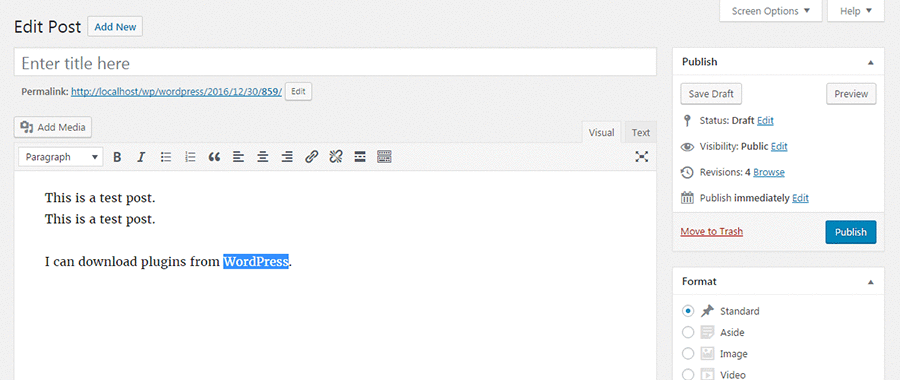
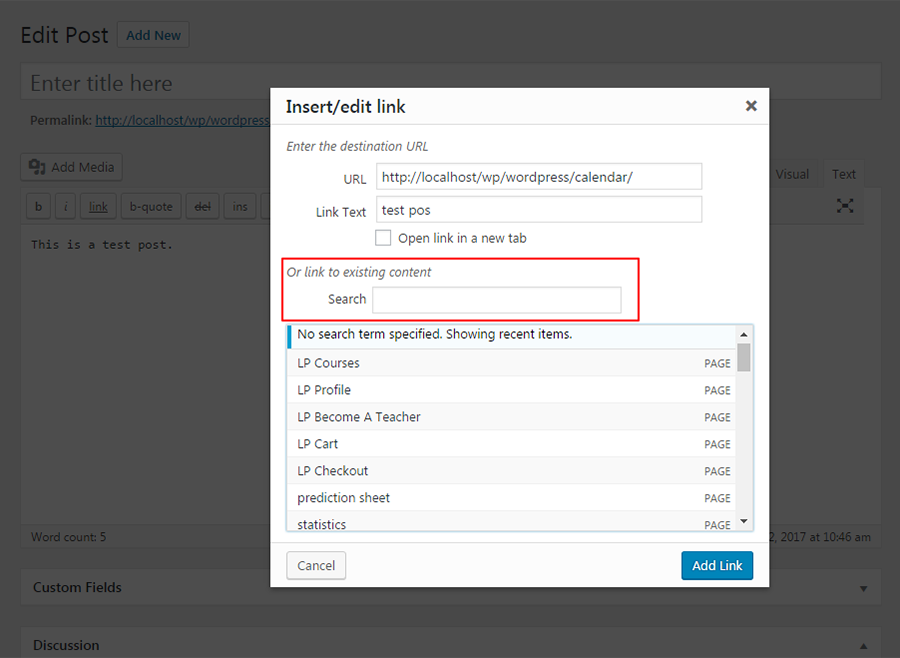
After highlighting the text to be linked, click on the Link icon, and paste the URL in the small box that opens. The highlighted text is linked automatically, and you have to move out of Visual Editor only to copy the URL of the required link.
We also suggest clicking on the Gear icon when adding links and checking the box to “Open link in a new tab.” This way readers aren’t leaving your page as soon as they click a link.
You can also directly paste URLs to embed videos and tweets without needing to copy embed codes. WordPress recognizes a number of websites from where content can be sourced.
Internal links encourage a visitor to stay longer on your site, and reduce bounce rate. Searching within your site for content is easier with the Edit Link button.
Quick Edits
To make quick edits to a draft, open the Quick Edit option that appears under each post in the All Posts page of your website. From here you can make changes to title, slug, category, author. You can also restrict viewing, password protect or make it sticky from here.
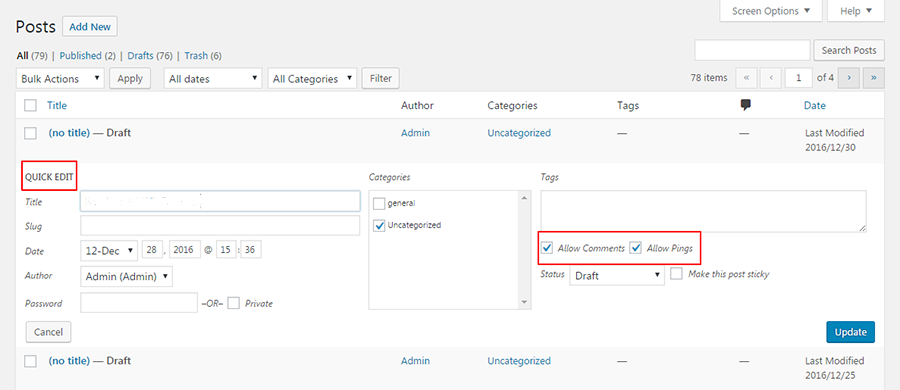
Close Comments – the flip side of being a popular blog is that your Comments section can get overburdened. If you want to close comments on a per post basis, you can do so under Quick Edit. Alternatively, you can close comments by going to Settings > Discussions.
Screen Options
On the top right of every screen on your WordPress website, you’ll see the Screen options button. This feature helps to customize the dashboard and every other screen to suit your own working style. It allows you to control what options and elements should appear on each screen.
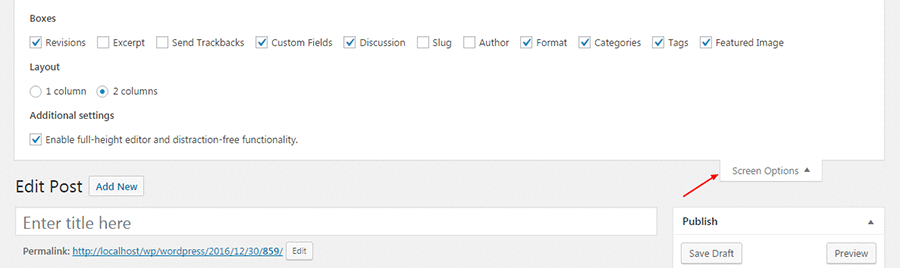
If you’ve installed a new plugin or theme to add advanced features to your posts (like reviews, custom image settings, etc) but you aren’t seeing them in your editor, chances are you simply need to go to your Screen Options to enable them.
Note: If you want to use the distraction free writing option we mentioned in the Crafting Content section of this post, then you’ll definitely want to visit the screen options to enable this additional setting.
If you like to dig into WordPress a little more, click on the Help button which appears at the top right corner on every screen. The dropdown menu that opens explains the chief aspects of each screen. Not only that, each dropdown menu item links to the official WordPress documentation.
Press This
Press This is a handy tool for writers which used to be a part of WordPress core but has since been broken out into it’s own plugin (I know, I know – we said we were only going to cover built-in features, but since this one was recently removed we thought we’d still include it). It lets you “grab bits of the web and create new posts with ease” while reading on the net. It’s essentially a browser extension that you need to install. And whenever you find something interesting, you can share it on your WordPress site.
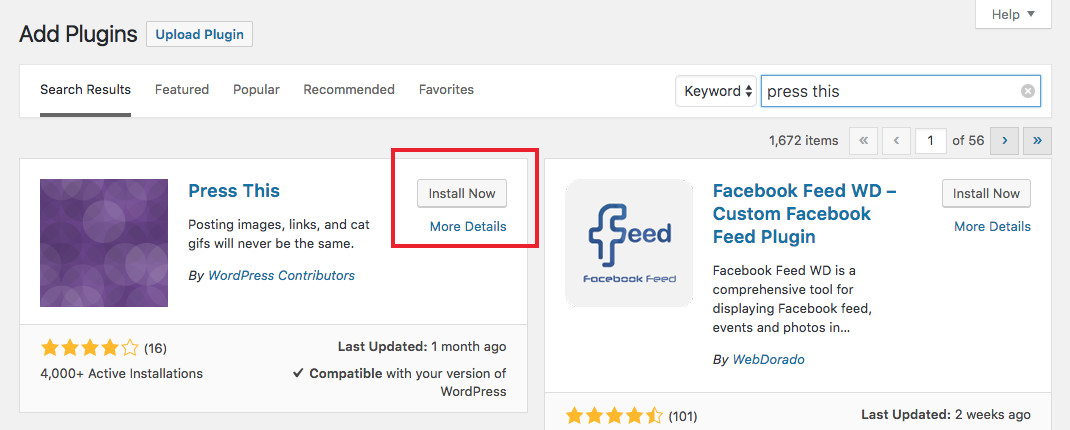
To add it back simply go to Plugins > Add New then search for “Press This” and click to Install/Activate. When you see something you like on the web, click on the Press This in your browser and paste it in the popup that opens. Edit it and save, or publish directly.
Create Media Playlists
Just as you would create a gallery using images in your media library, you can create audio / video playlists using media files available in your media library. These playlists can then be embedded in your posts.
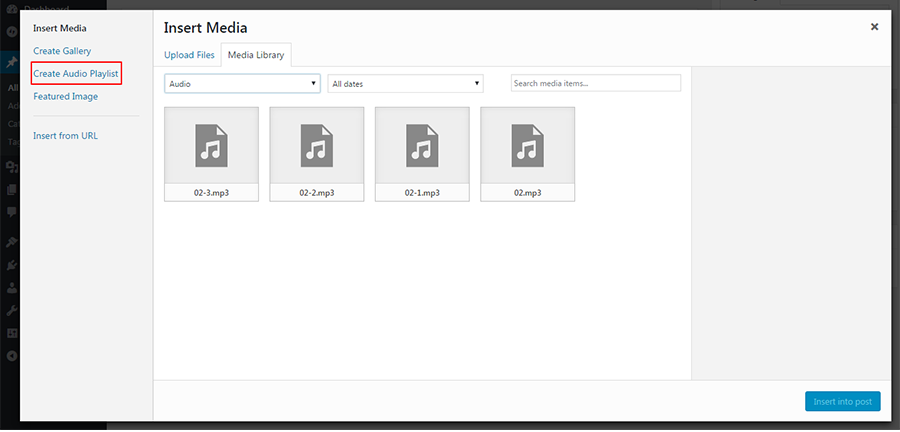
First upload your media files Media > Upload New Media. Then click Add Media > Create Audio Playlist and select the audio files from the Media Library and click “Create New Playlist.” This will allow you to edit the playlist settings to show artist name, images and to show the tracklist. Next, click on “Insert Audio Playlist” and you can see the audio playlist in your post.

Similarly, you can create a video playlist.
Logout Everywhere
Did you know that your WordPress site can be accessed from anywhere? And from multiple devices? It may often happen that you forget to logout of your site after working on it. If you remember that when you’re away from your device, you can access your site from any other device and logout.
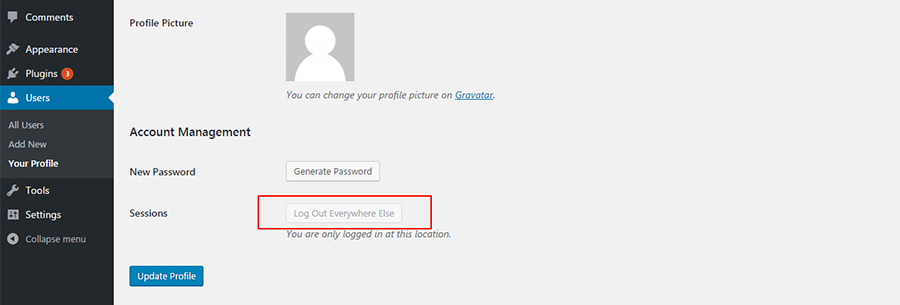
You can enable this security enhancing feature under Profile > Account Management > Sessions.
WordPress Permalinks
The default URLs in WordPress are unwieldy and not good for SEO too. Luckily, there’s an option to change the default URL at Settings > Permalinks.
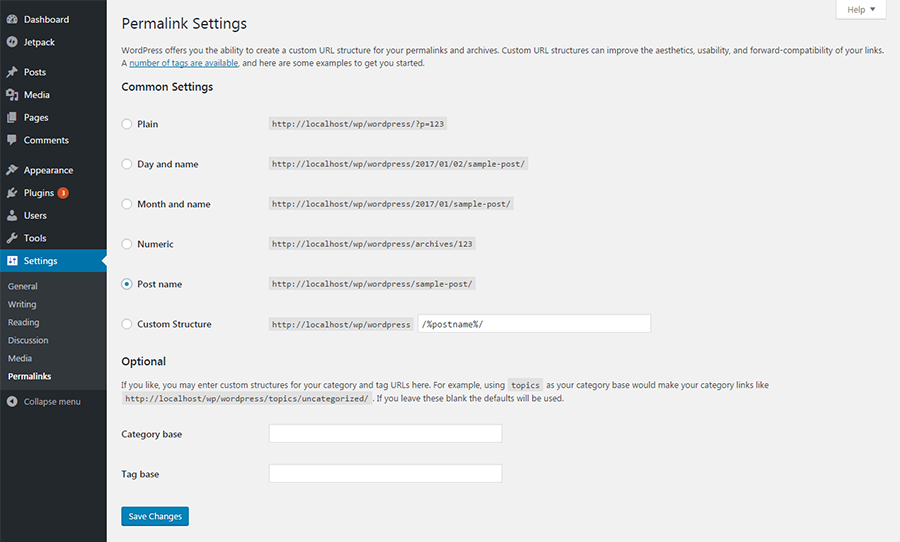
You can choose from 4 standard options or use custom URLs. But you should know that using the post name in the URL may count for organic ranking (boosting your SEO).
Learn more on how to improve WordPress permalinks as well as how they can impact your site’s performance. Also, it’s important to note that once you’ve selected a permalink format and added content you can’t simply switch your permalink settings with a bit of work. If you already have content on your website please see our guide on safely changing permalinks before your edit your settings.
Reading Settings
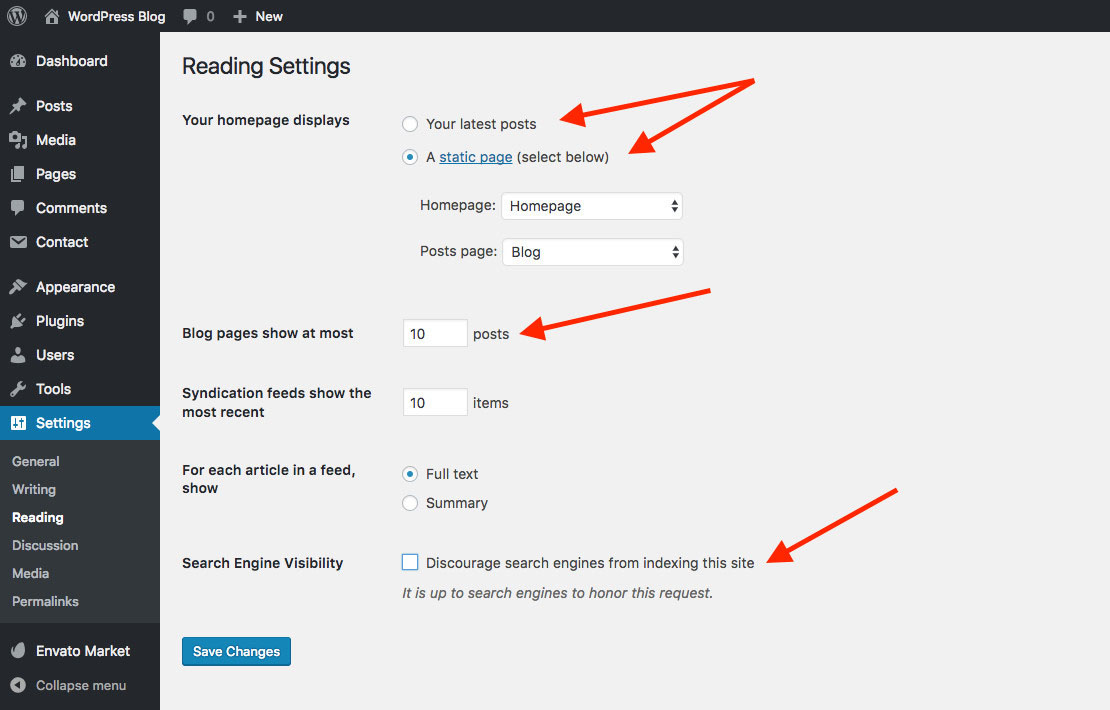
After updating your permalink settings, you should also check your Reading settings for your homepage, feed options and search engine visibility.
Homepage displays: This setting will depend on the WordPress theme and plugins you are using. Most blogging themes will simply use “Latest posts” as the homepage, but if you theme includes custom pages or page templates you may have the option to create a custom homepage. In that case, select your home page as the Homepage and if you have another custom page for your blog select it as the Post Page (or leave this one blank).
Blog pages show / Syndication feeds show: Set the number of posts you want to display on your blog posts page (unless you’ve created a custom one with a page builder or your theme) and the number of posts you want shown in your RSS feed.
Search Engine Visibility: Take a second to make sure this box is NOT checked. You want Google, Bing, Yahoo, etc to find your website, crawl and index it. The only time this box should ever be check is when your website is in a staging or “coming soon” mode before you launch your site. Once your website is live, the box should always be unchecked.
Small Bits of Code to Add Features
Enjoy greater convenience by using small bits of code to add some minor features that can save you time. Since these are code snippets, we do recommend you only use them if you are comfortable with basic coding and that you backup WordPress before you make any edits to core files.
Adjust Auto Save Interval: To avoid loss of your most recent work due to connectivity or any other reason, you may want to autosave more frequently. This code will help you adjust the frequency of your autosaves, just open up your wp-config.php file to add the following.
define( 'AUTOSAVE_INTERVAL', 240 );
Database Maintenance: While you have the wp-config.php file open, there are two minor functions to help optimize your database that can be implemented with small bits of code. One is to regularly empty out trash after a specified number of days. Change the 30 to any interval, or enter false if you want to stop it completely.
define( 'EMPTY_TRASH_DAYS', 30 );
And another to limit the number of revisions to a post that can be saved, beyond which the earlier versions will be deleted.
define( 'WP_POST_REVISIONS', 3 );
Other WordPress Features
Media Editing: Adjust default media size, so images are automatically saved by WordPress in the size that you need. Settings > Media > Insert Media > Edit Image. Some basic image editing can happen inside the WordPress Image Editor – rotating, cropping, flipping, scaling.
Default Category: Replace the default ‘Uncategorized‘ that appears with all your posts. Go to Posts > Categories and pick a new default category. This is helpful for SEO as you don’t want Google to think that “other” is a topic you write on. Choose something specific to your niche.
Favicon: What is a favicon? Well, simply put a favicon is the little image displayed on browser tabs and used for bookmarks on devices (even mobile). It helps readers identify open tabs or saved links at a glance. It’s the small symbol found in the address bar by which you can identify a site. Appearance > Customizer > Site identity and pick an image from your media library to serve as a site icon or favicon.
And That’s It
That’s my list of options to make it immensely easy to work around inside WordPress.
Let’s not rush into loading our websites with plugins before we check out the in-built tools for the same functions. Adding more plugins can be helpful… But when there is already an option within your existing WordPress install why not give it a try?
Just move about within your WordPress screen and explore all menu items and icons one at a time. You’ll probably find many more that I missed out. If you do stumble upon anything useful, do let us know in the comments below so we can add it to our list!

Thanks dude. All the “small bits of code” were new to me, but very useful!
Ths, get new helpful info.
I am using your adapt free theme I thought you need to know that you are still using the unsecure google font i.e. http.
My SSL reports this as insecure messing it up:
Just update your theme – this was included in the November theme update (here’s the adapt changelog) we just forgot to update our live site as well so we’ve just done that as well 🙂
Very well explained. Covered almost every topic of basics. Its a great help to me. Thanks for sharing 🙂
One of the best post for beginners to learn the WordPress, it helps to get familiar with WordPress features to make sure your website search engine and user friendly.
Really useful post, thanks.
A couple of things I already knew but needed a reminder about, like keeping my sidebars clutter free and taking the extra time to make use of the image and alt options with all my images (so easy to get lazy with those).
And a couple of things that were new to me too, like having one integrated media folder (gonna do that on all my blogs today), and the customized, streamlined permalinks. I’ve always just left those alone out of laziness and ignorance – the result is some very unsightly links!
Something else I’d add for complete beginners who want to set up a blog: don’t worry about getting everything in this post right from day 1. All of this can be fixed at any point down the road. I’ve got blogs that have been going for years, and I’m still making changes today that should have been made a long time ago.
The main thing is to just start today and get some good content up.
I really love this article, and found it helpful in my wordpress day to day life. Once more Thank you for writing up this nice tips
hi i am beginer its so helping information to me . thanks fore sahring this information.
very good information for the new WordPress beginners