Time Saving SQL Queries for WordPress

If you are a WordPress website owner, there is a lot of stuff to take care of.
Constantly updating your blog content, adding new products, changing prices, and we do not even mention regular plugins update, providing a dev with access and doing many more things as a part of daily WordPress routine.
Sometimes, if you need to tweak settings, you find a tutorial of a long web-page with many instructions to perform a single action. But what if you knew that the majority of these changes can be changed with a simple SQL query, a command you run in your database manager menu.
Since you are a busy person and saving your time is a priority, here are the basic SQL queries that will help you to achieve the results in a few minutes.
First Steps
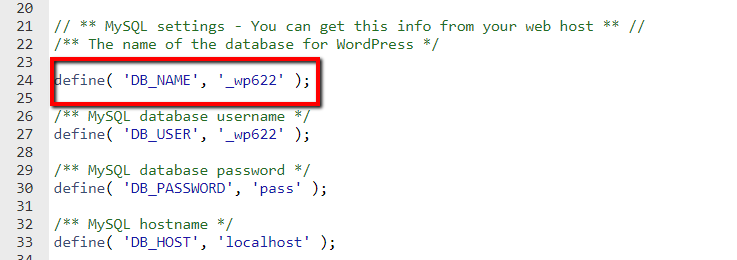
When there is more than one website in your hosting account, prior to executing SQL queries, you need to make sure that you are modifying the right database. You can find the database name assigned to a specific WordPress installation in your wp-config.php file on the string:
define (‘DB_NAME’, ‘yourdbname’)

Also, pay attention to the table prefix, as you will need it to specify once running SQL commands. It’s located in the same file at the bottom of the page settings.

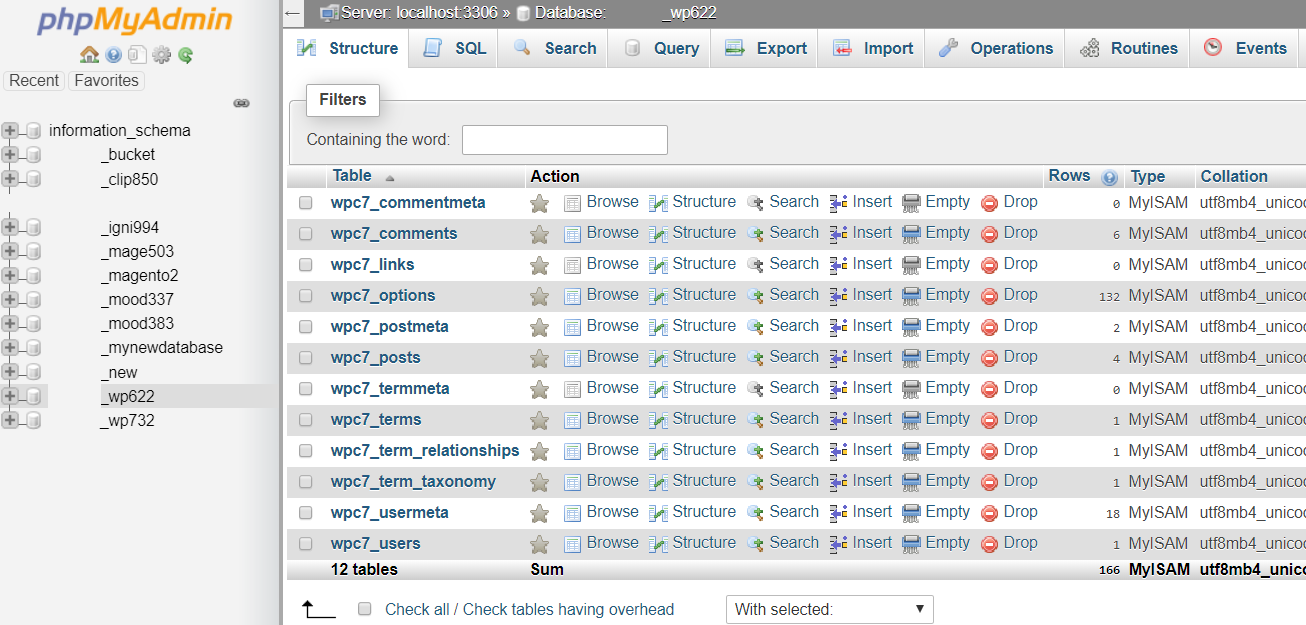
In this example above, the database name is _wp622. The table prefix is wpc7_. Now, when we know it, let’s go to the Database manager. The majority of control panels use PHPMyAdmin for database Management.

Once you are there, find your database name in the list and click on it:

Before making any changes, make sure that you create a backup for this database, to be able to quickly restore it just in case something goes wrong.
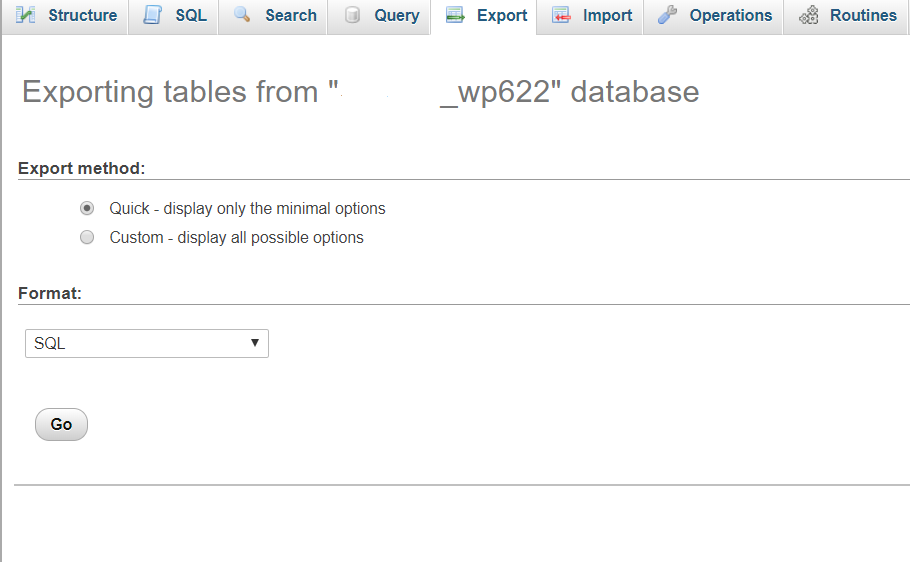
We cover how to backup WordPress in detail in our general backup guide. But to give you a quick walkthrough, choose the Export option, choose the method and format according to your needs and press Go (here we have set all the default options):

Once done, you are safe to proceed. Press the menu SQL and let’s get started:

Replace URL
If you plan to update your website URL by adding the SSL certificate to your website or by doing other modifications, make sure to use the following command:
UPDATE wp_options SET option_value = replace(option_value, 'http://www.oldurlofthewebsite.com', 'http://www.newurlofthewebsite.com') WHERE option_name = 'home' OR option_name = 'siteurl';Let’s say I want my URL to be https//: and my domain name is example.com. In this case, I need to modify the wp_options table name and the very URL:
UPDATE wpc7_options SET option_value = replace(option_value, 'http://www.example.com', 'https://www.example.com') WHERE option_name = 'home' OR option_name = 'siteurl';
And wait for a success message.

Why is it so important to see it? If you press Go but there are some errors in the query, the system will not be able to fulfill the request and you will receive errors meaning that the execution failed. The error will look as follows and will indicate the reason why the process failed.

Please note that this command is a basic one and will replace only the main URL of your website, so if you plan to change the domain name of your website from example.com to test.net, you will need to modify it including all the tables where the URL of your website is met such as wp-posts, wp-postmeta and also take care about the tables with rows containing URL generated by plugins (for instance, WooCommerce).
To do that, you will need at least basic SQL training. One more option would be to open the database you exported in any text editor and with Ctrl+H replace all the mentions of your old domain to the new one. If this sounds too complicated, a variety of other tools exist that help automate this process (such as the interconnect/it database search & replace script, or the Better Search & Replace plugin based on the same script) while just uploading the file to your website folder for the working site and opening it in a browser.
Create New Admin User
If you need to add a new user with Admin role to your installation, you will have to use the following command and modify it depending on your preferences:
INSERT INTO `wp_users` (`user_login`, `user_pass`, `user_nicename`, `user_email`, `user_status`)
 VALUES ('yourlogin', MD5('yourpassword'), 'firstname lastname', 'email@example.com', '0');

 INSERT INTO `wp_usermeta` (`umeta_id`, `user_id`, `meta_key`, `meta_value`)
 VALUES (NULL, (Select max(id) FROM wp_users),
 'wp_capabilities', 'a:1:{s:13:"administrator";s:1:"1";}');

 INSERT INTO `wp_usermeta` (`umeta_id`, `user_id`, `meta_key`, `meta_value`)
 VALUES (NULL, (Select max(id) FROM wp_users), 'wp_user_level', '10');
Note, that you will need to modify the tables and login values according to your desired username and databases.
I want to create a user mydeveloper with the password mypassword, my developer’s name is John Doe and the email is test@test.com. So my query will look as follows:
INSERT INTO `wpc7_users` (`user_login`, `user_pass`, `user_nicename`, `user_email`, `user_status`)
 VALUES ('Mydev', MD5('mypassword'), 'John Doe', 'test@test.com', '0');

 INSERT INTO `wpc7_usermeta` (`umeta_id`, `user_id`, `meta_key`, `meta_value`)
 VALUES (NULL, (Select max(id) FROM wp_users),
 'wp_capabilities', 'a:1:{s:13:"administrator";s:1:"1";}');

 INSERT INTO `wpc7_usermeta` (`umeta_id`, `user_id`, `meta_key`, `meta_value`)
 VALUES (NULL, (Select max(id) FROM wpc7_users), 'wp_user_level', '10'
Note that I don’t need to modify the rows names (i.e. wp_user_level or play with numbers 0, 10, 13 as they mean the user role and corresponding rights. Once done, I press Go.
The output should show the successful results like the following ones:

Change Admin Login Username
To change the username login name, go back to MySQL tab and run the following command:
UPDATE wp_users SET user_login = 'newlogin' WHERE user_login = 'admin';Let’s say your default username is mydeveloper, the one you created before and you want to set secureduser instead of it. In our particular case, we run the following command, as we have also the default prefix wp7c_:
UPDATE wpc7_users_users SET user_login = 'secureduser' WHERE user_login = 'mydeveloper';
The successful output looks as follows:

Change Admin Password
Following the security rules of regular password changes, you may also want to change the password for your secureduser. Here is the query for it:
UPDATE wp_users SET user_pass = MD5( 'new_password' ) WHERE user_login = 'youruser';For this particular password change command, our command is as follows:
UPDATE wpc7_users SET user_pass = MD5( '$tR0ngP@s$w03D' ) WHERE user_login = 'secureduser';
Press Go and wait for the success message:

Delete Spam
For users who publish a lot of posts and leave the comments open for interaction, the issue with spam comments may become really painful. While you may filter the comments by manual approval, you will probably want to find a way to quickly delete everything you have not approved. Here’s how:
DELETE FROM wp_comments WHERE wp_comments.comment_approved = 'spam';When customized to the particular case we are discussing here:
DELETE FROM wpc7_comments WHERE wpc7_comments.comment_approved = 'spam';
Note: the prefix needs to be modified in both places where it’s met, since wp_comments.comment_approved is the separate field in the table.
Here is the successful output:

Delete All Unapproved Post Comments
At some point, you may realize that you are tired of filtering and reading the comments for the articles before making the final decision to publish them, so you want to delete them. There is a command for that:
DELETE FROM wp_comments WHERE comment_approved = 0Note, that the comment_approved section does not need the modification as this tab represents the default function in the table that is immutable.
The modified command looks as follows:
DELETE FROM wpc7_comments WHERE comment_approved = 0
Once done, you can see the usual outcome for successfully executed commands:

While it may seem that following the instructions may take longer than just doing things manually, that’s not so. The bigger your website is, the more time you have to spend on it. One single action performed separately for 10 posts and you end up with 10x more time spent on execution.
So in fact, you save a ton of your precious time by running these commands and can use this time on more important things such as content planning or looking for inspiration ideas.
Happy blogging!


Comments
No comments yet. Why don't you kick off the discussion?