How to Launch a Self-hosted WordPress Blog in Minutes

The first time I installed a WordPress blog, I nearly pulled out my hair. The process was easy to follow, but every time I got to the end, I would get an error, and like many other errors, it never said what was wrong. Later after checking with my web host and making a lot of noise over the matter, they informed me some stray dog ate my .htacess file. So I renamed the affected file and whoa, I installed my first WordPress blog ever!
It was nothing big. Heck, who I’m I kidding? The feeling of achievement that came with that first installation was like no other. Firstly, I was overjoyed the installation was successful at last. Secondly, I was excited that I was making a big stride towards my dream of owning an online business. Since then, I have installed countless instances of WordPress both on web servers and PCs.
Provided you know what you are doing, installing or rather launching a self-hosted blog should take less than fifteen minutes. It’s easy-peasy work and anybody can do it. If you’re excited and ready to launch your first blog, let’s get the timers ticking and get this over and done with. Enjoy and don’t forget to share your thoughts in the comments, we always look forward to your feedback.
What You Need
First things first, let’s look at what you will need. You will need a web hosting package. A self-hosted WordPress blog unlike a free blog (e.g. yourname.wordpress.com) requires a web server. This is where you will install the WordPress platform. Next up is your domain name. This is the identity of your blog. It’s the virtual address of your blog on the web (the URL). Some form of payment is required for these two essentials. Just keep in mind that these are recurring monthly or yearly payments, so make sure to budget accordingly.
And lastly you’ll need about fifteen (15) minutes of your time to install the WordPress script and customize the blog with a new theme and a couple of plugins Can’t wait to get started…
Choosing the Perfect WordPress Hosting
First, let’s get your self-hosted WordPress blog a nice cosy home. Again, unless you own web servers, you will need to rent server space. We’ve covered this topic many times in the past but if you’ve never seen those posts, here is a quick summary of the factors you need to keep in mind when choosing the right web hosting for your WordPress blog:
- Cost: Don’t always go for the cheapest deal in the market. At the same time, don’t pay for features you don’t need now or in the near future. Paying for what you need means you must know the requirements of your self-hosted WordPress blog beforehand. Many web hosts have some great prices especially when they’re running a promo, even for managed WordPress hosting. Additionally, if you catch any of them in good moods, you can take advantage of generous discounts and coupons to cut down on your web hosting costs (checkout our WordPress coupons page to see some of the hosts’ current specials). Start small or depending on your website’s needs, and scale up or down accordingly. Don’t play cheap with your online business, but don’t let a business swindle you.
- Features & Performance: You want to be with a web host that “…guarantees up times, super-fast servers, [unlimited] bandwidth and enough disk space to accommodate your needs.” But how much is enough? Most web hosts provide un-metered disk space, unlimited bandwidth and unlimited sub-domains among other features. As a baseline though, 5GB worth of bandwidth per month and 5GB disk space should be enough for most people. Other features to keep in mind include addon domains, backup services, email and script support among others. On up times, Jetpack comes with a great feature that sends you email alerts every time your site goes down. If you start getting a lot of these alerts, you should consider changing your web host or upgrading to a superior hosting plan.
- Quality of Customer Support: Customer care comes second to none. If you love your customers (and who doesn’t), you always want to keep a smile on their faces. Of course, there are customers you need to kick to the curb as soon as you can, but that’s not the point. The web host you choose for your self-hosted WordPress blog should have a good reputation for customer support. You don’t want your visitors seeing errors because your host’s customer care can’t fix some random issue fast enough. Reviews on the internet will quickly tell you if your WordPress hosting provider of choice values customer support.
Here at WPExplorer, we absolutely love and value all our readers. We also love and use WPEngine – a top-ranking managed WordPress host – but for the purposes of this tutorial, I’m choosing Bluehost because it’s reliable, comes with a lot of awesome features and the customer support is simply amazing to say the least.
However, web hosting is just one part of the equation. You’ll also need a domain name so clients, friends and family can find your WordPress blog on the web.
Choosing the Perfect Domain Name
Now that we have settled on a comfy home for your WordPress blog, the only thing we need is an address, so you will finally a have a URL for your business cards people can find your business. Your domain name can be anything you fancy. It can be your name, a combination of your name and your favorite drink, the name of your product with a little twist – anything! I’ve seen a couple of funny domains on the web but that’s story for another day.
By the way, a domain name is something like facebook.com or youtube.com in case you have your head in the clouds. They usually cost about $10 bucks per year and you can always get a free domain when you sign up with Bluehost. Many other web hosts offer a free domain, so don’t feel limited in this regard.
You can choose to register your domain name with your web host or with a domain registrar partner such as Namecheap (I register my domains here) or GoDaddy among others. Whether you register your domain with a registrar or web host, don’t let your mind wander off, I will tell you exactly what to do to point the domain to your WordPress blog in a couple of minutes. But first let us take a selfie breather and then set up your web hosting account.
Setting up a Web Hosting Account
You will need a domain name to open a web hosting account. If you would like to register with a domain registrar like yours trully, head over to Namecheap or wherever, and just do it. It’s a simple and straightforward process I don’t expect you to run into any trouble. If you would like to get a free domain (free for at least one year), head over to Bluehost and click the green “get started now” button at the center of the homepage.

This should take you to the sign up page where you can choose your web hosting package. At the time of writing, there are three packages available: starter at $3.95 per month, plus at $6.95 per month and business pro at $14.95 per month:

Keep in mind that these are promotional prices for the first term only (this is how pretty much any hosting discount works). After your first term, the prices renew at the regular rates respectively. Still, this is very affordable hosting and is perfect for anyone just starting out.
If you register your domains with a registrar as opposed to your web host, you will need to adjust your nameserver (DNS) information. If you purchase your hosting package from Bluehost, you will need to add ns1.bluehost.com and ns2.bluehost.com to your nameserver records. It’s not too complicated, but don’t hesitate to contact your domain registrar or search their FAQs if you need assistance.
Also, after registering your domain, it might take about 24 hours to propagate. We are not taking this time into account in this tutorial. So If you just purchased your domain, you make need to take a little coffee break 🙂
That out of the way, let’s move on to the next step. Select a plan that matches your needs. This should lead you to a page where you’ll add or choose your domain name:
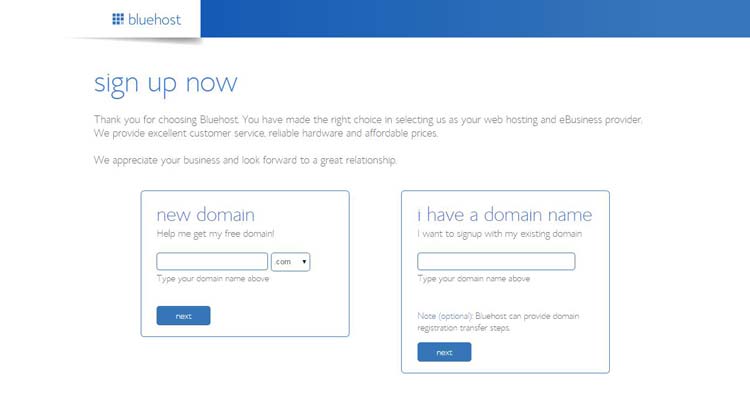
If you want a free domain, use the box to the left. If you already have a domain name, use the box to the right. Choose a unique domain but have it in mind that your choice might be unavailable:
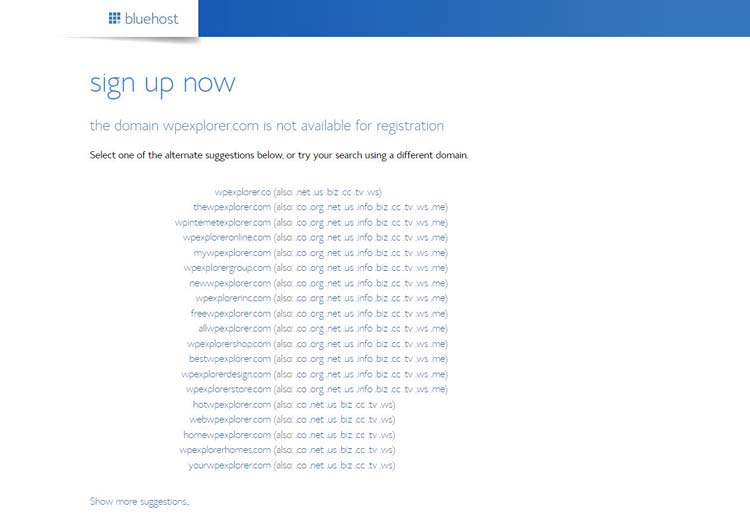
If it’s unavailable, just choose another domain or change the .com extension to something like .org, .net or .us among others. At the end of the day, you will always get a domain that pleases you, so don’t sweat it.
Click “next” and you should be taken to another page that collects your information, package details and billing details. Choose what you need, enter your billing information and click the green “next” button at the bottom. Bluehost allows you to pay by credit card or with PayPal, so you are well covered here. Go ahead and complete your payment.
Now what?
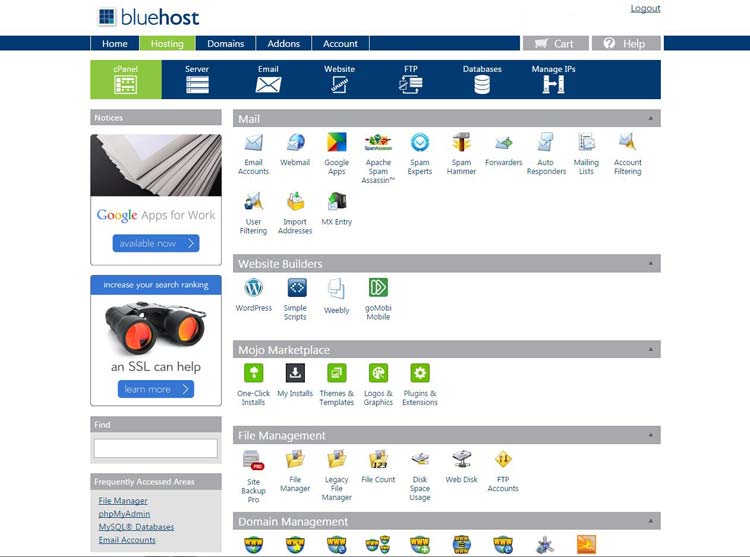
Login into your email account and you will see a “Welcome to Bluehost” email. This initial email contains all the links you need to get started. You can login to your account by going to https://my.bluehost.com/cgi-bin/cplogin or clicking any (or some) of the links in the welcome email. Your control panel (also called c-panel) should look like this:
Fun, right?
Installing Your Self-hosted WordPress Blog
Under “Website Builders”, click on the WordPress icon. The fun part is just starting. The new tab that opens leads to Mojo Marketplace One click Installs. Just click the green “Install” button or choose to “Import” an existing installation of WordPress. For our case, “Install” it is.
On the next page, select the domain you would like to install your WordPress blog to. Your domain should show up here so long it was registered. Click “Check Domain”. Wait for five seconds. Tick “Show advanced options” to set up your admin username and password. Agree to the terms and conditions and then click “Install Now”. Wait for a few seconds or go get a coffee.
Come back and click the black “View Credentials” button that appears on an orange banner at the top of the page. This opens another page with your blog’s URL and login details. Login to your WordPress blog via http://www.yourdomain.com/wp-admin. Replace youdomain.com with your actual domain name now that you have it.
By default, your new self-hosted WordPress blog spots the latest version of a WordPress theme known as Twenty Fourteen. It’s a basic theme and if you don’t like the green-black mash-up, just go to Appearance –> Themes on your WordPress admin menu. From here, click “Add New” to choose from the thousand of free themes available at WordPress.org.
Our free theme collection is full of awesome themes you can use to improve the look of your blog. But if you’re looking for the perfect WordPress theme designed to adapt to your needs, I recommend Total Drag & Drop WordPress Theme.
At this point, we are very much done setting up your WordPress blog and you should feel free to do whatever that is you want with it. Got to Plugins to activate Akismet – a lethal spam assassin – and install any type of plugins you like from social media, membership to eCommerce and Admin plugins just to mention a few.
Can’t wait to publish your own content? Go to Posts –> Add New to create your first blog post, Pages –> Add New to build a new page (e.g. a brief About page with a your mission statement) or Media –> Add New to upload audio, video or image files. You can upload downloadable files too, so feel free to share your PDF eBook freely. Default upload file size is capped at 50 MB but you can change this easily by adding a few lines of code to some PHP file. Don’t worry about this at the moment though, you will learn all about it here in time.
The WordPress Admin Dashboard is beautiful and easy to use, and even if you’re a beginner (greenhorn per se), you should have a great time creating with WordPress. Always remember to log out of your site every time. Above everything else, have as much fun as you can.
If You Run Into A Snag
It happens, we all make mistakes. So just in case you run into any problems along the way, here are a handful of helpful links with great tips for rookies, your blog and even SEO. And of course there’s tons more helpful info in our blog (just use that nifty search box in the title to find what you need).
- New to WordPress? Avoid These 10 Rookie Mistakes
- 15 Common WordPress Errors With Solutions
- 15 WordPress Mistakes to Avoid at all Costs
Conclusion
What did I leave out? Mmmh, can’t think of anything at the moment. It’s about 4PM here and “Party The Pain Away” by Tech N9ne is playing in the background. I’m out of coffee, which means I’ve to go downstairs. Until next time, let’s talk in the comment section below. Adios and God Speed amigos!


I won the competition here recently for Siteground hosting. I used to use Bluehost, but I’ve come to hate Mojo Marketplace, and the performance isn’t great. But Siteground is beyond awesome. The plans are great value (I’ve been recommending them to clients), they provide managed WP backups and updates on every plan, and the performance is superb. And when it comes to setting up a new WP site, you just type in your site title and description (and choose your own username and password or go with the random one they provide) and click a button rather than having to go through the Mojo rigamarole.
Awesome, I am glad you are having a great experience Trisha!
Nice post, I really enjoyed reading it 🙂
Thanks for the compliment and passing by Arifin!
Hi Freddy, thanks for the mention and I am glad you like my blogging guide on WHSR.
I wouldn’t, however, recommend WP Engine especially for newbies who are just starting out. Don’t get me wrong, WP Engine is an okay host – I shifted one of my main blogs to them in 2012 and the site load time improved 100% instantly – BUT they are just not right for starters, mainly because of –
1. Price – the cheapest plan is $29/mo and you can host 1 blog. Similar plans at BlueHost or Hostgator cost less than $5/mo – less server power but i think is more than enough for 99.9% fresh blogs. So IMHO it’s better to allocate that money (extra $25/mo!) in other places – such as marketing your blog or creating better content.
2. No email hosting – WP Engine does not provide email or webmail features. If you want an email address ending with your domain name (something like email[at]mydomain.com), you will need to host your own email accounts.
Hope this helps. I enjoyed reading this great post BTW, cheers!
I think if your intentions are to run a blog you would like to get popular some day it’s better to go with a good host to start with then have to migrate later down the road. I starte WPExplorer on HostMonster actually and in less then 3 months I already had to upgrade to a new server and for a beginner it was a nightmare (and scary process). If your intentions are to have a blog or site with little traffic that you know will stay like that, then yes go with a shared hosting plan. Just keep in mind you do pay for what you get. I get customers all the time complaining about their site being slow and trying to blame their theme but it’s just their host throttling them…A lot of people spend more then $29 just going out to dinner, a think your site/blog is a bit more important then that 😉
Here is a crack. Wpengine provide a good hosting service, nodoubt but it’s pricing scheme is very bad. They charge you extra if you cross your visiters limit.
My understanding was that they let you off the hook the first time if you just go a bit over by accident, but you definitely need to pick a plan that will accurately/consistently meet your web resource needs no matter which host you choose. But I feel WP Engine offers one of the best WordPress hosting services on the web (fast hosting, 0 throttling, daily backups, awesome support and lots more) and this only works because they charge customers fairly.