How to Host Events with WP Event Manager

Where’s the party at, people? Stay safe and healthy while hosting events, with the help of a plugin. That’s right – we are here to talk about the WP Event Manager plugin, the subject of today’s review.
If you want to host in-person events, or better yet host online events, you need a powerful tool. Something that helps you to create an event website like a pro. Whether hosting online or offline events, you need a tool to support you and help with the hard work behind the scenes. WP Event Manager is one such tool.
As an event manager (or a web developer creating an event management system), you understand how taxing things can get. Stuff can run out of hand and get ugly in the blink of an eye, which disappoints clients, and takes money from your pocket.
But that mostly happens if you’re always trying to juggle many things at the same time. What you need is an event management system that makes your work easy. WP Event Manager offers you multiple tools in one system so that you can create your event management platform like a boss.
In the upcoming sections, we will learn more about WP Event Manager, explore the features, and test-drive the plugin. Without further ado, let us get it on.
What is WP Event Manager?
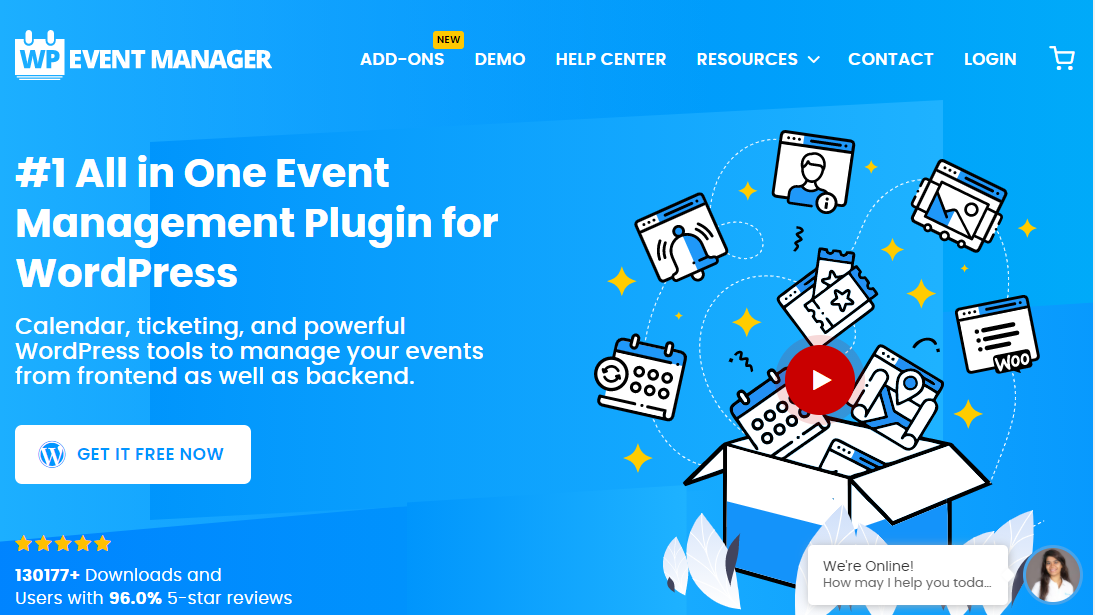
WP Event Manager is a robust event management plugin for WordPress websites. The plugin ships with a ton of features and options to add event listing functionality to your WordPress website.
Interestingly, WP Event Manager remains lightweight and easy to use, even with a million and one features. It’s perfect for all website owners, whether you know code or otherwise.
WP Event Manager is the event plugin of choice for many beginners and developers. While it is incredibly easy-to-use for newbies, it comes with custom post types, a debug mode, endpoints, and templates files for developers.
Plus it works with all WordPress themes and plays well with your favorite plugins, including WooCommerce (to sell your tickets), Google Analytics, and more.
If you’re in the market for an event plugin, you can never go wrong with WP Event Manager. It’s perfect for all event listing websites, big or small since it’s scalable to a fault.
WP Event Manager is used by businesses such as Maastrichter, Virtual Forums, StartupRemote, and World Oceans Day, among others. You can view the extensive WP Event Manager showcase to see all of the awesome sites built with the plugin.
WP Event Manager is first of all super easy to use. I had it up and running in a matter of minutes. But it also has a lot of customization options. The field editor is really awesome! – Brian Jackson.
With more than 130k downloads and 10k+ active installations at the time of writing, it’s proof enough that WP Event Manager works as advertised.
The plugin is best known for the following features.
WP Event Manager Key Features
As I always opine, any plugin is only as useful as the features it offers. At the same time, you only want to stick with plugins that provide you the functionality you need without feature bloat. WP Event Manager offers you all the features to add event listing functionality without getting in your way. It’s intuitive.
Here, a small list of the features to expect in WP Event Manager.
- Fully responsive design – Your events look beautiful and work smoothly on multiple devices, be it mobile or desktop.
- Excellent support for all major browsers
- Ajax-ready for smooth event browsing
- SEO friendly and compatible with SEO plugins
- Multi-lingual
- Filterable and searchable event listings
- Backend and frontend event submission (The latter helps your visitors to submit and manage events without accessing WordPress admin)
- Event previews before going live
- Event categories
- RSS feeds
- Custom event fields
- A ton of shortcodes, widgets, and template tags to add events anywhere on your site
- Full caching support to load your events faster.
- Lots of documentation and tutorials
- Ongoing support and updates
- Multi Organizer & Venue feature
- And More
WP Event Manager Premium Add-Ons & Pricing
That’s not the end of it. While the base code is 100% free, there are many WP Event Manager premium add-ons that cost anywhere between $19 and $99.
Premium add-ons help you to add extra features to your events, which leads to better user engagement and more sales. Here are some of the premium add-ons available for WP Event Manager.
- Calendar – Allows you to display upcoming events on your website ($39/yr Personal license for a single site; $99/yr Developer license for five websites)
- Google Maps – Helps your users to find events by location. The add-on also enables proximity event search on your website ($39/yr Personal; $99/yr Developer)
- Registrations – Users can register to events using a form, and organizers can view/manage the registrations for their dashboard ($39/yr Personal; $99/yr Developer)
- WooCommerce Sell Tickets – Sell an unlimited number of event tickets via WooCommerce ($39/yr Personal; $99/yr Developer)
- Attendee Information – Collect and list attendee information for better event coordination ($39/yr Personal; $99/yr Developer)
- Zoom – The add-on allows you to integrate Zoom accounts, manage Zoom meetings, webinars, live stream, and sell Zoom meetings via WooCommerce ($39/yr Personal; $99/yr Developer)
- WooCommerce Paid Listings – Sell events and packages via WooCommerce.
- Recurring Events – Create events to repeat daily, weekly, monthly, or yearly ($39/yr Personal; $99/yr Developer)
- Event Alerts – Visitors can choose to receive regular event alerts via email ($39/yr Personal; $99/yr Developer)
- Bookmarks – Logged in users can bookmark events allowing them to save their favorite events ($19/yr Personal; $49/yr Developer)
- Embeddable Event Widgets – Event organizers can create embeds without writing code. You can display your event embeds wherever you want, including Facebook, among other places ($19/yr Personal; $49/yr Developer)
And there is more…
- Colors – Set a custom color for each event type or category. You can customize the color of text and backgrounds ($39/yr Personal; $99/yr Developer)
- Sliders – Create a responsive owl carousel and other types of sliders for your event listings ($19/yr Personal; $49/yr Developer)
- Event Tags – Add tags to your events and make them easy to search ($19/yr Personal; $49/yr Developer)
- Contact Organizer – The add-on allows you to add a contact form that helps users to contact event organizers without frustrations ($19/yr Personal; $49/yr Developer)
- Export Events – Are you looking to backup or transfer your events? If so, Export Events is the WP Event Manager add-on you need ($39/yr Personal; $99/yr Developer)
- iCal – The add-on enables you to display your events on Google Calendar among other calendar apps ($39/yr Personal; $99/yr Developer)
- Google Recaptcha – Easily add Google Recaptcha on your events website to stop spamming ($39/yr Personal; $99 Developer)
- Google Analytics – The add-on allows you to add Google Analytics tracking to measure events and interactions on your website ($19/yr Personal; $49/yr Developer)
- Emails – The add-on sends email notifications to event organizers when an event is submitted, approved, or expires ($19/yr Personal; $49/yr Developer)
Note: All license types are billed yearly, but you can cancel your subscription at any time in your WP Event Manager account page. However, they don’t offer a refund policy.
You can buy any add-on you want individually or purchase a discounted bundle package. At the time of writing, WP Event Manager offers a Personal Bundle Package with all add-ons for $235/yr (normally $640/yr). The Developer Bundle Package is currently retailing at $499/yr (normally $1630/yr). You need to renew yearly to receive updates and support.
In the next section, we will learn to install and test-drive WP Event Manager. It’s usually the most exciting part.
How to Install WP Event Manager

WP Event Manager is available as a free plugin on WordPress.org. That means you can install it directly inside your WordPress admin, which is incredibly easy.
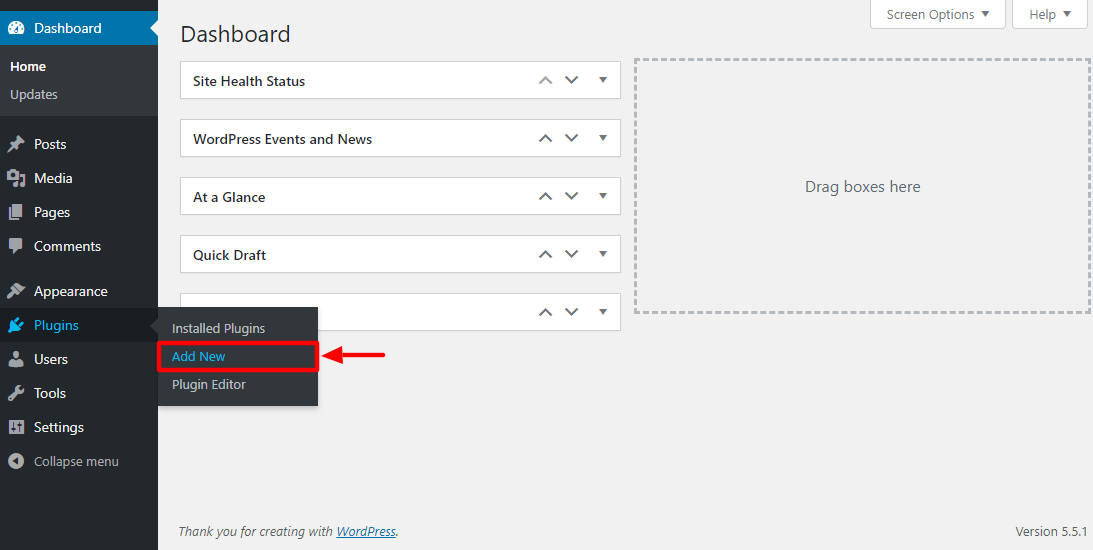
Log in to your WordPress admin and navigate to Plugins > Add New:
Next, enter “WP Event Manager” in the search box, and hit Install Now, as we highlight below.
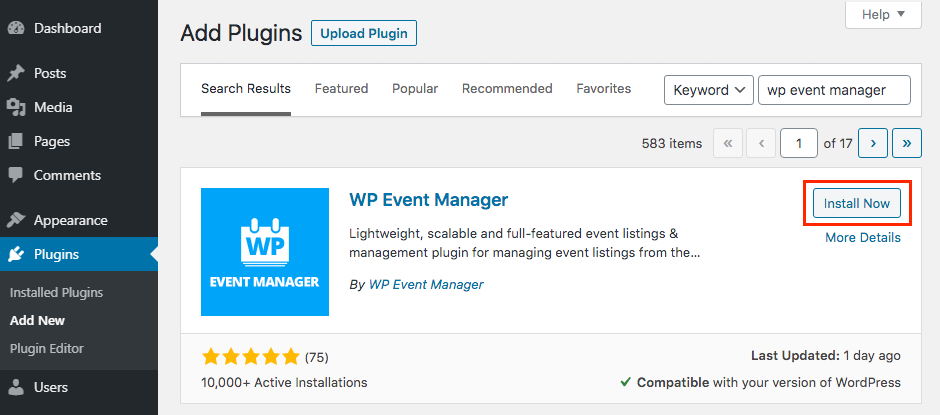
After that, click to Activate.
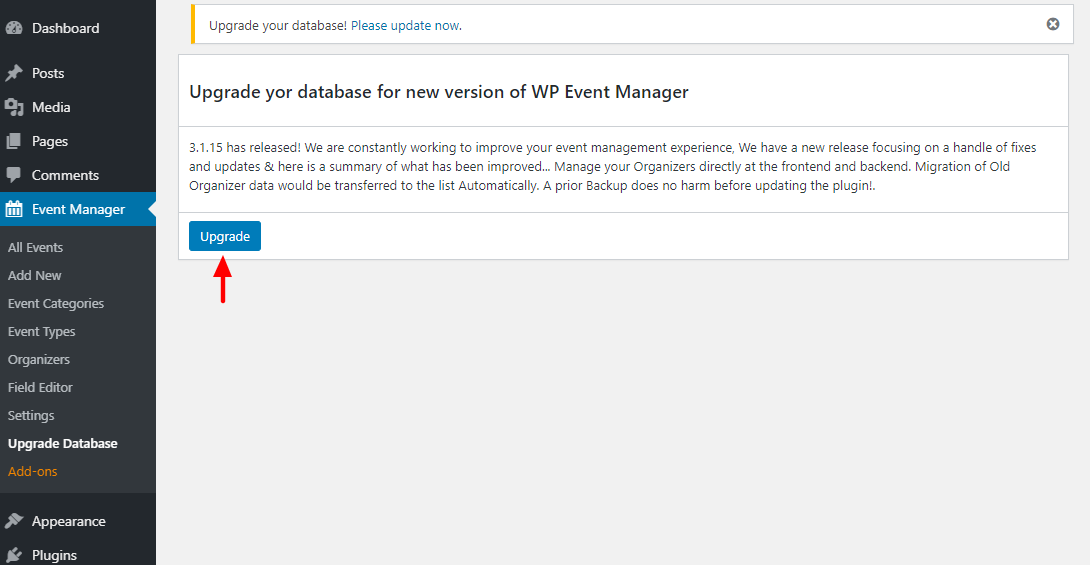
Next, click Please update now to update your database:
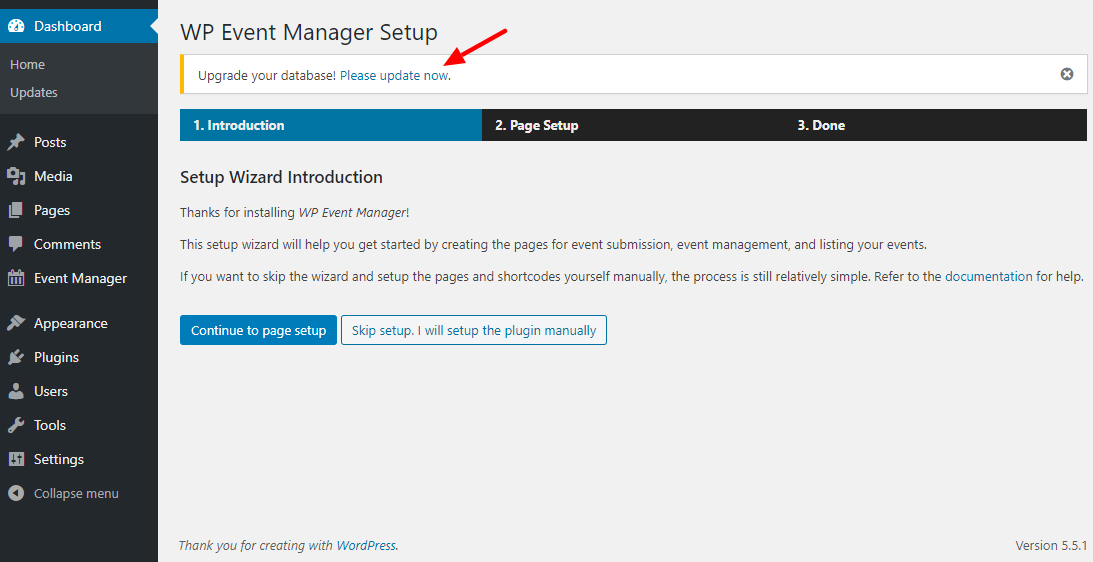
Next, hit the Upgrade button to initiate the database update:
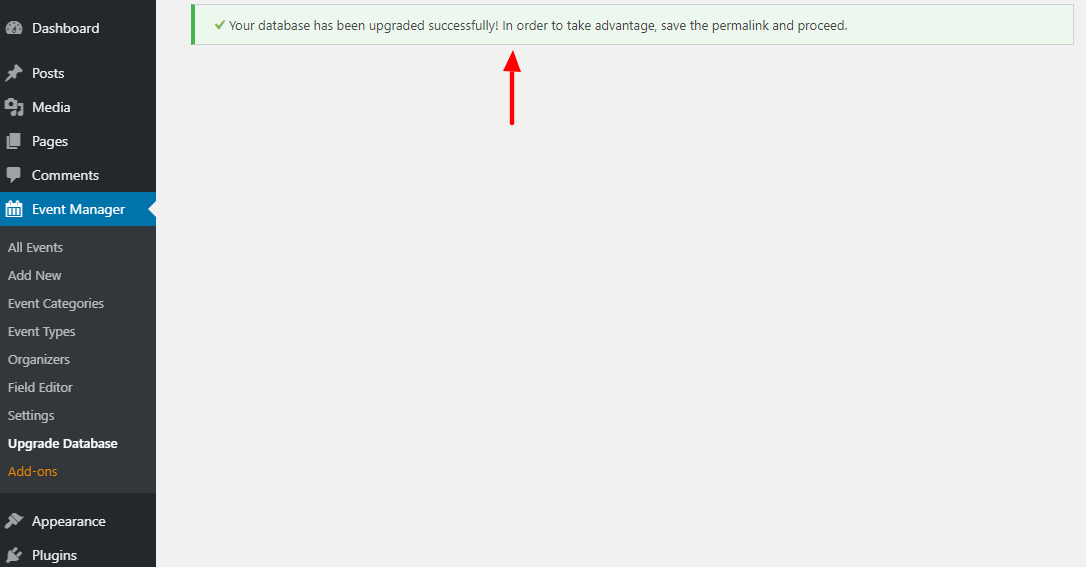
Once your database upgrades successful, you will see:
After that, click the Event Manager menu item to open the dashboard. Next, click Add New to add your first event, as we detail below.
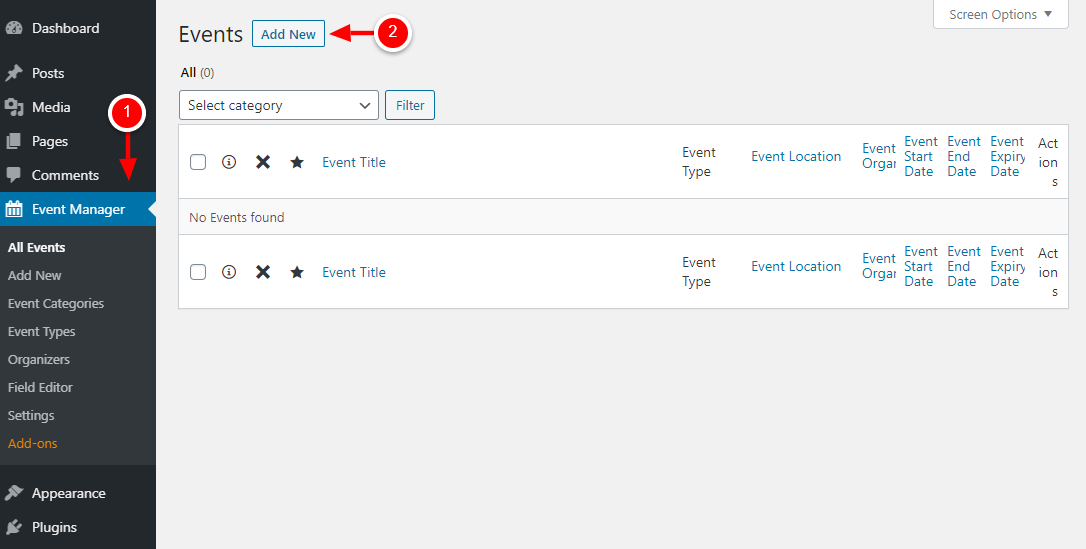
Doing so leads you to the event editor, where you can add your event details.
The WP Event Manager Editor
And as you can see, WP Event Manager is already compatible with the WordPress block editor, aka Gutenberg.
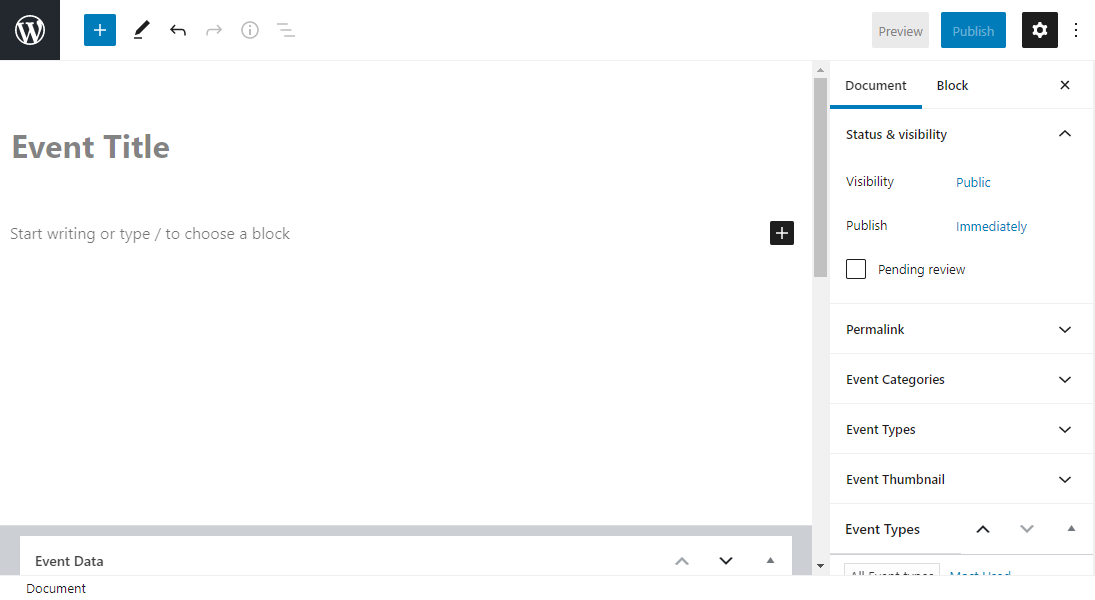
On the above page, enter your event title, description, and scroll down to the Event Data section:
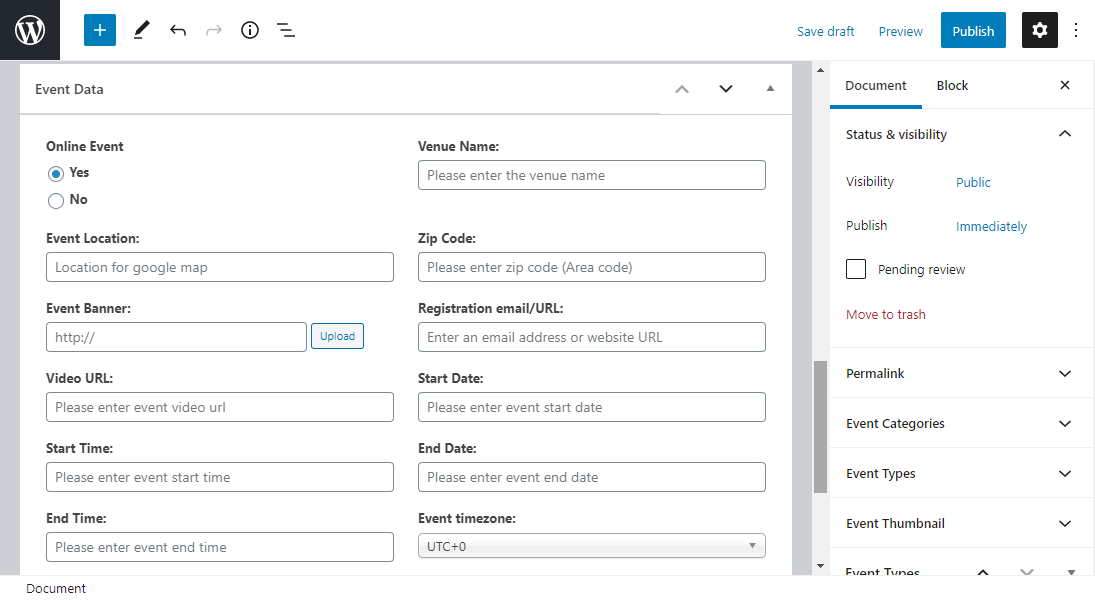
Under the Event Data section, you can add a lot of details about your event, including:
- Choose whether or not it’s an online event.
- Set event location
- Define the event start date/time and end date/time
- Add an event banner and registration email/URL
- Assign organizers (Note: you must first add organizers by navigating to Event Manager > Organizers in WordPress admin)
- Make the event a featured listing.
- Set event registration deadline and expiry
Add your event details and data as you see fit and shift your attention to the Document block to the right:
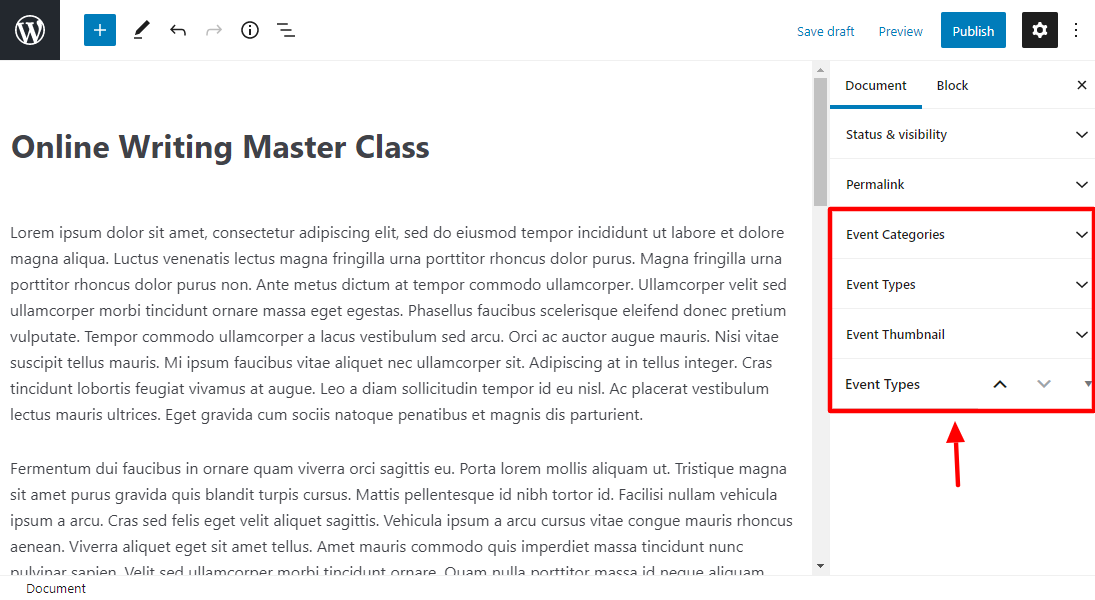
From the section, you can set event category, type, and thumbnail. It’s incredibly easy to set up since WP Event Manager comes with pre-defined categories and types. Plus, you can add a new event category and type right there and then.
After configuring your event as you see fit, click Publish:
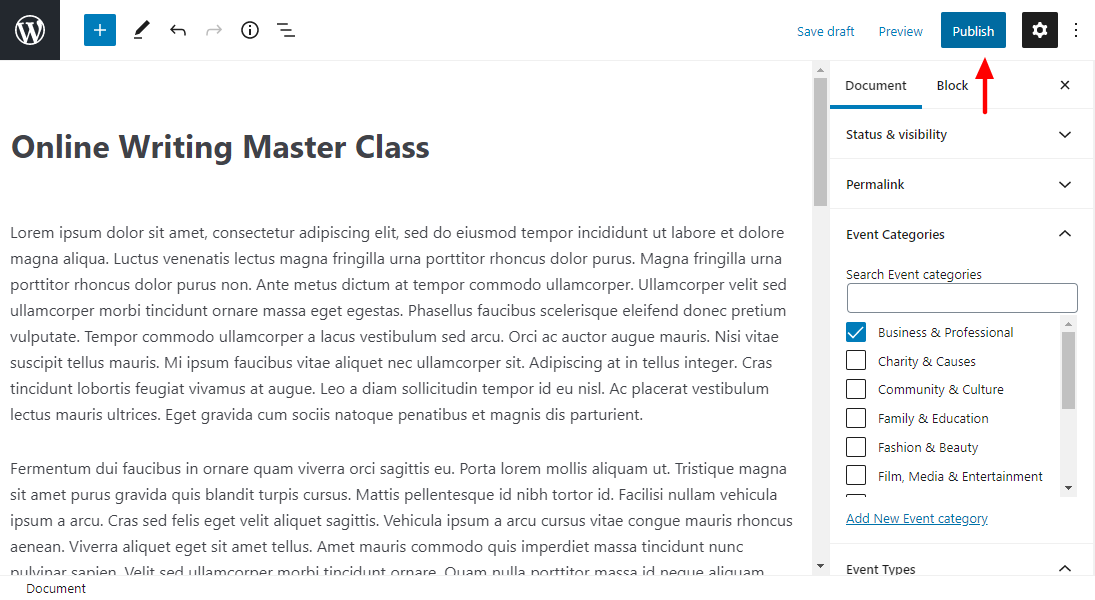
Remember, you can preview your event before publishing, or save as a draft for later.
Now, if I view my event on the frontend, I see this:
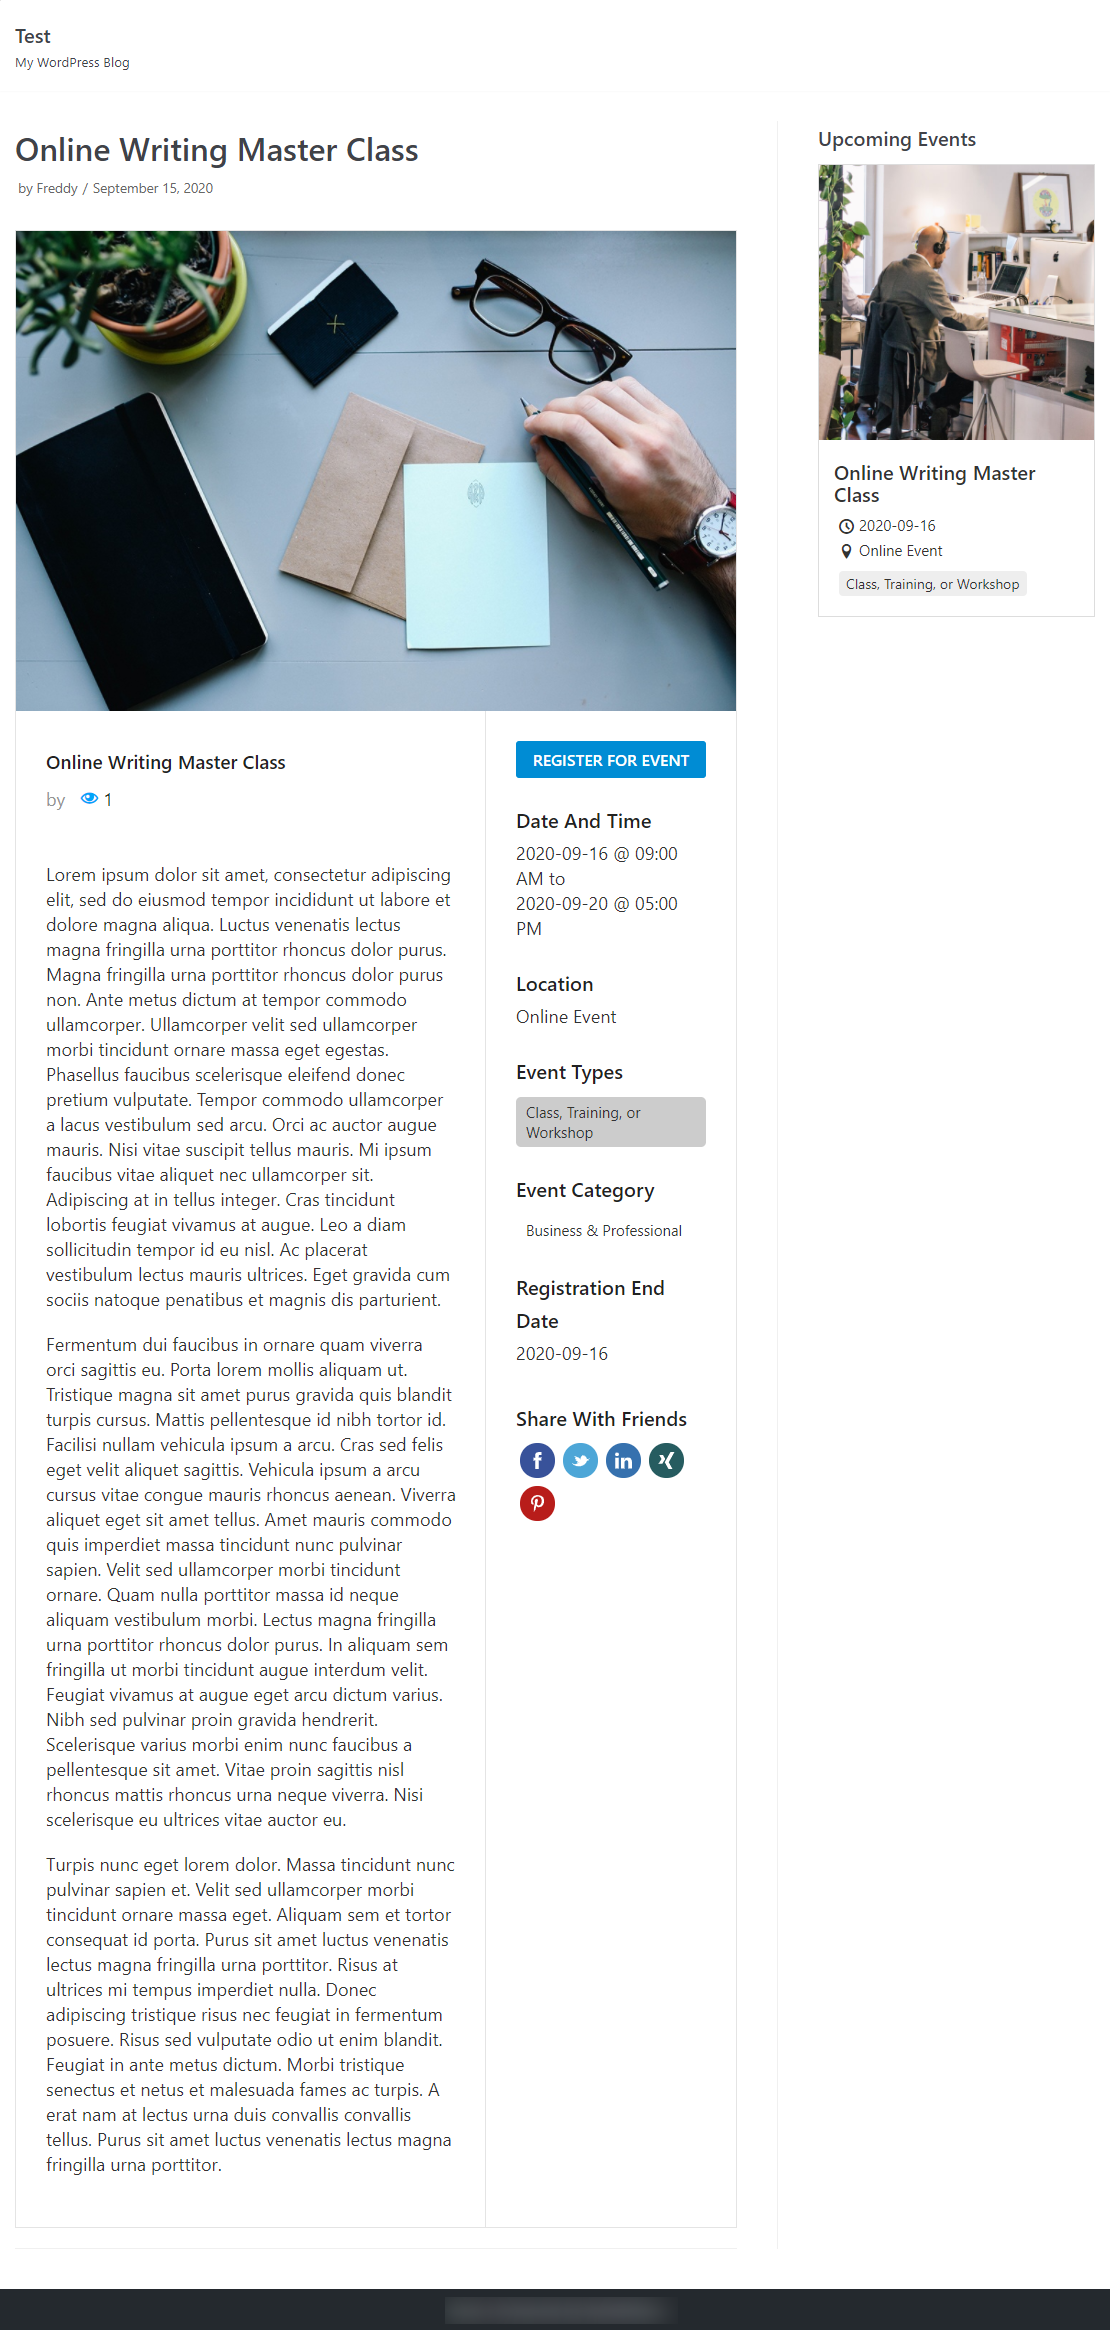
Notice the Upcoming Events widget I added to the sidebar? It’s pretty nice.
WP Event Manager widgets are easy to add. You can access the widgets by navigating to Appearance > Widgets on your WordPress admin dashboard:
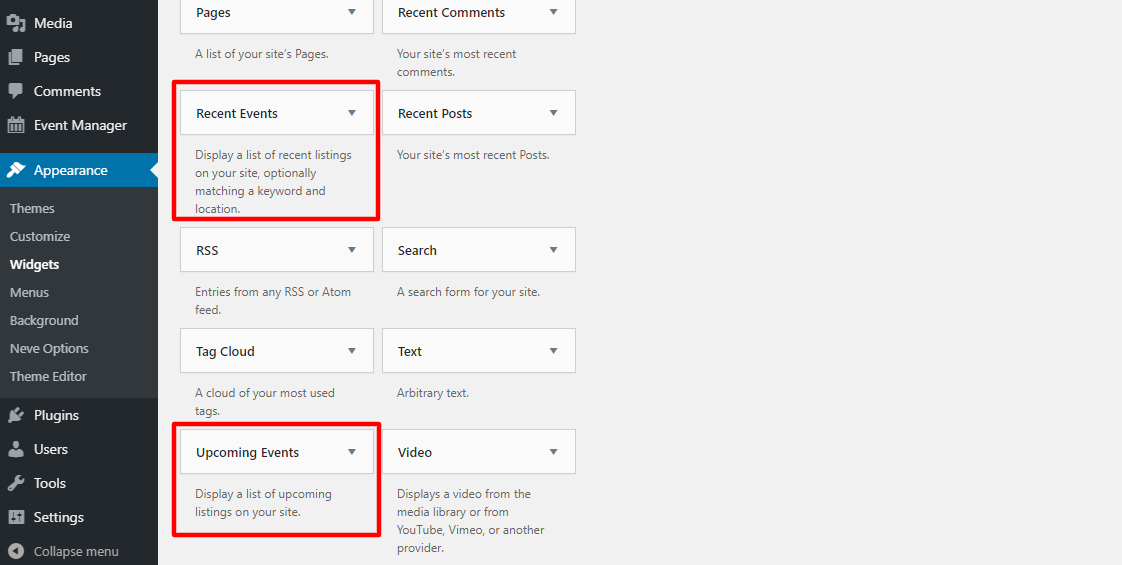
Creating events in WP Event Manager is super-duper easy. You don’t write any code; enter your event details, click a few buttons, and you’re good to go 🙂
Back to the WP Event Manager inside WordPress admin, let us cover more options.
WP Event Manager – All Events & Features

As you can see, the sample event we just created is right there. As you create more events, they appear in the above screen for easier management.
Now, let us add a new organizer to illustrate how the whole thing works.
Add a New Event Organizer
Navigate to Event Manager and click Organizers:
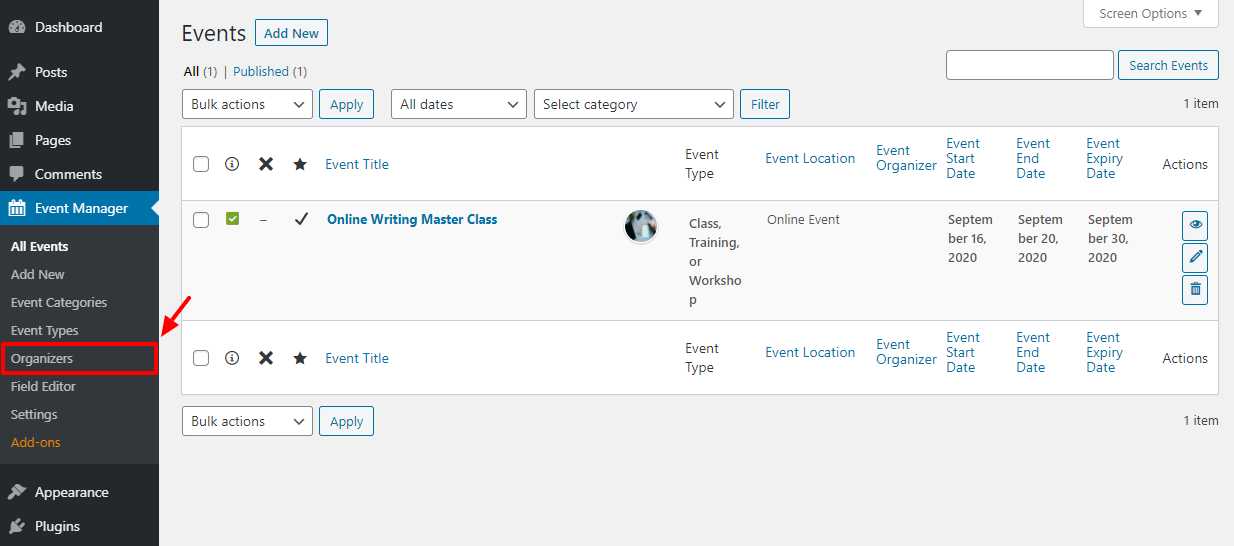
Next, click Add New in the Organizers page:
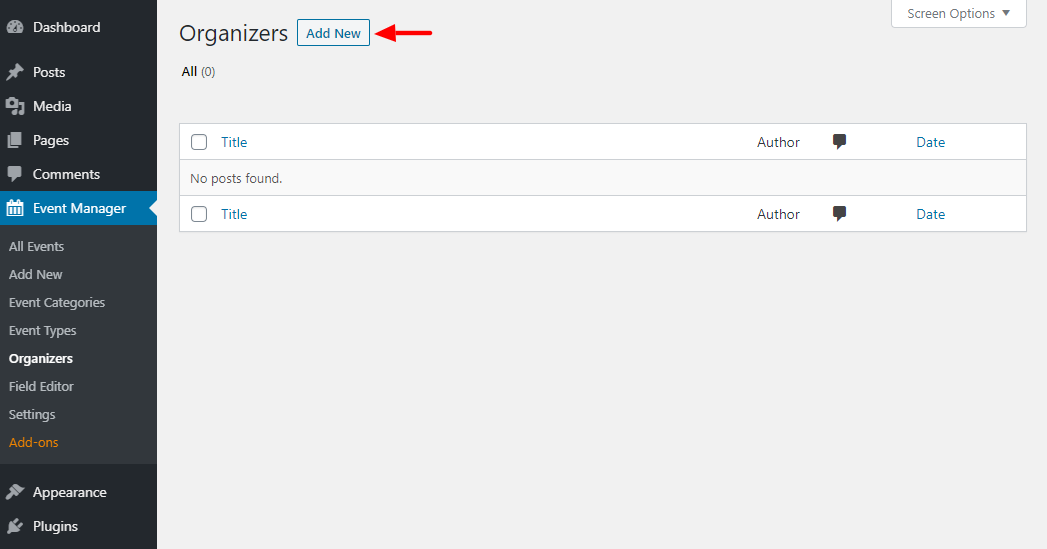
On the next screen, you have plenty of options to add a new organizer:
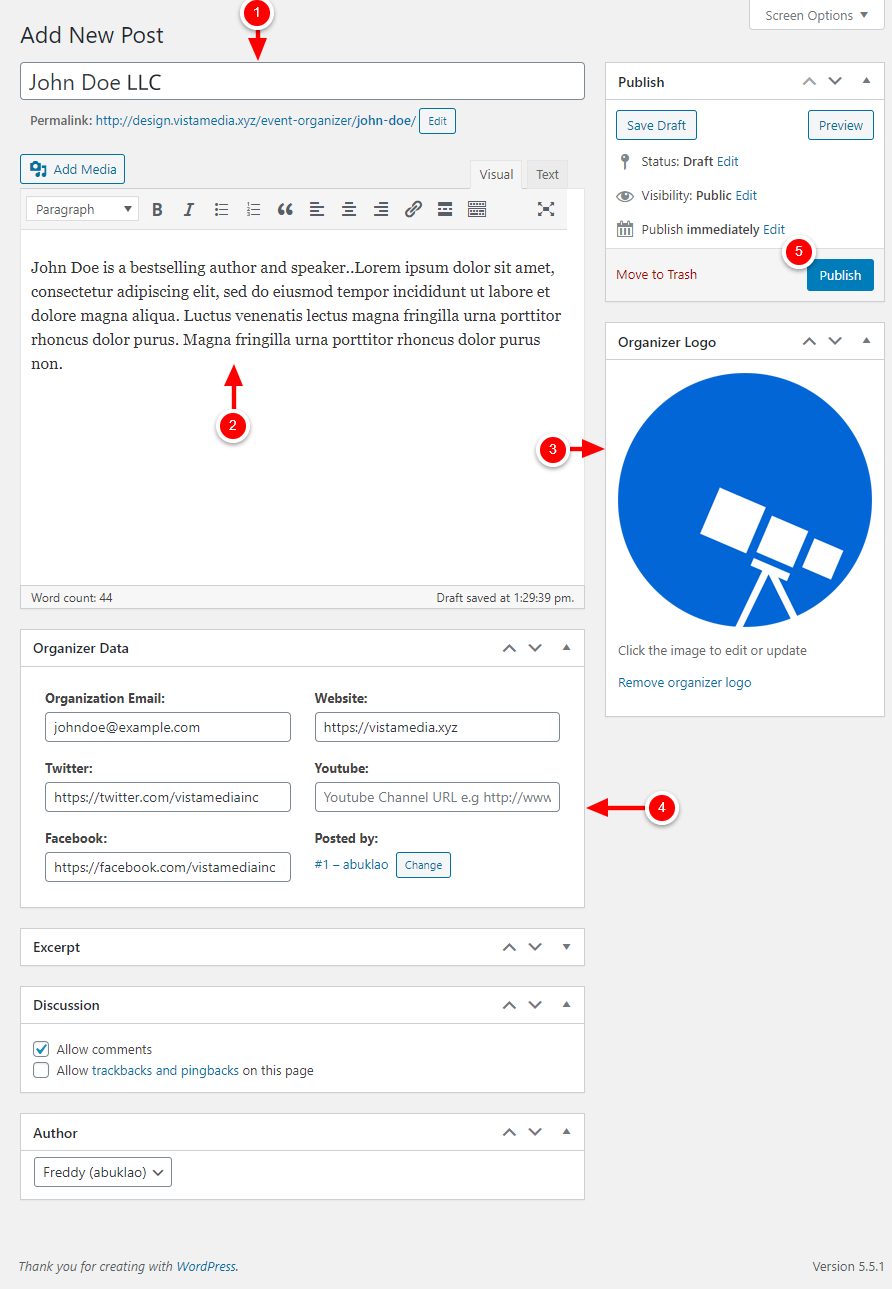
Here, some notes about the above image:
- Add the organizer’s name here
- Enter the organizer’s bio here
- Set the organizer’s logo (or profile picture)
- Add more details about the organizer, including email, website, and social media profiles
- Click Publish
And that’s it; you’ve added a new event organizer successfully. Now, you can assign the organizer to any event when you’re creating the event.
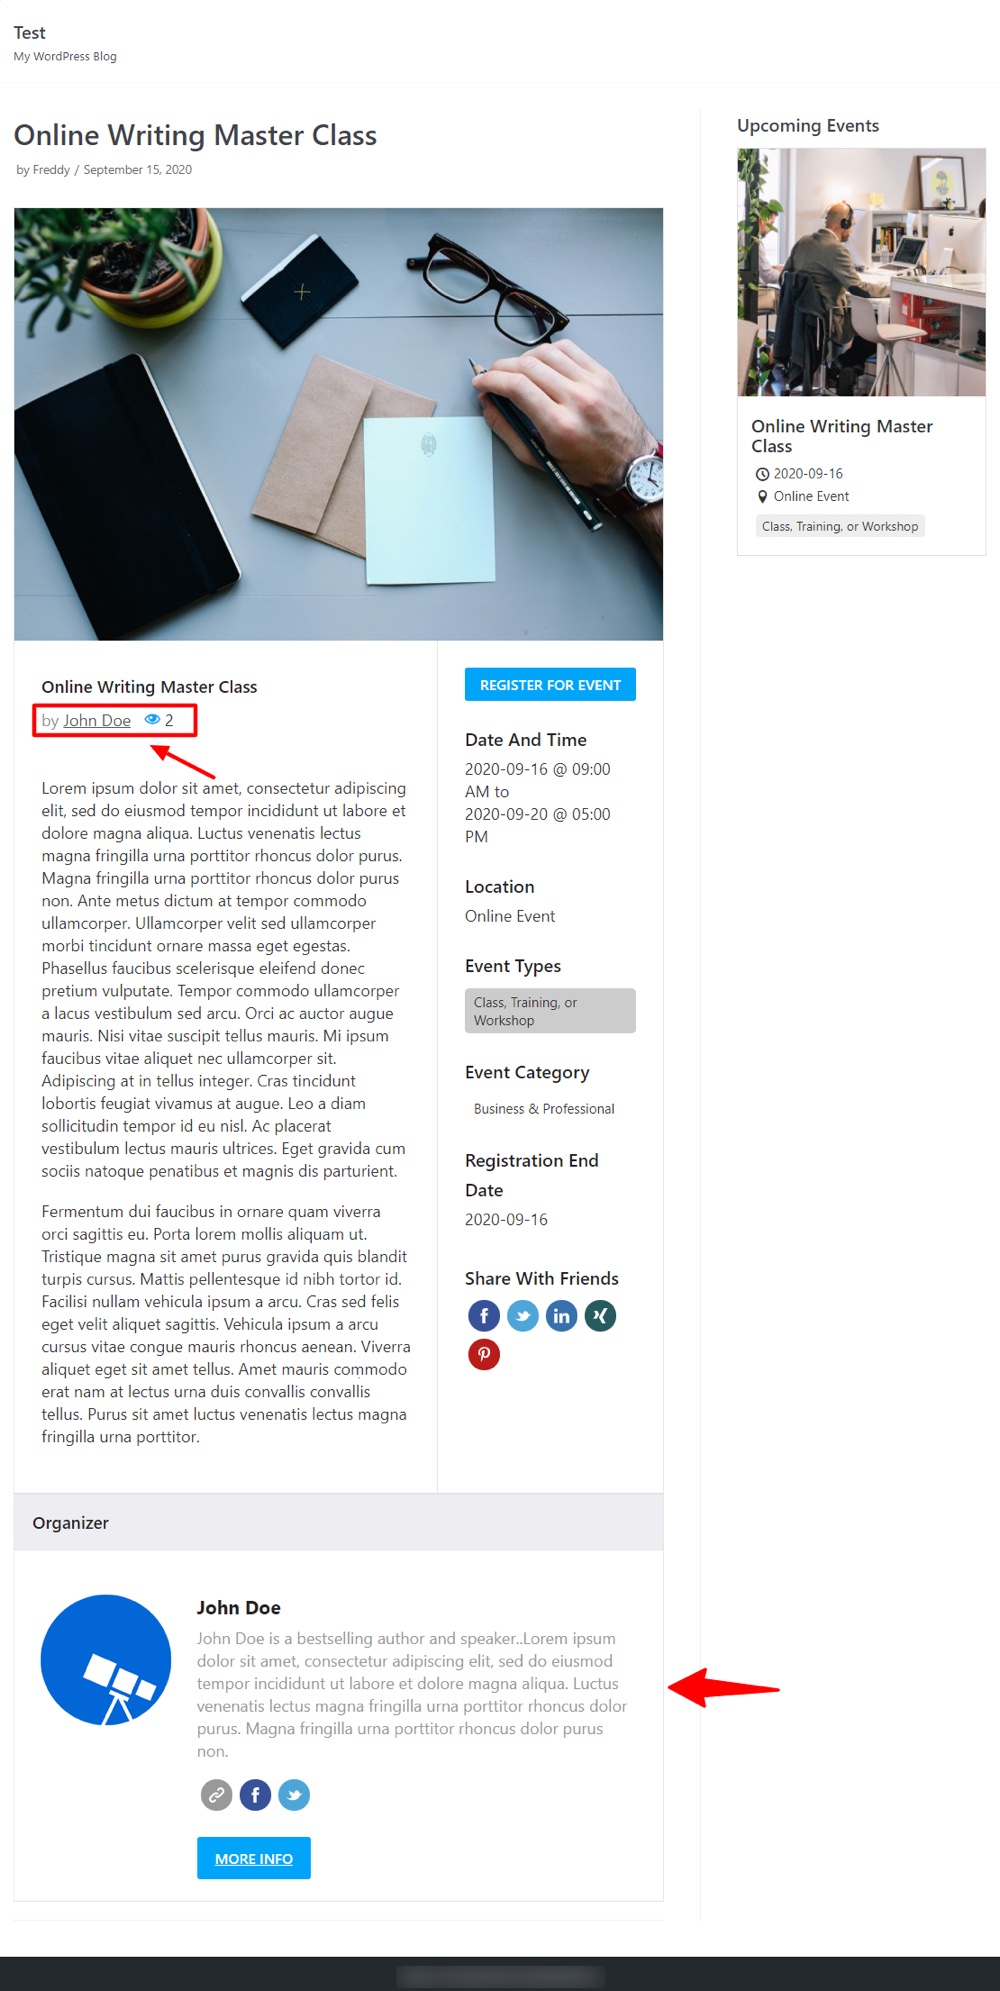
Now, if I view my event in the frontend, I see organizer info at the bottom:
We are moving on swiftly.
WP Event Field Editor
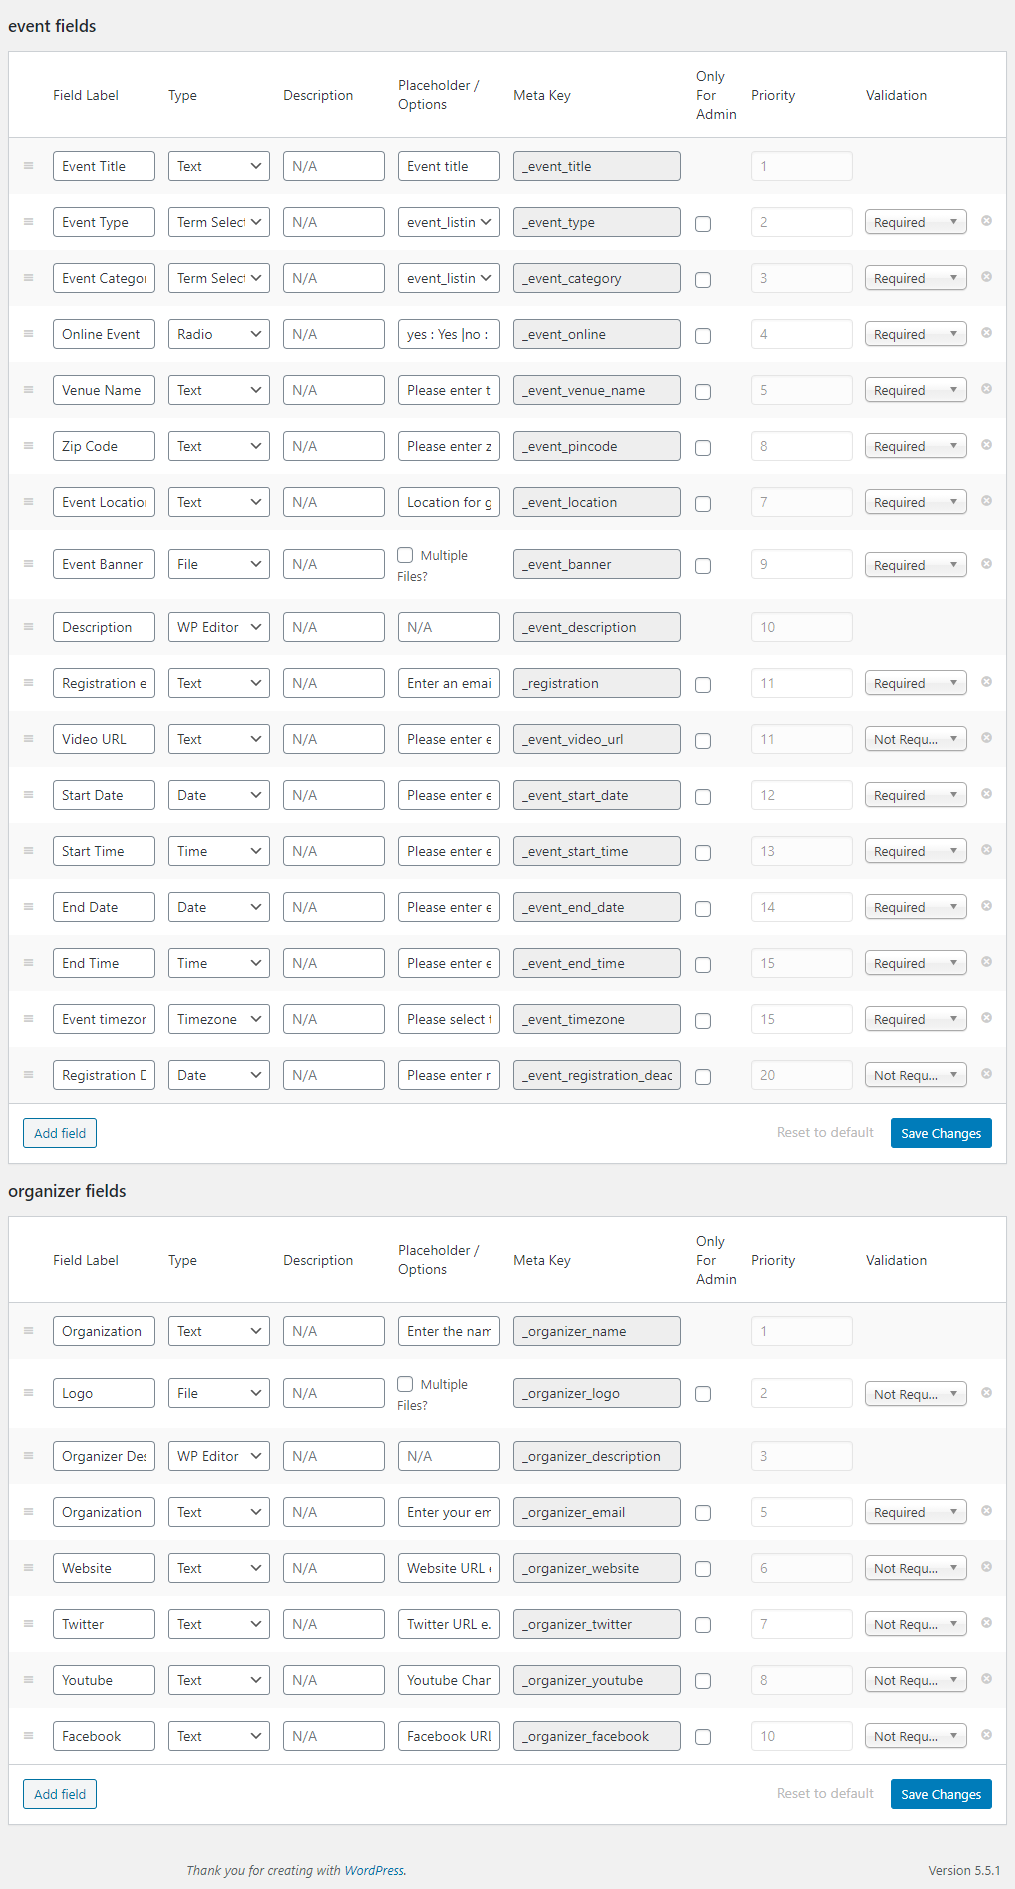
If you’d like to add custom fields to capture more information, navigate to Event Manager > Field Editor.
On the next page, you can edit existing fields and add new ones easily:
Now, let us head over to the Settings page.
WP Event Manager Extra Settings
Navigate to Event Manager and click Settings. From here you can have a lot of options to customize your WP Event Manager experience:
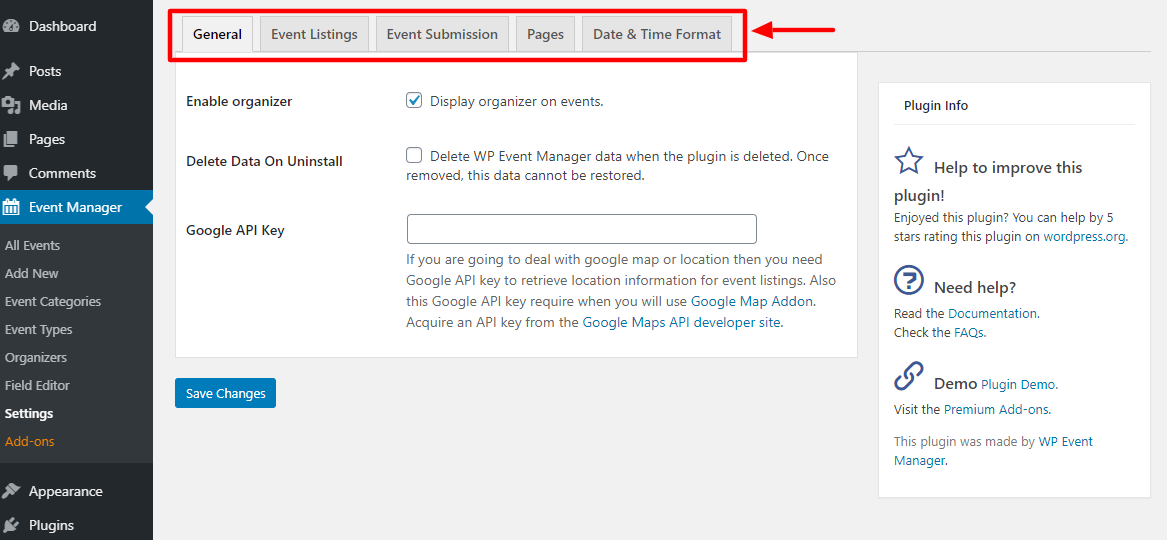
Let us go over each tab briefly.
General
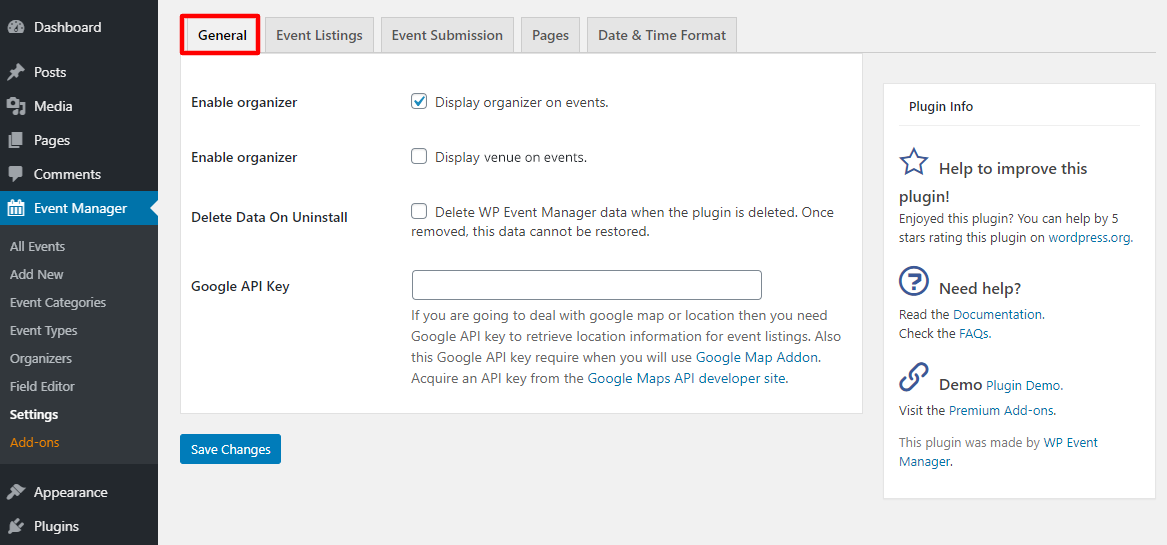
Under the General tab, you can:
- Choose to display organizers on events
- Enable an option to display the venue (location) on events
- Select to delete WP Event Manager data when the plugin is deleted
- Enter your Google API Key if you’ll use Google Maps in your events
Event Listings
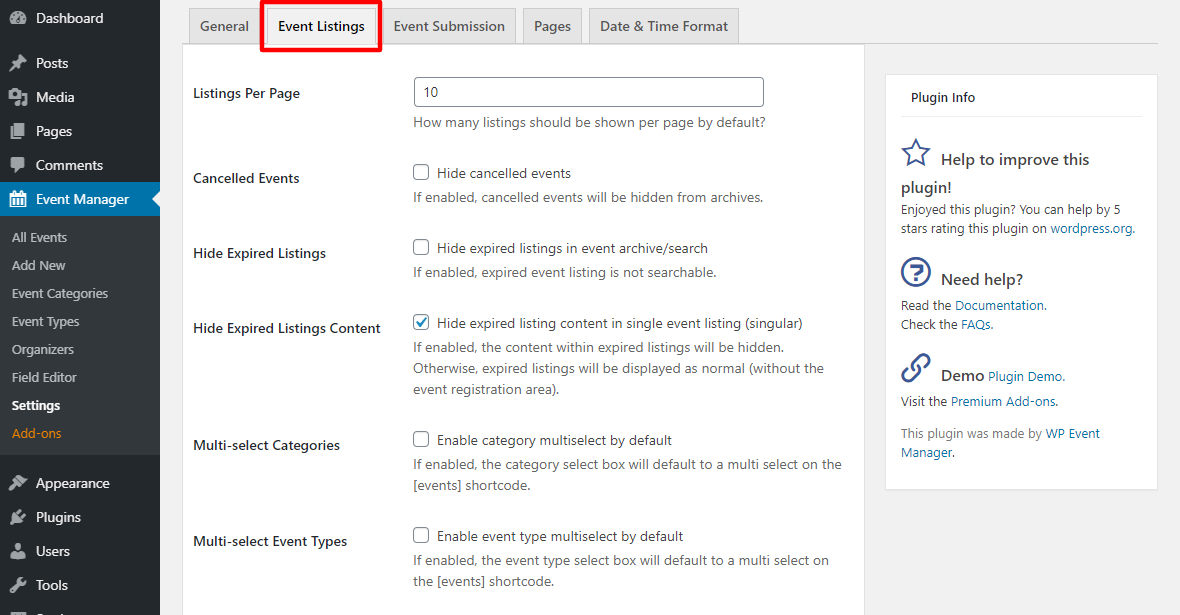
The Event Listings page allows you to define how events are listed on your website. You can:
- Set the number of events to display per page
- Choose to hide/show canceled and expired events
- Activate event category and type multi-select
- Configure the event category and type filter
Event Submission
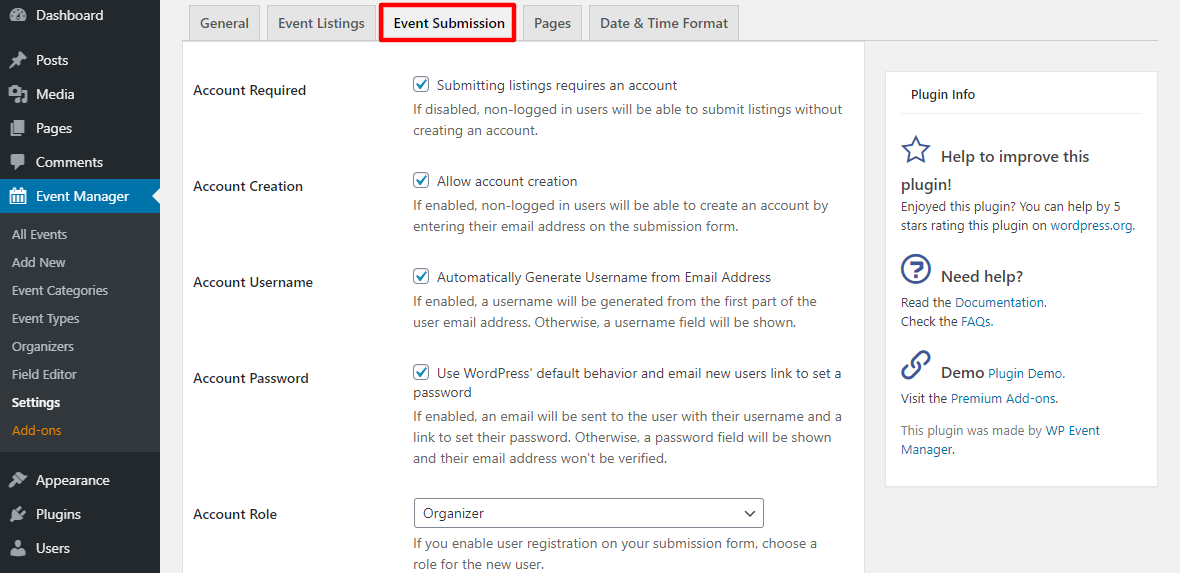
Under the Event Submission tab, you have plenty of options to set up how organizers submit events to your website.
You can:
- Force users to create an account to submit listings. If disabled, users can submit events without an account.
- Force users to create a username and password when creating an account.
- Choose the default role for all new users. We recommend setting this to the Organizer.
- Moderate new listings and automatically delete expired listings after 30 days.
- Enable event categories, types, and ticket prices for listing and submission forms.
Next, we have the Pages tab.
Pages

The Pages tab allows you to define default pages for various parts of the WP Event Manager. Here are the available pages:
- Submit event form page
- Event dashboard page
- Event listing page
- Login page URL
- Venues page
- Submit organizer form page
- Organizer dashboard page
N/B: You must first create the page you want to use by adding the shortcodes. It’s incredibly easy. To illustrate, let us create a submit event form page.
Here we go.
Navigate to Pages > Add New:

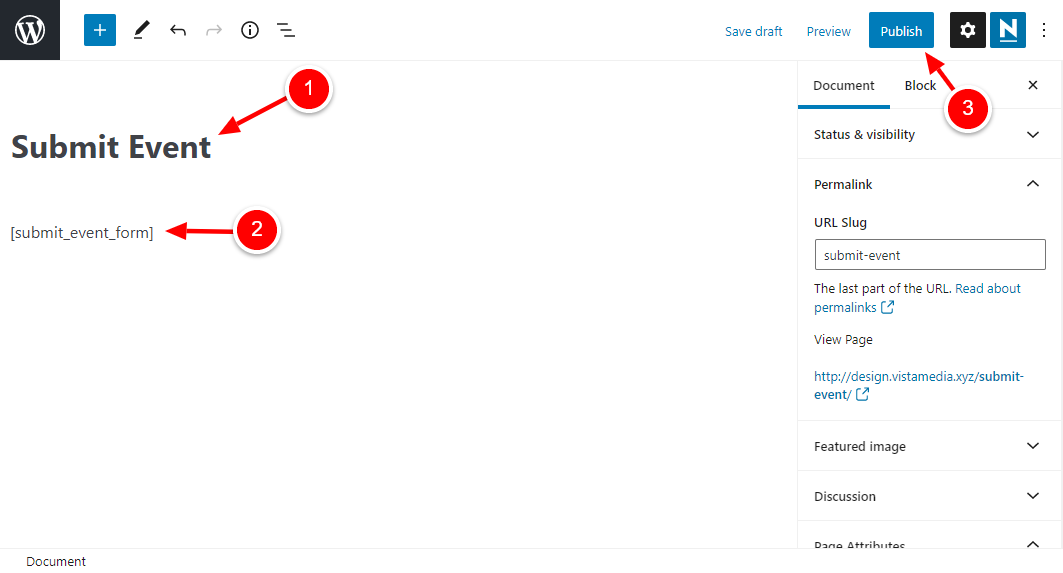
In the page editor, please enter a title (ours is Submit Event), drop the [submit_event_form] shortcode into the body of the page, and click Publish, as shown below.
If I view my Submit Event page on the frontend, I will see this:
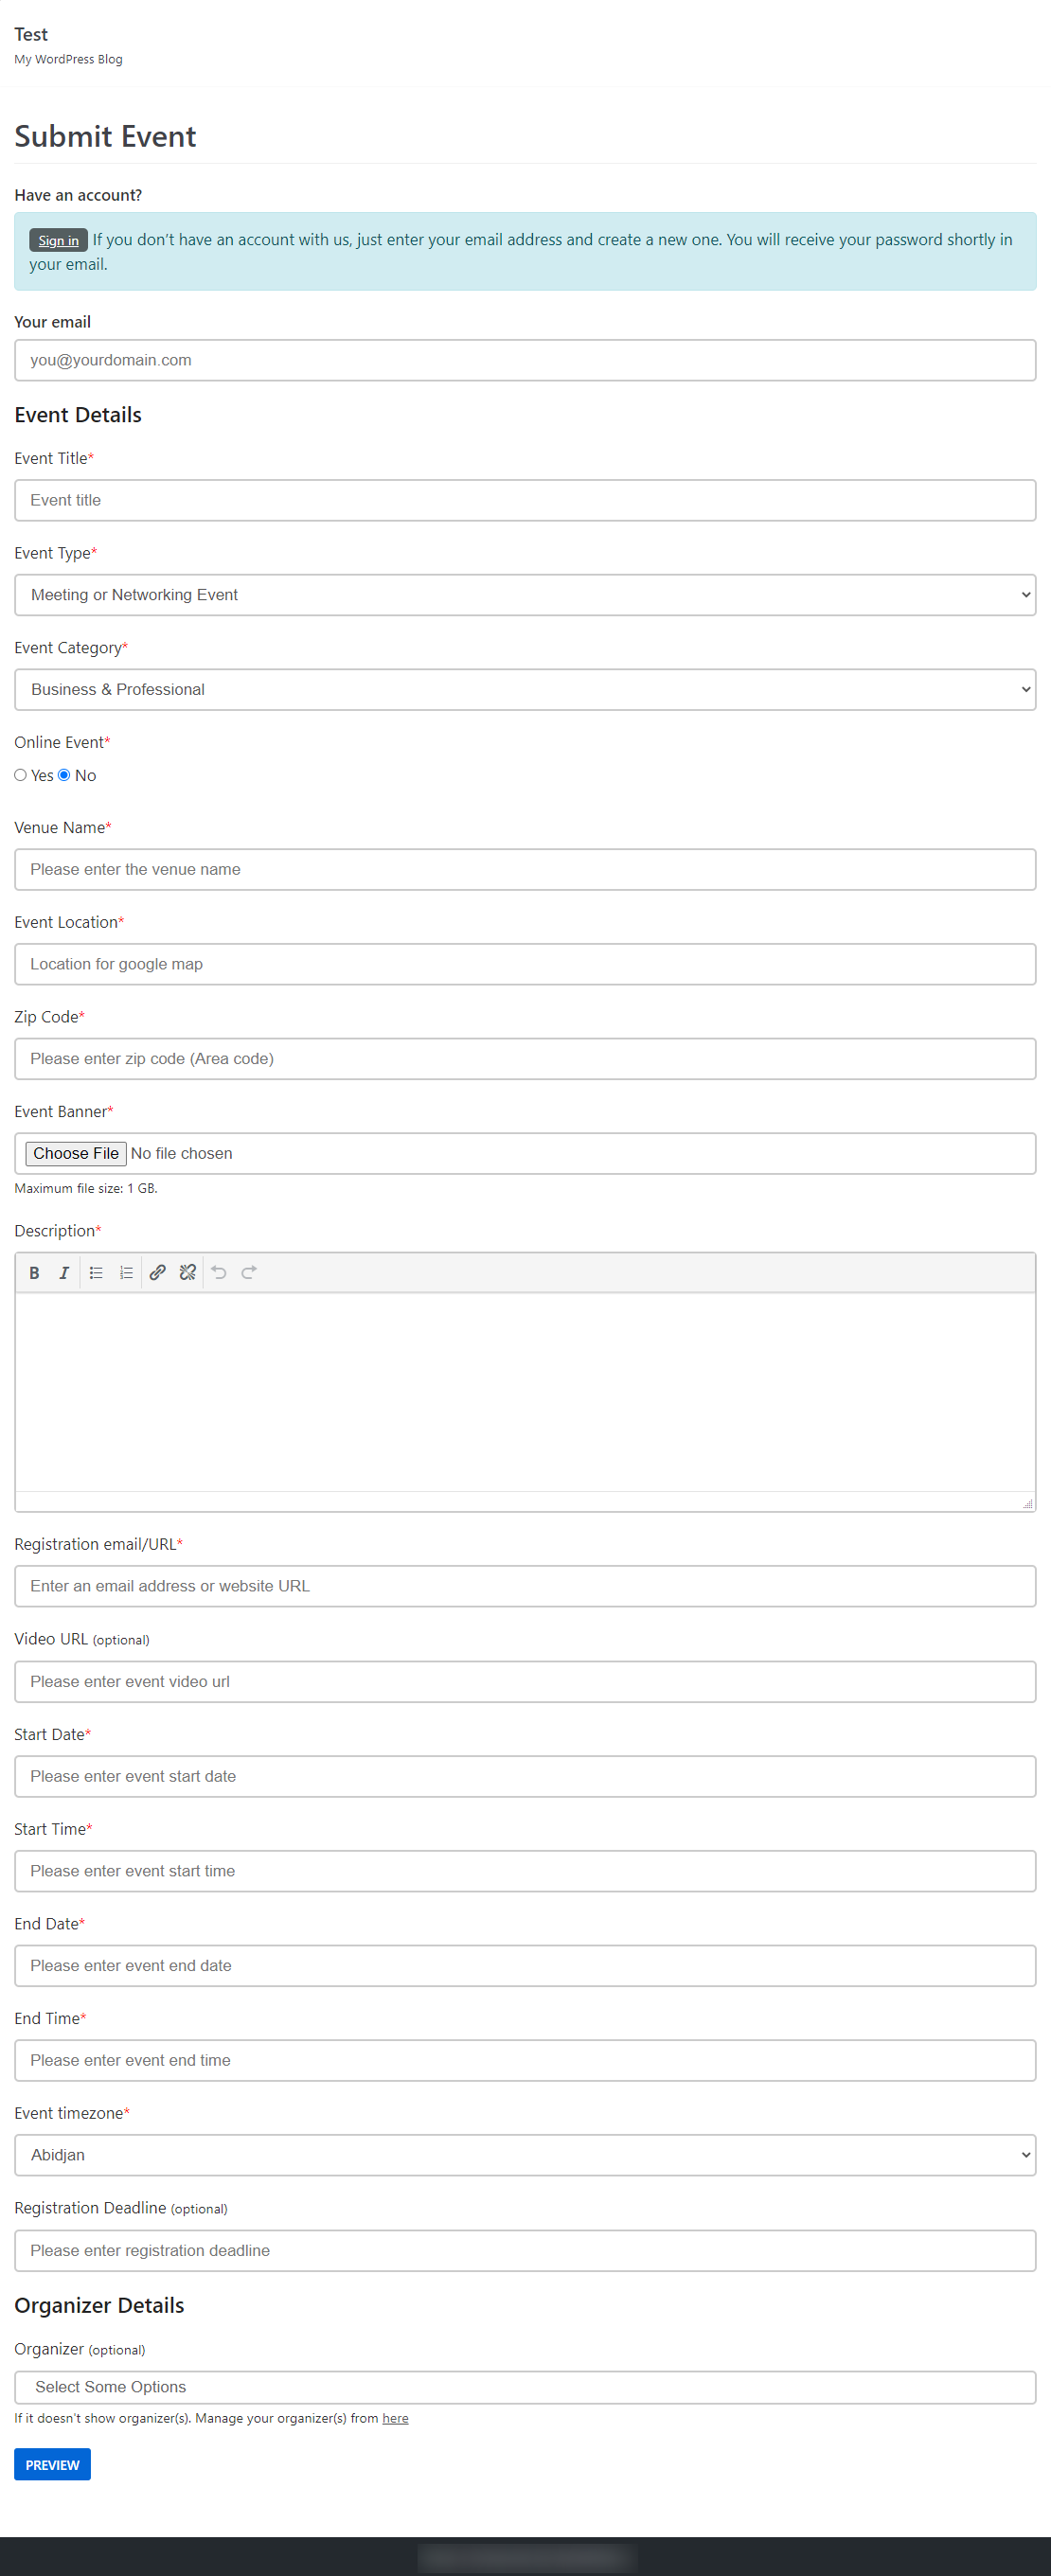
You create the other pages we mentioned similarly. Just name your page, paste the shortcode, and hit the publish button. Now, we only need to tell WP Event Manager the page we’re using to submit events.
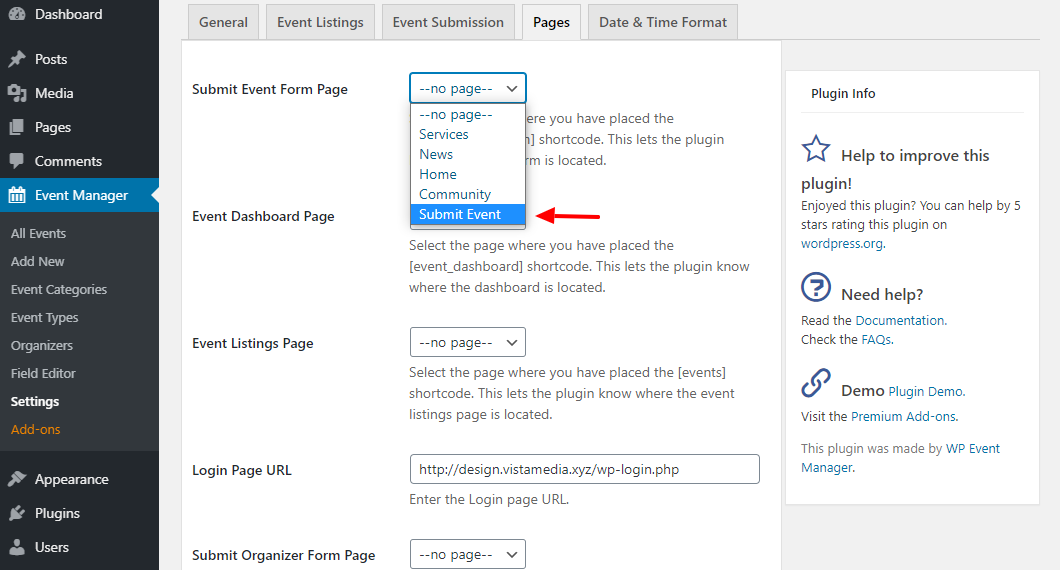
Go back to the Pages tab, i.e., Event Manager > Settings > Pages:

Click the drop-down next to Submit Event Form Page, and choose the new page you just created:
Next, scroll down and click Save Changes:
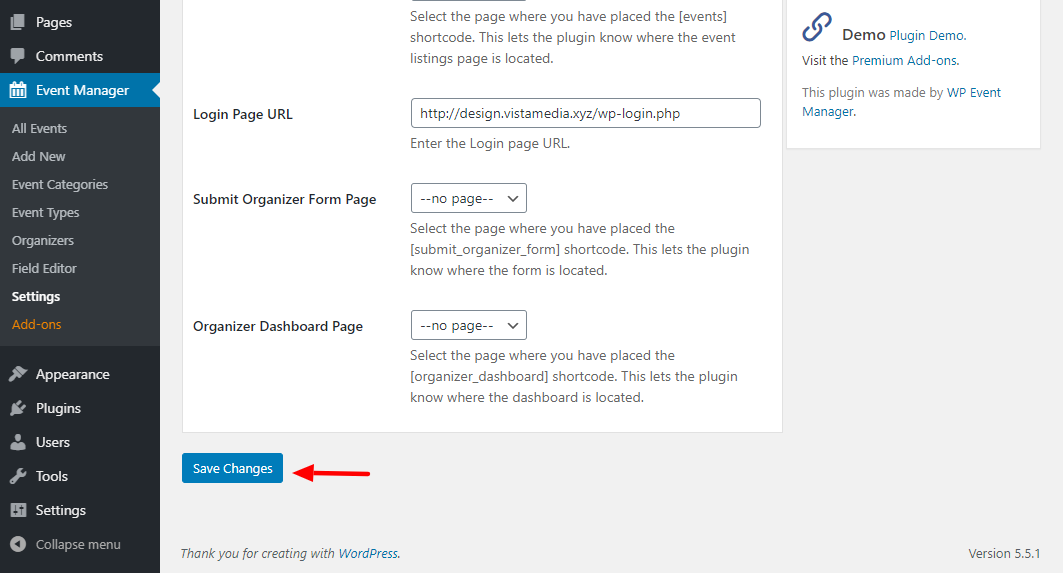
Pro Tip: Repeat the process for the other pages 🙂 It’s as simple as A, B, C that I don’t expect you to run into any problems. Plus, all the shortcodes you need are available on the above page.
Date & Time Format
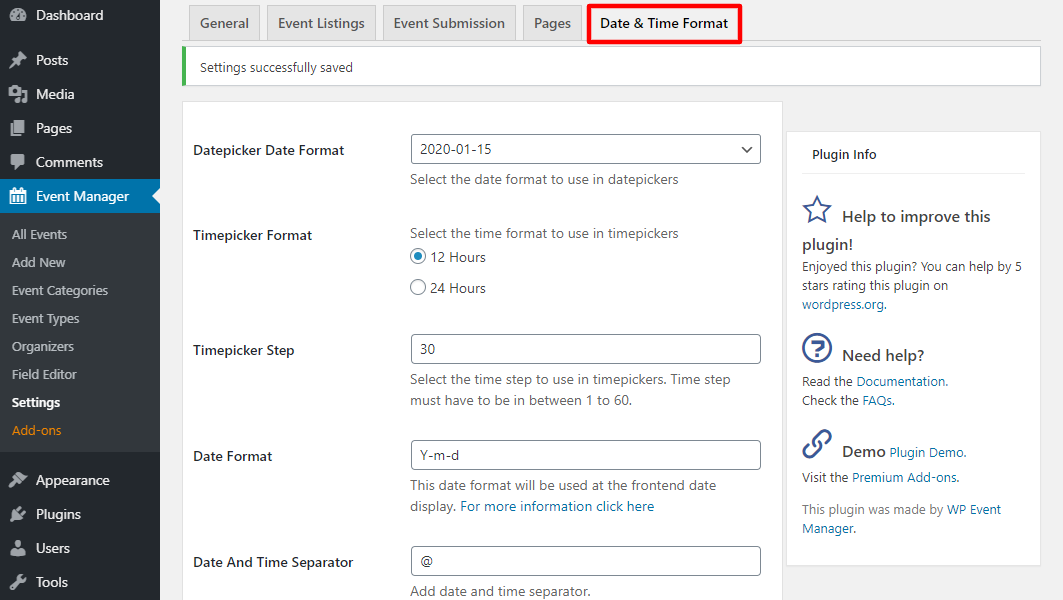
The last tab, Date & Time Format, helps you to set the date and time formats for your events. It’s straightforward and pretty self-explanatory.
If you’d like to view the available WP Event Manager add-ons, navigate to Event Manager > Add-ons:
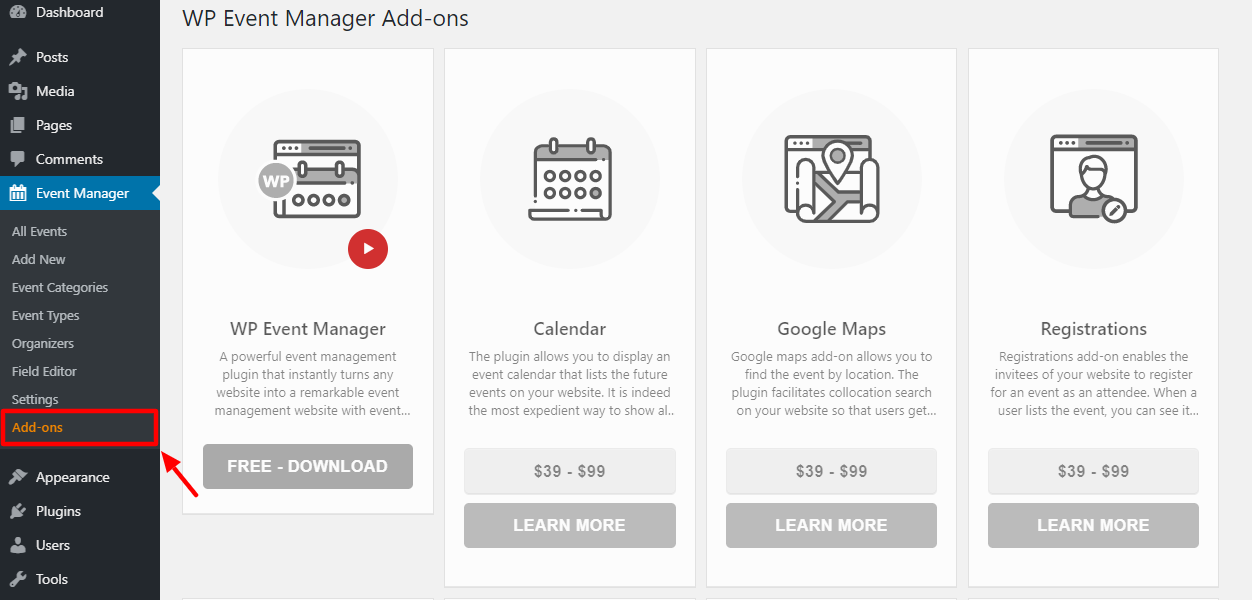
We covered add-ons earlier, so I won’t dwell on that.
Final Words
WP Event Manager is a fully-customizable and powerful event plugin for all WordPress websites. It offers you plenty of options to create unique event-listing websites in an instant. You don’t need prior coding knowledge to use WP Event Manager. It’s intuitive and straightforward.
The free version is already powerful, but if you need to extend your event website, you have a dozen brilliant add-ons at your disposal. Configuring the whole thing is incredibly straightforward; you should be up and running in no time. Honestly, I can’t wait to see what you create with WP Events Manager.
We hope our review offered you a clearer picture of a WordPress event plugin like no other. Did we miss something? Have questions regarding WP Events Manager? I will be monitoring the comment section for the next 24 hours, so please share your thoughts!


Comments
No comments yet. Why don't you kick off the discussion?