How to Use CM WordPress Search and Replace

Change is inevitable, and if you run a website updating content is necessary. Whether you have a blog or a store, eventually something will change. And lucky for you CM WordPress Search and Replace is here to help make your life a bit easier.
CM Search and Replace
With CM WordPress Search and Replace the headache of updating specific terms or links is gone. This handy plugin makes it easy to enter parameters, add replacements and see updates take place in real-time. And there are a variety of uses – like word replacement, limited time rebranding, permanent url updates and more (which we’ll show you below).
But first – let’s take a look at the plugin’s features!
Free Version

If you want to give the plugin a try today you can, and for FREE. Just install the free CM On Demand Search and Replace plugin version from WordPress.org which includes features that allow you to:
- Create replacement rules
- Enable case sensitivity
- Replace text or HTML
- Search within WordPress posts and pages
This is a perfect, simple solution for correcting common spelling mistakes (similar to the infamous capital_P_dangit WordPress function), prevent use of specific words (especially bad ones) or quickly replace the year in annual posts.
Pro Version

For more features, you can upgrade to the Pro version (affiliate link) of the plugin. This greatly extends available options to include the following:
- Enable local replacements or choose to update your database.
- Preview changes and targeted pages, posts, etc.
- Commit changes permanently to your database.
- Define advanced replacement rules.
- Drag and drop rules to reorder priority.
- Add case sensitivity or regex patterns to rules.
- Replace text, HTML, numbers, links, dates and even IP addresses.
- Search within posts, pages, custom post types, titles, excerpts and comments.
- Limit searches to specific content.
- Define custom time frames for replacements.
- Support for ACF, Yoast, bbPress and WooCommerce.
- Use a frontend widget for quick replacements.
Are Changes Permanent?
Now here’s the cool thing about CM WordPress Search and Replace Pro – changes don’t have to be permanent. In fact, by default changes are not committed to your database and instead happen on the fly as site visitors access your content.
But there is an easy built-in option to make change permanent if that’s what you want (such as in the case of moving domains). After creating a rule you may choose to commit change and make them permanent by replacing them directly in the DB – which we’ll show you in the guide below.
Can You Replace Any Content?
Yes – with CM WordPress Search and Replace Pro you can create rules to find content pretty much anywhere on your site. Since Pro extends support beyond just posts and pages to custom post types, titles, excerpts, comments, and even content related to third party plugins (like meta created as a part of Yoast).
Pricing
So how much does CM WordPress Search and Replace cost? Like most plugins from Creative Minds there are a few set price points that include increasing site licenses and addons. At the time of writing the plans available are:
- Free – $0 and available on WordPress.org directory
- Essential – $29 for CM WordPress Search and Replace Pro with 1 site license
- Advanced – $69, which includes CM WordPress Search and Replace Pro plus the Admin Tools plugin for 3 sites
- Ultimate – $119 for a bundle of 6 administration plugins (Search and Replace, Admin Tools, Email Tools, Registration, Email Registration Blacklist and HTTPS SSL) for 10 sites
Not that you know a bit more about what the plugin has to offer, let’s take a look at the setup.
CM WordPress Search and Replace Setup
How you install CM WordPress Search and Replace and what features you have access to depends on if you use the free version or Pro. For the purposes of this post we’ll be looking at the Pro version.
Plugin Installation
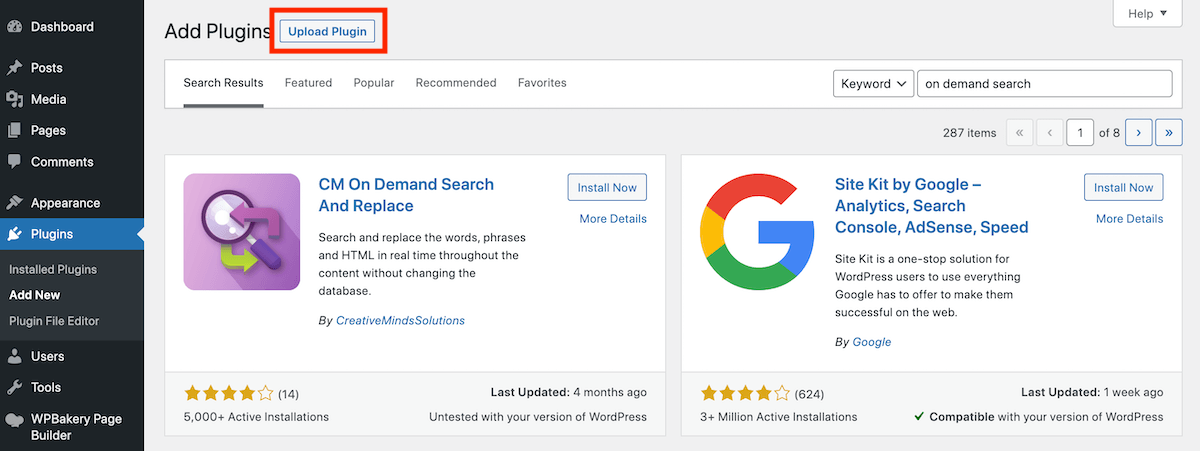
To install CM WordPress Search and Replace you first need to purchase a license plan from Creative Minds and download the plugin zip file. But leave your Creative Minds account open – you’ll need to come back to grab your license key soon!
Next log into your WordPress site, go to Plugins > Add New and click on the Upload Plugin button. Select the plugin zip file, click upload and follow the prompts to install and activate.
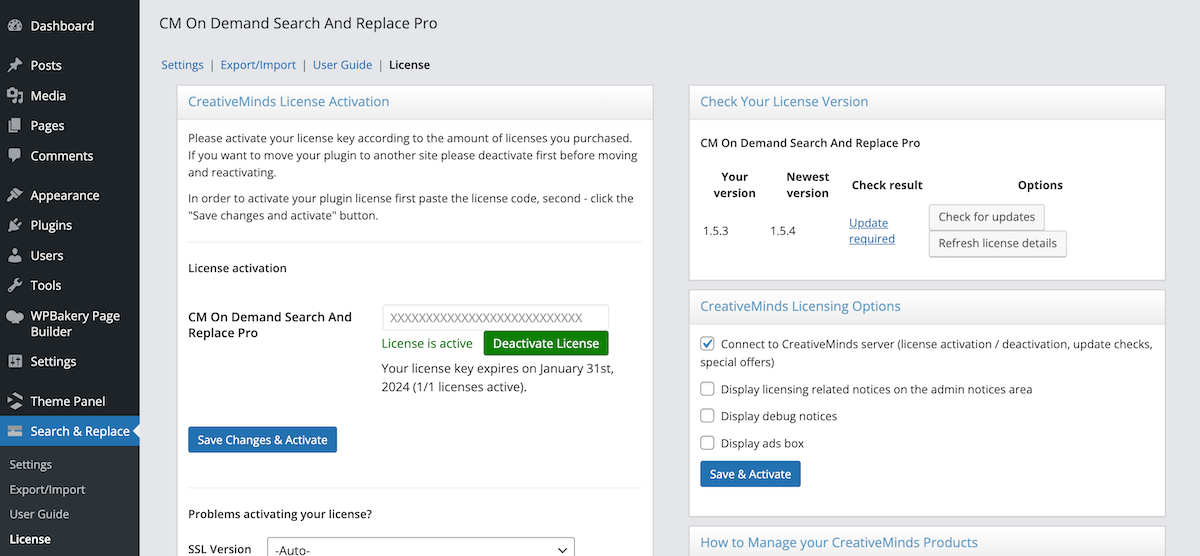
Once activated you should be taken to the License screen for the plugin. If you’re not, simply navigate to Search & Replace > License.
Here is where you will paste in your plugin license from your Creative Minds account. This way you’ll be sure to get all plugin updates and offers without a hitch!
Now that the plugin is ready to go, you can begin putting it to work.
Replacement Rules
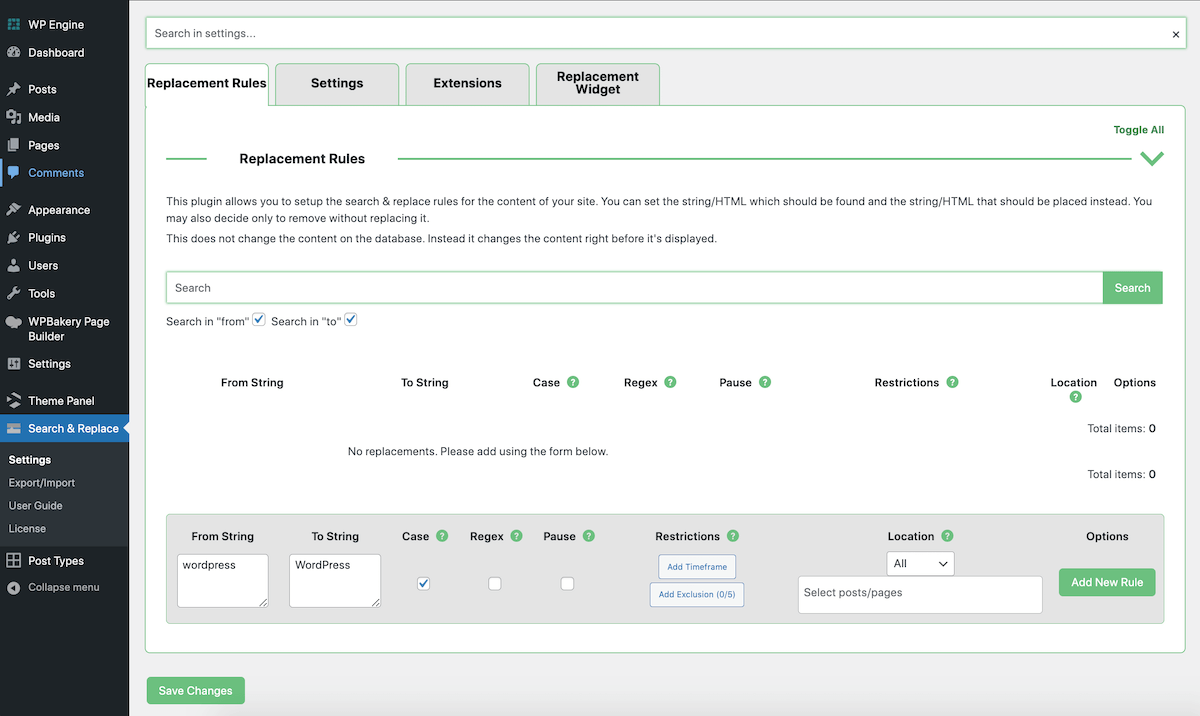
If you go to Settings you’ll find all of the options to create your search and replace rules plus defaults. The first tab for Replacement Rules is where you can create your rules. As your creating, here are a few important tips to keep in mind:
- From String: content to be removed/replaced
- To String: new content to be added
- Case: enable case sensitivity
- Regex: be sure to check this box if you want to add a pattern for your search string using Regex
- Pause: pause this specific rule so it does not find/replace
- Restrictions: add a specific date range for the rule to function or add exclusions (e.g. do not search within site title, page title, content, excerpt or comments)
- Location: choose specific posts, pages or post types to include or exclude
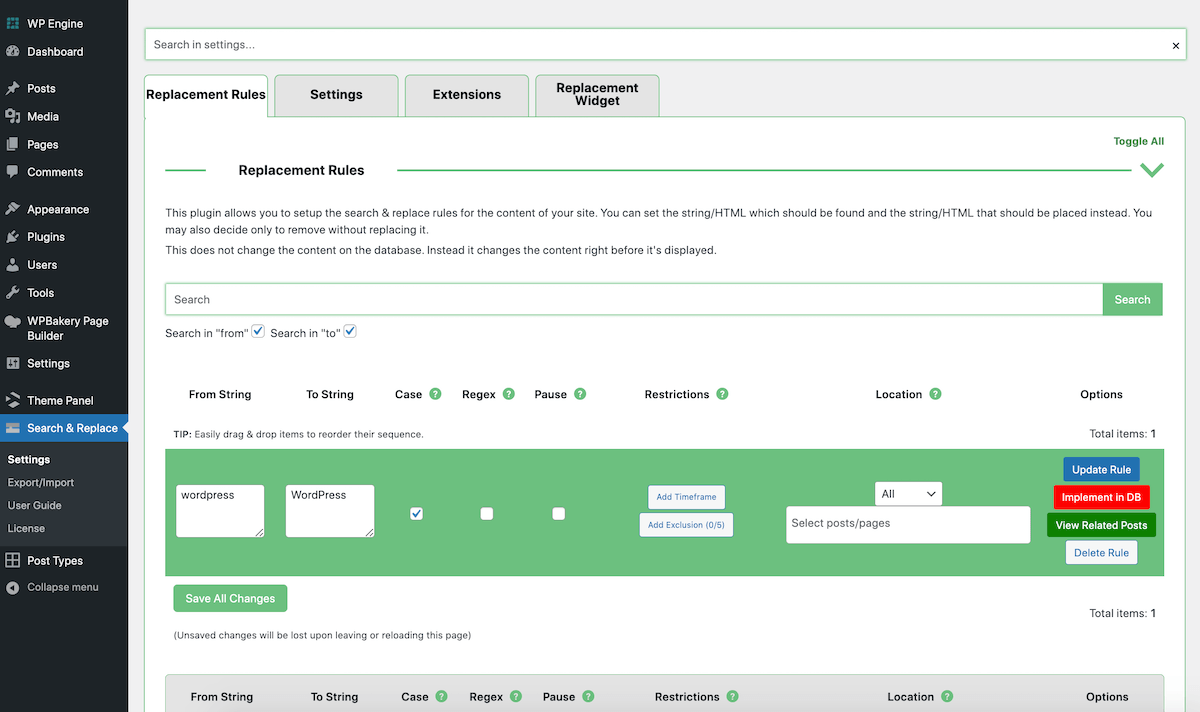
- Options: view related posts that meet the conditions of your rule, commit a rule’s changes to your database and update rule settings (note: these options are not available until you create and save a rule)
Settings
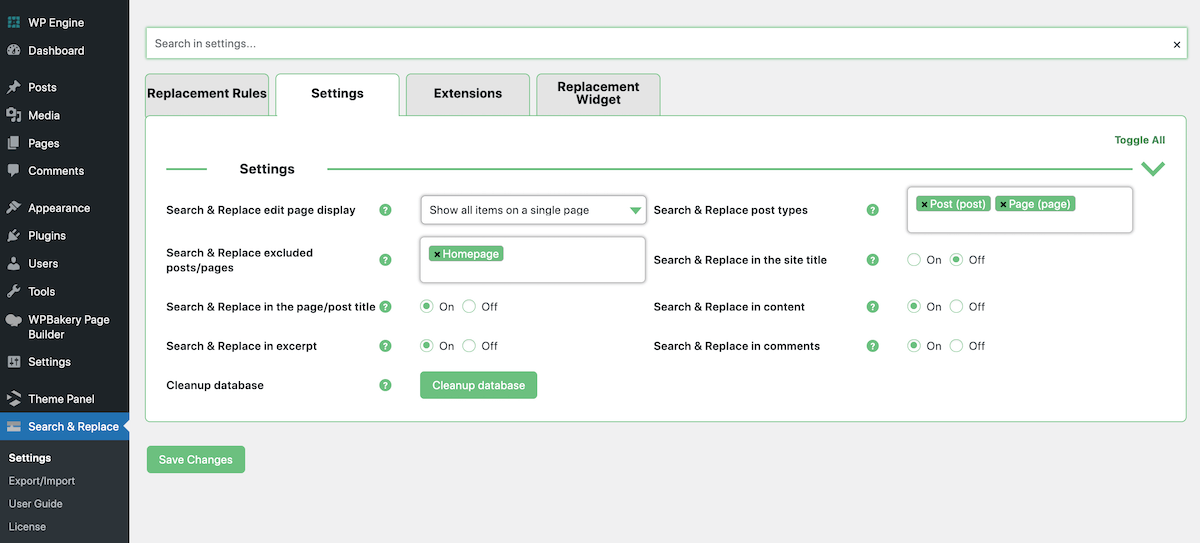
Next, in the Settings tab you’ll find default options. In this section we suggest making sure you add any pages you always want excluded (such as your Privacy Policy) and enable Search & Replace for all of the content where you think you’ll want to use it. In the above example we enabled it for all areas and available post types except the Site Title.
Last, this is also where you can find a button to Cleanup Database. If you want to remove all previous CM WordPress Search and Replace data stored in your database. Once you erase this data you can’t undo your decision – so make sure you’re sure before clicking.
Extensions
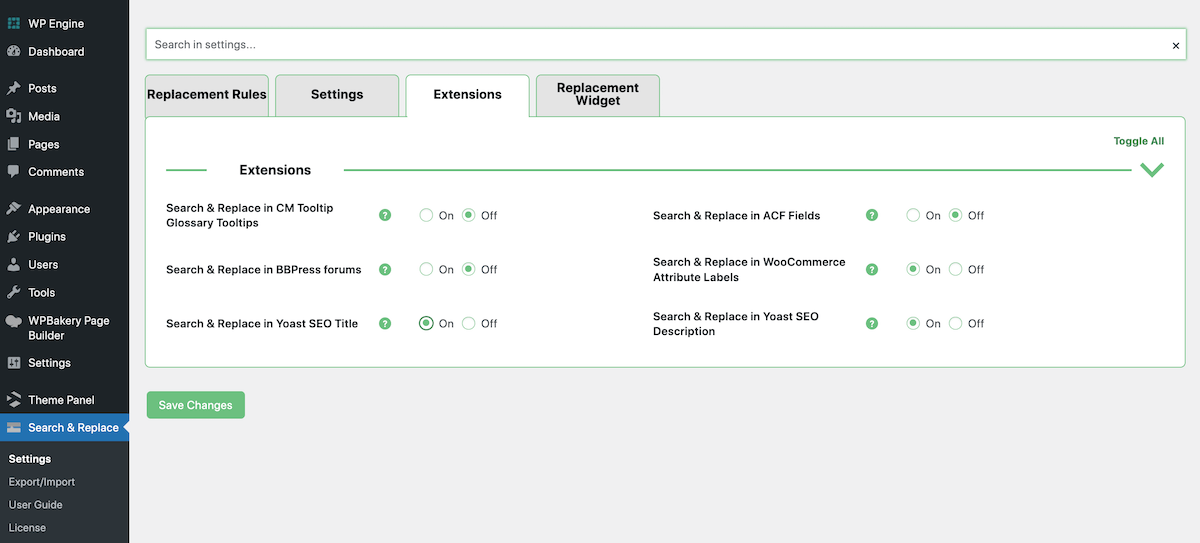
Up next is the Extensions tab where you’ll find toggles to enable support for various plugins. These include CM Tooltip Glossary, Advanced Custom Fields (ACF), WooCommerce and Yoast. If you are using any of these plugins it might be wise to enable the extension so you can search and replace within the plugin(s) content.
Replacement Widget
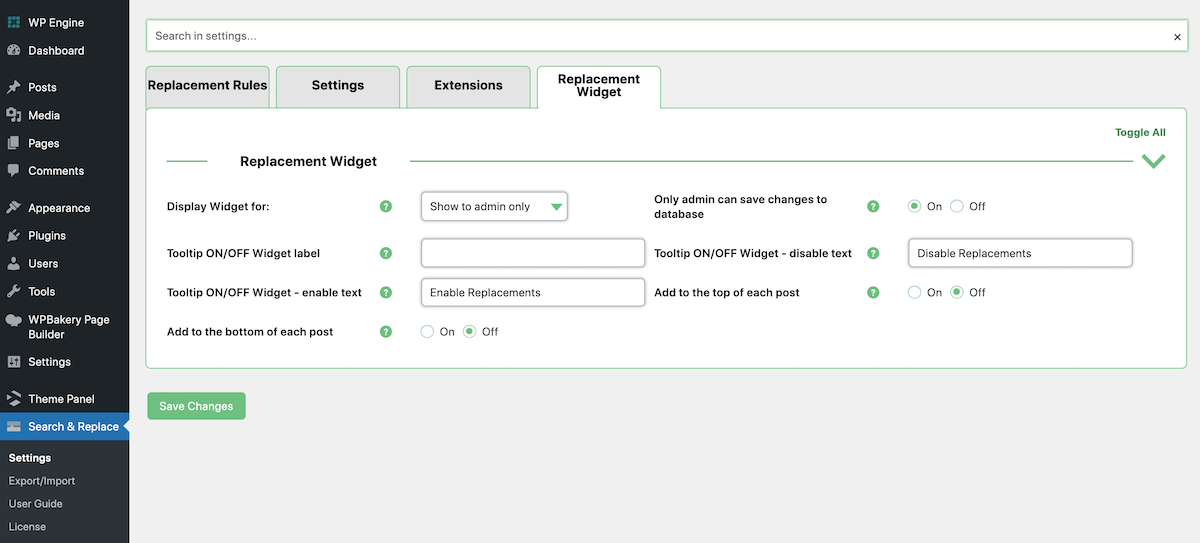
And the last tab offers settings for the Replacement Widget, which you can add to your site to access CM WordPress Search and Replace features from the frontend of your site.
Here we would suggest making sure you select a Display Widget for option. We chose Admin only, since we don’t want subscribers or visitors accessing the widget.
Now that you have an idea of how the plugin works, let’s create a few rules!
Use Cases
We quickly mentioned how you can leverage the CM WordPress Search and Replace plugin to manage a variety of updates on your site. So let’s take a more in-depth look at how this might be accomplished.
Profanity Filter

With CM WordPress Search and Replace Pro (or even free) you can create a quick profanity filter with very little effort. Just add in the word you want to avoid and the word you want to have displayed instead and click save.

And when we say profanity it doesn’t have to be just curse words. Perhaps you don’t want commenters mentioning a specific competitor in your comments section but you still want to be able to mention them in your blog posts. In this case, you would create your rule and check the option for
Temporary Product Rebrand
If you operate a storefront, or really any e-commerce business, you may have seasonal promotions. For example a monthly bundle or featured product. And if you do it’s very likely that you reference your featured product in a number of places on your site to give it as much exposure as possible. But rather than

When creating your rule just add a time frame. In this scenario it would be for the duration of a month, so our “March Bundle” would read “April Bundle” throughout our website. Then you can always come back and update the rule for new verbiage and dates. Easy as pie!
New Website URL
Maybe an affiliate program has switched to a new platform for links, or you’ve migrated to a new domain name, or perhaps you’ve finally moved to HTTPS. Whatever the case, if you need to find and permanently replace a large number of URLS within your content then CM WordPress Search and Replace Pro can help.

In this case create your rule and save. Then you can click on the View Related Posts button to be sure that you’ve captured all of the content that needs updating. And finally, once you’re sure of your update click the button to Implement in DB and commit the replacements to your site database. That’s it – so much faster than individually updating posts!
Conclusion
At first glance a search and replace plugin may sound a bit niche. But once you dig into the features it’s easy to see that CM WordPress Search and Replace can be helpful to a variety of websites for a number of reasons. Especially the ability to enable temporary or permanent database changes.
Hopefully this guide has been helpful, but if you have any questions please leave them below. And if you do purchase CM WordPress Search and Replace Pro we’d love to hear how you’re using it on your site!


