SPanel for WordPress Quick Guide & Review

Today we’ll be looking at SPanel – a self titled all-in-one hosting platform. It’s a newer alternative to cPanel or Plesk which you may have seen before, and it’s an equally powerful server management portal to consider.
Created by Scala Hosting, SPanel pretty much has all the features that cPanel offers. SPanel also offers a dedicated WordPress management module named SWordPress Manager, which lets you manage your WordPress sites.
Following are the top features of the SWordPress Manager, which we’ll discuss in depth in part 5 of this article.
- Create, delete, and clone WordPress sites
- Create staging versions of WordPress sites
- Reset the WordPress admin password with a single click
- Enable/disable WordPress auto-updates
- Enable/disable WordPress security lock, which prevents users from installing new plugins or modifying WordPress files.
Table of Contents
Here’s a quick overview of this article:
- Setup a new SPanel admin account
- Create a new user account
- Add a new subdomain using SPanel (optional)
- How to install a free LetsEncrypt SSL
- Create a new WordPress site using SWordPress Manager
- Other SWordPress Manager features
For the purposes of this article we’ll be using a Scala Hosting managed VPS plan, so to follow along you’ll have to execute steps 1 and 2 before you can install WordPress. Let’s get started!
1. How to Setup a New SPanel Admin Account
If you purchase a Managed VPS hosting plan through Scala Hosting, you are required to set up the admin account for SPanel. The SPanel admin account is different from your general hosting account, and is used to do different things, as we’ll see later in this tutorial.
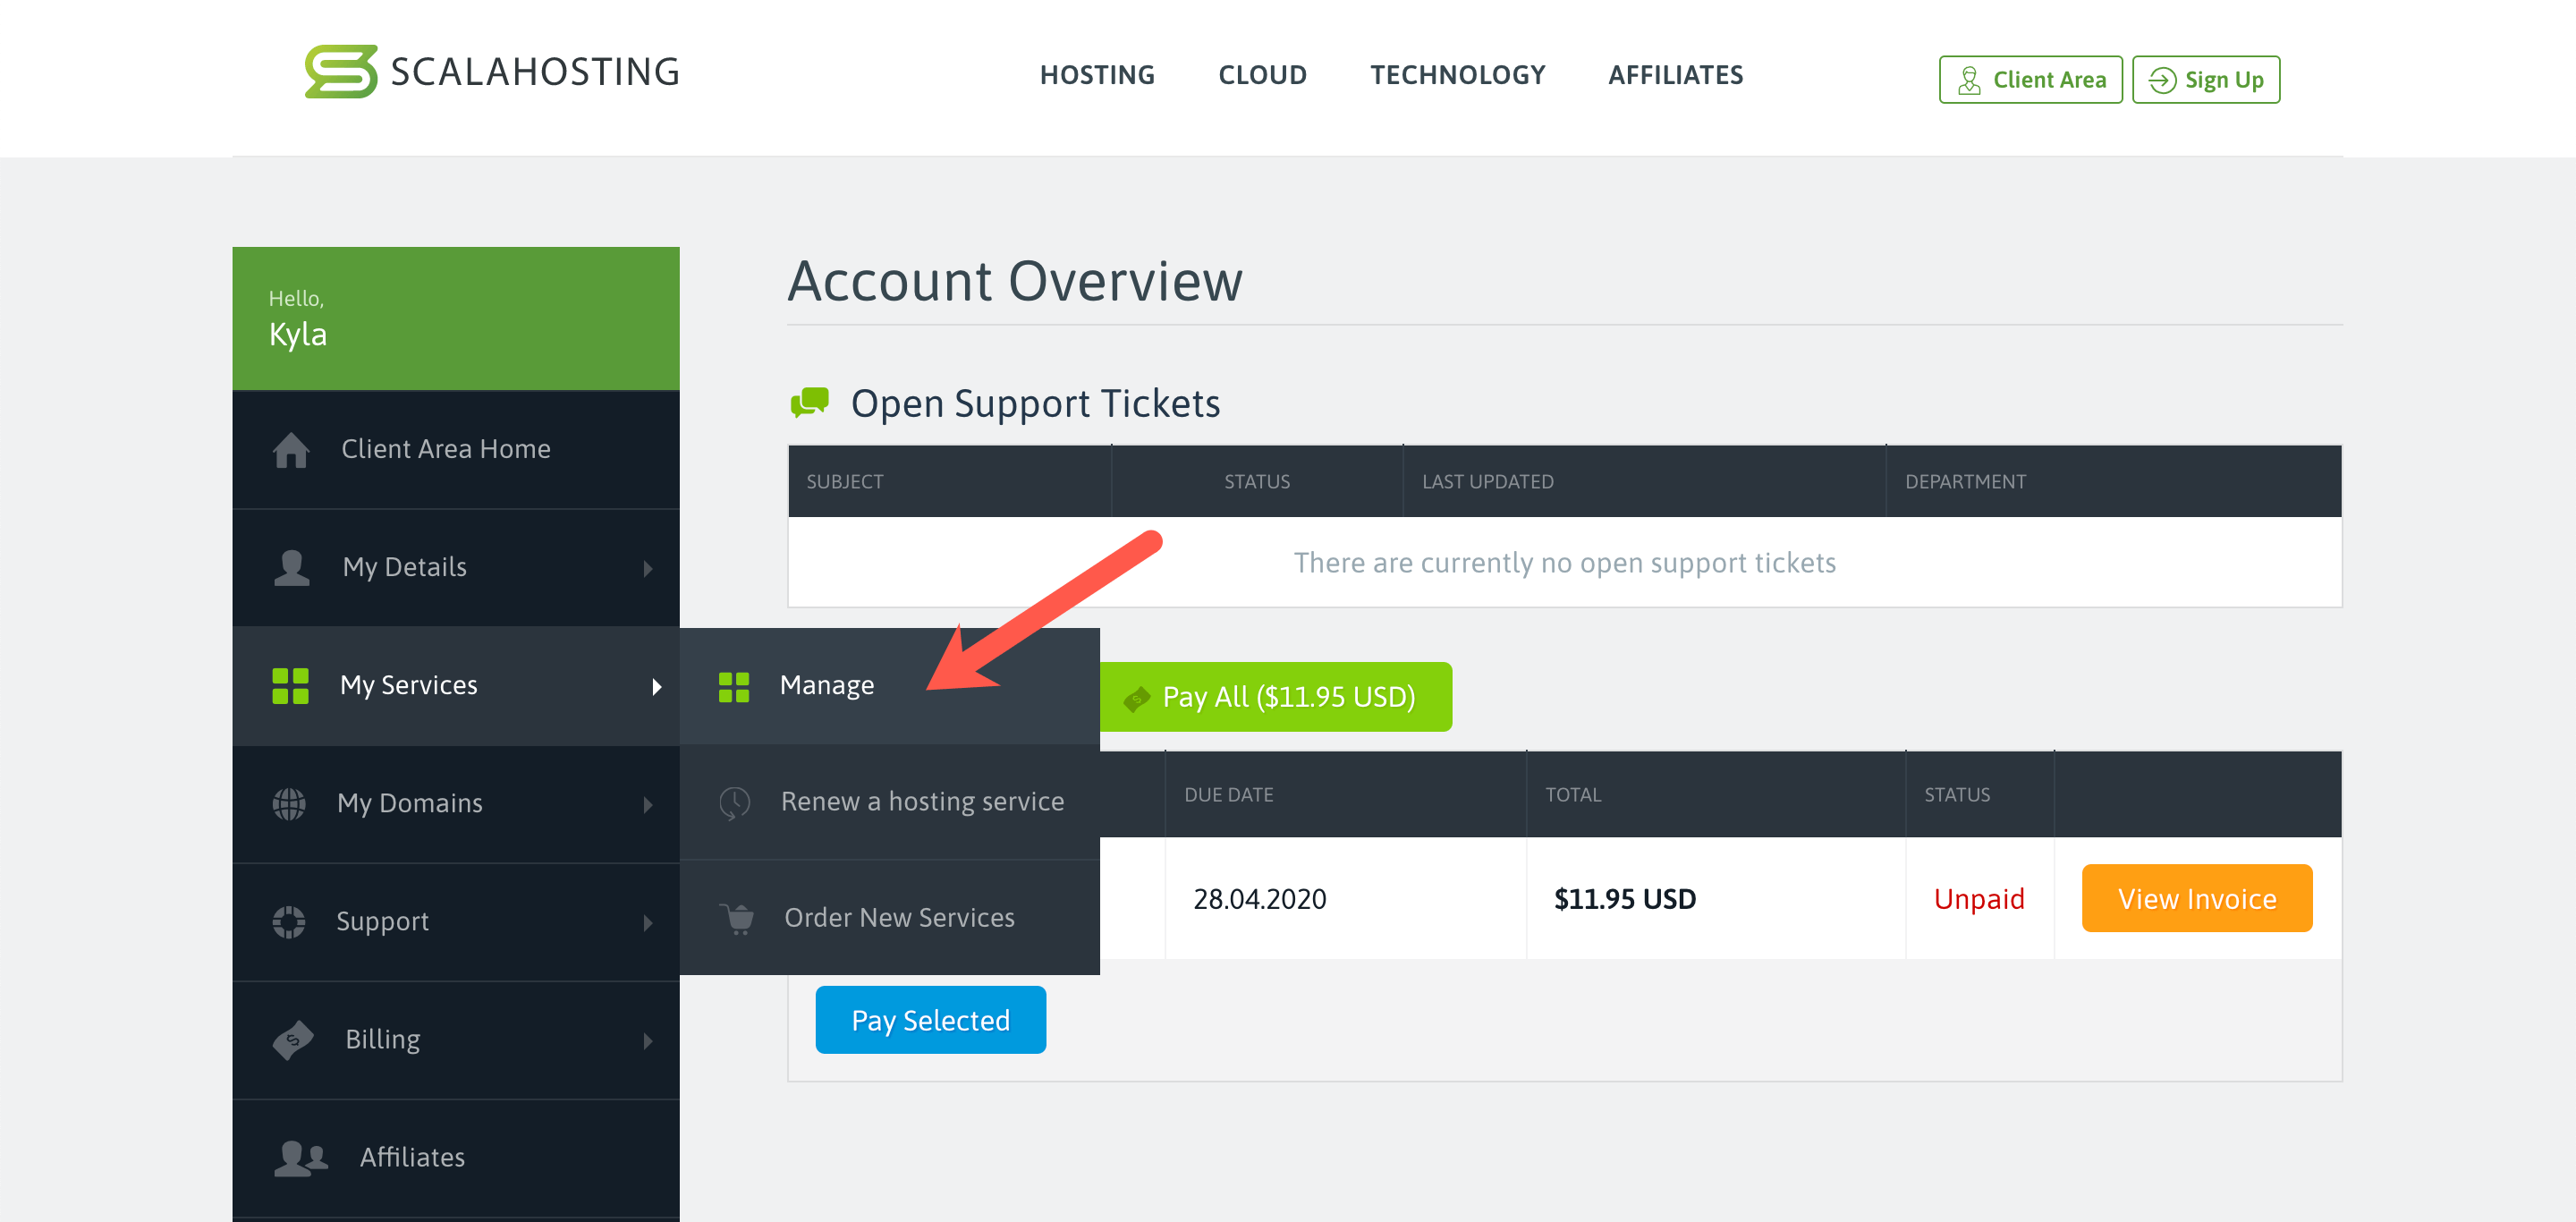
Step 1: Log in to the Client Area of your hosting account. Then, on the left sidebar, select My Services → Manage.
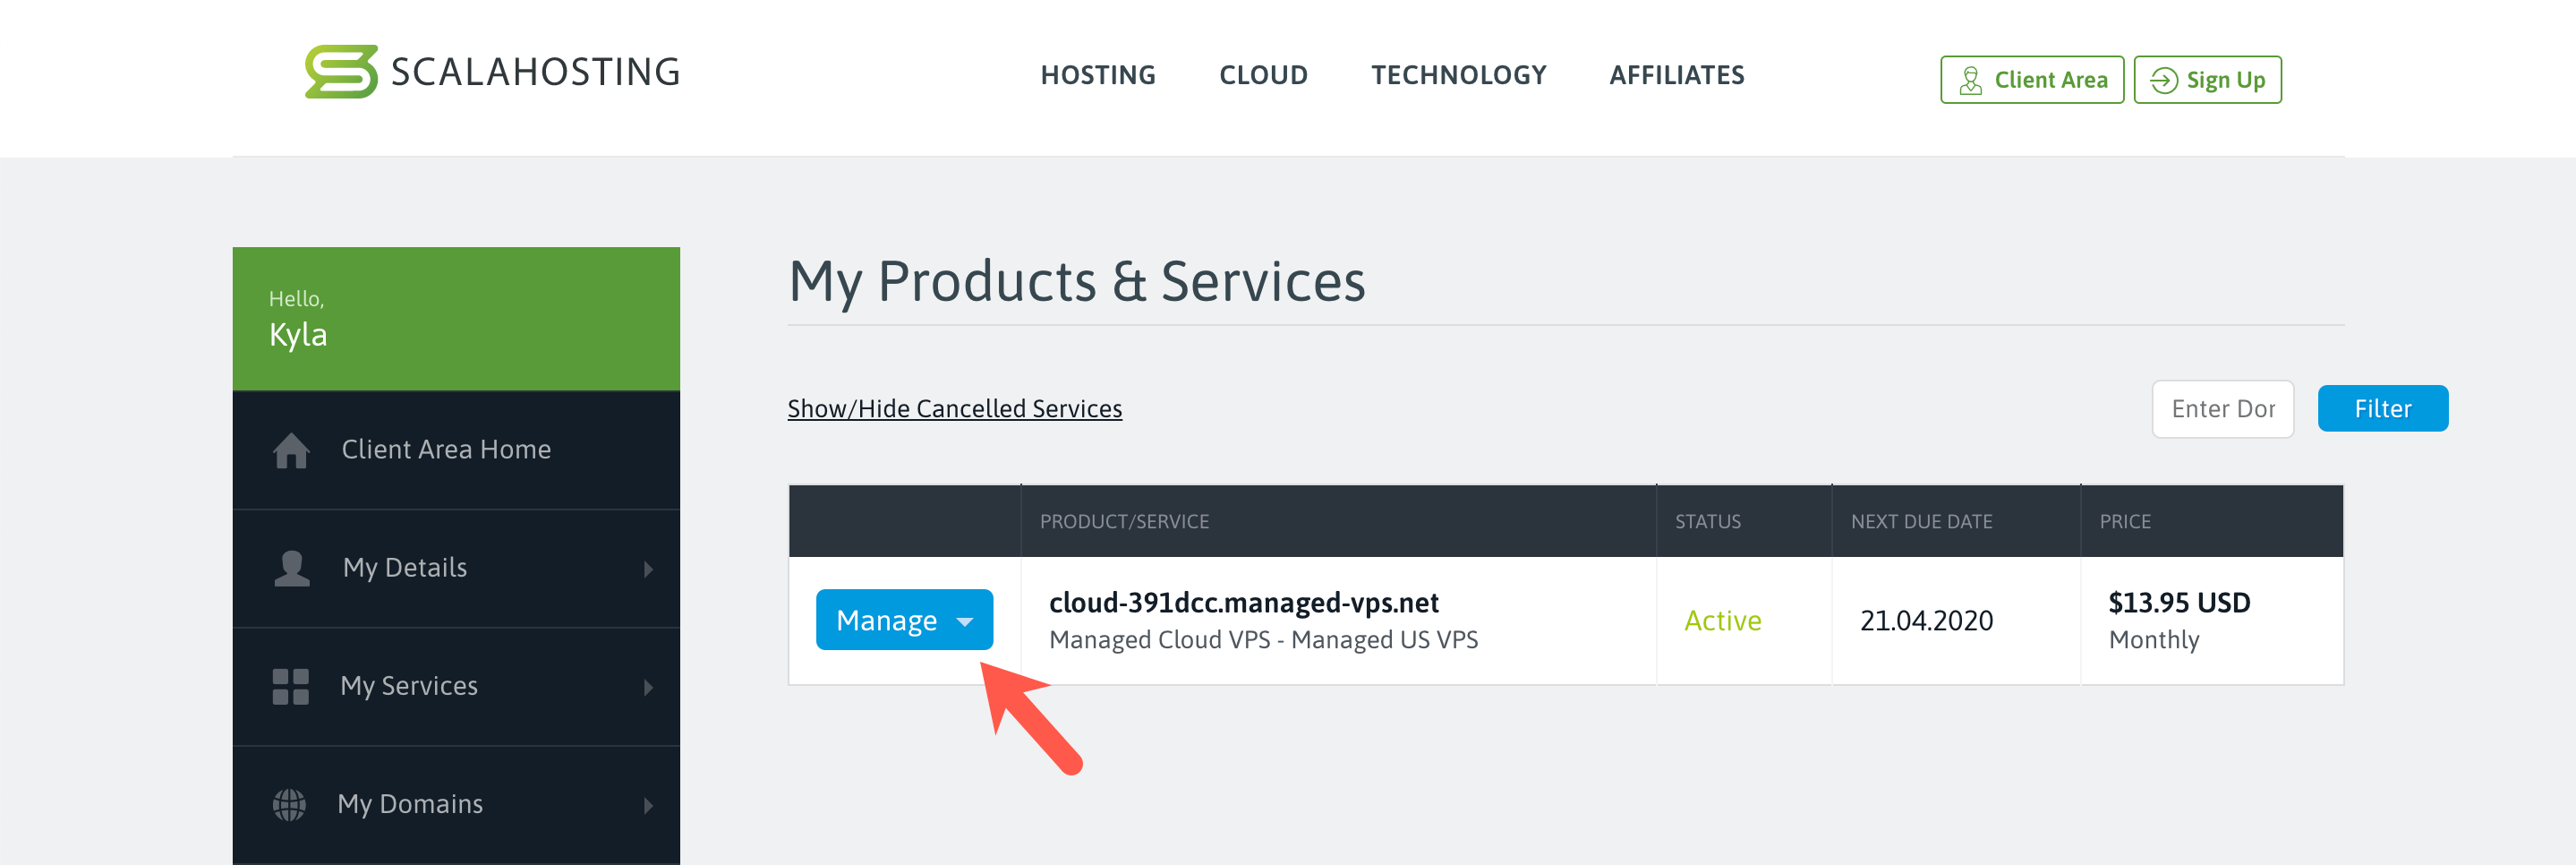
Step 2: You are now in the My Products & Services page. You should see the details of the Managed VPS listed in this page.
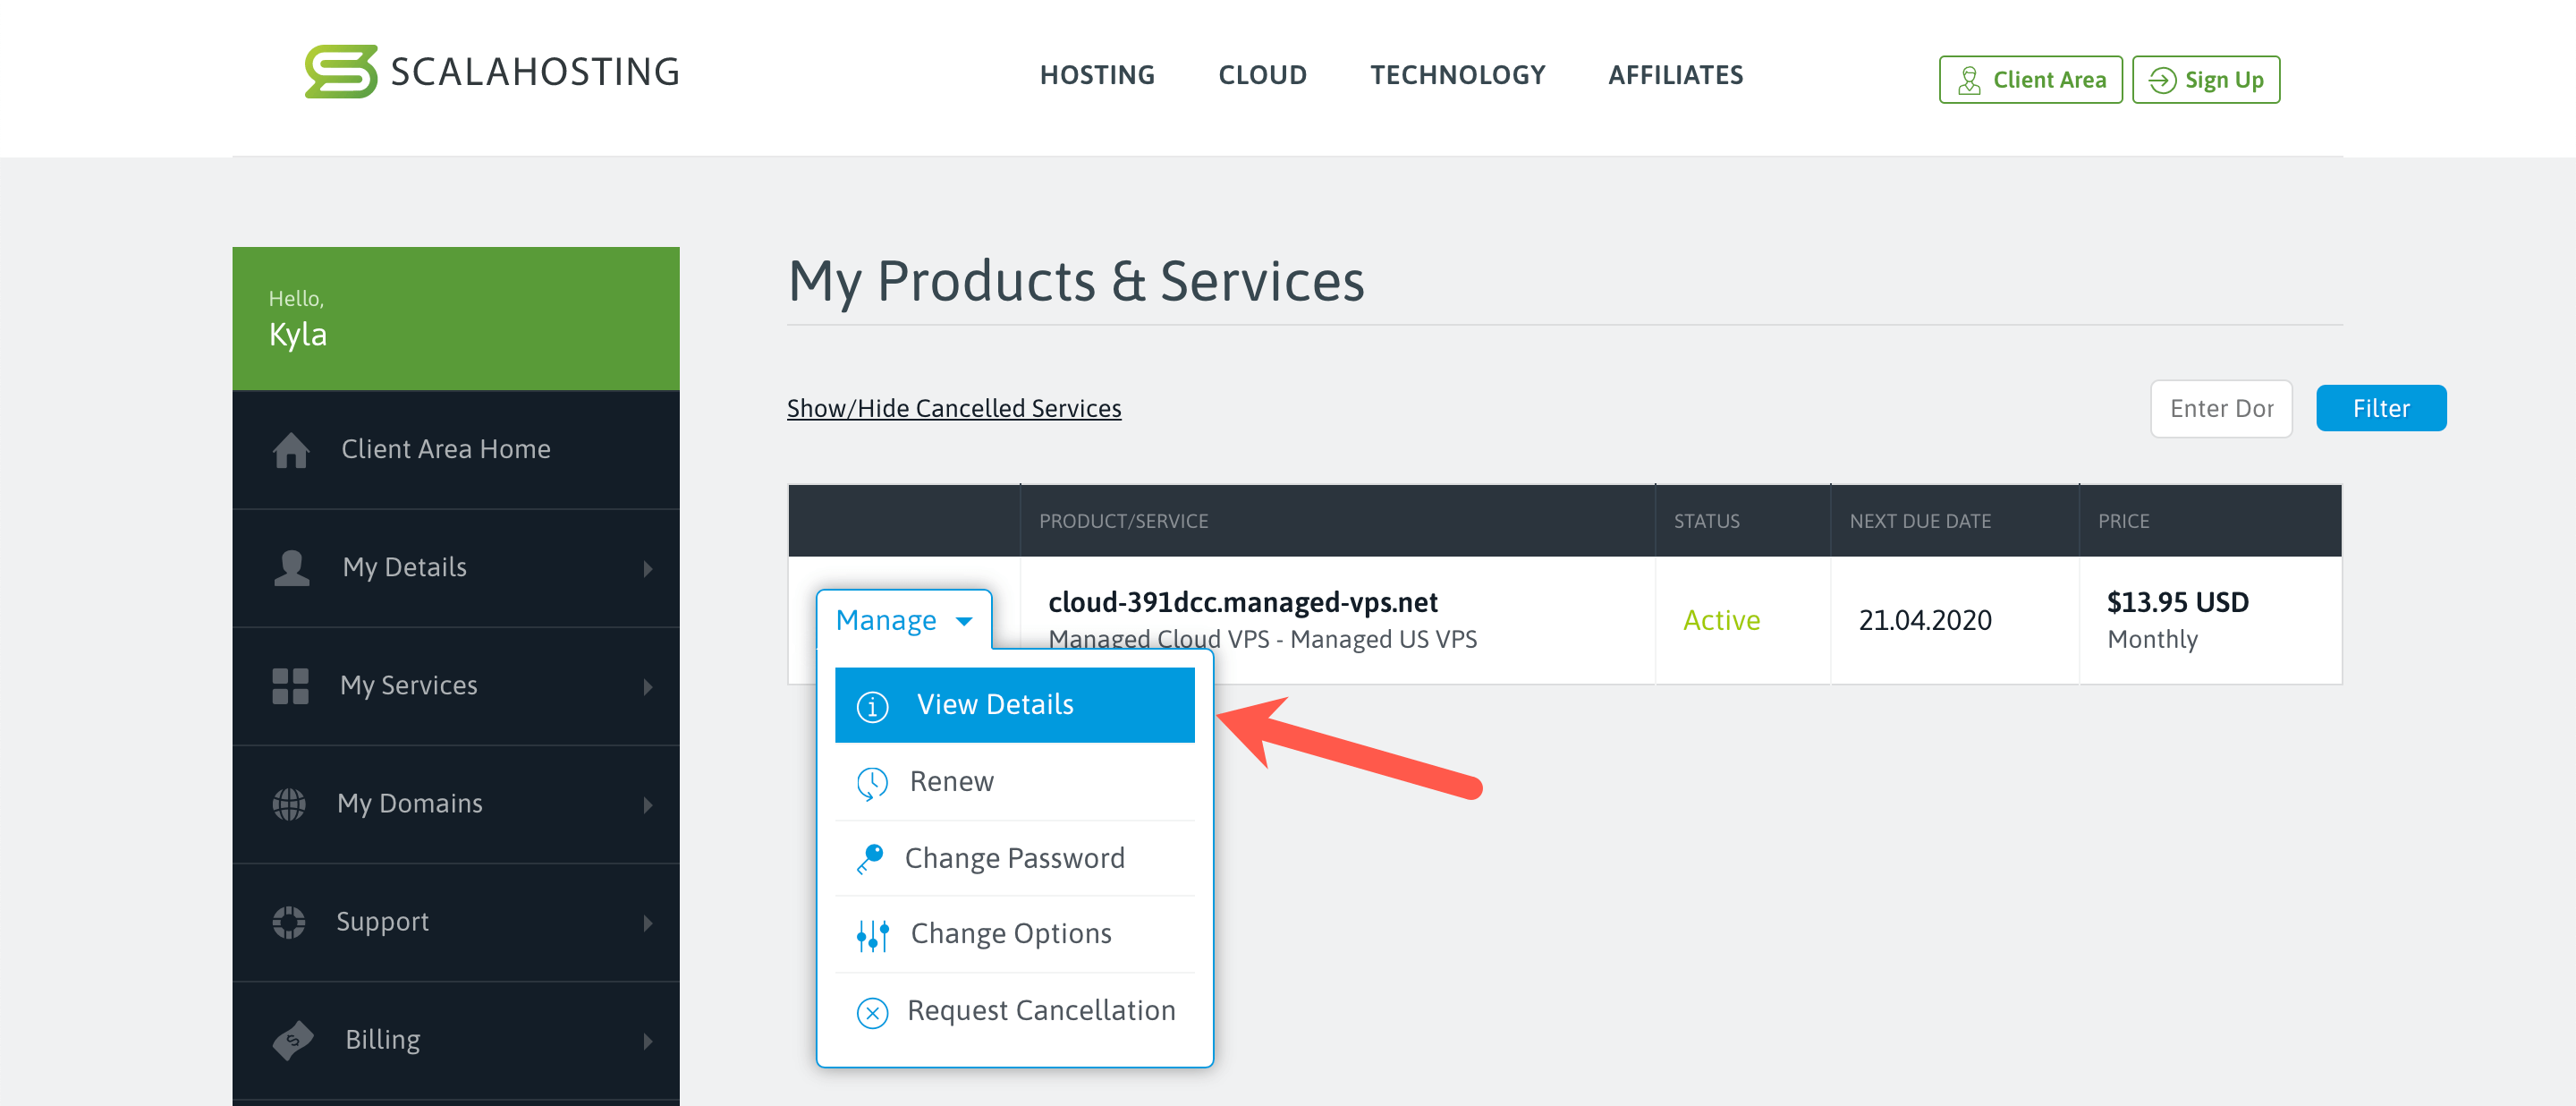
Step 3: On the same page, click on Manage → View Details.
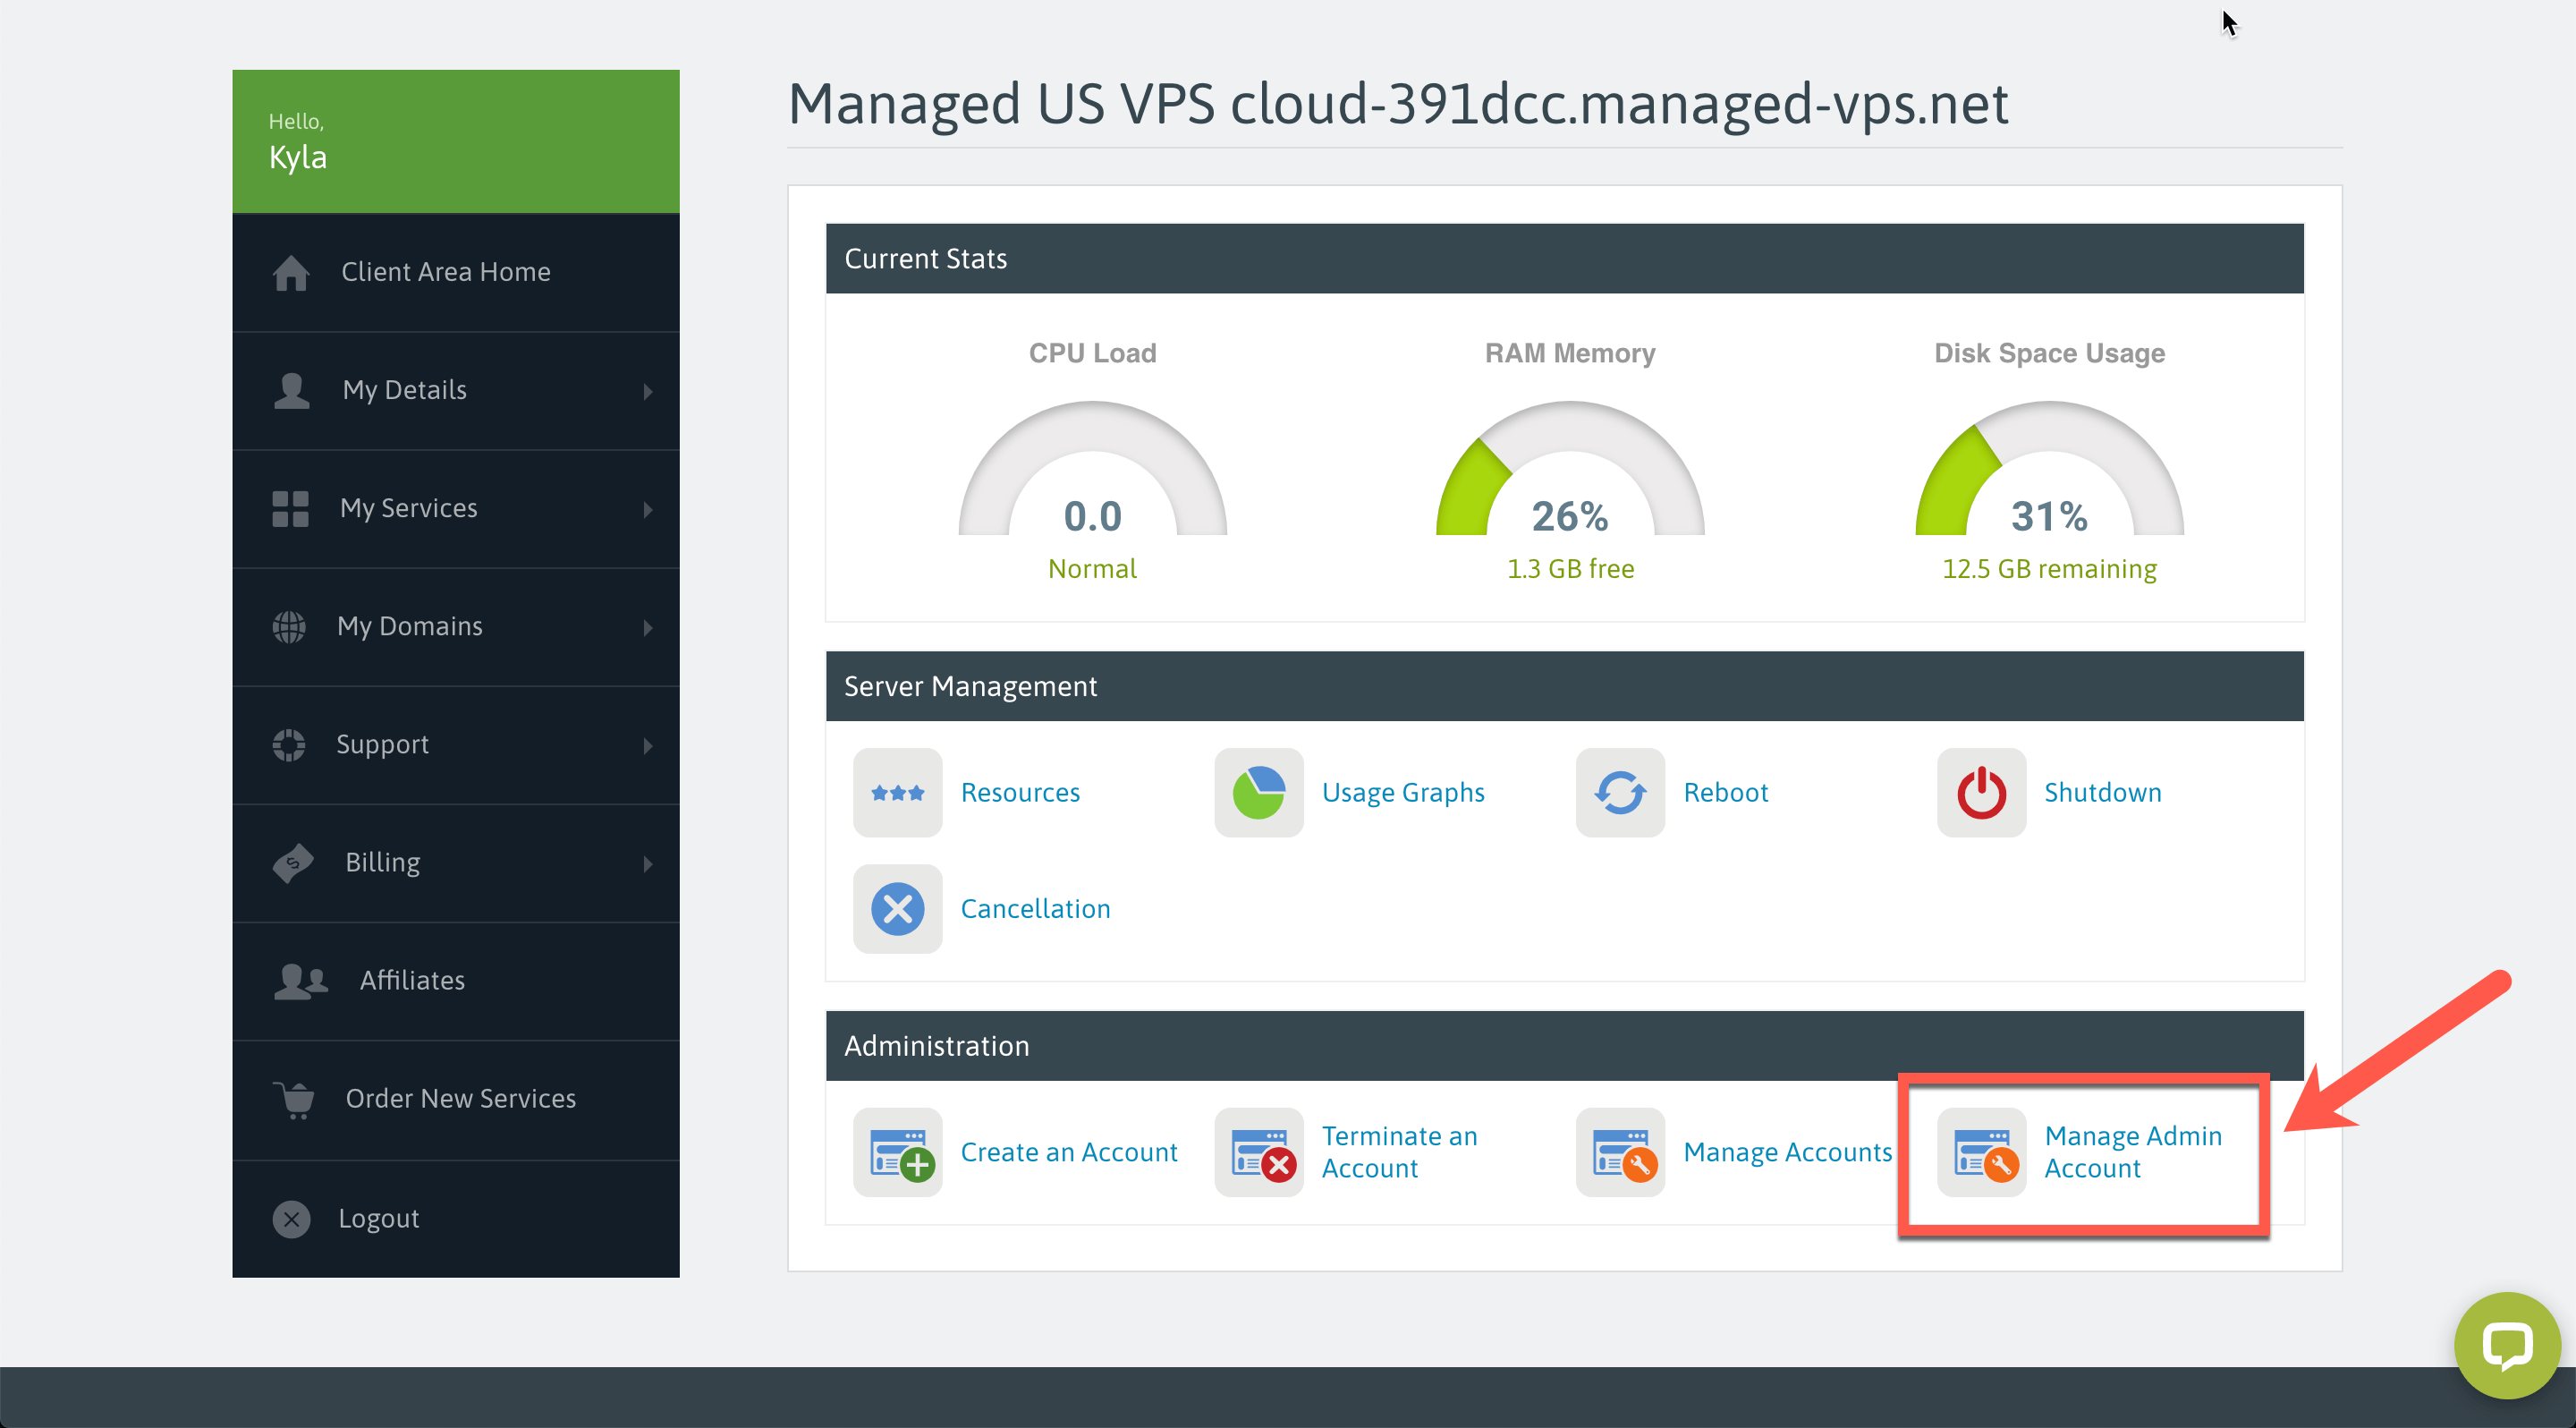
Step 4: Under the Administration tab, click Manage Admin Account.
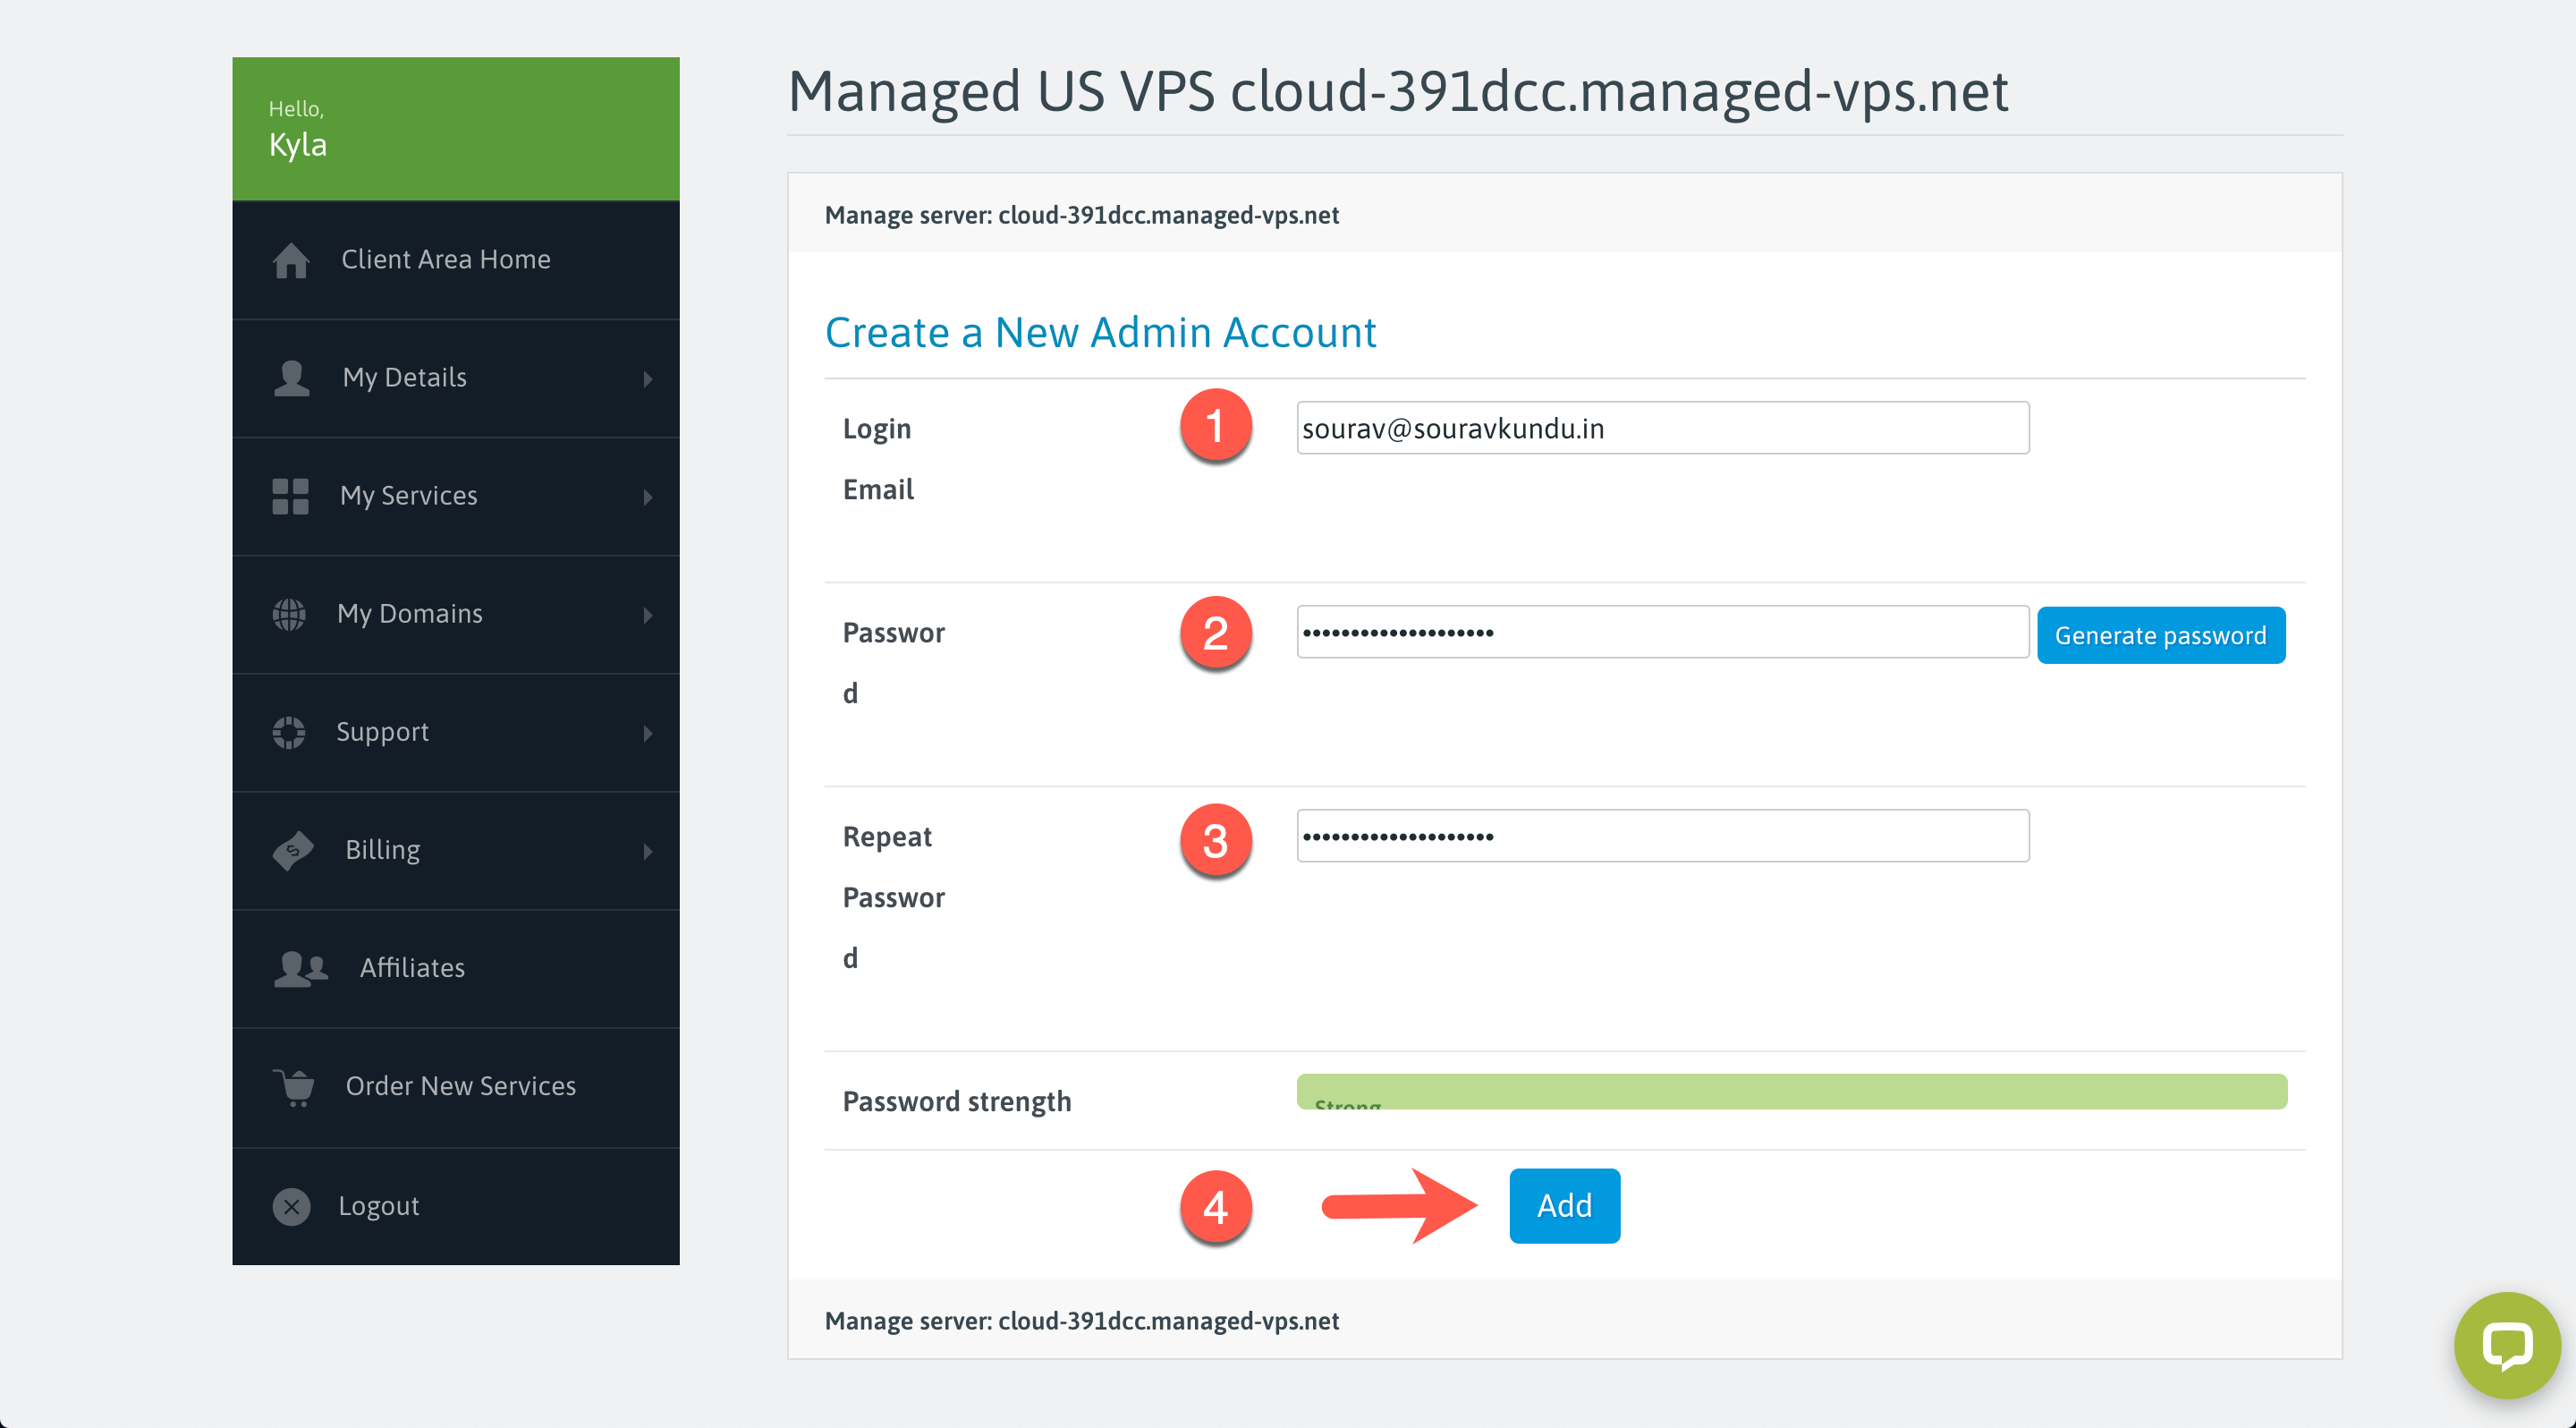
Step 5: Since this is the first time you are creating an admin account for SPanel, you will be brought to the Create a New Admin Account page. Enter the details as follows:
- Login email: This is the email you’ll use to login to SPanel. This can be different from the email that you’ve used to purchase your hosting plan.
- Password: Generate a strong password and save the details elsewhere.
- Repeat the same password used in step 2.
- Once you’ve saved the details, click on Add.
Step 6: Your new admin account for SPanel will be created with the details you had entered in the previous step.
2. Create a New User Account using SPanel
In the last section, we created a new admin account for SPanel. Now, it’s time to login to your Managed VPS’ SPanel.
The login URL is as follows:
https://<YOUR-HOSTNAME>/spanel/login
You can find your Managed VPS hostname from the hosting details email sent to you, or if using Scala Hosting in the Client Area (refer screenshot in Part 1, Step 2).
In this tutorial, the server hostname for the Managed VPS is:
cloud-391dcc.managed-vps.net
Therefore the SPanel login URL is:
https://cloud-391dcc.managed-vps.net/spanel/login
Note: If you try to use the server’s IP address instead of the hostname, you might get an SSL error.
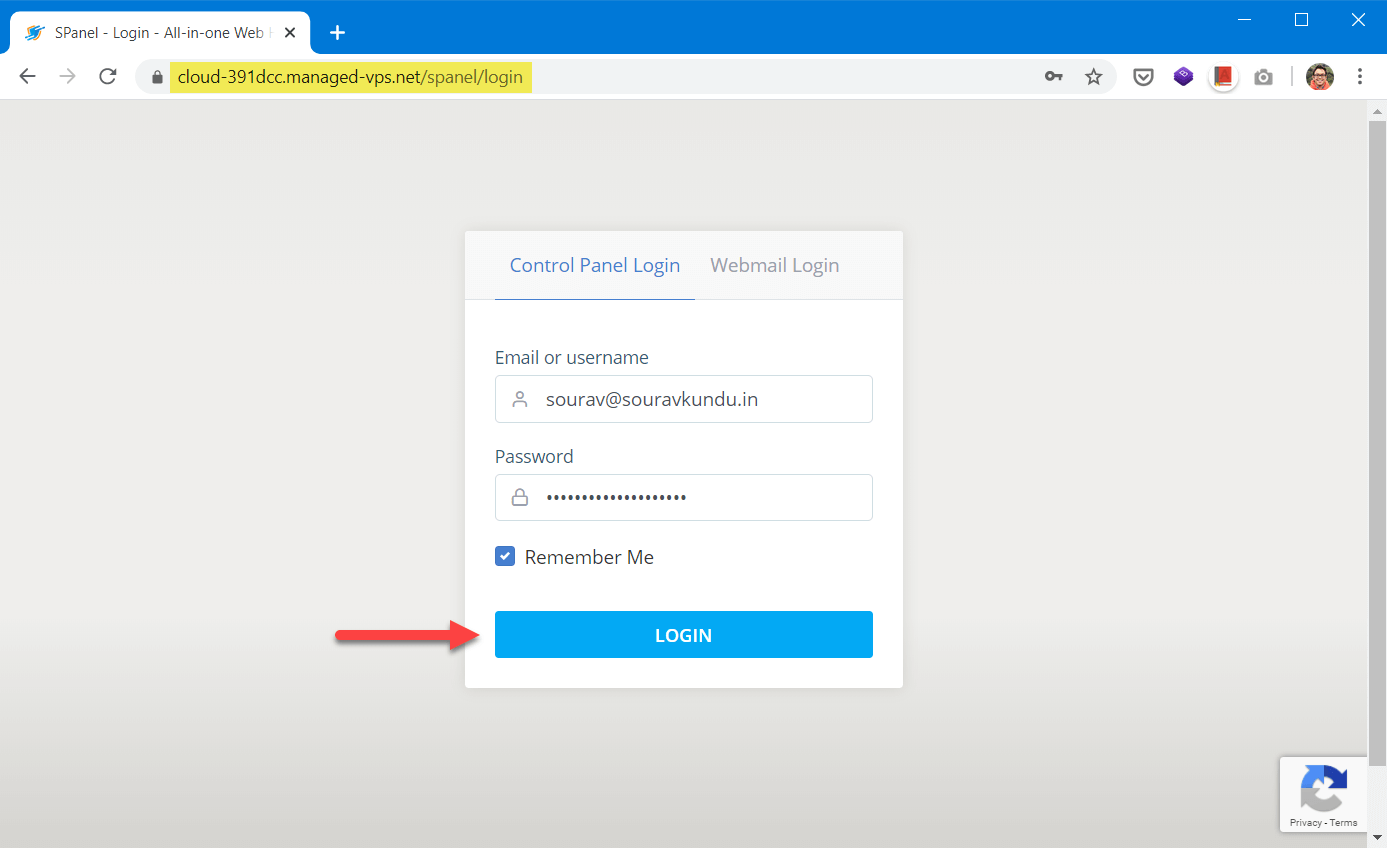
Enter the SPanel admin account’s email address and password that was created in Part 1, Step 5 and click on Login.
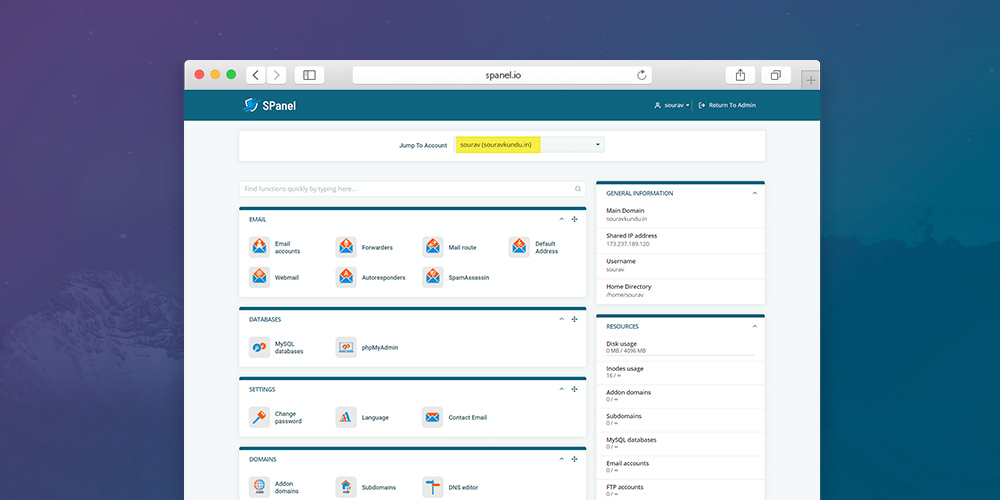
If you’ve done everything correctly so far, you should be able to login to the admin account of SPanel, as shown in the screenshot above.
You might be wondering about when we get to the part where we actually can install a WordPress site with the SWordPress Manager. Well, since this is a managed VPS, you need to first create a new user account in your VPS, which is linked to a domain name. Once that’s created, you can switch to that user account and finally install WordPress.
Here’s how you can create a new user account in Scala’s Managed VPS:
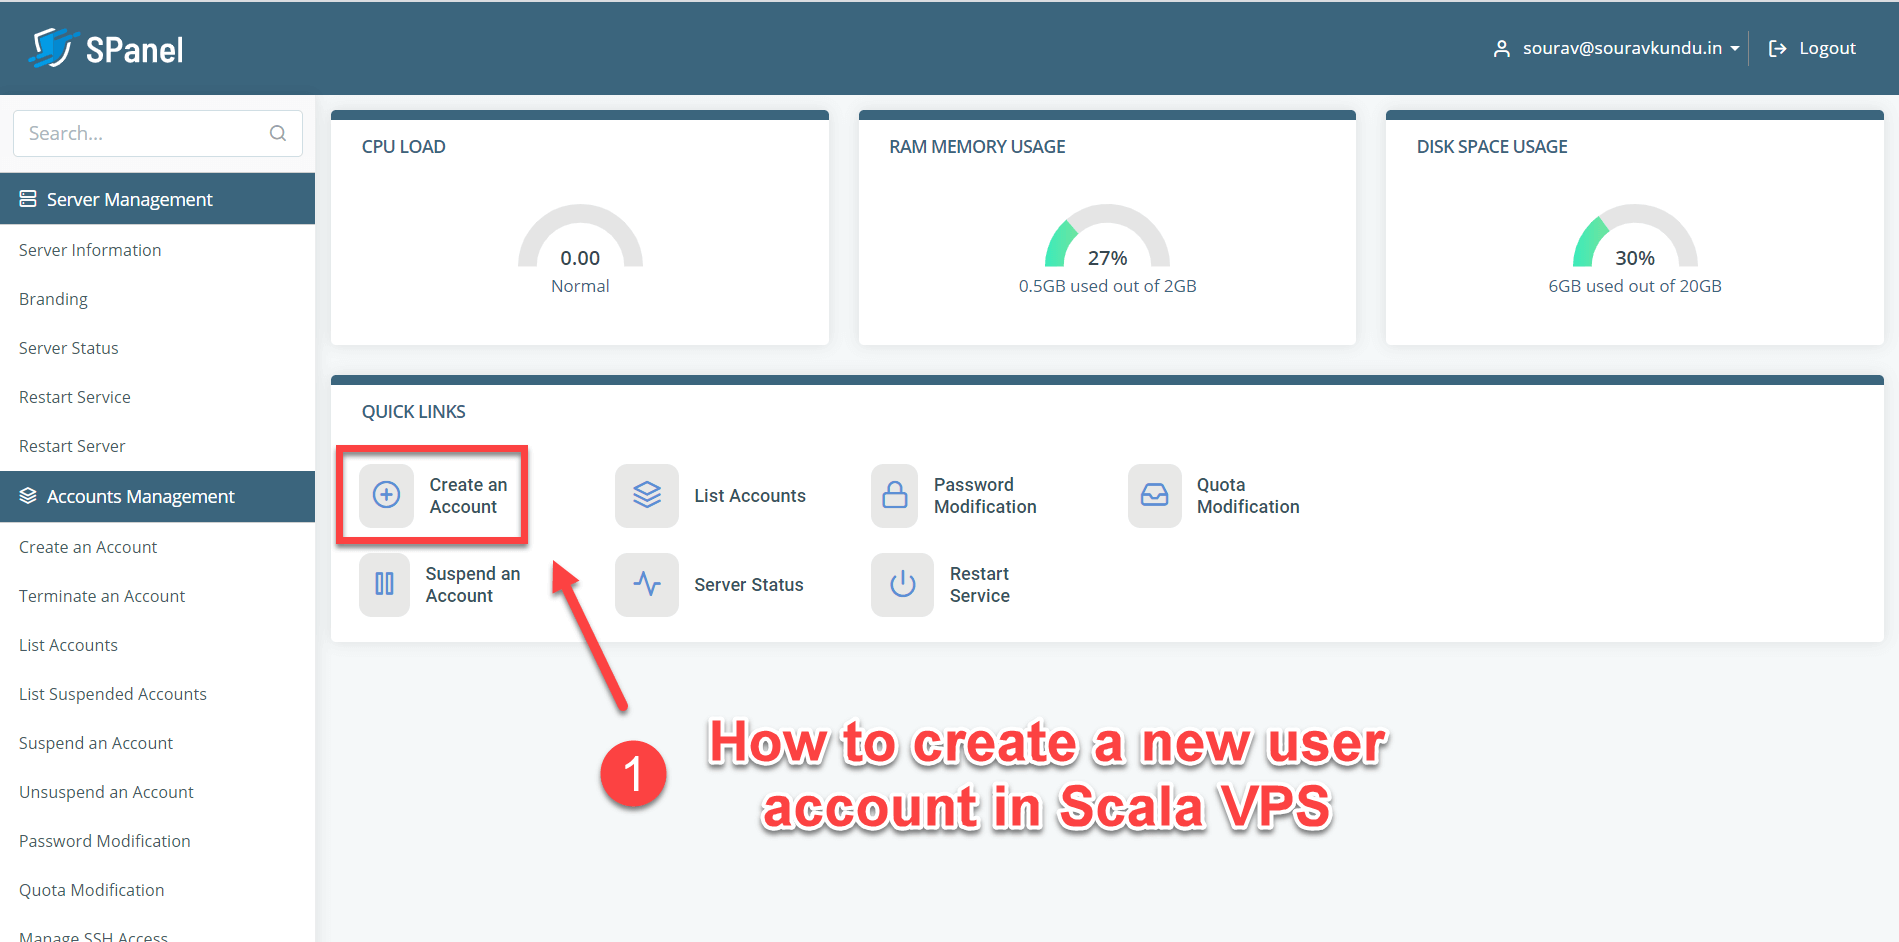
Step 1: Login to your SPanel admin account (you’ve already done this), and click on Create an Account.
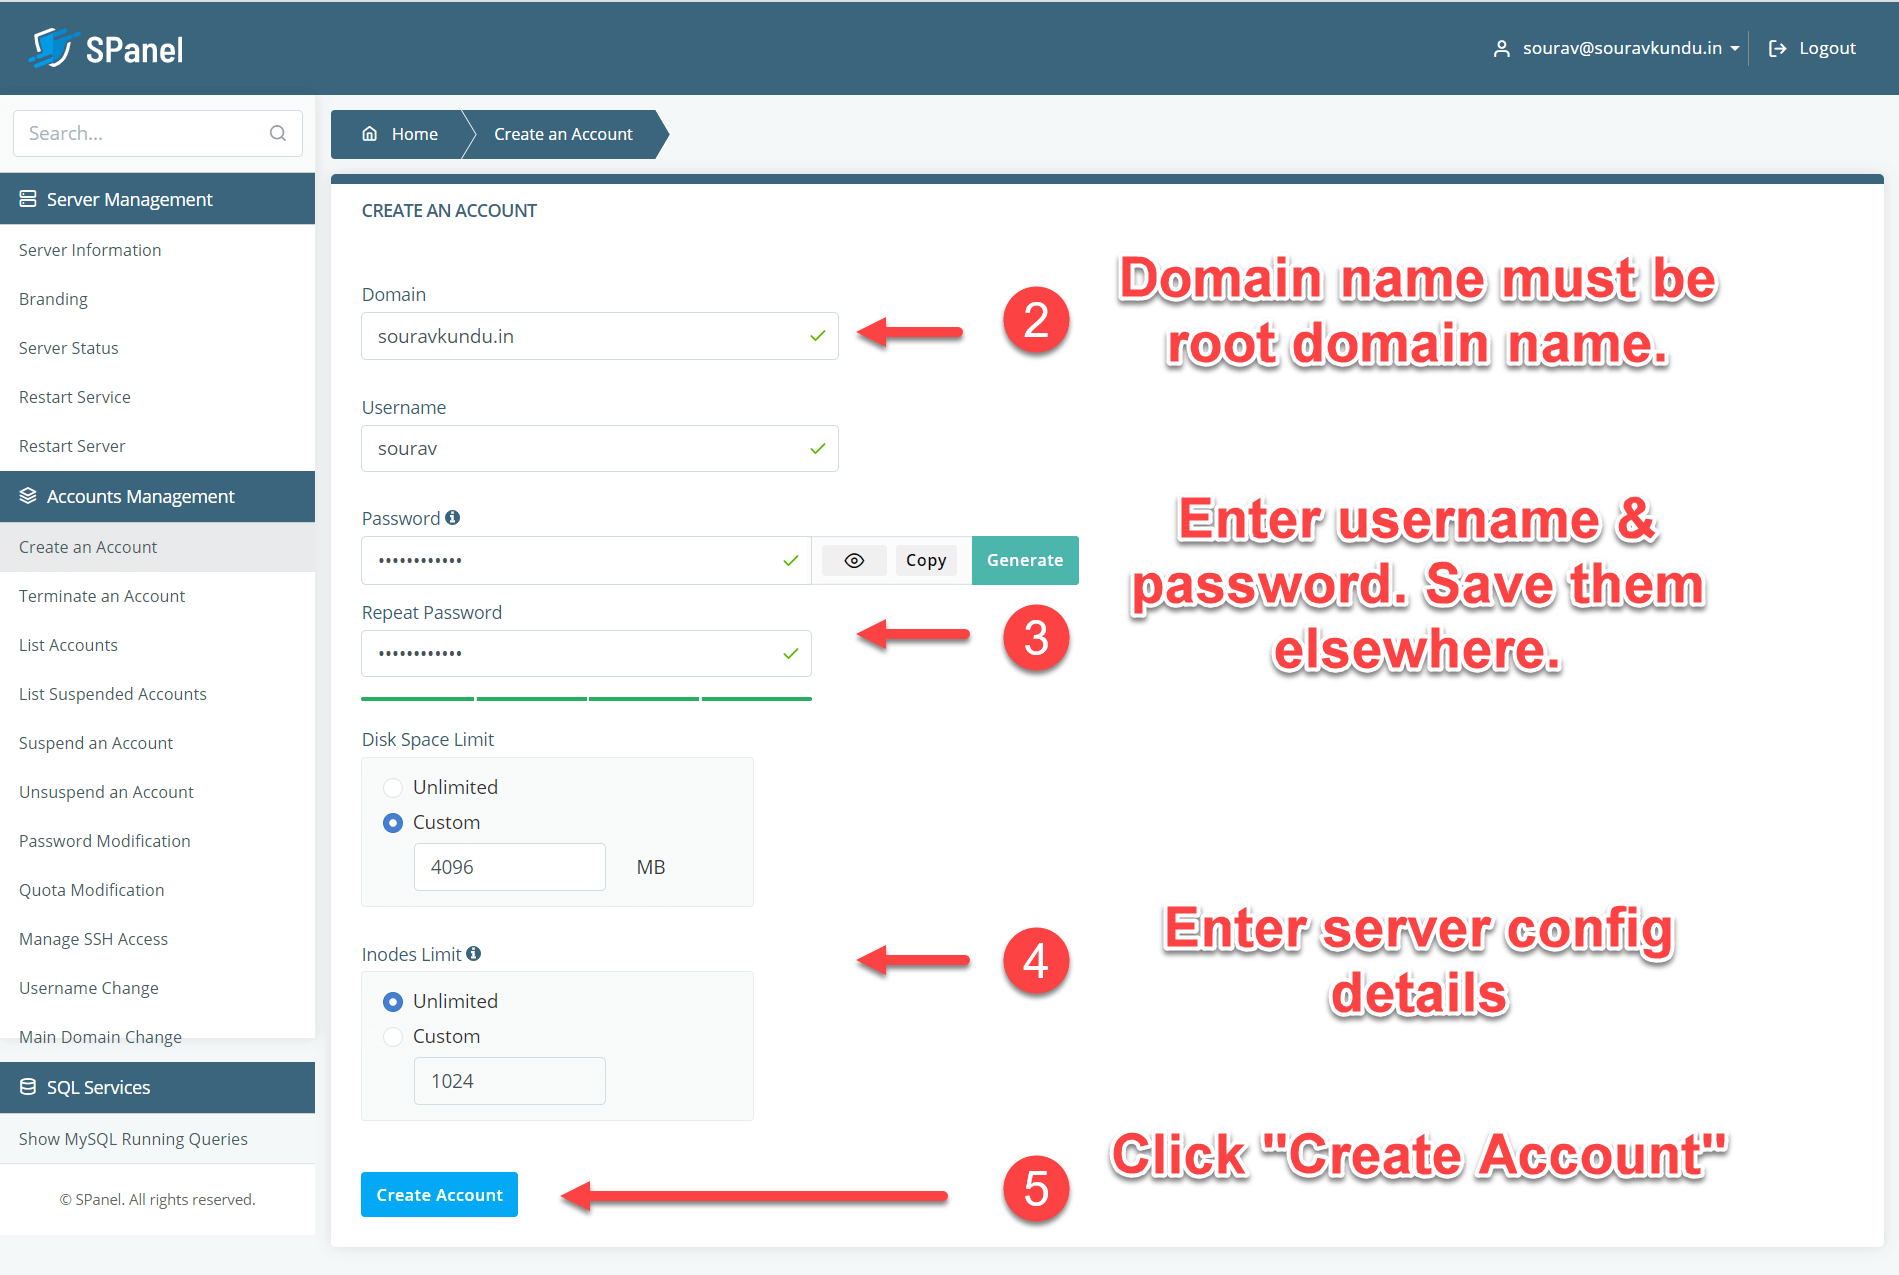
Step 2: This is the new user account creation page in SPanel. Enter the details as described below:
- Domain name: This is the domain name that you plan to use for your WordPress site. Even if you plan to use a subdomain for your WordPress site (such as scalawp.souravkundu.in), make sure that you enter only the root domain (i.e. souravkundu.in), and not the subdomain. If you enter a subdomain, WordPress won’t work. Later in this tutorial, we’ll show you how to install WordPress in a subdomain and/or a root domain.
- Username: This needs to be different from your SPanel admin account username. I’ve found that using a part of the domain name as the username makes it easy to remember and identify.
- Disk Space Limit: If you plan to host multiple WordPress sites in your Managed VPS, you can allocate only a certain portion of your total available disk space to each site. If you plan to host only one site, select the Unlimited option.
- Inodes Limit: If you’re using a single WordPress site, keep it selected as Unlimited.
- Once done, click on Create Account.
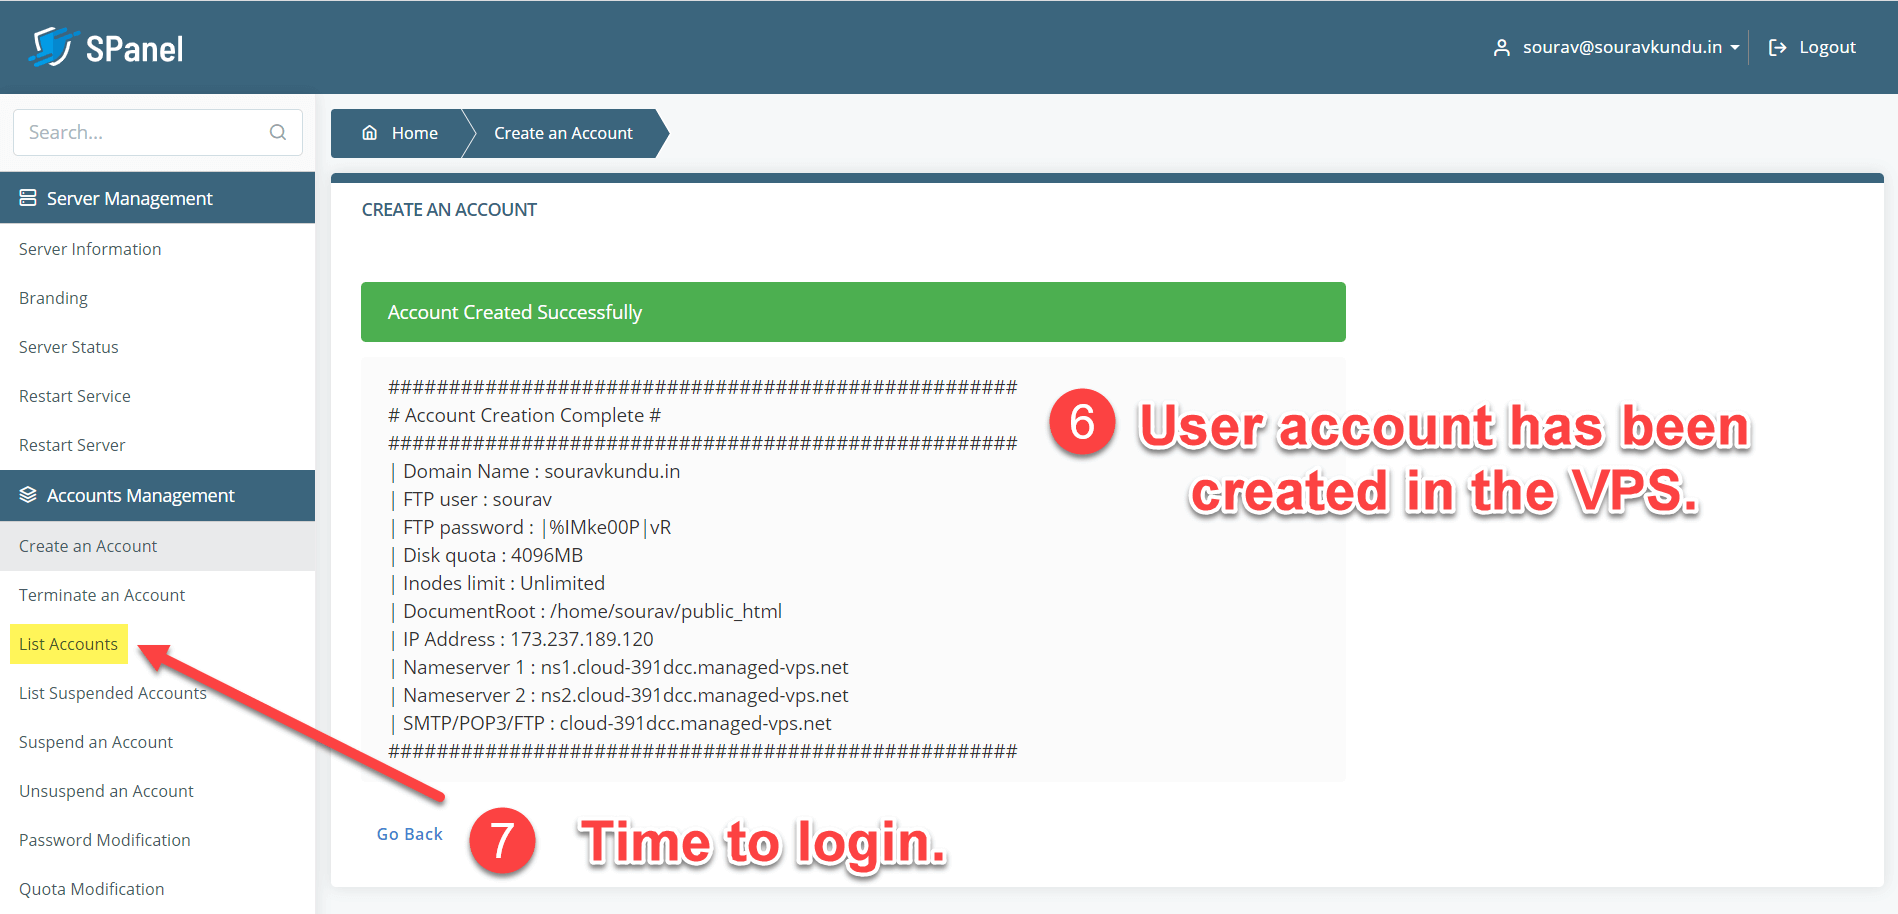
Step 3: Once the new user account is created, you will get a success message as shown in the screenshot above.
Now, it’s time to login to that newly created account. On the left sidebar, click on List Accounts.
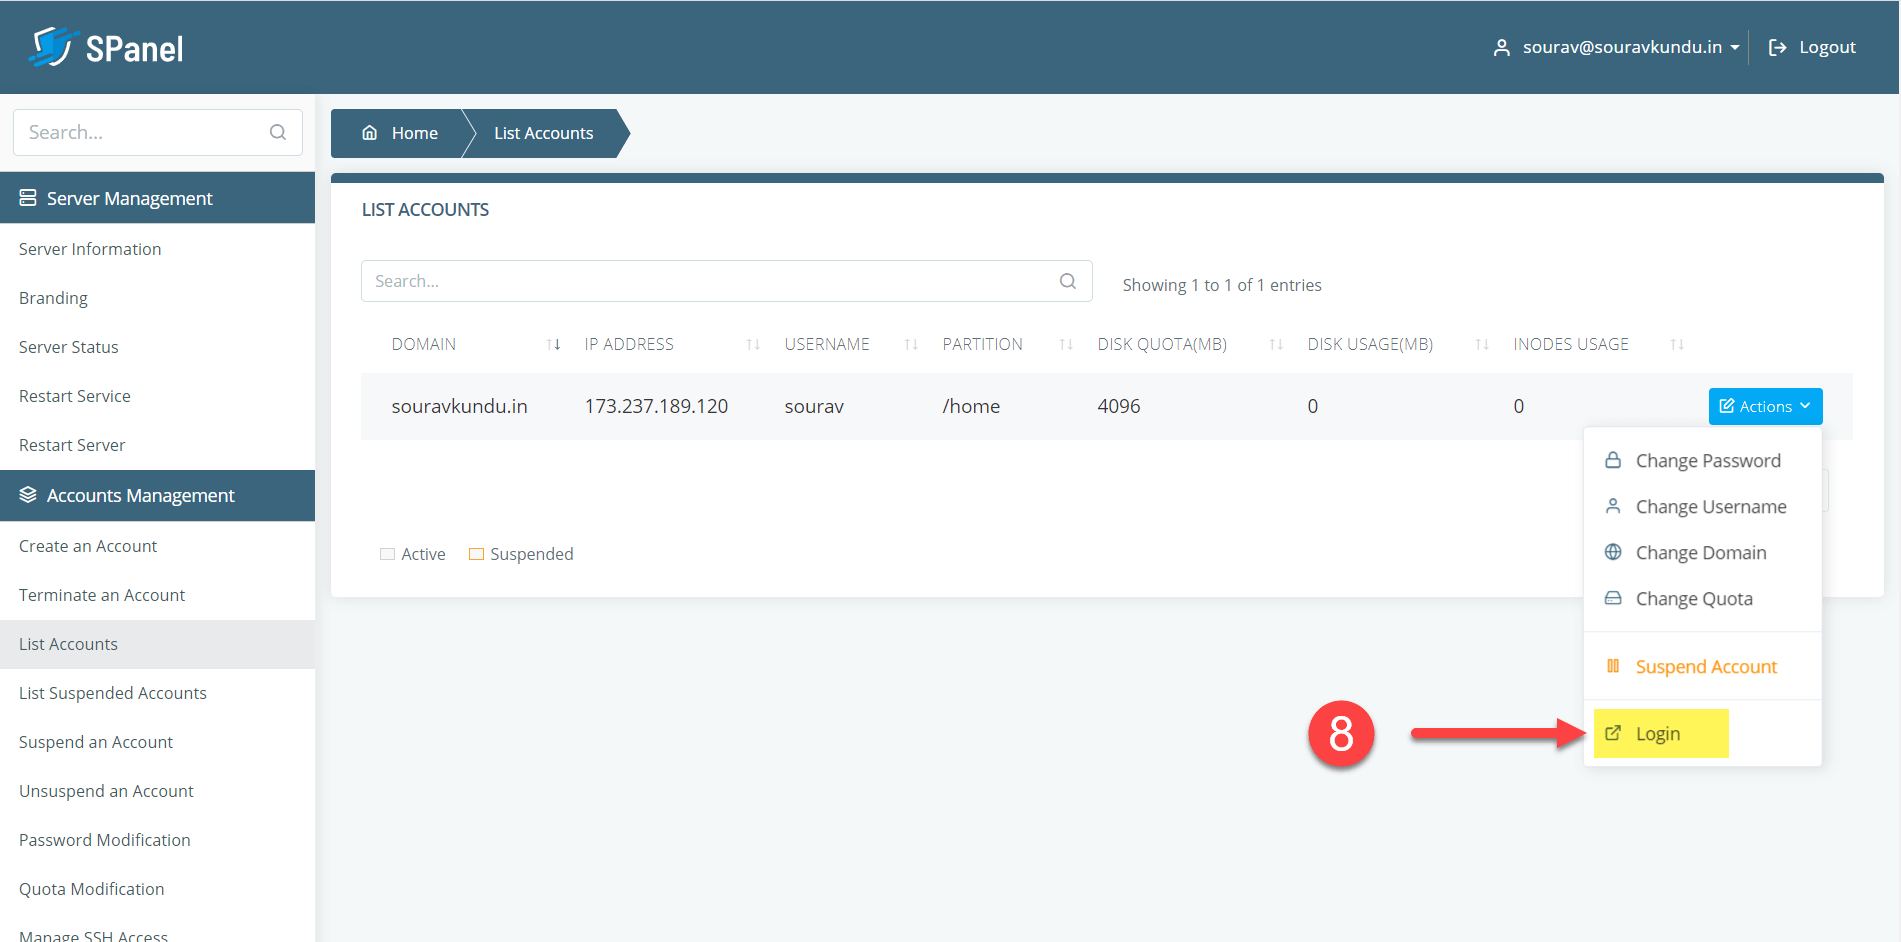
Step 4: In the List Accounts page in SPanel, you’ll see the user account and domain that you create in the last step. Click on Actions → Login.
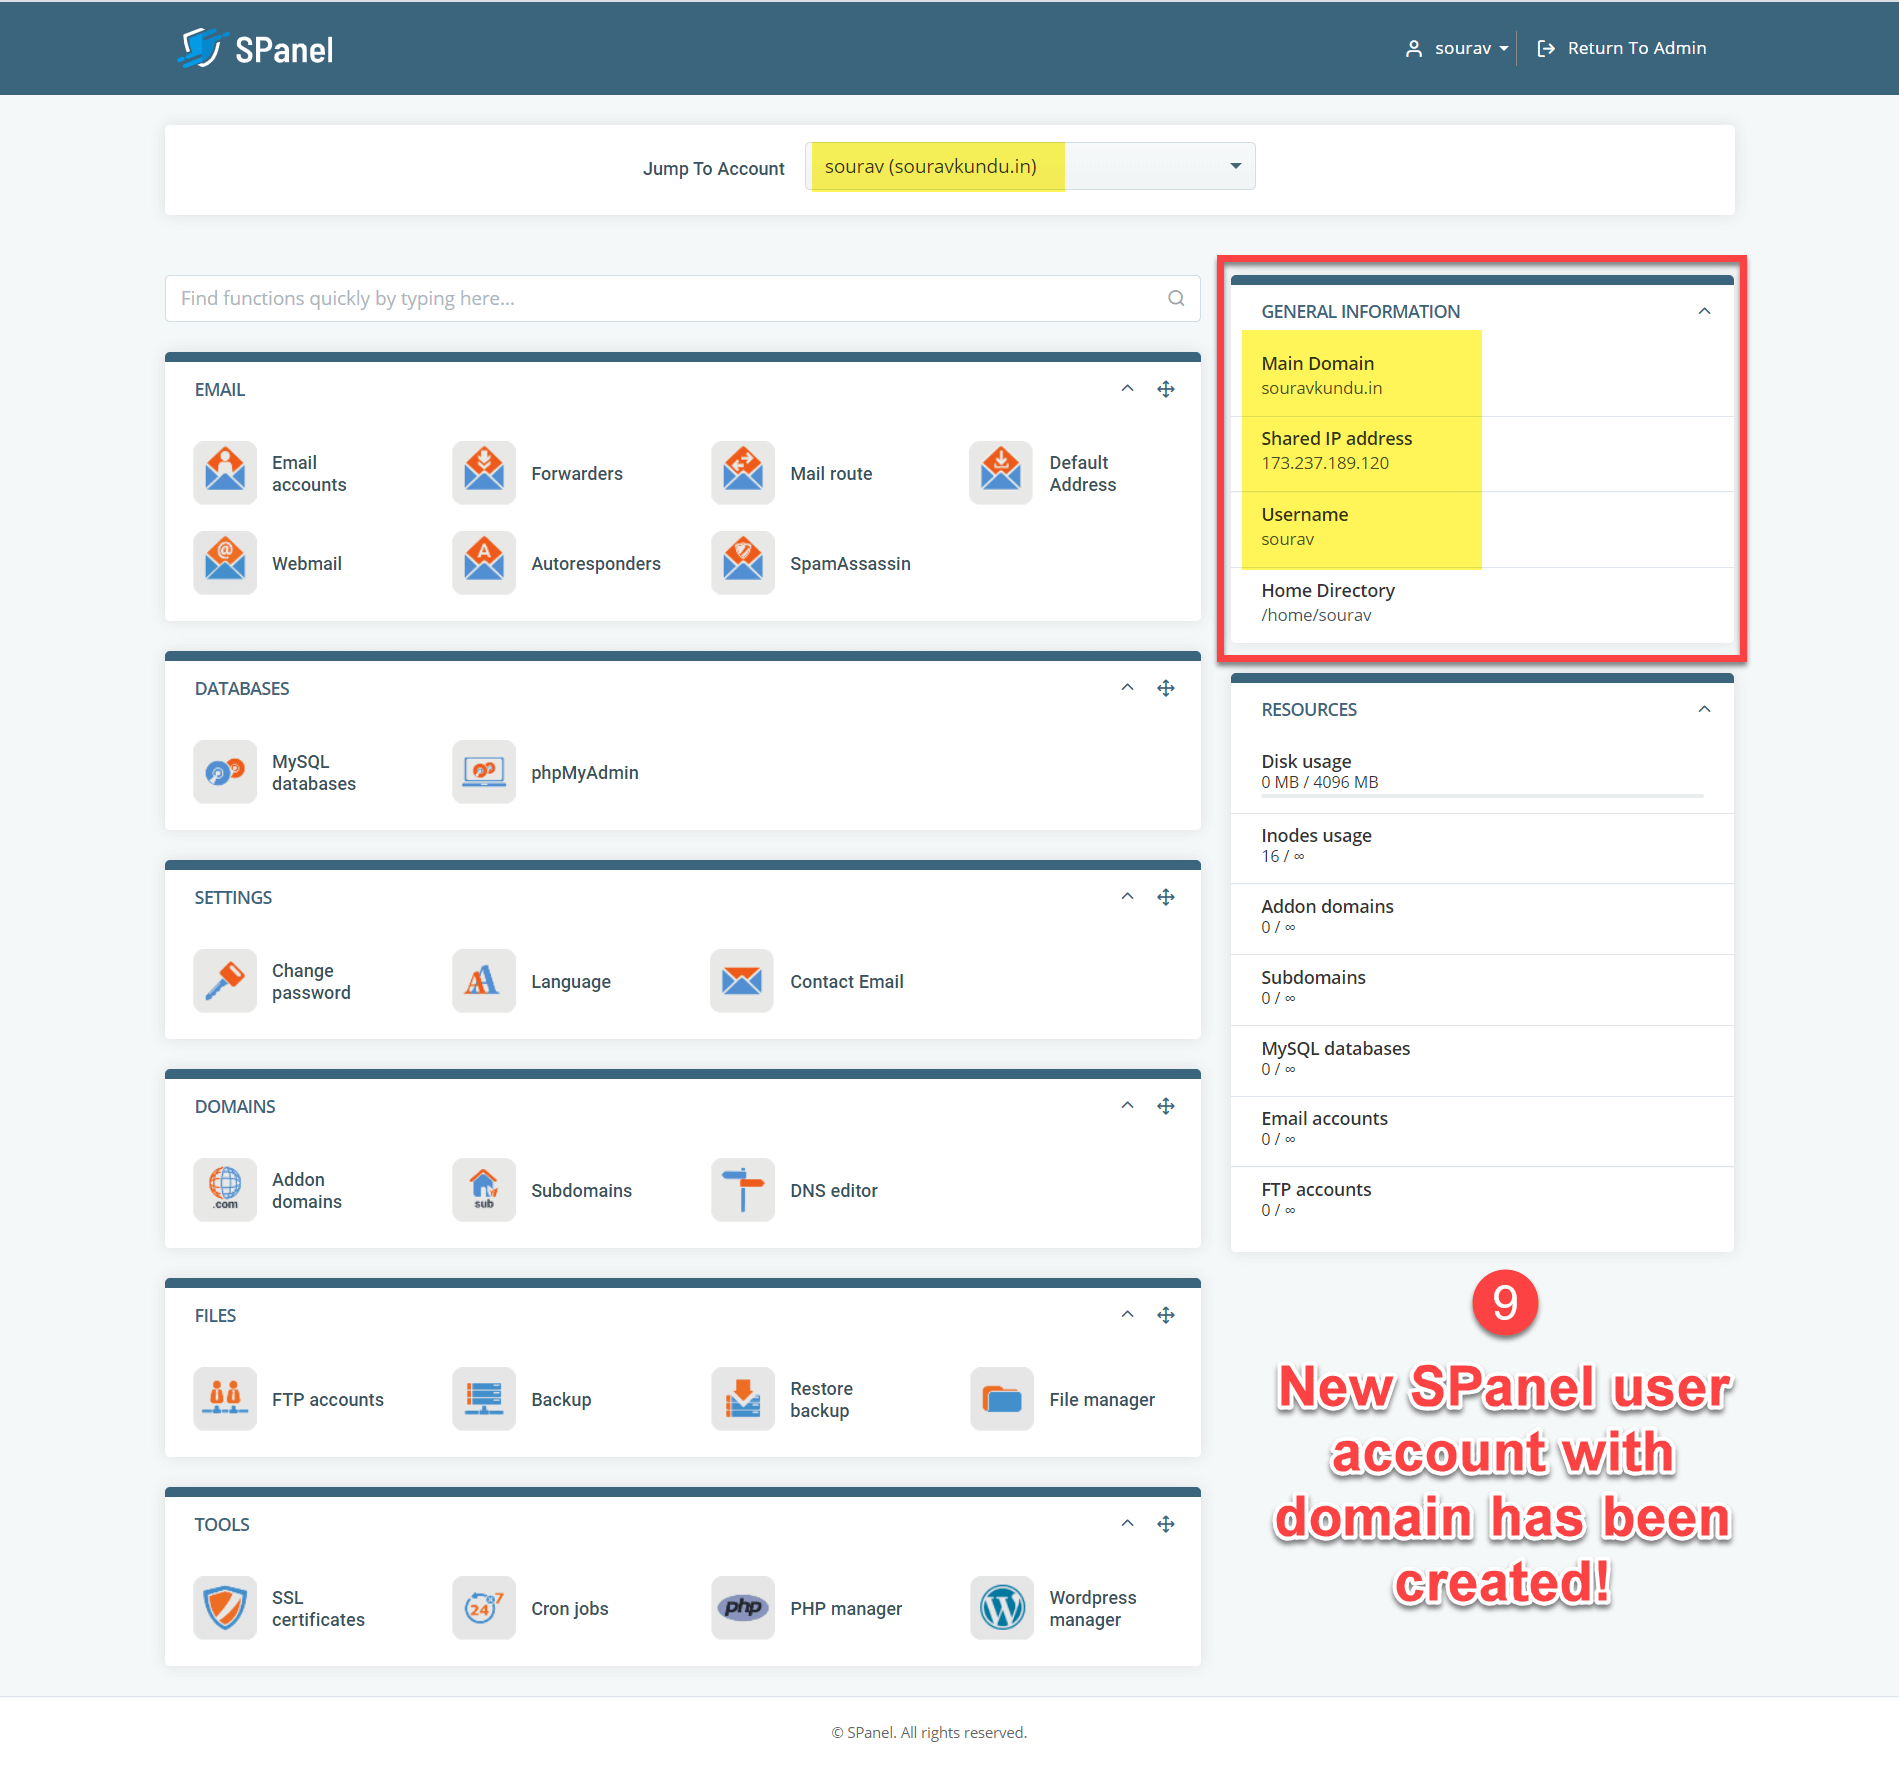
Step 5: You should be logged in to the new user account (not the admin one) in SPanel as shown in the screenshot above.
3. Add a Subdomain using SPanel (Optional)
Remember in Part 2, Step 2, when creating a new user account, you had to use the root domain, even if you wanted to install WordPress in a subdomain?
This section addresses that issue. If you want to install your WordPress site in a subdomain, follow this section, else feel free to skip it.
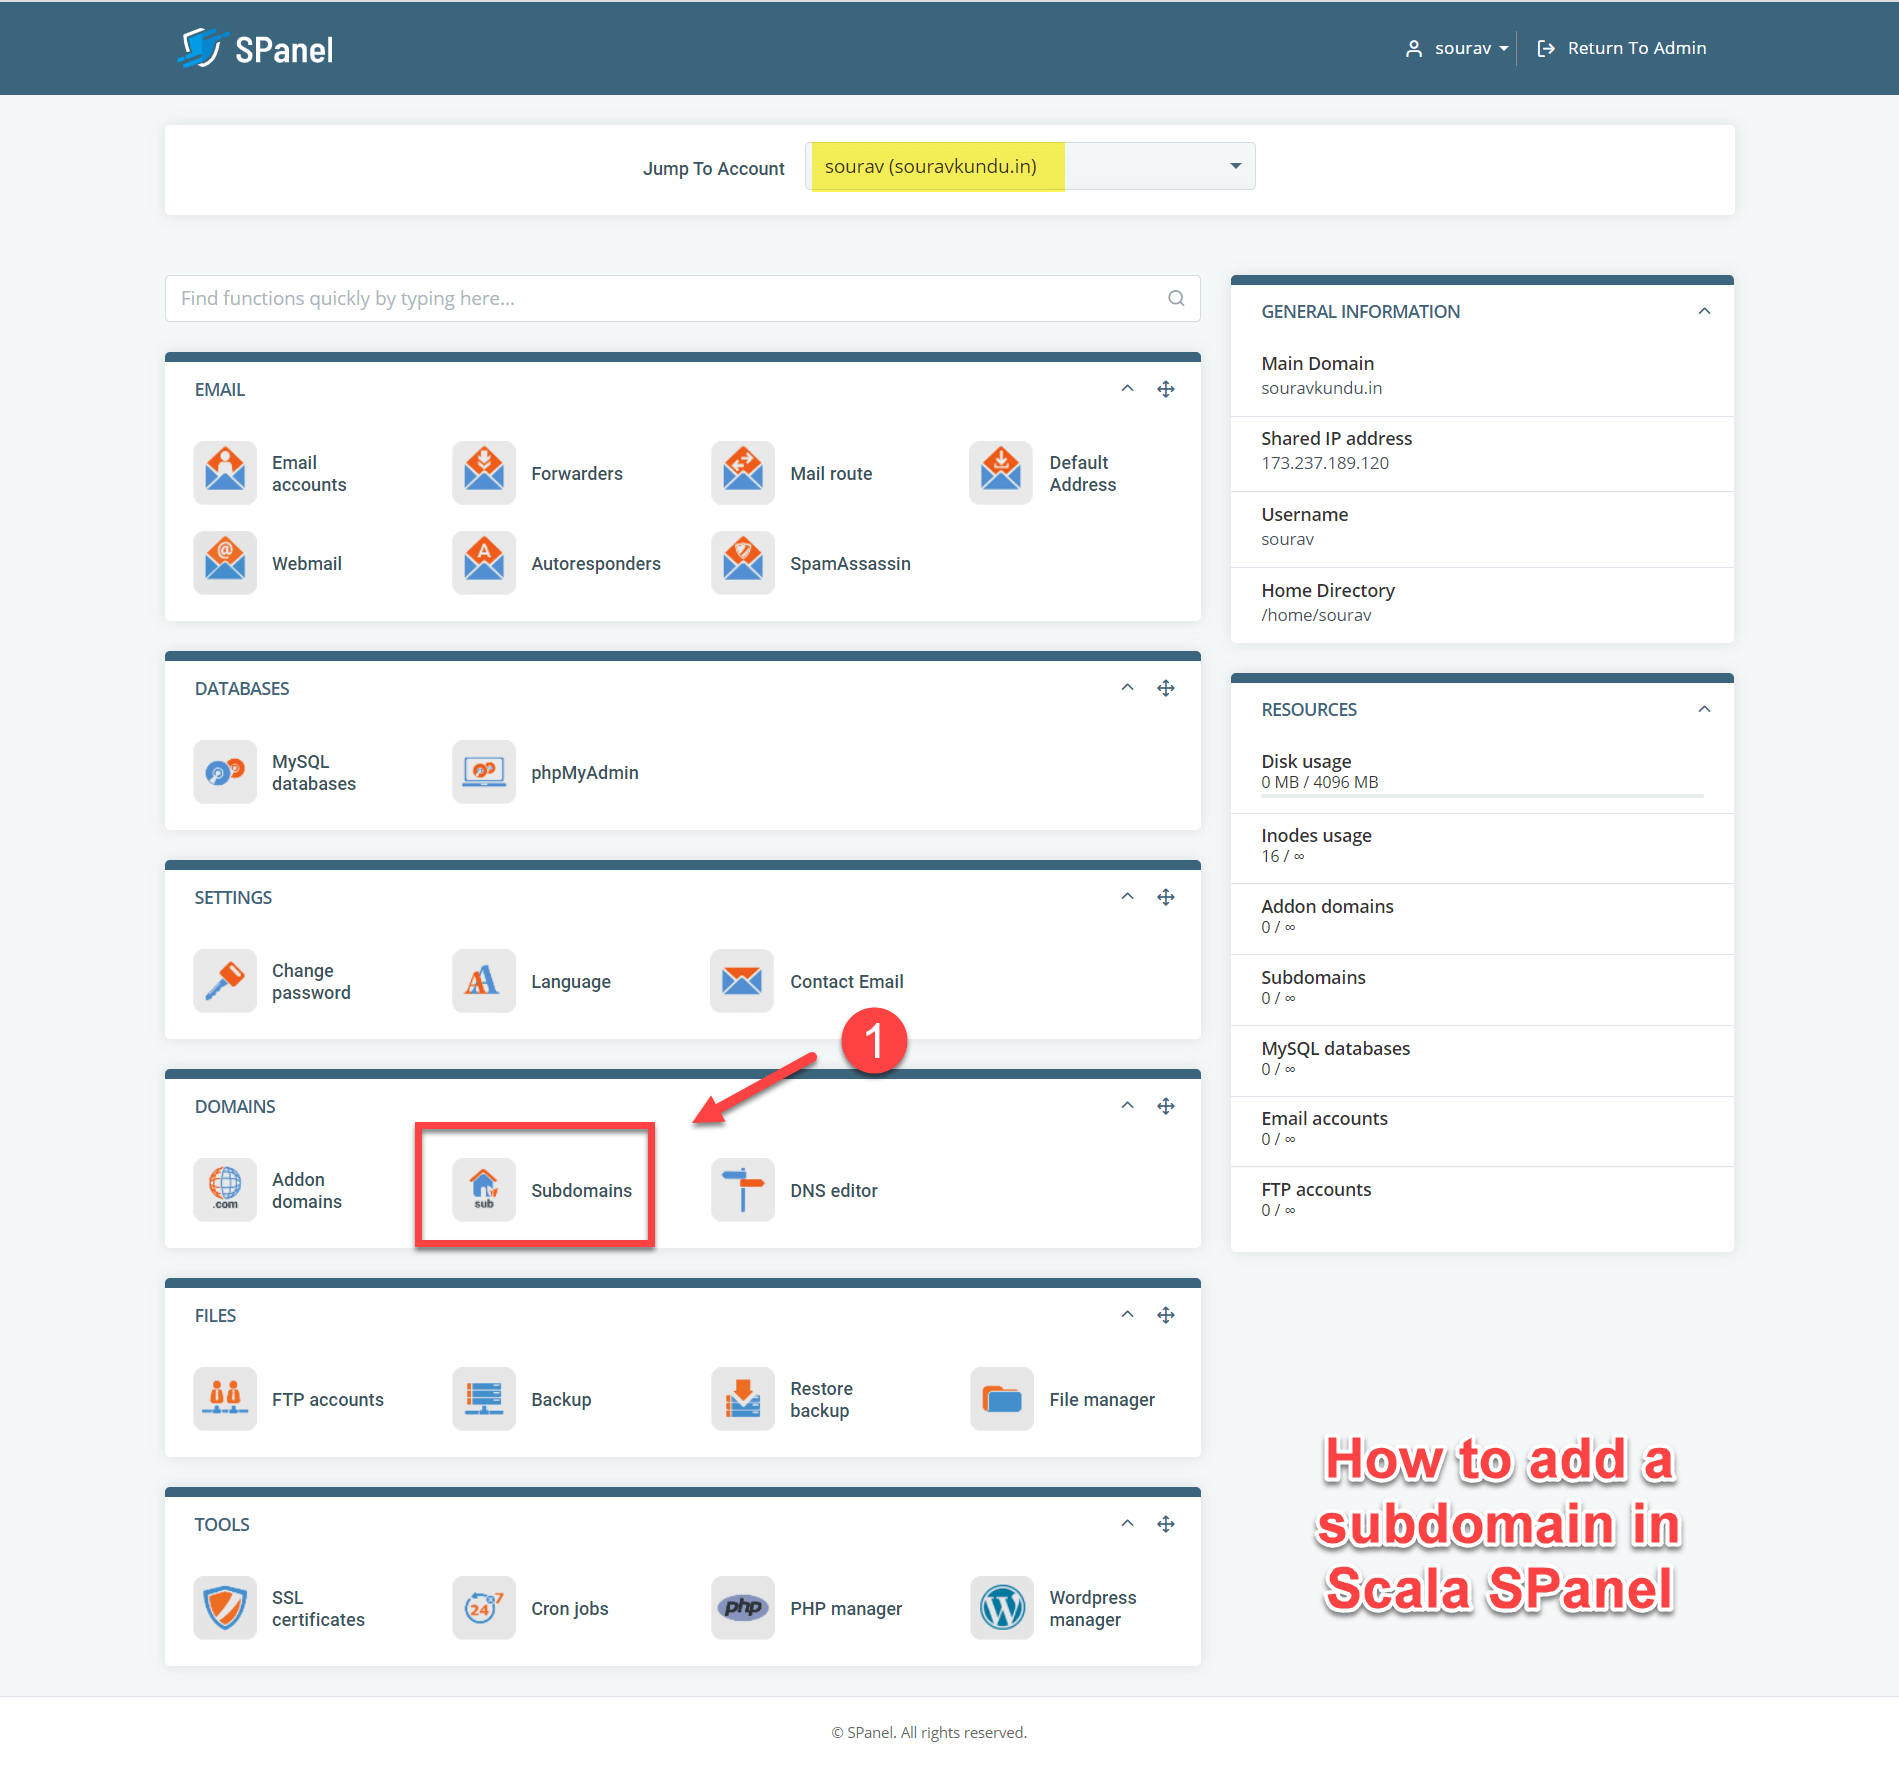
Step 1: Go to your SPanel user account (the non-admin one) and select Subdomians.
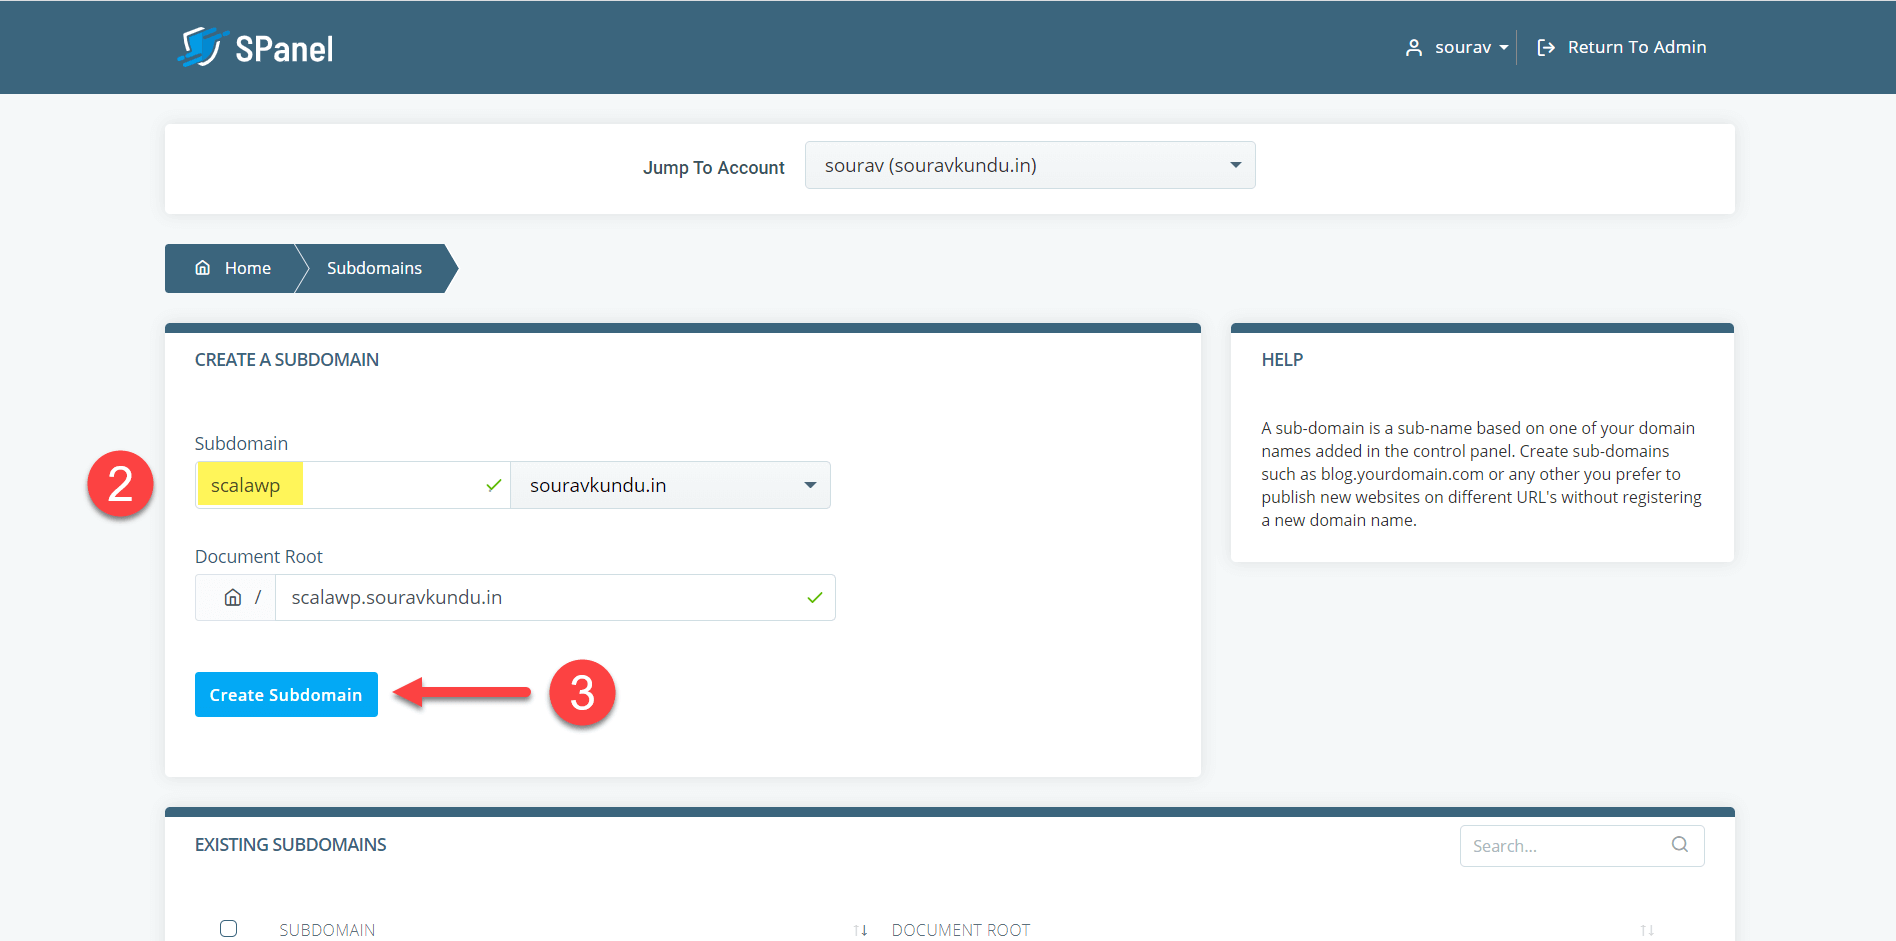
Step 2: Add the subdomain that you want and click on Create Subdomain. (For this tutorial I’ve chosen to install WordPress in a subdomain scalawp.souravkundu.in).
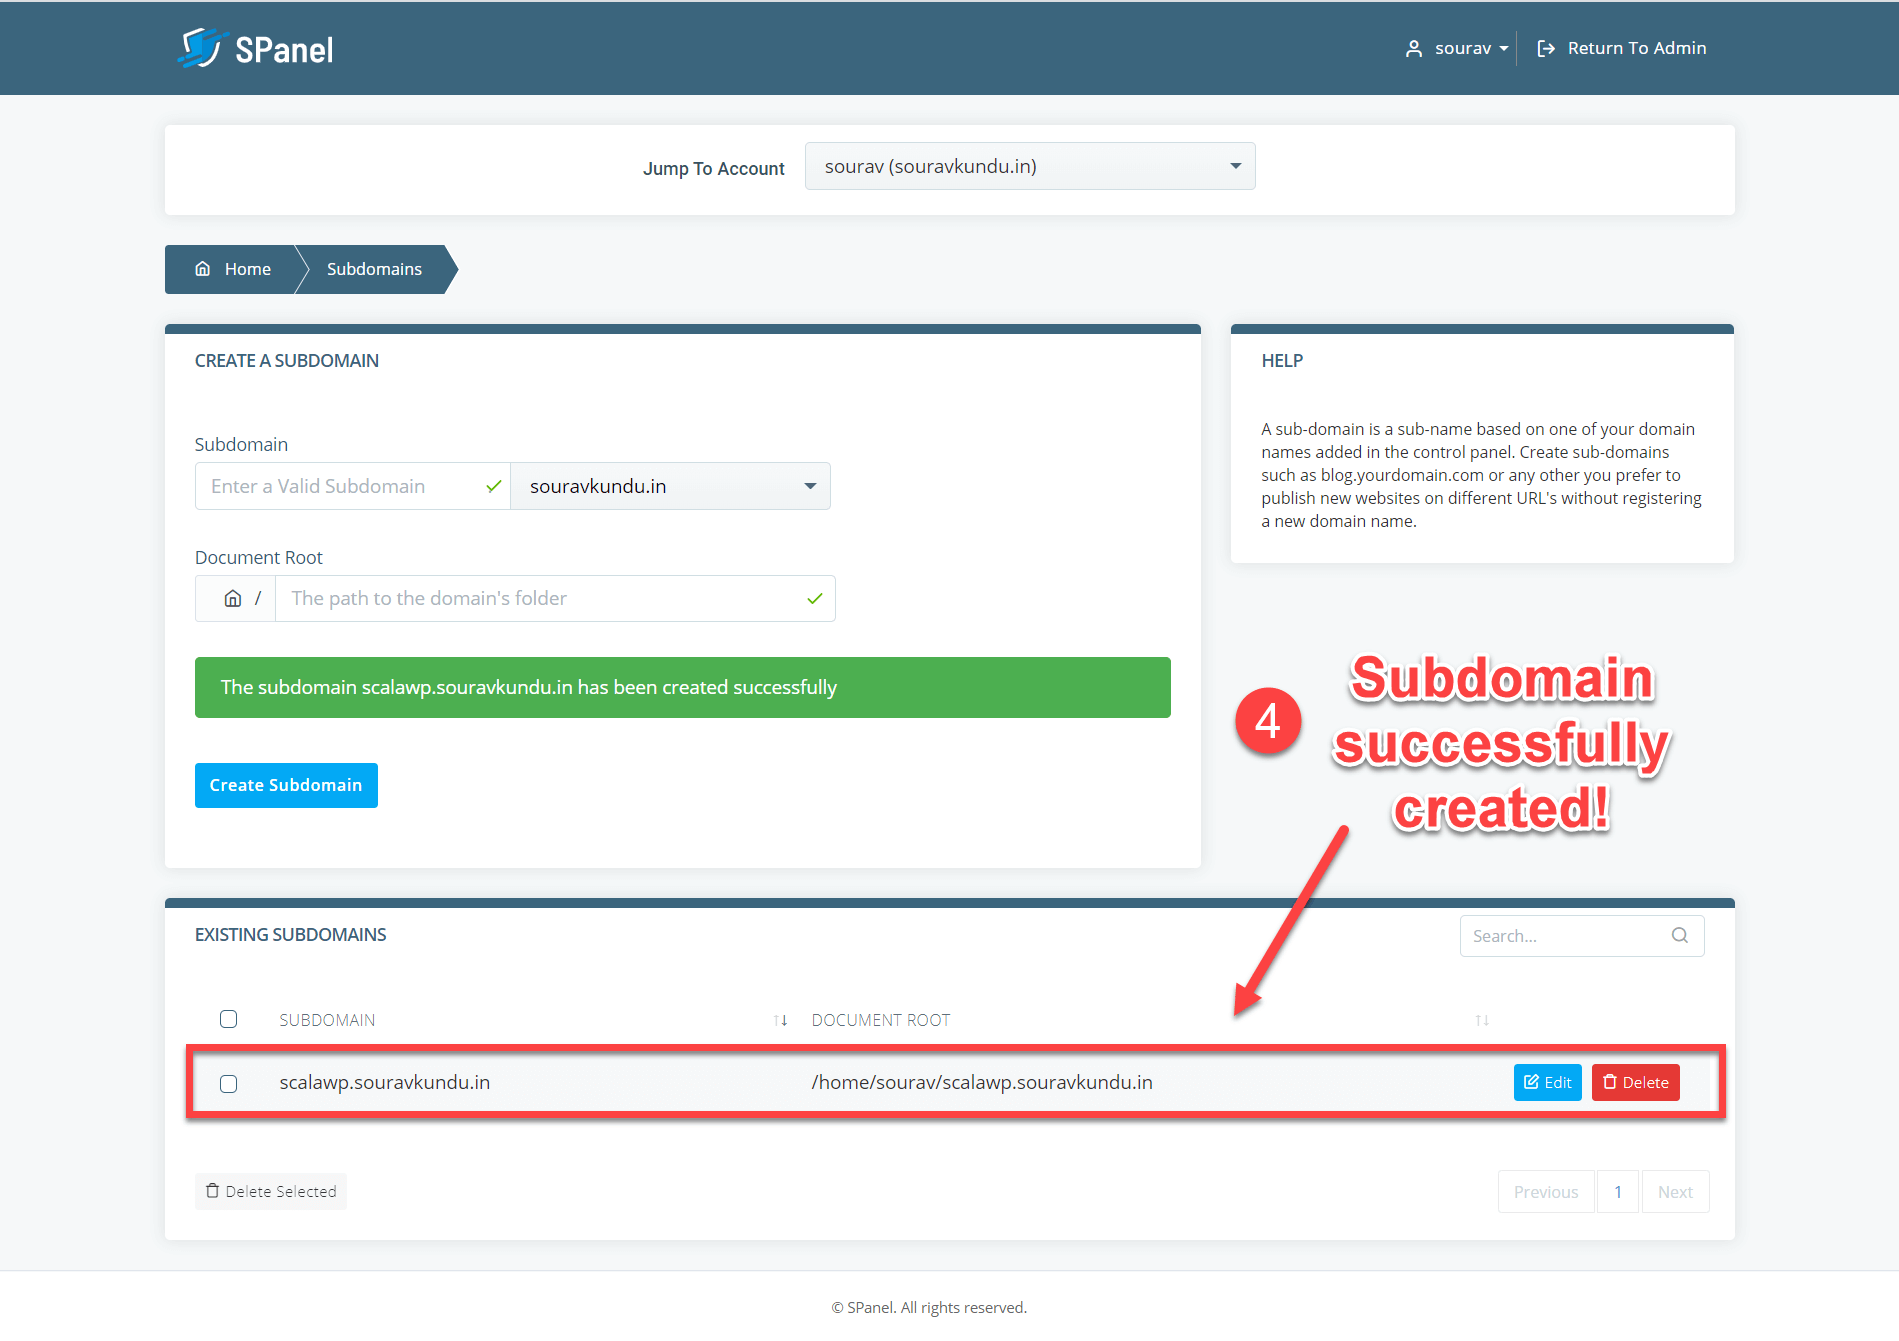
Step 3: You should get a success message as shown in the screenshot above, and your newly created subdomain would appear under the Existing Subdomains tab.
4. Install a Free SSL Certificate from LetsEncrypt in SPanel
If you do not have an SSL certificate, it is highly recommended that you get one for your WordPress site. SPanel gives you the ability to install free SSL certificates issued by LetsEncrypt, for all your domains and subdomains.
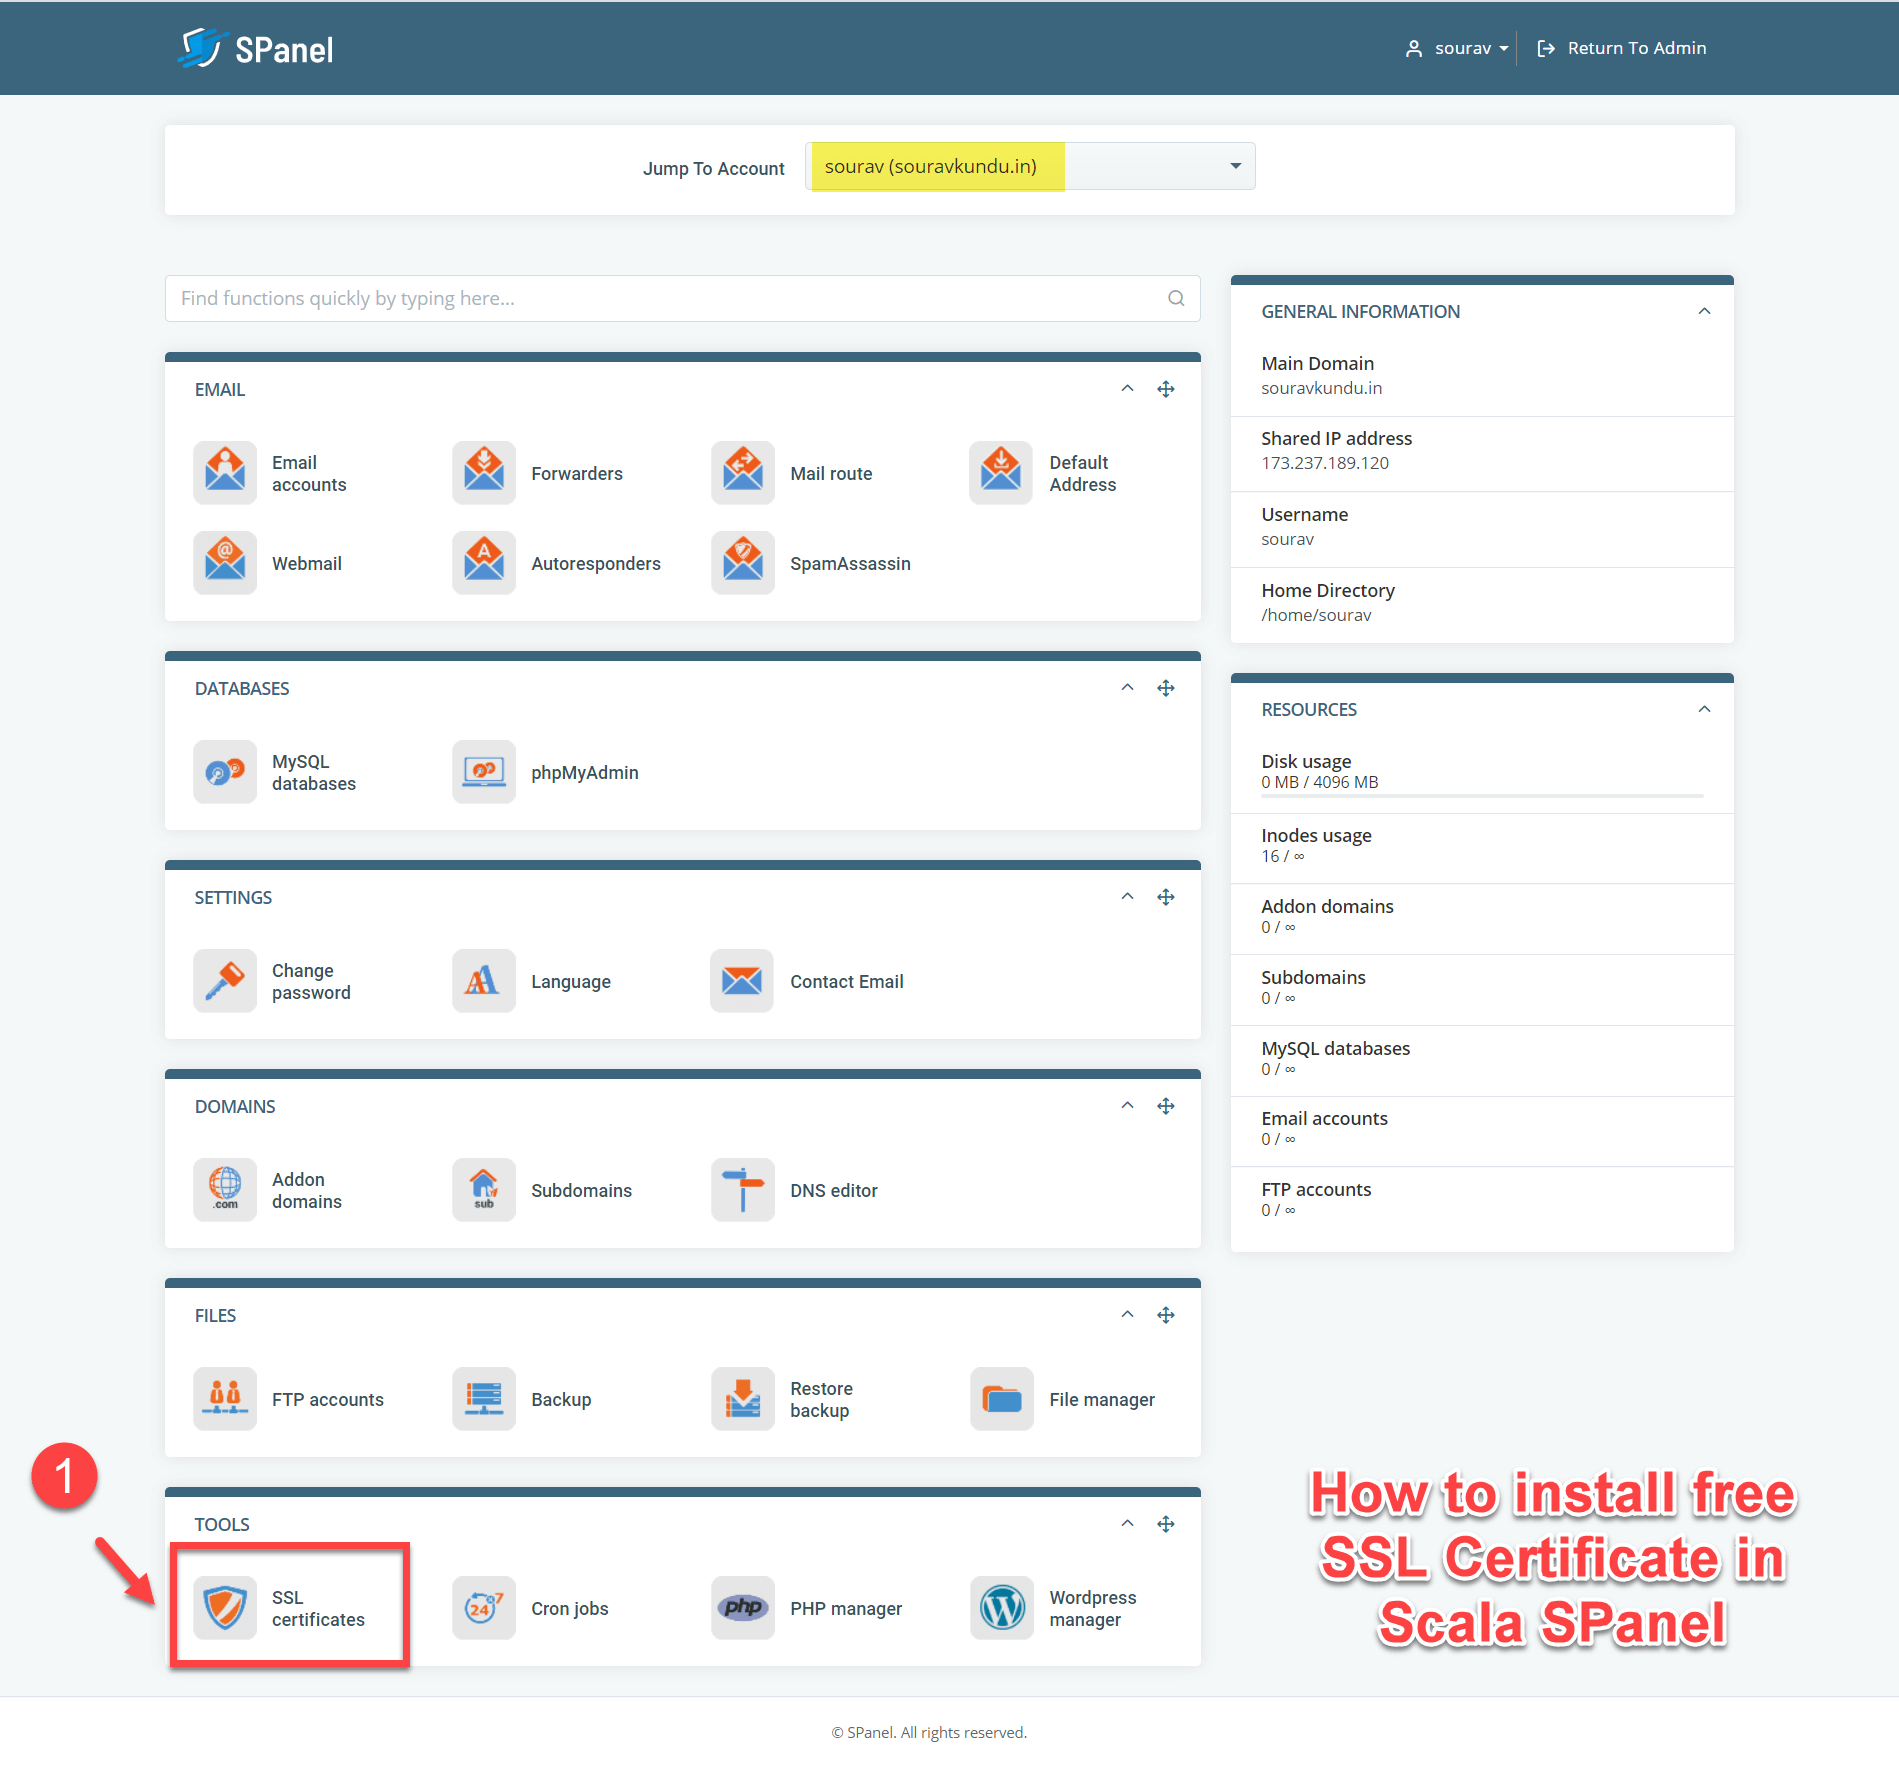
Step 1: To get started, go to your SPanel user account (the non-admin one) and select SSL Certificates as shown in the screenshot above.
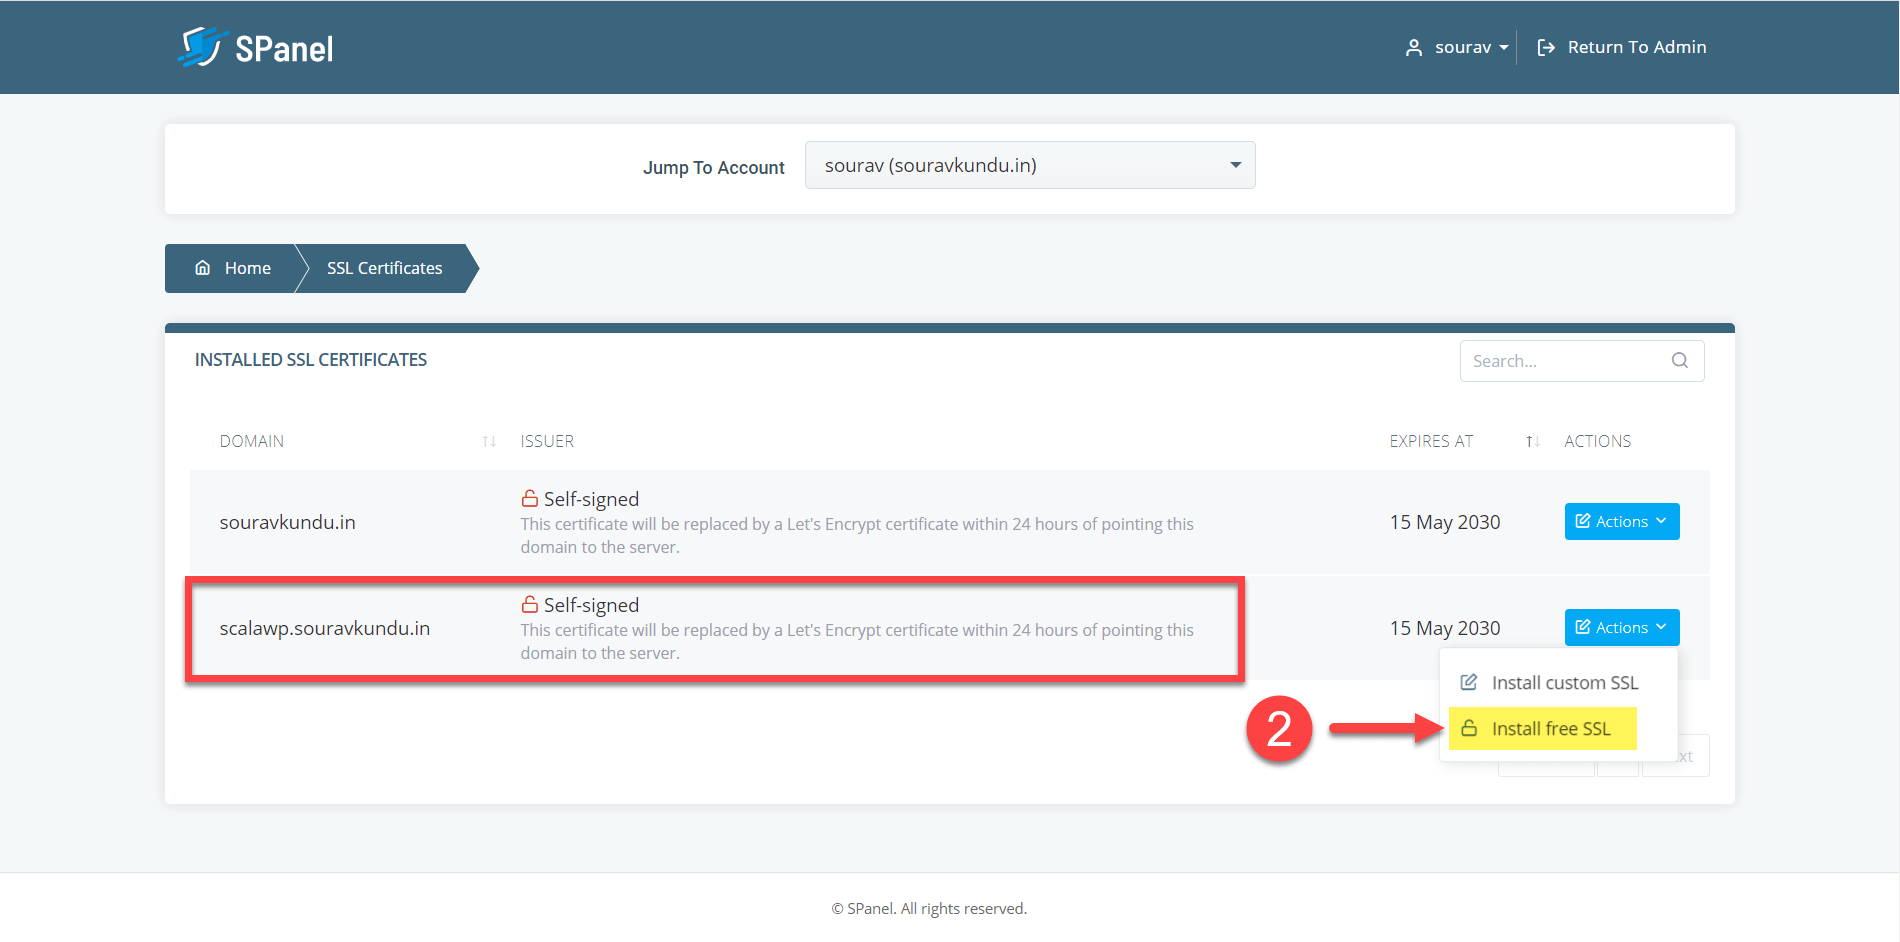
Step 2: Select the domain or subdomain for which you want to install the SSL certificate. Click on Actions → Install free SSL.
Note that if you’ve purchased a premium SSL certificate, you can install that as a custom SSL certificate in SPanel.
For this tutorial, since I want to install WordPress in the subdomain scalawp.souravkundu.in, I am installing a free LetsEncrypt SSL certificate for that domain.
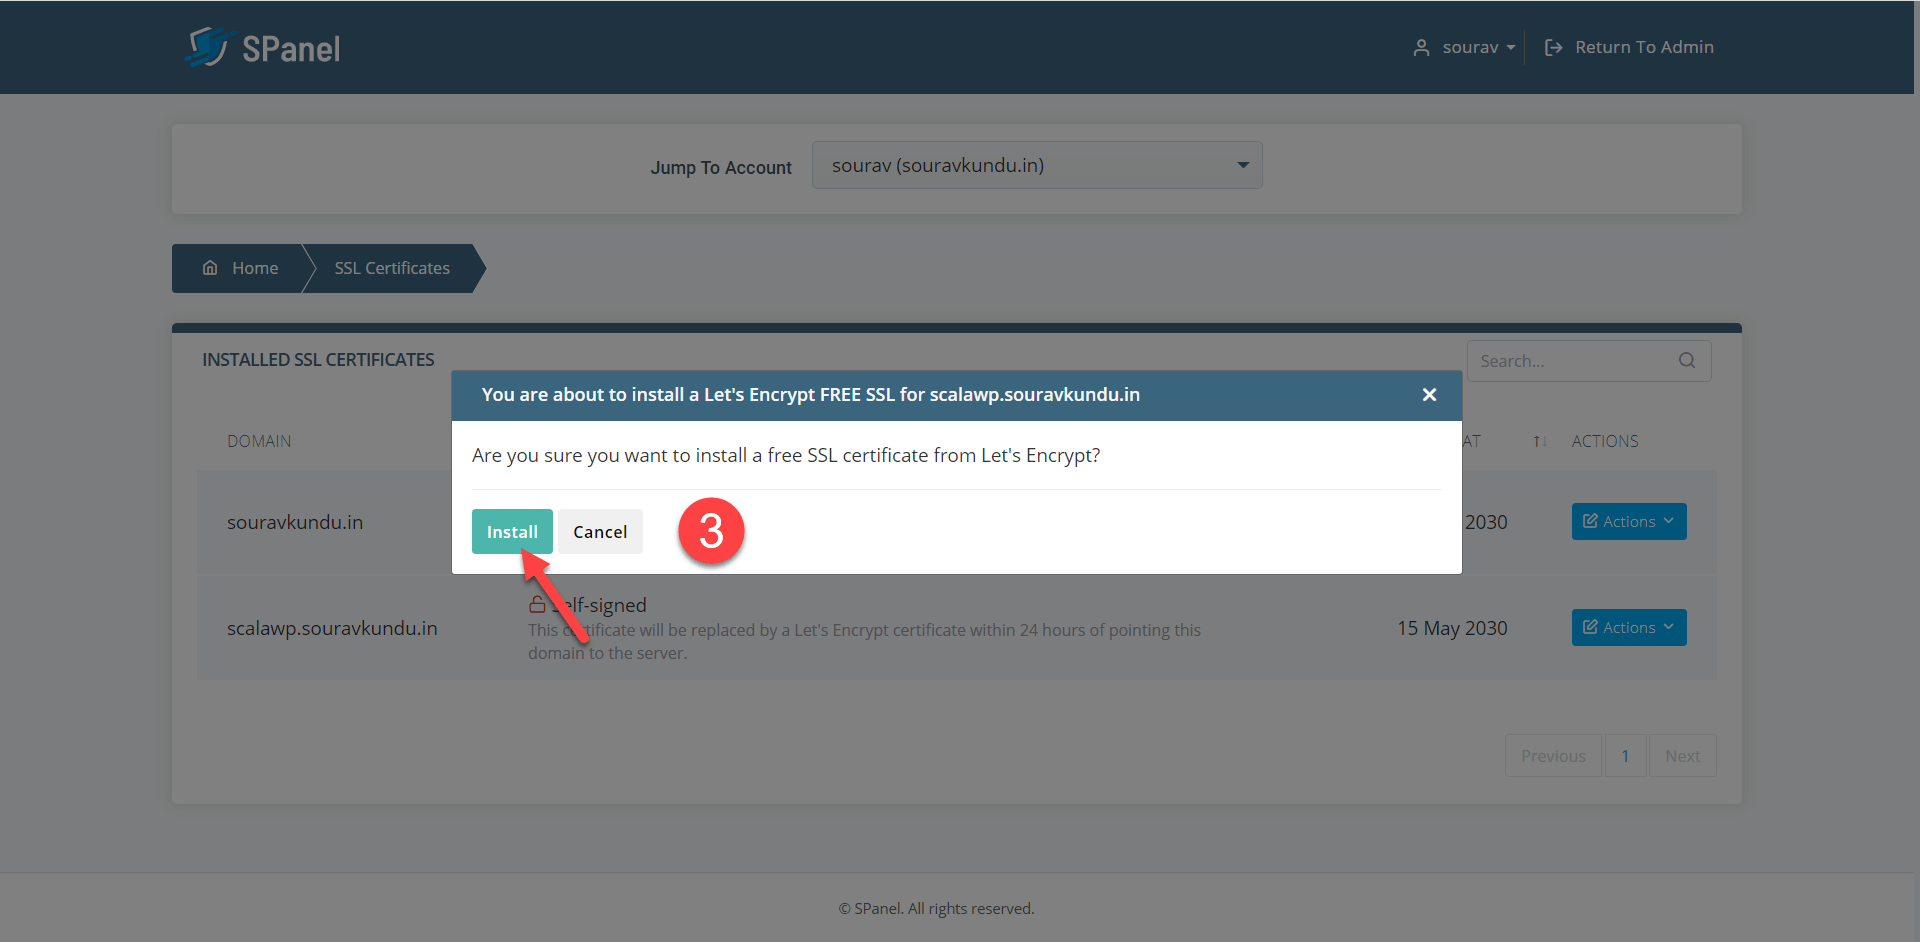
Step 3: Click on Install.
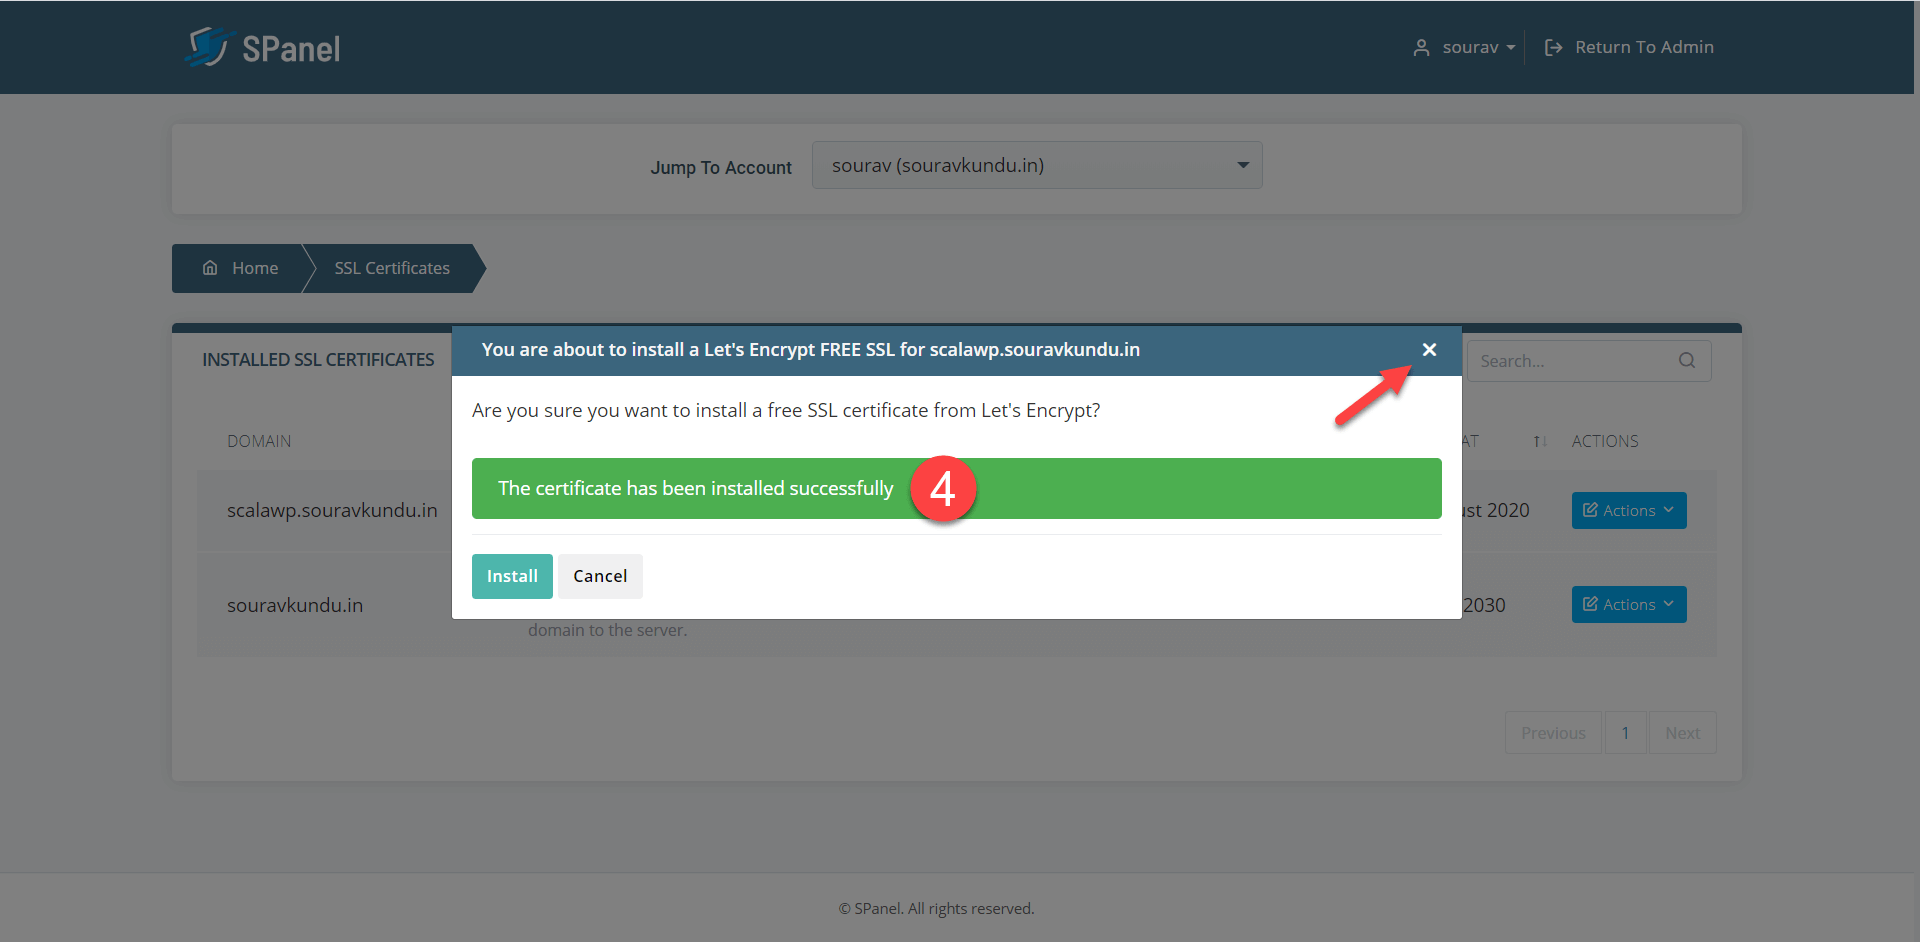
Step 4: Once done, you’ll see a success message as shown in the screenshot above. Close the box by clicking on the X icon at the top right corner.
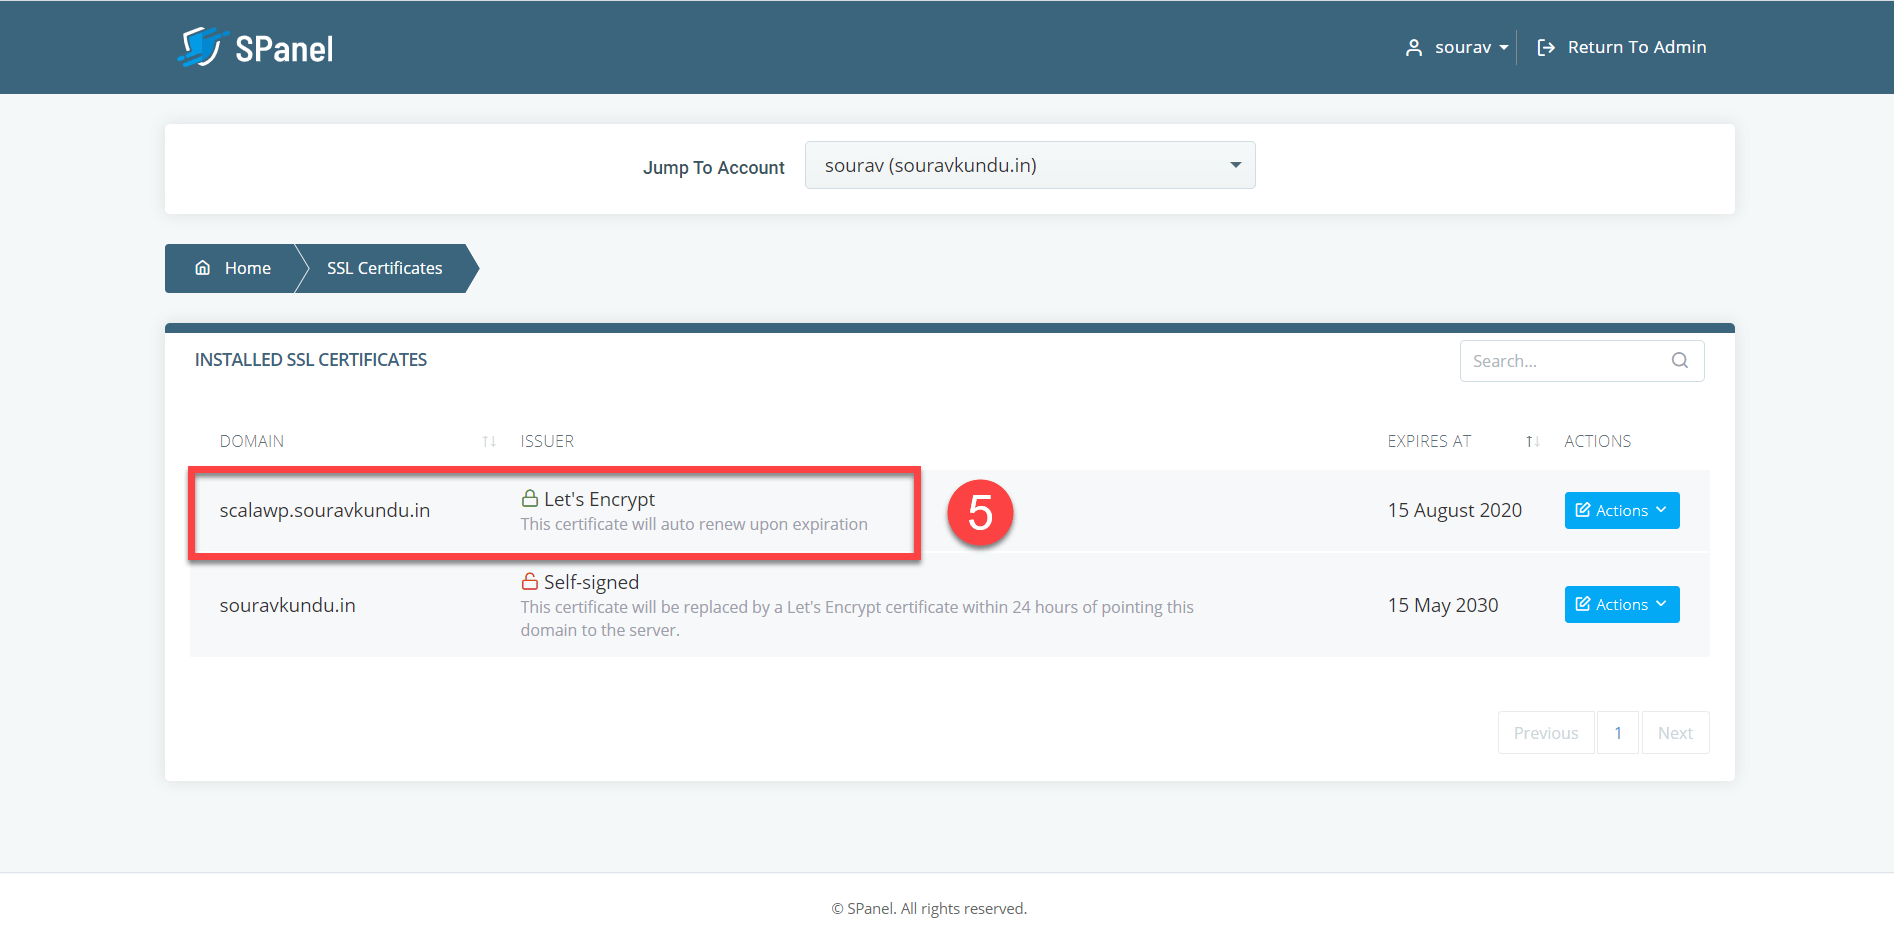
Step 5: The SSL Certificates page will now show that LetsEncrypt is now installed for the scalawp.souravkundu.in subdomain.
Configuring DNS Records
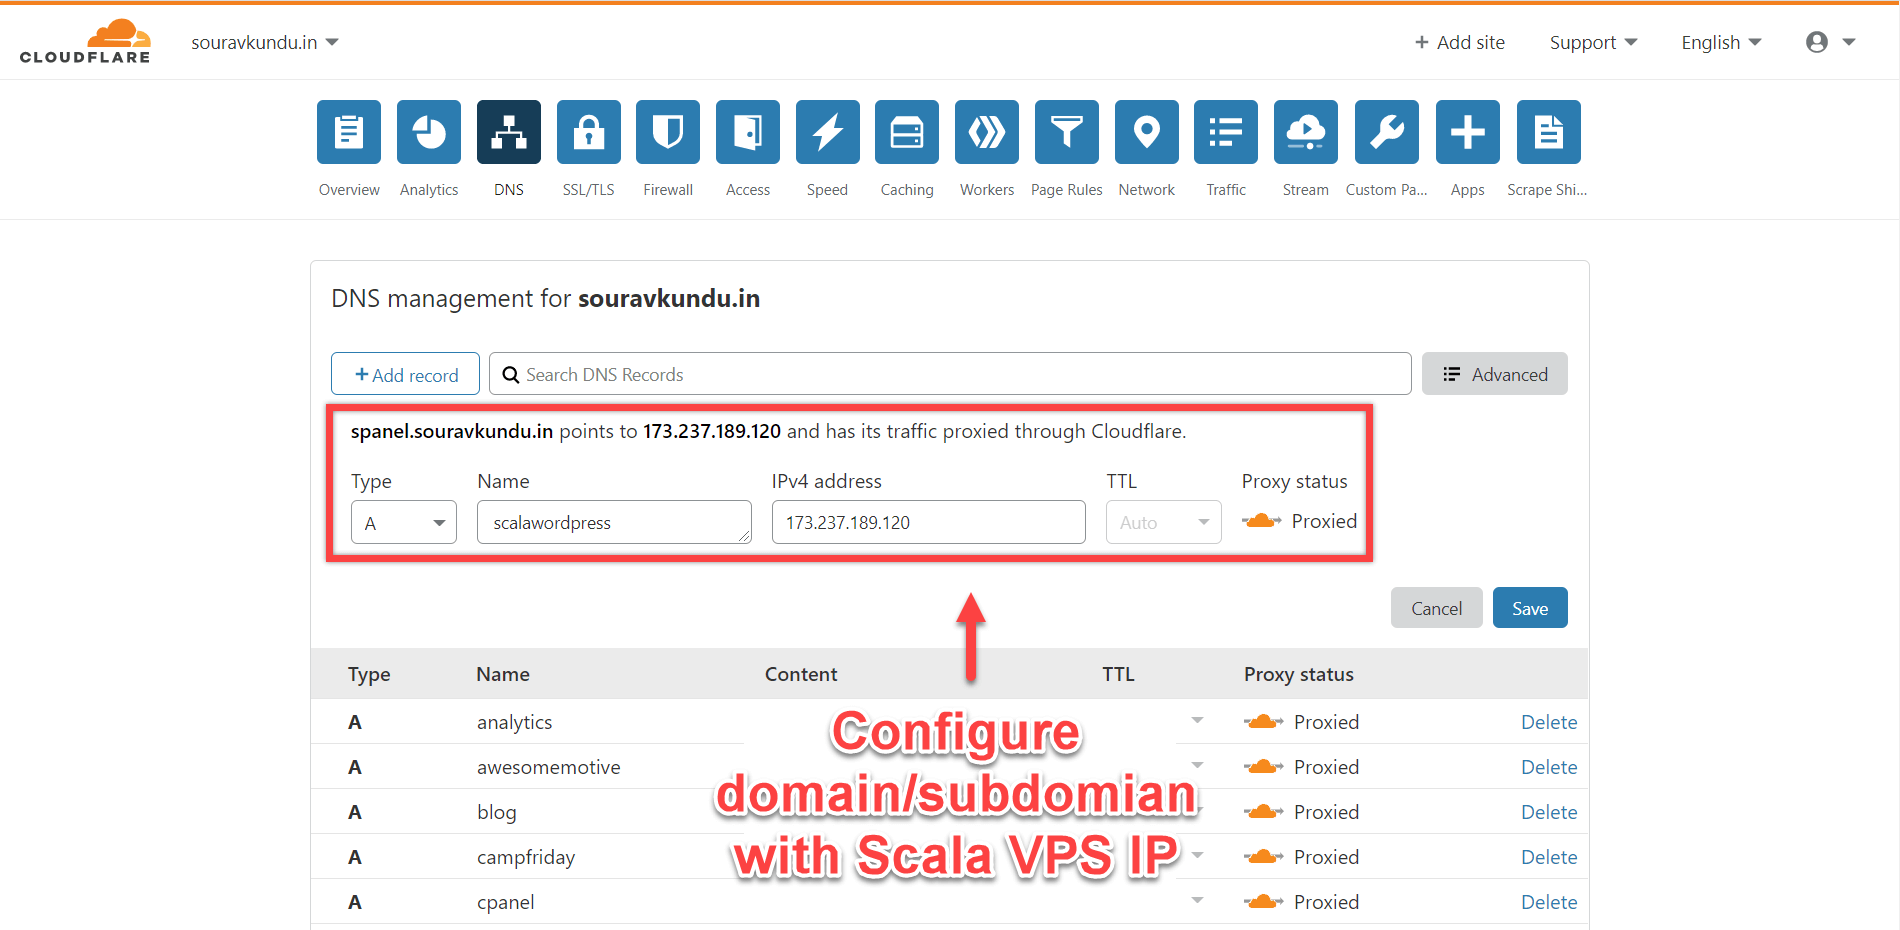
Note that you’ll also have to add an ‘A’ record to your domain’s DNS records to point to the IP address of your managed VPS.
I use CloudFlare to manage my DNS, where I’ve added an ‘A’ record to point scalawp.souravkundu.in to my Managed VPS’ IP address.
5. Create a new WordPress site using SWordPress Manager
Finally we’re ready to install WordPress. As discussed in the introduction, SPanel includes a SWordPress Manager module which lets you create and manage new and existing WordPress sites. We’ll explore all the features offered by the SWordPress Manager in this section.
Let’s start by installing a new WordPress site with the SWordPress Manager.
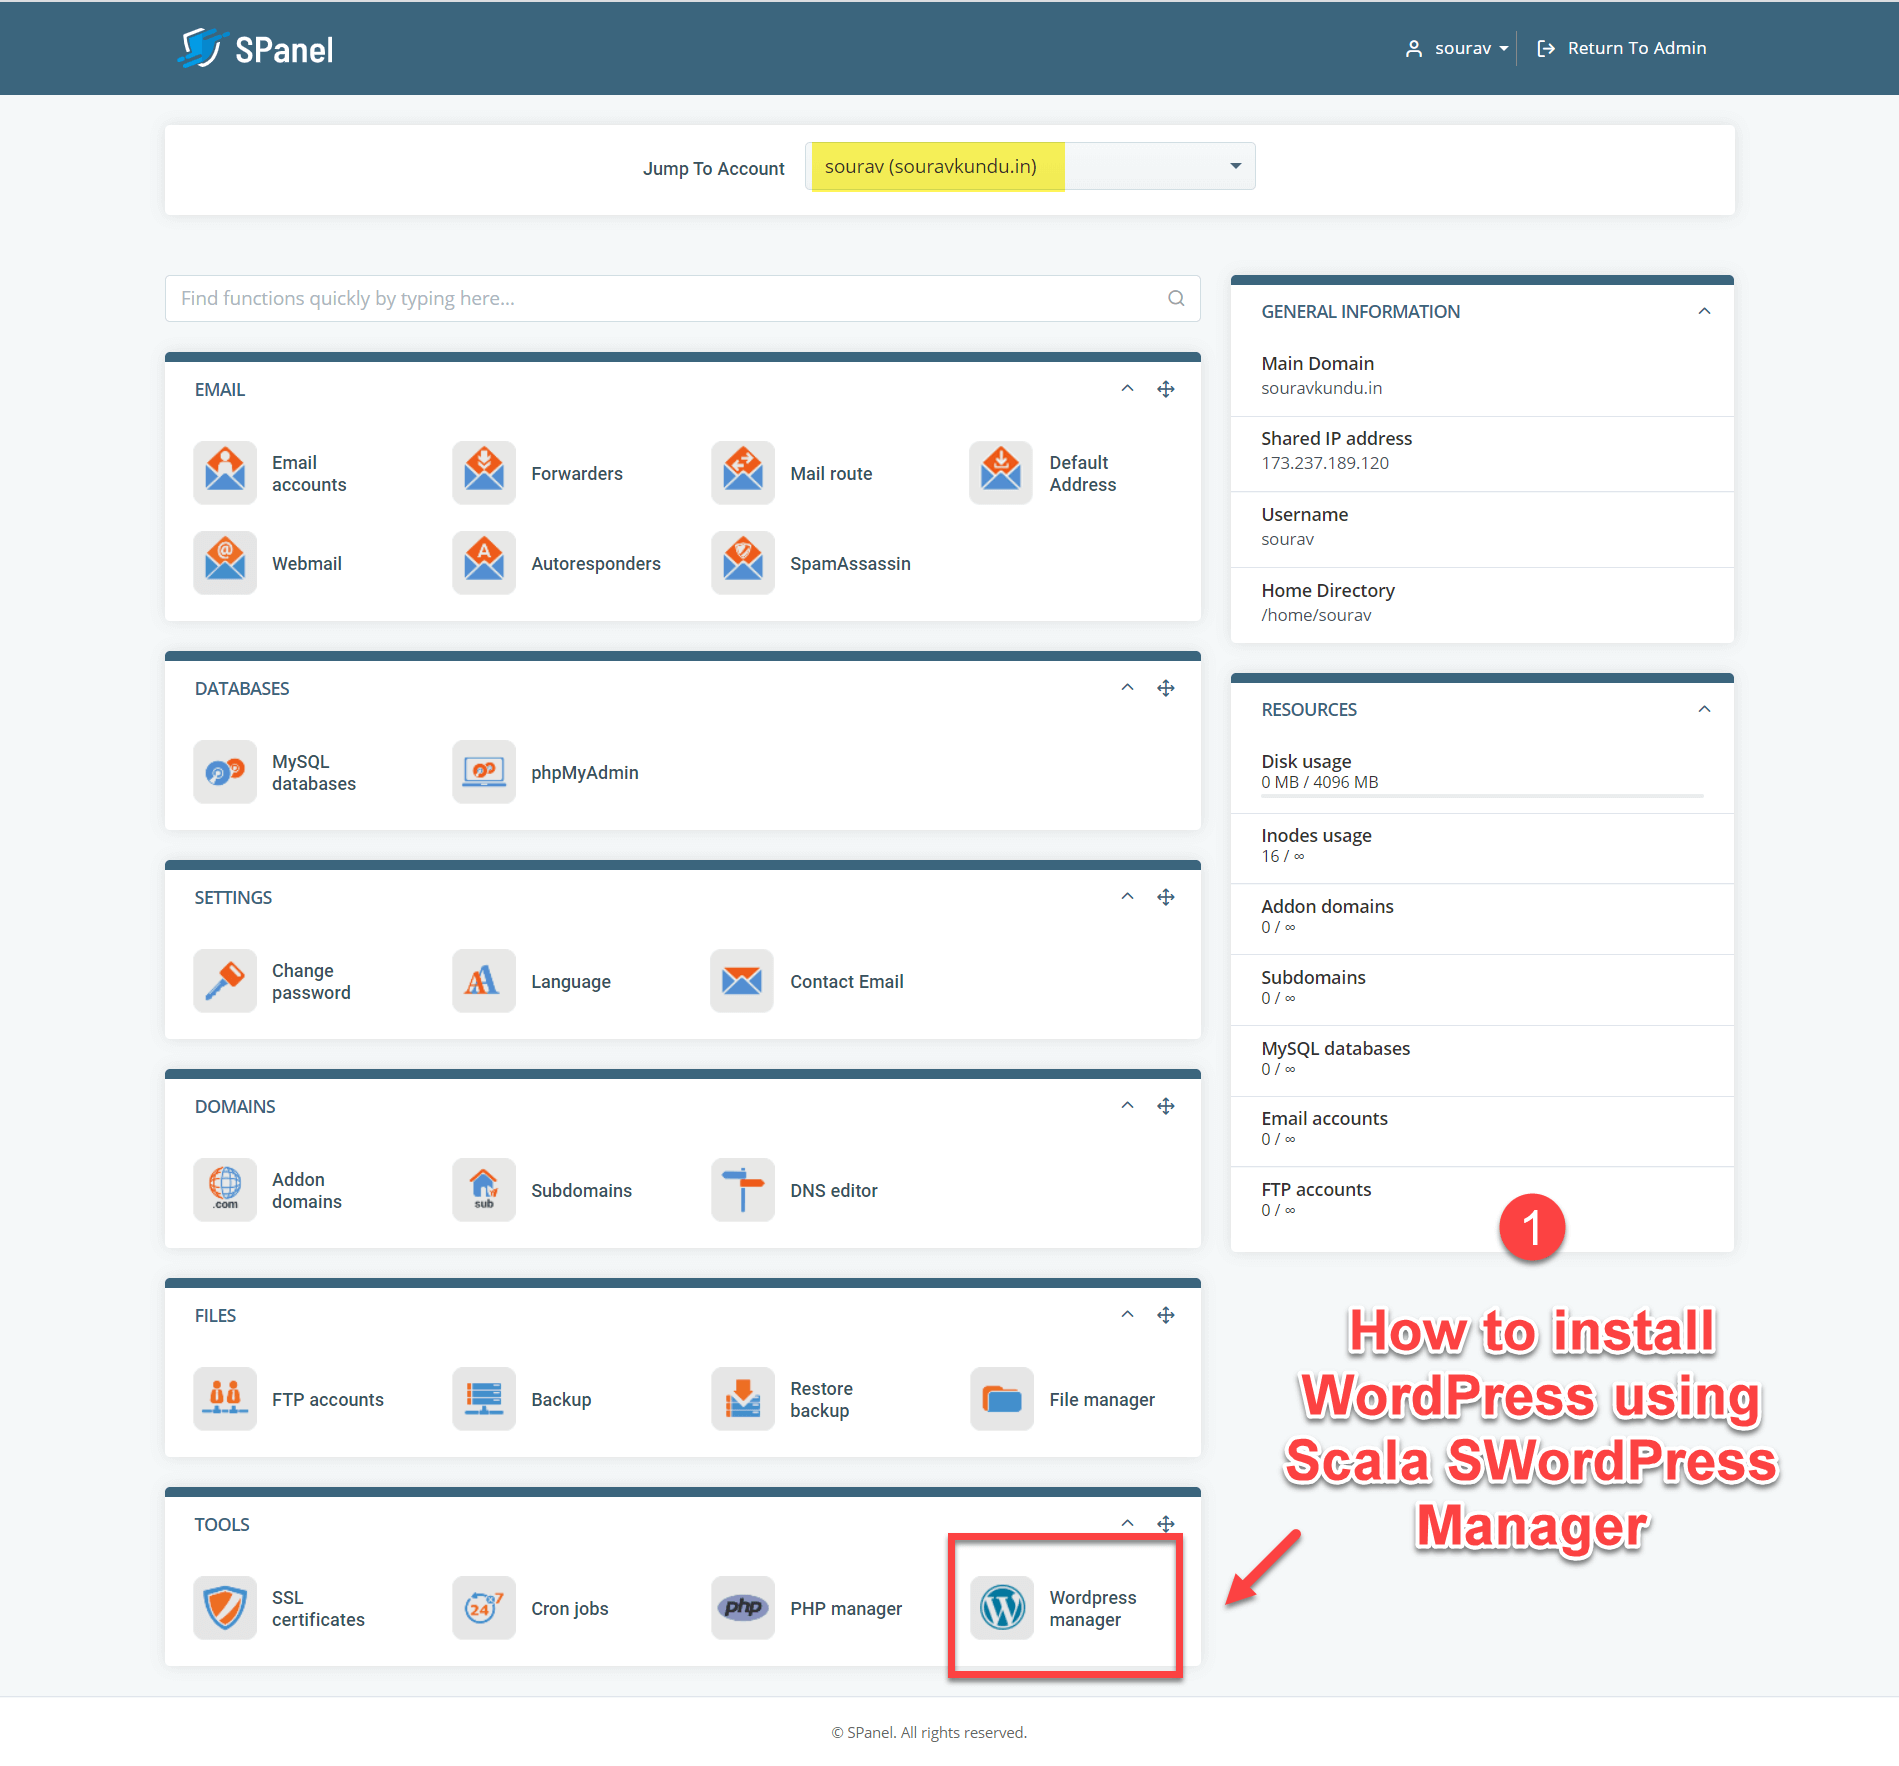
Step 1: To get started, go to your SPanel user account (the non-admin one) and select SWordPress Manager as shown in the screenshot above.
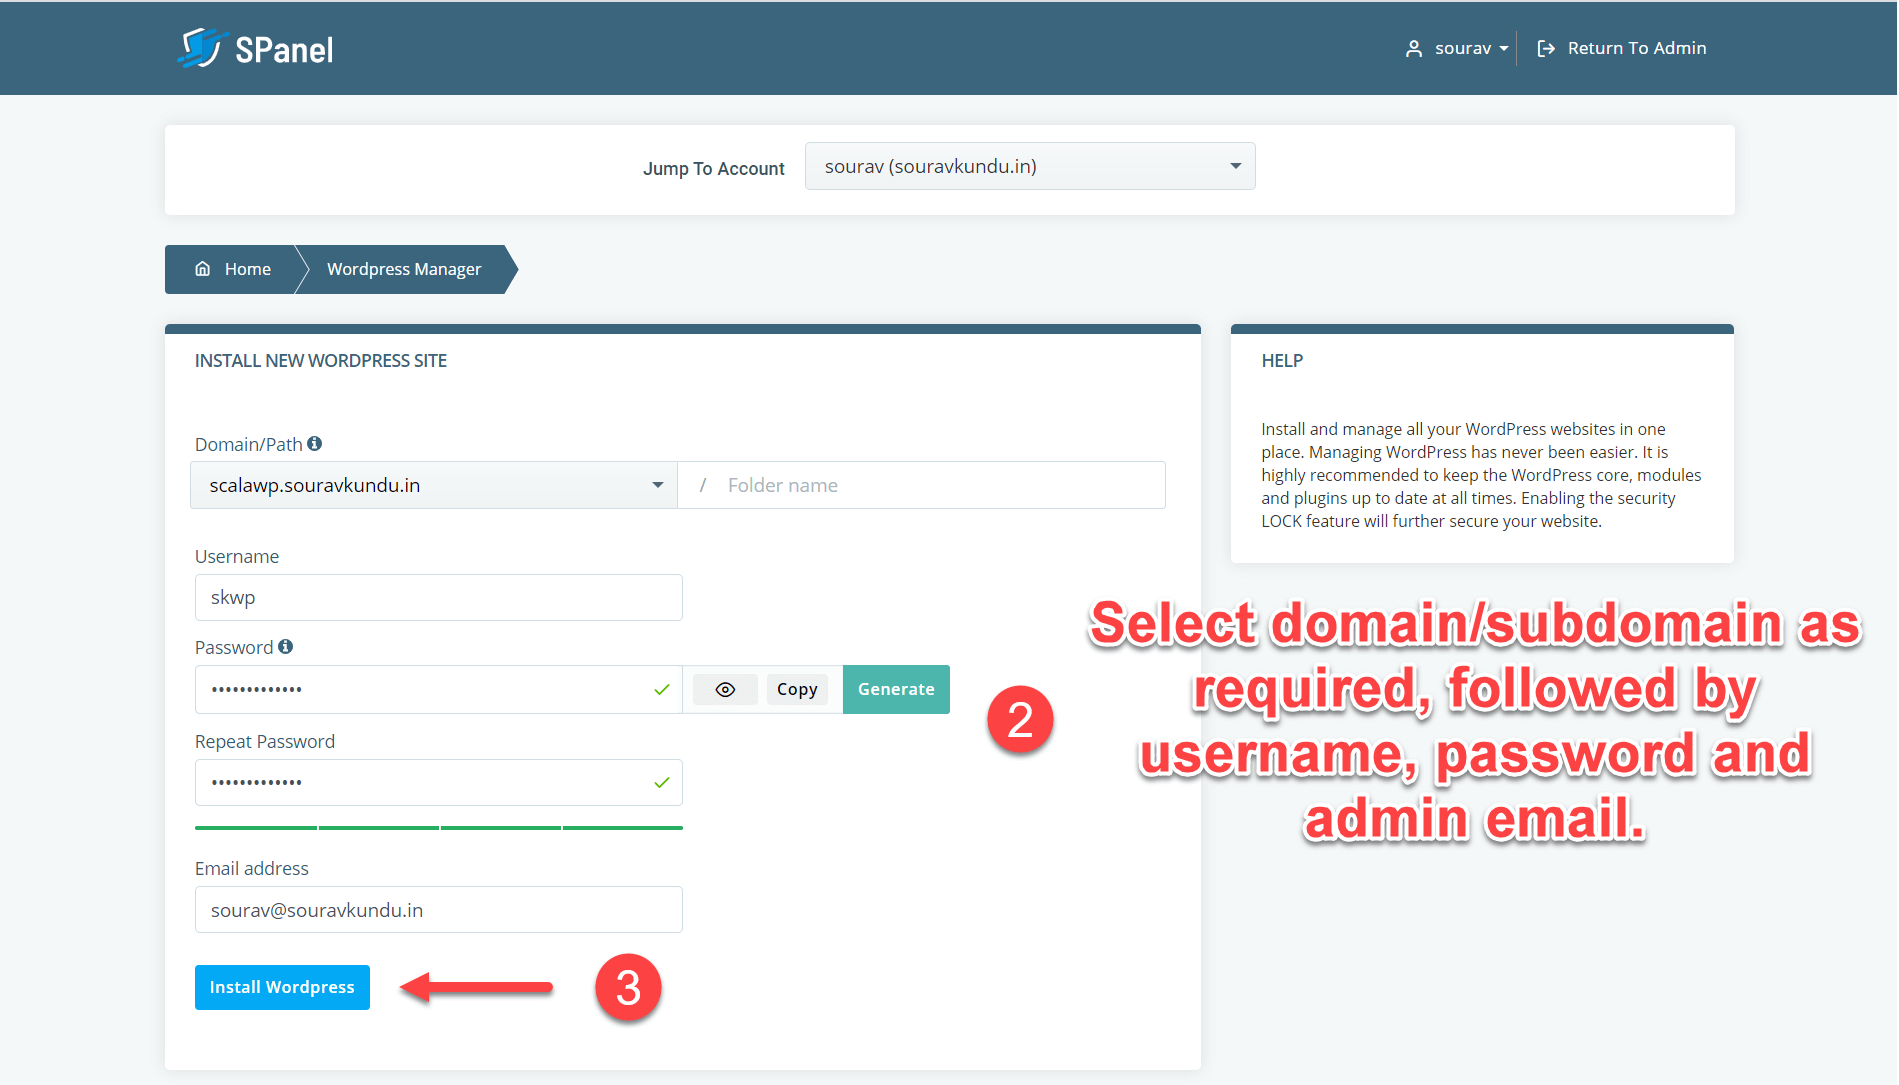
Step 2: You’re now in the SWordPress Manager page. Under Install a New WordPress Site, enter the details follows:
- Domain/Path: If you plan to install WordPress in the root directory of your site, then select the root domain name from the dropdown and leave the path directory empty.
However, since I want to install WordPress in a subdomain, I’ve selected scalawp.souravkundu.in from the dropdown menu, and left the path field empty. - Username: This will be your WordPress login username. Remember not to use ‘admin’ as it is a security risk.
- Password: Choose a secure password and save it in your password manager.
- Email address: This will be the primary email address for your WordPress admin account.
- Double-check the information and select Install WordPress.
The SPanel SWordPress Manager will now install a new WordPress site with the entered details.
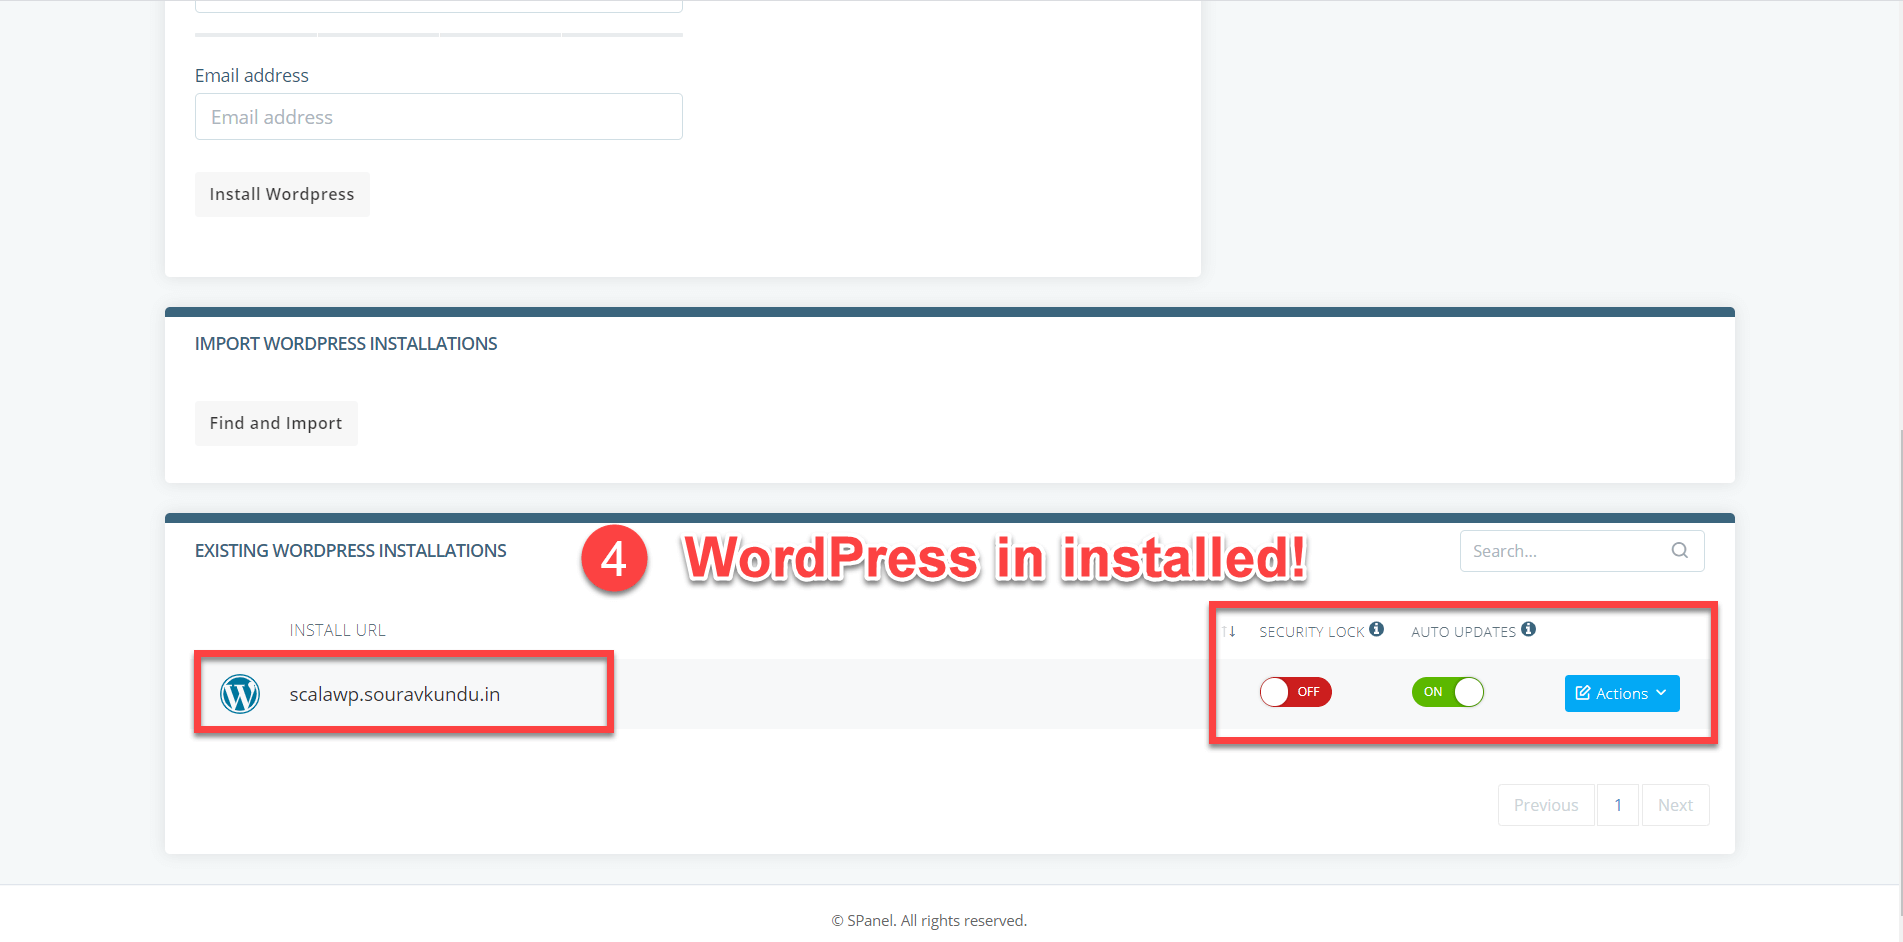
Step 3: Once done, you’ll see your new WordPress site under the Existing WordPress Installations sections. That’s it. Your WordPress site is now ready!
Note: Since you’re probably going to want to install new plugins/themes in your new WordPress site, it’s best to disable the Security Lock. Once you finish installing the required plugins, you can enable the Security Lock.
6. Other Features of the SPanel SWordPress Manager
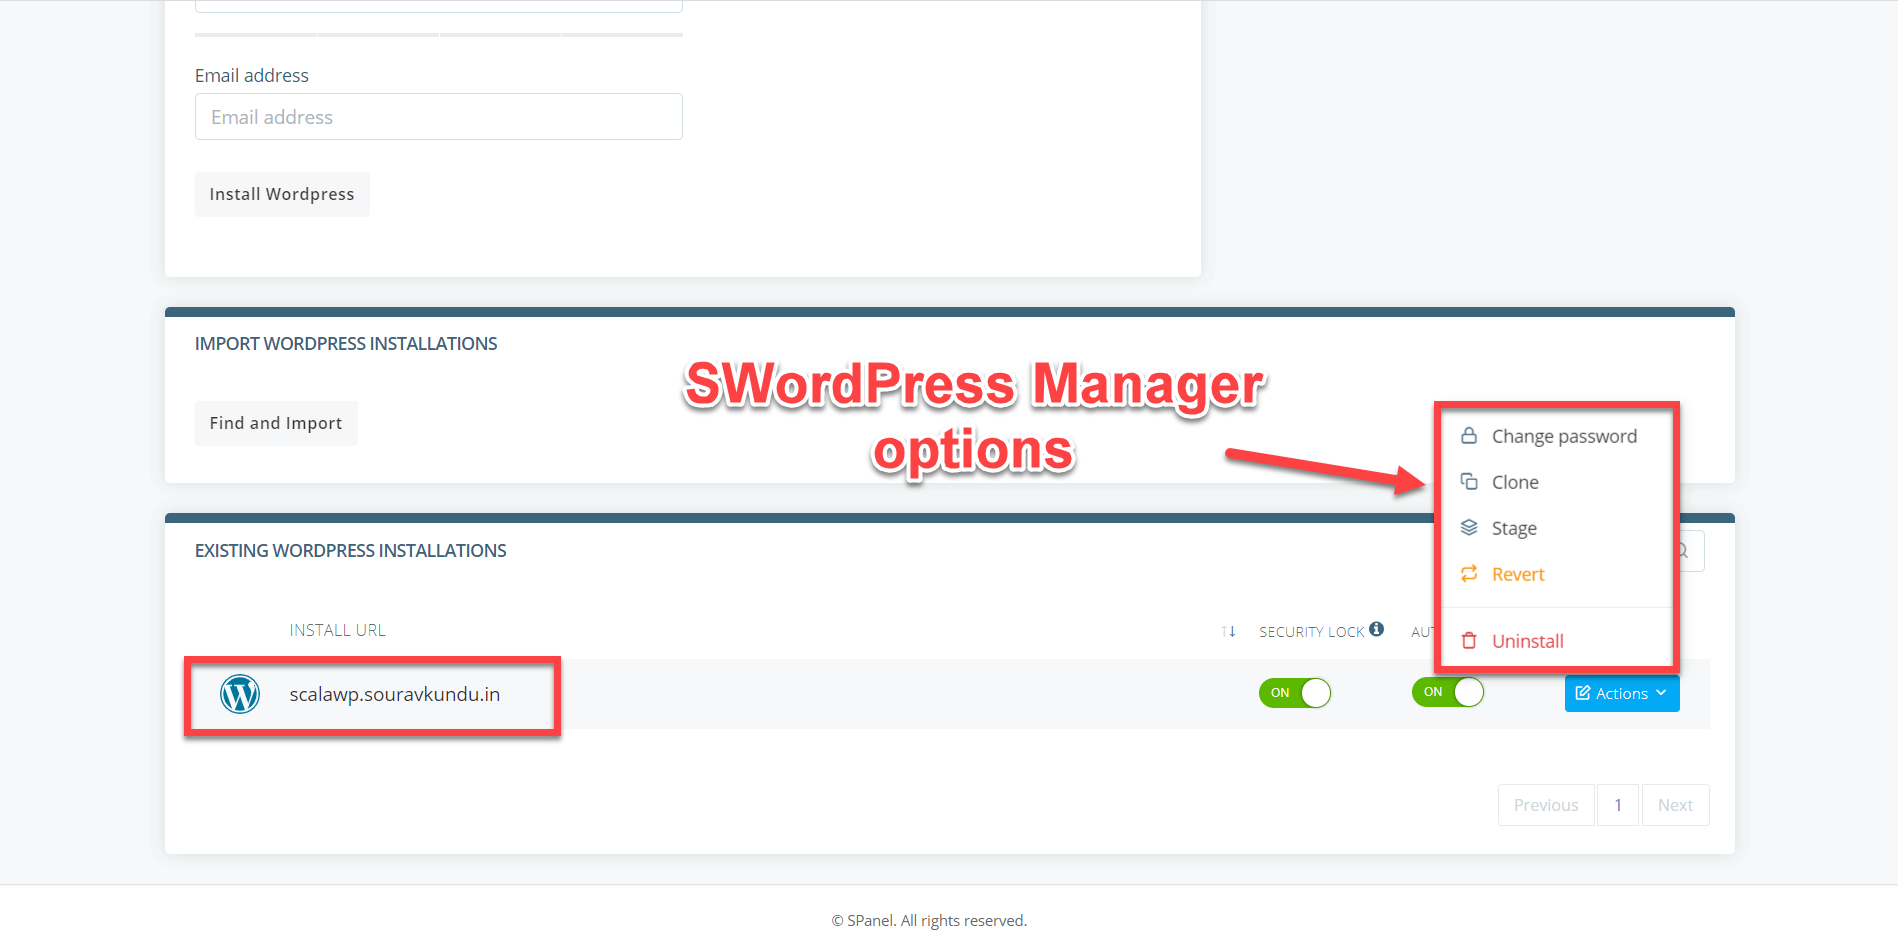
So far, I’ve shown you how to install a new WordPress site using SWordPress Manager. It can do other time-saving tasks such as:
- Changing the WordPress admin password with just a single click
- Cloning a WordPress site
- Creating a staging version of a WordPress site
- Deleting a WordPress site
- Enabling/Disabling the security lock of a WordPress site; which when enabled, prevents the installation of new plugins or the modification of existing WordPress files.
- Enabling/Disabling WordPress automatic updates
6.1 How to Change WordPress Admin Password using Scala’s SPanel SWordPress Manager
One of the most useful features offered by SPanel SWordPress Manager is that you can reset your WordPress admin password directly from SPanel, without having to deal with a password reset email.
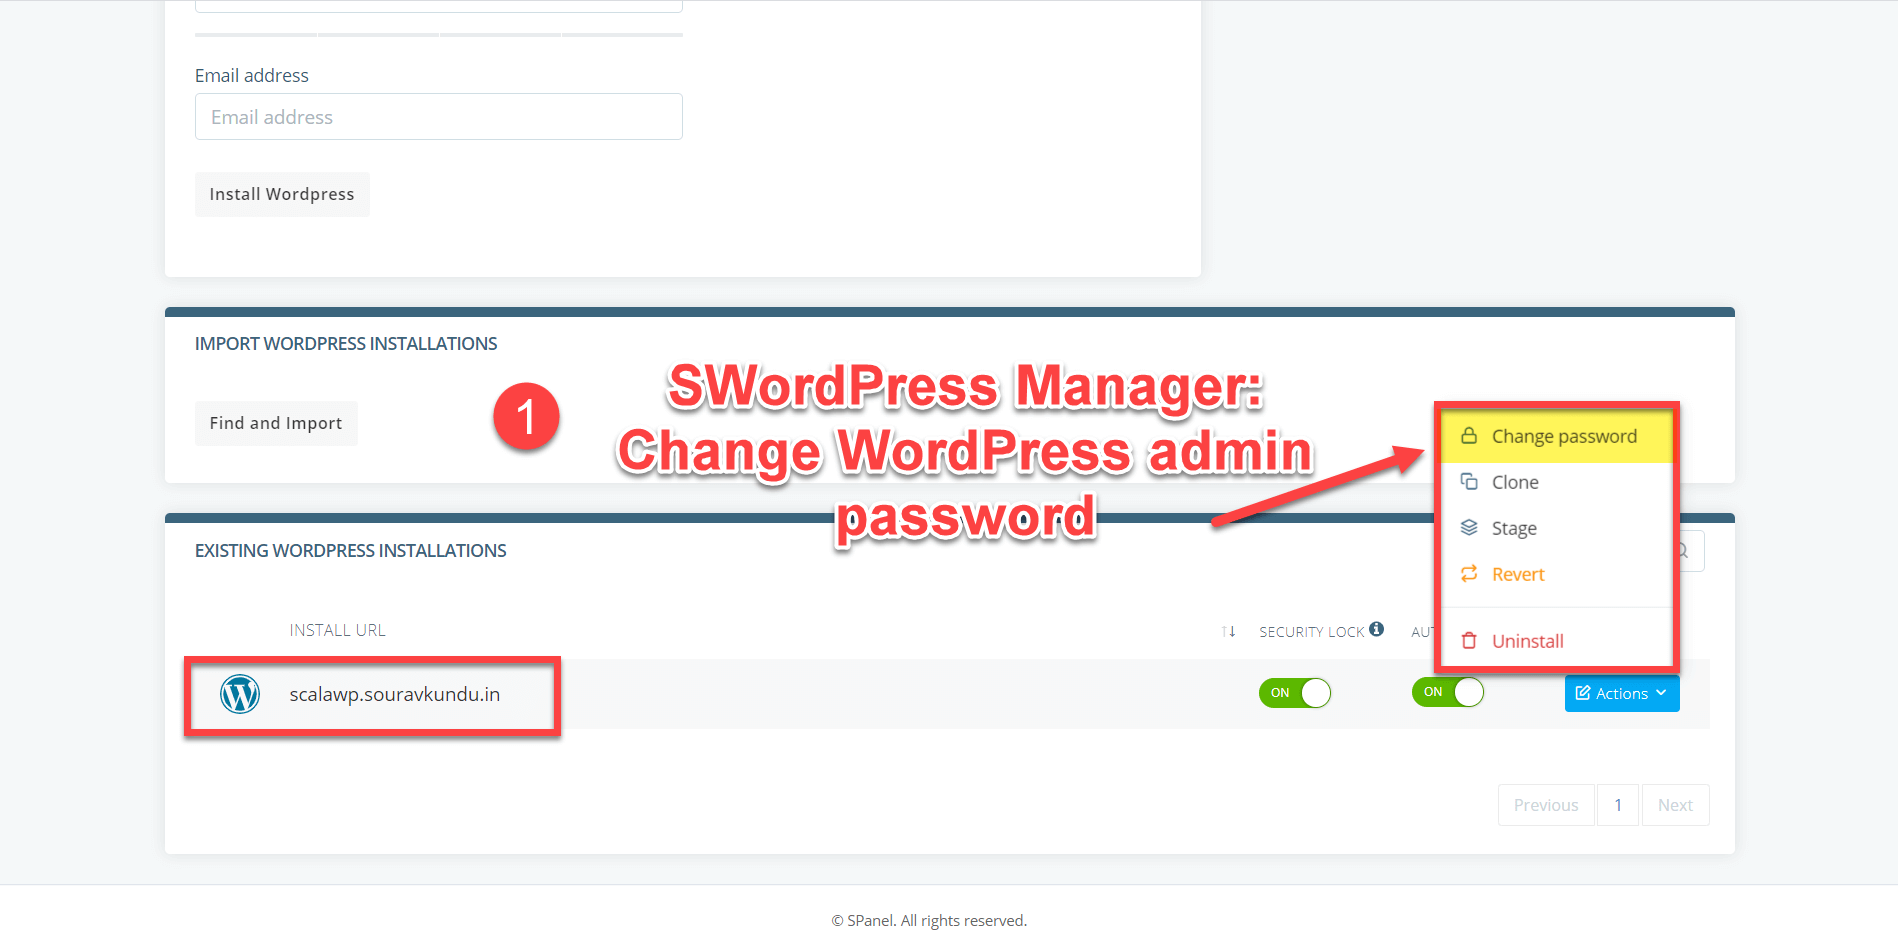
Step 1: Go to your SPanel user account (the non-admin one) and select SWordPress Manager. Next, select the WordPress site you want to modify and select Actions → Change password.
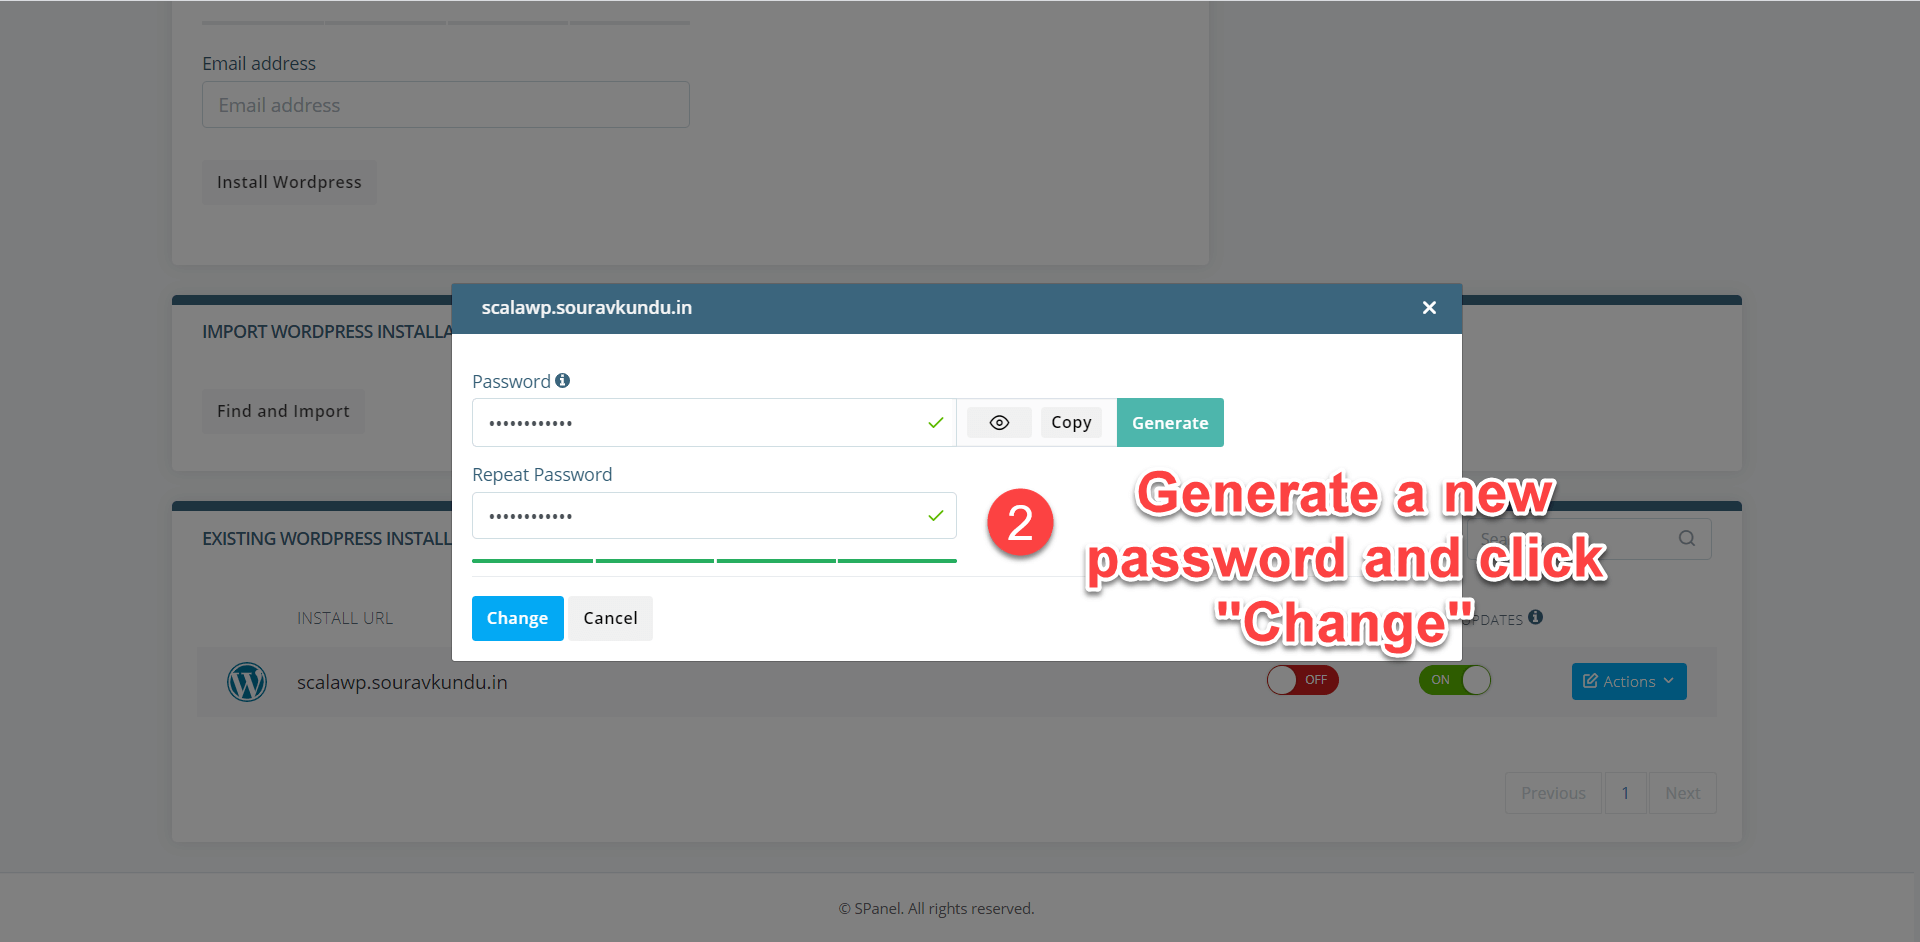
Step 2: Enter the new password and save it in your password manager. You can use the built-in password generator to quickly generate a strong password. Click on Change to complete the process.
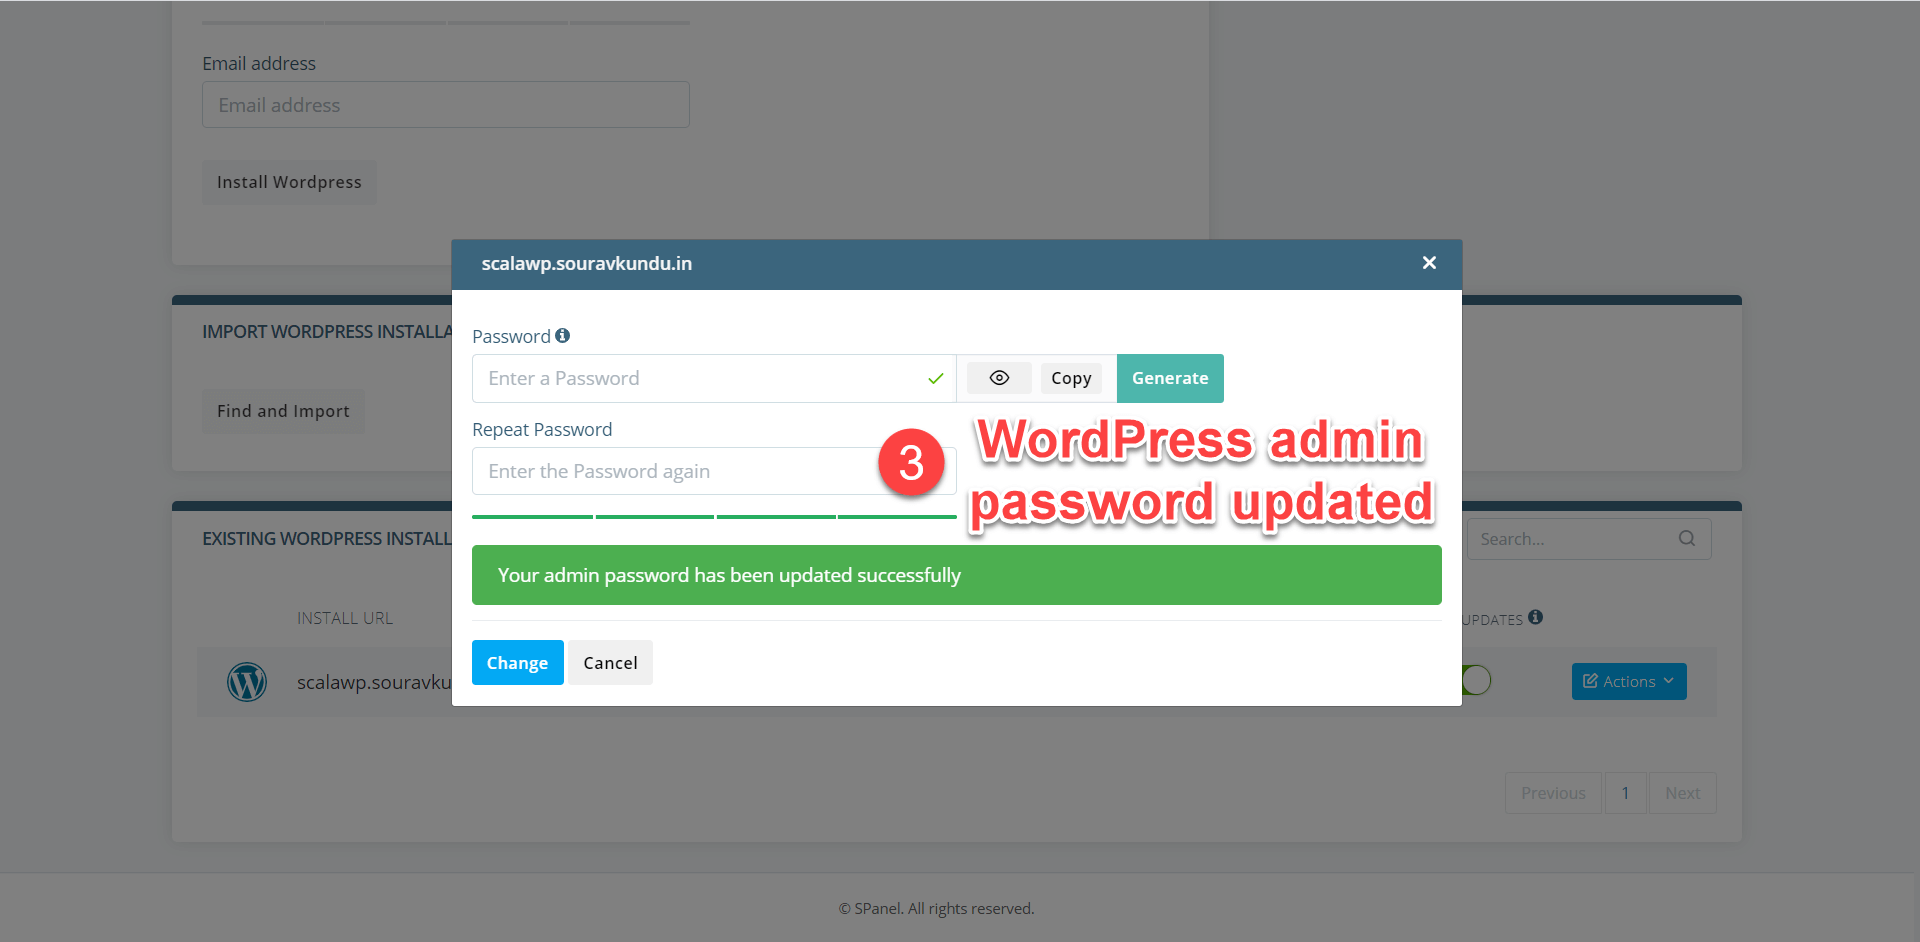
Step 3: Your WordPress admin password will be successfully updated as shown in the screenshot above.
6.2 Better WordPress Security with SWordPress Security Lock
The included WordPress Security Lock feature, when enabled, prevents the WordPress admin user (or any other user) from installing new plugins, or modifying WordPress files. This security feature works at a file-permission level, which helps prevent malicious attacks on your WordPress site.
However, when you want to install a new plugin, simply disable the Security Lock, install the plugin and enable the Security Lock again.
Here’s a demonstration of what happens when you try to install a plugin in WordPress with Security Lock enabled.
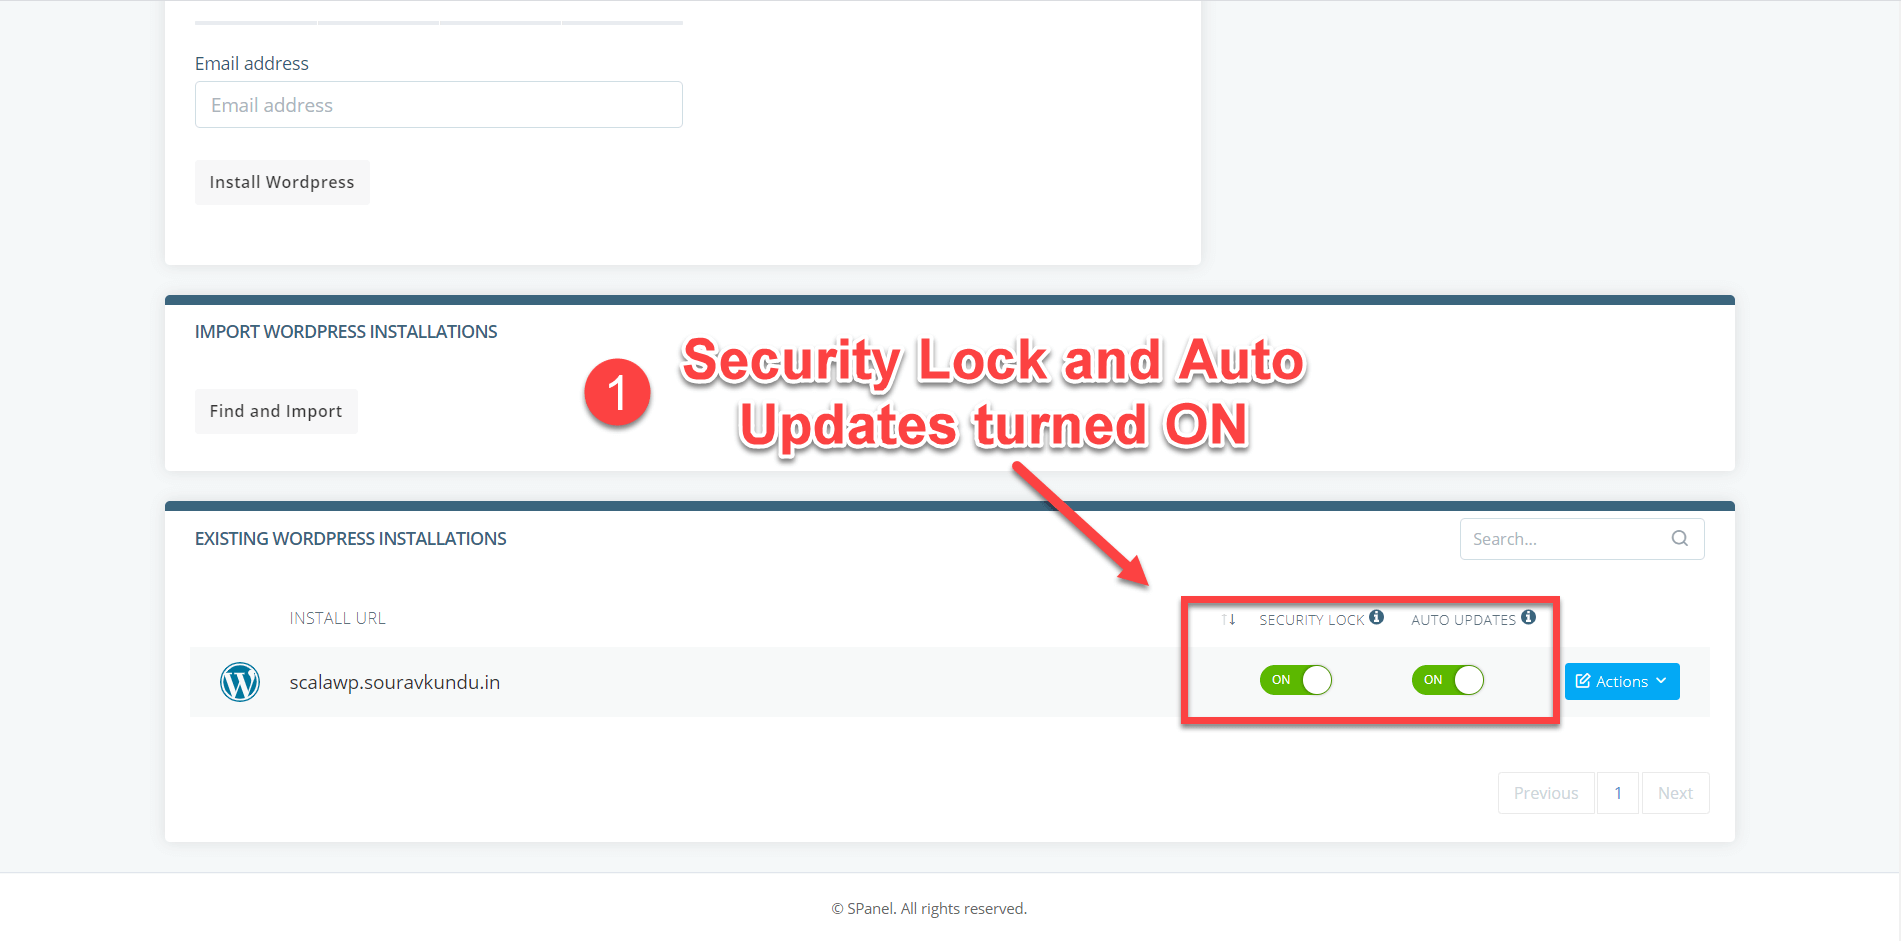
Step 1: First, you enable the WordPress Security Lock from the SPanel SWordPress Manager.
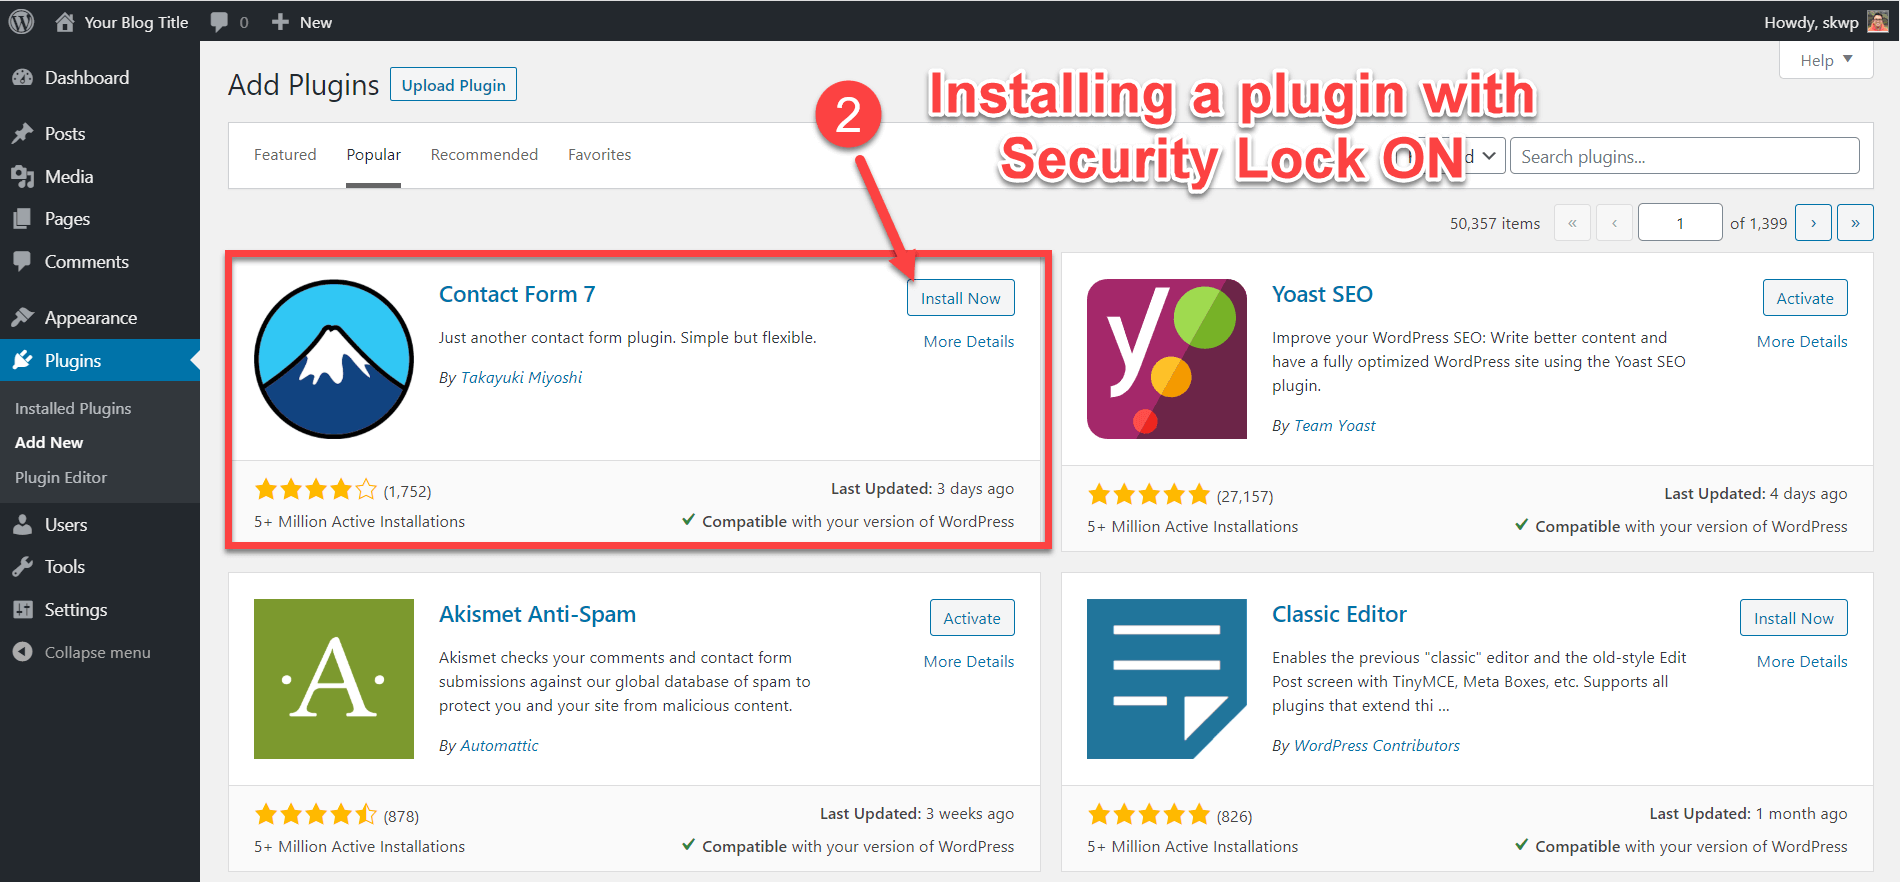
Step 2: Go to your WordPress dashboard → Plugins → Add New and try to install a new plugin.
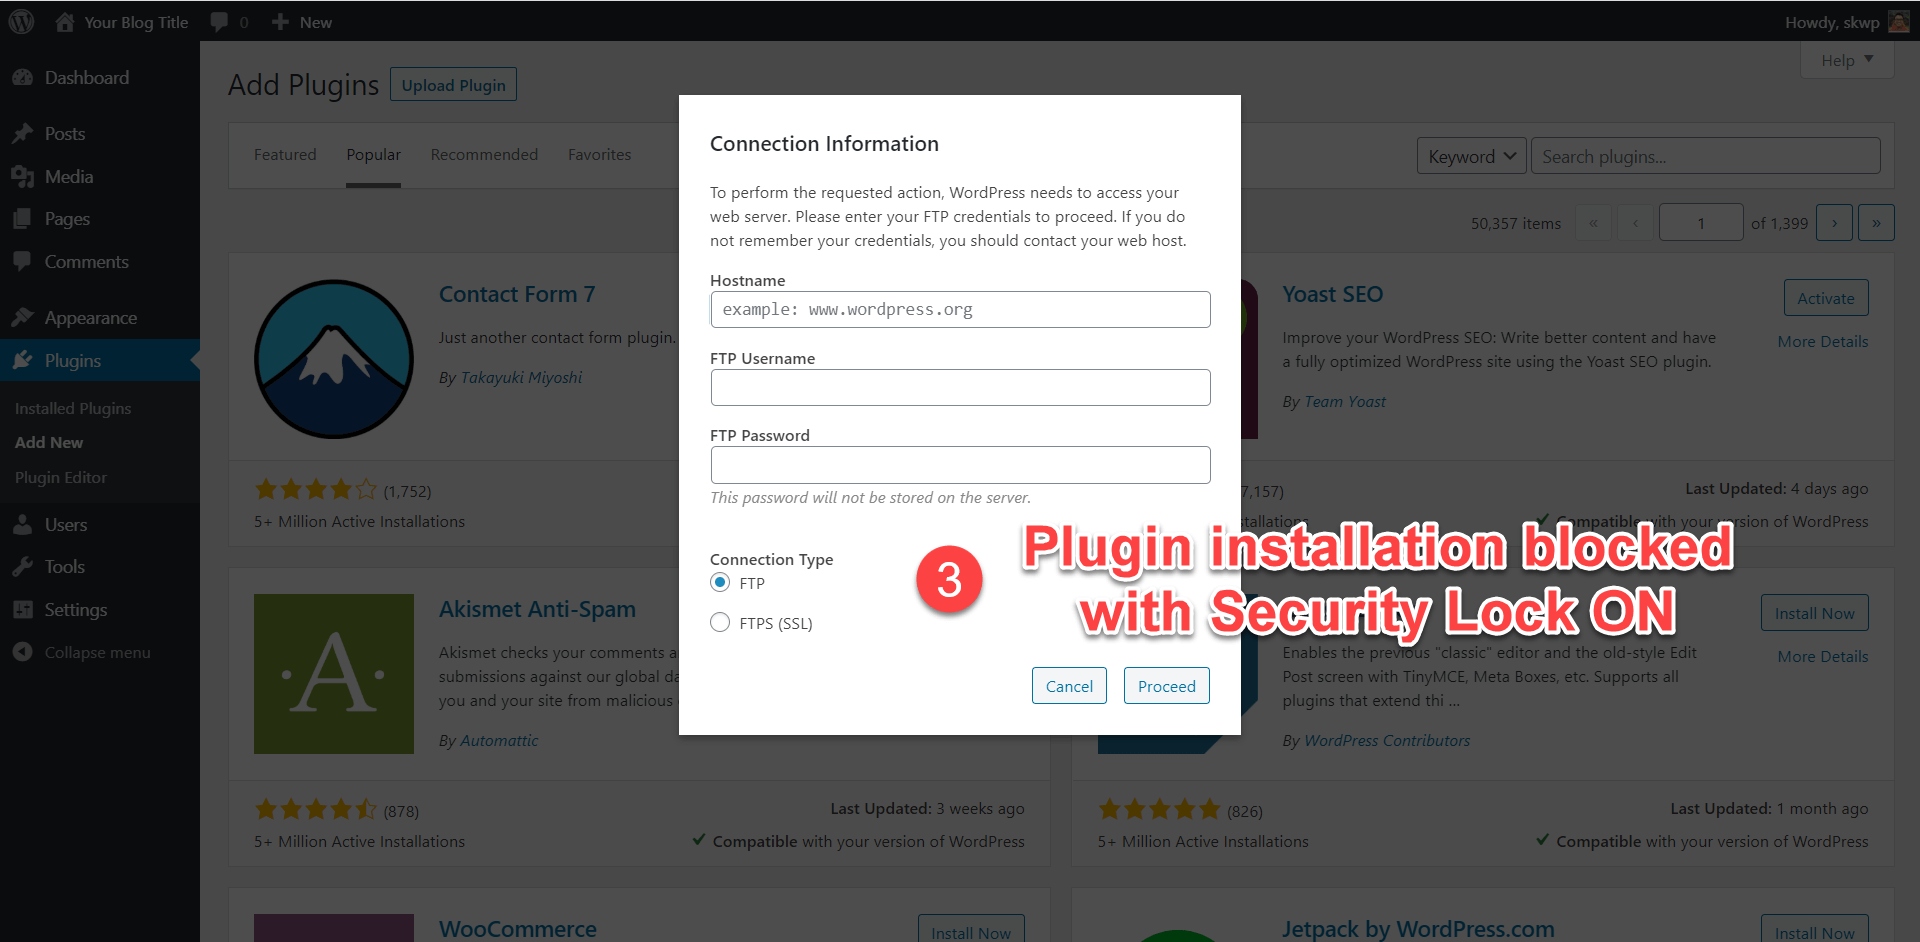
Step 3: You’ll get an error message as shown in the screenshot above.
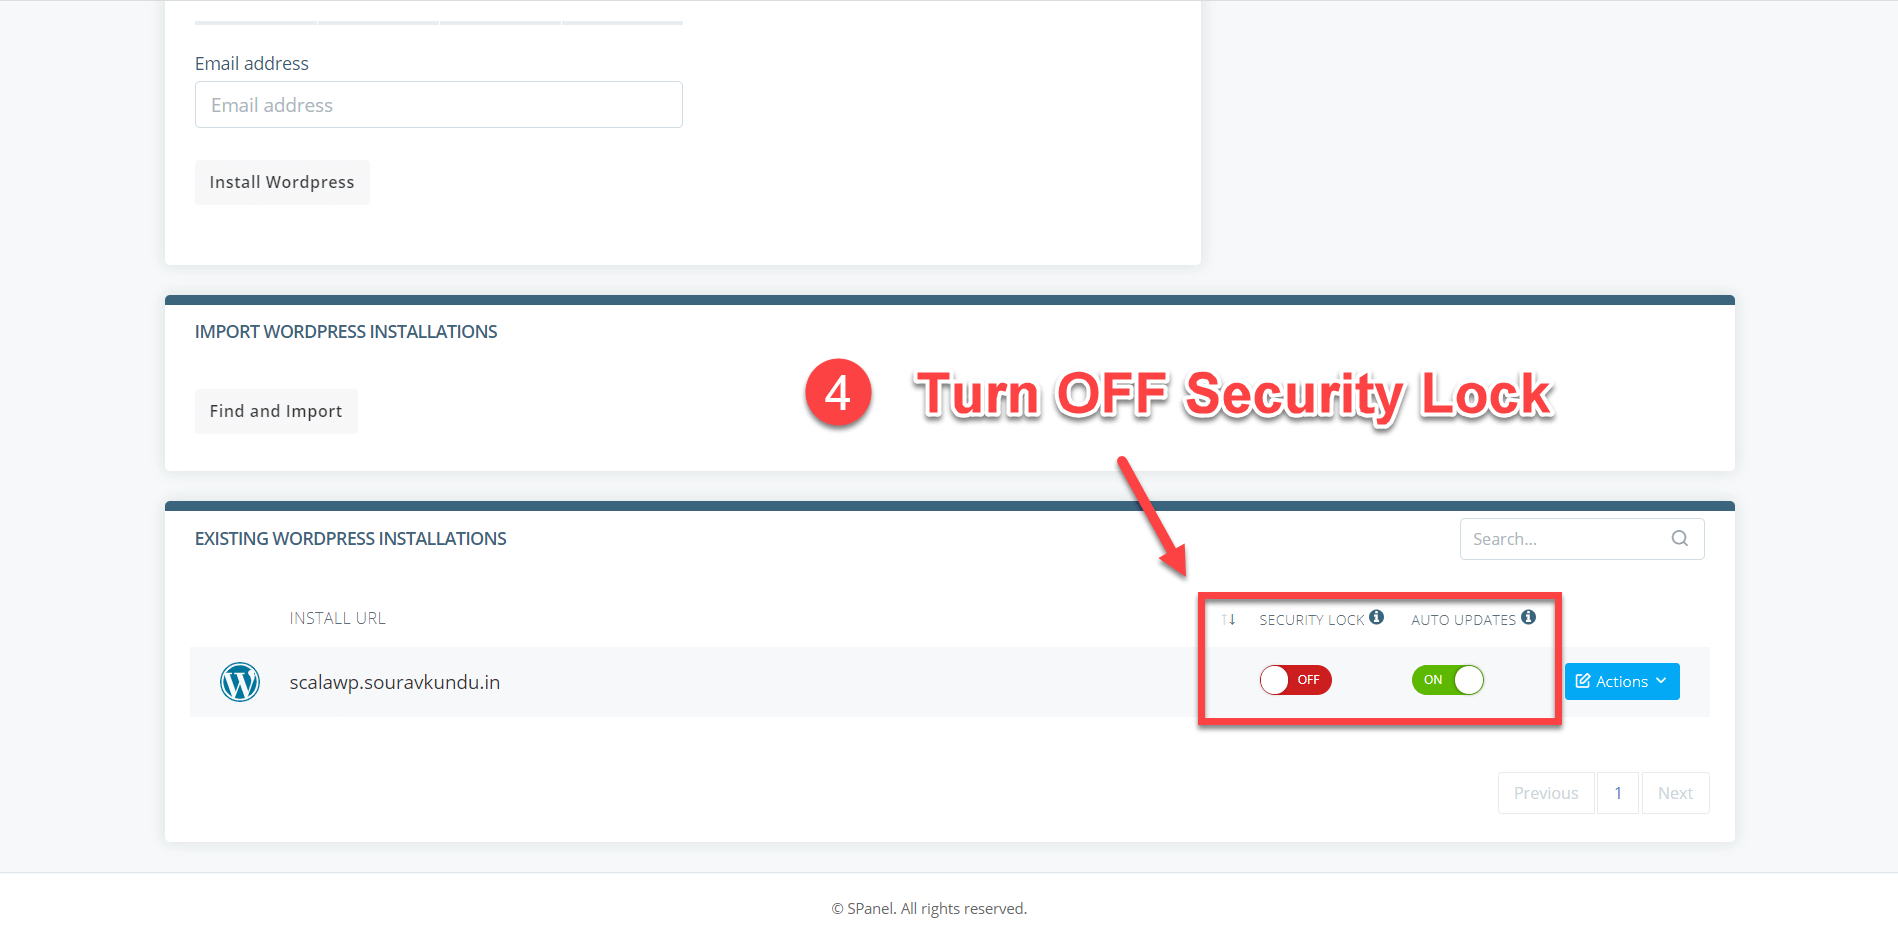
Step 4: Return to the SWordPress Manager and disable the Security Lock for your WordPress site.
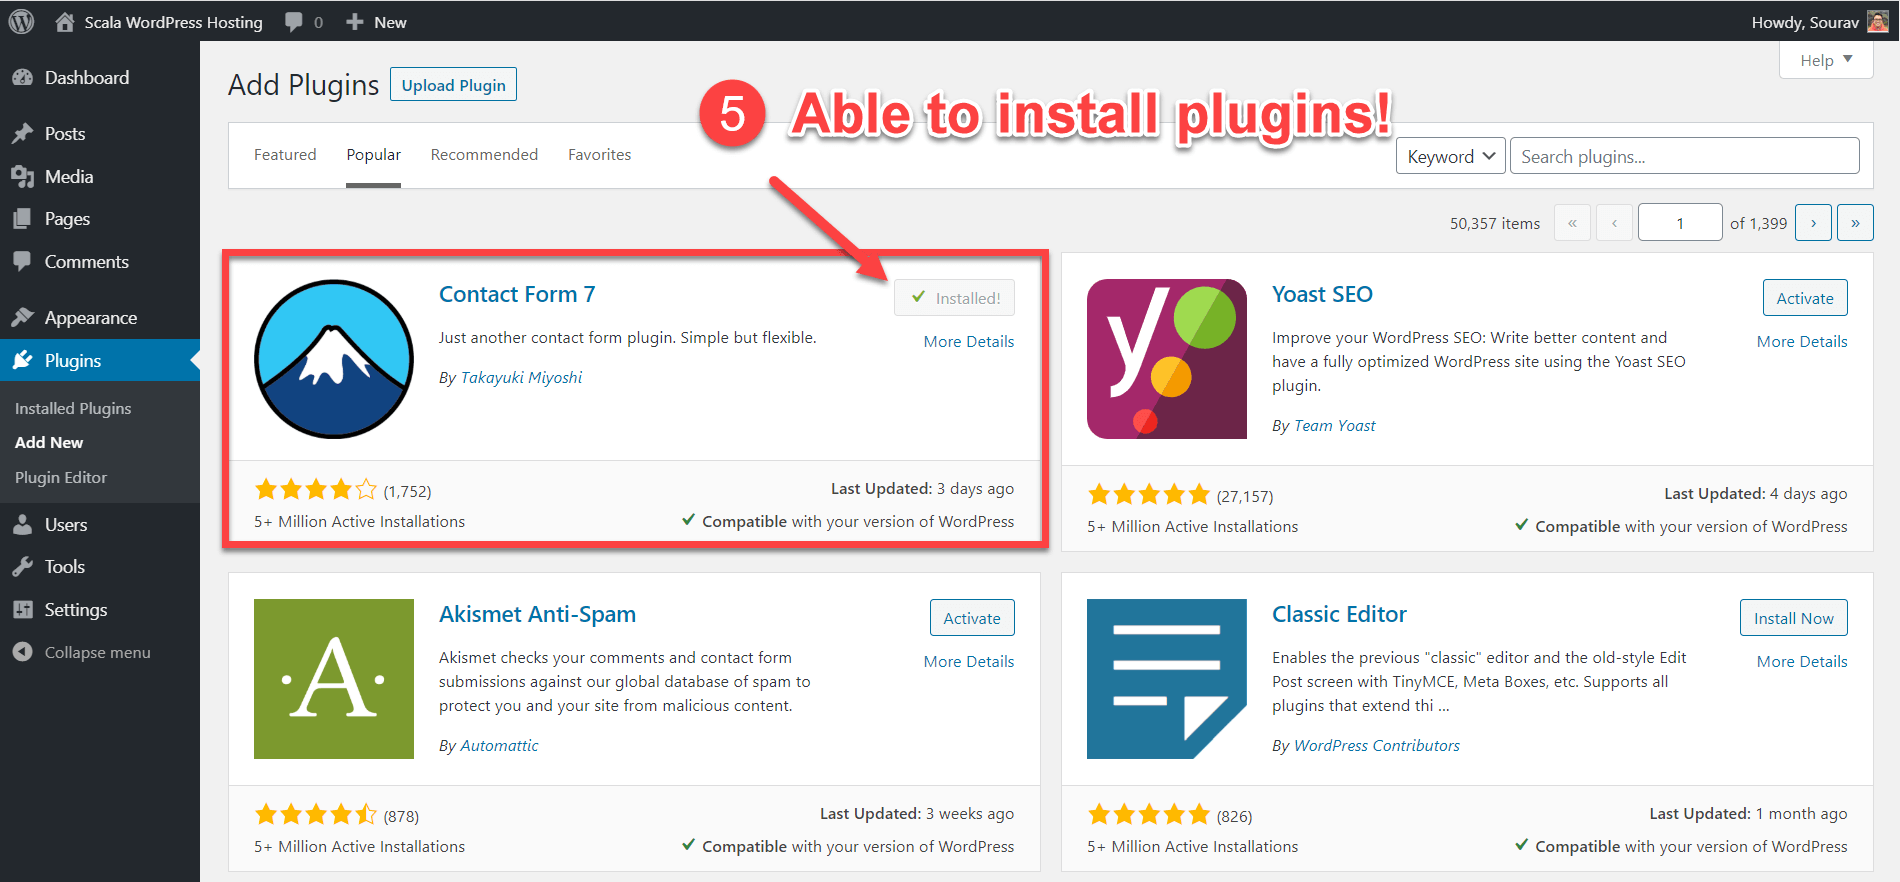
Step 5: Try to install the plugin again, and this time it will be successfully installed. Once done, don’t forget to re-enable the security lock.
6.3 How to Clone a WordPress Site using Scala SWordPress Manager
When you have a live WordPress site with incoming traffic, it is always a good idea to test new plugins/theme changes in the staging version of the site. SWordPress Manager gives you the ability to create a staging version, or a clone of your WordPress site.
The following section shows you how to create a clone of your WordPress site:
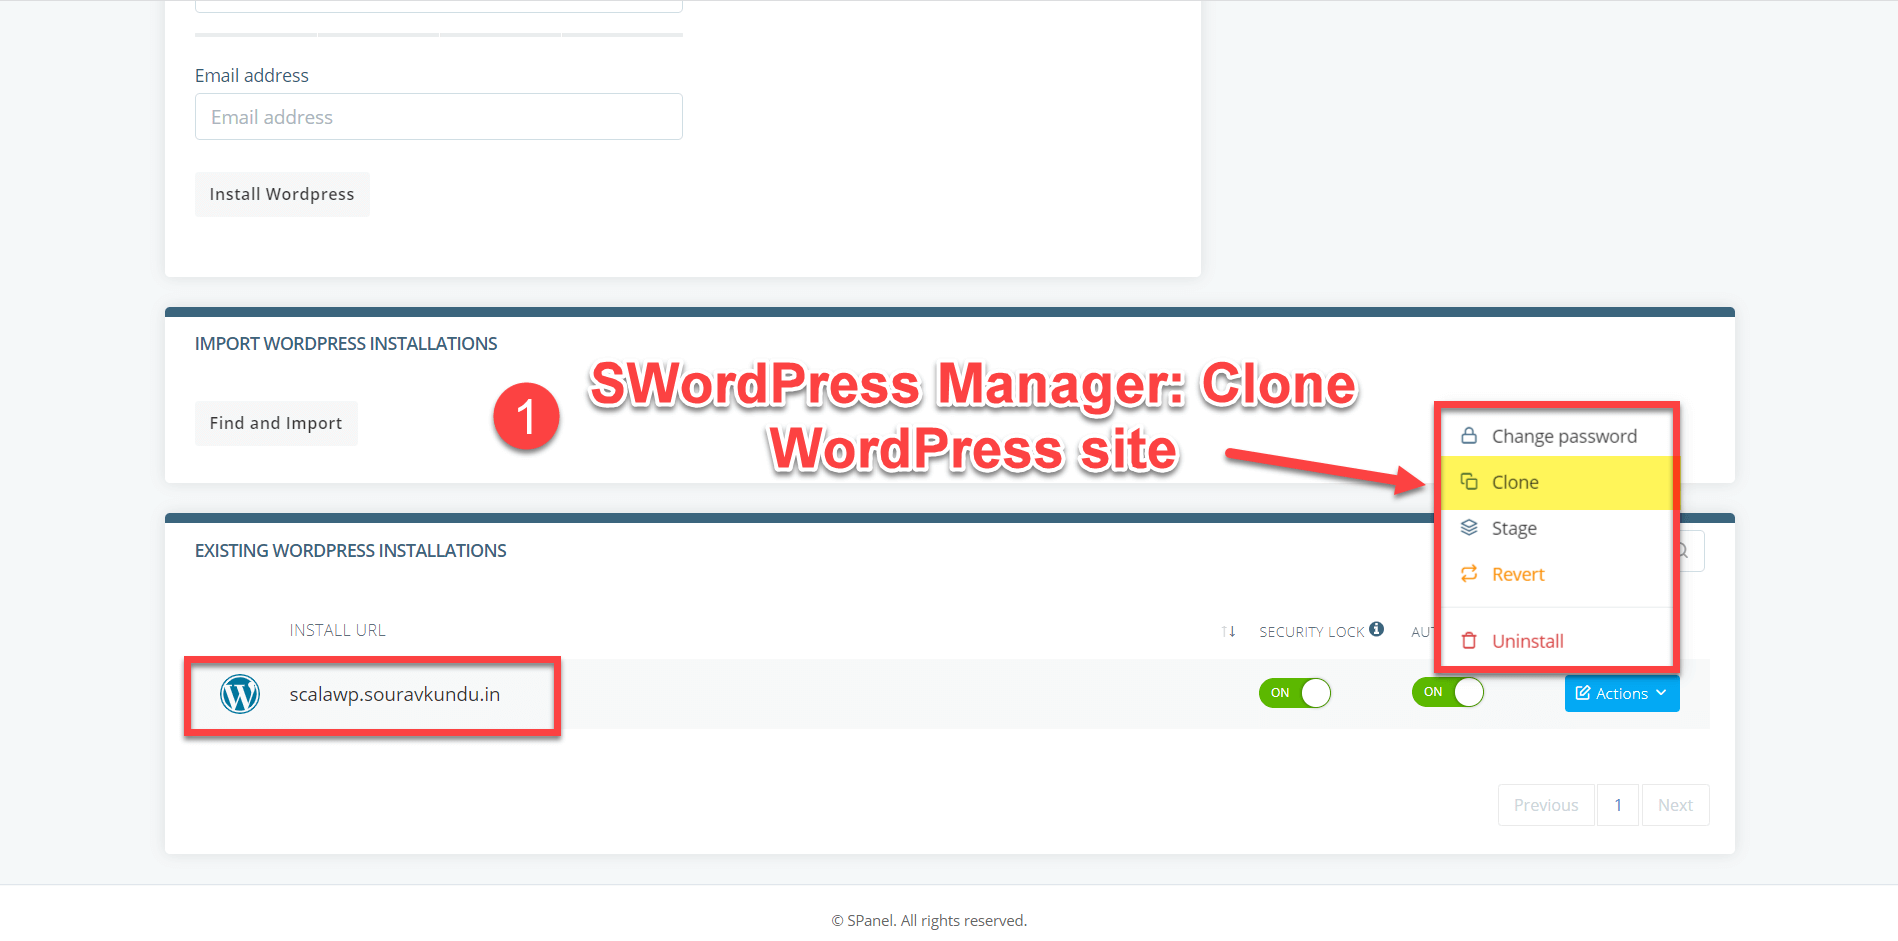
Step 1: Go to your SPanel SWordPress Manager, select the site you want to clone and click on Actions → Clone.
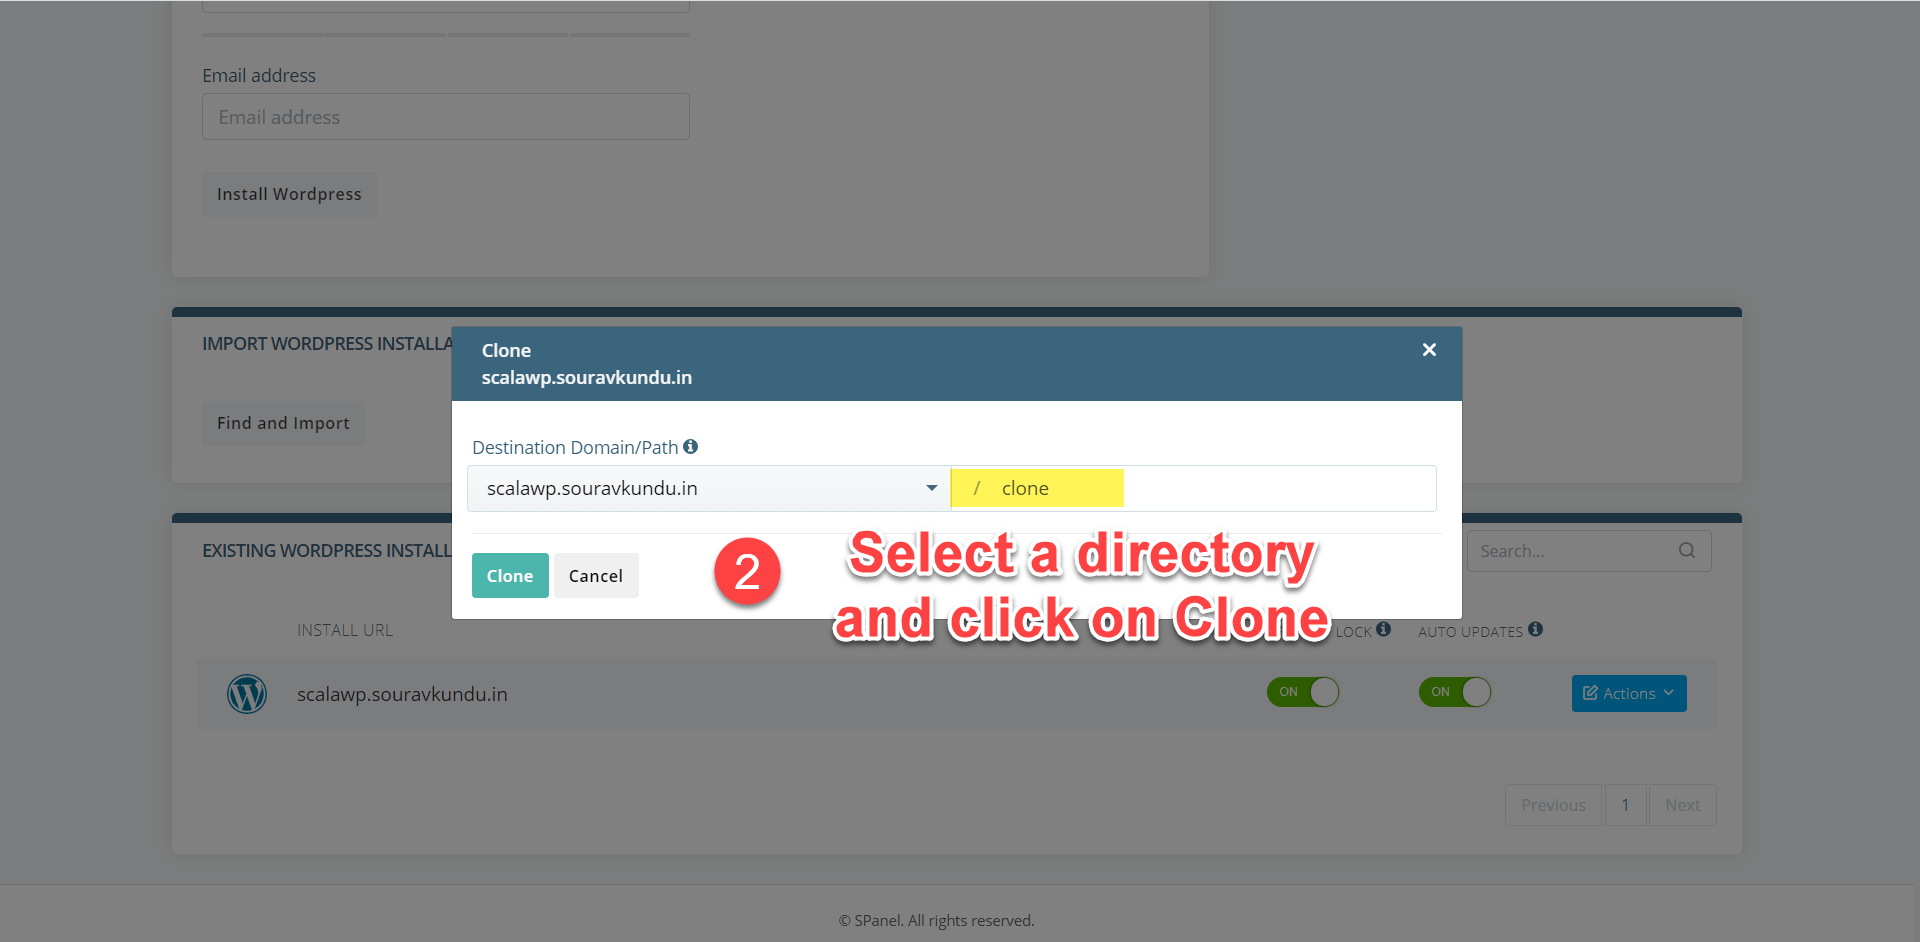
Step 2: Enter the directory in which you want to save the cloned version. I’ve selected the subdirectory /clone for this tutorial. Click on Clone when ready.
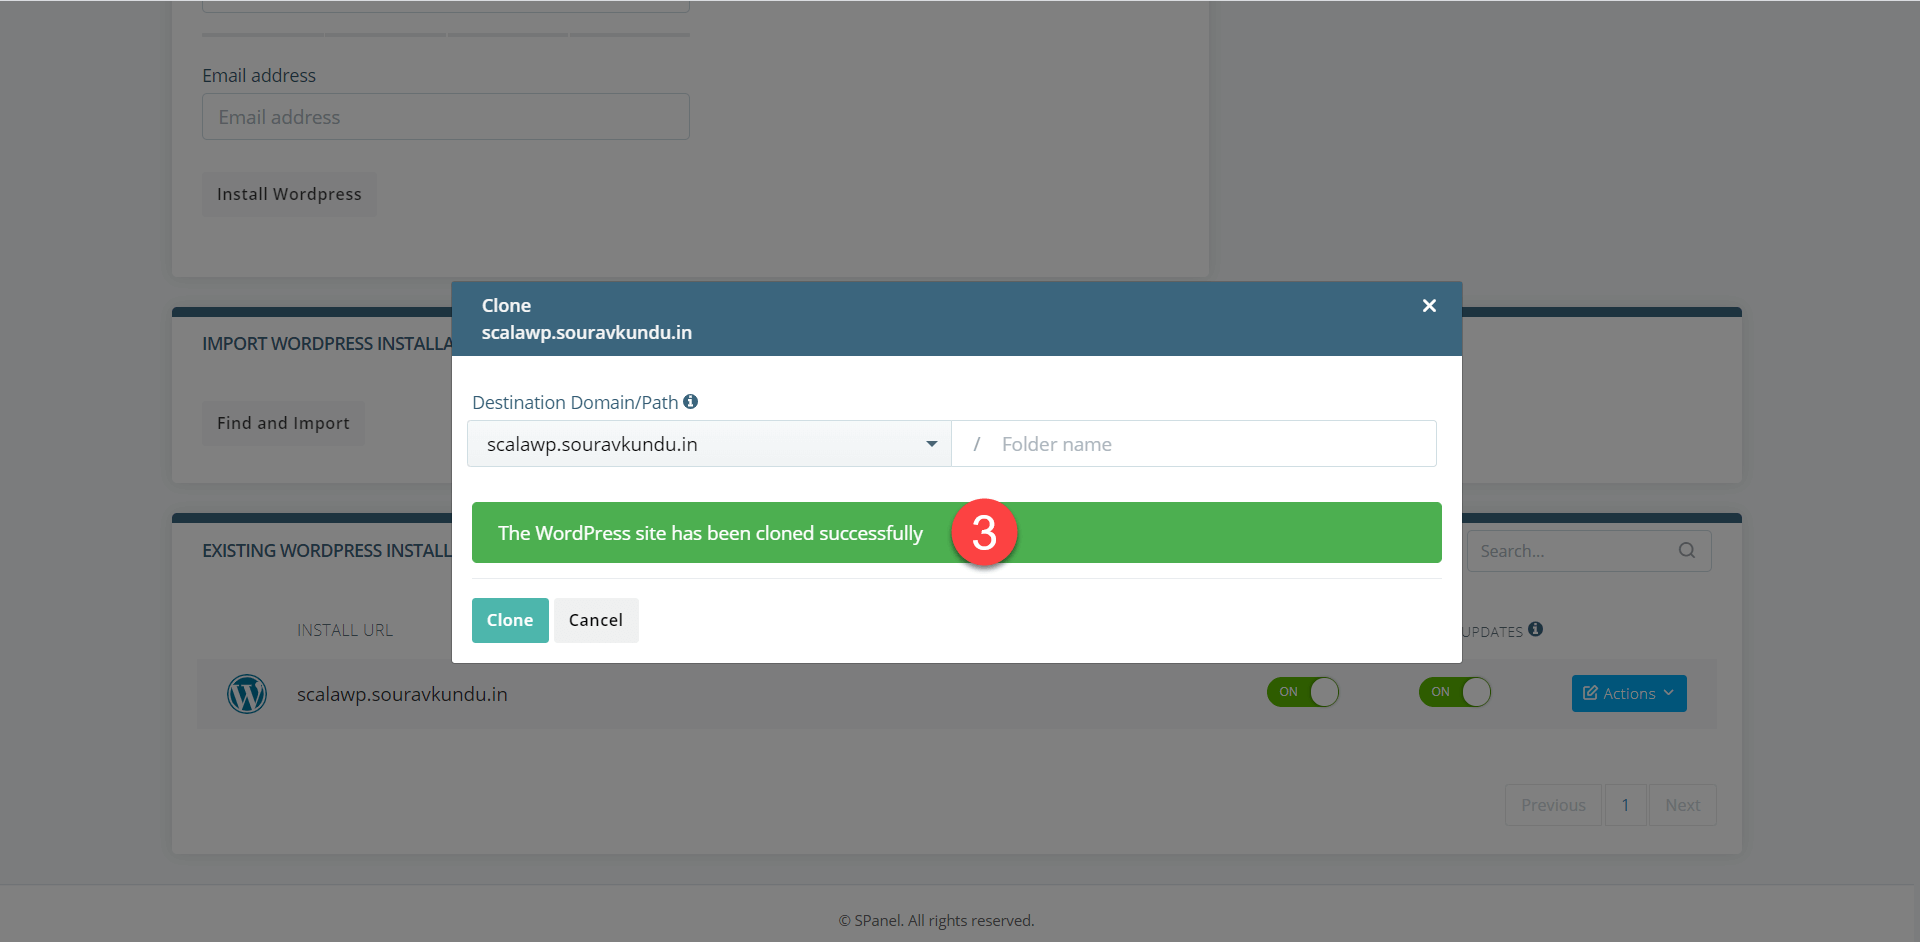
Step 3: In about 30 seconds, the cloning process is complete, and the SWordPress Manager shows you a success message as shown in the screenshot above.
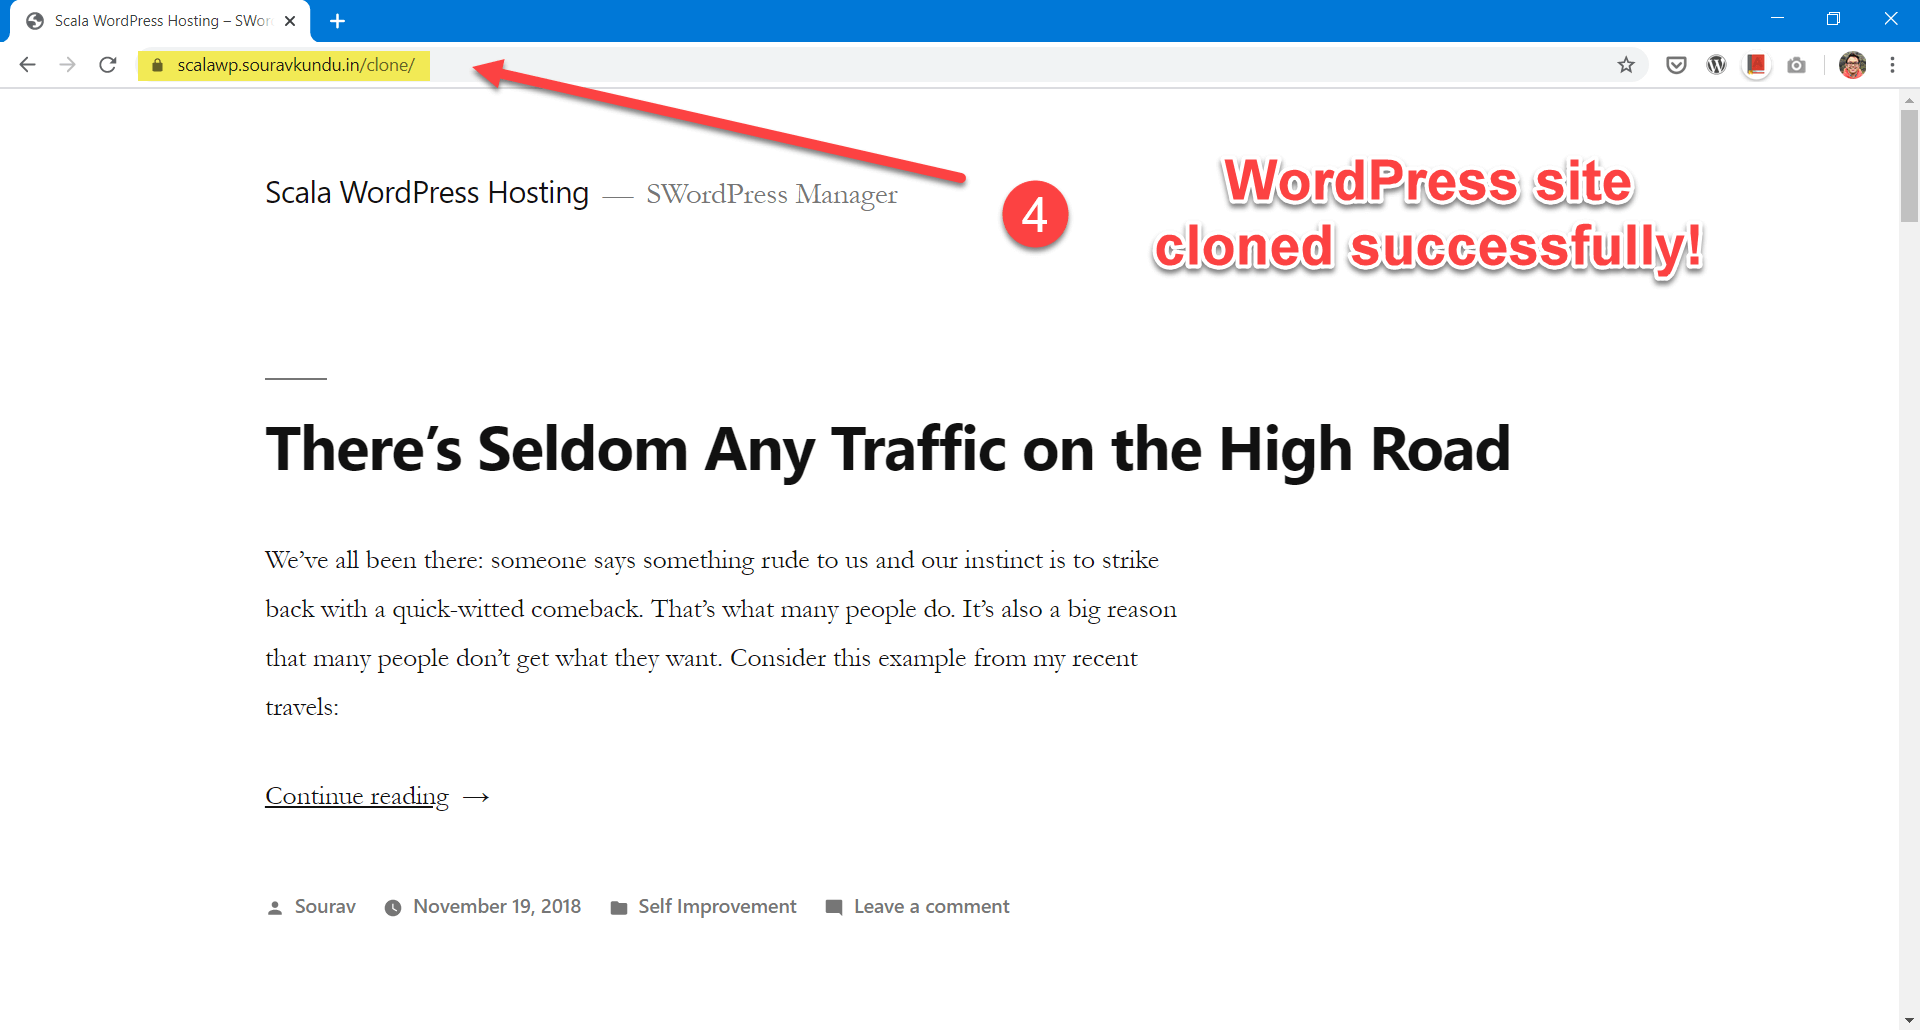
Step 4: Here’s a screenshot of the cloned WordPress site.
6.4 Backup & Restore WordPress Sites using SWordPress Manager
Scala’s SPanel comes with a backup and restore tool for your WordPress site. When taking a backup, SPanel takes a backup of your entire WordPress VPS. You cannot select individual WordPress sites to backup, nor can you configure automated daily backups using SPanel. However, depending on your Scala Hosting plan, you can configure daily automatic backups.
Here’s how you can take a full backup of your WordPress VPS using SPanel.
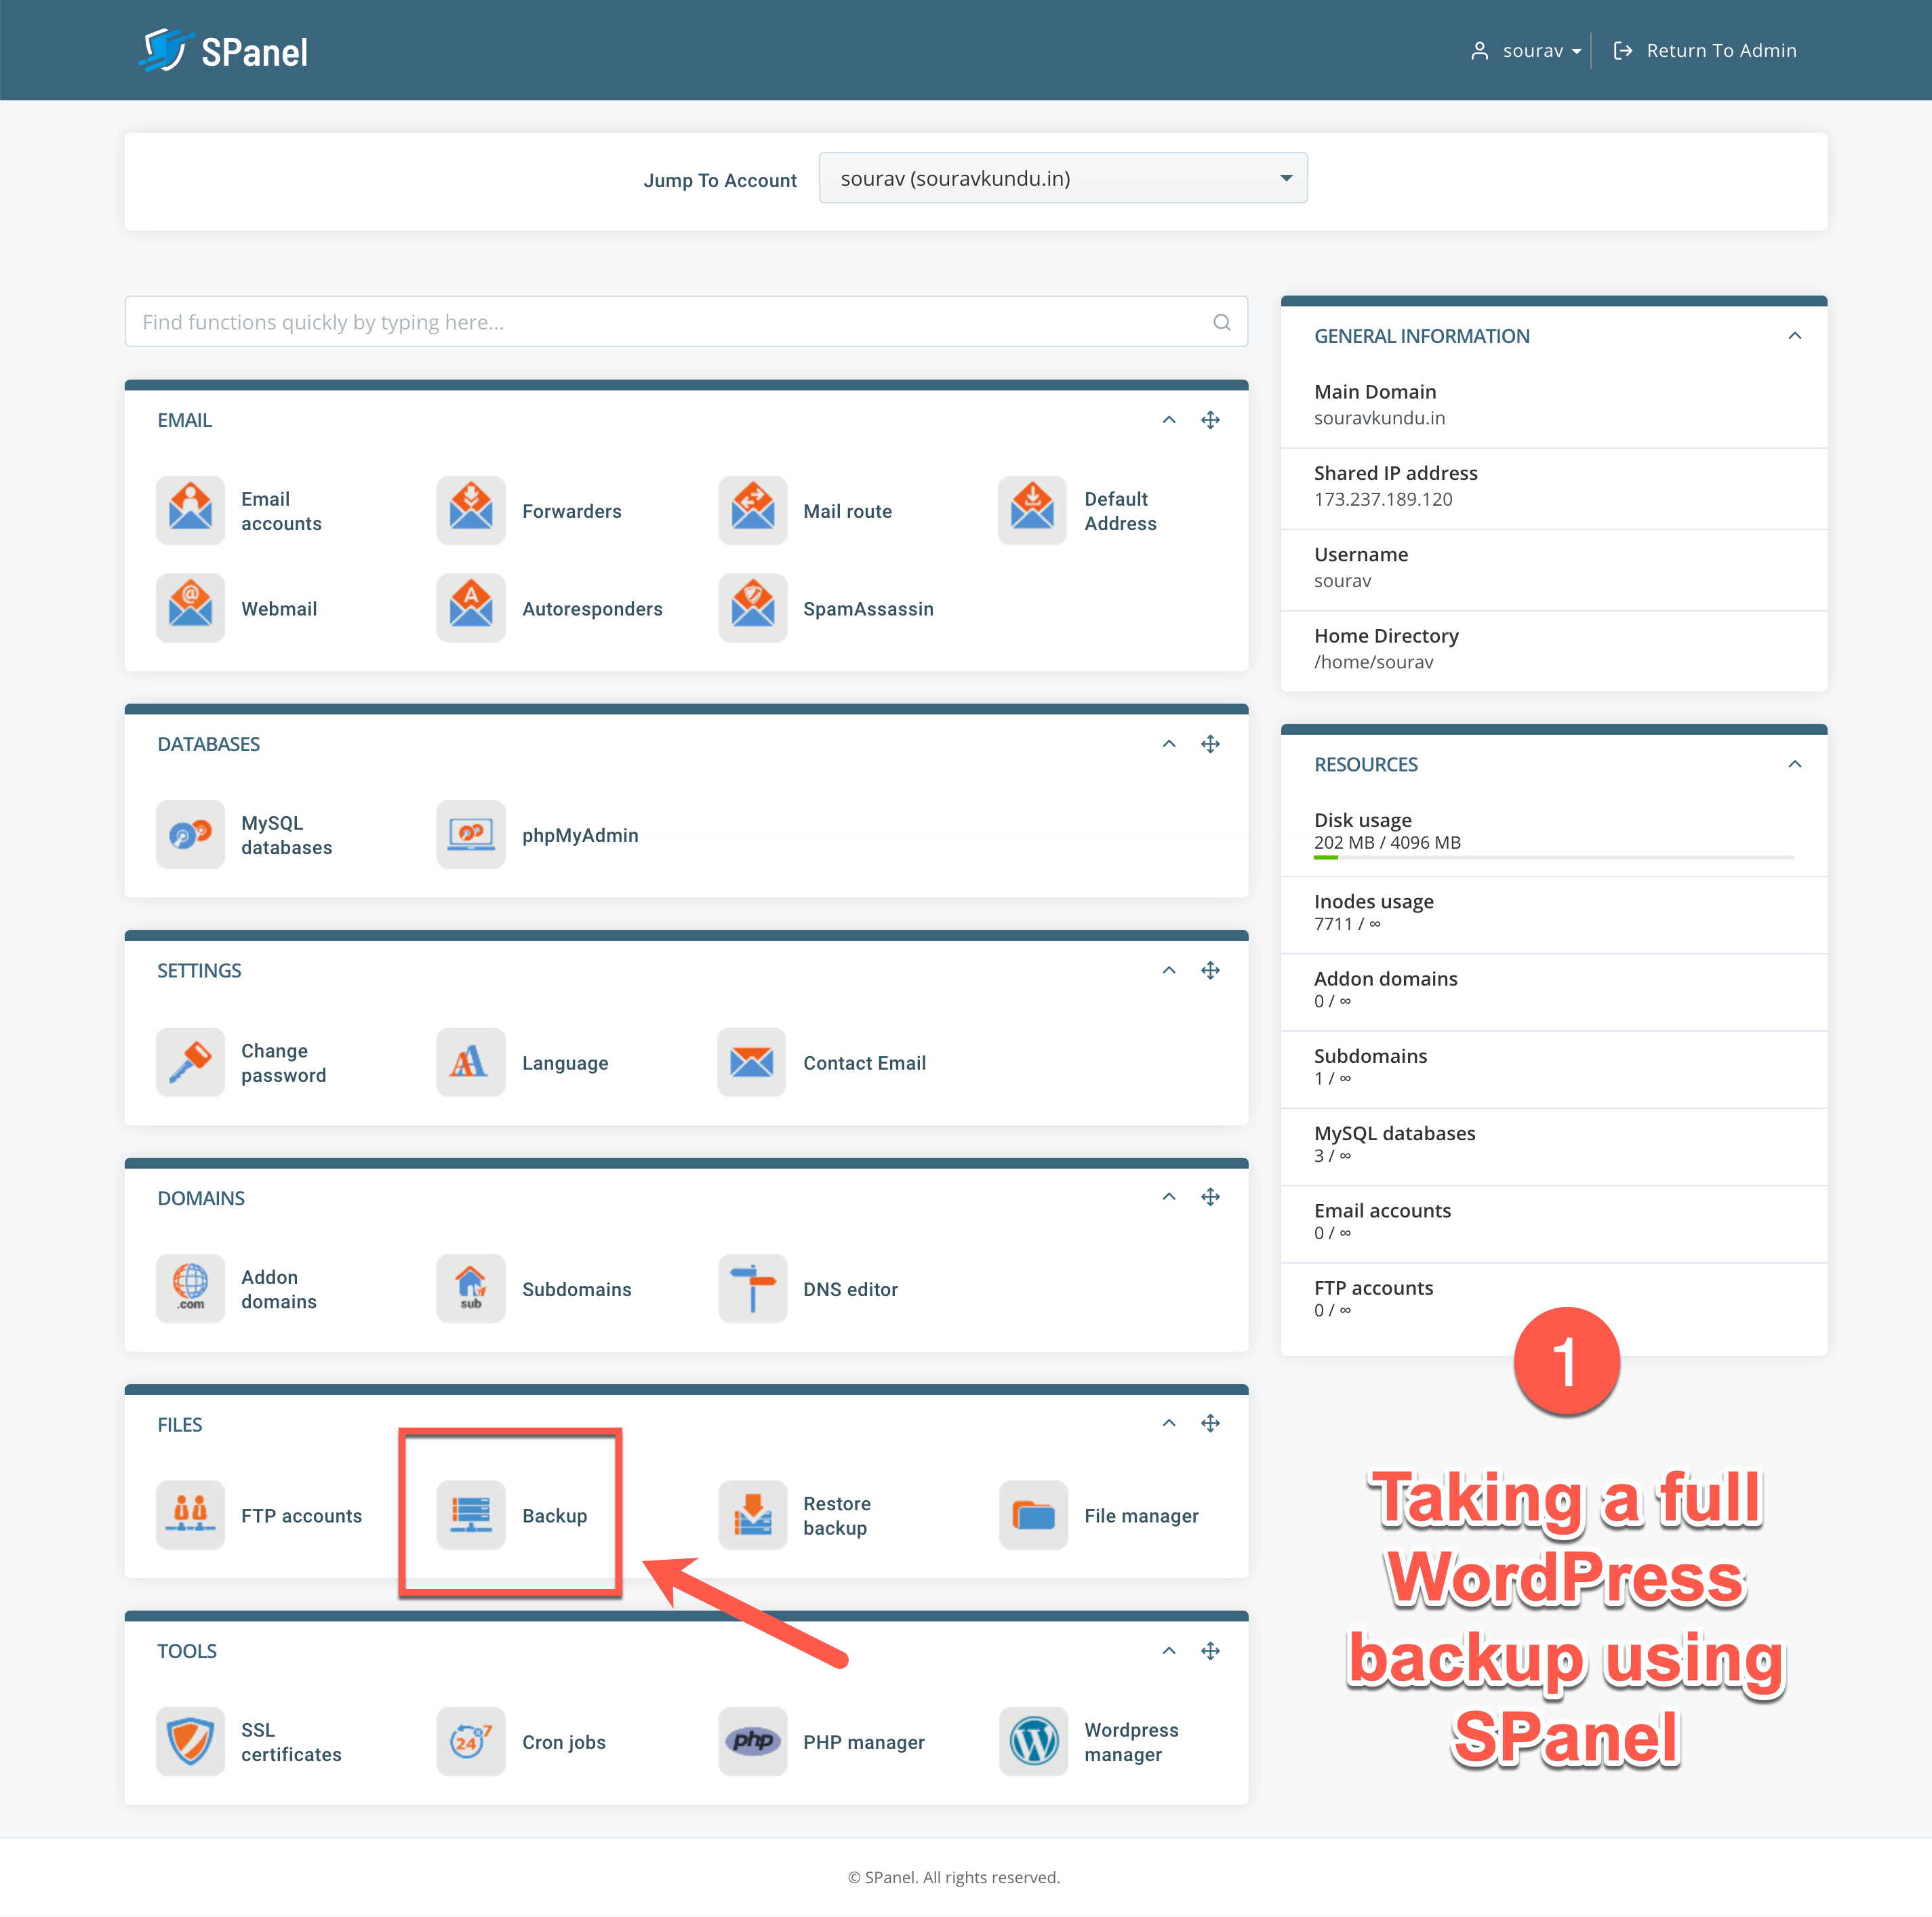
Step 1: Go to your SPanel user account (the non-admin one) and select Backup as shown in the screenshot above.
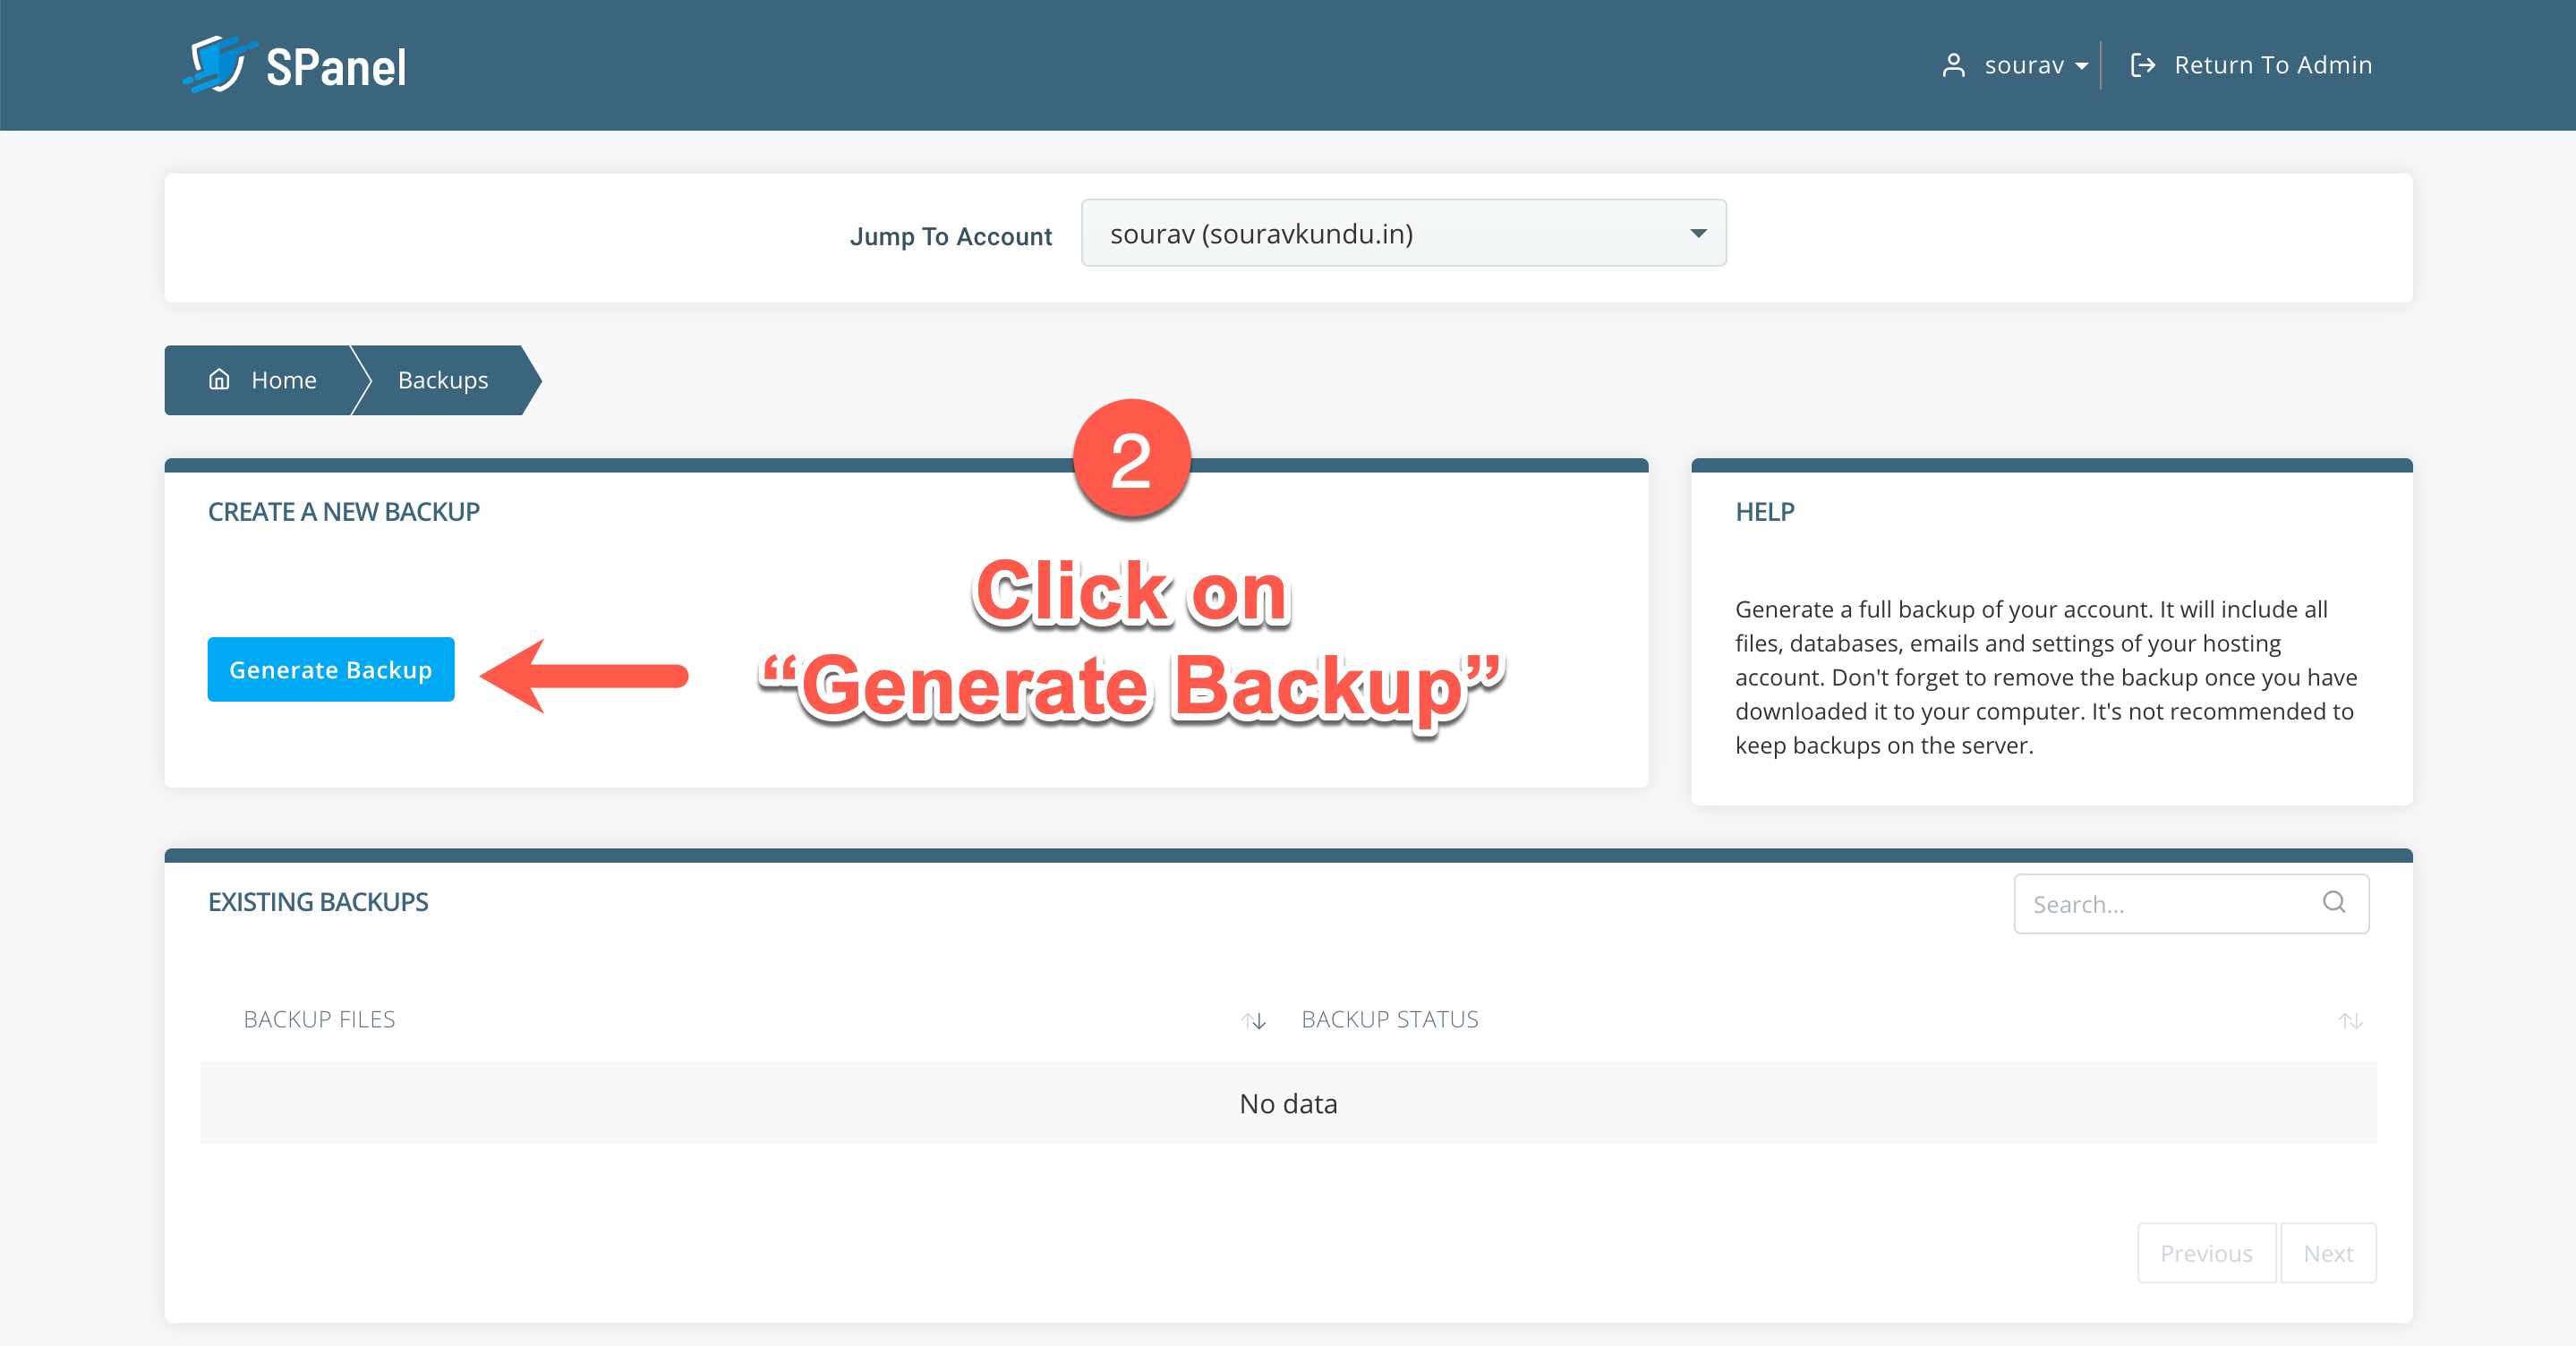
Step 2: Click on Generate Backup
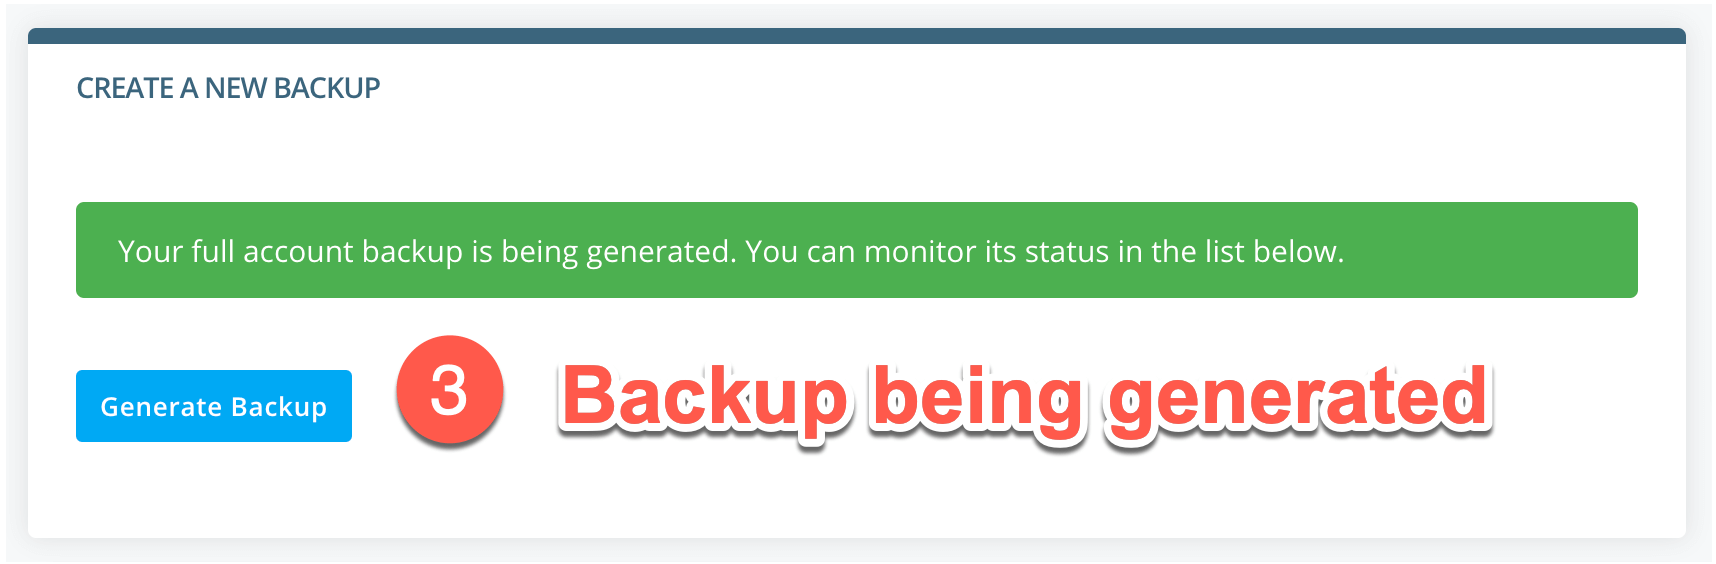
Step 3: SPanel will now show you a notification of the backup being generated.
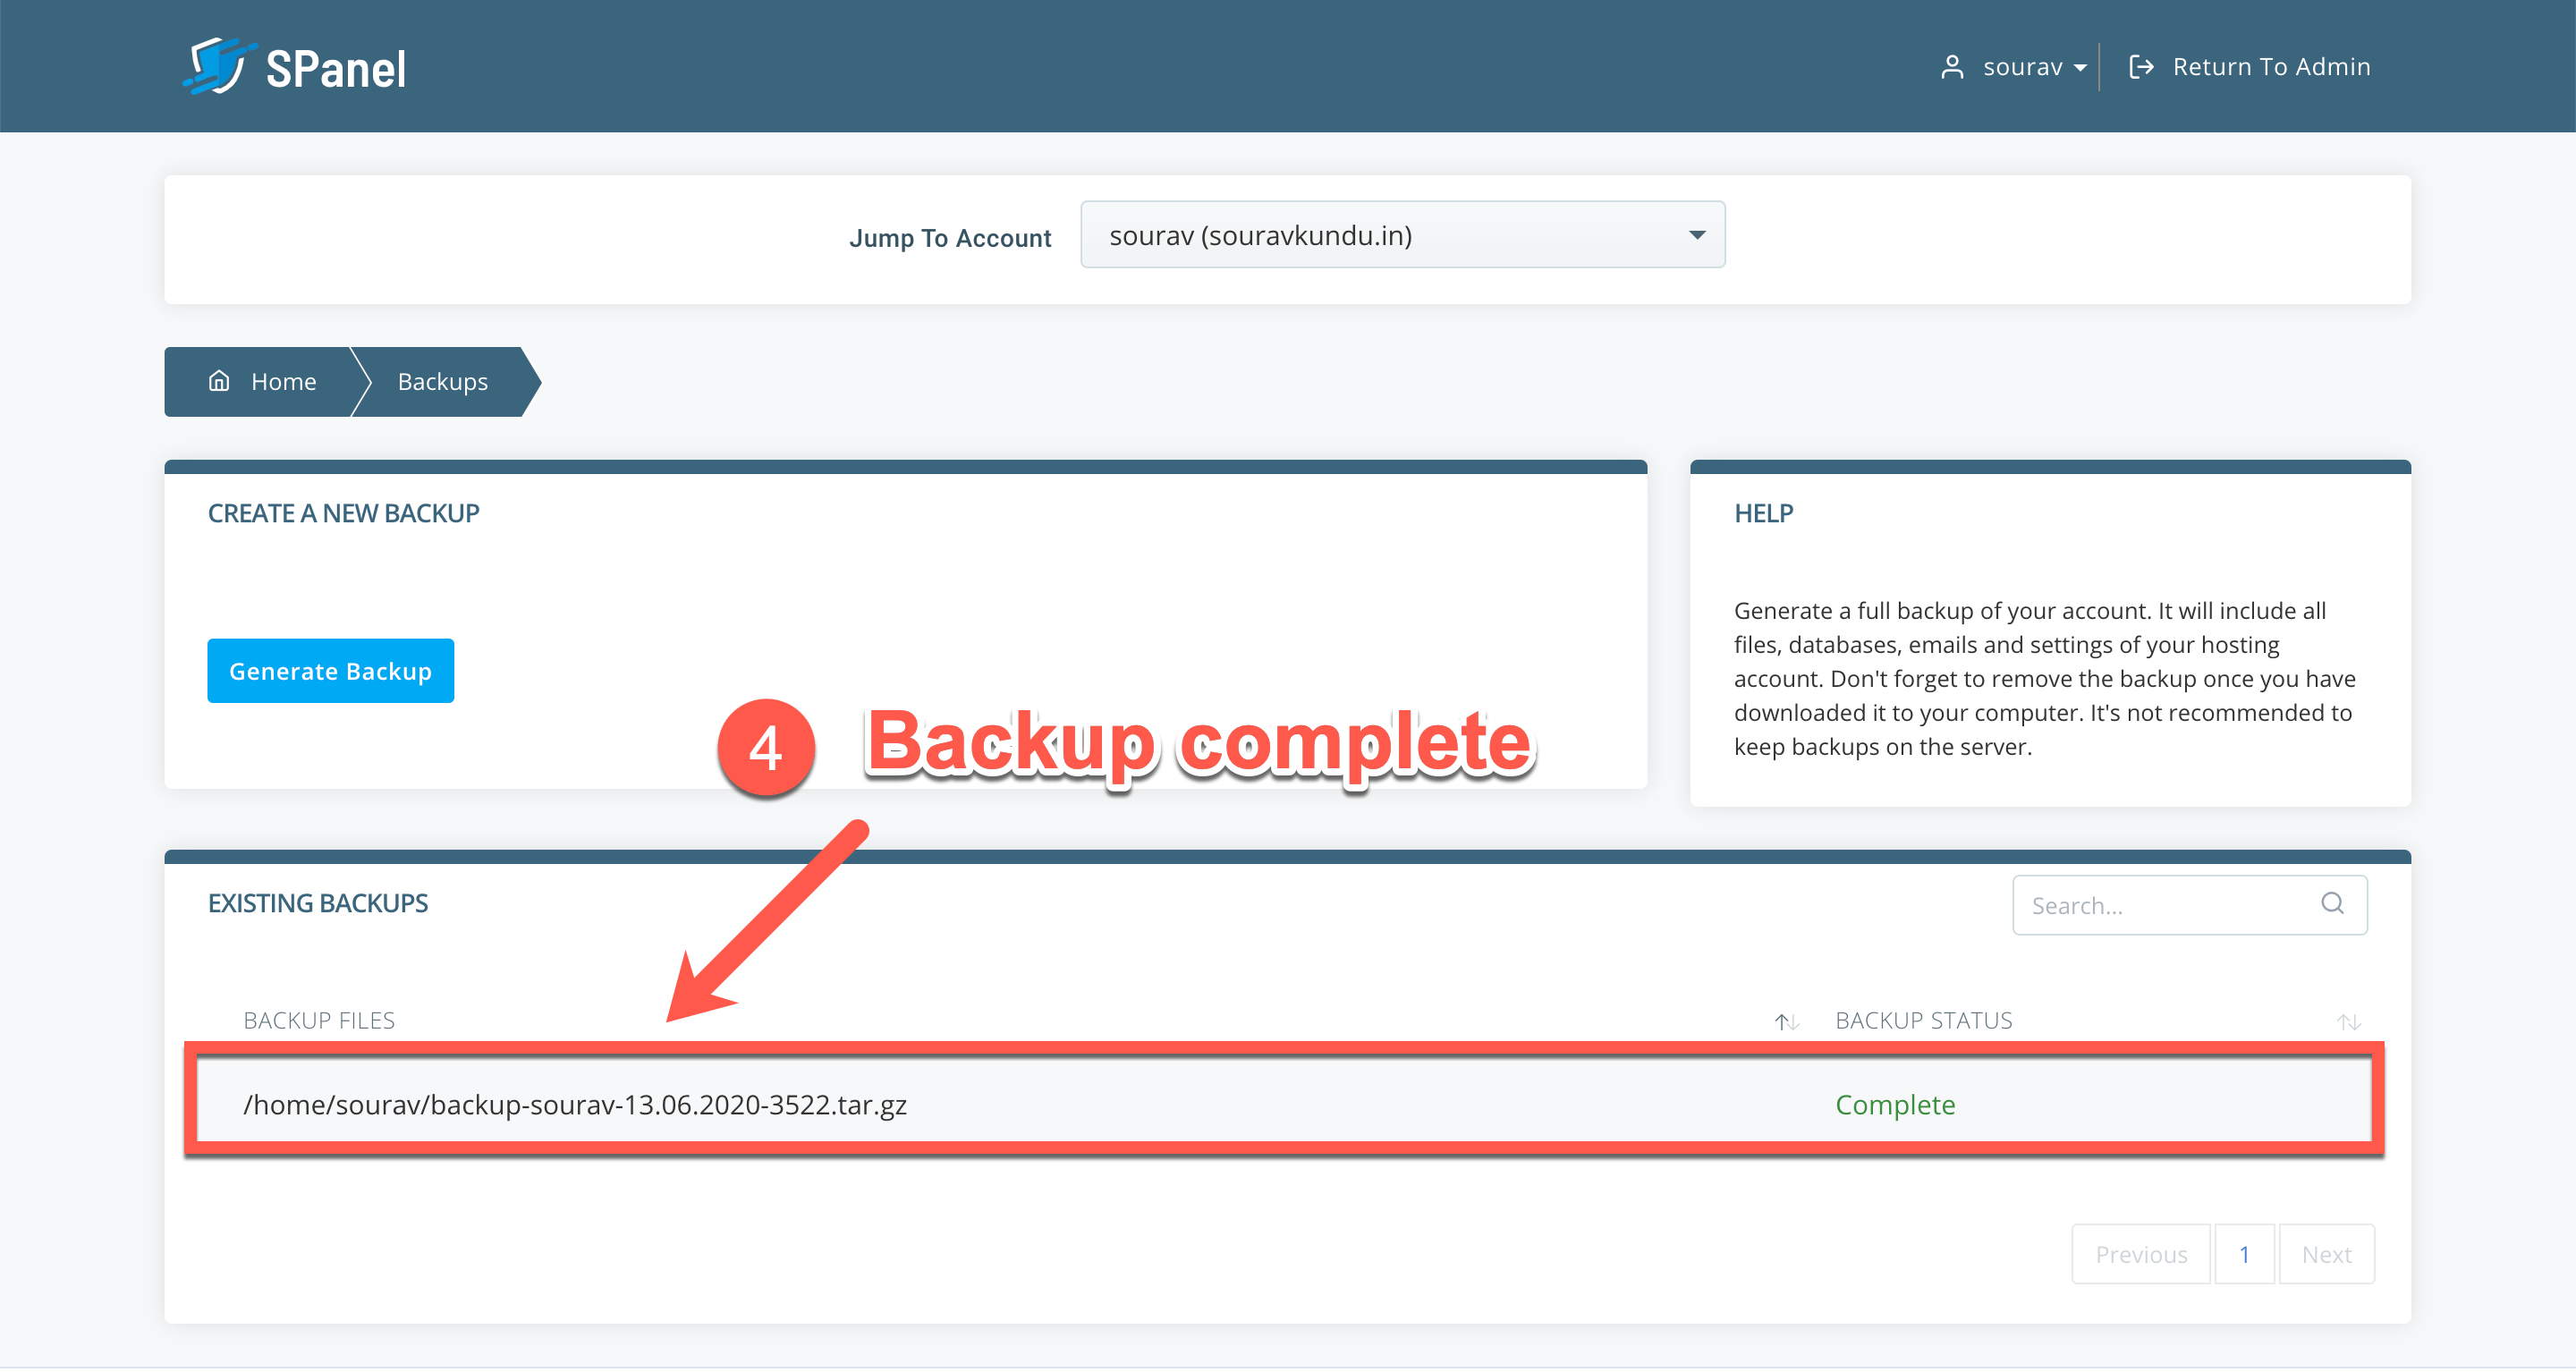
Step 4: Your WordPress VPS backup is now complete.
Now we’ll show you how to restore a WordPress site using SPanel. Thankfully, you can restore individual databases, files or folders, which means you can restore individual WordPress sites. Here’s how to get started:
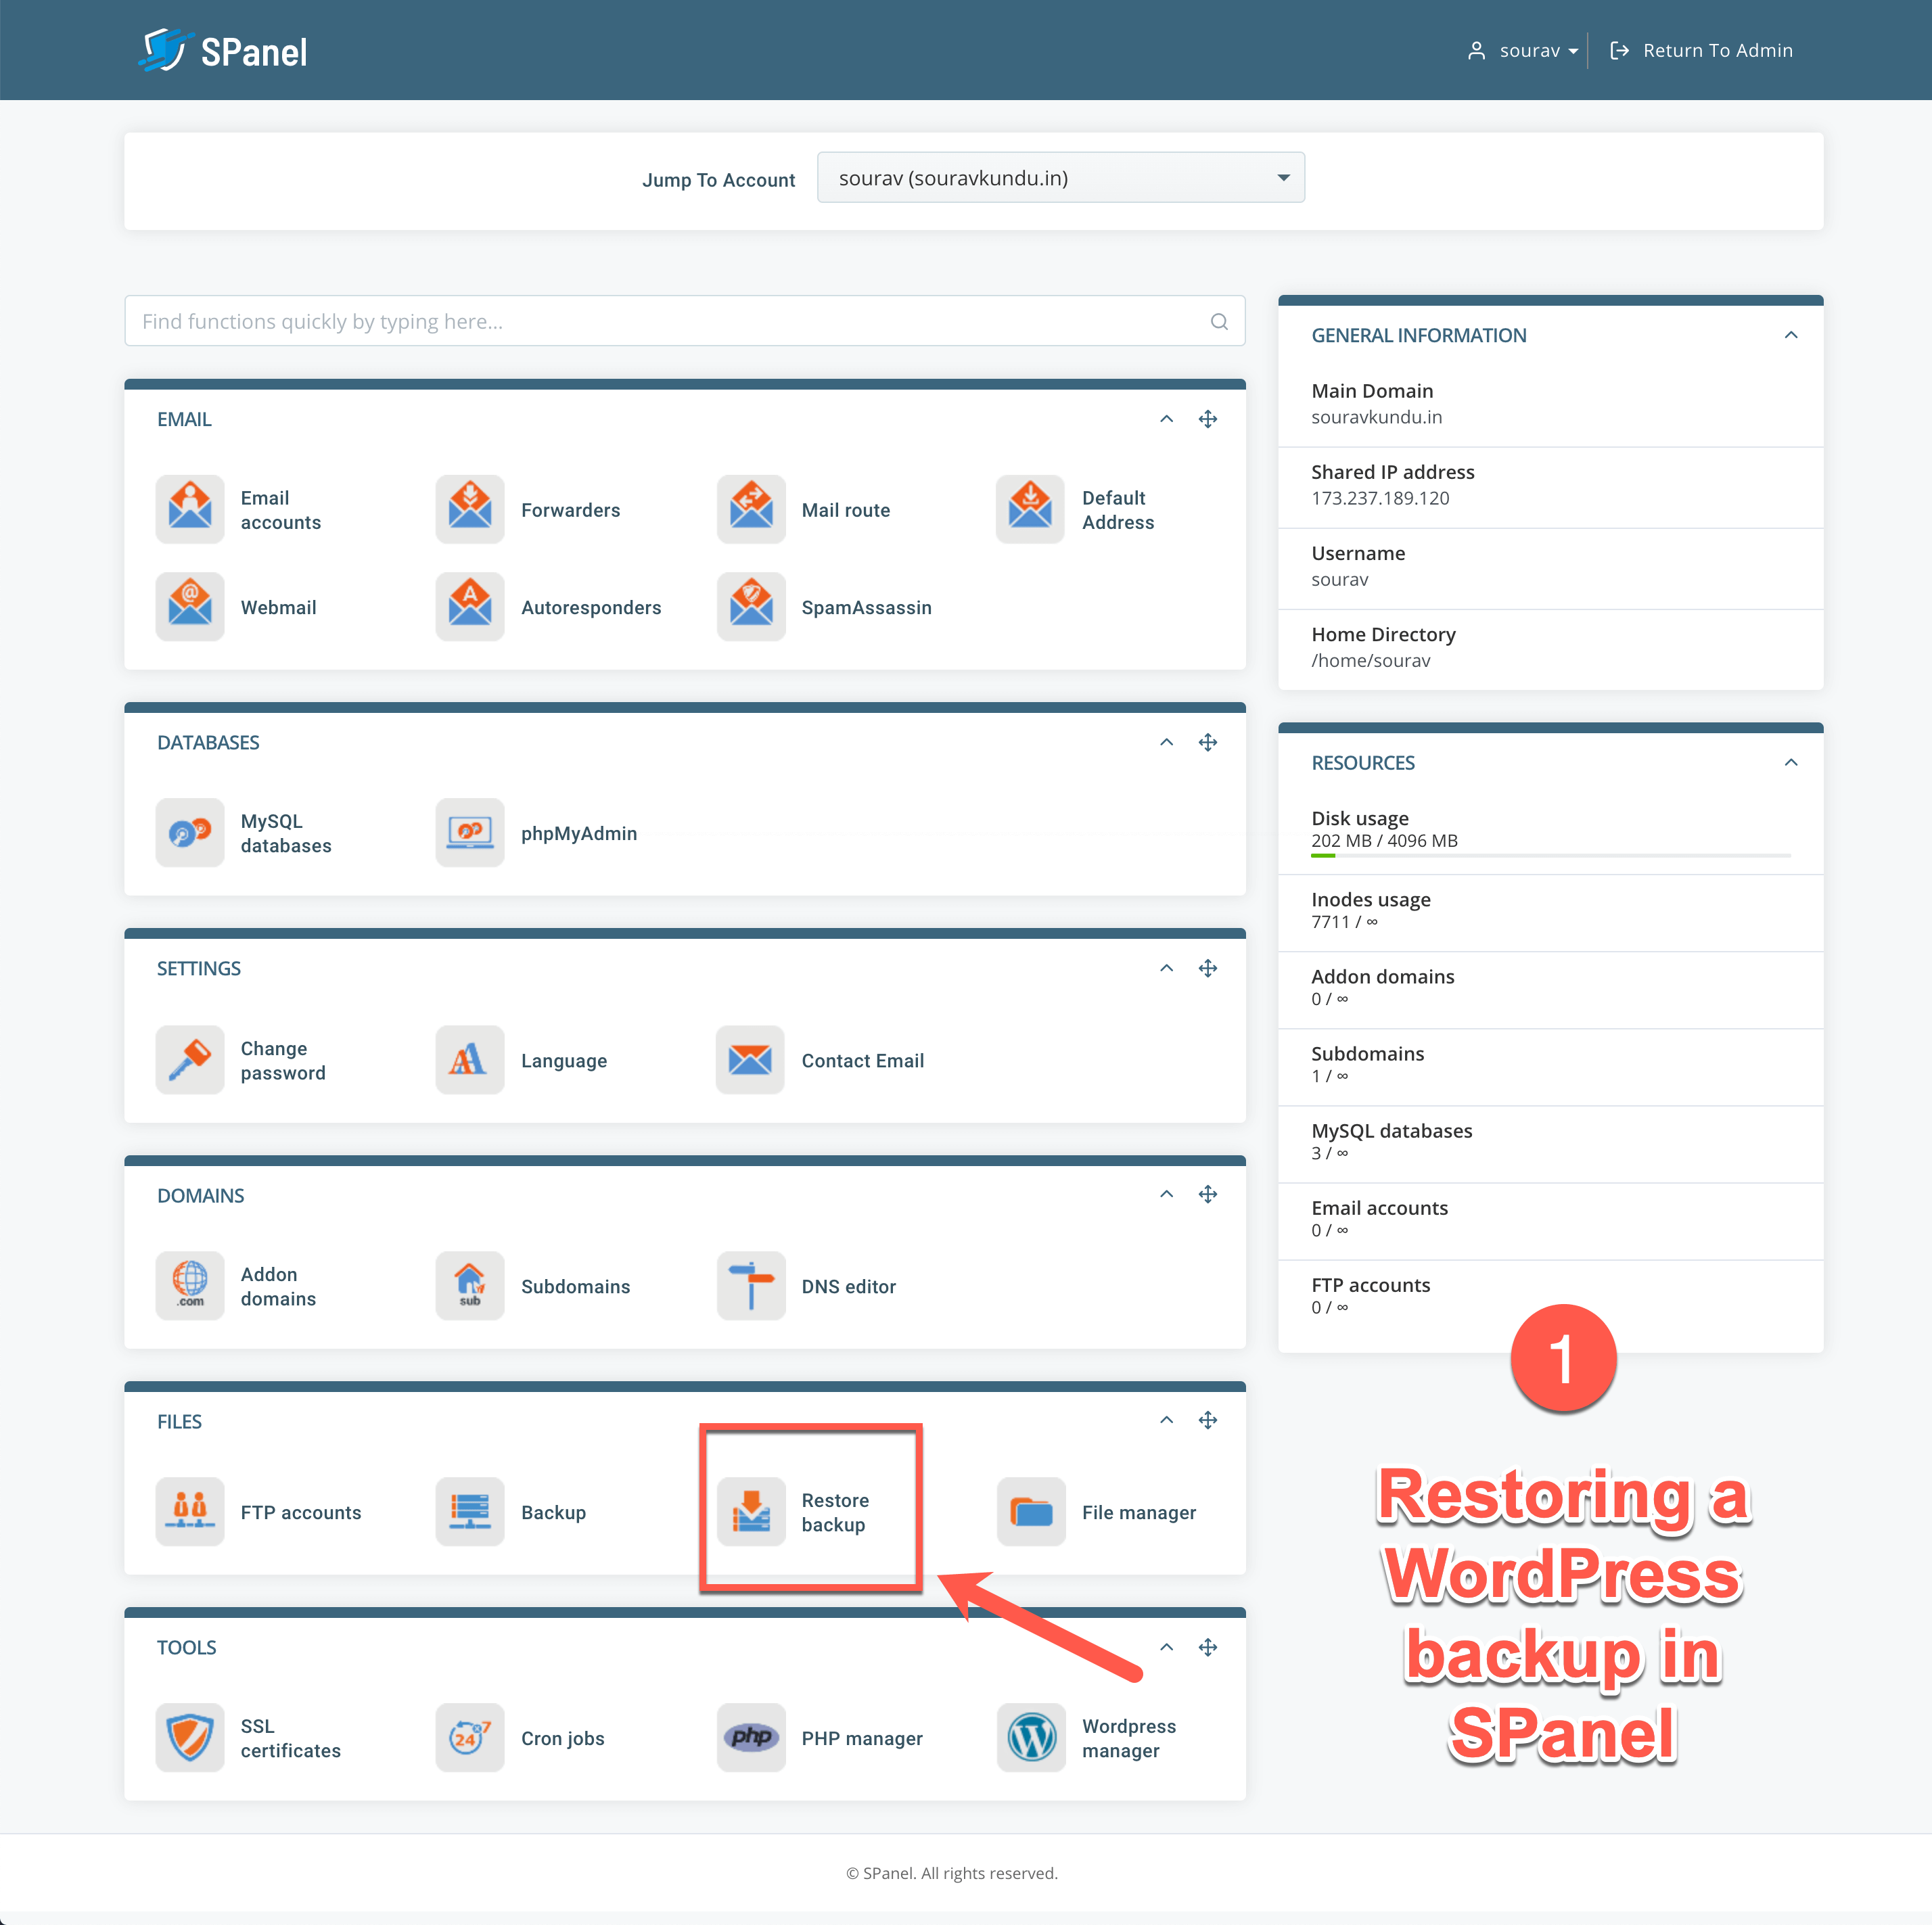
Step 1: Go to your SPanel user account (the non-admin one) and select Restore Backup as shown in the screenshot above.
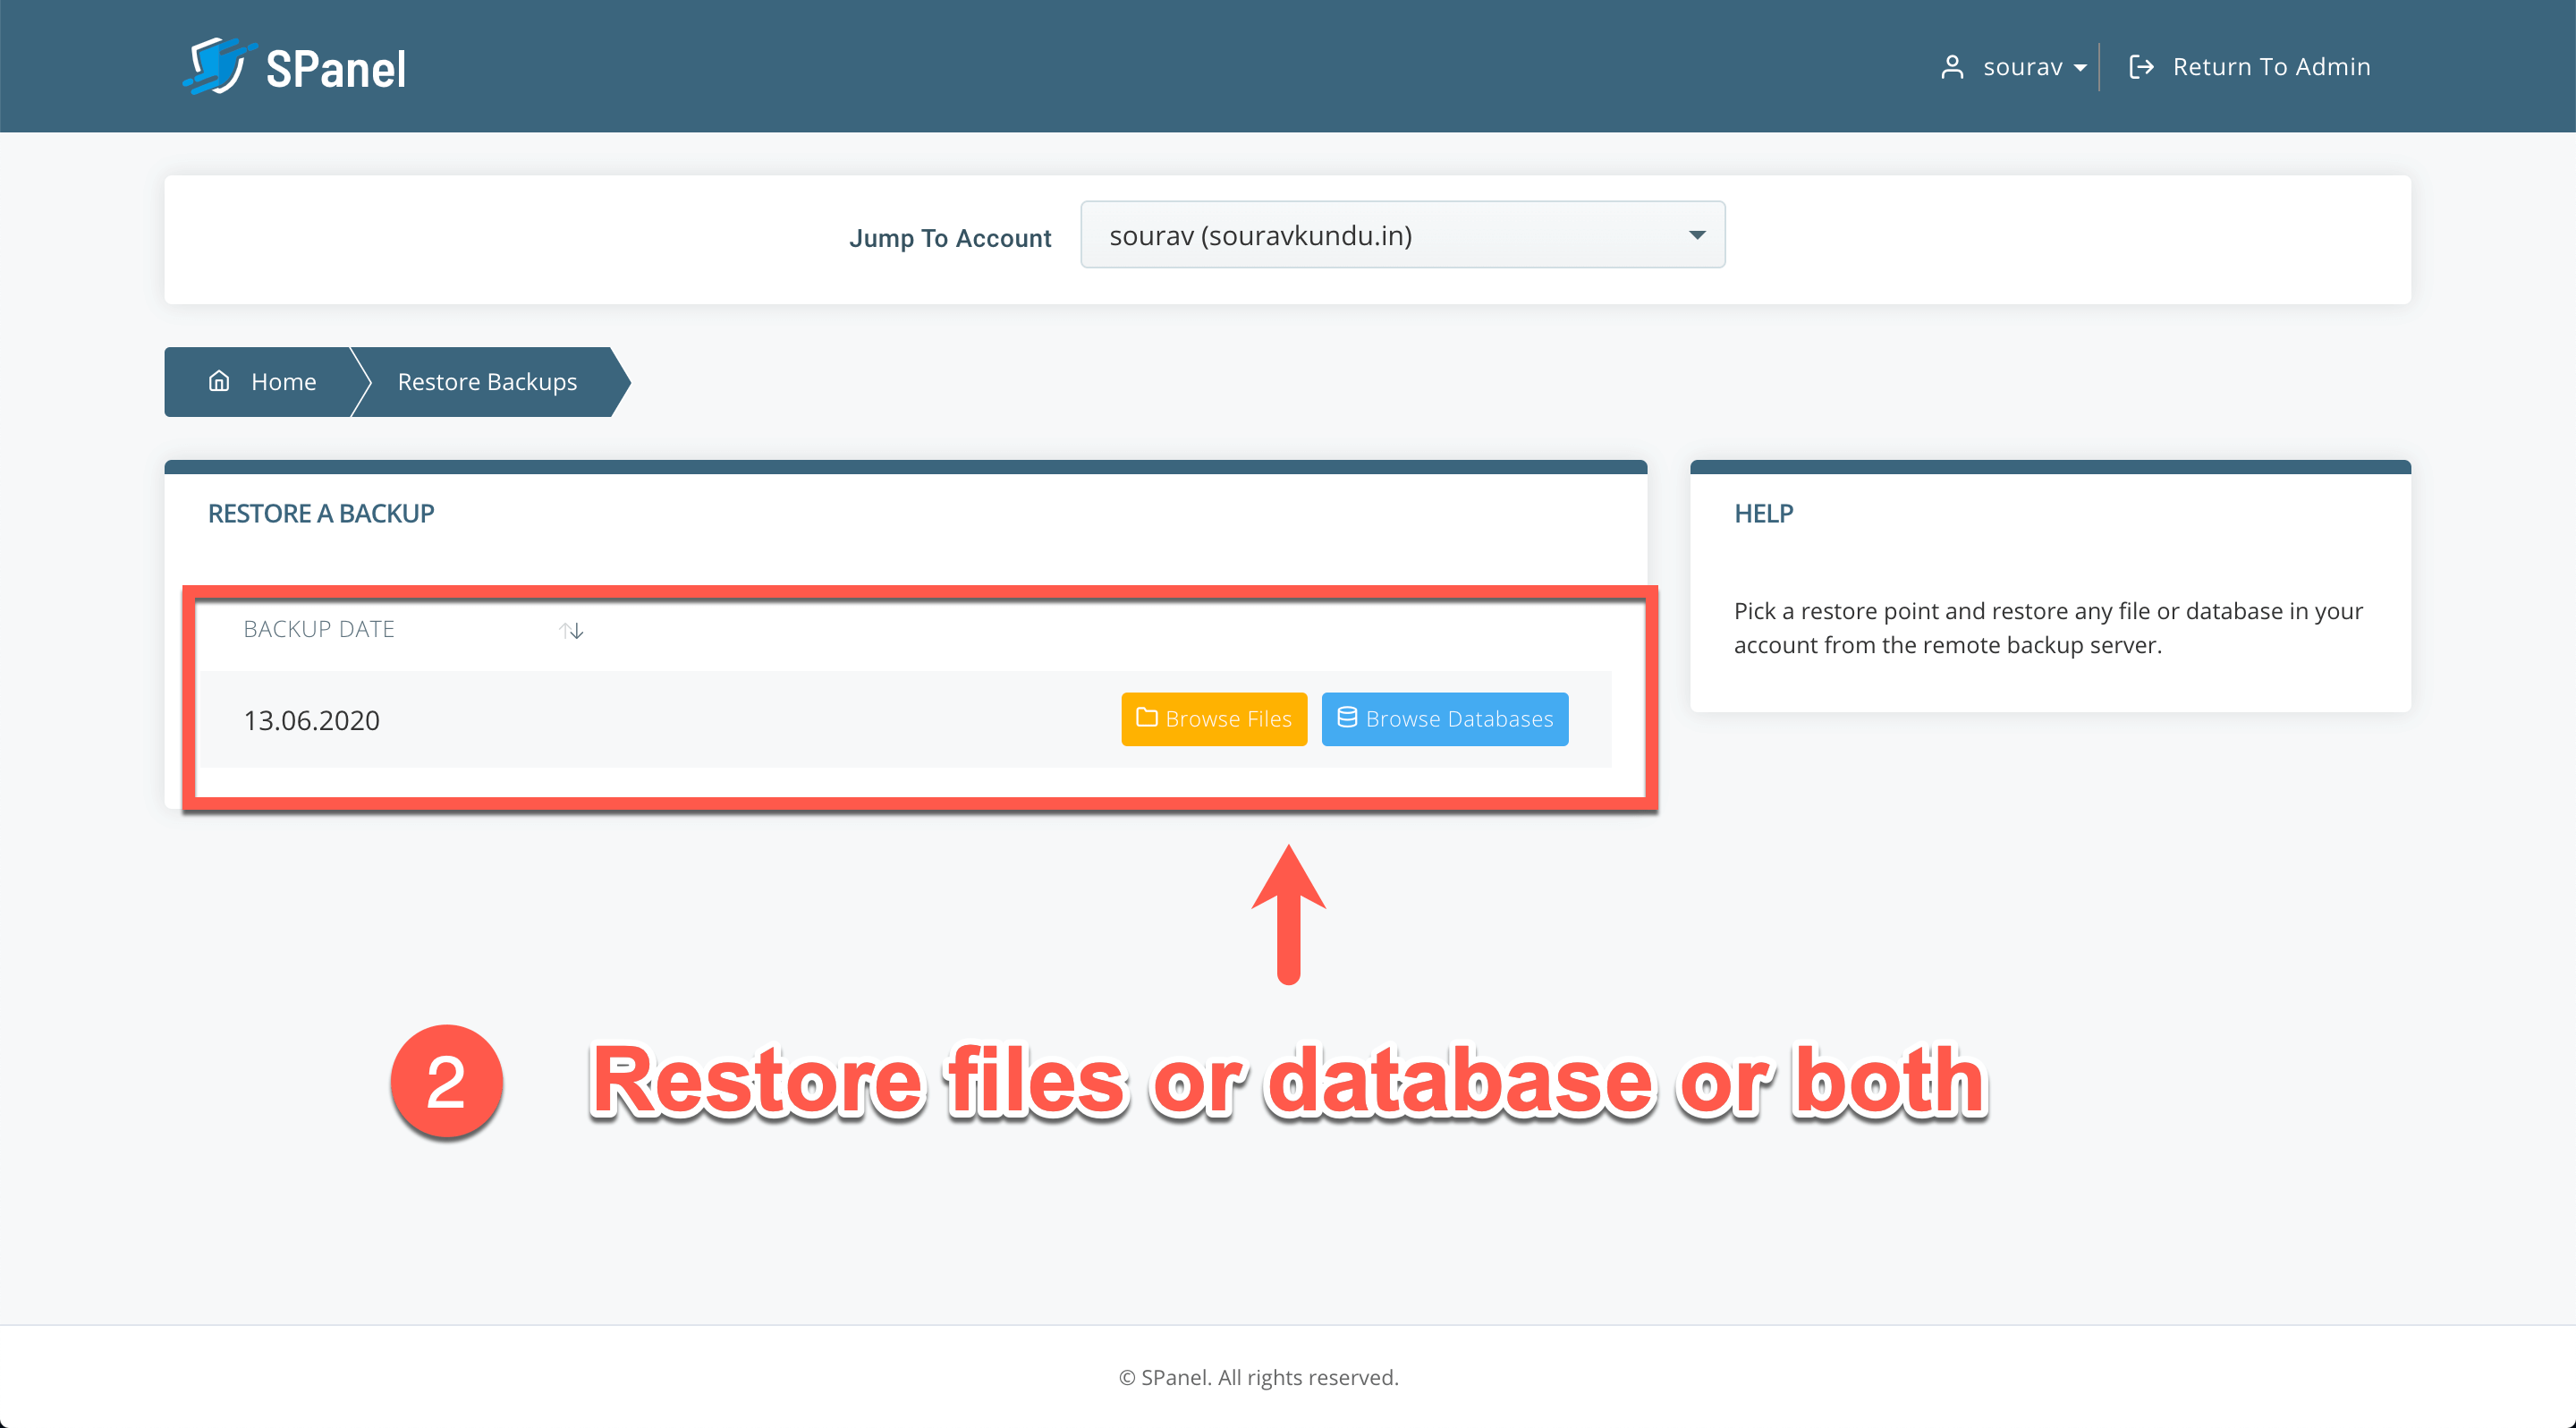
Step 2: SPanel will now show the list of your backups. In this tutorial, I’ve taken a single WordPress backup, which appears on this list.
- The Browse Files page lets you restore files and folders, and the Browse Databases page lets you restore WordPress databases.
- In order to restore a WordPress site, you’ll have to restore both the WordPress installation folder and the WordPress database. We’ll show you how to restore the WordPress backup of scalawp.souravkundu.in that we took earlier.
- Click on Browse Files to continue.
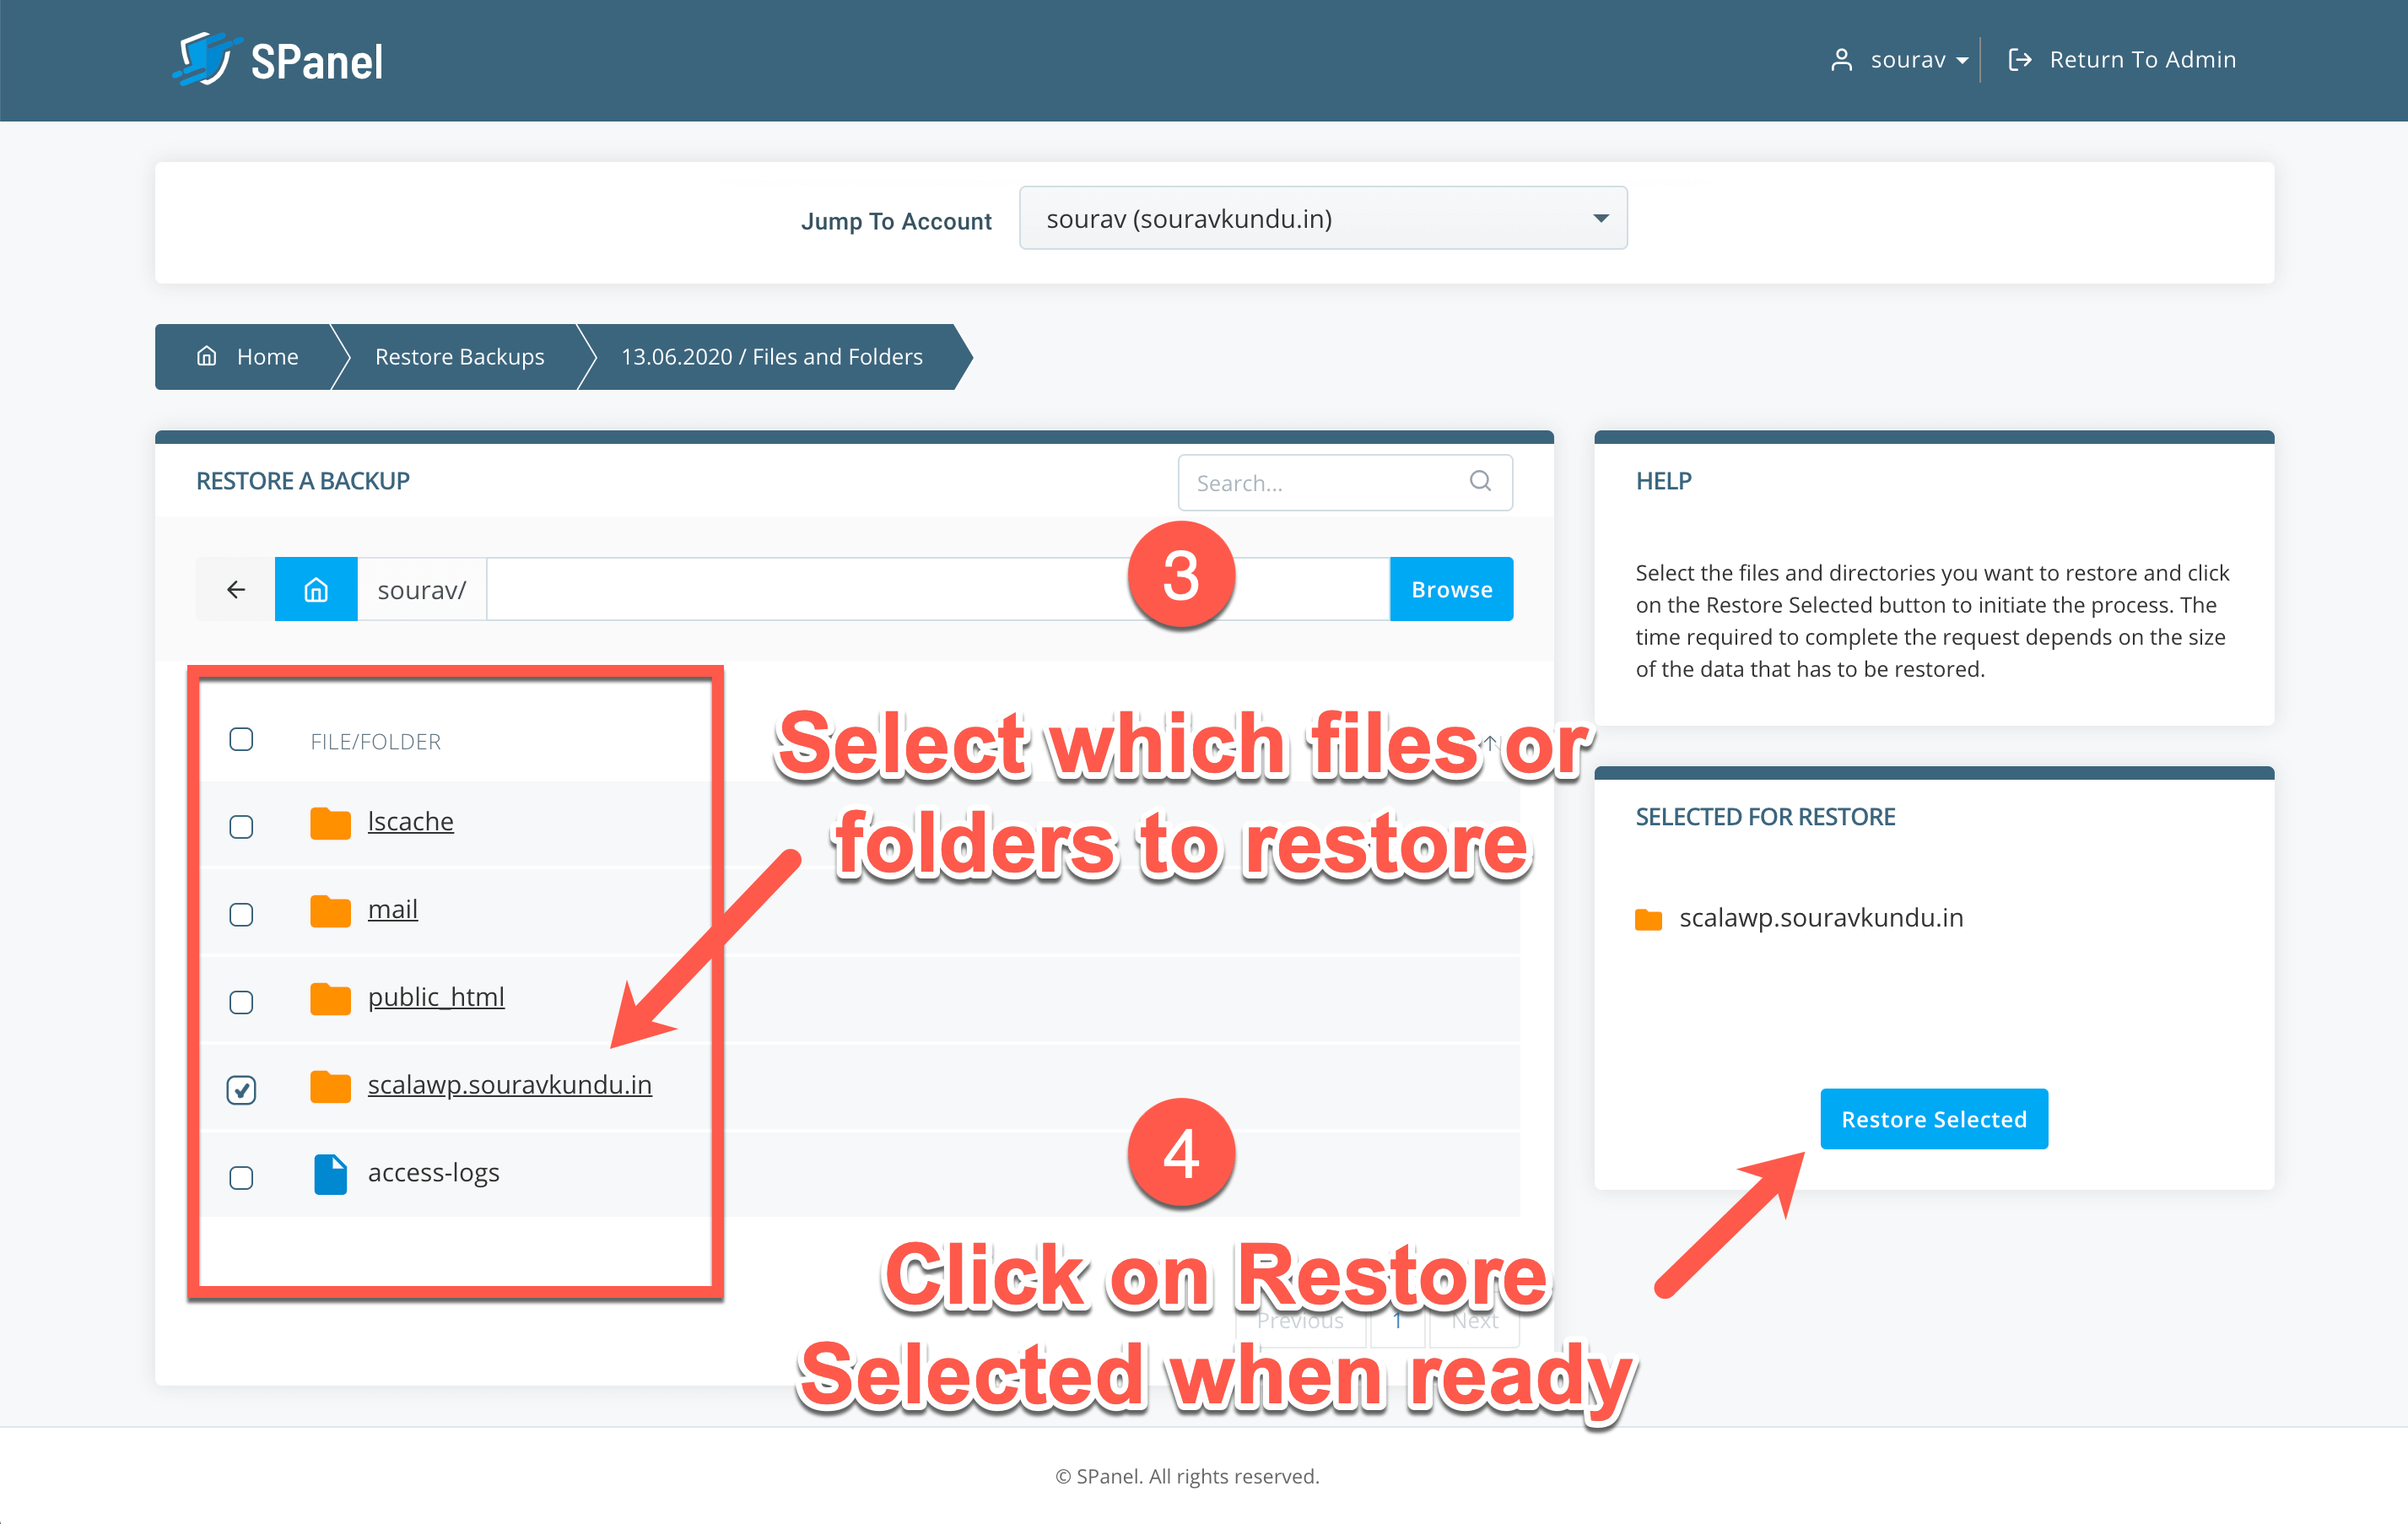
Step 3: Once you’ve clicked on Browse Files, you’ll land on this page. You can choose to restore individual files or entire folders.
- Since I want to restore the scalawp.souravkundu.in WordPress site backup, I’ve selected the entire folder.
- Once ready, click on the Restore Selected button to restore the WordPress backup.
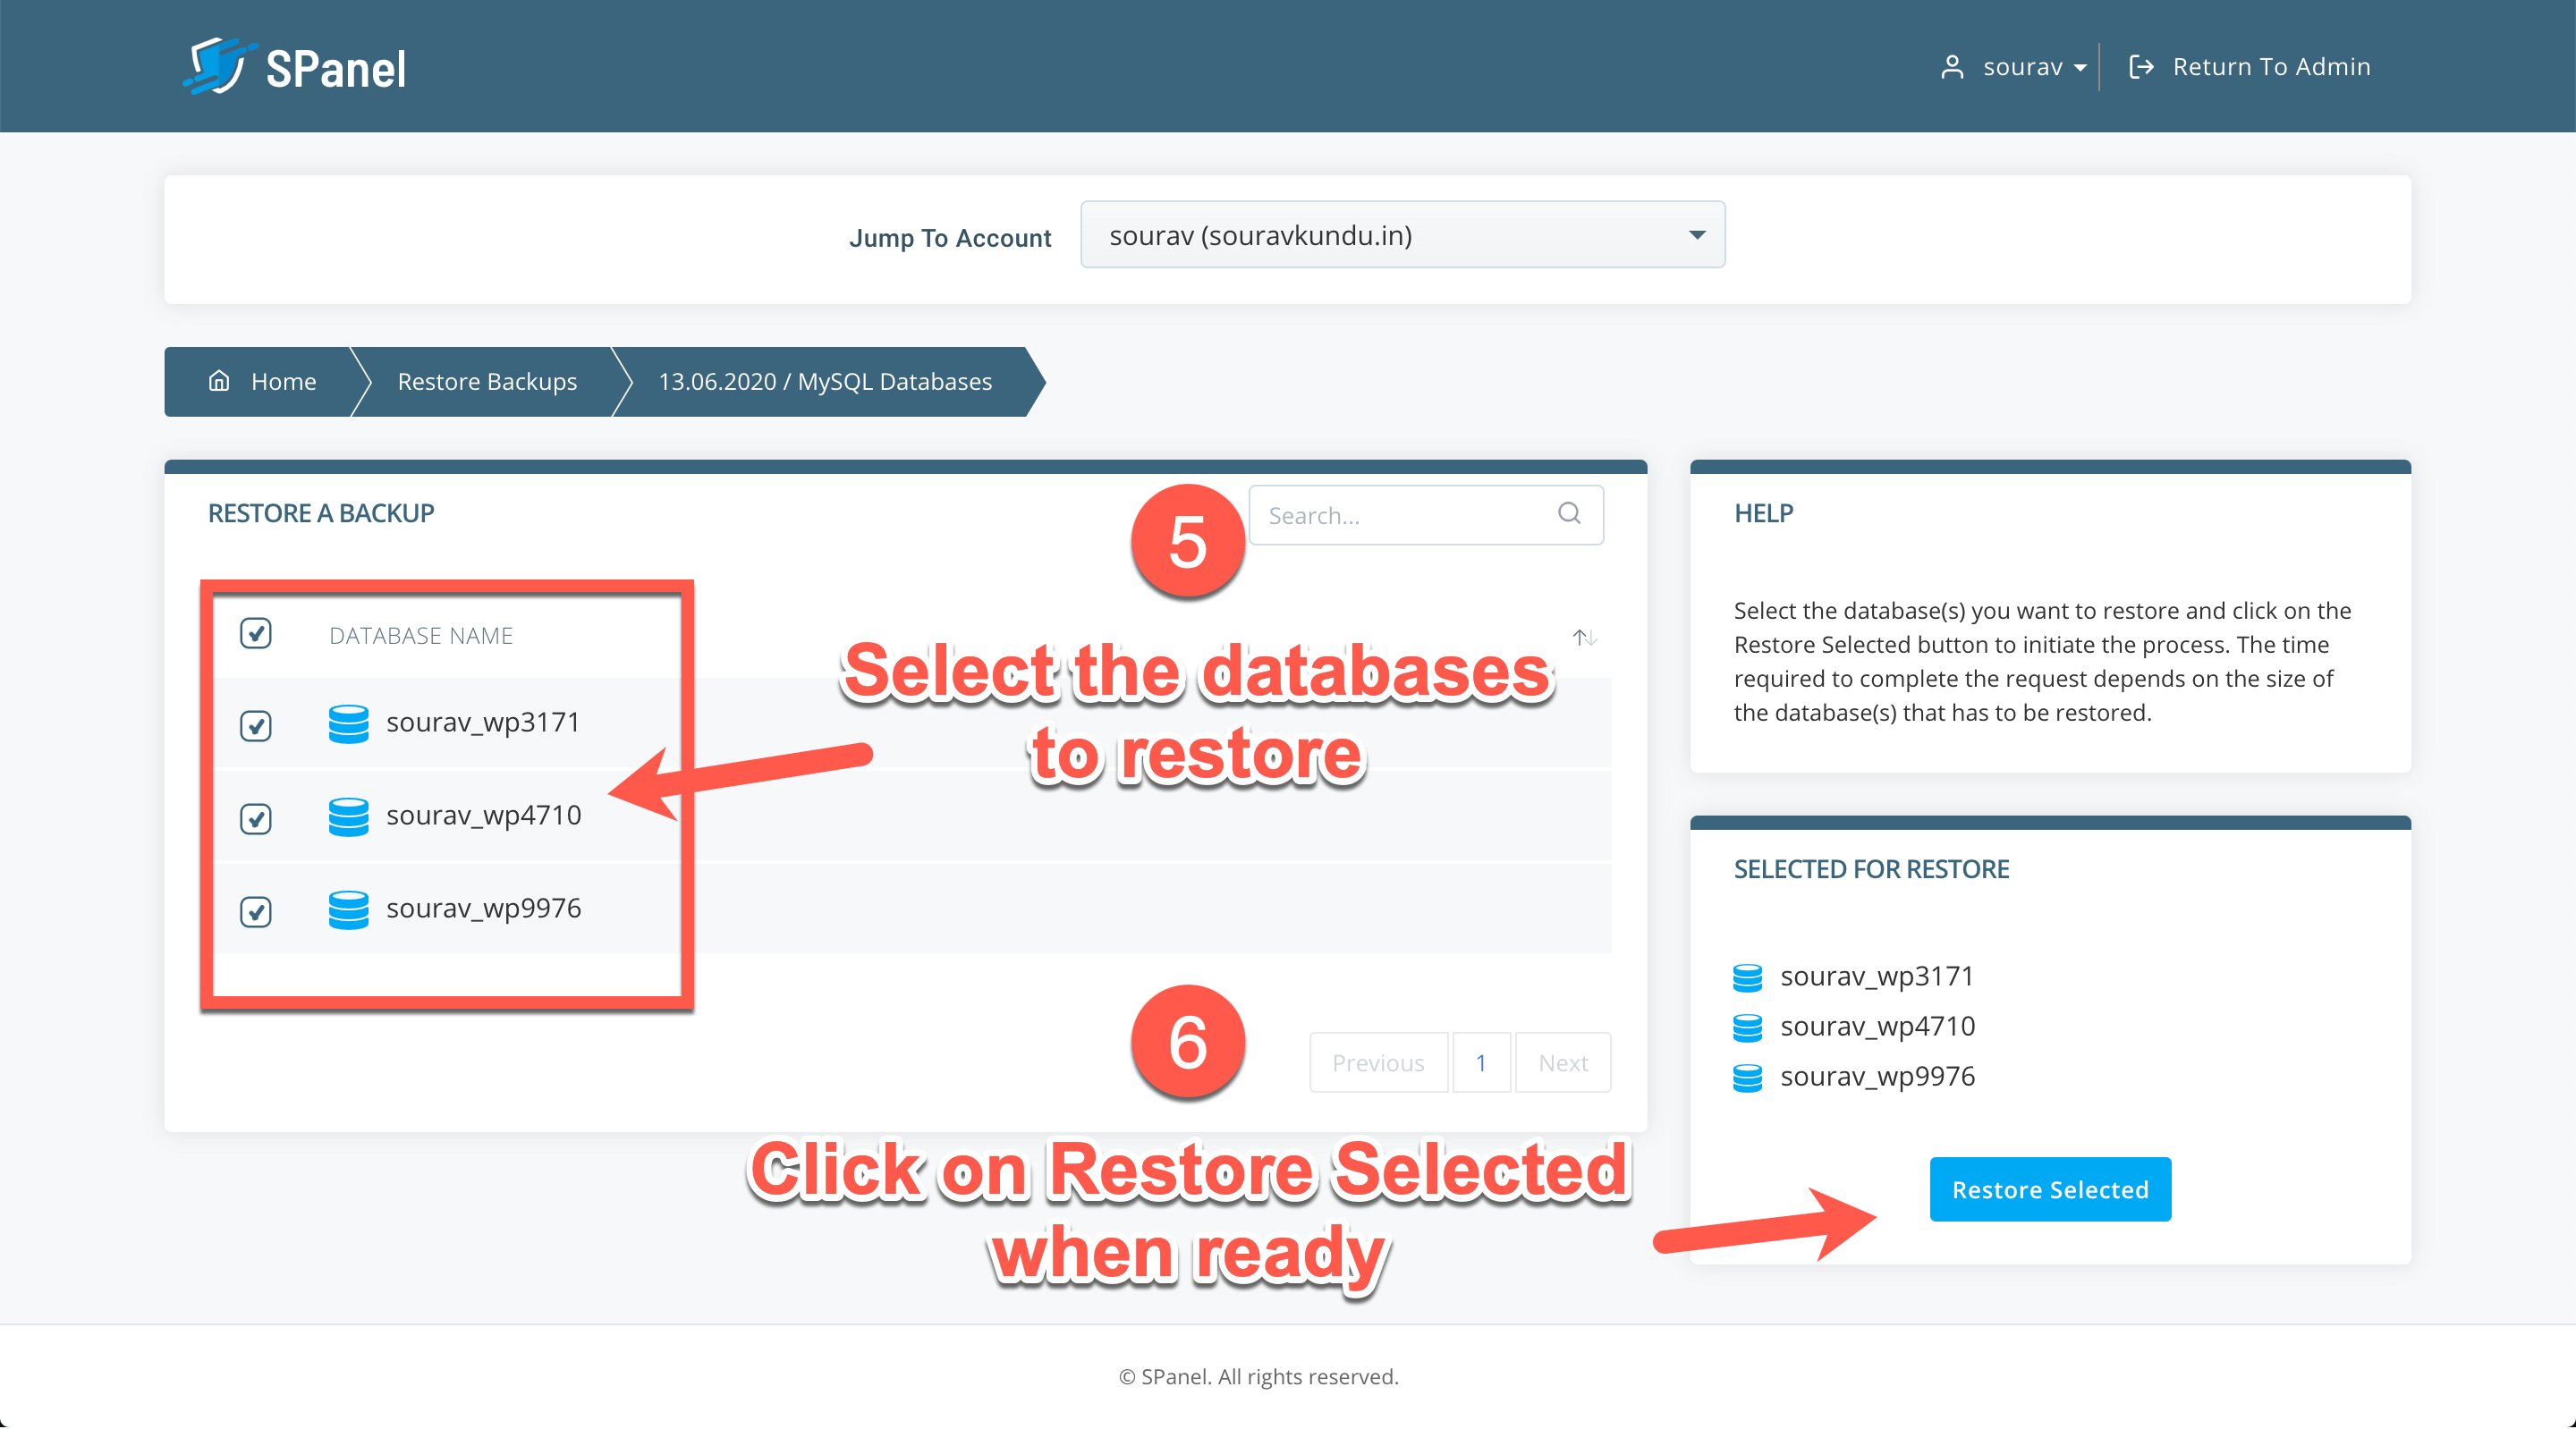
Step 4: When you click on Browse Databases in Step 2, you’ll land on this page. You can select the database of your WordPress site and click on Restore Selected. To find out the database name of your WordPress site, browse to the WordPress installation directory and check the wp-config.php file.
Once restored, you’ll get a success message and the backup process would be complete.
Scala WordPress Hosting Plans & Pricing
Learn More About Scala Hosting
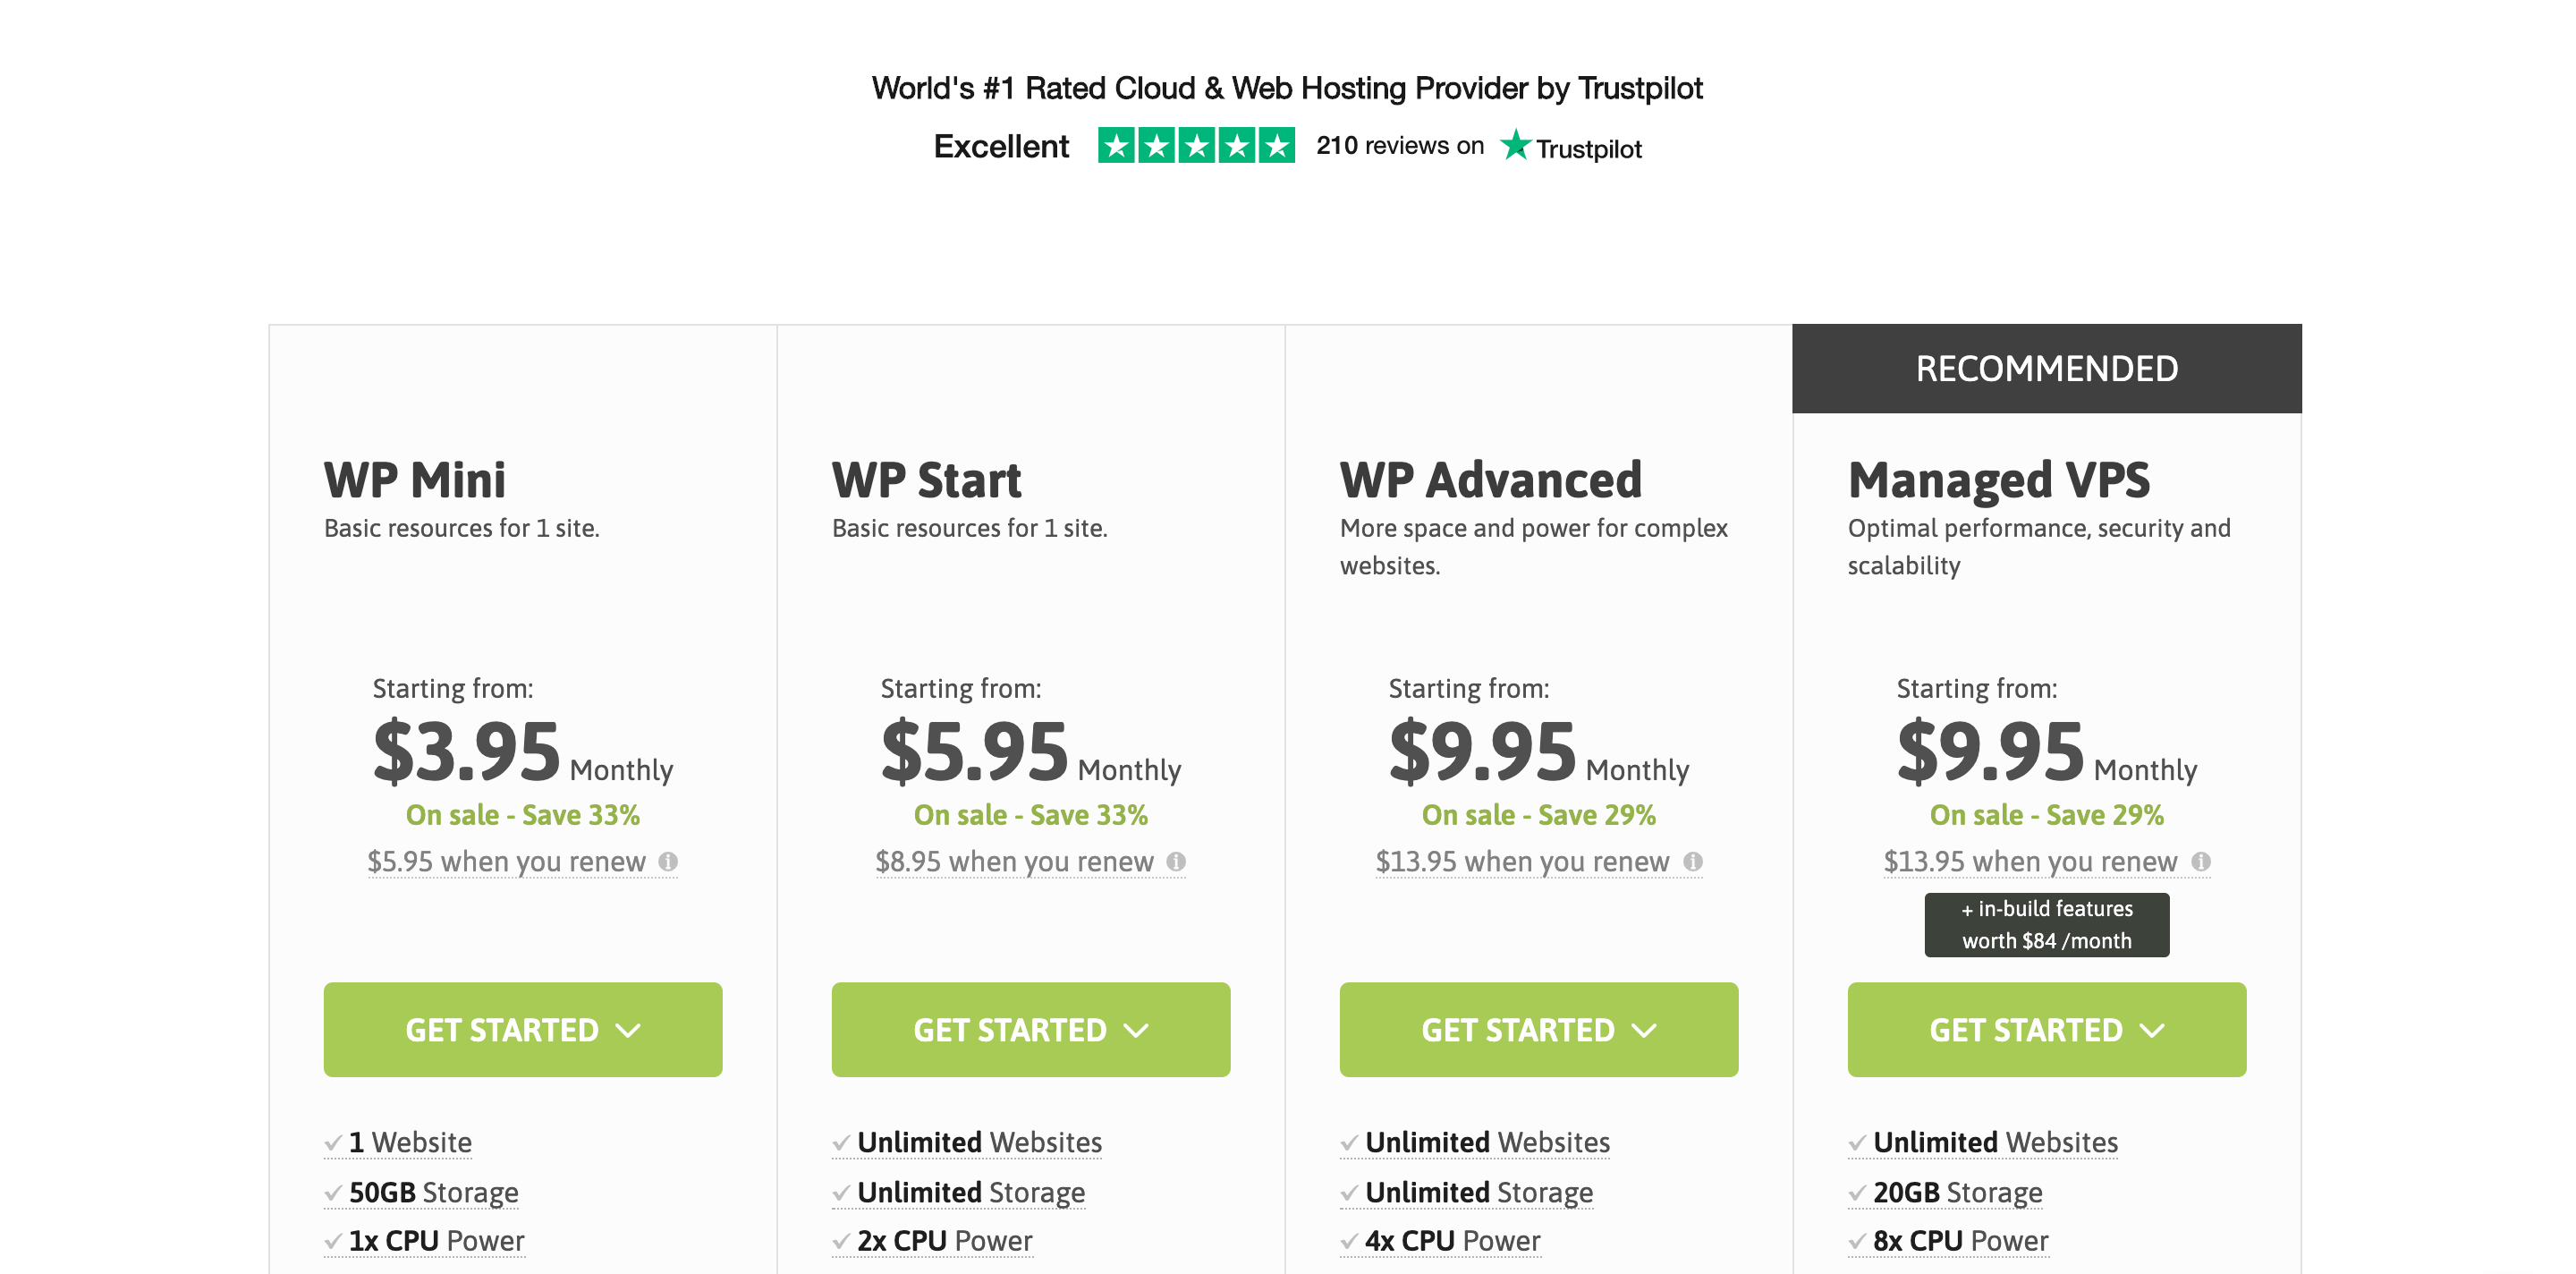
Since it’s what we used in our guide, we wanted to share a quick look at Scala’s plans. Their Managed VPS WordPress hosting plan costs $9.95/month and offers unlimited WordPress website hosting. Since it is a Managed VPS, you can run your sites in a dedicated environment, as opposed to a shared hosting environment. You also get other neat features such as:
- Fully managed WordPress hosting
- Priority customer support
- Dedicated IP (so your outgoing WordPress and/or marketing emails don’t land in the recipient’s spam folder)
- Daily automatic backups with 2-day snapshots
- White-label hosting
All Scala WordPress hosting plans come with SPanel and SWordPress Manager and include 24×7 customer support and a 30-day money back guarantee.
Conclusion
The purpose of this tutorial/review is to give you an overview of Scala’s SPanel control panel, and the SWordPress Manager – which is a handy tool for managing WordPress sites.
There are two features from SWordPress Manager that I particularly liked: (i) the WordPress admin password reset and (ii) security lock. In the past, I’ve written about how to reset your WordPress site’s admin password using phpMyAdmin or MySQL. That process could easily take a good 10-20 minutes for new WordPress users. However, with Scala’s admin password reset feature, it takes less than 2 minutes.
The site cloning feature is particularly useful as it enables me to quickly create a copy of a WordPress site to test a new theme or plugin. Plus, the staging environment feature is great for implementing new themes and plugins, before taking them to the live WordPress site.
In terms of WordPress backups, you cannot backup individual WordPress sites with SWordPress Manager. You can, however, restore individual WordPress sites. In my opinion, you should invest in a WordPress backup plugin such as Solid Backups or UpdraftPlus, which enable you to backup your WordPress site/s to the cloud, separate from your hosting provider.
Coming to Scala Hosting, one of the best things I liked about them is their 24×7 hosting support. I ran into a couple of issues when creating a new user account (part 2), and when installing a new WordPress site (part 5). Scala’s live chat support was both speedy and effective at helping resolve those issues.
However, I felt that the VPS setup process was a bit tedious. It took four parts to actually get to the part in which I show you how to install a WordPress site in your Scala Managed VPS!
Nevertheless, I’m confident that I’ve covered everything you need to know in order to create a new WordPress site in Scala, and manage it using SPanel and the SWordPress Manager. If you have any questions or feedback, please feel free to drop a comment!