Why and How to Add a Hello Bar to Your WordPress Site


Setting up your WordPress site can be overwhelming. Getting your site’s content and design up to speed is the first step – and many WordPress users tend to stagnate after they set up a blog and lock in the basics of their site. However, there are a few bells, whistles, and tools that all sites really ought to have. A hello bar, otherwise known as a notification bar, is one of them.
What’s a hello bar? Well, it’s a bar that rests atop your WordPress site, greeting people as they arrive at your page. It’s not always notifying people, as the synonym “notification bar” suggests, but often has more targeted goals. That’s why the industry has shifted to know these tools not as notification bars, but hello bars or top bars.
These bars can be used for much more than just notifying site visitors. At Hello Bar, we make hello bars along with many other site assets that are killer for converting your visitors into significant assets to your company.
Neil Patel notes that the Hello Bar top bar on his Quick Sprout site accounts for 11% of his total leads. That means that his Hello Bar accounts for 11% of his revenue.
How does that work?
Well, there’s a few ways top bars work to convert visitors into leads. It depends on your goals – are you trying to build your email list? Increase your social media following? Direct more traffic towards certain pages of your site, or announce a sale or discount code?
Hello bars can be used to accomplish all of the above. Here’s a few ways we’ve seen our top bars employed (we’re constantly seeing new and creative uses across WordPress).
Dangling A Lead Magnet

We’ve seen a wide variety of lead magnets employed by Hello Bar users – which is incredible. Providing a unique and relevant lead magnet for your specific community is hugely important to generating leads successfully.
A lead magnet, in marketing, is a free item or service that is given away for the purpose of collecting information. Lead magnets are typically offered as an exchange, i.e. I’ll give you a free recipe to download if you give me your email address. You can think of lead magnets as bait – without a nice juicy offer on the line, visitors won’t bite.
What constitutes a juicy offer differs from community to community. A clothing retailer wouldn’t want to use the same lead magnet as a fitness coach. It just wouldn’t catch the eye of their customers or get them excited to interact any farther with their site.
There are 5 different types of lead magnets:
- Educational lead magnets: teach your visitors something they don’t already know
- Useful lead magnets: provide a tutorial, template, or other tool with which to solve a problem
- Community-building lead magnets: Create a way for your audience to build a community based on the things they have in common
- Entertaining lead magnets: Inspire or entertain your audience
- Interactive Lead Magnets: Quizzes are great for this!
These lead magnet types can be used in various ways. For example, a fitness coach might share an educational lead magnet, like a fitness guide. A blogger might invite their readers to join their blogging community, serving as a community-building lead magnet. There’s a lot of options here – more than 50, actually.
Remember, you’re not asking your site visitor to give you money right away – often, he or she will not be ready to purchase right off the bat. Instead, you’re asking for something of value: his or her email address, or other personal information, in exchange for something of value from you. Once you have your visitor’s email address, you can follow up with later on to direct him or her through your sales funnel.
Informing Visitors About A Sale

Hello bars are excellent tools for announcing sales and discount codes on your site. You can use them to drive traffic towards a certain page and make sure that your best deals don’t fly under the radar.
If you’re having issues with a high bounce rate, where visitors come to your site and leave quickly without interacting, you can also use Hello Bar to help drive traffic towards other pages that might interest those visitors who are leaving. This strategy can help distribute more views to your site and expand your opportunity to interact with your visitors.
Warning Users About An Incident
We’ve seen our top bars used for announcements and warnings on a variety of sites. For example, one of our users operated a government site and used their top bar to announce an upcoming weather event. We’ve also seen software companies use our top bar to announce issues with their systems or tech problems that their team is working to solve.
So, we’ve covered how hello bars are used. But how do you actually get one set up on your WordPress site?
How to Create a HelloBar
It’s pretty simple.
- Visit Hellobar.com and sign up for an account. (Hint: Now’s a good time to take advantage of our FREE 30 day trial of our premium Growth account, just for members of WP Explorer’s community.)
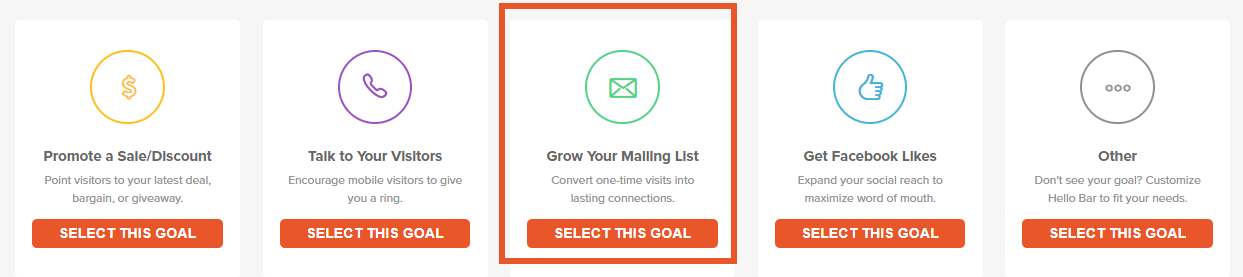
- Select your goal.
- Design your top bar, using our step by step popup creator.
- On your Hello Bar dashboard, click “I use WordPress” and then click the green “Download” button. This will save a .zip file to your computer.
- Log in to your WordPress Dashboard and navigate to the Plugins tab, where you will select “Add New”.
- At the top of the plugin page, click the “Upload Plugin” button and select the Hello Bar zip file you downloaded.
- Finally, go to the “Installed Plugins” tab within your WordPress Dashboard and Activate your Hello bar plugin.
Then you’re all set to start using your hello bar!
Using your new top bar is pretty straightforward, but we do have a few tips on optimizing your hello bar’s performance.
Start With Content
If you’re not sure where to focus your (limited) time, the element of your top bar that will make the biggest difference is the text that you choose to include. Having a killer headline and call to action is key.
Long gone are the days when “Join my mailing list” was enough to snag a visitor’s attention, let alone information. When crafting your headline, remember that the best converting headlines are unique and customized to your brand and your brand voice.
They’re also short. Don’t lead in with something too lengthy – the more time it takes for a visitor to read your headline, the less chance you have of them converting. Keep your headlines short and sweet. You can use your CTA (call to action) button to supplement your headline with more information.
For example, if you were offering a free recipe, you might set your headline as “Want My Secrets For Healthy Meals?”. Then, for your CTA, you might say “Yes, Send Me My Free Recipe!”. This way, you’re making it clear that the recipes are free, without taking up valuable space in your headline.
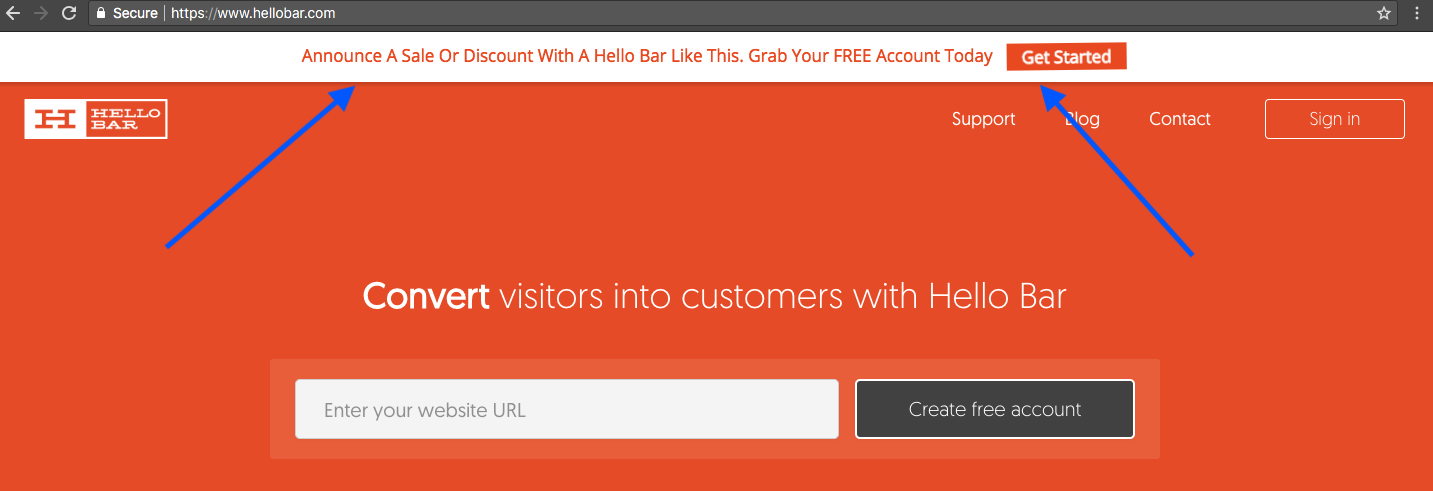
Another important tip about crafting the perfect CTA is to make it the response to a question. While testing out Hello Bar, Neil Patel placed a top bar on his site and asked the pointed question: Do you want more traffic?
![]()
Neil’s top bar worked fabulously. He was able to achieve such success by choosing a question that spoke directly to his audience. As one of Forbe’s top 10 marketers, Neil knew that people go to his site to learn how to better their online presence. Who on his site wouldn’t want more traffic?
It’s a question that people can’t say “no” to, which makes it incredibly effective. Finding CTAs that resonate with your audience so strongly is hard to do, but worth it when it comes to conversions.
Play With Design
Hello Bar has a lot of design options available – it’s easy to play with our features for hours, but there’s a few easy ways to skip this toggling and still leave with the end-result of a perfect top bar.
The best trick we have up our sleeve? Templates and color auto-detection. Simply log in, select a template that works best for you, or even just select auto-detect colors and watch your top bar magically match your site within seconds. It couldn’t be easier.
Of course, there are other features to tweak. An animated CTA button can do wonders for your conversions – it’s certainly worth trying! Various colors can also catch eyes in different ways. There’s a lot to play with here, and even more options for including photos come along once you delve into our other site features aside from just the top bar.
A/B Testing

With so many different options for headlines, CTAs, and designs, it’s hard to know what will work best for your business’ website. Luckily, there’s a way to know just what your site needs – and it’s a lot of fun, too.
A/B Testing is a method of experimentation that is frequently used in marketing where you can place multiple variations of a top bar on your site at the same time (different visitors will see different variations), and ultimately compare which one converts better.
When you’re setting up your A/B tests, there are a few important principles to keep in mind to ensure that your A/B tests are not just showing you which site feature works best, but why.
The #1 rule? Only test one element at a time. This means that if you’re looking to try out a variation, you should only change one detail on your top bar at once. For example, your headline variations might look like this:


We recommend to first test your headline. The best practice is to create 2 or 3 variations to test – any more will stretch your views too thin, meaning that it will take much longer to arrive at conclusive data.
You’ll know when you have enough data to prove that one variation is better than the next when a star appears next to one of your variations – that’s our system telling you that you’ve found a winner. Once you’ve identified a winner, it’s time to pause the losing variations. Then, you can start making new variations.
Try testing your CTA next. Once you’ve found a winning CTA, it’s time to start testing design aspects, such as color, image, or animation. Be sure to give your variations enough time to run – if you don’t, you might have false conclusions that don’t convert as well as they ought to.
Targeting
Marketing really comes down to putting the right message in front of the right people. This is where targeting comes in. Using targeting methods, you can select a number of filters to refine the audience who sees your particular top bar.
This means that you can customize your hello bar to fit your exact customer. The better fit your bar is for your customer, the more likely he or she will be to participate towards your conversion goal.
Here’s a few different ways you can set up the targeting for your hello bar (there are many more options within Hello Bar itself):
- URL Path: If you have visitors coming from different pages, you can customize your Hello Bar site features to fit the site they’re coming from.
- Date: If you’re announcing a sale, you can customize the dates on which certain top bars appear. This allows you to send a special greeting on Halloween, or simply update your site for different seasons without having to redesign your whole site.
- Device: You can customize your popups to display differently whether someone is accessing your site from a desktop, tablet, or mobile device. This is incredibly important, as web browsing is increasingly prominent among smartphone users.
Don’t be afraid to create more than one top bar to use on different pages, with each feature having specific targeting rules. This will give your site browsers as custom of a browsing experience as possible!
Once you’ve got your top bar all fine tuned, you can start exploring other forms of popups. Some of our site assets convert better than others (check out our page takeovers upon exit!), but it really depends on your site – and your dedication to A/B testing.
Ready to get started? Try out Hello Bar’s premium Growth account FREE for 30 days! An exclusive sneak peek for the WPExplorer community!