How to Remove a WordPress Site from Google Blacklist

Google blacklists around 10,000+ websites every day. When a website is added to Google’s blacklist, it means that Google and other search engines are marking the website as unsafe and not secure. Google’s Safe Browsing security team identifies unsafe websites across the web and notify users and webmasters of potential harm.
Are you one of them?
A blacklist notice typically comes as a surprise throwing the website owner into disbelief, denial and confusion. It takes some level of tech-savviness and prudence to be able to get your website off Google’s blacklist. It can be quite a task to get your website removed from Google’s blacklist once it’s infected with malware including ransomware, spyware, viruses, worms, and Trojan horses.
The Significance of Google’s Blacklist
Google’s blacklist or the Google Transparency Report is used by hundreds of service providers to identify if the website is safe for users. It is also used by popular browsers like Firefox to ensure the protection of Firefox Users. If your website is on Google’s blacklist, chances are that it will be flagged by many other service providers too. The sooner you get your website off Google’s blacklist, the sooner you can reclaim your user-base as well as brand-value.
1. Decoding Blacklist Warnings
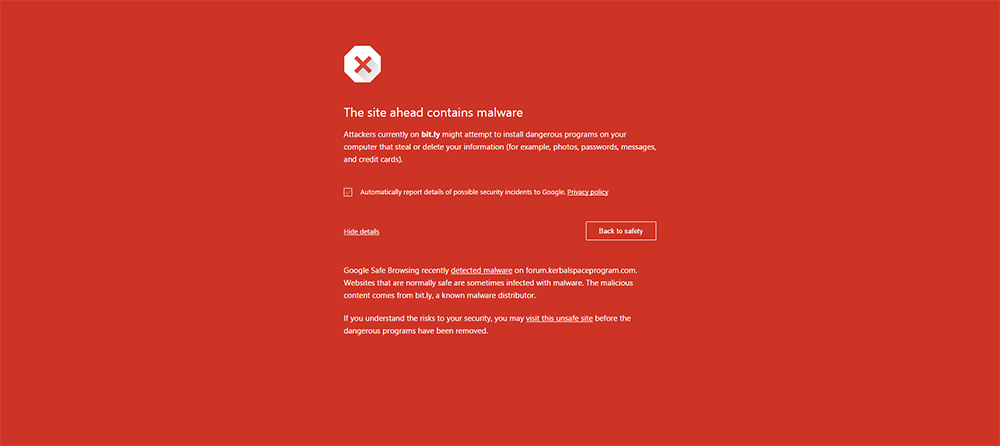
Generally referred to as “malware” or “phishing” websites, Google has very specific messages for each case:
- The site ahead contains malware: Typically these type of sites try to trigger download or installation of malware. This will result in infecting your computer system.
- Deceptive site ahead: This is a warning thrown for “phishing” site (sometimes called a “spoofed” website). These type of sites trick the user into believing that the site is legit and have them submit their information like usernames, passwords or even payment details for nefarious purposes.
- The site ahead contains harmful programs: Even though this may seem a lot like the first one, there’s a semantic difference. This specific warning is triggered when a website is known to distribute adware like changing the browser homepage or installing browser add-ons that may trigger ads or malicious redirects. Specifically the primary target is your browser.
- This page is trying to load scripts from unauthenticated sources: This warning is only issued on website claims to be secure (has a valid SSL certificate and is running on the HTTPS protocol) but includes scripts and resources like images from a non-ssl website. A related warning “Your connection is not private” is a result of invalid SSL certificate. SSL related warnings are not caused by Google’s blacklist but instead Google’s push for HTTPS.
- Continue to [site name]?: Sometimes when you mistype the website’s URL, Google will throw such warning to ensure the website you are trying to visit is really the one you want to visit.
In this article we are going to cover the specific cases when your website has a legitimate infection i.e. case 1, 2 and 3.
2. Finding Google Safe Browsing Site Status
Safe Browsing is a service that Google’s security team built to identify unsafe websites across the web and notify users and webmasters of potential harm.
They examine billions of URLs per day looking for unsafe websites. And when Google detects unsafe site, it shows warnings on Google Search and in web browsers. You can check safe browsing site status here.
In case of an infection it will show up similar to this:
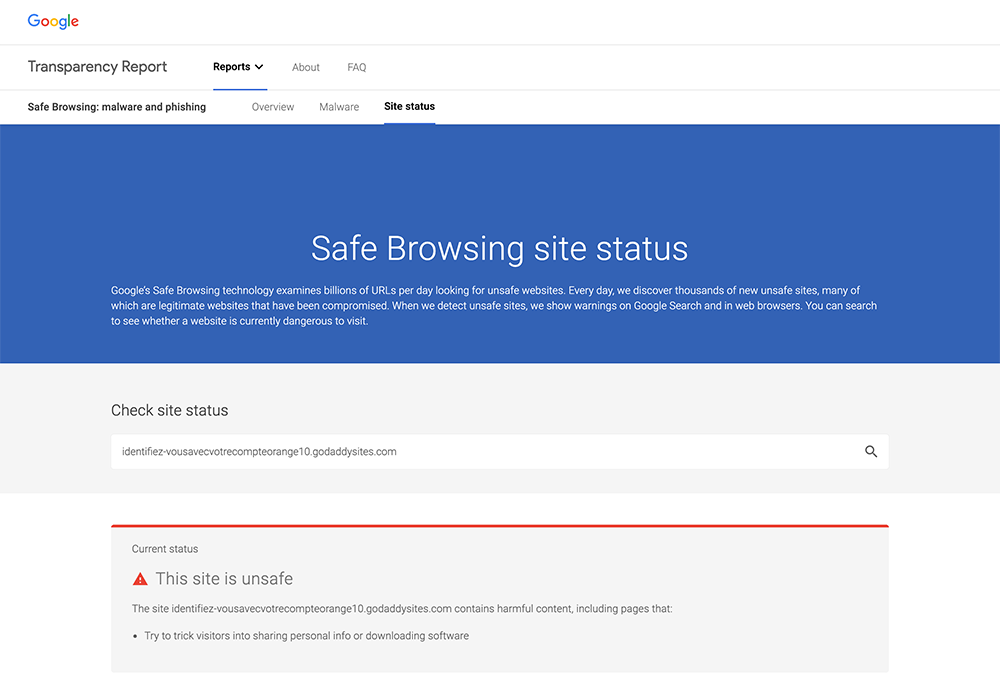
Quick Tip: Additionally do a Google site search of your website. Just enter “site:mysite.com” in the Google search box and hit enter (replace mysite.com with the url of your website). The results will show the titles and descriptions of pages on your website as they appear on Google. A hacked website typically has its page titles hijacked.
3. Scanning Your Website for Malware
The first thing to do is to identify the infection. This will help you proceed with the malware removal and cleanup before you submit a review to Google. You can scan your website for malware in several ways:
- Ask your webhost to scan your website for malware: Any good web host will scan your website for free and provide a file which lists all the malware infected files. In fact some of them will proactively notify you of the infection before Google even gets to detect it. However there are chances that once they find the infection, they may block your website for the safety of their customers, attempt a destructive cleanup (deleting affected files or databases), etc.
- Using an external malware scanner to find infection: External scanners scan your website URL(s) to determine if your website page(s) have malware infection or not. While external scanners can be used to detect infection on websites, they are not as powerful as internal scanners. Sometimes they may miss some URLs and at the most they will report URLs having malware instead of being able to precisely pinpoint the location of infection like the specific file that’s infected. Some of the good ones are Sucuri Sitecheck and malCure WebScan. Here’s a complete list of free tools to scan your website for vulnerabilities.
- Using a plugin to do an internal scan of website files and database: An internal malware scanner is your best bet. It does an in-depth scan, reports exact findings like the infected files and database records and also give you an opportunity to clean up the site in a manner that works the best for you. If required you can even backup the site, scrap it and start afresh. Or you can inspect each infection and clean up the specific infection to secure your website with no (or minimal) data loss. Here are the best internal malware scanners for your WordPress website.
4. Removing Malware from Your Website
A complete in-depth malware removal guide is beyond the scope of this article. Though once you have identified that your website in fact has malware and you need to proceed with cleanup, you can proceed in one of the two ways.
DIY Malware Removal
If you are tech savvy or willing to learn and go an extra mile then you can try to remove the malware yourself. However the downside is that you’ll need to be able to identify the source of infection and plug in the security loopholes else the infection will only end up recurring. You’ll need to be familiar with the usage of FTP clients like FileZilla, phpMyAdmin, ssh / shell, WP CLI, etc. If you are familiar with these, chances are you know what you are doing.
Here are a few DIY Malware removal resources for you to get started:
- FAQ My site was hacked
- The 5 Steps I Took to Recover My WordPress Blog from a Hack
- How to Clean & Recover a Hacked WordPress Site
Hire a Professional Web-Security Expert
If you don’t what you are doing, your best bet is to hire a trusted malware and blacklist removal service provider to clean up the infection from your website. However this involves spending money so you want to make sure you hire someone who has expertise in the web-security domain and is not just a web-designer or developer. Here is a helpful guide for selecting the right malware removal service.
Professional security experts clean website on a daily basis so they are on top of things, know the tools of the trade, are experts in using advanced tools, are able to manually identify the infected files and know how to communicate with Google (and other blacklists) on how to get the website off the blacklist.
For hiring a web-security expert you have several options. The best one is to go with an agency of repute as they have refined processes and quality control.
5. Request a Review
Once you have completed malware removal, you need to make sure that your website cache is purged. Sometimes missing this small step may cause a lot of frustration and wasted time and effort. A stale cache will continue serving malware to visitors and Google will continue to flag the website as malicious.
Before you request a reconsideration, please recheck your website. Use multiple internal scanners to ensure malware is detected in case one of them fails. Try external scanners as well. Sometimes you may have outgoing links to malicious websites which the internal scanner will ignore however some external scanners are able to detect it.
Once you are sure that your website is clean, you can submit a reconsideration request.
Google needs to know the specific steps you’ve taken to ensure that your website is clean. They’ll verify if that’s the right thing you’ve done to remove the malware they detected. They also want to make sure that you are on top of things and know as an owner that your website is safe for users.
Please make sure that your website is verified in Google Search Console. Here’s Google’s guide on how to request a review. Follow the steps given below:
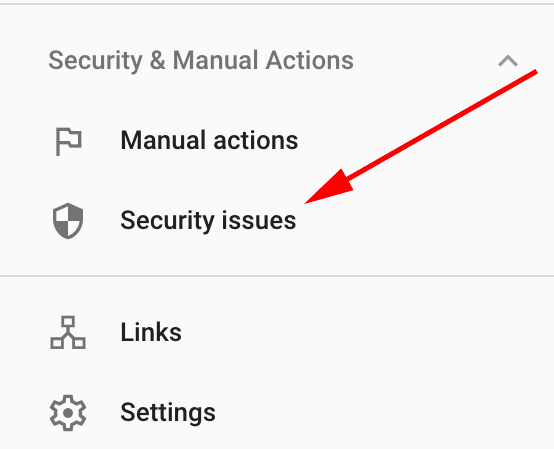
- Navigate to Google Search Console and select the affected property (website)
- Navigate to Security & Manual Actions > Security Issues
- Go ahead and “Request a review”. Once Google verifies that your site is clean and isn’t infected anymore, they’ll remove the “This site may be hacked” message.
Once you submit the website for a review, it typically takes a day or so for Google to revert back. Even though Google have shared their own timelines, in our experience they are faster. Please be patient and wait for them to revert back.
In case they still find the website malicious, you’ll want to take the help of a web-sec professional to ensure that the website is clean. A professional security expert will also help you submit a review request to Google and ensure that the site is clean, do a root cause analysis, and will keep following up with Google till the case is resolved to your satisfaction.
6. Final Steps
Hackers typically get peeved off once you take back control of your website. In the coming days you may see inflated URL requests and even a lot of bot-traffic (as legitimate search bots try to re-index your website). It is important that you take strong security measures to protect your website from future attacks as once you are on the hacker’s radar, they’ll keep trying to find a way back inside before giving up.
Also after going through this experience and having spent time, effort and money you must ensure that it doesn’t repeat again and take you back to square one. Take the following steps to proactively secure your website:
- Set up and/or automate WordPress backups
- Harden security of your website
- Add Website Monitoring
- Protect your website via Web Application Firewall
- Be vigilant, update WordPress (core, plugins & themes)
At the end of the day…
Finding your website on Google’s blacklist is never a pleasant experience. In fact most infections result in a loss of traffic, search engine ranks, brand-value (trust) and also a lot of wasted ad-spend if you are running paid ads. The sooner you get to know of an infection, the faster you can act and recover.
Key things to remember:
- Do not panic.
- Don’t be in disbelief or denial.
- Act promptly.
- Ensure thorough cleanup.
- Don’t forget to clear up your cache.
- Be patient & professional in your communication with Google.
- Practice proactive security.
And finally take this experience as a rich learning opportunity that resolves in your favor in all cases no matter what.

