The Best GridBuilderWP Review: Flexible Grids & Filters

When you sit down to watch a game of football, you can easily spot the superstars from a mile away.
Their stylish and polished game sets them apart, and often change the outcome of the match. Fans and managers love them because when they play, they are at their absolute best.
The same applies to superstars in the music industry. Usually, they put in the work, serenade us with hits, and still keep going. The stars are masters of their trade and push our imagination to the limits.
You know, just like Gridbuilder WP, the subject of today’s review.
Here’s a primer: We know building grid layouts isn’t for the fainthearted, more so as a beginner. It’s a challenging task even for reasonably experienced users.
Yet grid layouts are an amazing way of displaying and filtering content on your WordPress website. Something like this:

Or this:

But, sadly, creating grid layouts for your WordPress website isn’t straightforward. Or so it used to be before the advent of WordPress grid plugins.
To create fantastic grid layouts without breaking a sweat, you need a simple but powerful WordPress grid plugin.
If you are looking for such a plugin, Gridbuilder WP fits the bill perfectly.
And in today’s review/how-to article, you discover why Gridbuilder WP is the grid and filter plugin of choice for a growing number of WordPress users. We look under the hood and play with the plugin, so you already know it’ll be fun.
Without further ado, let us roll up our sleeves and get dirty.
What is Gridbuilder WP?

Also known as WP Grid Builder, Gridbuilder WP is a beautiful WordPress plugin that allows you to create advanced grid layouts quickly. It features an intuitive user interface that is quite pleasant to use.
The plugin comes with a beautiful suite of features perfect for beginners and developers alike. For the novice, WP Grid Builder is a complete solution to create flexible and filterable grid layouts and to filter them without coding knowledge. If you are a developer, the grid builder comes with plenty of actions and functions to keep you busy.
It works with all WordPress themes and integrates with most of your favorite tools seamlessly. On top of that, the plugin comes with add-ons that supercharge your grid layouts and the search filters (know as facets).
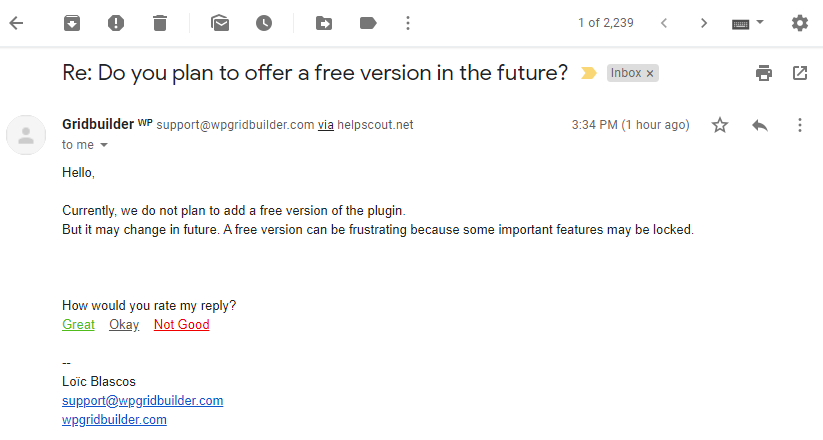
At the time of writing, they only offer a premium version of WP Grid Builder, but that may change in the future. Or as Loic Blascos – the developer – says in an email he sent immediately after my inquiry:
All the same, they have three plans that cost between $49 and $249 per year. Choose the plan that’s suitable for your needs.
If you are unhappy with your purchase, WP Grid Builder offers you a 14-day moneyback guarantee. Plus, they throw in some excellent discounts on renewals (20% for the Basic plan, 30% for Premium plan, and 40% for the Ultimate plan) for good measure.
To sweeten the deal, WordPress experts laud WP Grid Builder. Here’s one happy customer:
Both user and developer-friendly, Gridbuilder ᵂᴾ is an awesome product and a new paradigm for this kind of feature. Well-integrated to WordPress Core, it provides a nice Admin UX and a blazing fast front-end experience. – Jb Audras, WordPress Core Developer.
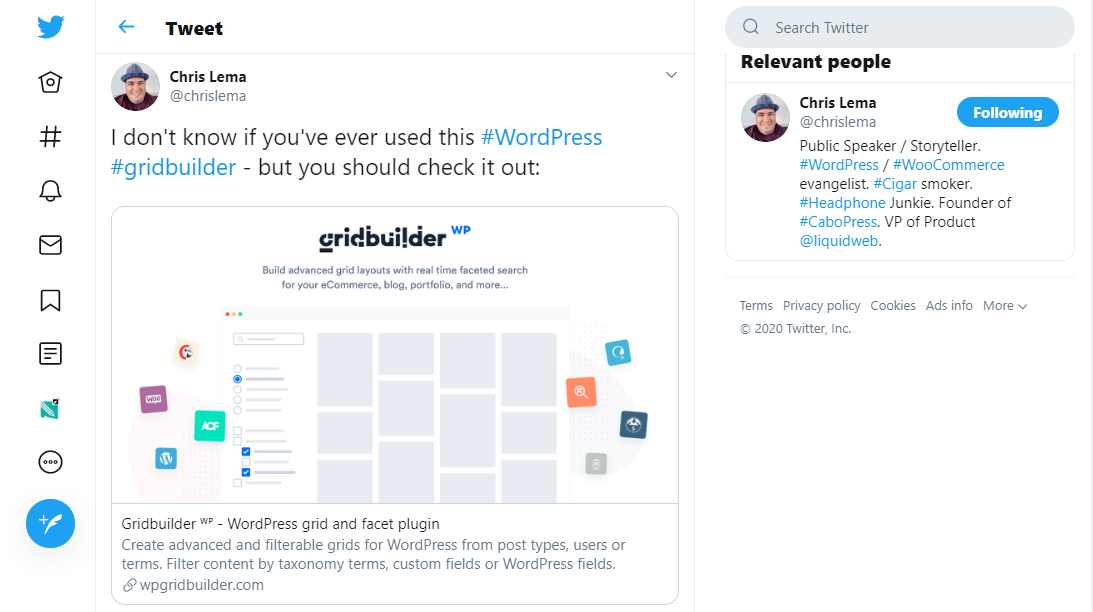
Even Chris Lema, one of the biggest names in WordPress circles, has nothing but praise for WP Grid Builder:
That, plus, you receive fast world-class support and detailed documentation to help you install and configure WP Grid Builder extensively.
Now we know what we are working with, let’s catch a quick glimpse of WP Grid Builder WP features.
Gridbuilder WP Features

WP Grid Builder ships with all the features you need to whip up grid layouts like a pro. Unlike competitors, the plugin makes it all too easy to create layouts for your ecommerce store, portfolio website, blog, and directory, among others.
You can expect the following features in your copy of WP Grid Builder:
- Smooth integration with WooCommerce, Easy Digital Downloads, SearchWP, Relevanssi, Polylang, WPML, Advanced Custom Fields and Gutenberg
- 100% responsive and mobile ready with touch support for lightbox and carousel
- SEO friendly – WP Grid Builder is W3C compliant and uses the best SEO practices
- Lightning-fast performance thanks to custom AJAX endpoints
- An advanced filtering system that allows you to sort WordPress content by (custom) taxonomy terms, post fields or custom fields efficiently
- 15+ facets types including radios, checkboxes, sliders, selects, ratings, sliders, ratings, load-more buttons, reset buttons and more, which allows your users to narrow down search results
- Import and export functionality so you can move your WP Grid Builder settings to another site easily
- Built-in lightbox
- Drag-and-drop grid builder
- 20+ ready-made and easy to customize grid cards. Further, you can create your cards from scratch
- 900+ Google Fonts
- 250+ SVG icons to decorate your grid cards as desired
- Social sharing support allowing you to share content on social networks right from your grids
- Support for image, video (including embeds from sites such as YouTube), gallery and audio post formats
- 3+ grid layouts including Masonry, Justified and Metro
- Lazy loading, which improves page load speeds
- 20+ loading animations, which reduces Perceived Loading Time by users
- 20+ reveal animations
- RTL support for languages written in Right-To-Left direction
- An intuitive admin dashboard
- And many more settings
What an impressive list of features? Now, let us install WP Grid Builder and test what we can achieve with a grid builder like no other.
How to Install Gridbuilder WP
Now the fun part 🙂
Installing WP Grid Builder is as easy as A, B, C. If you know how to install a premium plugin, you should have no problem installing WP Grid Builder. After purchasing the plugin, you can find the WP Grid Builder ZIP folder in your account or the purchase email.
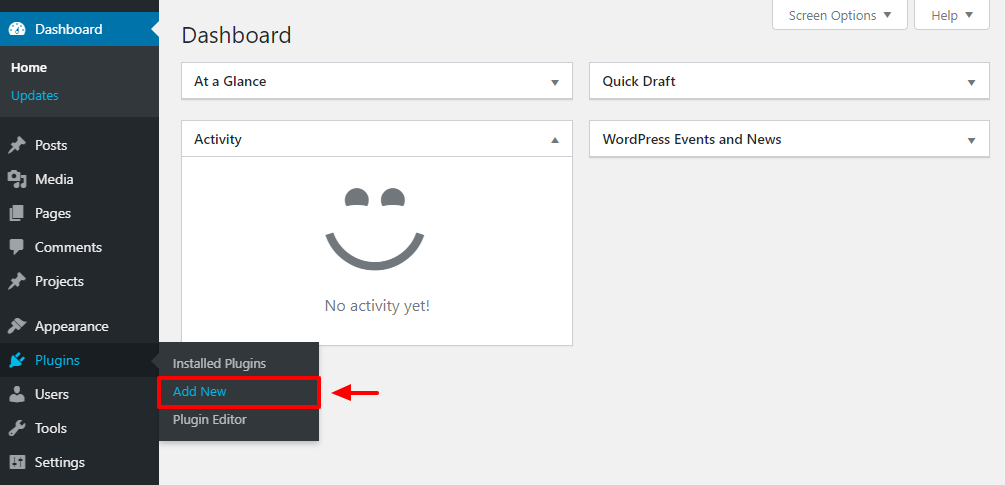
Firstly, download the WP Grid Builder ZIP file to your computer. Next, log in to your WordPress admin dashboard and navigate to Plugins > Add New, as shown below.
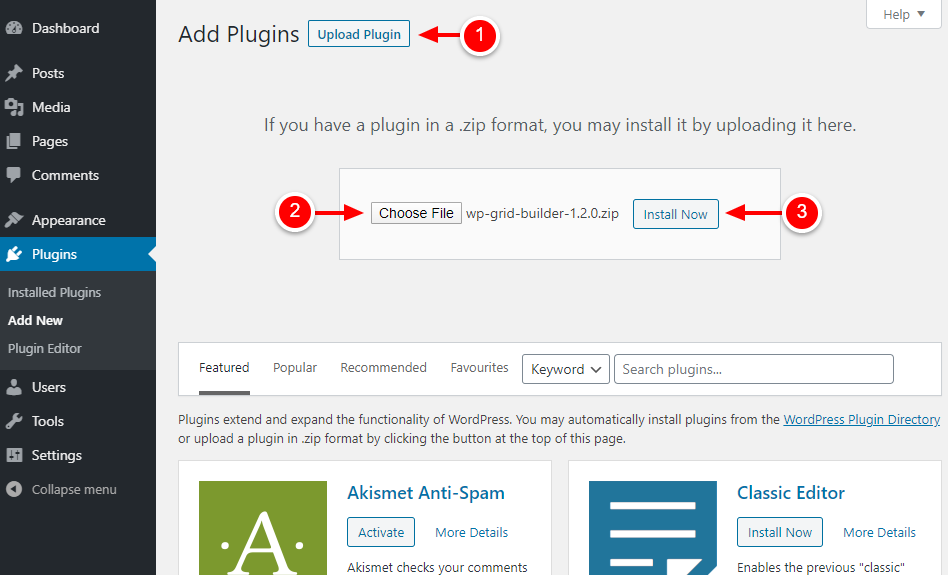
Next, click the Upload Plugin button, choose the WP Grid Builder ZIP file you downloaded and hit the Install Now button to get things in motion. Here’s a screenshot outlining the process:
Next, activate WP Grid Builder:
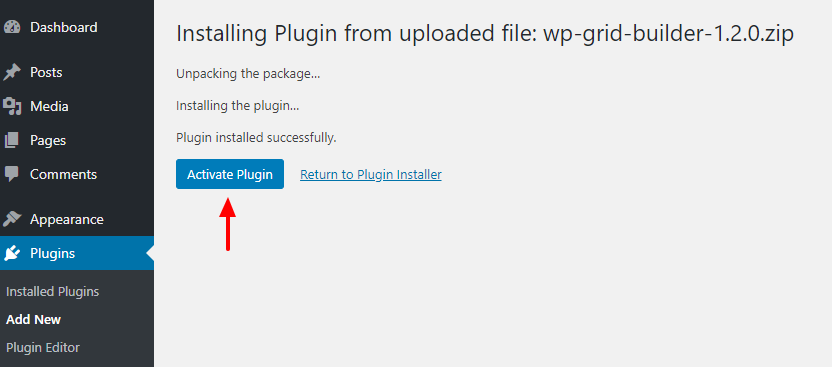
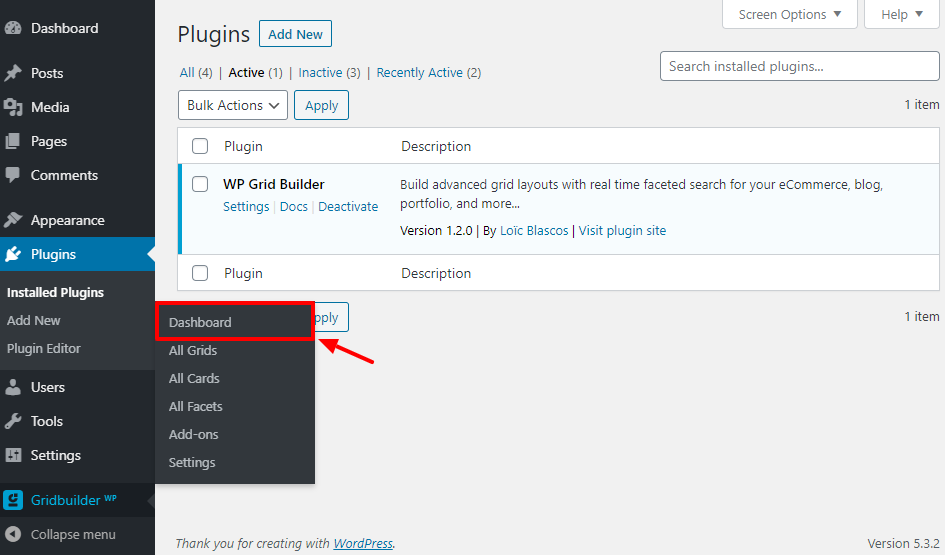
Activating the plugin adds a Gridbuilder WP item to your WordPress admin menu. Next, navigate to Gridbuilder WP > Dashboard, as we detail below.
After that, enter your license email and license key and click the Activate Plugin button:
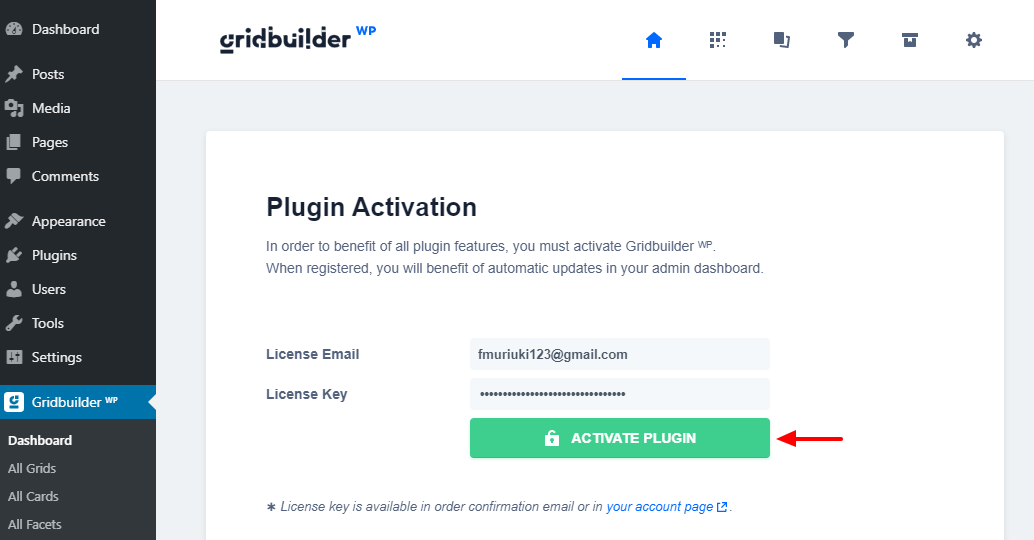
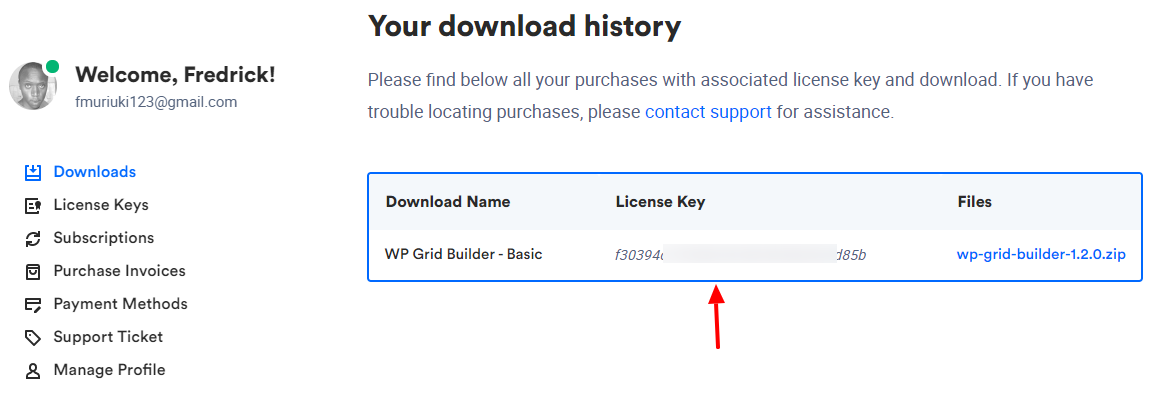
To benefit from automatic updates, you can activate your license, which is available in your order confirmation email or your account page:
Now that we’ve installed and activated WP Grid Builder, we can create our first grid layout.
How to Configure Gridbuilder WP
In the following section, you learn how to create a functional grid. I will do my best to cover most (if not all) settings. The excellent news is WP Grid Builder features have clear descriptions in the admin interface. We must start by naming our new grid for future reference.
Naming a New Grid
To create a new grid layout, navigate to Gridbuilder WP > All Grids on your WordPress admin menu:
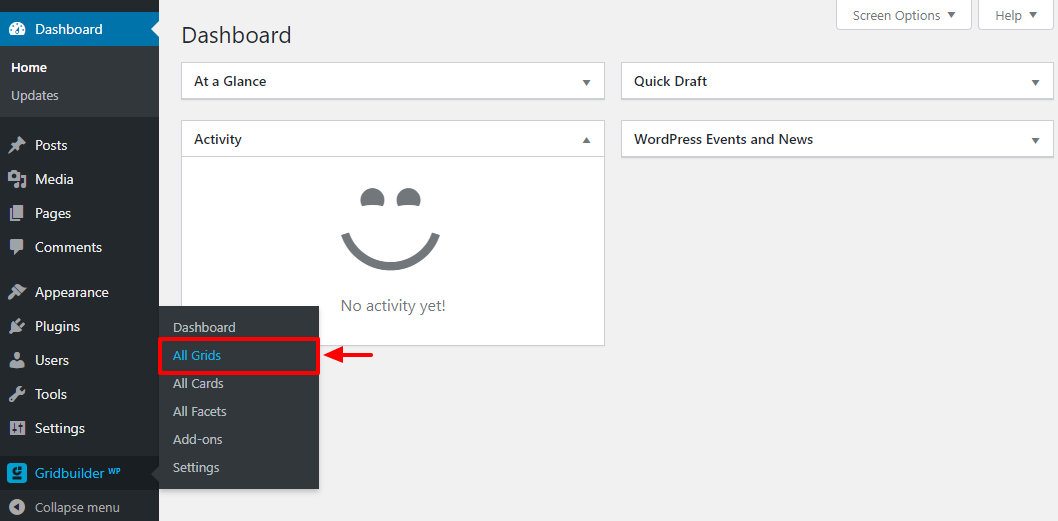
Doing so leads you to the All Grids screen, which is empty for now. Next, click the Create A Grid button:
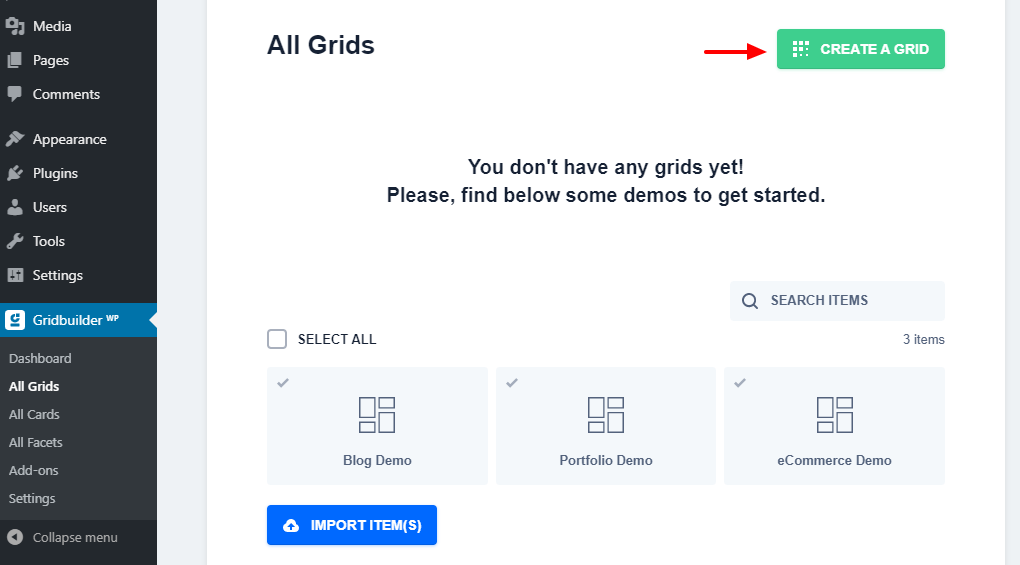
Alternatively, you can import the demos from wpgridbuilder.com. Note, however, the demos are just for layout settings purposes. The content displayed in your grids depends on your posts, media, products, etc.
For our testing purposes, I went with the first option, creating a new grid from scratch. The Create A Grid button leads you to the following page:
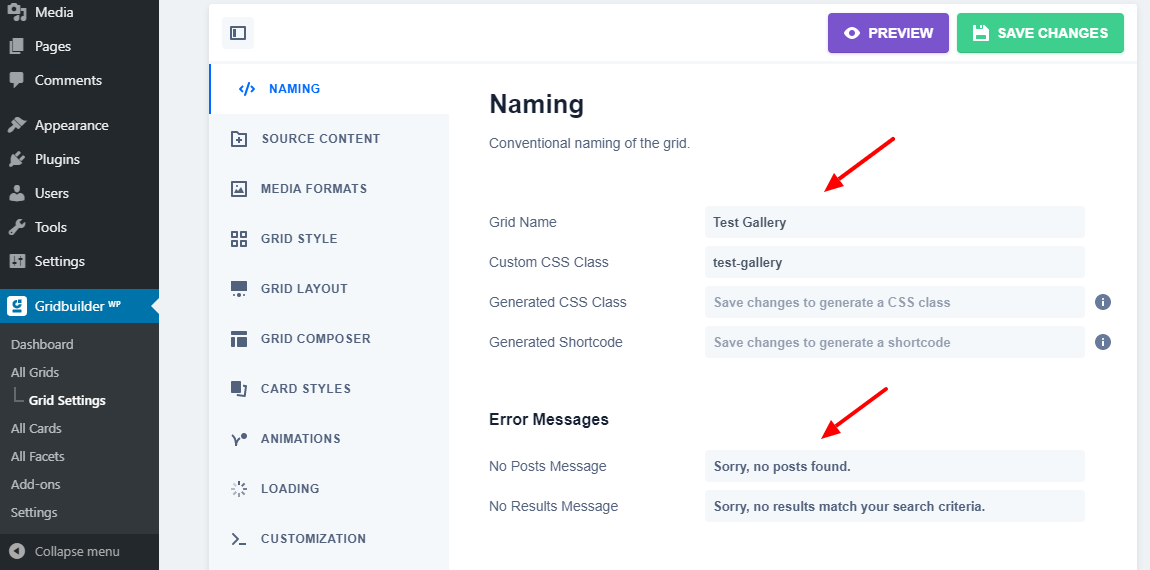
On the above screen, you can:
- Name your grid. I am using “Test Gallery” for our example
- Add and generate custom CSS class, so you can add custom styles to your grid if you so wish
- Define the error messages that users see if they don’t find any results
Choose Media To Display In Your Grid
It’s time to choose the media you want to display in your grid. For that, navigate to the next section, i.e., Grid Settings > Source Content, as shown below.
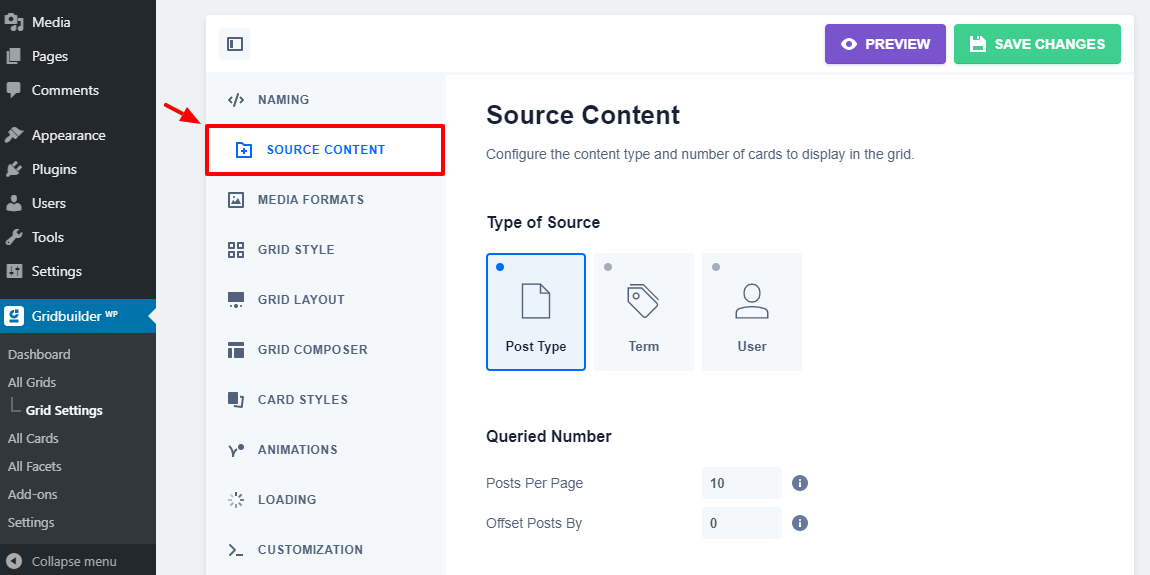
As shown above, you have three kinds of sources under Type of Source:
- Post Type – You can pull content from your posts, pages, media library or any other custom post type
- Term – You can source material based on categories, tags, or any other custom taxonomy terms.
- User – This option allows you to source content from specific WordPress users
Under that, you can set the number of items per page. Use the value “-1” to show all posts. Zero (0) defaults to the number of posts per page in WordPress settings.
Queried Posts Section
Below that, you have Queried Post(s) section:
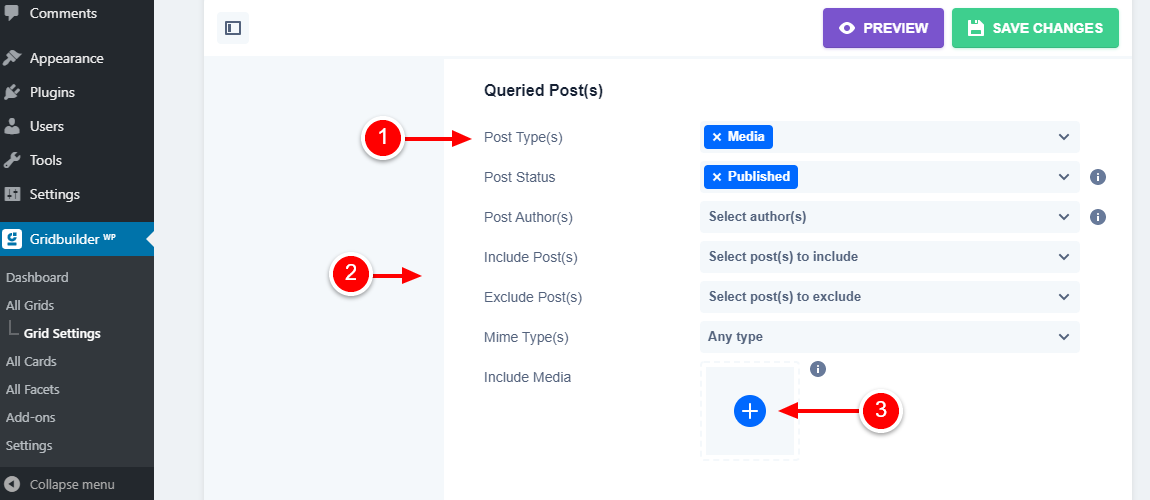 On the above screen, you can do several things as follows:
- Choose your post type(s) under Post Type(s) as marked on the image. If you’d like to create a grid for your blog posts, choose Posts. If you’re creating a grid for your media (say, you want to create a visual portfolio), select Media, as in our example above. The other post type available is Pages.
- Below post types, you can choose the post status of the content you want to display in your grid. You have a couple of options, but I would recommend you stick with Published. Additionally, you can choose post authors, mime types, and include/exclude specific content from your grid.
- As shown by item number three (3) in the image above, you can include other media directly, which can save you a lot of time, especially when you want to deploy a grid quickly.
As you scroll to the bottom of the screen, you will note options that help you to order your grid content by values, tags, and custom fields. You’ll only need these options when fine-tuning your grid:
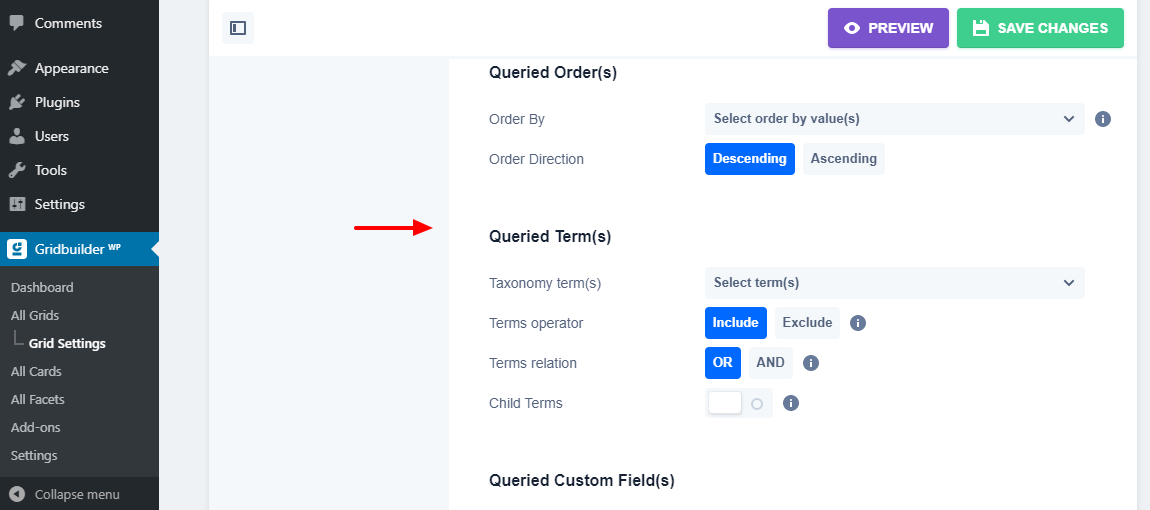
Aside: To avoid losing your progress accidentally, click the Save Changes button as you create your grid. Let’s set up media formats.
Media Formats
Navigate to Grid Settings > Media Formats:
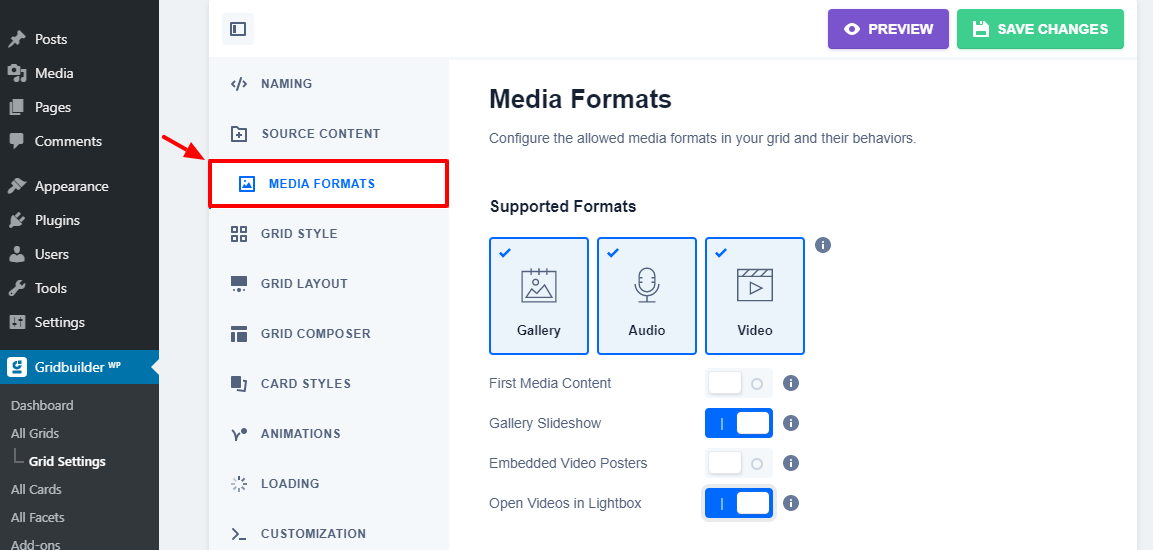
You can choose the media formats you’d like to use in your grids. WP Grid Builder supports galleries, videos, and audio. Towards the bottom of the screen, you can set a default thumbnail in each grid card (or tile) in case the content is missing.
On the same screen, you can choose to capture the first media in your posts automatically (in case the content is missing). Also, you can enable gallery slideshows inside grid cards, use posters from embedded videos, and open videos in a lightbox instead of the grid card.
Grid Style
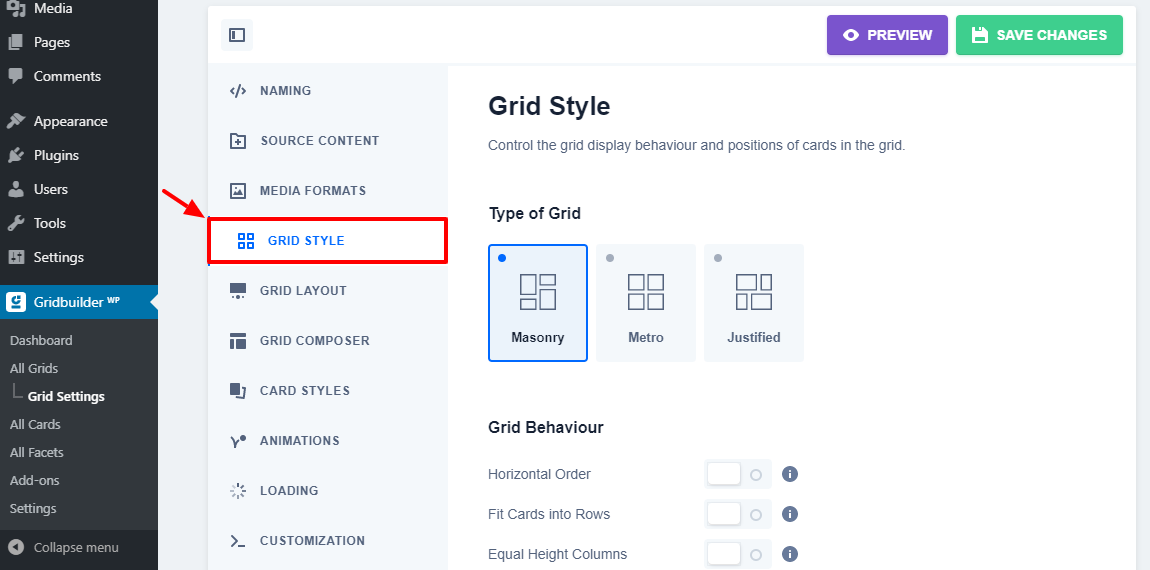
Go to Grid Settings > Grid Style to customize your grid, as shown above. By default, you have three grid styles: Masonry, Metro, and Justified. I’m using Masonry for illustration purposes. Also, I had published images to my media library previously. WP Grid Builder adds the photos to the grid automatically.
Other than that, you can control other options such as grid behavior, override card sizes, and control responsivity. Save for choosing a grid style and overriding card sizes, you will hardly touch the settings. Choose your grid style, and let us move to the next section.
Grid Layout
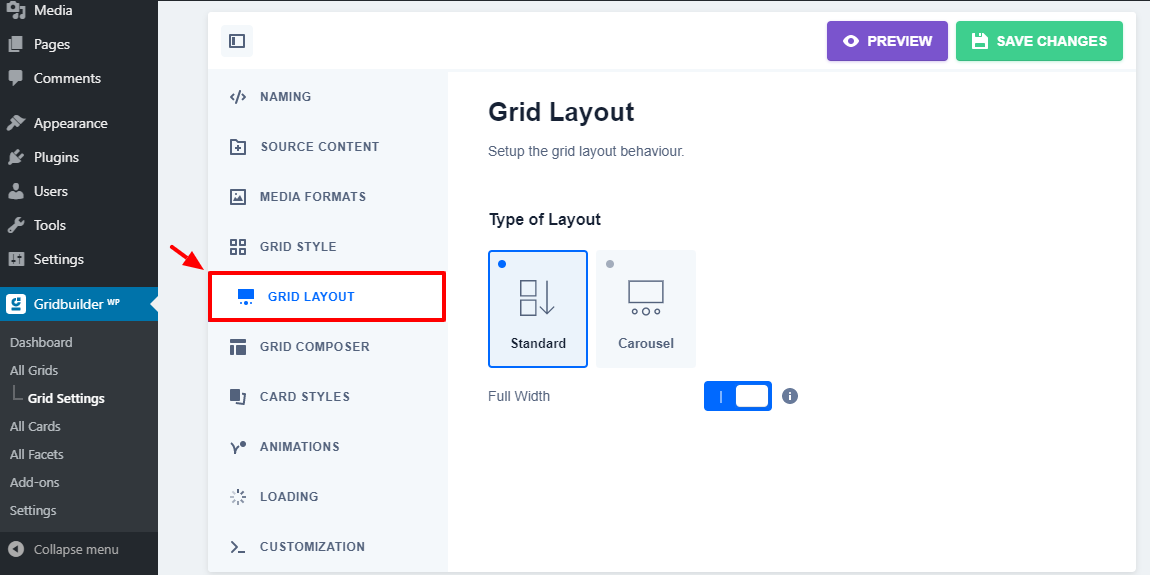
There is nothing much to see here. You have two types of layouts for your grids; the Standard vertical design, and the Carousel layout. On top of that, you can make your grids full-width. I am working with the Standard design, and my grid is at full width.
We are moving on.
Grid Composer
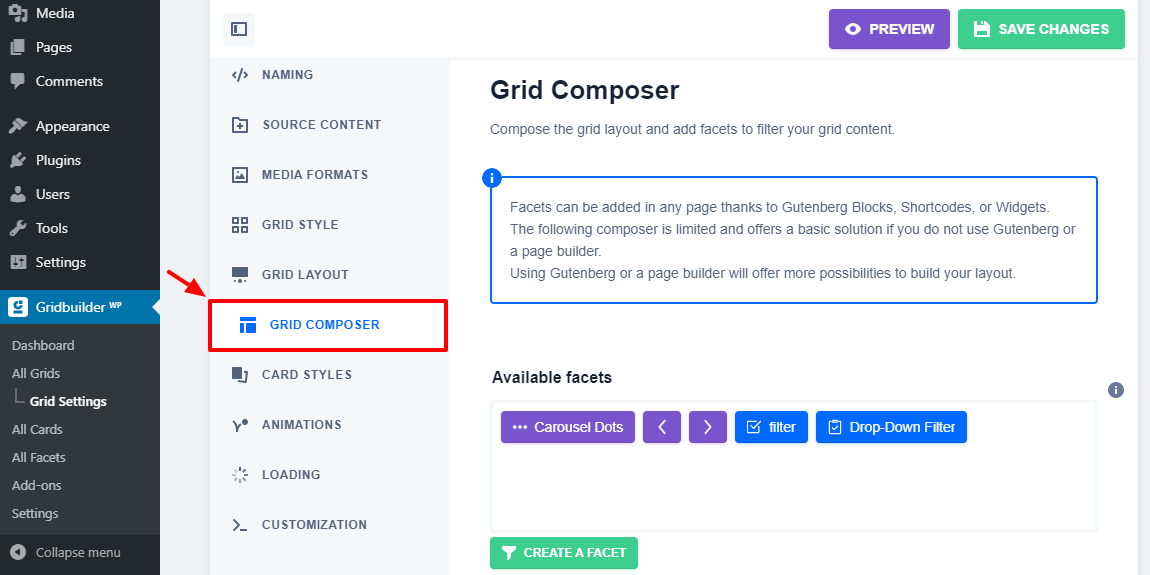
The Grid Composer comes in handy when you’re customizing your grids with facets, e.g., a filter, rating, search, checkboxes, load more, pagination, and so much more.
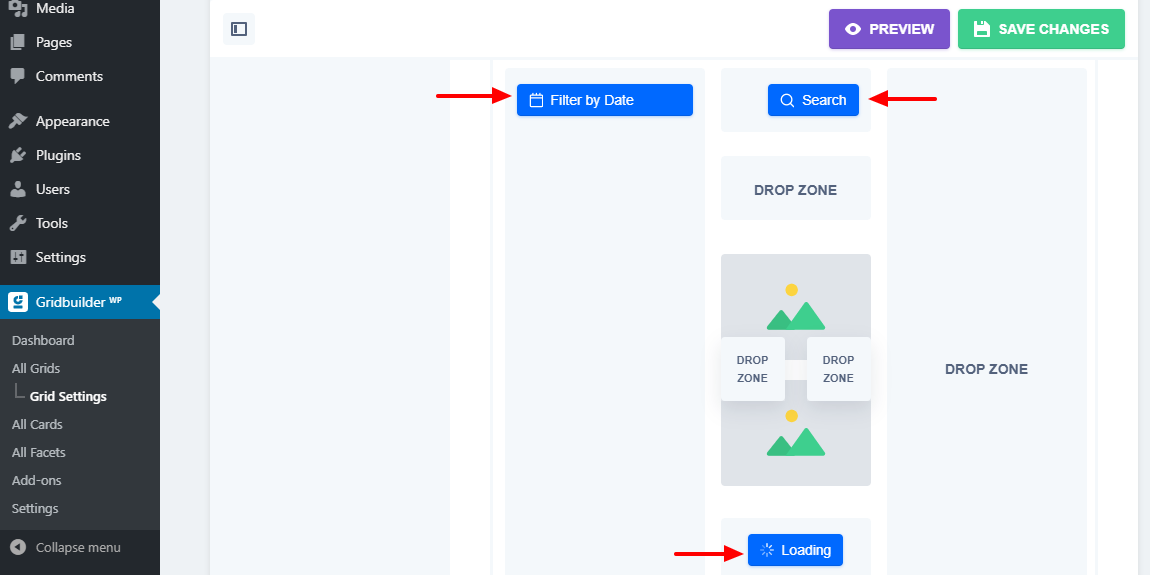
At the bottom of the screen, you’ll find a drag-and-drop grid layout builder. For instance, below, see my example with three facets: Filter by Date, Search, and Load More button.
If I publish my grid at this juncture, I see the following grid, complete with my three (3) fully functional facets:
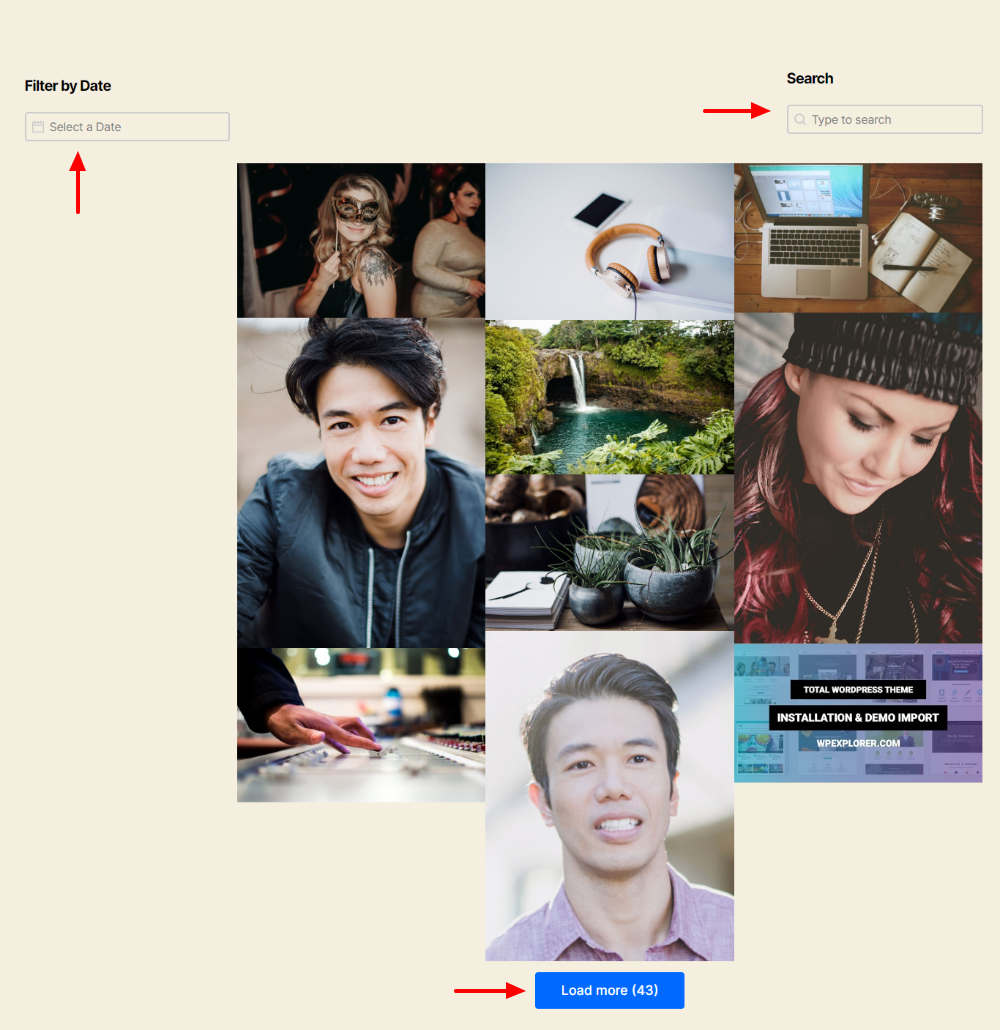
Not bad 🙂 Not bad at all. I hope you’re getting the gist of things, except we aren’t done. Let’s go back to the WP Grid Builder admin area.
Card Styles
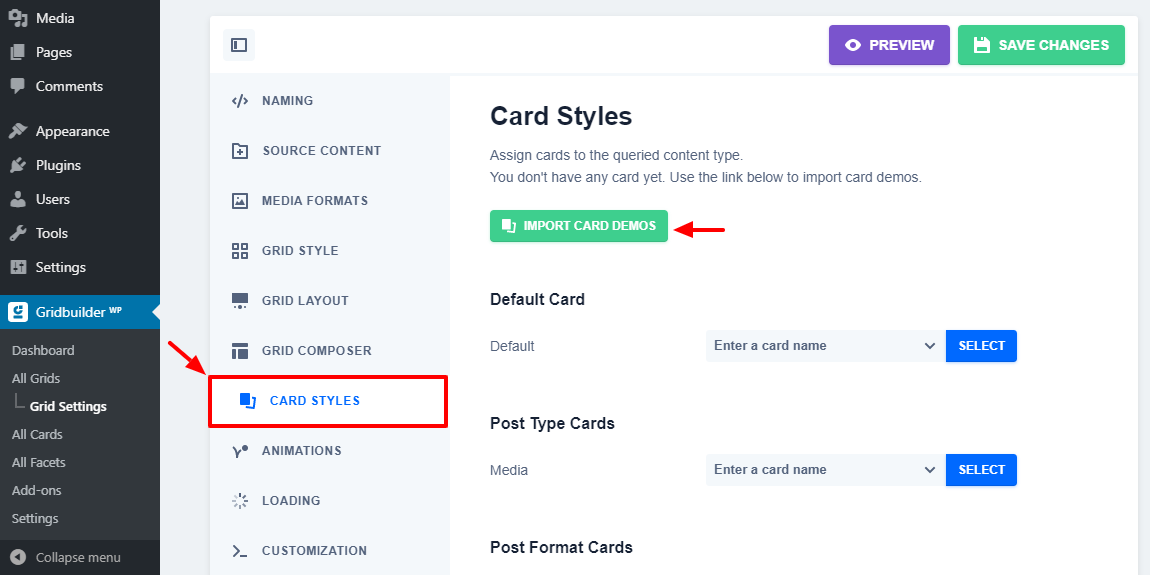
The Card Style section shown above allows you to customize your grid cards. Grid cards are simply the rectangular or square tiles that make up the grid. When you start using WP Grid Builder, you might need to import the demos, as shown in the image above. You can, however, create your cards from scratch, which unlocks endless possibilities.
So I went ahead and imported all cards and assigned a default card to my grids. After that, I selected a card for each type of post, including my media. I’m using Beryl as my default card.
Looks pretty much reliable, this WordPress grid builder, color me impressed. Next up, we have animations.
Animations
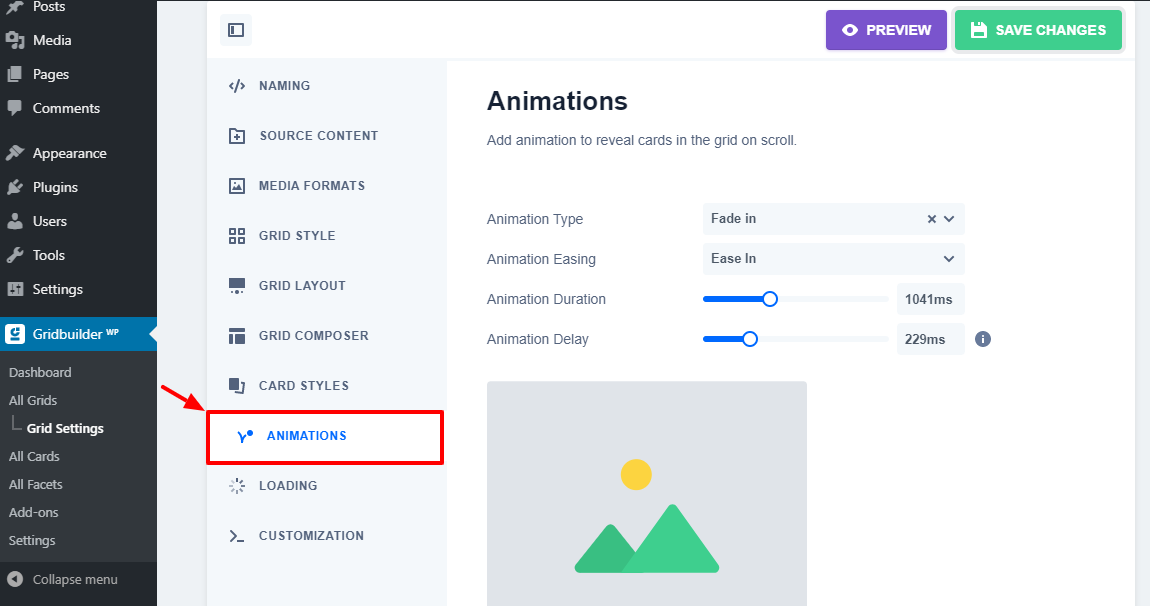
Again, nothing much to see here; just a couple of animations to reveal cards in the grid when a user scrolls or clicks the Load More button. The feature is incredibly easy to use and produces beautiful effects that boost user engagement.
Loading

Next, you have loading options, as we detail above. On the screen, you can toggle on lazy loading to boost the speed of your grids tremendously. Lazy loading only loads media when it’s in the user’s viewport, which can reduce the time your grids take to load.
On the other hand, a loading bar or icon reduces the Perceived Loading Time by users. The loader appears when a user is loading a set of posts. It appears when loading the grid page and when the user filters or sorts a grid. It’s a convenient and user-friendly way of keeping users on your site.
Customization
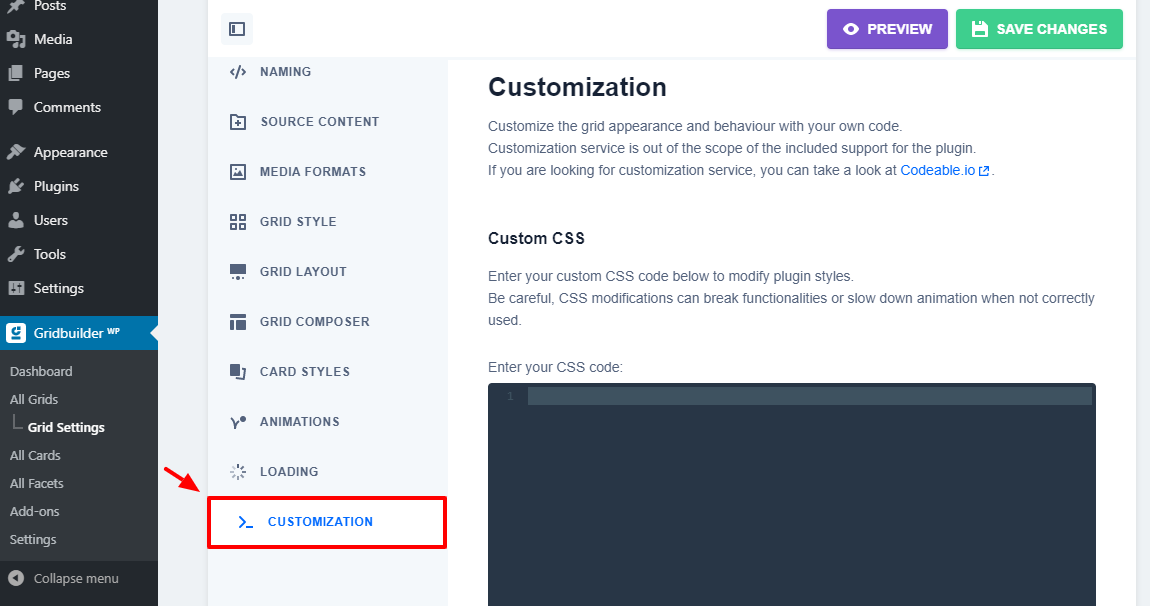
Remember the custom CSS class we added to our grid earlier? Well, you use the class to modify plugin CSS styles in the Grid Settings > Customization window. If you don’t know your way around CSS, you’re better off hiring outside help if need be.
Gridbuilder WP Add-Ons
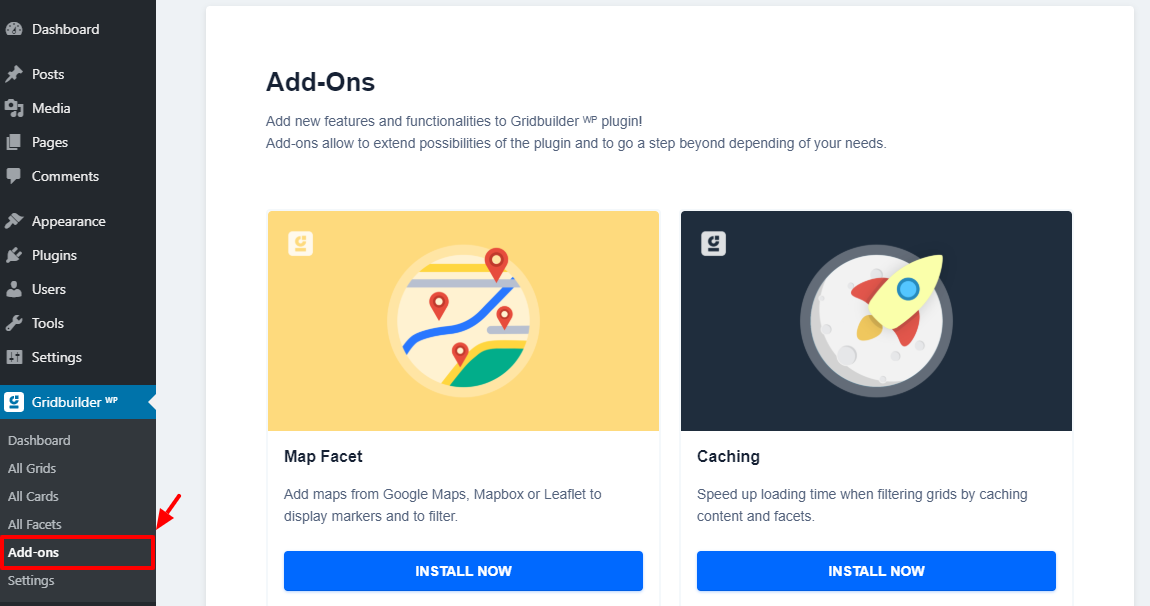
Add-Ons allow you to extend the functionality of a WordPress plugin. WP Grid Builder ships with a couple of add-ons that you can install easily by navigating to Gridbuilder WP > Add-ons. Currently, WP Grid Builder comes with four add-ons, namely:
- Map Facet – Allows you to add maps from Google Maps, Mapbox or Leaflet and display markers
- Caching – To speed up grids by caching content and facets
- LearnDash – Display course information on cards
- Multilingual – Integrate WP Grid Builder with Polylang and WPML
Other Gridbuilder WP Settings
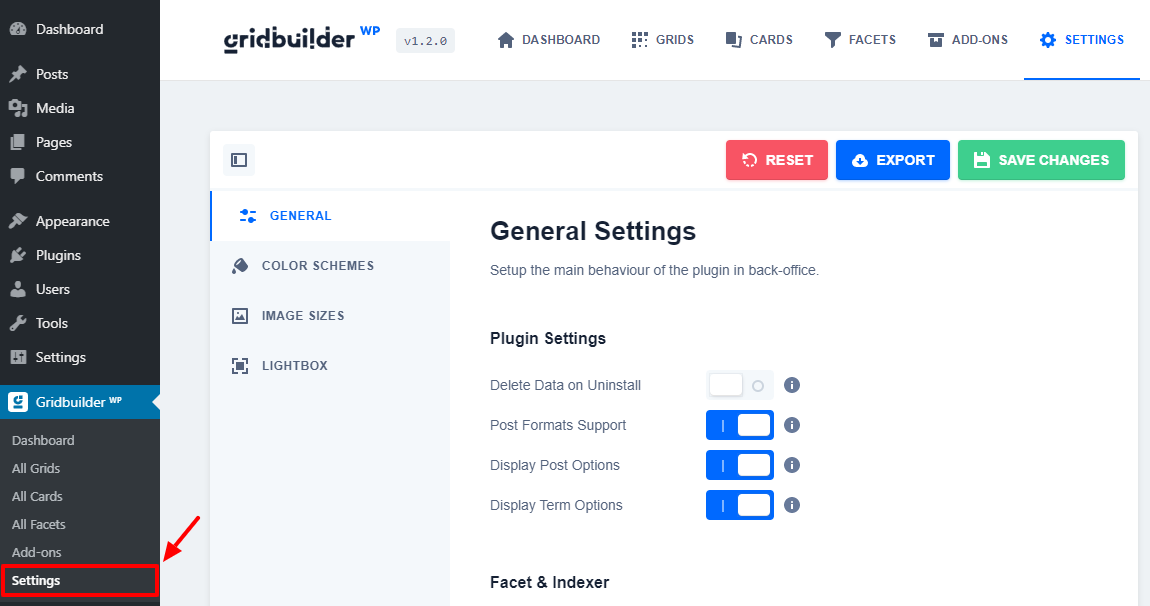
To access WP Grid Builder general settings, go to Gridbuilder WP > Settings. On the screen, you find options such as:
- Allow WP Grid Builder to render blocks in Gutenberg
- Enable support for post formats
- Display post and term options (post formats and term colors)
- Clear cache and purge style sheets
- Change global colors
- Set up additional image sizes
- Configure your Lightbox plugin
- Reset plugin global settings
Conclusion
WP Grid Builder is a fabulous WordPress grid and filter plugin suitable for both beginners and developers. It ships with an extensive list of amazing features that make creating responsive grid layouts a breeze. On top of that, they offer you a flexible pricing structure and fast support.
What do you think about Gridbuilder WP? Did we miss something? Please let us know in the comment section below.


Honestly what is stopping me from getting WPGridBuilder is the lack of tutorials on how to create custom filters (Because it has no color filter for example) and how to create custom templates/cards (Because while flexible, the card creator has limitations (you can’t add your own product badges for example).
ATM I use oxygen builder to build everything and FacetWp which handles the queries and facets. If WP grid builder would be easier to create custom filters and card templates (such as with a theme editor as Oxygen) I would switch in a heartbeat
Thanks for the great write up Freddy
WP Grid Builder is one of the best Grid Builders without doubt. But they are not GDPR-compliant and fully ignore articles 16 and 19 (right of customer to rectify his personal data), justifying it with billing data. Billing data and current customer data are two completely different things.
I was not aware this was an issue! Have you tried contacting them about this? Depending what you need, have you checked out my Total theme? It includes a Card Builder that works with WPBakery, Elementor and Gutenberg. Currently it only has a simple filter functionality but it does have a built-in JS API you can use for advanced filtering, I have a sample snippet here.