Backup to the Cloud with BackWPup for WordPress


We’ve been talking about the importance of website backup in my recent post series – Common WordPress Mistakes to Avoid. In fact, the issue tops the list! But many of us are under the false impression that backing up a WordPress site is difficult, or even time-consuming. In today’s post, we’ll try to reverse that notion.
Today we’ll learn how to configure the free BackWPup plugin to automatically backup your WordPress site to the cloud. Once you’re done with this tutorial, you’ll be able to schedule automated backups, into any upload destination along with a host of configuration options. You won’t have to spend any more time configuring or maintaining backups – all of that will be done automatically.
We’ve chosen to use Dropbox as our cloud provider since it’s one of the best free cloud storage providers in the industry. If you prefer to use a paid cloud storage provider, you can try Amazon AWS. If you don’t have a Dropbox account, I’d recommend you get one today. PS: We’ll also be needing one to use in our tutorial.
How to Install the BackWPup WordPress Plugin
Installing the plugin is a walk in the park. Simply go to:
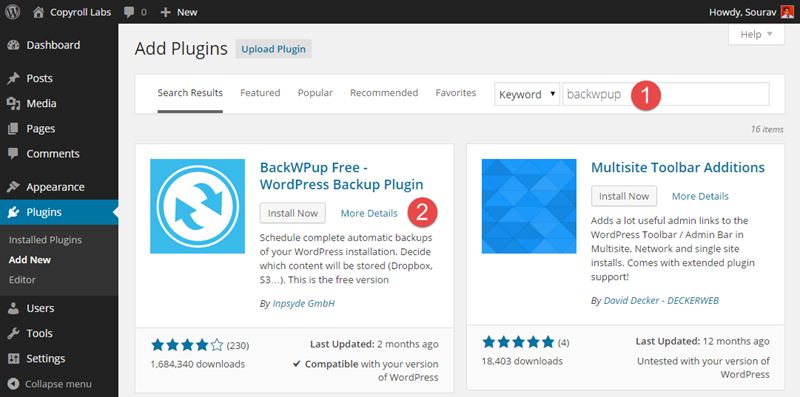
- WordPress Dashboard > Plugins > Add New
- In the Search Plugins box, type “BackWPup”. The first result should be the plugin you’re looking for.
- Simply click on Install and then Activate the plugin.
Done? Good. Now open a new tab in your browser and login to your Dropbox account. You can close the tab if you like. We’ll be linking our Dropbox account with the BackWPup plugin shortly.
The Preliminaries
First, we check for a few server side dependencies, to ensure that the backup operation takes place smoothly.
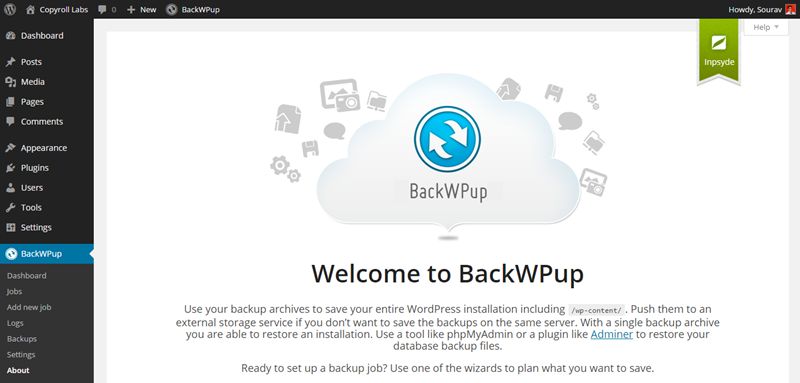
- Head over BackWPup’s admin panel found under WP Dashboard > BackWPup > Dashboard.
- Select Point #1 Check the installation.
- BackWPup will check your hosting server environment for any conflicts or unmet dependencies.
- The collected information will be displayed in the Information tab in the Settings panel of BackWPup. (We’ll revisit this tab later for some extra tuning.)
- In most cases, no issues are reported.
- If however, an issue is found, (for instance, the cURL version isn’t found) you should contact you hosting provider to get it fixed.
- Once done, hit on Save Changes.
How to Create a New Scheduled Backup Job in BackWPup
Now we’ll create a new scheduled backup with BackWPup. It’s easy, all you need to do it follow these simple steps:
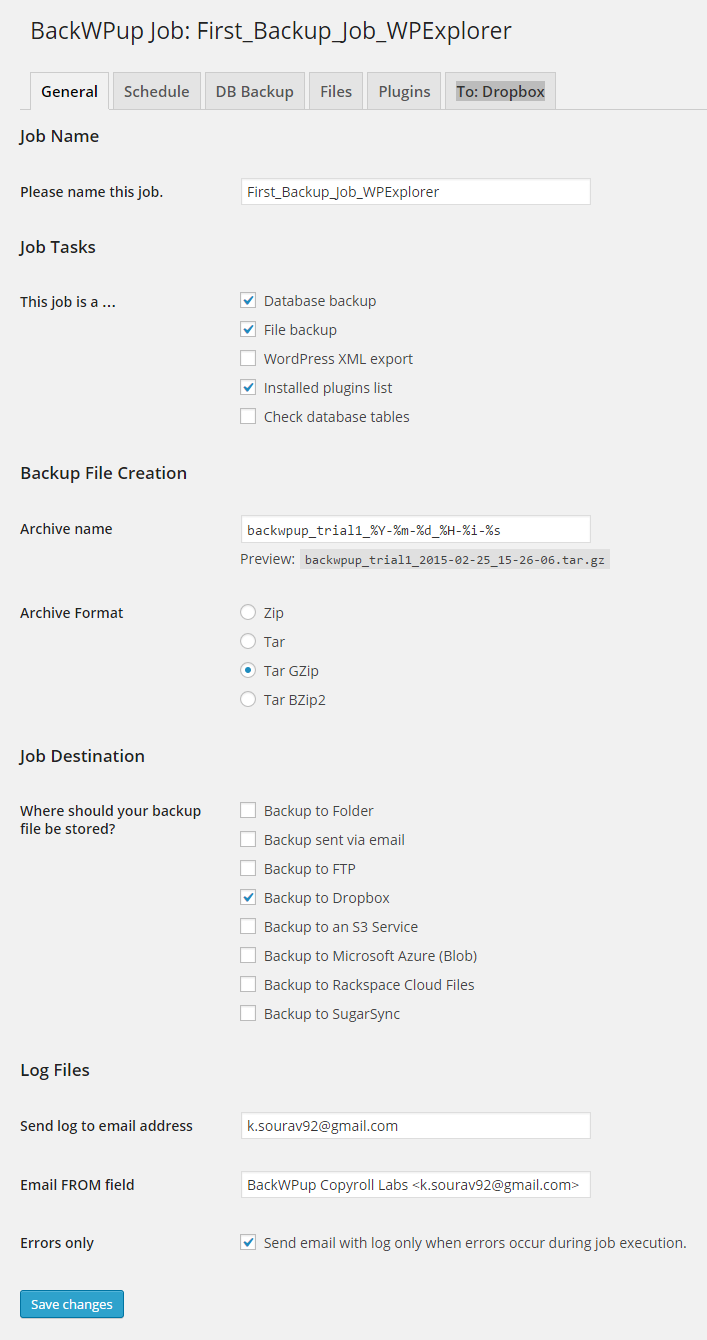
- Head over to WP Dashboard > BackWPup > Add new job
- Under Job Name, give a meaningful name that you can later relate to.
- We’ve used First_Backup_Job_WPExplorer
- Leave the Job Tasks tab alone, since we won’t be needing the unchecked features
- Under Backup File Creation, set the Archive name to backwpup_trial1_%Y-%m-%d_%H-%i-%s
- Finally in the Job Destination tab, check Dropbox.
- A new tab called To: Dropbox should appear on the top menu. Select it.
Connecting Dropbox to BackWPup Plugin
Now we are in the To: Dropbox tab, as described in the last step. Open a new tab in your browser and login to your Dropbox account, if you haven’t done so.
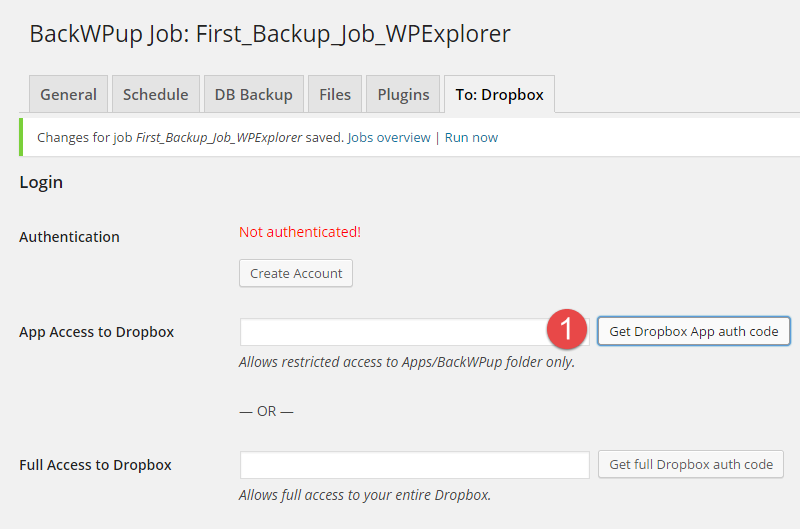
Under the To: Dropbox tab, followed by Login > App Access to Dropbox, click on the Get Dropbox App auth code button.

This opens up a new tab and asks for permission. Click on Allow and Dropbox will generate a restricted access a code for you. This means that BackWPup plugin will only have access to the Apps/BackWPup folder in your Dropbox. This is an ideal solution since the plugin won’t need access to your full Dropbox account.
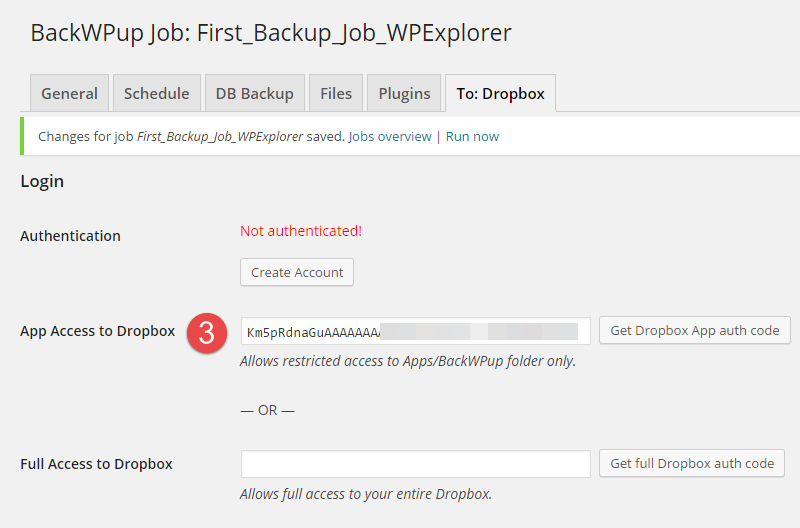
Copy-paste the code in the App Access to Dropbox field.
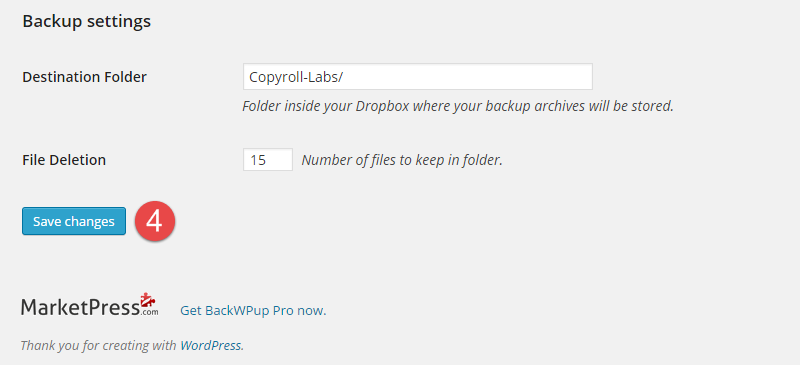
Click on Save Changes to test the integration.
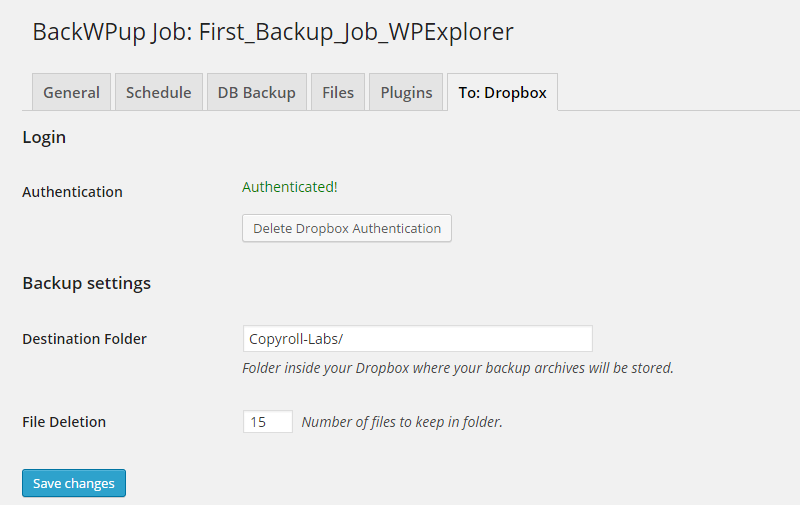
Once done, you should get a confirmation message saying “Authenticated”. This concludes our Dropbox integration.
Running the Backup for the First Time
We will now proceed with running the backup job. You can run the backup job in one of four ways:
- Starting the job manually from the WordPress dashboard
- Starting the job from the specified URL
- Via WordPress CLI
- By scheduling the job via WordPress Cron
The first two options are best suited for the entire audience. We’ll use the manual method to run out backup job for the first time.
Here’s a screenshot of the backup process –
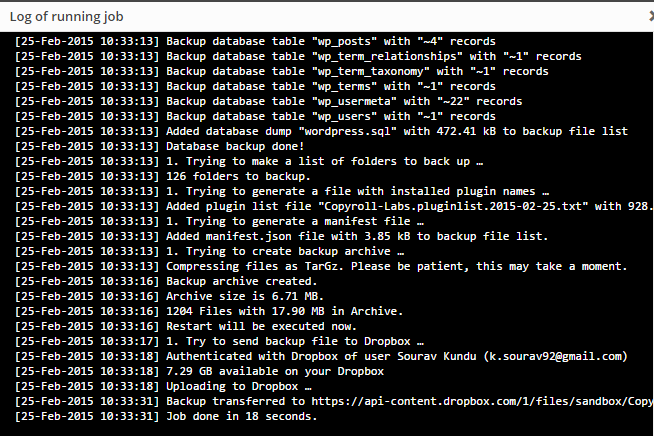
And the one with a completed backup –
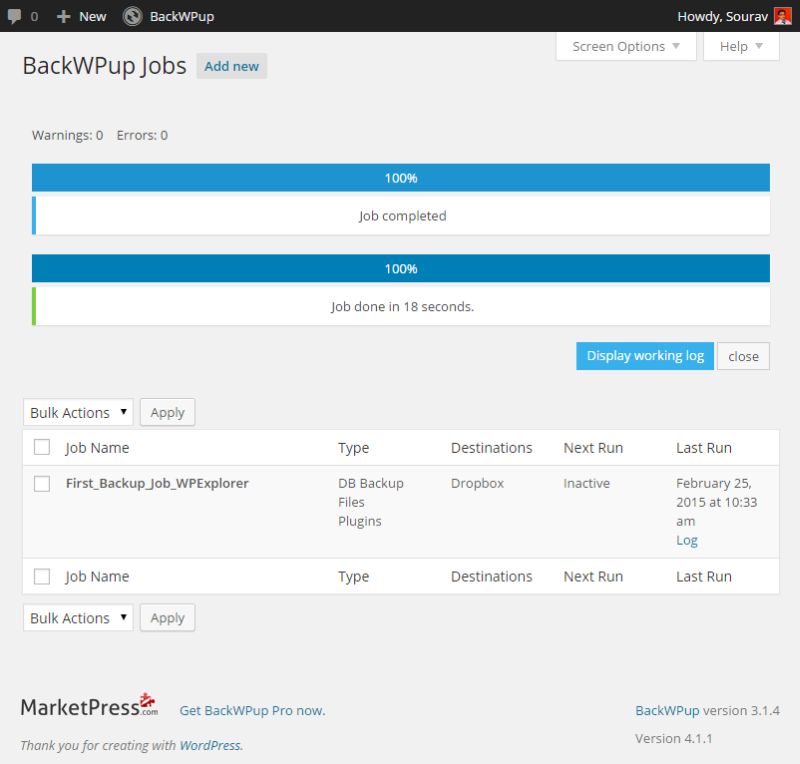
Once done, you should see the archive uploaded in your Dropbox account. If you have it installed like me, you’ll find a desktop notification as well.
Scheduling the WordPress Backup
Scheduling the backup must be done with care. If you’re on a shared hosting server and schedule one to many backups, then chances are that you’ll end up get flagged for resource overuse. We have a small table prepared discussing how often you should schedule backups. Let’s get on with the steps:
- Go to WP Dashboard > BackWPup > Jobs
- Open the backup job that you last created, which in our case was First_Backup_Job_WPExplorer
- Select the Schedule tab
- Navigate to Job Schedule > Start job and select the with WordPress cron option
Now let’s configure the scheduler. We’ll use the basic Scheduler Type and select a Daily backup frequency starting at midnight.
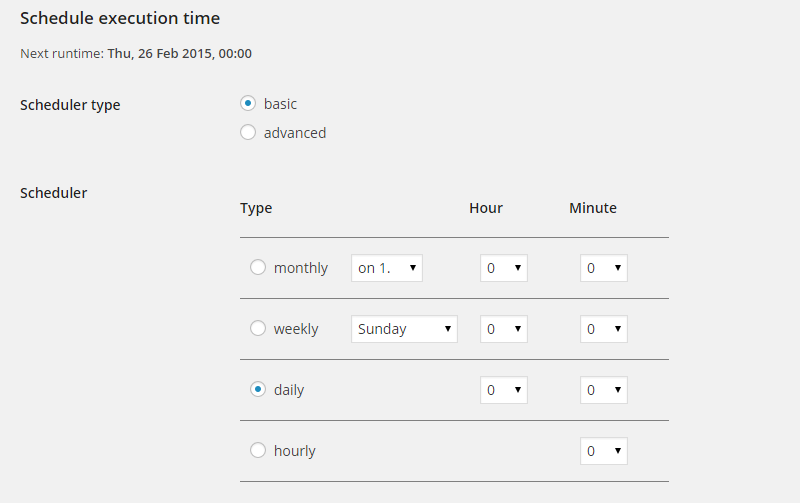
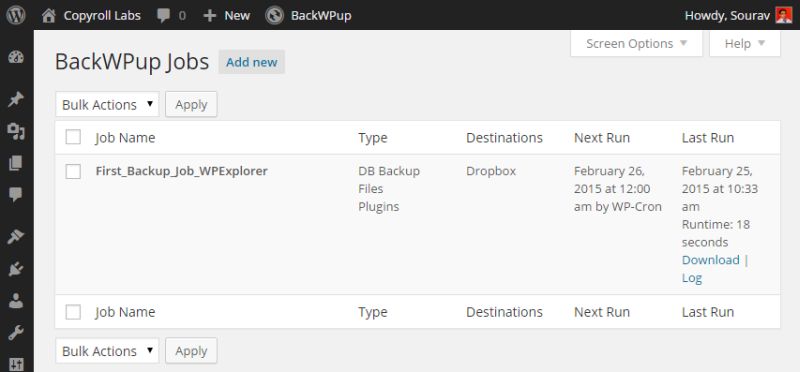
Hit Save Changes to successfully update the scheduler. Once done, this is what our Jobs panel should look like –
You’ve done it amigo! Congratulations!
This concludes our basic tutorial. If you have any doubts or queries or recommendations on how to improve this tutorial, please give me a shout at @Souravify or ask in the comments section below.
Now that we have learnt how to configure and schedule automated WordPress backups to the cloud, I like to share a few backup related tips with you.
Playing with BackWPup Settings
In this section, I’ll be quickly visiting the advanced settings of the BackWPup plugin. These are great options that the creators of the plugin built-in to help you better manage your backups.
The Jobs Tab
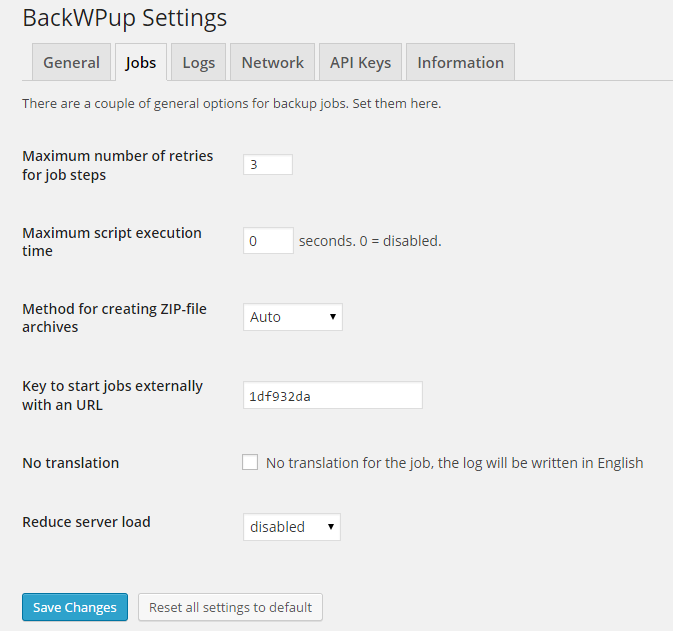
For starters I’d like to discuss the options available under the Jobs tab under BackWPup > Settings.
You tweak the setting here to get the most out of the plugin.
- The Reduce server load option is excellent for moderating resource usage in shared hosting environments. With this, you’ll be able to schedule daily backups without any resource overuse flags.
- Maximum script execution time option should be kept to 0, since it depends on the server’s processing capacity. However, if you find that the backups aren’t successful, you could set it to a finite value for debugging.
The Network Tab

The Network tab is another setting I want to discus. If your blog’s admin area i.e. wp-admin folder is protected with HTTP authentication via .htaccess, then you should enter the login credentials in this tab. For instance, DigitalOcean’s Cloud WordPress droplets have this feature enabled by default. Hence the login details must be entered for the plugin to function properly.
What is Differential Backup and Why Should I Use it?
When you’re backing up the same site over and over again, a majority of the files remain unchanged. In fact these files turn out to be the large ones – the ones contributing to most of the backup’s size. Think about media files like images and documents. They don’t change once uploaded. They’re called static content.
What if you could only backup the files that do change? Such files include new or updated themes and plugins, and of course, the WordPress database. Luckily the developers have a smart solution – it’s called differential backup.
In short – it saves space
It means backing up only those files which have been modified form the last backup time. The main advantage is that the backup size is significantly reduced. Let’s face it – space isn’t unlimited, so why not optimize your storage needs?
Differential Backup is available in the premium version of the plugin – BackWPup Pro, which starts at $75 for a single site license. You can check out an interesting free versus pro comparison of the plugin at MarketPress to see if you really need to upgrade (but don’t worry – for most bloggers, the free version should get you by just fine).
Try BackWPup Today
With over 1.6 million download of the free version at the WordPress repository, and 60,000 premium subscribers, BackWPup is one of the finest WordPress backup plugins in the market. Give it a try!
How Often Should I Backup my WordPress Site?
A question many of us ask, or rather, should ask. Ideally, your backup frequency should depend on three factors:
- Publishing frequency
- Amount of traffic your site oversees
- Number of comments posted
- Hosting environment
If you don’t want to read the following three paragraphs, quickly go through the table I’ve prepared for you.
Daily Backup
If you publish 3+ posts/week, oversee a monthly traffic of 10,000+ monthly visitors and incur a steady stream of comments, you should schedule a daily backup. Anything more than this should also have the same. To save space you could also schedule a daily differential backup and a weekly full backup.
Weekly and Bi-Weekly Backup
If you publish 1-2 posts per week, oversee a monthly traffic of around 5000 visitors, then you should consider a weekly backup. If space permits, take a full backup or you could try experimenting with a differential backup every two weeks. If you publish around 1-2 posts a month, then you could select a bi-weekly backup,
Monthly Backup
This backup schedule is ideal for a portfolio/product website, where the amount of new content generated is pretty low, i.e., the content is mostly static in nature. It’s safe to assume that you’re not going to enable comments in your product’s landing page. So why take a backup every day? Monthly backups are best suited for such cases. Also, I would recommend taking a full backup instead of a differential one.
| Posts per Week | Monthly Traffic | Comments | Hosting Environment | Backup Frequency |
| 3 or more | 10,000 or higher | 10+ per day | Cloud, VPS or Managed WordPress Hosting | Daily (Differential Backup) andWeekly (Full Backup) |
| 1-2 | Up to 5,000 | 10 per week | Cloud or VPS or Shared Hosting | Weekly or Bi-Weekly (Differential and Full Backup respectively) |
| 1-2 a month | Less than 1,000 | 1-2 per month | Shared Hosting | Monthly |
Please note that this table is for reference purposes only. I would strongly recommend you to find a backup schedule that best meets your requirements. If you find yourself running out of space, read the next line! 😉
PS: You can safely delete backups that are older than three months.
Over to You…

Audience participation is a wonderful thing and I’d like to thank each and every one of you, who take the time and effort to post a comment. A discussion on “website backup” is something all webmasters can relate to. And many of them have a story of their own. We’d love to hear your story!
If you don’t have one, here are a few questions to rattle your mind – Have you tried BackWPup? What’s your preferred backup service? Are you using a paid one? How often do you backup? Let us know your thoughts!


