How to Install & Setup WordPress Caching with WP Super Cache


- 1. Beginners Guide to WordPress Internal Functions
- 2. What is WordPress Caching and Why is it Important?
- 3. How does WordPress Caching Work?
- 4. Currently Reading: How to Install & Setup WordPress Caching with WP Super Cache
- 5. How to Setup WordPress Caching with W3 Total Cache (W3TC)
- 6. MaxCDN Review: The Best CDN for WordPress?
Hello everybody. Welcome to a new chapter in the WordPress Caching series, where we will finally learn how to implement WordPress caching. I hope that you’ve read up on the previous topics in which I’ve explained how WordPress works (internally), what is caching and how WordPress caching works. Today, you’ll finally be able to transform that theoretical knowledge into practical use! So let’s get started.
The Preliminaries
Caching your existing WordPress installation is a variable factor and it depends on your current WordPress environment. This tutorial describes one of the easiest ways to implement WordPress caching. If you’re on a shared host, VPS or even a dedicated server, this tutorial should fit your needs. If you’d like to crank it up a notch, have a look at Pro WordPress Caching with W3 Total Cache + APC (coming soon).
Please note that folks using managed WordPress hosting services such as WPEngine, this tutorial won’t be of much use to you since WPEngine employs their own super complex and (super) effective caching algorithms – called Evercache technology! I’d go out on a limb here and say that WPEngine is probably the best managed WordPress hosting provider you’re going to find. So buckle up fellas, its go time.
The Setup

We will be using one of the most popular free WordPress caching plugins available – WP Super Cache. It’s one of the oldest plugins out there and I clearly remember using this in my very first WordPress caching attempt. Here’s what I’m using for the tutorial.
- WordPress Revision: 3.8.2
- Hosting Environment: Shared hosting server with LiteSpeed webserver (alternative to Apache)
- Super Cache Version: 1.4
Installation
As with any plugin, there are two ways you can install them.
The DEUA way – Download, Extract, Upload & Activate
The DEUA way is the slowest possible way to extract any WordPress plugin. For those of you who’re new – it goes something like this:
- You download the WP Super Cache plugin from the WordPress plugin repository
- Extract the archive in your computer
- Upload the extracted to your wp_content/plugins/ folder via FTP using an FTP client such as FileZilla
- Then, go to the Plugins page in your WordPress dashboard and activate the plugin
I do not recommend this method. 😉
The Easy way – Search & Install
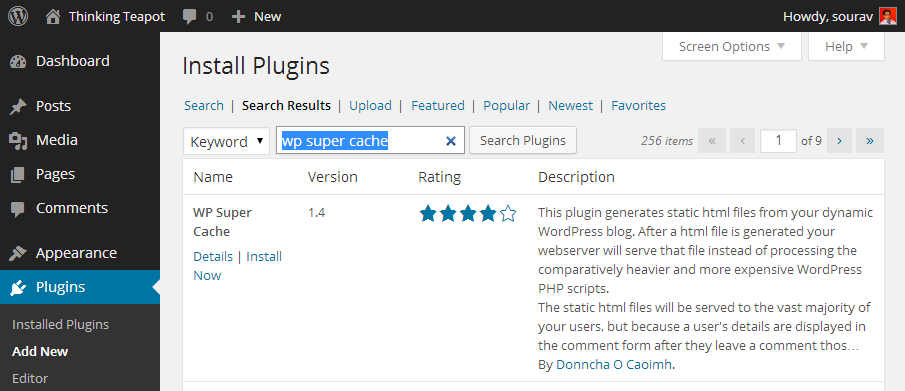
The much easier way is to just search and install the plugin like so:
- Navigate to the Plugins > Add New page in the WP dashboard
- Search for “wp super cache”
- Hit Install
- Press on Activate
- Done!
Now that was easy, wasn’t it?
Initial Plugin Configuration
Okay so let’s take it step by step from now on. We’ll cover each page in the plugin one by one with relevant screenshots. As soon as we activate the plugin, we get a message like this:

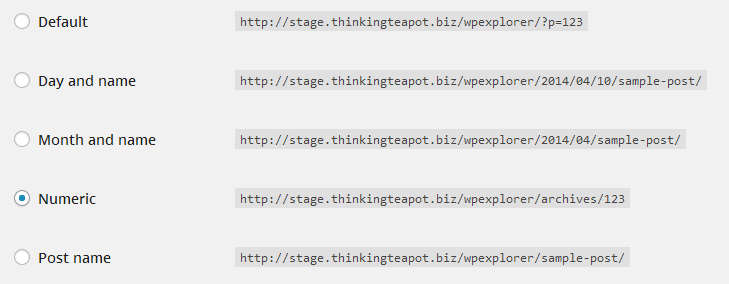
Click on the hyperlink to visit the WP Super Cache settings page. If you get a message asking you you to change your permalink structure, head over to Settings > Permalinks in your WP dashboard and choose any one other than the first one. For my demo site, I’ve chosen the Numeric permalink option.

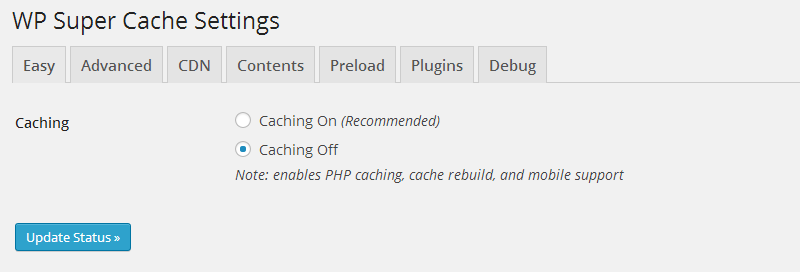
Now that we’ve got that sorted, let’s open the WP Super Cache’s settings panel. You can find it under Settings > WP Super Cache. So the first thing that you’ll notice is this yellow box with a message which reads:

This is fine. However, this yellow message box should not come up every time you open the WP Super Cache settings – it’s a one time message. If it does popup every time, follow the FAQ link. You’ll also notice that Caching is disabled. Let’s keep it that way and cover each tab one by one.
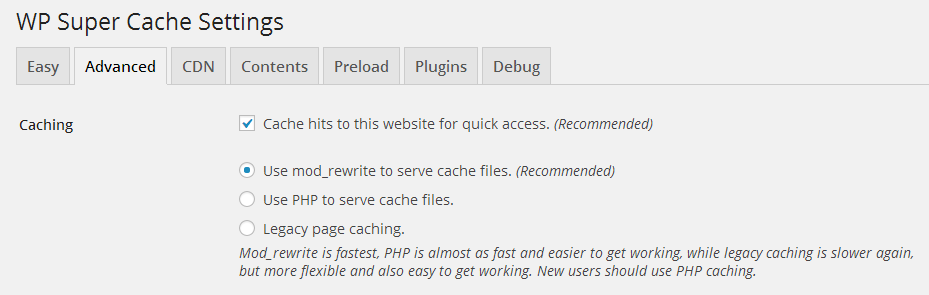
WP Super Cache: Advanced Settings Tab
The first tab that we want to cover is the Advanced Settings Tab. It contains three groups of settings:
- Caching
- Miscellaneous
- Advanced
The options are pretty much self explanatory – I’ve checked the optimal settings for each group in the the three screenshots given below. These will work in most hosting environments – shared or dedicated.
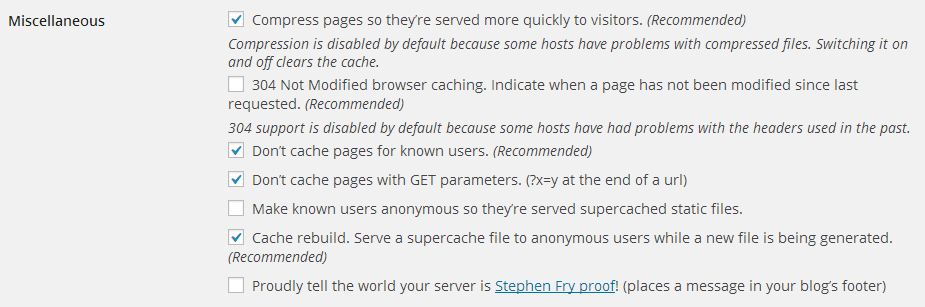
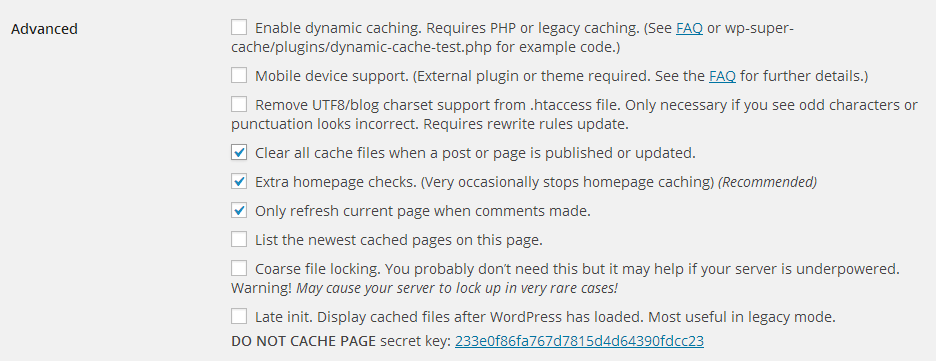
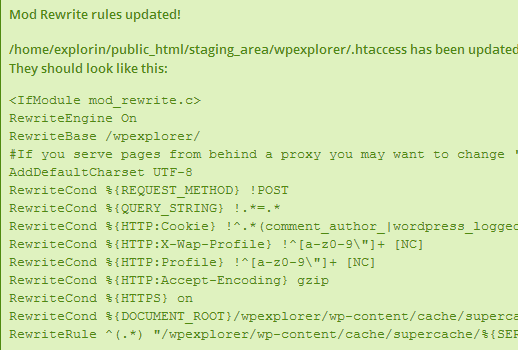
Once you’ve checked these options, press the Update Status button to save the changes. You should immediately see a rather long yellow box containing a lot of text.
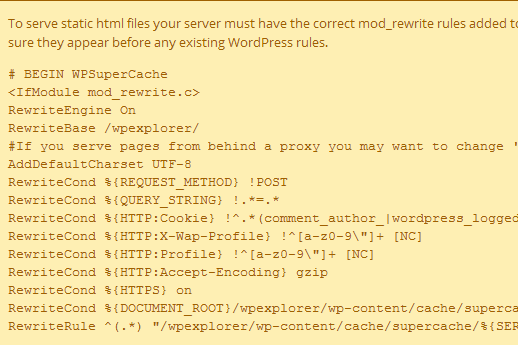
Well, these settings are for your server’s .htaccess file. Simply scroll down and you’ll find the “Update Mod_Rewrite Rules >>” button.
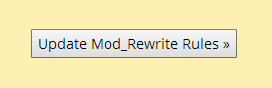
If your .htaccess file is writable, you should see a green box indicating that the modification was successful:
Okay, now the Advanced tab is taken care of. We move on to configuring the Preload Tab.
WP Super Cache: Preload Settings Tab
The preload settings essentially makes the plugin cache all your site’s posts and pages periodically. You can set the time interval between each cache refresh. This time interval is a very crucial setting.
In shared hosing environments, you should optimally set it to once a day – that’s every 1440 minutes. If you update your site twice a day, then you can set the time interval between each cache refresh to 720 minutes. In the latter setting, the preload cache will be refreshed twice a day. This would incur additional server load. I would recommend not to use a lower value in shared hosting environments – since it might (and most probably will) be counted as server resource overuse.
However, if you’re on a VPS or a dedicated server – you can set the refresh rate as low as 60 minutes. It’s worthwhile to know that the number of posts and pages you have in your site affects the resources required for each preload cache refresh operation. An optimal refresh time for a dedicated server on a high traffic site would be 2 hours.
I’ve check the relevant checkboxes and have set the cache refresh interval to 1440 mins. You are free to choose any value!

Click on “Update Settings”. If you’d like the caching process to start immediately, click on the “Preload Cache Now” button after you’ve updated the aforementioned settings. Building the preload cache is a resource intensive and time consuming task and depends on the number of posts and pages you have – so wait for sometime – say 10 minutes and then visit the Contents tab
WP Super Cache: Contents Setting Tab
The Contents tab in WP Super Cache shows you the number of cached pages in your WordPress site. Remember we learnt that, WordPress ultimately generates HTML pages. Well, this tab shows you which of those pages are cached and their age – measured in seconds. This data should correlate to the preload cache refresh interval you’ve set in the Preload tab. We’ve chosen 1440 mins – that’s 86,400 seconds. This is the maximum age of each cached page. Technically none of the cached page’s age should exceed this value.
Sometimes, you might not find current/accurate cache stats. To view the latest/most accurate cached pages statistics, hit the “Regenerate Cache Stats” button.

Once updated, you should see that the cache stats are updated. Remember that I’m using the demo data from the Free Blogger Theme by WPExplorer. This is what the cache stats look like:

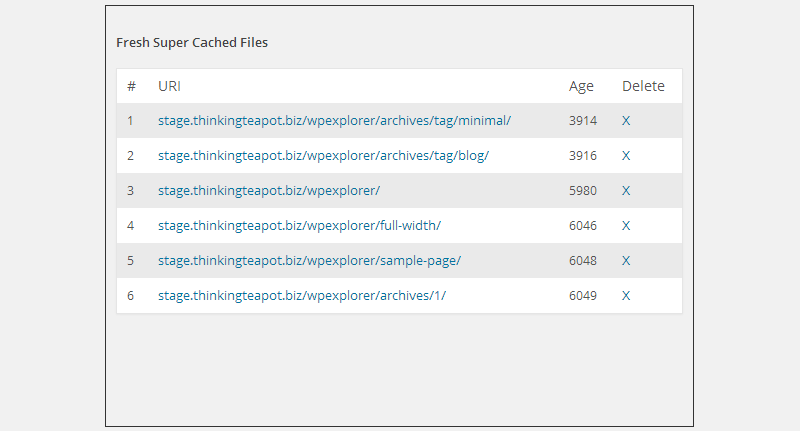
For an even better sneak peak and a better understanding of WordPress caching – proof that HTML files are actually cached, click on the “List all Cached files” option. Here’s what mine looks like:
A Blessing in Disguise
This option is super helpful if you want to delete a single cached page. Suppose you’ve updated an old page and you need the cache to reflect the change. Instead of regenerating the cache which can be both server intensive and time consuming, you can quickly delete the cached version of the file from this menu. When a visitor visits the original link, the page is regenerated from scratch and is saved as cache for future requests. Fast and efficient – just like Agent 47.
Is everything’s working? I think so!
Now that WP Super Cache is properly configured, let us test the cache. Head over to the default tab, i.e. Easy settings tab in WP Super Cache and click on the “Test Cache” button. If everything is configured correctly, you should see something similar:
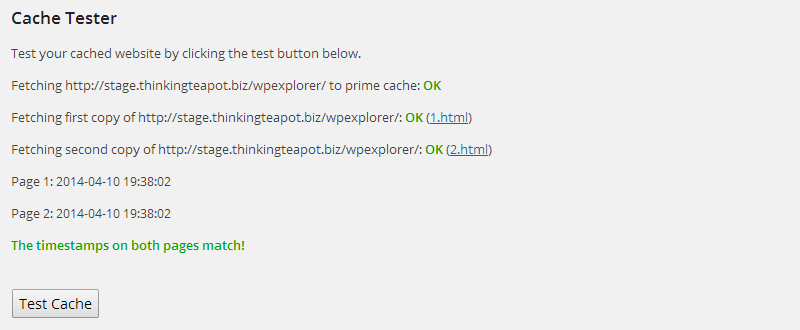
Bingo! It works! Congratulations, you’ve successfully implemented caching in your WordPress site. Your site should be considerably faster now! Don’t believe me? No problem. Have a look at these benchmark results of the demo site before and after implementing WordPress cache.
The Before

And The After

Conclusion
Now that you’ve seen how caching works, and how real its advantages are I am sure you’re more than convinced to try it out – that is, if you haven’t already. In the next post in the series, I’ll explain how to integrate MaxCDN with your existing WordPress site. MaxCDN with caching combined, will have a profound effect in your site’s performance. Stay tuned!
As always, I hope that you’ve been able to learn something new today. If you have any queries or suggestion, we look forward to hearing from you!


Very helpful Thank you very much
Glad you liked it Emily!
I have the question. I use mod_rewrite, After update the .htaccess file can i change the permission back to 644? The mod_rewrite are still working? I think it is not safe to use 777.
Thank you
This is a good question Emily. Yes, you can change the permission to 644 after you’ve modified the htaccess file. In fact, it’s a good security practice. 🙂
Thank you very much! 🙂
Great article. One question: the rewrite rules in the .htaccess file could also be place in the Apache hyped.conf file, right?
Hi! Thanks for all the tips I just installed wp super cache on my website www. swimbikerun. ph and followed your settings.
The page does indeed load faster but it says i should disable gzip? I researched and most users said this should be enabled.
What can you recommend and if ever, how do I disable zlib compression?
How can I make zlib compression work with wp super cache?
Thanks.
—-
Zlib Output Compression Enabled!
PHP is compressing the data sent to the visitors of your site. Disabling this is recommended as the plugin caches the compressed output once instead of compressing the same page over and over again. Also see #21 in the Troubleshooting section. See this page for instructions on modifying your php.ini.
Great tutorial, thank you!
Hi,
A very clean tutorial.
Yet, I also have a question.
What happens to pages that have pagination?
For example, a portfolio page which has more paginated pages.
How does caching work for the rest of the pages?
The paginated pages are actual pages themselves, so it works exactly the same way. If you add new posts though you may want to clear the cache incase the numbers are being cached though (I’m not sure if that happens).
Thanks sir, this help me 🙂
Thanks for the very clear and helpful advice. I’m new to WordPress and find many of the ‘How To’ guides very baffling. I’m a complete stranger to coding etc. Thanks for the clear and simple tutorials.
Very helpful Thank you very much
Great post. I have been looking for the right setting of permalinks to work with WP Suoer Cache.
This is an excellent tut! Thank you so much for this!
Thanks for the post, it was recommended and seems to be living up to it so far.
Do you have any extra considerations for E-com sites? Caching and shopping carts, etc..
loading time just increased by 2s -_-
I have custom CSS code pertaining to specific posts and pages. If I change the permalink structure – as the plugin requires – will the permalinks of previous posts and pages also change? If yes, guess my custom CSS code will then turn out an error – since the CSS code will be referring to the old post and page IDs, not the new ones…Or?
Your CSS should be fine if it’s added correctly because changing your permalinks never changes your ID’s. In WordPress all ID’s are unique and the only way they can be changed is via the database or custom functions so they should always be the same.
thanks for this settings and i really thank full….
Can you please tell me what other plugins should I use with wp-super-cache to speed website even more?
I would also recommend WP Smush to compress images as well as CleanerPress (although it’s a bit outdated now it has some good features) and Autoptimize. I haven’t used them in a while since I’ve developed all my own plugins for these things, but may be worth looking into still.
Yes I also recommended Autoptimize!
I have a big classifids websits whr ther are 25K++ posts…and i want to use Preload…so what should be the time to collect garbage? should i provide higher ime value or lower in this case? thanks
It is a great article
thank you very much
Can i just change the way of caching from mod-rewrite rules to PHP caching?
This is awesome – Ive configured it properly…Everything is working right.
Thanks boss
thank you very much, very helpful
This series of pages on Caching has been excellent! I feel like I’m getting a better understanding of the process and enough confidence of using WP Super Cache now that I’ve tried it on a sand box site.
Thanks for explaination i like this site :3
In your walkthrough, you mention “You’ll also notice that Caching is disabled. Let’s keep it that way and cover each tab one by one.”
But you don’t mention at what point you actually enable cacheing. Can you clarify.
Caching should be enabled at the very end once you’ve gone through all the settings and setup the plugin to best work for your needs. So basically once you are done messing with all the settings, enable it.
Thank you sourav for the detailed guide for set-upping the WP-Super cache plugin.
Thanks for this great article. I could not read like that explained article on the web.
Thanks for this awesome article keep sharing like this
-Humna
Hi
Your article is really good. easy to understand. But I have a doubt what will happen if we enable 304 Not modified browser cache and if we don’t enable?
Here is a great article explaining the 304 Not Modified status code and why you may want to enable it. I would recommend enabling it. If you are unsure though, you can ask your webhost.
Great post. I was confused about which caching plugin to use. this article gave me an idea and how to set up WP super cache. As everyone knows caching plays a very important role in any website, the caching comes with advanced settings, helps the user to make their website more reliable. Thanks for the post.
Is there a way to export settings once you get done?
I’m not aware of an settings export/import option. Bur I do see that it’s been recommended to the developers before. You could always lave a comment on the plugin page or upvote the feature request on github – if enough people are interested I’m sure the developers will consider it.
Thanks for sharing this!