Tips on Redesigning Your WordPress Website
No other platform hands you the power to customize the look and feel of your website like WordPress. It’s one of the reasons why WordPress is popular with publishers and web developers alike.
You can take a basic (and drab) WP theme, add a logo, edit a few lines of code, change your CSS and have a professional (yet personable) looking website in no time. It’s easy work and this tutorial will show you just how to do it.
Are you ready? Let’s start with first things first; the colors.
Designing A Color Scheme
When developing a color scheme for your WordPress site, there are many things to consider. Think of it as painting your house, or your stone-and-mortar store. You have to determine the color that will go on your walls and the color you want your doors.
The way you paint your exteriors and interiors will depend on a couple factors top being your personal preferences.
Coloring your WordPress site isn’t different either. What color do you want your links? Your background, how will you make it the most appealing and leave your competitors mouth agape? Which colors will complement (or even empower) your message? How do you want your text? The sky’s the limit to the choice of colors you can use on your WP site.
You have to determine all the colors you will use from the onset. I would recommend you stick only to three colors, but you are free to use as many colors as you would like.
Just don’t overdo it or you will end up diluting your marketing message in all that color. After all, an excess of anything is poisonous, so no matter the colors you choose, it’s important to ensure there is harmony.
It’s best to use the most colors where a majority of people will see (and hopefully) love them. I’m talking about your logo and masthead. These areas are exactly where you need the most colors; the rest of your website can be less colorful but more informative.
216 Colors Versus 12 Colors
We are all familiar with the twelve elementary colors, but the web is full of colors and their different shades. For this very reason, choosing the color that will exude personal warmth while creating a professional look can be a challenging task.
You are in luck though, because I fished all over the Internet and found the following tools to get you started:
KULER

Kuler was designed by Adobe to help web developers create top-of-the-class color schemes. Kuler is an online tool, meaning you can carry it around and use it from wherever, but there is also a desktop application to help you develop color schemes right from your desktop. In addition, if you have an Adobe ID, you can save your color schemes with a single click.
There are various color rules to utilize with Kuler including Monochromatic, Compound, Complementary, Analogous and Triad amongst others.
HTML COLOR CHART
Knowing the colors you will use is only half the job. To implement your colors, you have to translate them into HTML codes.

This is where the HTML Color Chart comes in. It is a colorful chart with over 200 (216 actually) web color codes. Armed with the chart, no color under the sun should prove difficult to implement.
The codes will work with HTML, CSS, Adobe PhotoShop and other graphic manipulation tools, so you have all the freedom in the world to play with your colors as much as you would like.
Check out the HTML Color Chart.
GENOPAL
If you need help picking colors, GenoPal is the application you want. It’s a very simple web application that “pins” color palettes to your browser window. As you pick your colors, they appear in your browser in the form of colored “sticky notes”. 🙂

With GenoPal, you can increase the brightness and control hue saturation, so you get exactly the shade you want.
On their website, a mobile app is in the pipeline. Once it is launched, it will let you carry the app and develop colors on your mobile device. Their design is ingenious, and the fact that this application actually works is a clear sign that GenoPal means business.
COLORHEXA
ColorHexa is the online version of the artist’s paint plate. This website gives you the ability to mix colors by just entering color codes. Their forerunning app is the color blending tool but they also have a gradient generator and a color subtractor. Isn’t that pure genius at work here?

How does the ColorHexa Blender work? All you have to do is type your color codes separated with a “+” and ColorHexa does the rest of the work. For example, I tried:
#ff0000 + #0000ff + #ff00ff and I got #aa00aa. What’s more, they give you an entire page of color information (on your final color e.g. #aa00aa). This is one tool you have to try yourself to experience color blending like never before.
ULTIMATE CSS GRADIENT GENERATOR

This is probably the best tool as far as generating color gradients goes. It is completely online and helps you to generate refreshing midpoints and their corresponding CSS codes. They also provide Chrome and Firefox Add-Ons to let you integrate the app to your browser for easier and faster access.
There is a preview area where you see your gradient, so all you have to do is generate your gradient as you deem fit and copy-paste the CSS code generated. It’s really that easy and they have more colors than you will ever use.
Check out the Ultimate CSS Gradient Generator.
Picking Fonts
Now that I’ve shown you how to choose and blend colors like Picasso, let’s play around with the fonts.
Your colors and web design will pull in people, but it’s your words i.e. your pages and posts that will make the people stick around.
We are busy creating our best stories at all times, so most of us forget that the fonts also matter. But the font you choose influences how people interact with your website. With the right fonts, your target audience will want to stick around and eventually click through to your other pages, which is exactly what you want. Engagement.
There are a million and one fonts out there, but unfortunately, a user will only see the fonts that are installed on their machine. If the font you use is not installed on their machines, they will see a close alternative (or a completely different font), which won’t have the same effect you wanted.
“Playing with fonts is like playing with fire. Sometimes it can light a match on a web page, a sparkler of pretty text. Other times, it can burn down the whole house.” – Lorelle of cameraontheroad.com.
You can control your fonts (and create the effect you want) with your stylesheet. In your theme, the stylesheet is usually the style.css file. You can use this file to control the color of your fonts, type of font/font-family, font-size and other aspects of your chosen font.
The following is a good example:
#menu {font-family:Arial, Helvetica, Sans-serif, Verdana, "Times New Roman"; font-size: 0.8em; color:black;}
The above code will set the font-size in your menu to 0.8em and set the color to black. It will also set the font to Arial, but if the user doesn’t have Arial on their machine, Helvetica will take over. If they don’t have Helvetica or Arial, Verdana, Sans-serif or Times New Roman will take over.
By controlling the fonts, you can create a more consistent look and feel.
However, to solve the problem of font inconsistency once and for all, you can use embedded fonts. By using embedded (or external) fonts, the user does not need to have the font on their machine.
Additionally, it is easy-peasy work.
All you have to do is open your style.css and put the following code at the top.
@font-face{font-family: Museo300; src: url("fonts/museo300-regular.ttf") format: ('truetype'); font-weight:normal;}
NOTE: You have to define the name and the location of your font. In the example above “Museo300” is the font, which was saved in a folder named “fonts”.
To use the font across your website, for instance, you can write:
body{font-family:Museo300;}
You can use an embedded font for any element on your website. For example…
#menu{font-family:Museo300;}
…will set Museo300 in your menu.
The above method means you have to download the font and upload the same to your server, which if you ask me is quite tedious.
However, you don’t need to download any external font you want to use.
You can simply link to the fonts from your head (header.php) section like so:
<link href="http://fonts.googleapis.com/css?family=over+the+rainbow" rel="stylesheet" type="text/css"/>
How and where do you add the line above? You need to open your WordPress Administration Panel –> Appearance –> Editor –> header.php
If you don’t want to or can’t edit your header.php file, just import the fonts by typing the following line in your style.css:
@import url(http://fonts.googleapis.com/css?family=over+the+rainbow);
The above example will let you use the Over The Rainbow font from Google anywhere on your site. For example, if you wanted to use Over The Rainbow throughout your website, you could use this code:
body{font-family:"Over The Rainbow";}
Google provides over 600 free font families, so play away!
Update (07/12/13): If you would like to add Google Fonts to your WordPress site easily, you can use the Google Typography plugin. Other than that, you can learn more about Google fonts and how to implement them in this Improve Your WordPress Website Typography With Google Fonts by Tom Ewer.
WordPress Plugins For Adding Fonts
And for those who don’t want to dig into code, you could always install a WordPress plugin to do some of the heavy lifting for you. Here are a few of the more popular free font plugins from WordPress.com:
Are you having fun? Let’s move on…
Formatting Date and Time
Have you been to a WordPress site that displayed the date or time in a really nice tone that made you feel like a complete noob where your site was concerned? The owners of these sites just played with a single line of code and now you can’t get enough of their dates. Haha.
Good news, you can edit this line of code and surprise your readers as well.
In your WP Dashboard, navigate to Appearance, and then to Editor as shown below:

Once there, you will be able to see a list of your .php files to the far right:

Click on single post (single.php) and once it is open, open the search bar by pressing Ctrl+F. In the search bar that appears, type:
the_time
You will immediately spot a line that might look something like:
<?php the_time('F Y'); ?>
Now, the area you want to edit is (‘F Y’).
Allow me to flesh out this section to give you something fleshier to bite on.
The “F” in (‘F Y’) stands for Full name of the month and the “Y” represents the Year in 4 digits. Therefore, if you use (‘F Y’), your date will look like:
September 2013
If you throw in a comma between F and Y, you should have something like:
September, 2013
If you would like to add the day and other elements, you can use the following characters:
l = Full name of day (lower-case L)
F = Month
j = The day of the month (the date)
Y = Year in 4 digits
y = Year in 2 digits
More characters can be found in the table below:

And here, a few examples:

Always remembers to edit only the characters within the brackets (‘F Y’) and, take note, don’t delete the single quote marks. Feel free to use as many characters as you want to achieve the effect you want and remember to save everything when done.
What’s more, you can get rid of the date by deleting…
<?php the_time ('F Y') ?>
…like I did on my blog not long ago. 🙂 Now, all I get is Posted by Fred in so and so category…blah blah. No dates at all.
Are you fuelled for the next part? You better be.
Didn’t find the_time function?
That’s ok, because a lot of themes now a days are using the_date() function instead of the_time() function, which is actually better practice. If your theme is using the_date() function you won’t have to do any editing because you can simply change the way your data displays in your dashboard under “Settings->General”.
Using Images
This is probably the easiest (and shortest) part of this tutorial. But if you are really new to WordPress, adding images can be a challenge.
WordPress allows you to add images through the upload utility or (Add Media button) when creating a new post or page. All you need to do is place your cursor where you want the image to be in your post or page, and then click “Add Media”.

Once the uploading utility opens, you can add other details such as your caption, size, links and alignment.

This area is found on the right side of the uploading utility.
To learn more about adding images, please check out the following resources:
- WordPress: Using Images
- Theme Design (Adding Images)
- Image Size and Quality
- WordPress Image Optimization
- Editing Images In WordPress
And if you’re not sure where to find some awesome free images, checkout the post we wrote the covers the best image resources for WordPress.
See? I told you it will be the shortest 🙂
Adding a Favicon
Before we totally forget about images, let us create and add a favicon to your WordPress site. A favicon (or favorites icon) is the icon used to bookmark a website.
A favicon will help your readers identify your website visually.
Generally, a favicon is a 16 X 16 pixels square graphic file with the extension .ico. The extension stands for icon.
How to Create a Favicon
You can create your favicon online or using image editing programs such as GIMP, or any other that allows you to save .ico files. Most of the online services are free.
While the image is usually very small (16 by 16 pixels), the favicon should represent your blog in its entirety. The image or text you use to create your favicon should represent your online business.
If you are using an image editor:
- Crop or add space accordingly to ensure your image is square
- Resize the image to 16 X 16 pixels, and
- Save the image as favicon.ico
Online services that you can use to create favicons include (but not limited to):
After you create your favicon, they will let you download it to your computer, so don’t worry.
How to Install Your Favicon in WordPress
If there is another favicon in your theme’s main folder, you will need to delete it using your FTP client or any method available to you. FTP clients are recommended because they are easy to use and you can quickly find whichever file you are looking for.
For this tutorial, I used faviconer.com to create a favicon for my blog and Filezilla to delete existing favicons.
With the favicon.ico file in hand, upload the same into your theme’s main folder. This is the folder where your current theme is stored.
Then upload another copy of your favicon to the root folder (usually public_html) or the main directory where your site is stored, so you can be able to see your favicon when you type yoursite.com/favicon.ico. This will automatically add your favicon to your feeds.
When you are done uploading, it’s time to get your favicon.ico working. This is what you should do:
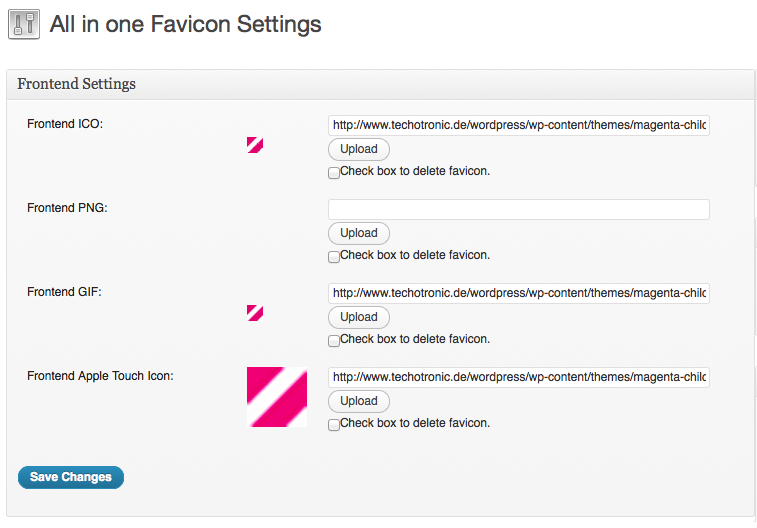
Adding your Favicon using a plugin
The best way to add your favicon is using a plugin. I would recommend using the “All In One Favicon” plugin for more advanced usage for a very simple approach you can use “The Simplest Favicon” plugin which doesn’t have any back-end options you just have to upload a file called favicon.ico in the correct place on your server.
Adding the favicon manually to your template
Some people might prefer (even though its not the best way) to add their favicons manually to their template, to do this follow the following steps:
- Login into your Dashboard
- Navigate to Appearance
- Then to Editor (Theme Editor)
- Find and open header.php (header) file
Add this line to your header file (preferably at the top where you see other <link rel=…/> tags:
<link rel="shortcut icon" href="<? php echo gets_stylesheet_directory_uri(); ?> /favicon.ico"/>
Save once done.
Refresh your browser to see your new changes.
At this point, you should be able to change your colors, pick better fonts, format dates and time, use images and add a favicon.
Conclusion
There is so much to discuss about redesigning your WordPress site that it would be a disservice (to you) to attempt covering everything in a single post.
To benefit you the most, it is best to split the tutorial into several parts (this is part 1). We will be sharing more redesign tricks as days come, so be on the lookout. The purpose of these tutorials is to help you create the best WordPress site ever and leave you feeling happier because you did it all on your own.
If you would like to share your opinion(s) or add something to the discussion, please feel free to leave your comment in the comment section below!


Helpful. Thank you.
You are welcome.
Thank you for such an informative post, sometimes it its the little changes that make a world of difference. Great tools.
Hi Kimberly. Sure thing, it’s the little changes that make a world of difference. Thank you for reading 😉
Huge post, but design should not decrease page speed.
Most definitely Shemul, design changes shouldn’t decrease page speed. Thanks for your comment.
Thanks..I dont know much about designing wordpress sites but your tutorial will help me..