3 Lesser Known Image Management Tips in WordPress


- 1. The Ultimate Guide to WordPress Image Management
- 2. Currently Reading: 3 Lesser Known Image Management Tips in WordPress
- 3. WordPress Image SEO Mistakes & How to Fix Them
Welcome to the second post in the Ultimate Guide to Image Management in WordPress. The first post was about getting start on the right foot. We learnt when to use a JPG or a PNG image format (albeit with rigorous examples), and a couple of tips on properly uploading a stock image.
In today’s post, we’ll look at some of the more technical aspects of image maintenance and management in your WordPress site.
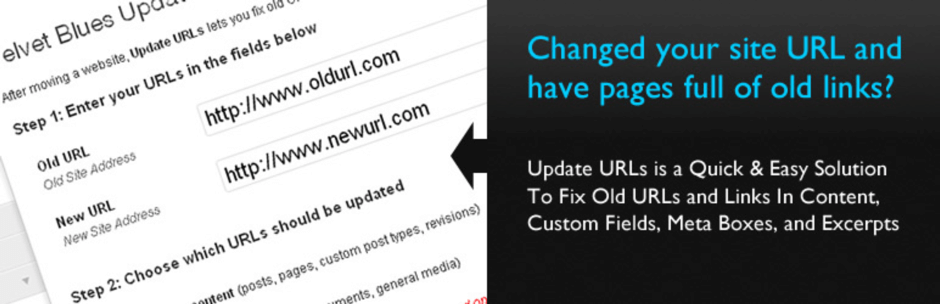
- What happens to your images when you change the site URL or move servers?
- What if you have multiple authors in your site, and some of them link to external images? How do you get those images to be hosted to your server?
- What happens when someone hotlinks your images? Btw what is hotlinking?
These are some of the questions we’ll answer in today’s post. As always with our post series, we start with why and then move on to the how. Let’s get started!.
Tip #1: Image Management with Site URL Updates
This is one of the most common mistakes we see across with WordPress users.
When does the WordPress Site URL change?
But first, we must understand when a site URL is likely to change. Following are the three most common scenarios.
1. Moving to a New Domain Name
The site URL is updated when you change the domain name. For instance, Moz was previously known as SEOMoz. With their new branding, they had to update all the existing URLs of images, PDFs, affiliate links, etc. from seomoz.com to moz.com
2. Changing the WordPress Installation Directory
The site URL also changes when you change the location of your WordPress installation. In fact, this is one of the most common cases out there.
WordPress installs itself in a new default directory called blog. A lot of first-time WordPress users unknowingly end up installing WordPress in example.com/blog.
Only to later realize that they want to move WordPress to the root domain, i.e. example.com. (If you’re a product or service company, who included a content marketing in the later stages, you would relate.)
Once WordPress is moved to the root directory, the site URL changes from example.com/blog to just example.com. Any image, PDF (or any media file for that matter) would look something like this:
- OLD: example.com/blog/ebook.pdf
- NEW: example.com/ebook.pdf
3. Shifting between Staging and Production (Live) Servers
This is prevalent in high-traffic blogs or e-commerce websites where any error results in a drop in conversions. Migrating to and from a staging server can be made very simple if you are using a managed host such as WPEngine or Flywheel. (Btw, we at WPExplorer have been using WPEngine over the three years in a row and never faced a downtime!)
The problem occurs when someone uploads an image or links to some post using the staging server’s URL. When you transfer your site back to the live server, the links of the staging ones are used for those images that were uploaded in the staging server’s environment. Hence this should ideally be avoided. If in case you think someone from your team could have uploaded content in the staging environment, you can apply the fix which we are about to share below.
On a similar note, some of you might question – Well what’s the harm in using links from the staging server? Won’t it save bandwidth from the current/live site?
You’re not wrong to think so. However in reality, this rarely takes place. Here’s why:
- A staging server usually runs on lower resources. You’d be compromising on site speed which would negatively impact the user experience.
- In a lot of cases, the root link of the staging/test server keeps changing – which might lead to a ton of broken links. Imagine a 3000-word tutorial with broken screenshots all over the place. How would that make you feel?
- This would also negatively impact your image SEO. Remember, image search on Google is still a source of organic traffic. If the image does not belong to your domain – you’d be losing out on free organic traffic and SEO points!
What are we trying to solve?
Now that we know when a WordPress site URL is changed, let us see an example where there is potential room for error. Links that were automatically generated (such as affiliate links) face no problem. However, links that were manually pasted in posts and pages (such as internal links, image links, etc.) must be manually updated.
We all use images in our posts and pages. A typical example of an image link is:
https://mywpsite.tld/wp-content/uploads/year/month/image-name.png
When the site URL of your WordPress site changes, the source links of all images should also change to:
https://newwordpressdomain.tld/wp-content/year/month/image-name.png
Not just images, all links (including inter-post links, media files, PDFs, etc.) must be updated.
Okay, looks like we’ve discussed the issue in depth. Now let’s look at how to fix the issue once and for all. As always, we have a WordPress plugin to rescue!
Velvet Blues Update URLs
- First off, download and install the Velvet Blues Update URLs
- Upon activation, head over to WordPress Dashboard Tools > Update URLs page to configure plugin settings.
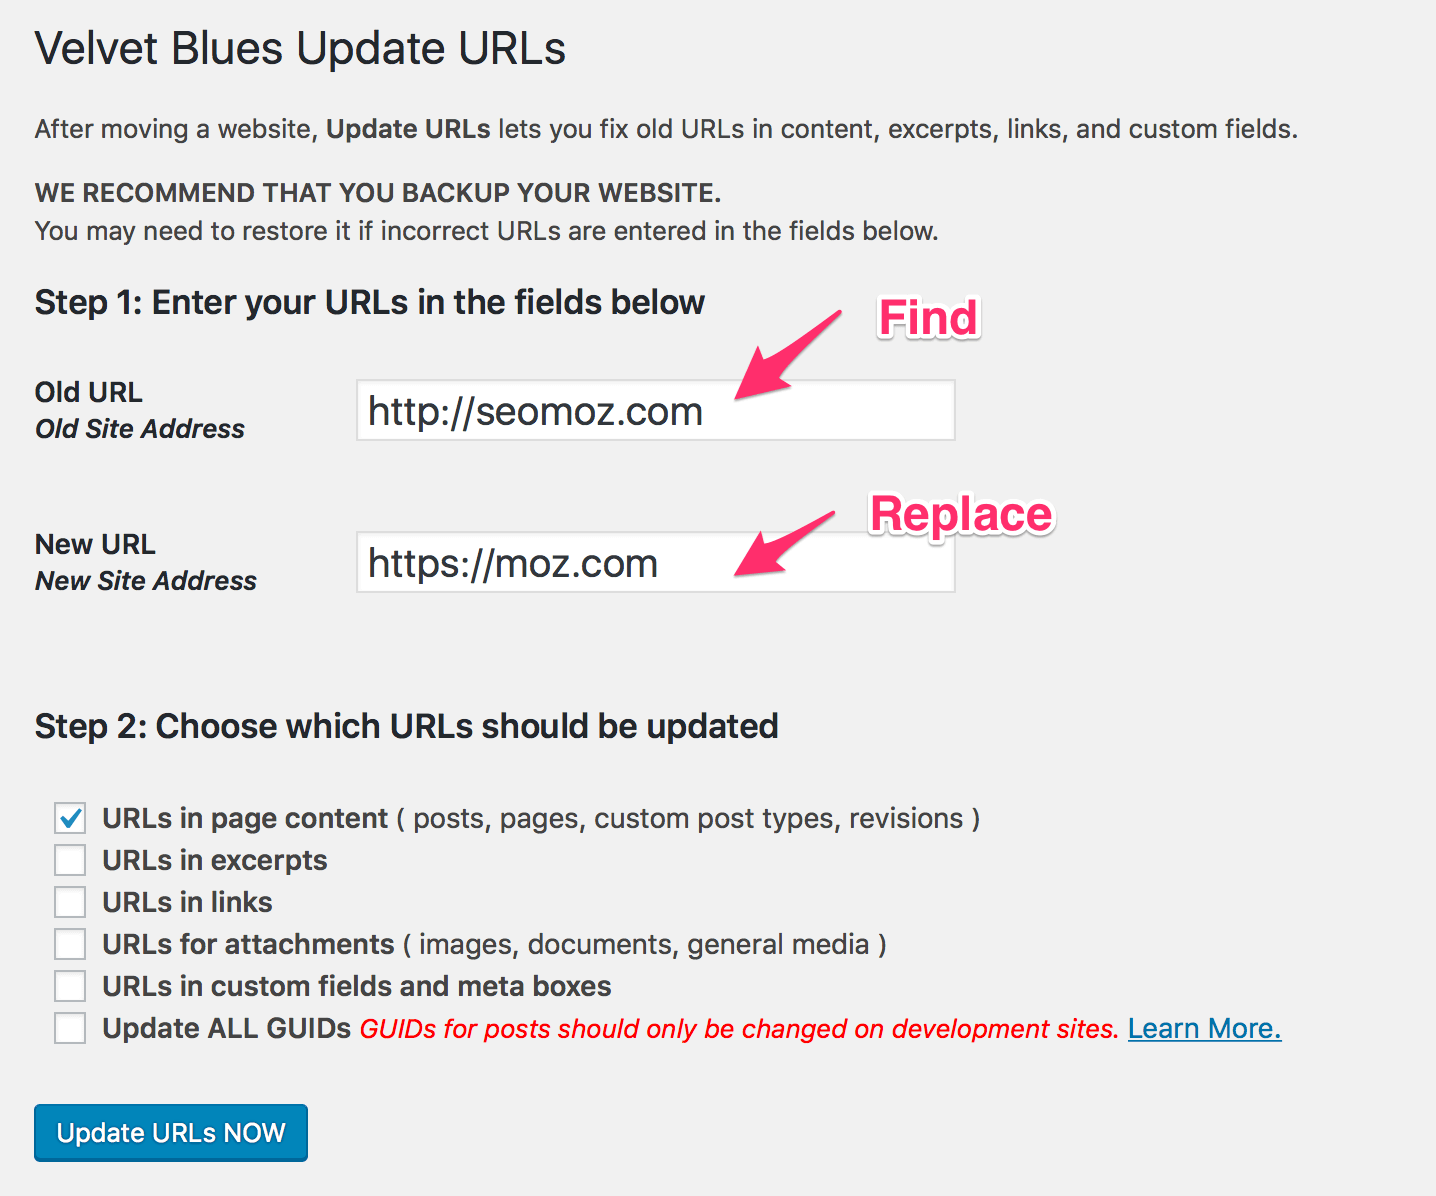
Remember how we used the Find and Replace feature Microsoft Word? Well, this is essentially what the plugin does! It finds the old URLs in the page or post content and replaces it with the new URLs. This way, image links are updated across all your posts.
Moreover, you can extend the functionality of the plugin to find/replace URLs in site links, excerpts, attachments, custom fields and meta boxes.
Following are a couple of examples for old URLs in your site:
- If you were moving from a staging server, the Old URL would be something like: hostname.com
- If you were changing/updating the domain name, simply use your new site name.
- If you had used ‘https’ as a protocol, replace ‘http’ with ‘https’.
In our example, we have replaced the old URL from https://seomoz.com to https://moz.com. Once you have entered the old and new URL, simply click on Update URLs NOW. The plugin will scan all your posts and pages and apply its find and replace magic. All your URLs will be updated to the New URL value
Word of Caution: Scanning and replacing multiple posts and pages could be a resource intensive, especially if your WordPress blog had hundreds of posts. If you selected all the scanning options (site links, excerpts, etc.), the resource usage would scale significantly. To many site-wide URL updates could lead to your hosting account being temporarily suspended due to resource overuse. This issue would be most prevalent in shared hosting providers. Therefore I would recommend a bit of caution when running the plugin.
Tip #2: Importing External Images in WordPress
External images are those that are not hosted in your server. In this tutorial, we’ll learn how to quickly and efficiently import all external images to your own WordPress site.
For clarity, let us assume that we are using the images with proper licenses (else we might land up in a different debate altogether!).
To quickly recap, here are two reasons why we should not use external images in our WordPress site:
- They consume other people’s bandwidth, which isn’t really fair.
- The hurt our image SEO scores.
Let’s take a look at the following post. It is pretty difficult to understand whether or not the post is using an external image using the Visual Editor.
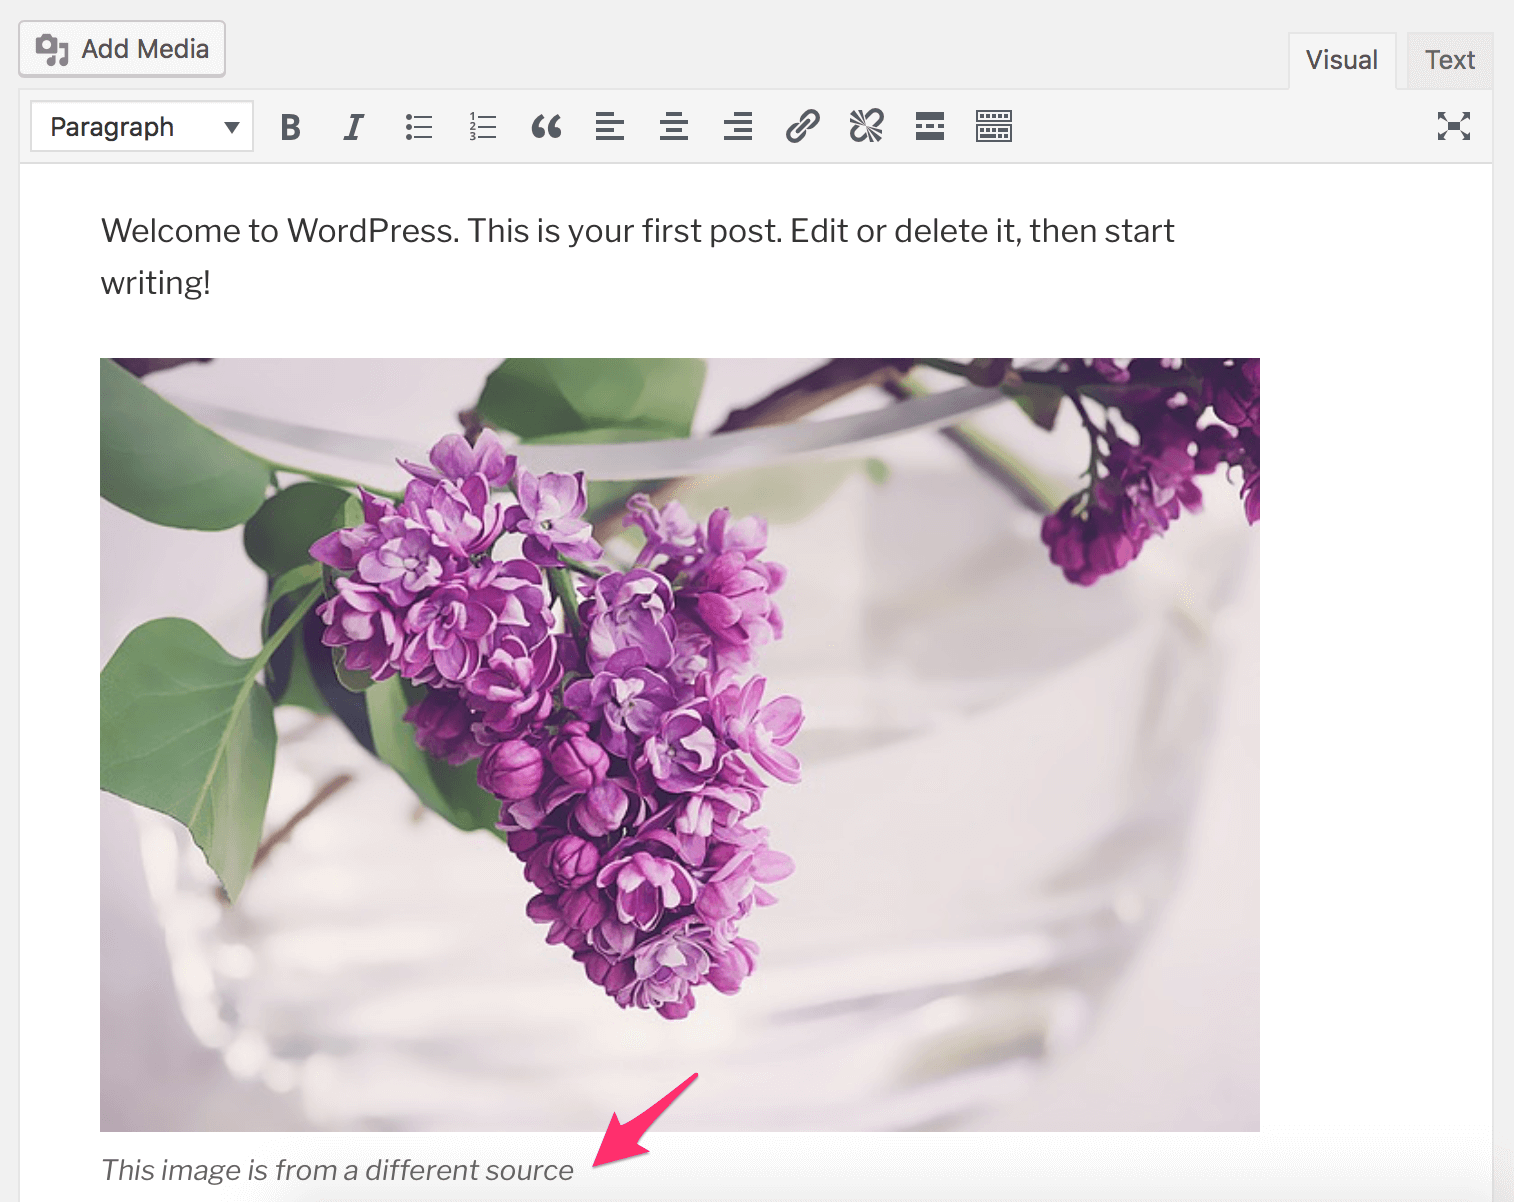
Unless, of course, we move to the Text view of the WordPress editor.

We see that that image is actually hosted on imgur.com – a popular image hosting website. To fix this, we need to:
- Download the image
- Upload it to WordPress
- Update the link in the post
Can you imagine repeating all these steps for each and every image for across all posts? Only finding all external images would take days! So there must be a solution, right? Or am I bringing this up just to disappoint you?
Of course not! There is a solution. And as always, it’s an awesome free WordPress plugin.
How to Import External Images in WordPress
One of the first things I like about this plugin is its very name. It’s clear, crisp and to-the-point. To begin with, download and install the Import External Images plugin. Activate the plugin and head over to WordPress Dashboard > Media > Import Images
You should see an option panel like this:
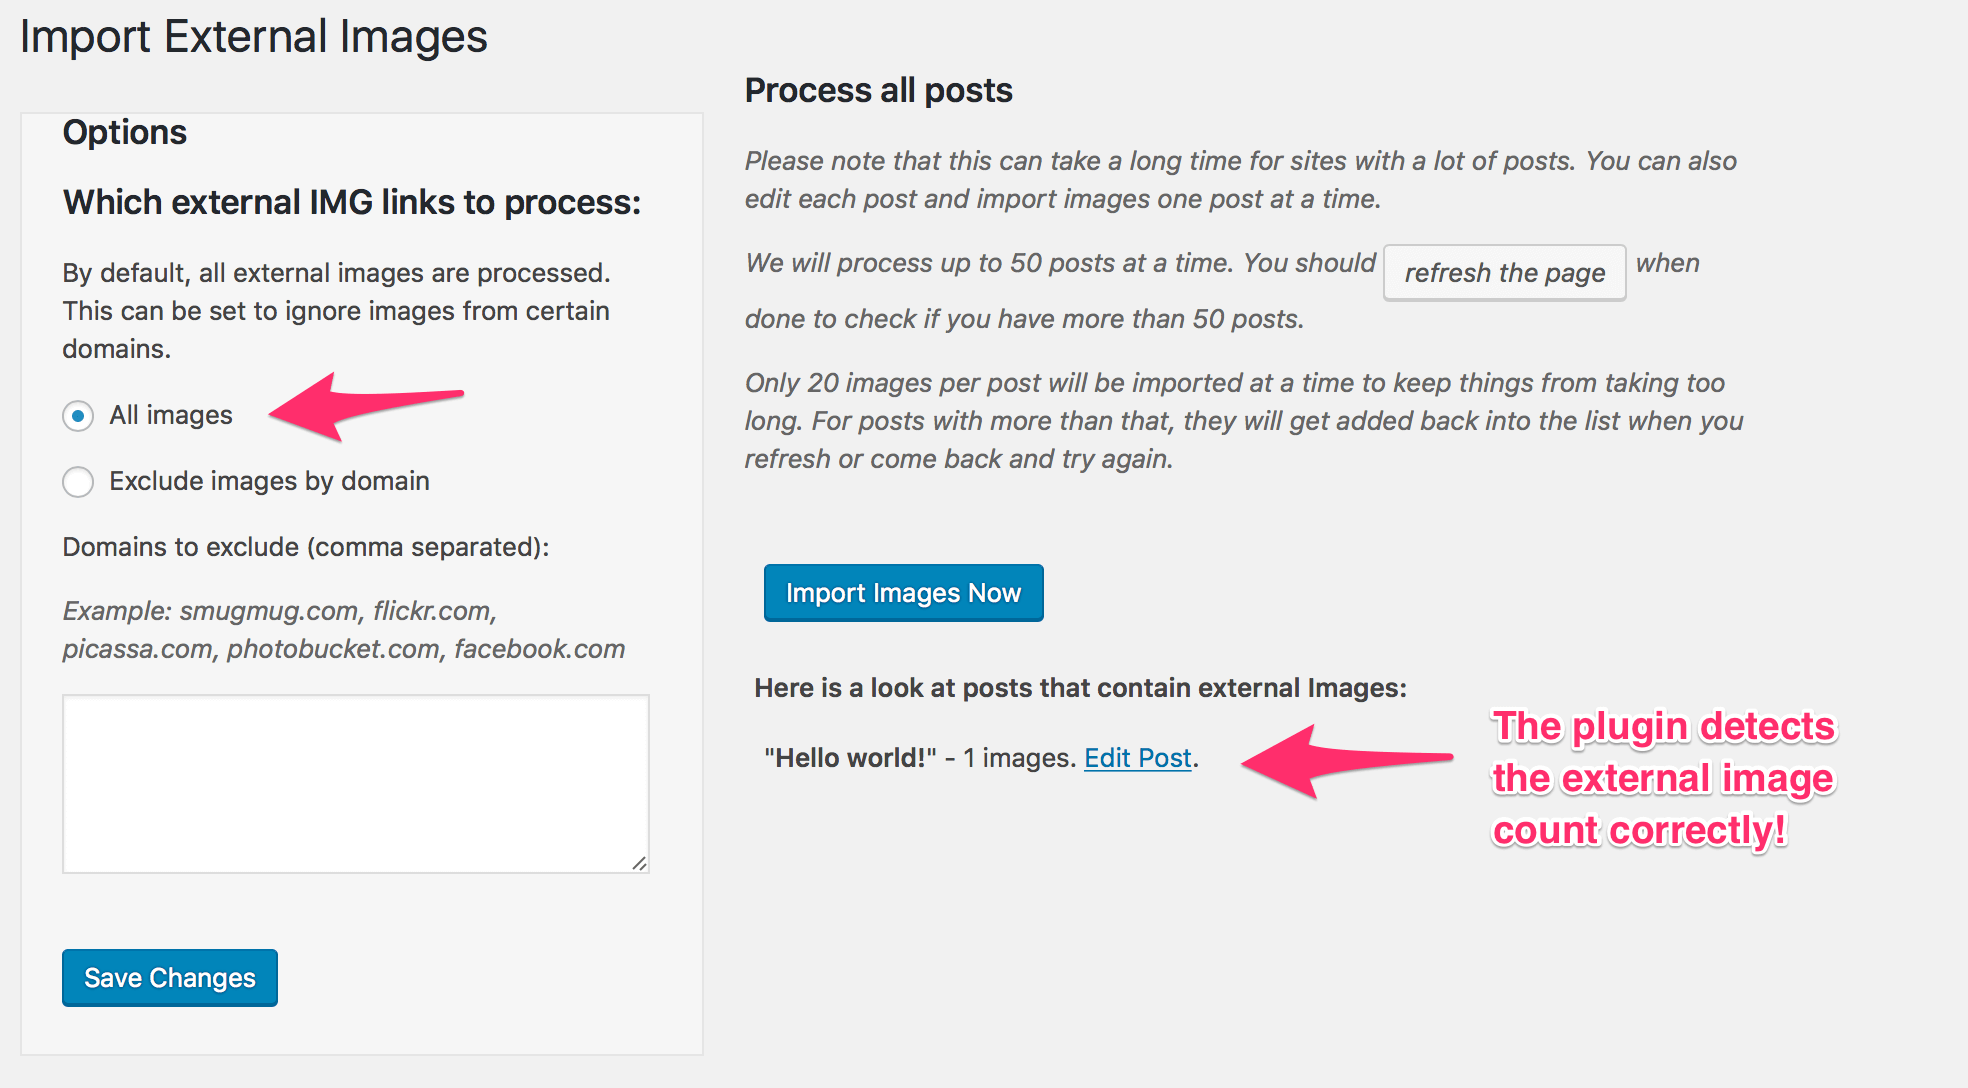
If you notice in the bottom right corner, you will see that the plugin has already identified the posts containing external images.
In our example, we ran this plugin in a staging environment, which is why we have just one post, with one external image.
All you need to do now is click on Import Images Now to start the process. On completion, you should see a similar confirmation message of the total images imported.
Optionally, you can also choose to exclude images based on the domain name. This is helpful if you have special image download links (from paid external image hosting sites such as Photobucket) that you don’t want to replace.
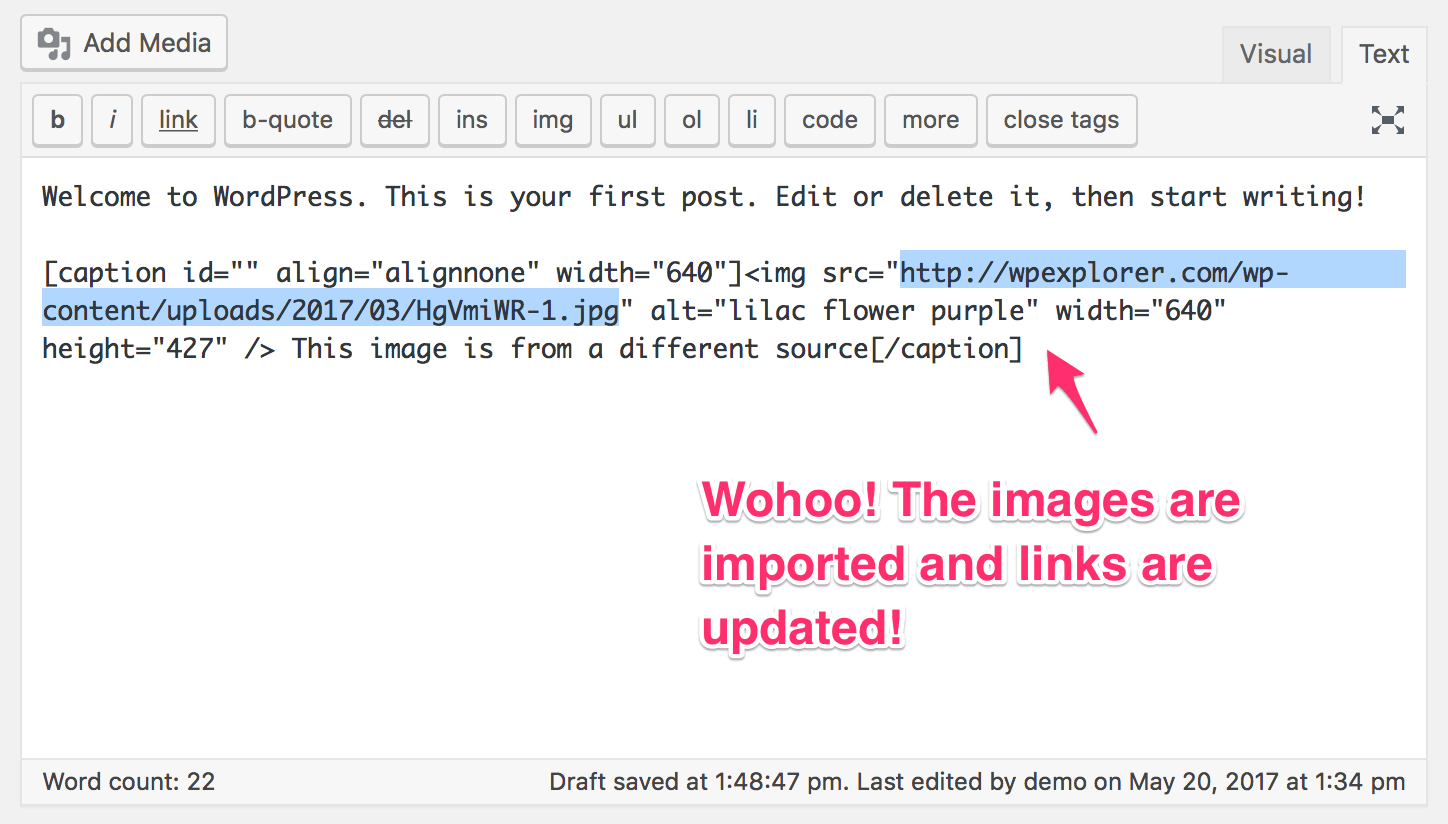
After the image import is complete, if we check the media gallery, we would see all the imported images.
Okay so the images are imported to the WordPress Media Gallery. What about the post content? Do they still point to the old image URL? Absolutely not!
The plugin also replaces the link of the image file with the new URL, i.e. your domain’s link!
Performance Impact: Similar to the resource consumption issues we discussed in the URL update plugin, importing external images in WordPress also consumes it’s fair share of server resources. Thankfully, the developer has put in measures to control the server usage. The plugin scans a max of 50 posts per call (i.e. when you visit or refresh the plugin’s settings page). It also limits the maximum number of images to 20 per import call.
Tip #3: How to Prevent Image Hotlinking in WordPress
To put it simply, hotlinking means wandering the city on someone else’s Uber booking. Think about it. You book an Uber for your commute and a stranger somehow manages to steal your booking and use it at their will. You pay for their rides. Now imagine if anyone could just take your Uber booking – use it however they wish to – how long they wish to – and you can’t do a damn thing about it.
Well, image hotlinking is somewhat similar. People take your images and use it on their site. They gain fame and you end up paying their bills. And there is nothing you can do about it.
Hold on! The last line in not true. You can do something about it. After all, it’s WordPress! You’re probably thinking “Ah Sourav’s going to introduce another plugin”. Bazzinga! I’m not.
1. Configure your Web Server for Hotlink Prevention (Apache or NGINX)
You web server is enough to prevent other people from hotlking your images. The two most common web servers are Apache and NIGNX. If you are using Apache as your web server, then you can prevent image hotlinking in WordPress by adding a few lines of code in your .htaccess file. Back in 2013, I wrote a short tutorial on this – it’s still applicable today.
However, if you are using NGINX as your wes server, then add the following code snippet to your NGINX configuration file.
location ~ .(gif|png|jpe?g)$ {
      valid_referers none blocked .yourwebsite.com;
      if ($invalid_referer) {
         return   403;
     }
 }
Replace yourwebsite.com with your actual domain name.
In a nutshell, this code snippet prevents GIF, PNG and JPG/JPEG files from being hotlinked. Those files will only be accessible by your domain and nobody else. In case someone tries to hotlink to these 3 file formats, they will get a 403 error.
Here’s a quick line-by-line explanation of the code snipped.
- Line 1 defines the image formats. You can add video formats such as mp4 here as well.
- Line 2 tells NGINX that requests from your domain must be allowed. If any other domain requests it, block the request.
- Line 3 tells NGINX what to do if a request is from a disallowed domain
- Line 4 is tells NGINX to throw a HTTP 403 Forbidden error, if the condition in line #3 is met.
- Lines 5 and 6 close the code properly so that it executes!
Similarly, if you wanted to prevent an entire directory from being hotlinked, there is a code snippet for that as well.
location /uploads/ {
      valid_referers none blocked .yourwebsite.com;
      if ($invalid_referer) {
         return   403;
     }
 }
Replace /uploads/ with the directory you want to prevent from being hotlinked. In our example, we have chosen the default WordPress uploads directory. If you are like most of us, you would upload all your images, PDFs and other media files using the default WordPress uploader, which in turn would place the files inside the /uploads/ folder. Thus, by protecting the master folder, we are preventing any and all uploads from being hotlinked.
2. Use a CDN to Prevent Image Hotlinking in WordPress
Surprised? So was I when I first read about it. We all heard of CloudFlare as one of the best free CDNs out there. Did you know they offered free hotlink protection as well?
To enable hotlink protection, simple head over to your CloudFlare account dashboard, followed by Scrape Shield. Toggle the button to ON and you’re set.
If you are using Cloudflare, you can easily enable hotlink protection under Scrape Shield in your account. Since Cloudflare is a fully proxy service you don’t need to worry about enabling hotlink protection on your origin server.
If you are using a premium CDN service such as StackPath CDN or KeyCDN, all you need to is create appropriate rules for zone referrers and enforce them. KeyCDN has a wonderful tutorial on this, it is worthwhile to give it a read.
3. Use a Plugin: All In One WP Security & Firewall Plugin
If you would rather not mingle with .htaccess code and wished there was a plugin available that could take care of business – well, you are in luck.
Check out the All In One WP Security & Firewall plugin. With over half a million active installations, this plugin has tons of essential WordPress security features.
Here is what you gotta do to activate the Image Hotlinking Prevention feature.
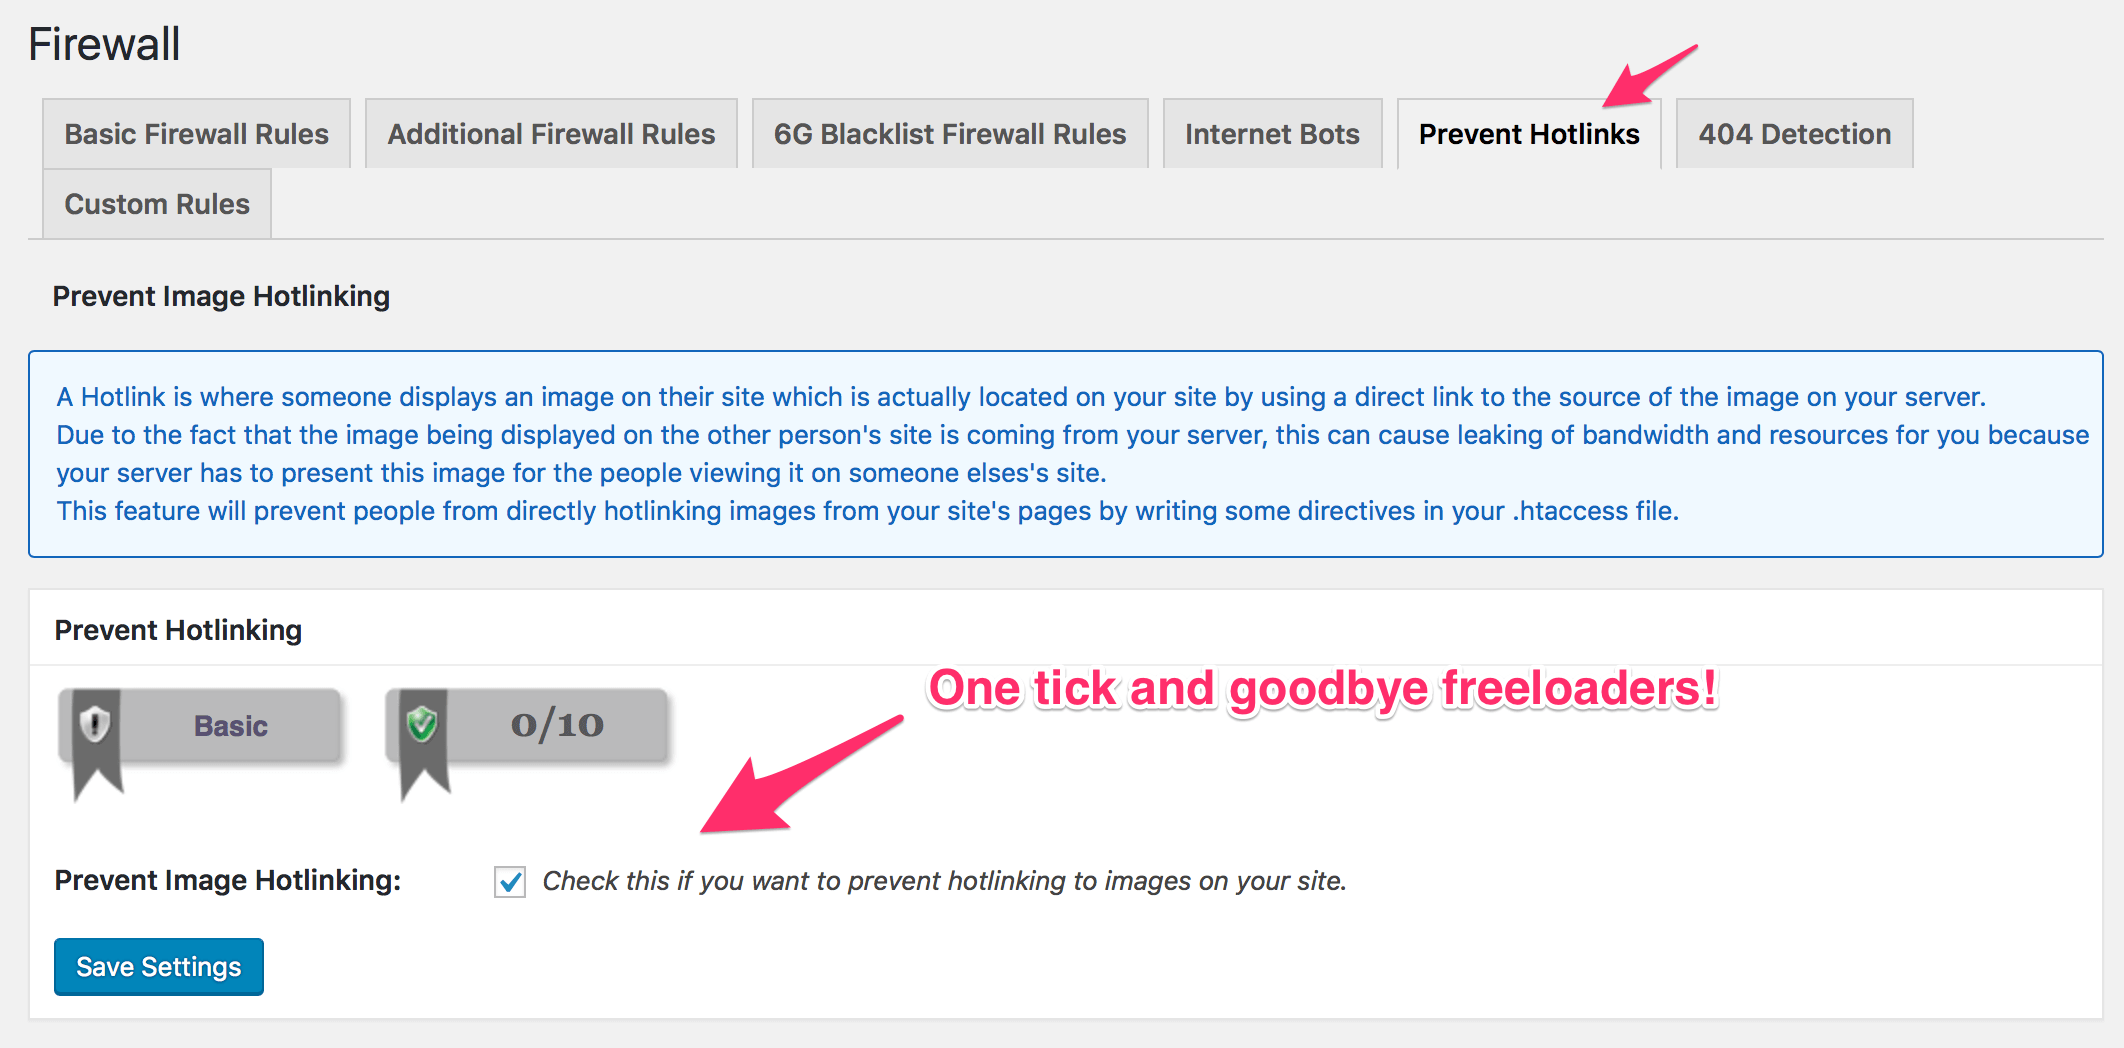
- Download and install the plugin.
- Activate it, and head over to WordPress Dashboard > WP Security > Firewall and click on the Prevent Hotlinks
- Check the small tick box on the bottom and click on Save Settings.
And that’s it. Image hotlinking is prevented from now on.
Conclusion
To wrap up this post, let’s quickly go through what we’ve learnt so far.
- How to update, rather replace the old URLs with the new ones. The solution is a nifty plugin called Velvet Blues Update URLs.
- Next, we learnt how to import external images to WordPress. A lot of fellow bloggers have done this at least once in their lifetime! Again, the solution was in a plugin called Import External Images.
- Both the plugins mentioned in the above two scenarios have a performance impact associated with them. We would need to run these plugin with caution.
- Finally, we looked at what image hotlinking is and saw two ways to prevent it. One was by adding a few lines of code to .htaccess plugin and the second one was by using a security plugin.
Question – what are your thoughts on these tips? Found anything useful? Have anything better to offer? Also, how do you like the series so far? Let us know in the comments below, and stay tuned for the next part of the series.