The Ultimate Guide to WordPress Robots.txt Optimization


When you create a blog or website on WordPress, a robots.txt file is automatically created for each of your landing pages and posts. This is an important aspect of your website’s SEO, as it will be used by search engines when crawling your site’s content.
If you want to take your website’s SEO to the next level, optimizing the robots.txt file on your WordPress site is important but, unfortunately, not as simple as adding keywords to your content. That’s why we’ve put together this guide to WordPress robots.txt so you can start perfecting it and improve your search ranking.
What Is a Robots.txt File?
When placing websites on search engine results pages (SERPs), search engines like Google “crawl” website pages and analyze their content. The robots.txt file of any website tells the crawler “bots” which pages to crawl and which not to – essentially a form of Robotic Process Automation (RPA).
You can see the robots.txt file of any website by typing /robots.txt after the domain name. It will look something like this:
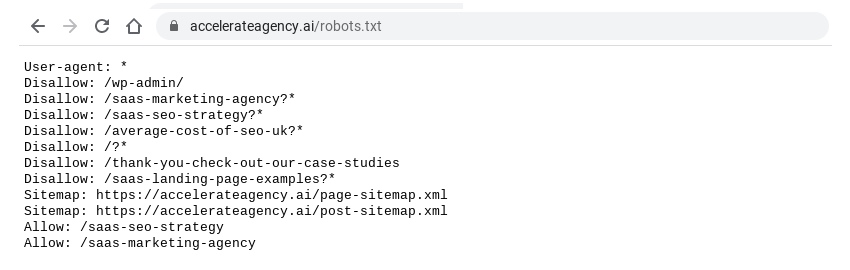
Let’s break down each of the elements in the above image.
User-agent
The user-agent in a robots.txt file is the search engine that the robots.txt file is to be read by. In the example above, the user-agent is marked with an asterisk, meaning it applies to all search engines.
Most websites are happy for all search engines to crawl their site, but sometimes you might want to block all search engines except Google from crawling your site or provide specific instructions for how search engines like Google News or Google Images crawl your website.
If this is the case, you need to find out the user-agent ID of the search engines you wish to instruct. This is simple enough to find online, but here are some of the main ones:
- Google: Googlebot
- Google News: Googlebot-News
- Google Images: Googlebot-Image
- Google Video: Googlebot-Video
- Bing: Bingbot
- Yahoo: Slurp Bot
Allow and Disallow
In robots.txt files, allow and disallow tells the bots which pages and content they can and cannot crawl. If, as mentioned above, you want to block all search engines except Google from crawling your website, you might use the following robots.txt:

The slash (/) after “Disallow” and “Allow” tells the bot it is allowed or not allowed to crawl all pages. You could also put specific pages in between slashes to allow or disallow the bot from crawling them.
Sitemap
The “sitemap” in a robots.txt file is an XML file that contains a list and details of all the pages on your website. It looks like this:
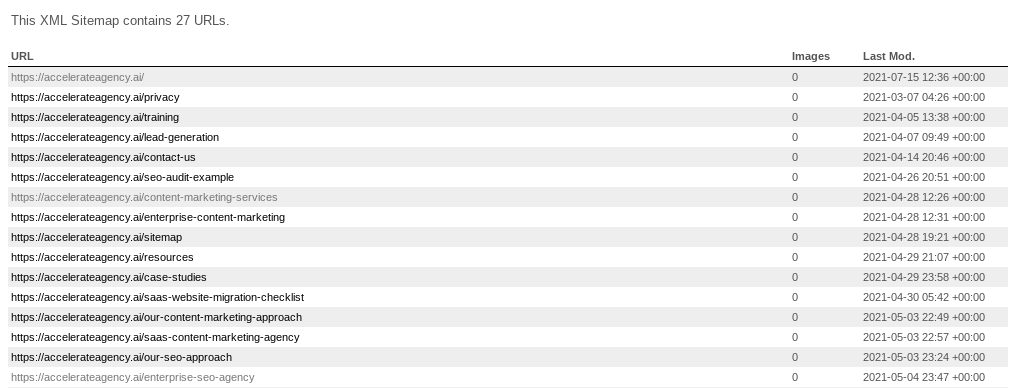
The sitemap contains all of the web pages that you want the bot to discover. The sitemap is especially helpful if you have web pages that you want to appear in search results but they are not typical landing pages – such as blog posts.
Sitemaps are especially important for WordPress users hoping to reinvigorate their website with blog posts and category pages. Many of these may not appear in SERPs if they do not have their own robots.txt sitemap.
These are the core aspects of a robots.txt file. It should be noted, however, that your robots.txt file is not a surefire way to block search engine bots from crawling certain pages. For example, if another site uses anchor texts to link to a page you have “disallowed” in your robots.txt file, search engine bots will still be able to crawl that page.
Do You Need a Robots.txt File on WordPress?
If you have a website or blog powered by WordPress, you will already have an automatically-generated robots.txt file. Here are a few reasons why it’s important to consider your robots.txt file if you want to ensure you have an SEO-friendly WordPress site.
You Can Optimize Your Crawl Budget
A crawl budget, or crawl quota, is the number of pages that search engine bots will crawl on your website on any given day. If you do not have an optimized robots.txt file, you could be wasting your crawl budget and preventing bots from crawling the pages on your site that you want to appear first in SERPs.
If you sell products or services through your WordPress site, ideally you want the pages with the best sales conversion to be prioritized by crawler bots.
You Can Prioritize Your Important Landing Pages
By optimizing your robots.txt file, you can ensure that the landing pages you want to appear first in SERPs are easy and quick for crawler bots to find. Splitting your site index into a ‘pages’ and ‘posts’ index is especially useful for this, as you can ensure that blog posts appear in SERPs rather than just your standard landing pages.
For example, if your website has a lot of pages and your customer data shows that your blog posts are generating lots of purchases, you can use sitemaps in your robots.txt file to ensure that your blog posts are appearing on SERPs.
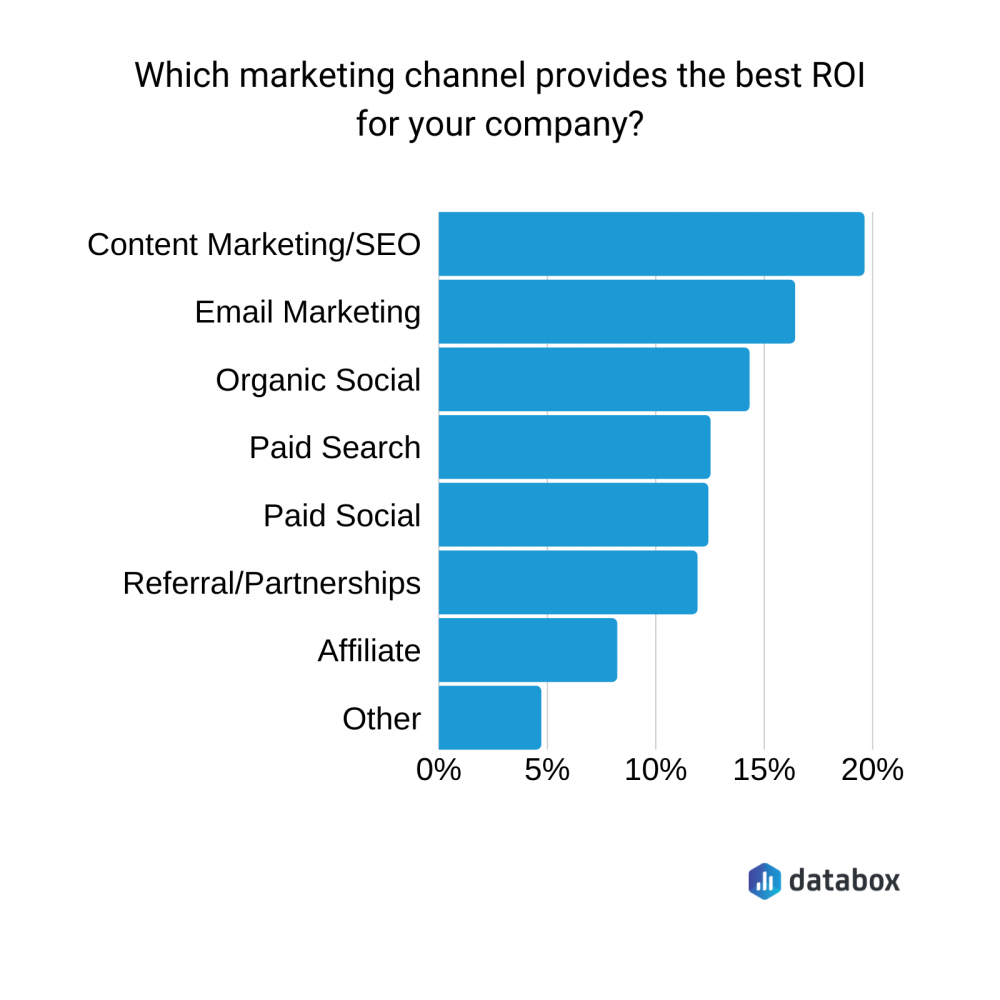
You Can Improve the Overall SEO Quality of Your Website
Marketers are well aware of the great search engine optimization ROI. Channeling organic searches towards your website by focusing on its SEO is cheaper and often more effective than paid ads and affiliate links – although both still help. Check out these stats for marketing channel ROI.
Optimizing your robots.txt file isn’t the only way to improve your website or blog’s search ranking. You’ll still need to have SEO-friendly content on the pages themselves, which you may need an SEO SaaS provider to help with. Editing your robots.txt file, however, is something you can easily do yourself.
How to Edit a Robots.txt File on WordPress
If you want to edit your robots.txt file on WordPress, there are several ways to do it. The best and easiest option is to add a plugin to your content management system – your WordPress dashboard.
Add an SEO Plugin to Your WordPress
This is the easiest way to edit your WordPress robots.txt file. There are lots of good SEO plugins out there that will let you edit the robots.txt file. Some of the most popular ones are Yoast, Rank Math, and All In One SEO.
Add a Robots.txt Plugin to Your WordPress
There are also WordPress plugins specifically designed by editing your robots.txt file. Popular robots.txt plugins are Virtual Robots.txt, WordPress Robots.txt Optimization, and Robots.txt Editor.
How to Test Your WordPress Robots.txt File
If you have edited your robots.txt file, it’s important that you test it to ensure you haven’t made any mistakes. Mistakes on your robots.txt file could result in your website being excluded entirely from SERPs.
Google Webmaster has a robots.txt testing tool that you can use for free to test your file. To use it, you simply add the URL of your homepage. The robots.txt file will appear and you will see “syntax warning” and “logic error” on any lines of the file that are not functioning.
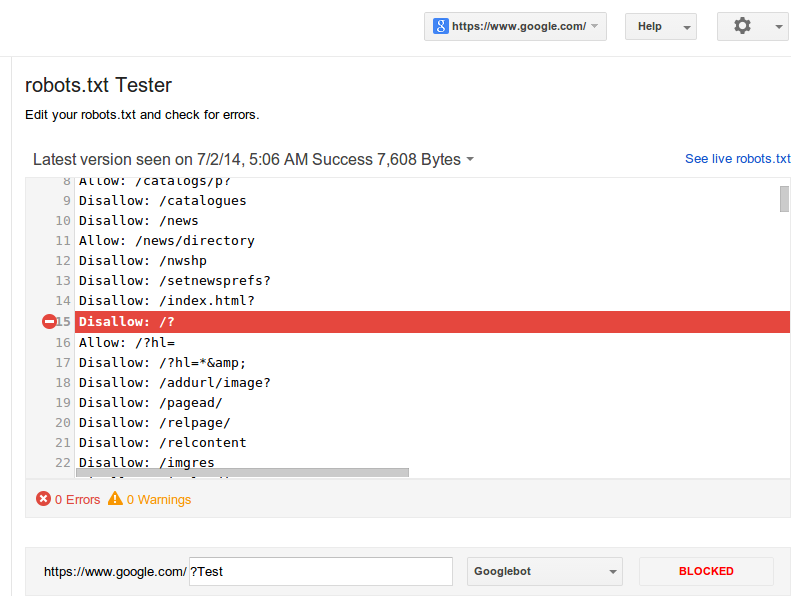
You can then enter a specific page from your website and select a user-agent to run a test that will show if that page is “accepted” or “blocked”. You can edit your robots.txt file on the testing tool and run the test again if need be, but note that this will not change your actual file, you’ll need to copy and paste the edited information into your robots.txt editor and save it there.
How to Optimize Your WordPress Robots.txt File for SEO
The simplest way to optimize your robots.txt file is to select which pages you want to disallow. On WordPress, typical pages that you might disallow are /wp-admin/, /wp-content/plugins/, /readme.html, /trackback/.
For example, a marketing SaaS provider has a lot of different pages and posts on their WordPress site. By disallowing pages like /wp-admin/ and /wp-content/plugins/, they can ensure that the pages they value are prioritized by crawler bots.
Create Sitemaps and Add Them to Your Robots.txt File
WordPress creates a generic sitemap of its own when you create a blog or website with it. This can usually be found at example.wordpress.com/sitemap.xml. If you want to customize your sitemap and create additional sitemaps, you should use a robots.txt or SEO WordPress plugin.
You can access your plugin on your WordPress dashboard and it should have a section for enabling and editing your sitemap. Good plugins will allow you to make and customize additional sitemaps, such as a “pages” sitemap and a “posts” sitemap with ease.
When you’re sitemaps are set up, simply add them to your robots.txt file like this:

Take a Minimalistic Approach
Whilst it might be exciting editing and optimizing your WordPress robots.txt file, it’s important to have a minimalistic, less-is-more approach. This is because if you disallow pages on your site, this will prevent crawler bots from searching those pages for other pages. This could mean that key pages don’t get discovered and the structural integrity of your site is weakened from the perspective of search engine bots.
There’s also no need to “allow” access to every page on your website in the robots.txt. Crawler bots will already discover those pages – focus instead on your sitemaps and the pages you need to disallow so that your key pages are found first.
In this guide, we’ve provided everything you need to know about WordPress robots.txt files. From explaining what robots.txt files are to diving into why and how you should optimize your robots.txt file for SEO, this article will help if you want to find simple and effective ways to improve your WordPress website’s search ranking.