NitroPack: WordPress Performance Optimization

Have you ever been on a site so slow you nearly lost your marbles? If so, I bet you probably hit exit and left never to return. It’s a well-known fact that a slow site is quite an annoyance. Slow sites will cost you dearly, which is why you should strive to improve your page speeds immediately.
To offer you some context, a slow-loading website leads to poor user experience (UX), which translates to higher bounce rates, lower conversions, and – ultimately – lost sales. On top of that, slow site speeds will impact your Google rankings negatively, costing you a lot of organic search traffic.
To avoid such problems, you need to create a lightning-fast website, and in today’s review, we point you towards an all-in-one tool that helps you do just that. Ladies and gents, say a big hello to NitroPack, a tried-and-tested service that helps you to improve the speed of your site like a pro.
It doesn’t matter your level of experience as far as website speed optimization goes, NitroPack makes the entire process all too easy. The platform comes with an intuitive dashboard and beginner-friendly options that help you to hit the ground running in under 10 minutes.
In the upcoming sections, we will learn more about NitroPack, explore the features, install and test-drive the whole thing. In other words, you will learn why NitroPack is trusted by more than 100,000 businesses across the globe. Without further ado, let us set sail.
What is NitroPack?
So, what is NitroPack in more detail? Well, NitroPack is a powerful speed optimization tool for WordPress and other platforms such as Magento and OpenCart. It was created for OpenCart over a decade ago, but there is a standalone plugin for WordPress websites nowadays.
NitroPack is a cloud-based service, meaning all speed optimizations happen on NitroPack servers, which saves you a ton of server resources. The free NitroPack plugin you download from WordPress.org simply helps you to connect your site to NitroPack servers.
The service offers you a lot of optimization features such as caching, image optimization, smart resource loading, a built-in CDN, code optimization, lazy loading, and more. It’s incredibly easy to set up you don’t need any technical knowledge or an expensive developer.
NitoPack is brilliant and people absolutely love it!
I have tried every cache plugin out there and never could get my site below 2.5 seconds. Setup Nitropack.io and within 5 minutes my site is a smoking .82 seconds and Google Page Speed score of 99. Yes, less than 1 second. The website works perfectly now and I am passing all Google Core Web Vitals with extremely high scores. Does it cost money? Yes, but the headache of trying to optimize and speed up my website is gone. Well worth it! – tsjustin
…and…
Incredible and well worth the money. Our eCommerce site and development team struggled for years with different caching tools and even diving deep into code and stripping out logic and unnecessary database calls. We still struggled, especially, in mobile to gain top speed scores. We tried nitro and all our major pages started scoring in the top 90s if not 100 in page speeds across all devices. – craigmande
NitroPack is a perfect speed optimization service for all types of WordPress websites be it portfolios, business sites, e-commerce, memberships, courses, and everything in between. I say this confidently since I have tried a couple of cache plugins in the past, but nothing has anything on NitroPack, in terms of functionality, usability, and support.
Now that you know what we are working with, what can you expect in terms of features?
NitroPack Features
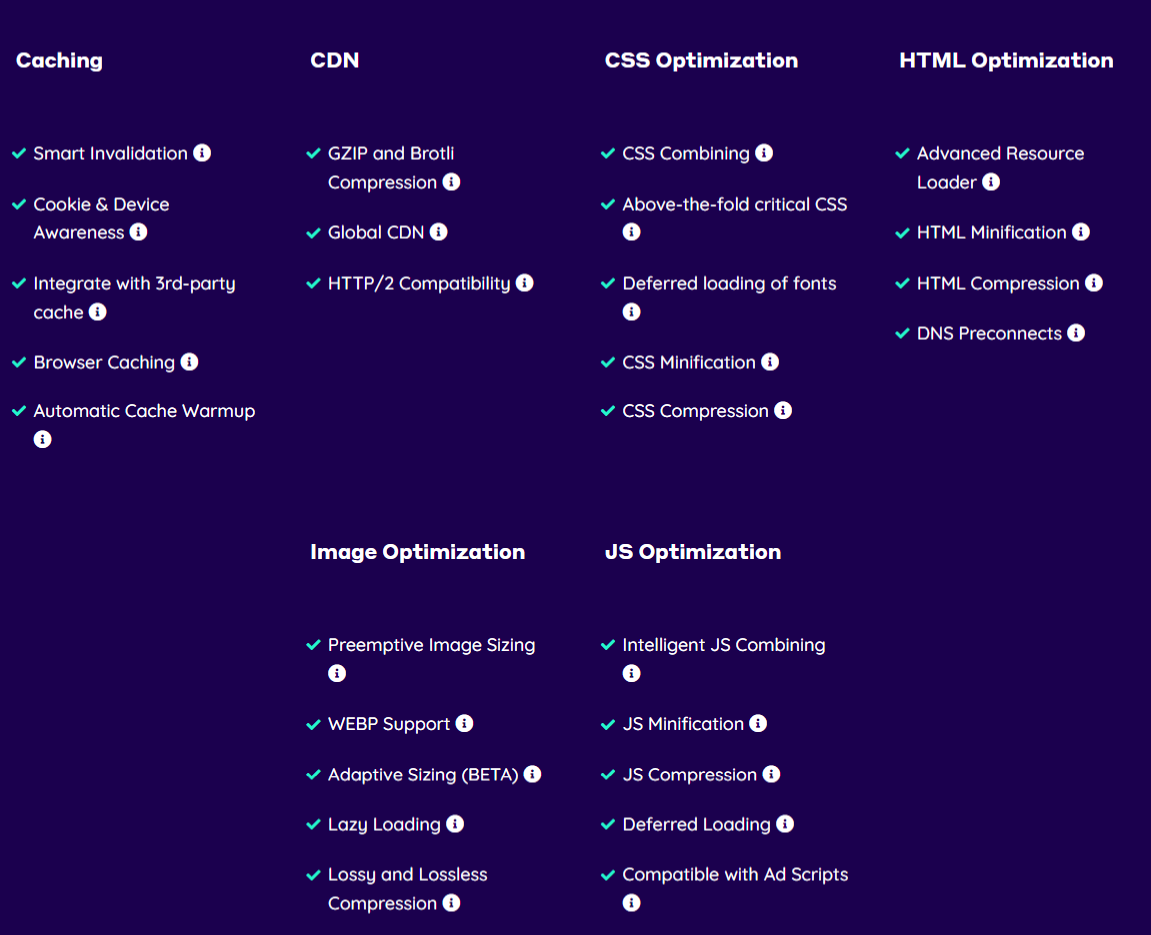
NitroPack packs quite a punch in the features department. With more features than you will ever need, the service remains incredibly easy to use. For most users, you are good with the default setup. That means you simply connect your site to realize results. Say goodbye to the days of complicated cache plugins that are a pain in the neck.
Here’s what to expect.
Next-Gen Caching
Caching is a huge part of website speed optimization. In the area of caching, NitroPack doesn’t disappoint. The service offers you a lot of smart caching options such as cache expiration, cache invalidation, cache warmup, and cookie exclusion.
On top of that, NitroPack allows you to create separate cache files for desktop, mobile, and tablet. That means you can create varying caches for different devices to maximize your speeds. Additionally, you can ignore most marketing URL parameters to ensure a high cache hit ratio.
Image Optimization
A website without images is rather dull. Images bring life to your content, but they are usually heavy and resource-intensive compared to text. By default, NitroPack offers you lossy or lossless compression to optimize your images for the best performance without sacrificing quality.
Additionally, NitroPack converts your images to WebP but keeps the original formats for browsers that don’t support WebP. If your images are missing width and height attributes, NitroPack fires Preemptive Image Sizing and Adaptive Image Sizing to ensure images fit their containers perfectly.
Robust CDN
CDN is short for Content Delivery Network. It’s simply a network of servers distributed across the world. When you upload your website to your physical server, the CDN saves copies of the website to these servers. Now, whenever a user visits your site, the CDN serves the copy that’s closest to them geographically.
NitroPack comes with a built-in CDN powered by Cloudflare, a leader in the field. That means you don’t need to configure a third-party CDN as is the norm with many cache plugins. Simply install NitroPack and you’re good to go.
Proprietary Resource Loading
To build the website you see in your browser, a website has to load a lot of resources from the server. Your website loads files such as JavaScript scripts, which can be resource-intensive and determine how fast (or slow) your web page renders.
NitroPack uses techniques such as code compression and minification to speed up JavaScript execution. On top of that, NitroPack delays the execution of non-critical JavaScript files and other resources until a user interacts with your page. By preloading and delaying resources until they are needed, NitroPack offers you an instant speed boost.
Critical CSS
CSS (short for Cascading Stylesheets) is the code that controls the design and style of your web pages. CSS controls everything from font types, font size, colors, borders, page layout, and everything in between. Critical CSS involves adding the CSS that controls the above-the-fold content to that page’s <head> tag.
To the absolute beginner, above the fold content is the content the visitor sees in the viewport as soon as they land on your site. NitroPack employs this technique to improve the performance and stability of every page on your website. Automatically.
Code Optimization
As we mentioned earlier, your website loads a lot of resources from the server to build the page you see in your browser. Other than JavaScript, your website loads other files such as HTML and CSS, among other resources. This translates to many round trips to the server, or what we call HTTP/S requests.
If you have large and many files, they will take longer to load, which slows down your website. That’s where NitroPack comes in. The plugin comes with a feature to compress and minify CSS, HTML (gzip), and JavaScript files (gzip and brotli). NitroPack can also reduce unused CSS rules on every page.
Lazy Loading
Lazy loading involves loading images, videos, and iFrames that the web visitor is currently looking at. Instead of loading all media assets when the page loads (which increases page load time as the assets load), you only load the media assets once the user scrolls to them.
NitroPack lazy loads all images, videos, iFrames, backgrounds, and images defined in CSS files to speed up your page speeds significantly. That’s not all, the plugin can also detect images declared in external files via the @import rule, which is useful for some WordPress themes.
The above is just the tip of the iceberg, for the complete list of features, I recommend you check out the NitroPack features page. Also, feel free to check out The Story of NitroPack and How NitroPack Works. I found both articles quite informative.
With the features out of the way, let us discover how much NitroPack costs. What can you expect to pay for a speed optimization service like no other? Read on to learn more.
NitroPack Pricing
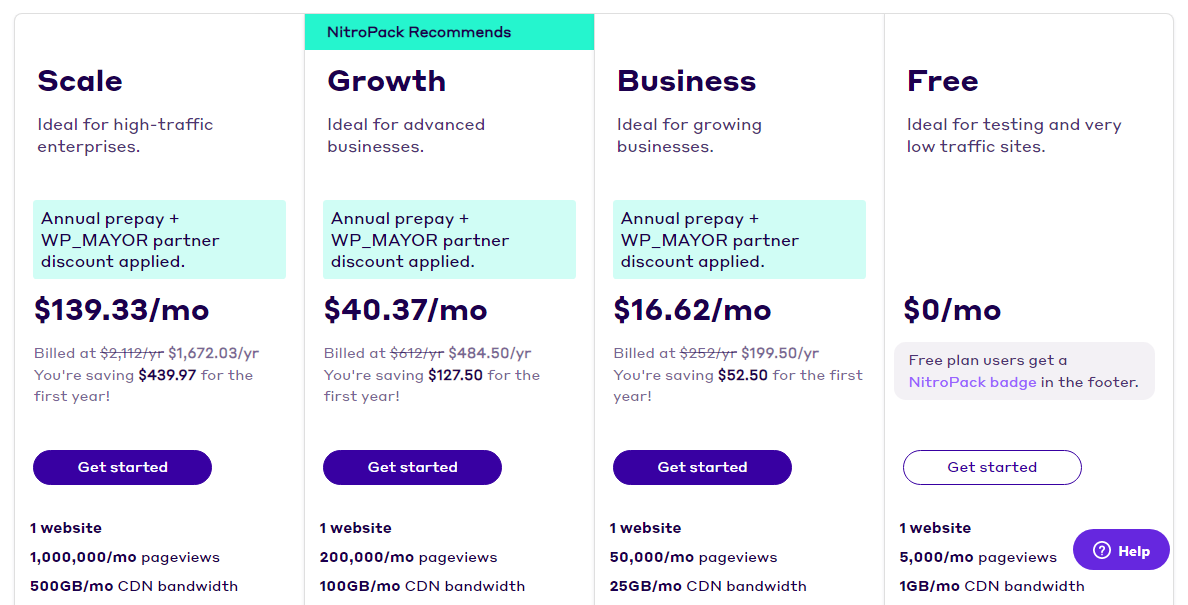
NitroPack offers quite flexible pricing plans. There are three paid plans and a free plan. All plans (free plan included) offer the entire suite of NitroPack features. The only difference is the number of page views and bandwidth you need per month. If you pay yearly, you get two months free, which saves you between $50 and $440 for the first year.
You can try NitroPack risk-free thanks to the 14-day money back guarantee. The free plan is free forever, and you can cancel any plan whenever you need. Also, note that all plans support only one website.
If you’re curious, here are more details:
- Free Plan – Free forever no credit/debit card required kind of deal. The plan offers you 5,000 page views and 1GB CDN bandwidth per month. The plan is perfect for testing and very low-traffic sites.
- Business Plan – For $16.62/month billed yearly, you have 50,000/month page views and 25GB/month CDN bandwidth. The plan is great for growing businesses.
- Growth Plan – Ideal for advanced businesses, the plan costs $40.37/month billed yearly. You have 200,000 page views and 100GB CDN bandwidth a month.
- Scale Plan – Meant for high-traffic enterprises, the plan will set you back $139.33 per month billed annually. You have 500,000 page views and 500GB CDN bandwidth monthly.
As always, choose a plan that’s suitable for your business needs. If you need a custom plan, don’t hesitate to contact the NitroPack team for a personalized quote!
Now that we know how much NitroPack costs, let us set up the service and give your beautiful website that much-needed speed boost.
How to Setup NitroPack
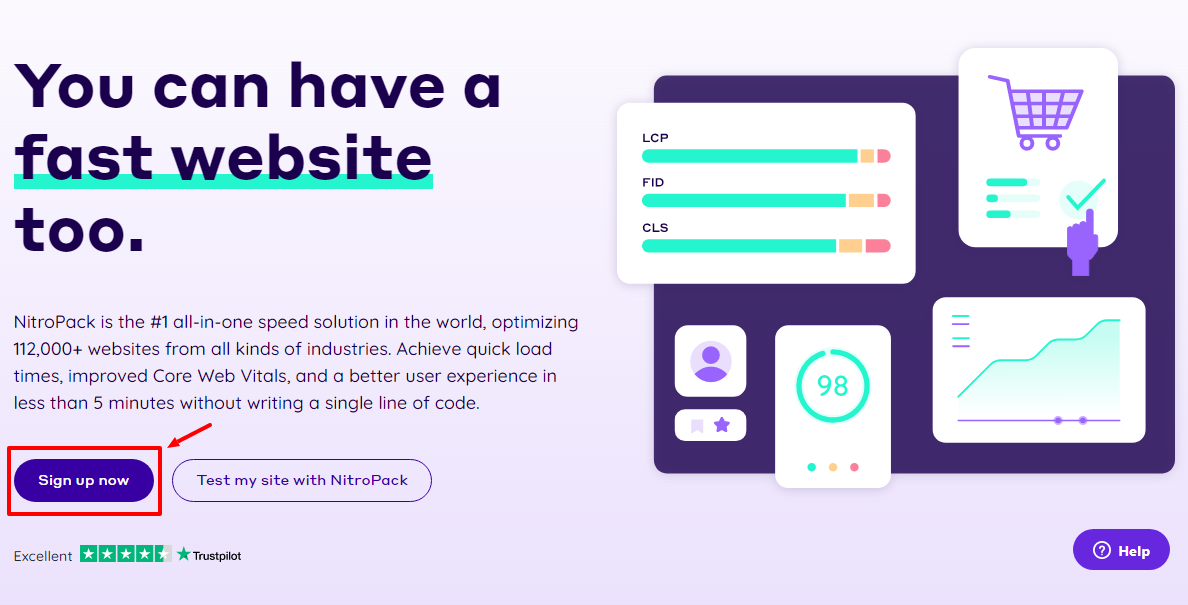
Setting up this beast is incredibly easy you will be done in less than 10 minutes I promise. For starters, you need a free account, so head over to NitroPack.io, and smash the Sign up now button, as shown below.
Next, choose your plan (I’m going with the free plan for illustration purposes). You can also start with the free plan and upgrade later. Remember there is a 14-day trial, so there is no risk if you choose a paid plan right away:

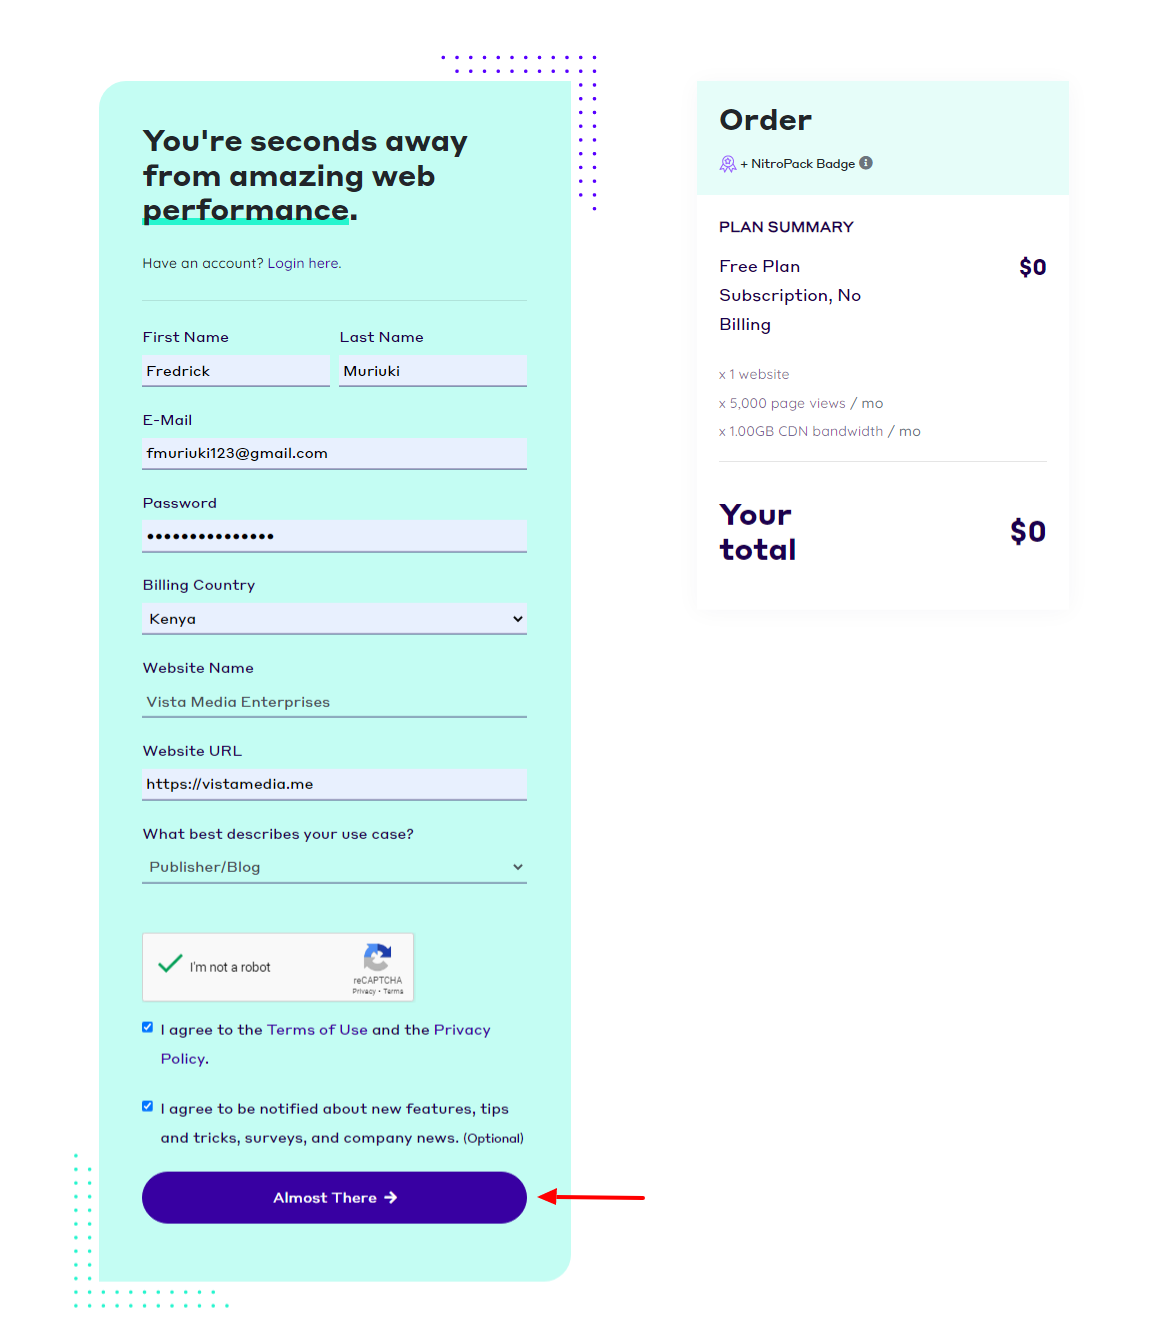
After that, fill out the sign-up form and click the Almost There button, as we highlight below.
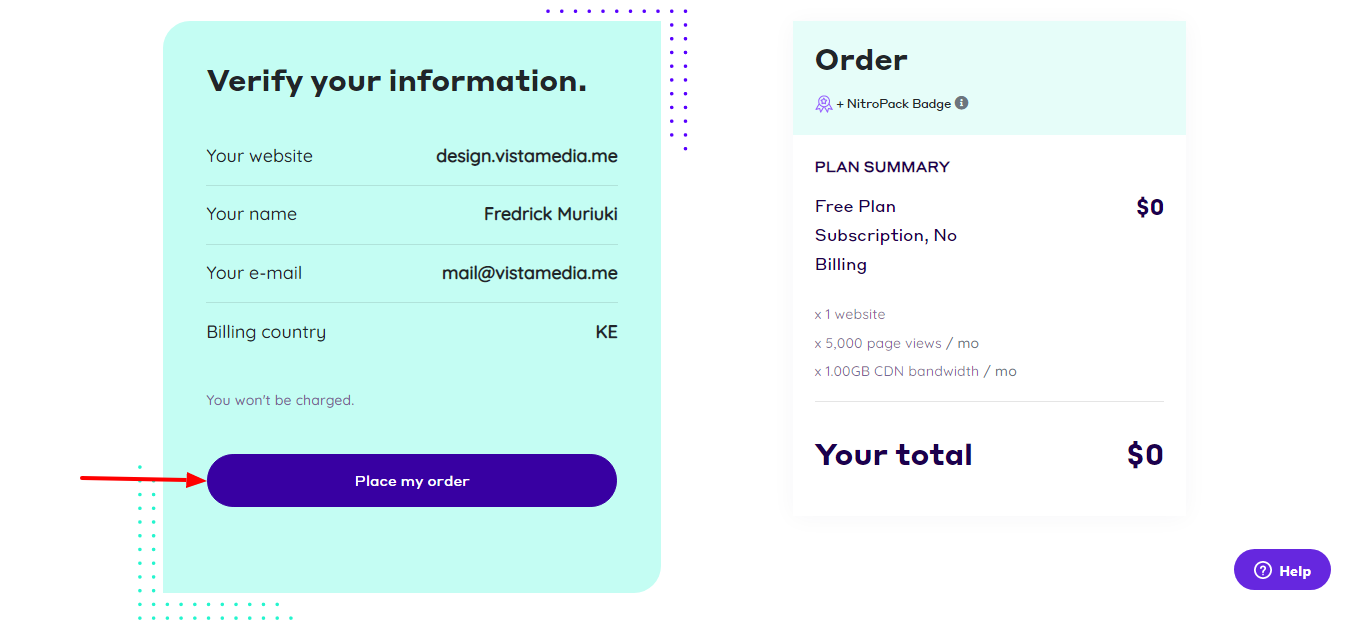
Next, click Place my order, as seen below.
So far so good, you’re doing just fine.
Click the Go to Dashboard button:

Doing so leads you directly to the NitroPack dashboard. Click the Verify new link to gain full access to help center features:
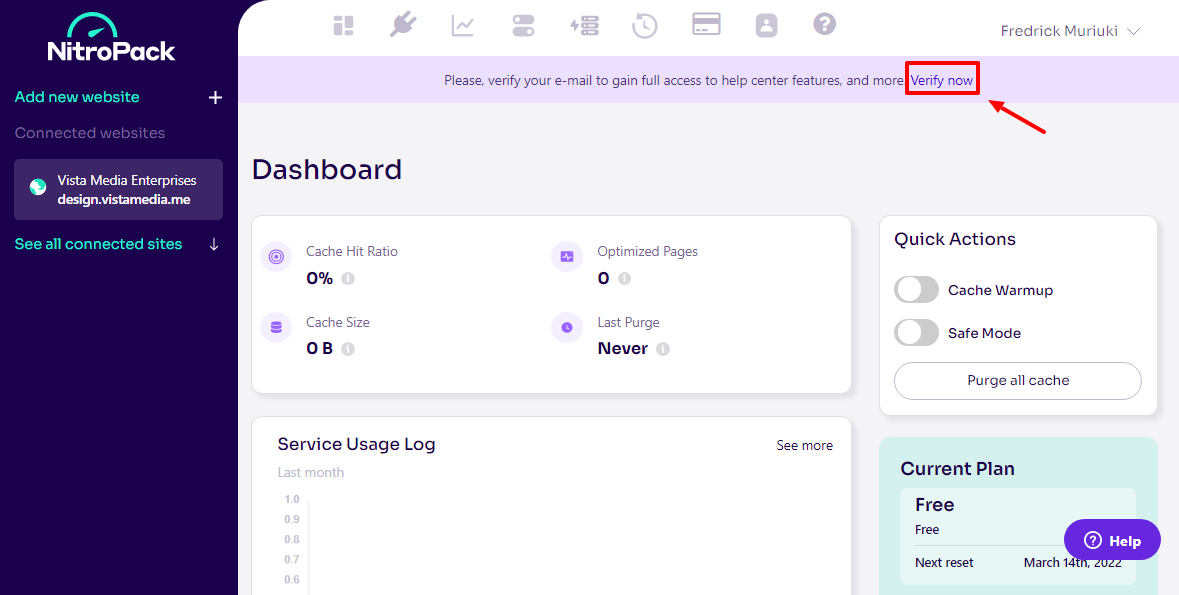
You will receive an email with a link in your mailbox. Click the link to verify your account. Now that you have your free NitroPack account ready, let us connect it with your WordPress website. Note that you will mostly work inside the above dashboard.
Connecting NitroPack with Your WordPress Site
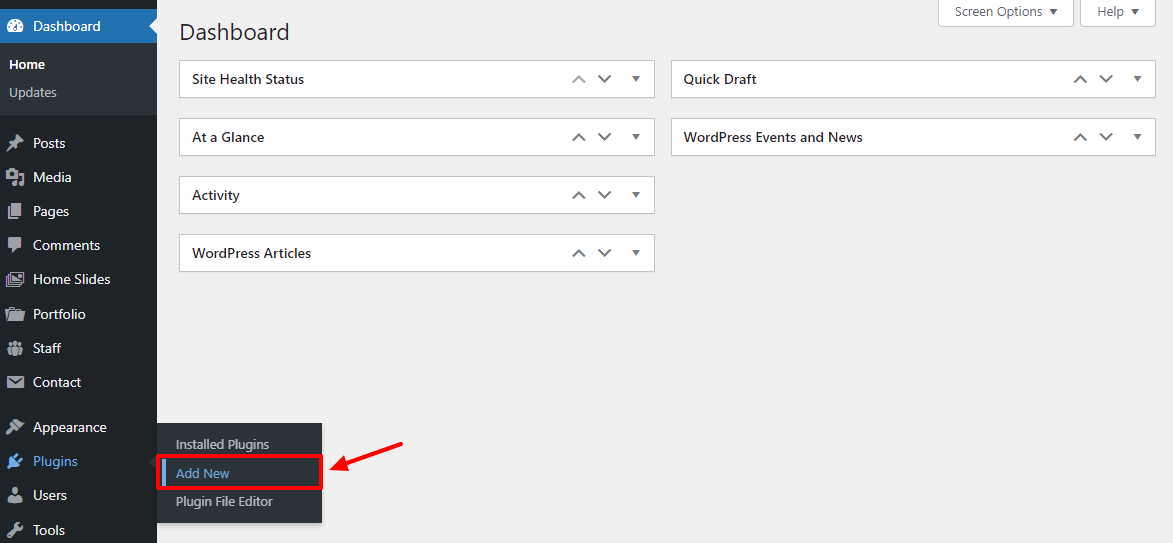
Now, let us connect your NitroPack account to your WordPress site. Log in to your WordPress admin dashboard, and navigate to Plugins > Add New, as shown below.
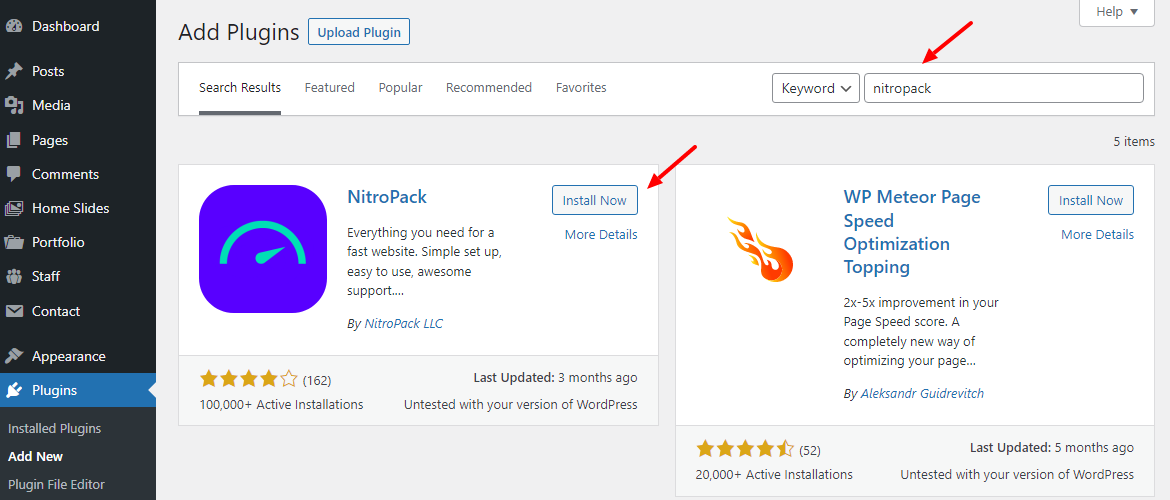
Next, enter “NitroPack” in the keyword search box and click the Install Now button, as shown below.
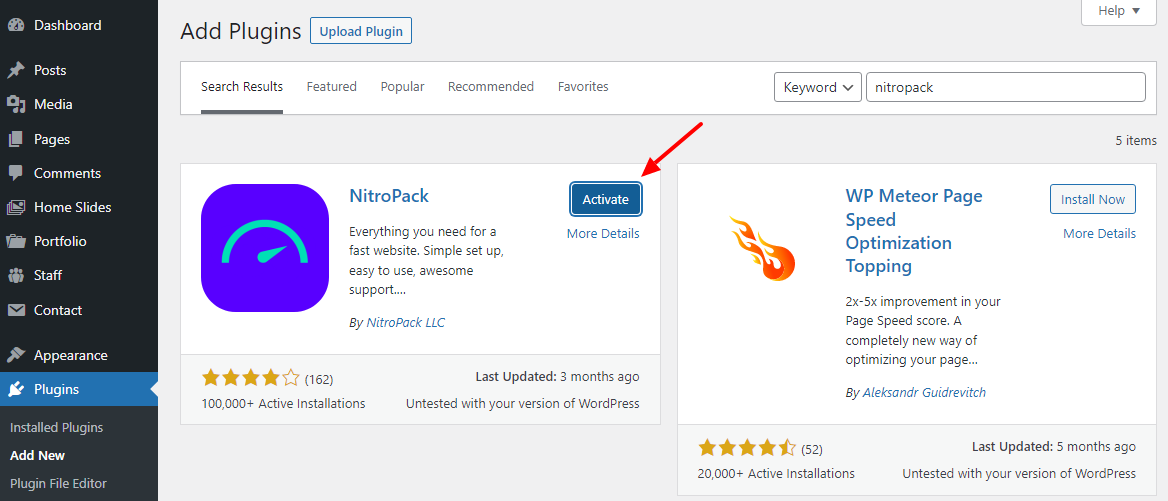
Next, activate the plugin:
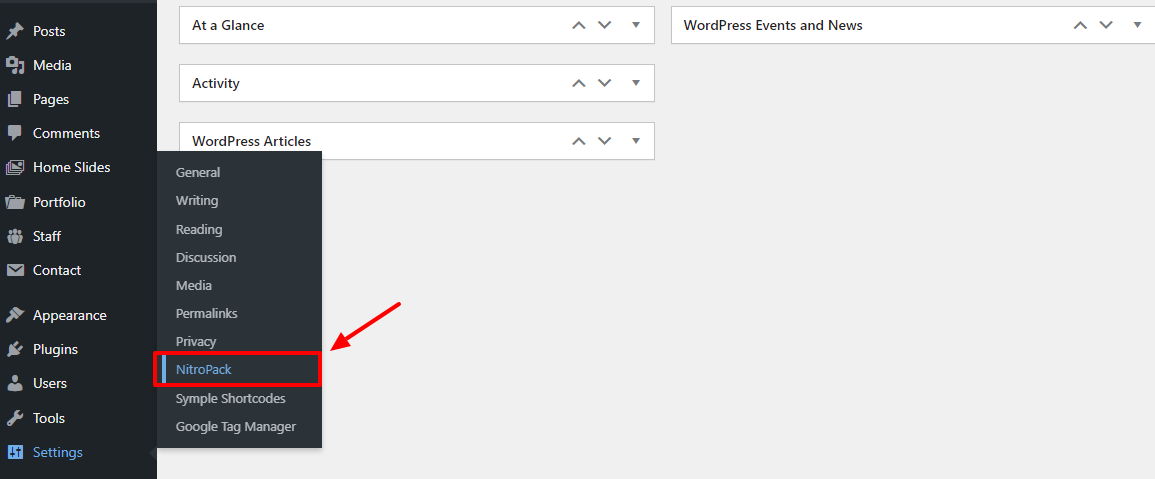
After that, navigate to Settings > NitroPack:
On the next page, click Connect to NitroPack:
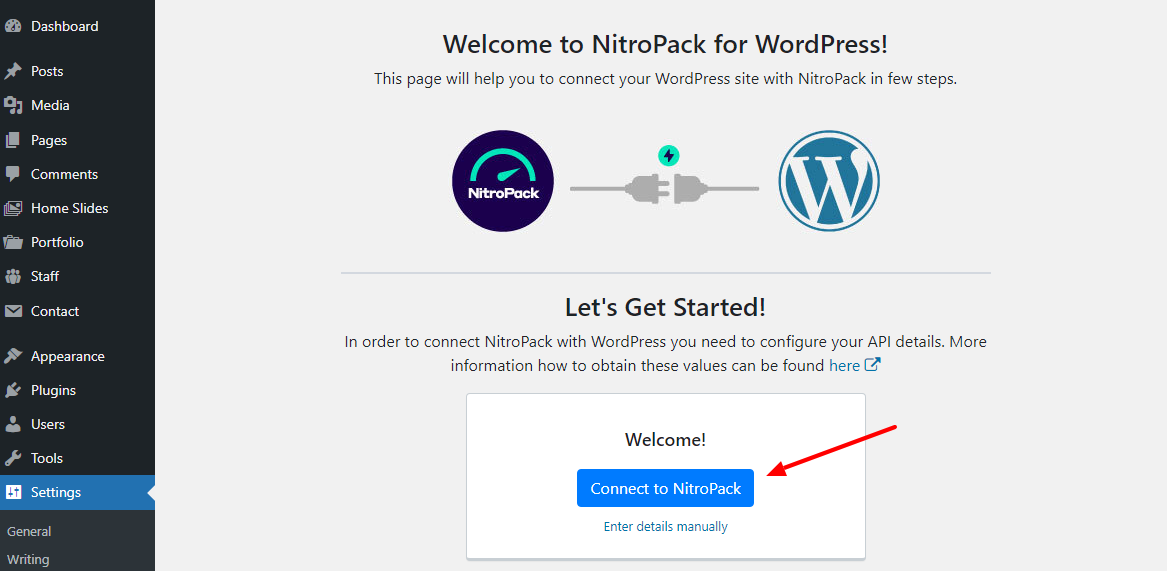
And that’s it! Your WordPress website is now connected to NitroPack.
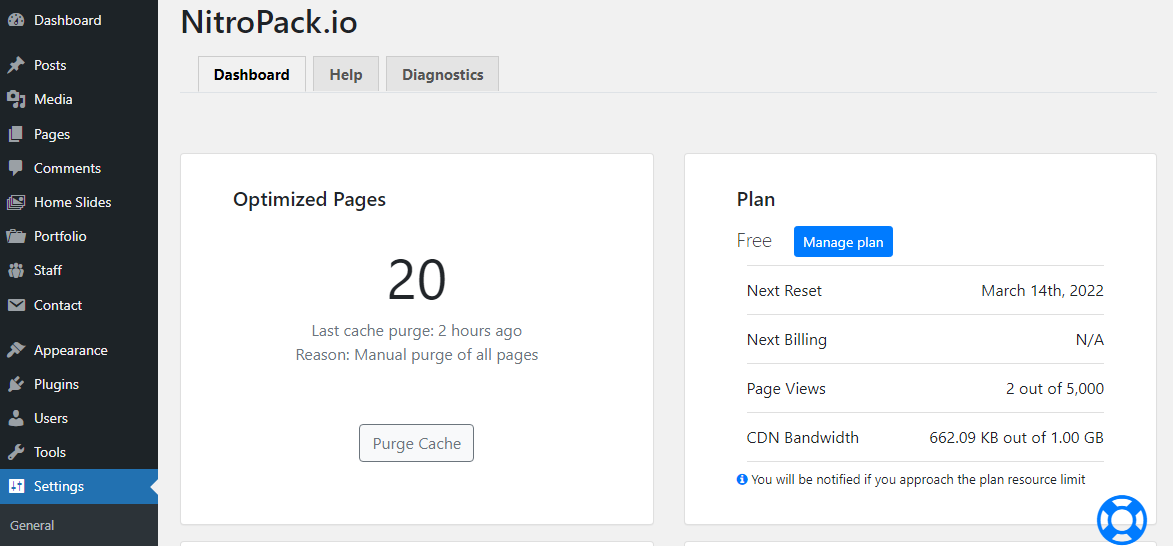
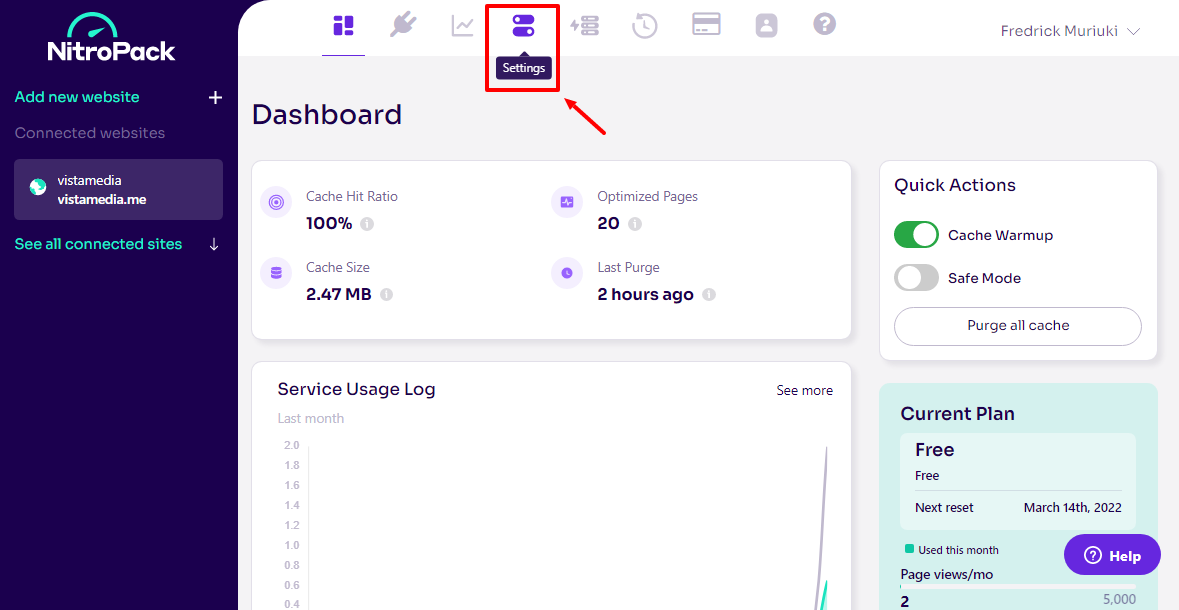
NitroPack is already accelerating your pages automatically using the default settings. You don’t have to do anything else unless you’d prefer to customize some of the settings. To do that, login back to your official NitroPack account, and navigate to settings, as shown below.
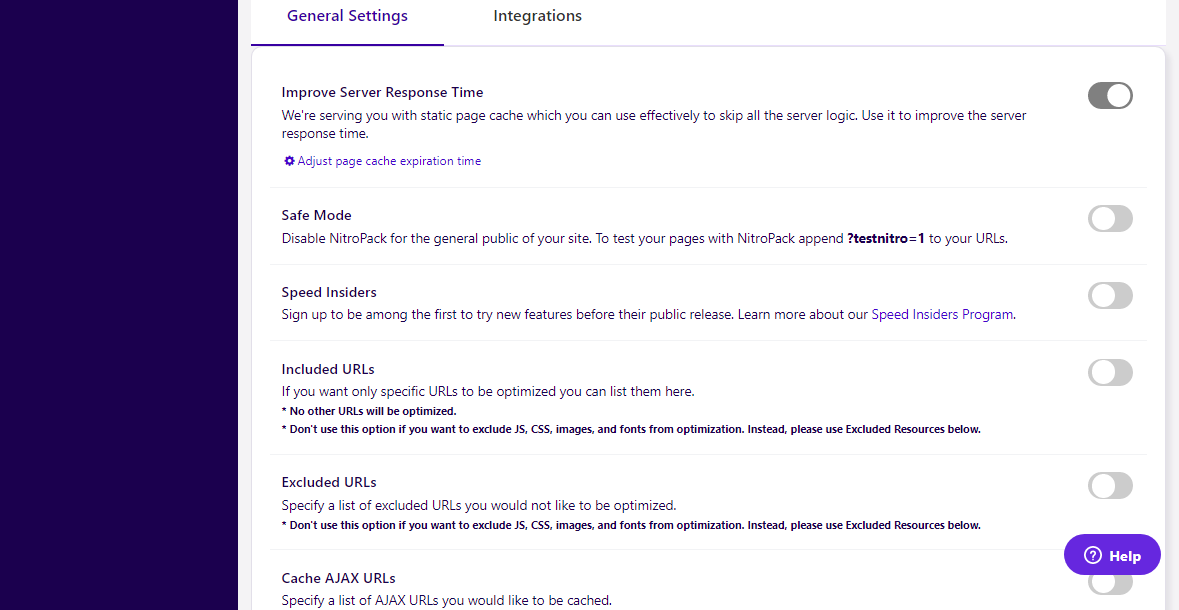
For casual users, the default configuration works just fine, you don’t have to do anything after connecting your site to NitroPack. For advanced users, there are a couple of self-explanatory settings. Don’t worry, it’s all a matter of point-and-click:
And there you have it. NitroPack is working hard in the background.
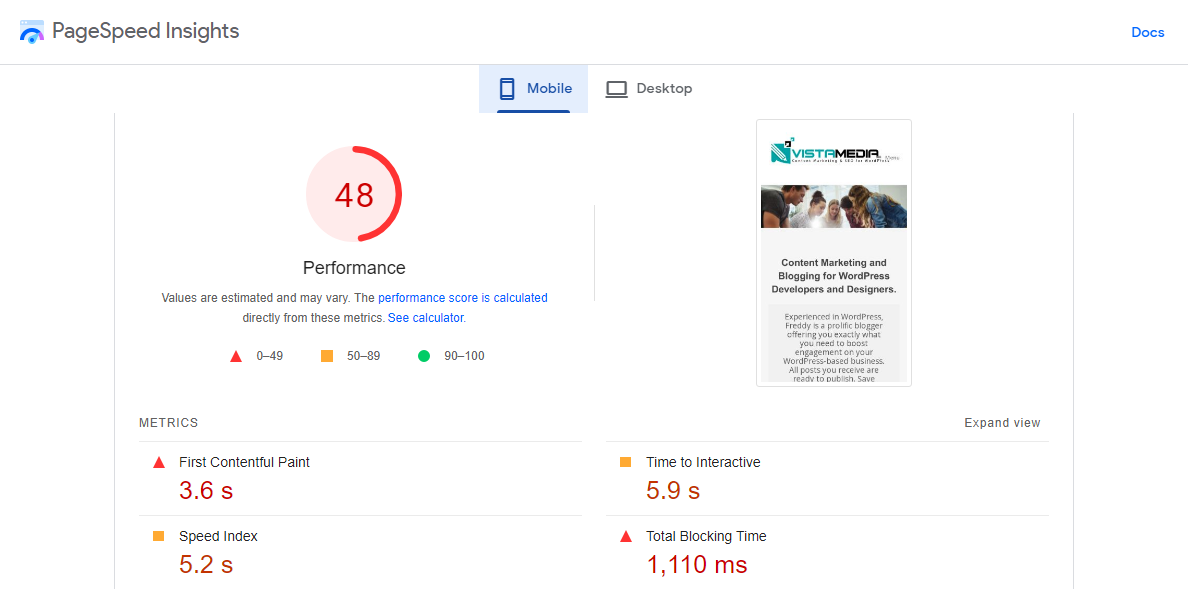
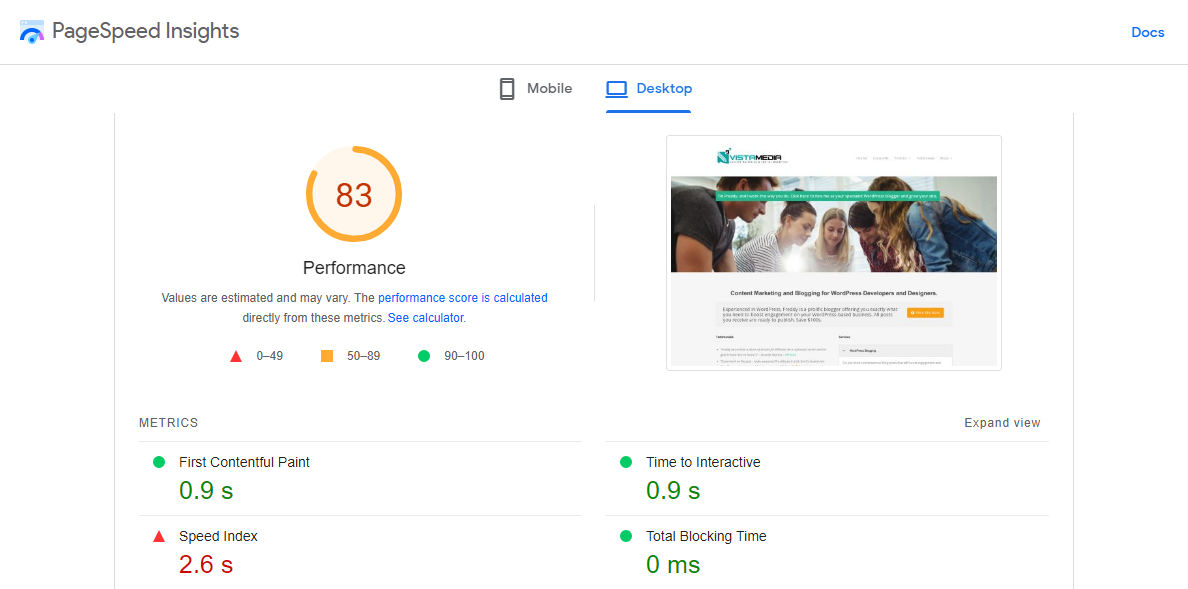
To check if the service was working, I performed some tests. Here are my results before connecting NitroPack:
GTMetrix:
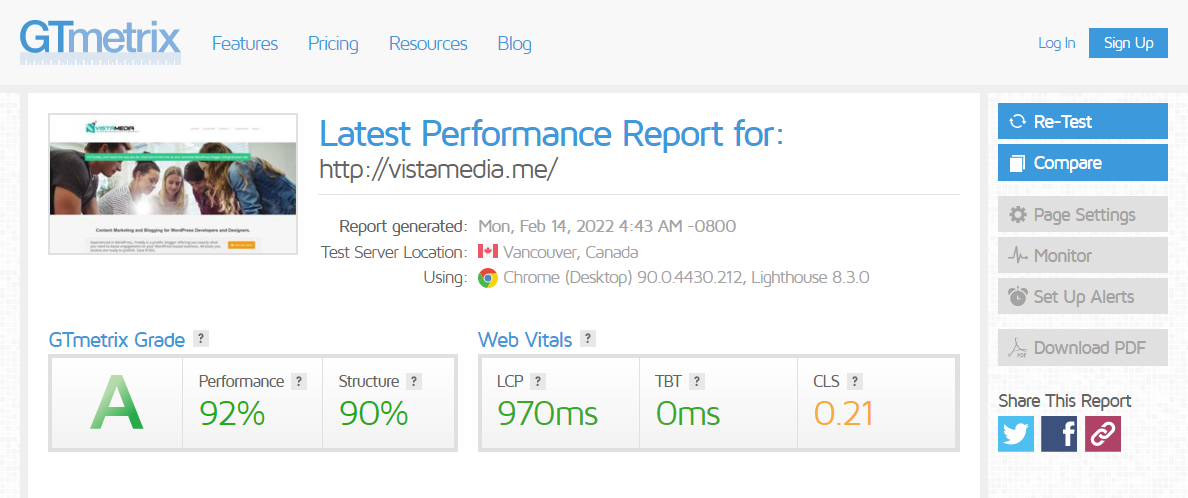
Google PageSpeed Insights Mobile:
Google PageSpeed Insights Desktop:
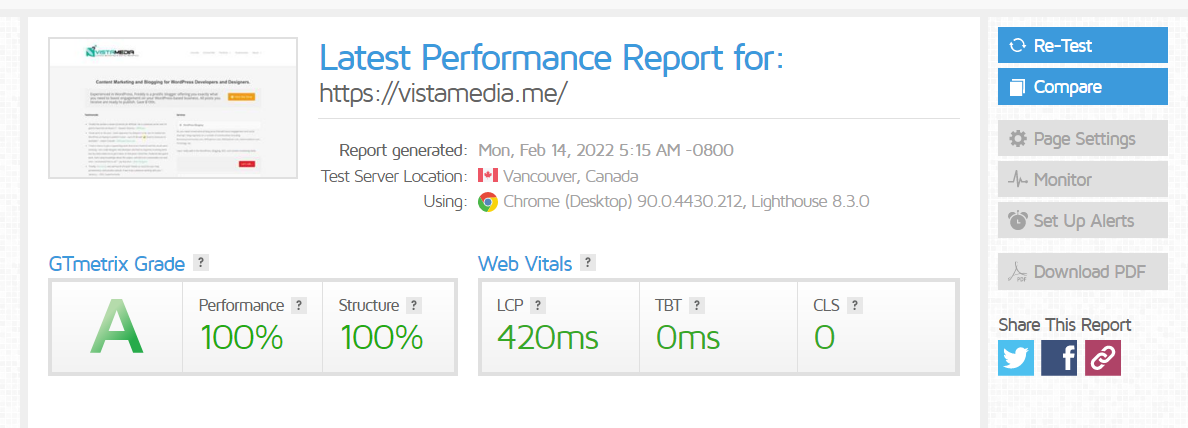
And, here are the results after connecting NitroPack…
GTMetrix:
Google PageSpeed Insights Mobile:
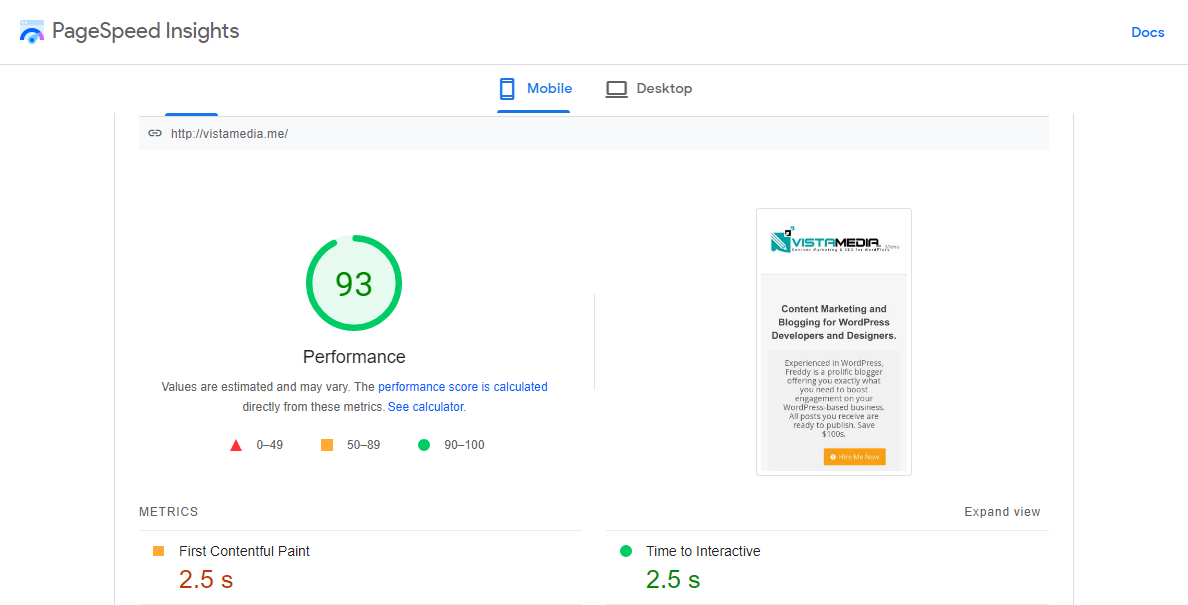
Google PageSpeed Insights Desktop:
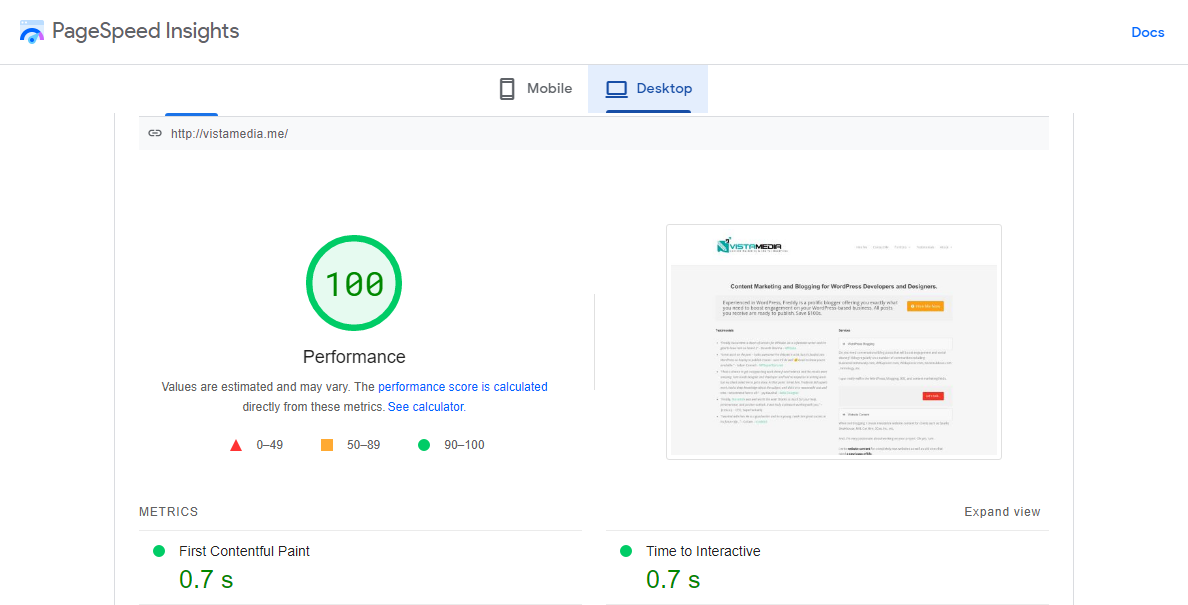
Quite the improvement you must agree, and I was using the default settings. I didn’t touch anything after connecting NitroPack to my site. And to think I set up the whole thing in less than 10 minutes. It’s simply extraordinary – we must laud these guys for a job well done.
If you run a website, having fast-loading pages is critical to your success nowadays. It’s great for user experience and conversion rates. A slow website will send your prospects away and tarnish your SEO profile with the likes of Google. Do yourself a favor, and invest in a solution such as NitroPack.
What are your thoughts about NitroPack and the article in general? Please let us know your thoughts in the comments below.


