CrowdFund Your Projects With WordPress

Crowdfunding has exploded in recent years, with the success of sites like Kickstarter and Indiegogo. If you’ve ever used a crowdfunding site (either as a creator or backer), you’ll know how useful they can be for getting funding. However, you are ultimately competing for attention with thousands of other live projects.
Instead of jockeying for position among everyone else, why not create a WordPress site for your project and allow your audience to fund it directly? It’s not as difficult as you would expect. All you need is a self-hosted WordPress installation and a free plugin.
In this post, we’ll discuss the benefits of using your WordPress site to crowdfund your projects or services. Then we’ll talk about how to use a free plugin to turn your site into fundraising platform. Let’s get started!
What Crowdfunding Is (And How It Benefits You)

Crowdfunding enables you to raise the money you need to create a product or service, by accepting donations from backers. It’s a fairly simple process where you first pitch your project, and individuals or businesses (backers or investors) can provide the money you need to launch it.
There are many benefits of using this method, including:
- You get upfront funds to help you develop your product or services.
- It’s more efficient than traditional funding.
- You’ll be able to generate social proof and traction for your product or service.
- It enables brainstorming from backers and donors, to help you refine your original project idea.
- You’ll often receive better media exposure and marketing for your project.
There are many types of projects that can benefit from crowdfunding. Obviously, physical products are perfect for this process. However, you can crowdfund anything, from digital products like games or mobile apps to film and television projects.
Introducing the WP Donation WordPress Plugin

WP Crowdfunding is a WooCommerce based plugin that enables you to create a crowdfunding site using WordPress. The plugin is available for free, and also includes a paid version that unlocks more of its features.
The major benefit of this plugin is that it separates you from the thousands of others competing on the major crowdfunding sites. This means you control every facet of the process, and don’t have to deal with potential contenders on the same platform.
Key features:
- Dedicated user registration
- The ability to declare a funding goal and define recommended prices
- Options to display backers on a single page, or list them anonymously
- A native wallet system to calculate, record and distribute funds (premium)
- Alternative systems of payment, such as PayPal Adaptive and Stripe Connect (premium)
Price: The plugin is free, and you can download it from the WordPress plugin directory. For more features, there is a premium version available for $149.
How to Use the WP Crowdfunding Plugin (In 3 Steps)
Before you make any changes, we recommend that you back up your WordPress site. Then, follow the steps below to get started!
Step 1: Download and Install WP Crowdfunding
First, it’s worth noting that these instructions are for the free version of the plugin, although the process of using the premium version is similar.
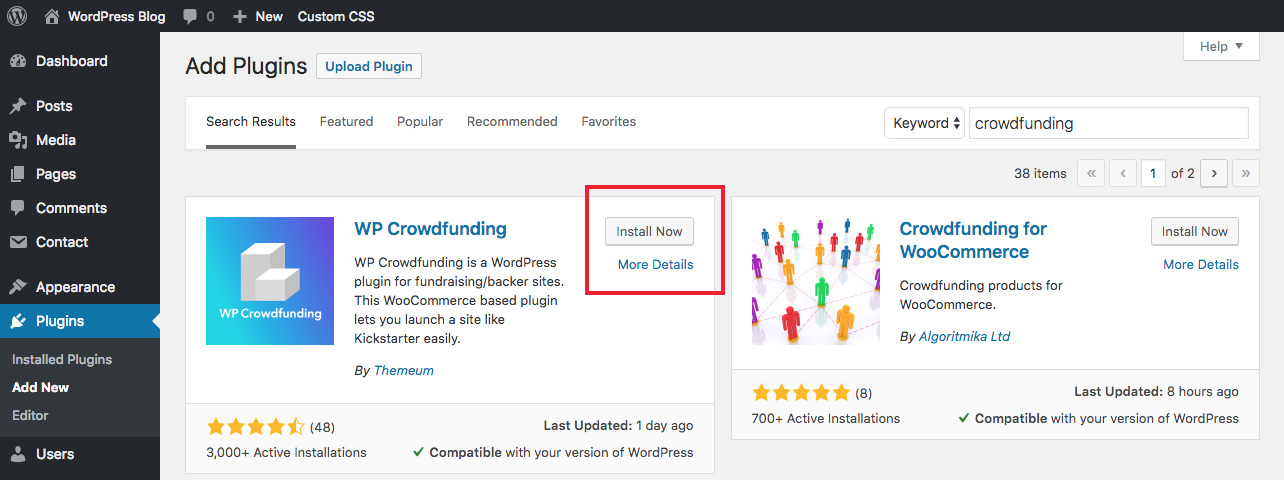
In your WordPress dashboard, choose Plugins > Add New. Search for “crowdfunding” and WP Crowdfunding should be the first result. Once you’ve found it click on Install Now. When the plugin is installed, select Activate.

After you’ve activated the plugin, you will see a notification in your dashboard to install WooCommerce if you haven’t already done so. This is necessary for WP Crowdfunding to work properly since it is a WooCommerce extension, so install and activate WooCommerce if you haven’t done so already.
Step 2: WooCommerce & WP Crowdfunding Plugin Settings
Once you’ve activated both plugins, you will see two new menu items in your dashboard: one for WooCommerce and another for Crowdfunding. We highly recommend setting up WooCommerce first, as this is where you will define your currency, location, shipping settings and most importantly payment settings. For more information on these steps please refer to our WooCommerce setup guide.
But once WooCommerce is ready, you can move on to setting ip WP Crowdfunding.
General Settings
Funds Manager enables you to choose your e-commerce handler. Since this plugin is built on the WooCommerce platform, you will need to set that as your default platform. Here’s a breakdown of some other General settings you’ll want to check out:
- Default Campaign Status: Set the default draft or published state for new projects.
- Minimum Price: Sets a minimum donation amount.
- Maximum Price: Sets a maximum donation amount.
- Recommended Price: Sets a recommended donation amount.
- Campaign End Method: Choose what triggers the end of your campaign (goal, date, both, never).
When installed, this plugin automatically generates a dashboard and a project submission page. If you want to use customized pages instead, you will need to specify them using the following two drop-down menus in this section:
- Select Dashboard Page: Choose a page to hold your dashboard front end.
- Select WooCommerce Form Page: Choose your custom submission form page.
It’s also important for your to edit the the Campaign Creator settings if you have multiple users with access to the backend of your website. Simply select the user roles you want to give access to create and edit your crowdfunding campaigns.
WooCommerce Settings
Next, let’s look at the WooCommerce Settings tab:

Here you will need to configure options specific to your WooCommerce setup. First, choose whether or not to display your crowdfunding project on your WooCommerce shop page.
From there, you can make several adjustments by setting your listing and registration pages, customizing your submission form with various text fields, and deciding what your pages will look like and include. If in doubt, choose the settings you think you want, then check out the front end of your site to see how they appear.
Style Settings
The last tab available is for basic styling options. Use the built-in options for color scheme (which is a highlight color) and button styling to further customize your crowdfunding pages and forms.
Social Share Settings
The WP Crowdfunding plugin also offers options to enable social sharing via Twitter, Facebook, Google+, Pinterest and linked in. Simply check the boxes for the social platforms you’d like to utilize.
After you’ve made these tweaks, you should be ready to actually create your campaign (Note – there are added options for Emails, reCAPTCHA and Wallet as well as access to campaign performance reports available only with the premium version of the plugin).
Step 3: Create a WP Crowdfunding Campaign
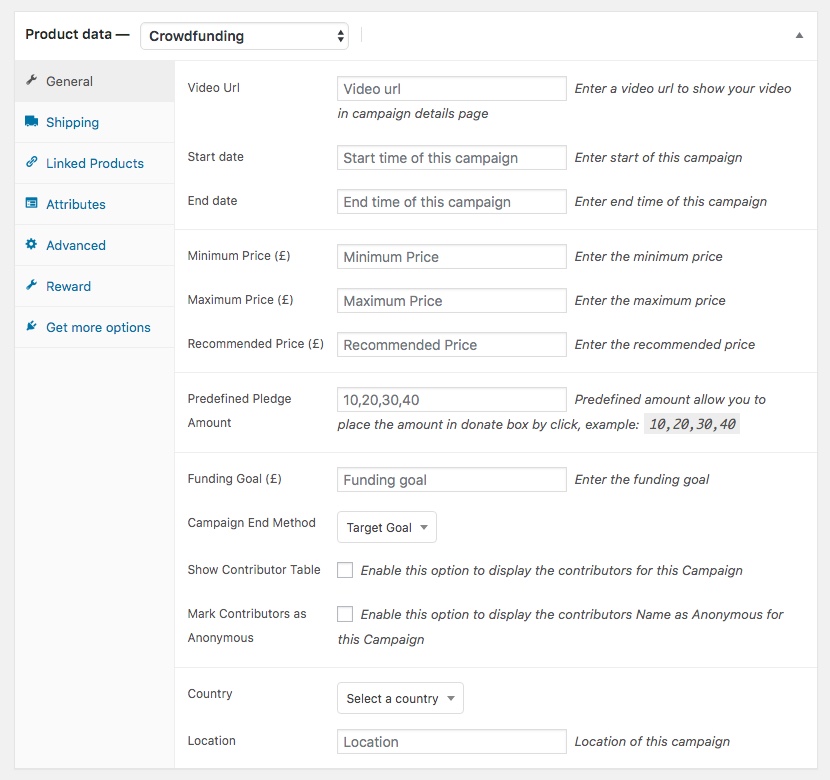
To get started, add campaigns yourself is directly via WooCommerce. Just select the “Crowdfunding” product data type and add your info.
Step 4: WP Crowdfunding Shortcodes
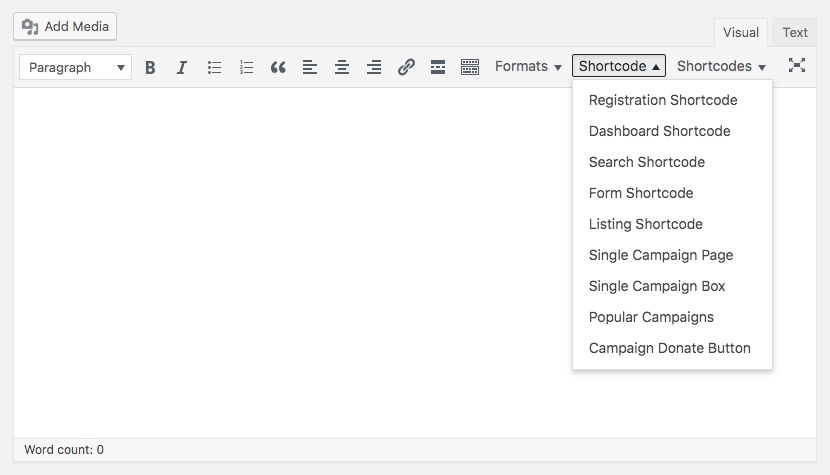
You will need to add a new page to your WordPress site. From the Shortcode drop-down menu, select the type of form you’d like to create:
Then, on the front end you can start configuring the campaign itself:
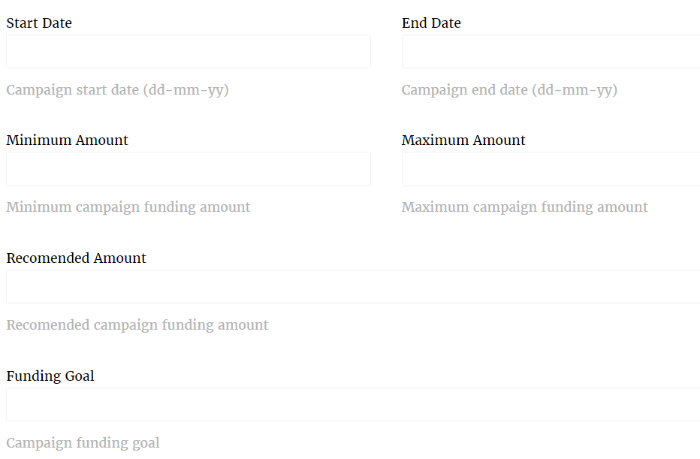
In addition to general information about the project, you can include pledge amounts and rewards here. Once everything is in order, click on Submit Campaign.
Before we wrap up, it’s worth mentioning that WP Crowdfunding does not require a specialized theme. So if you already have WordPress site, you won’t have to worry about changing its appearance. However, the premium version does include a free theme developed specifically for the plugin, which is worth checking out.
Creating a crowdfunding website enables you to build campaigns as small or large as you desire, and have complete control over every aspect. With the help of WP Crowdfunding, you can have your own fundraising website that encourages your community to fund and promote your project.
Do you have questions about using WP Crowdfunding to create your project website? Let us know in the comments section below!
Note: This is an updated post that previously covered the Crowdfunding plugin by Astoundify, which no longer exists.


Thanks. Are there other plugins/themes for fundraising? I’d love to know more about the alternatives…
Most of the themes I am aware of use the crowd-funding plugin we mention on this page. It basically will allow you to create a crowd-funding site with any theme 😉
any ready to use FREE themes, with crowdfunding plugin?
I haven’t really seen any good ones yet. Hopefully they will start “popping” out soon, the crowd-funding plugin is still fairly new.
do you need multisite to get them to create different campaigns like kickstarter?
No you shouldn’t.
Amazing templates. I would like to buy one!
You should check them out Chris!
I know this post is a bit outdated but, at first, describes the thing that im looking for. Is there any theme or plugin available that lets you do what fundify does but, after a campaign is fully funded lets you sell over that page the thing that was funded? like an ecommerce for funded projects. Thanks in advance. I hope to get an answer
I searched high and low, and all I could find are themes or e-commerce solutions that want you to paste in a link to your KickStarter or GoFundMe page 🙁 What you could do though, is insert the WooCommerce shortcode for the product you funded below your completed campaign (maybe in the product description area?) – here’s an example of the shortcode:
[product id=”99″]
[product sku=”FOO”]
Yes, you can do this via IgnitionDeck and IgnitionDeck Commerce (ID+M package), while still using Fundify. You just transition from crowdfunding to pre-orders or e-commerce.
You could also use IgnitionDeck Crowdfunding with WooCommerce or EDD.
Awesome! 🙂
Thanks both, Nathan i´ll surely will check over ignitiondeck.com/commerce , do you know anyone who has already done something similar with it? Thanks!!