How to Automatically Share WordPress Posts

I think you will agree when I say: driving traffic to your WordPress website is a tough nut to crack, especially as a beginner.
Where do you start? What traffic generation methods are good for newbies? And, do you really need to spend a load of money to drive traffic to your site?
Things become tricky because you don’t understand the nuances of SEO, link building, paid ads, and other advanced methods of generating traffic for your shiny new site.
Not to worry, however, because – in today’s post – you will learn how to drive free traffic from social networking sites simply by sharing your WordPress posts.
A couple of years ago, social media marketing was just a fad. Today, it’s one of the best ways of driving lots of traffic to your site.
Social Share Stats to Drive the Point Home
- Facebook has 2.89 billion monthly active users as of the second quarter of 2021, making it the most popular social media network. “Monthly active users” means the number of people who have used Facebook in the last 30 days.
- Twitter had over 330 million monthly active users as of the first quarter of 2019.
I could add other social networks but you probably get the point already. No matter how you look at it, social networking sites offer you a lot of exposure. If you play your cards right, you can have a piece of the action and drive a lot of traffic to your site. Freely.
Today, I show you how to automatically share every WordPress post you publish to social media.
Why might you want to?
- Sharing your posts manually is time-consuming, terribly tiring, and boring.
- Additionally, you might forget to share your awesome posts (the posts that have the potential to send lots of your traffic your way), especially if you have other business tasks to handle.
- It’s incredibly easy to implement you don’t need a developer to hold your hand.
With that preamble, let us discover how to share WordPress posts to social media sites automatically. Before that, why bother sharing your posts to social networking sites, to begin with?
Why Share WordPress Posts to Social Media Sites Automatically?
Is it not rather obvious? Why would you or anyone leave social media out of their marketing strategy? You spend a lot of time on social media, and so does your target audience.
Social networking sites offer you the golden chance to meet your target audience where they hang out. When you’re starting, nobody knows you or your beautiful website.
Sharing your WordPress posts on social media sites puts your brand and content in front of the people who are looking for what you’re offering.
Here is how you benefit by sharing your beautiful content on social media.
More Traffic
From the stats above, it’s apparent social media websites are some of the most visited platforms worldwide. That means you can drive a lot of traffic to your website from social media. If you write an amazing post that’s useful to people, they will click on your link and land on your site. You want more people to find your content, right? If so, you need to share.
On top of that, imagine what would happen if your post were to go viral? Virality can catapult your brand to new heights in an instance. One day you’re a little-known noob, and the next, you’re an online sensation.
Brand Awareness & Exposure
If you want to get your brand – hence business – off the ground, sharing on social media sites is a no-brainer. As more of your “people” find your content, they will become acquainted with your brand, which is exactly what you’re angling for, if I’m not wrong.
Build a Community Around Your Brand
Some people will not come to your website or convert to customers the first time they see your posts. But if they are interested, they will like your page or follow you. At the end of the day, you will build a community around your brand, which is always a great thing.
Increase Leads & Eventually Sales
It’s no secret that most of the people who land on your site will leave without doing anything. The good thing is you can use tried-and-tried methods to convert mere visitors into loyal and ready-to-pay customers. There are many tricks in the book to convert visitors into qualified leads that are ready to put money in your pocket. And guess what? These people hang out on social media sites but you won’t reach them if you don’t share your content.
Better Search Engine Rankings
Sharing to social media sites will boost your search engine rankings. How? You ask. For starters, by sharing, you’re essentially creating links to your site from social media sites. Usually, social media sites have high domain authority, plus the link profile will help search engines to discover more of your content.
Secondly, search engines take social signals (likes, comments, shares, retweets, etc.) into consideration when ranking your website. The more social signals you garner, the better your search rankings. The better your search rankings, the more traffic you’ll pull to your site. Wink. Wink.
The above are a few benefits of sharing your content on social networking sites. With that out of the way, let us now discover how to automatically share your WordPress sites to the numerous social networking sites out there.
How Can You Automatically Share WordPress Posts to Social Networks?
You can automatically share posts to social media sites using WordPress plugins! Below, we cover two of your best options: Jetpack (which allows you to auto-share to five social networks) and NextScripts: Social Network Autoposter (which allows you to auto-share WordPress posts to over 30 social media sites).
1. Jetpack Publicize

Jetpack is a popular plugin that allows you to supercharge your website. It comes with a couple of nifty features, including Jetpack Publicize, which allows you to share posts to three social media sites automatically.
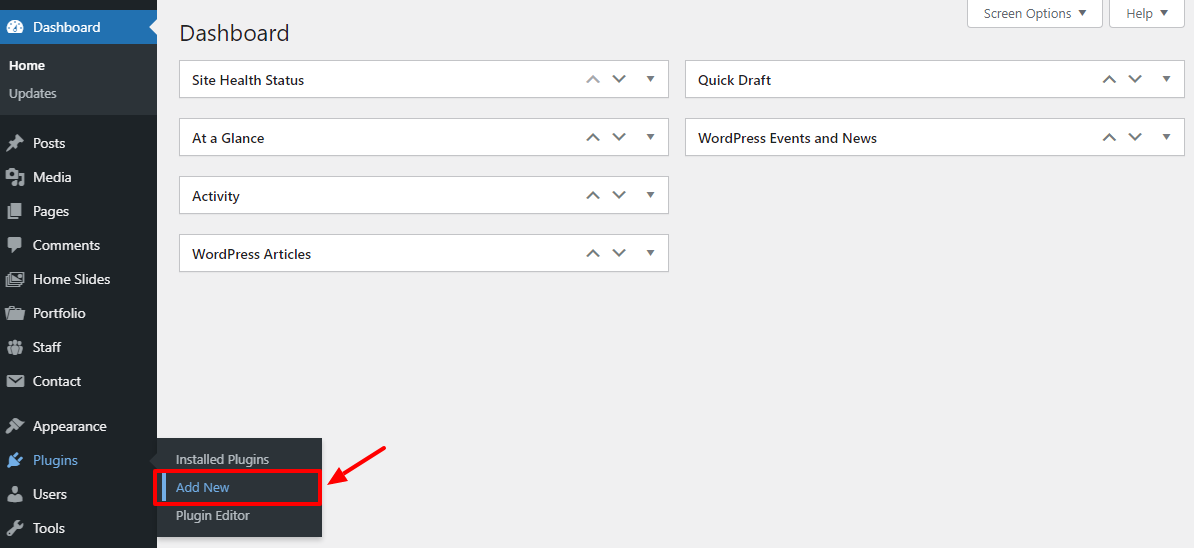
If you don’t already have Jetpack on your site, you can easily install the plugin from the official WordPress repository. Simply click Plugins > Add New, as shown below.
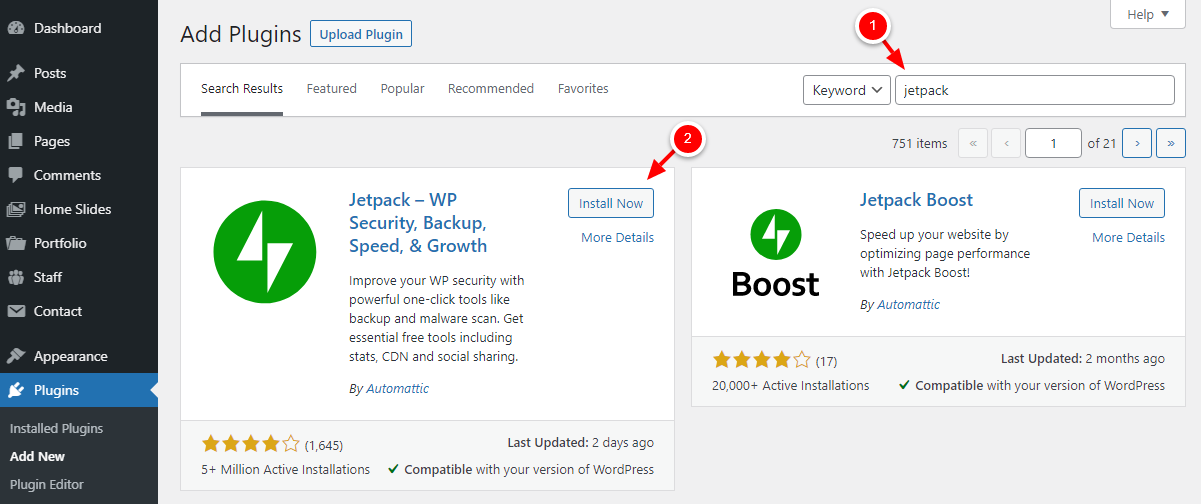
After that, enter “Jetpack” in the keyword search box and click the Install Now button, as we highlight in the screengrab below.
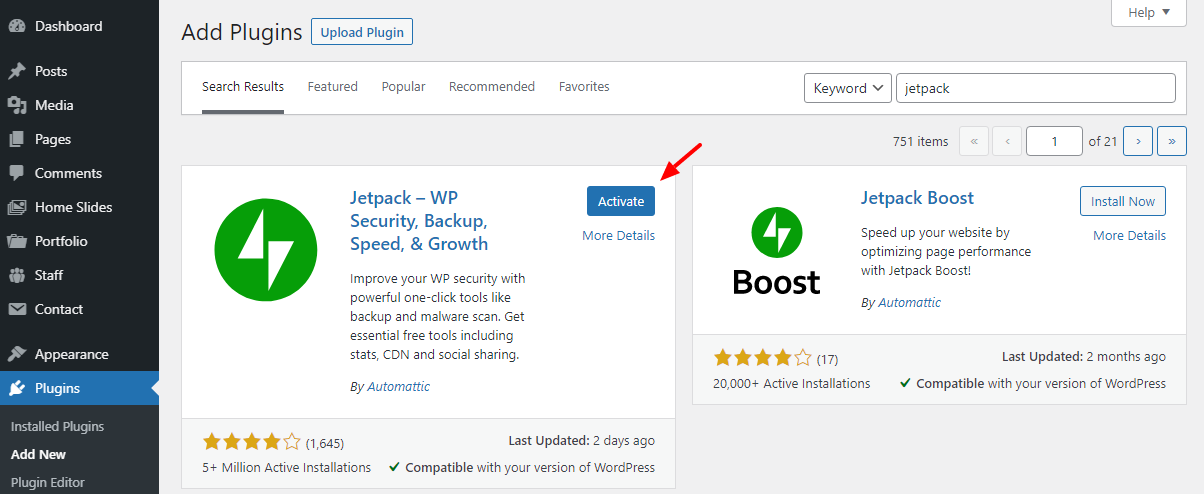
Next, click Activate to get the ball rolling:
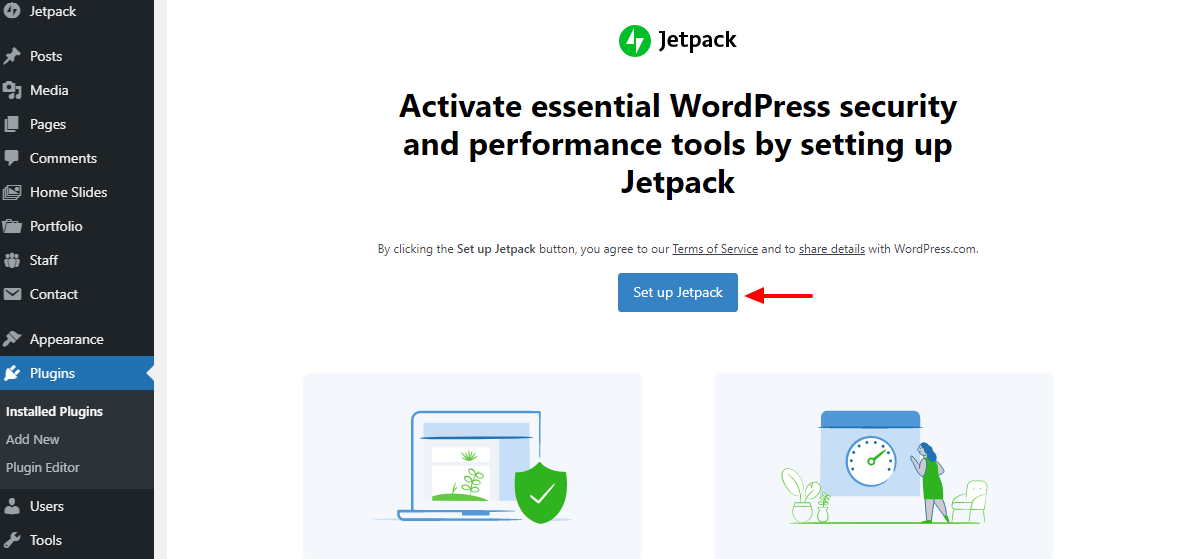
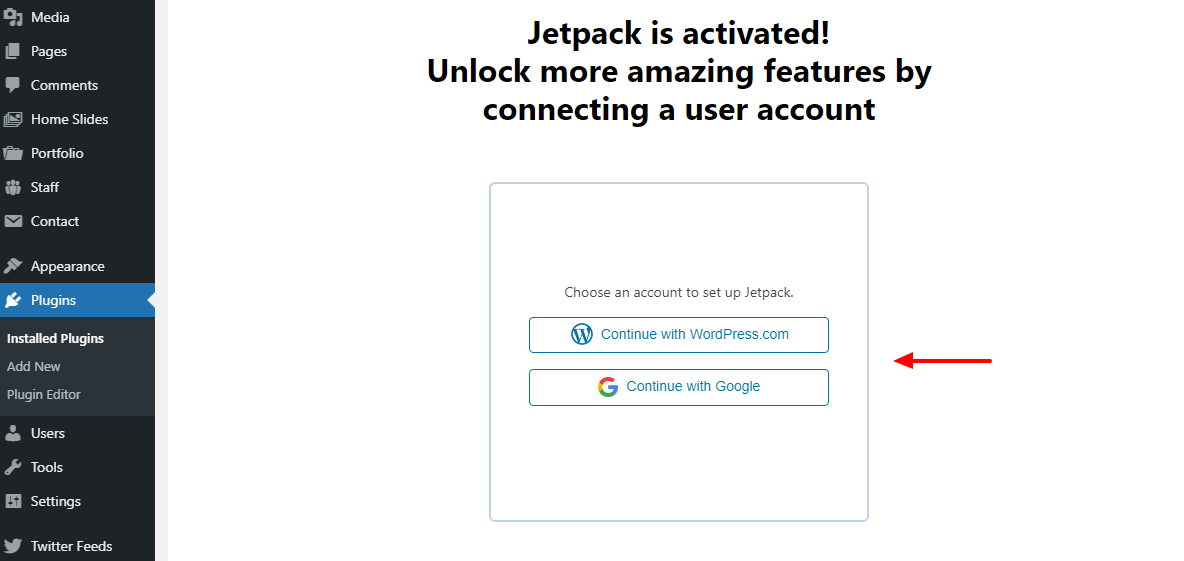
After that, click Set up Jetpack, as shown below.
Next, click either Continue with WordPress.com or Continue with Google depending on the account you’d like to use. I went with WordPress.com.
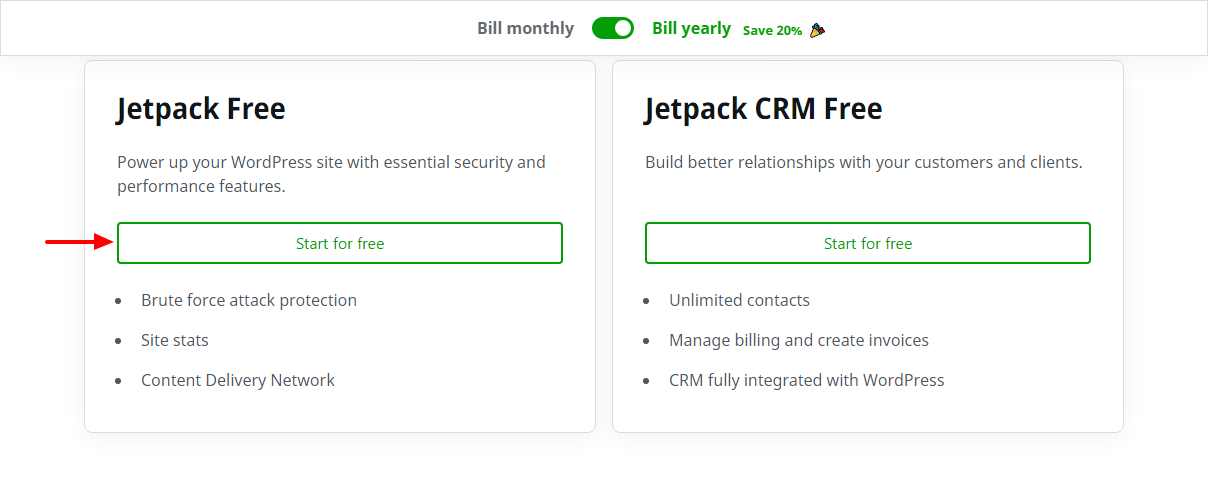
After connecting Jetpack with an account of your choice, you’ll be redirected to the Jetpack pricing page. Scroll to the bottom and click Start for free, as shown below.
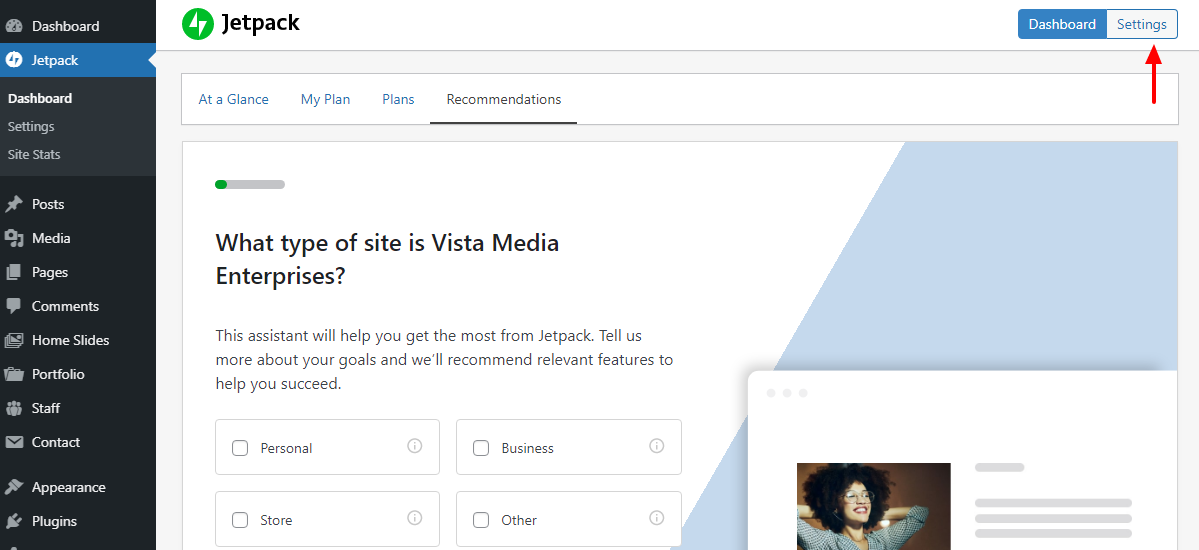
After that, you’ll be redirected to your WordPress admin dashboard. Next, click the Settings button:
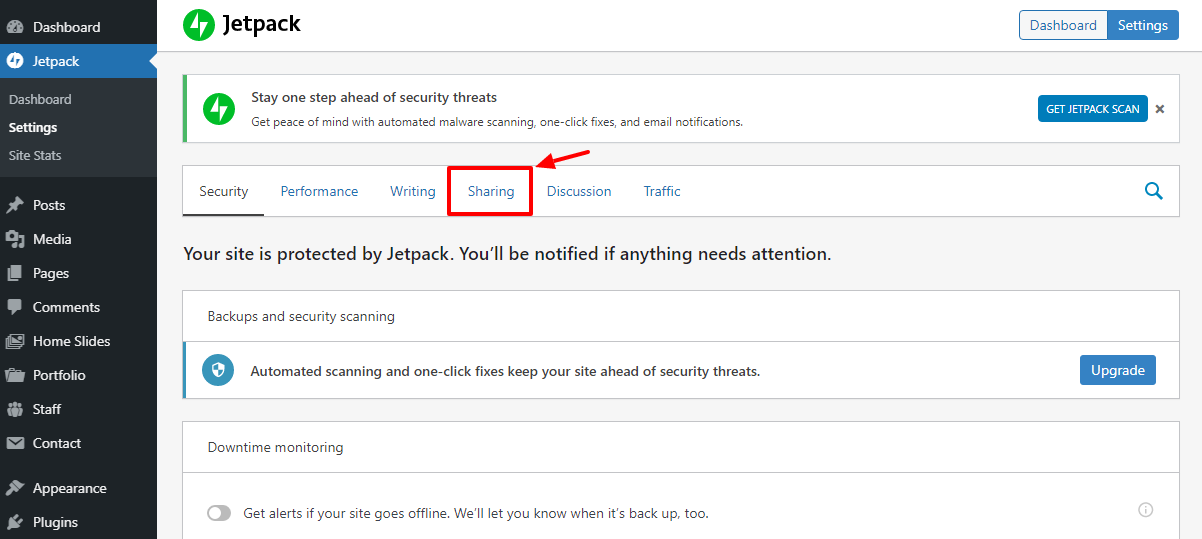
Next, click Sharing:
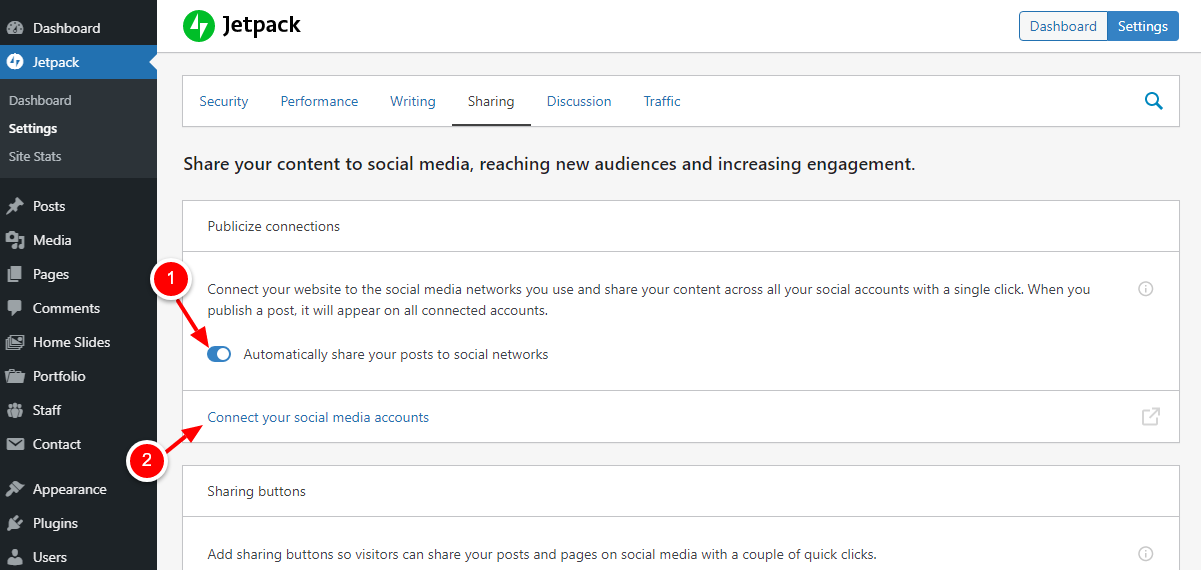
After that, toggle Automatically share your posts to social networks, then click Connect your social media accounts, as we highlight below.
On the page that opens in a new tab, connect your social media accounts, as shown below.
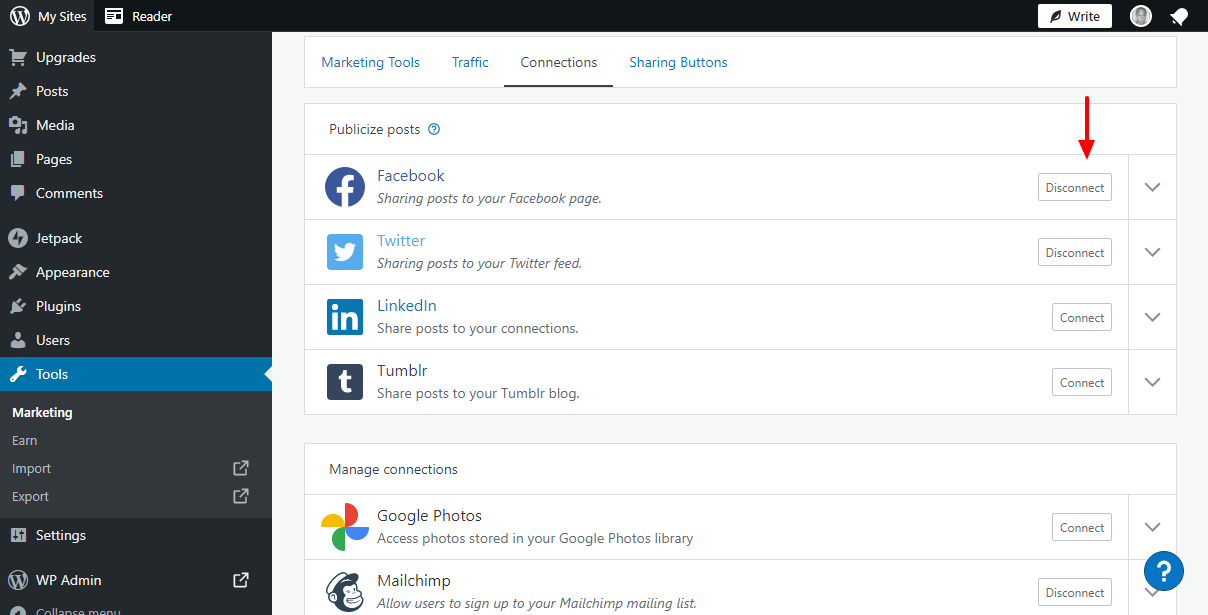
Connecting your social media accounts is a straightforward process I don’t expect you to run into any problems.
Once you’re done connecting your social media accounts, go back to your WordPress admin dashboard and create a new dummy post (You know, just to check out if auto-sharing is working).
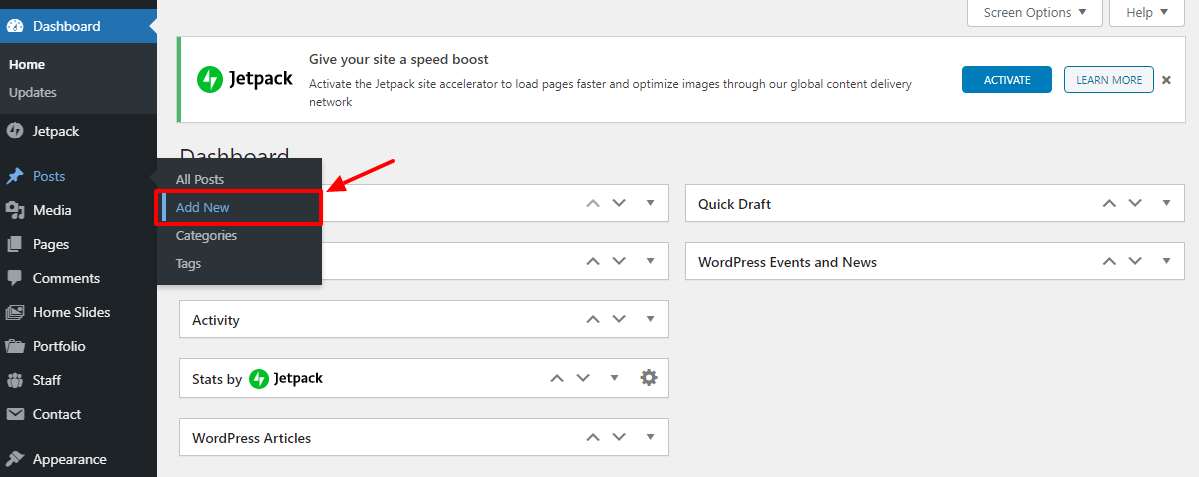
Now, if you check under the Publish tab, you will see your Jetpack Publicize options, as shown below.
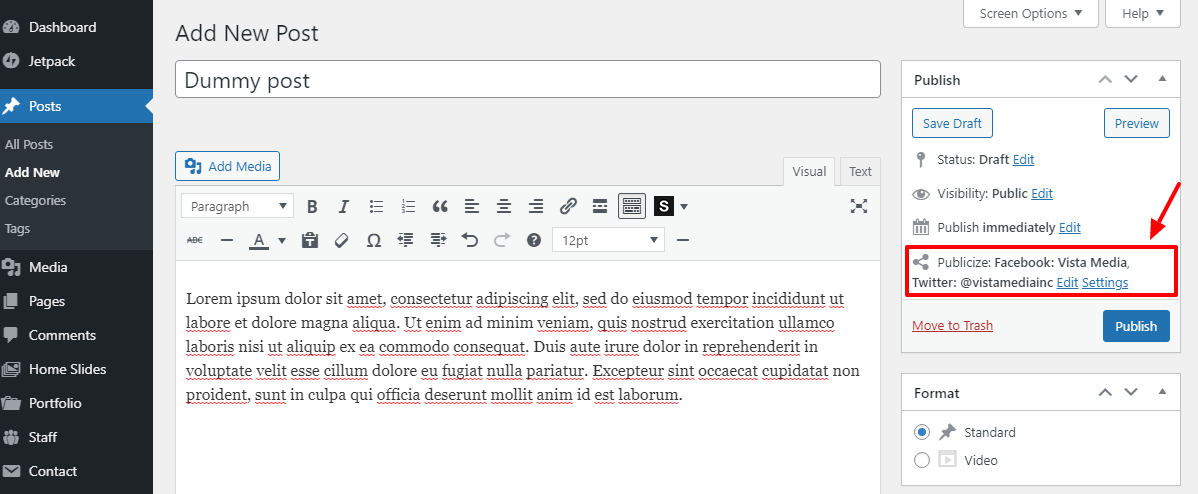
Now, if you publish your post, Jetpack will share it to the connected social media sites automatically. The only downside is you only have five social media sites. If you need to share to more social networks, you need a different plugin, such as NextScripts: Social Networks Autoposter.
2. NextScripts: Social Networks Auto-Poster

NextScripts: Social Networks Auto-Poster is a brilliant WordPress plugin that automatically shares posts from your blog to over 30 social media sites.
Installing and configuring the plugin is as simple as A, B, C. The plugin is available in the official WordPress repository meaning you can install it within your WordPress admin dashboard.
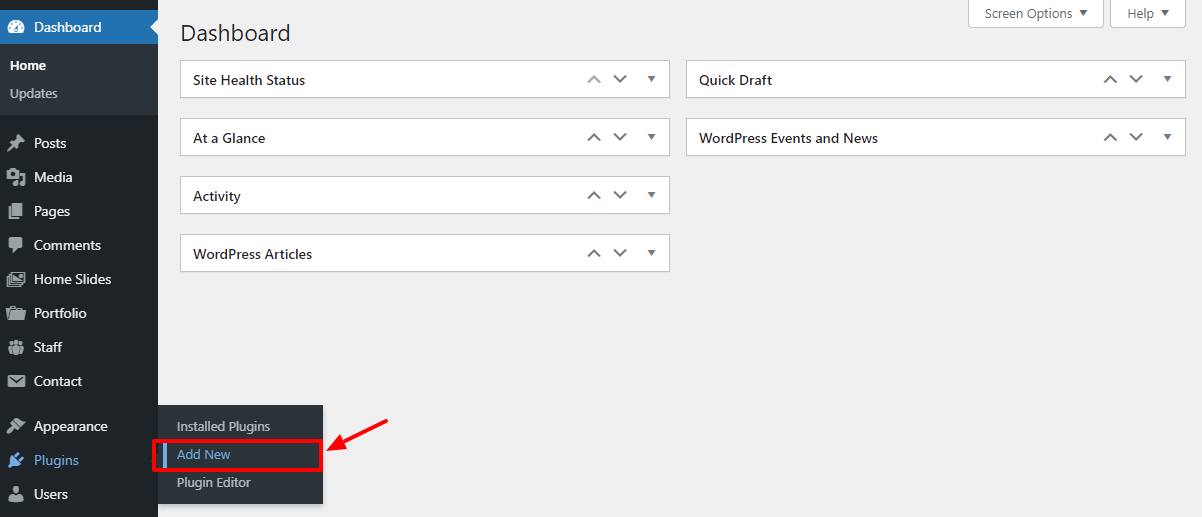
Firstly, login to your WordPress admin dashboard and navigate to Plugins > Add New:
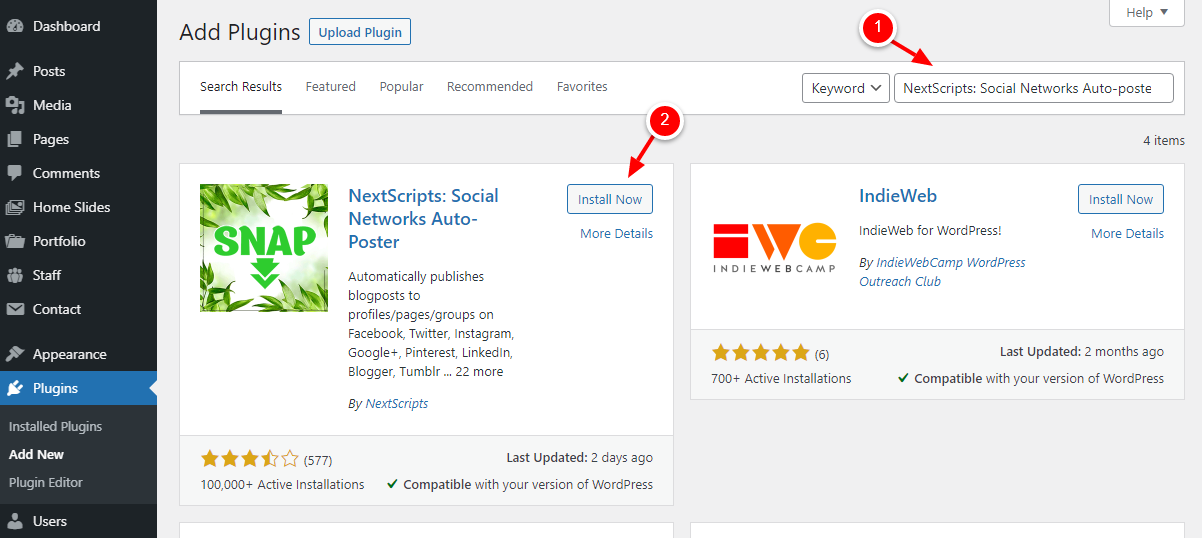
Next, enter “NextScripts: Social Networks Auto-Poster” in the keyword search box and click the Install Now button:
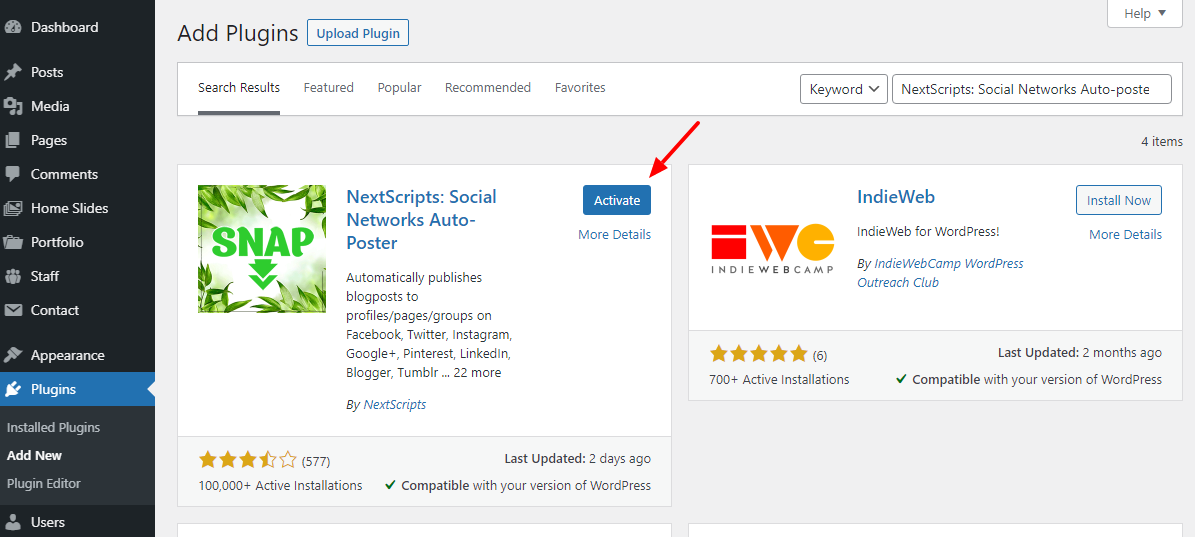
Next, Activate the plugin:
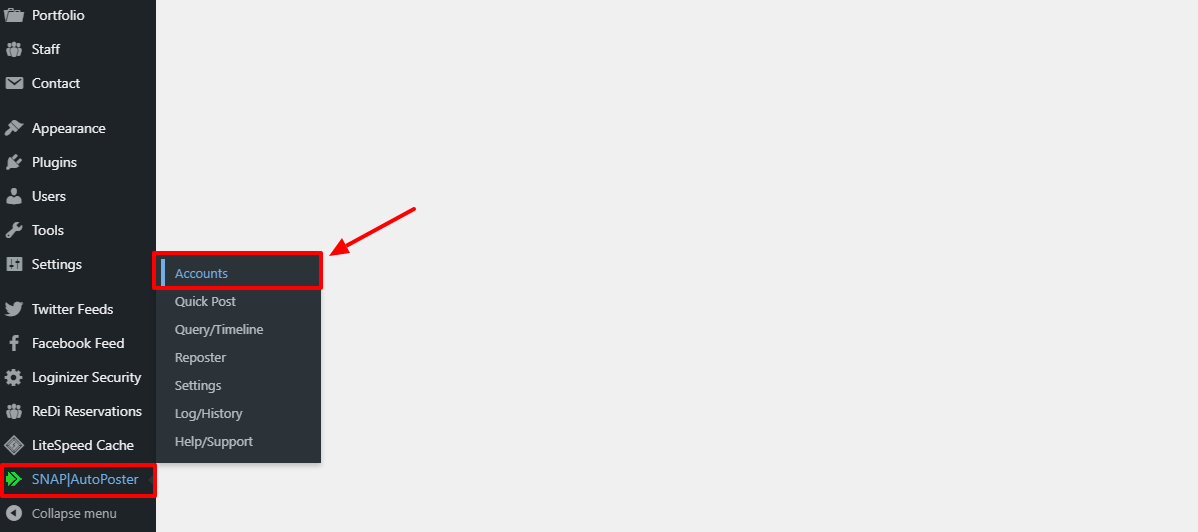
After activating the plugin, navigate to SNAP AutoPoster > Accounts to start adding your social media accounts:
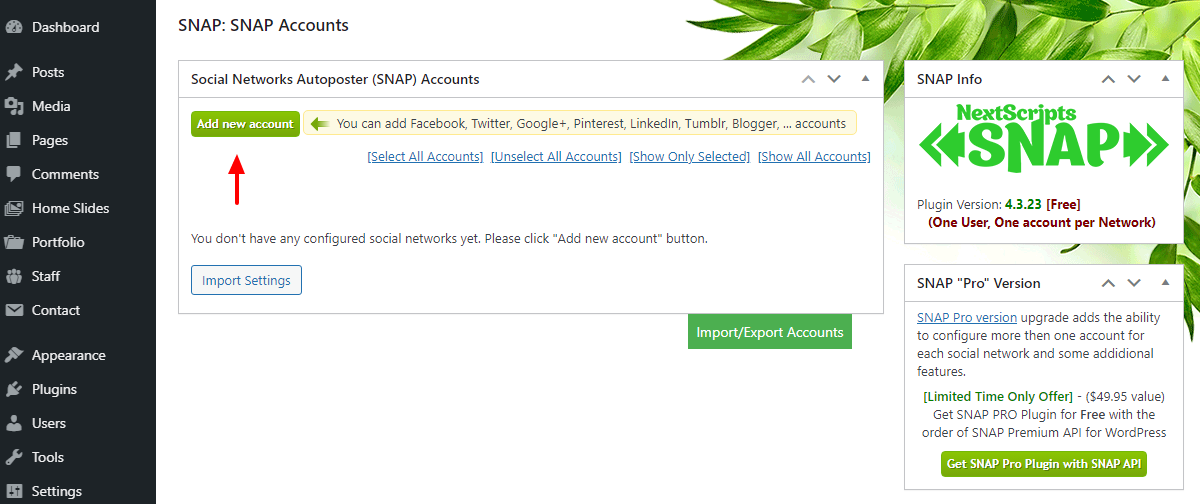
Next, click the Add new account button, as shown below.
Next, select the social network you’d like to configure:
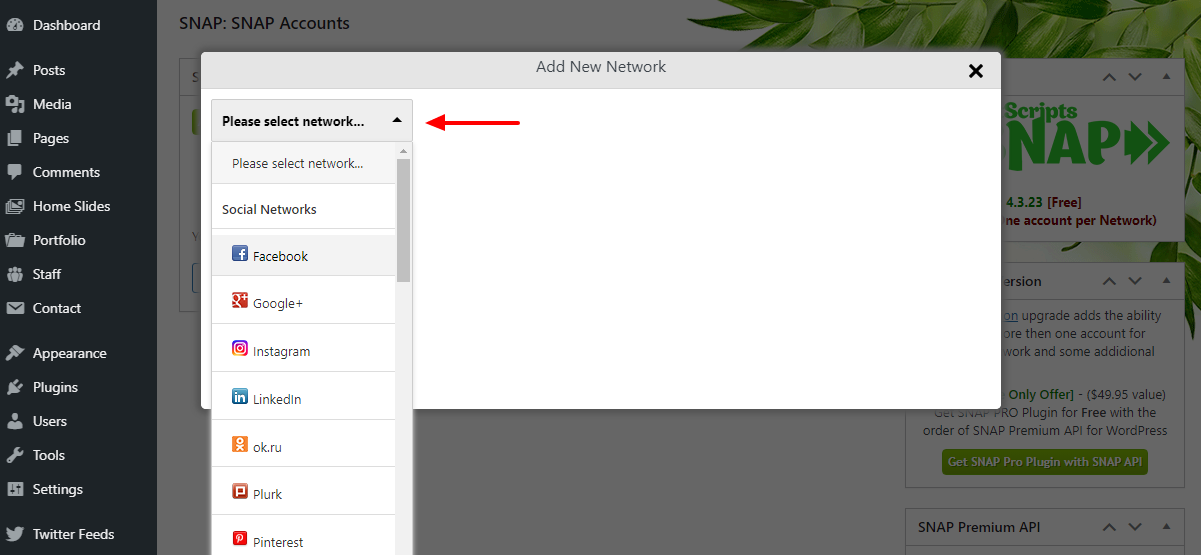
From the above screen, you can configure as many social media sites as you’d like. The plugin offers you detailed configuration instructions for each social network.
And that’s it, you now have two solid solutions to share your WordPress posts to social media sites.
Sharing posts to social networks is a great way of building your brand and driving more traffic to your WordPress site. However, sharing posts manually is a time-consuming and tedious process, which is why recommend using plugins such as Jetpack and NextScript: Social Networks Auto-Poster to automate the entire process.
How do you auto-share your WordPress posts? Please let us know your thoughts in the comments.


I would suggest doing the first one with the Awesome plan of Buffer.
Buffer’s Awesome plan will definitely help and let you connect even more accounts.
I must say I am still happy to use the publize funcion in Jetpack. It works great, even on Google+. Also tried Snapp autopost but this service sometimes does not work.
Yes JetPack publize is great, we use it too 😉
Yes, that are good options if you prefer to use plugins over web services 🙂
Twitterfeed is awful.
Hi Wendell, can you care to explain why you dislike the plugin? It would be much more useful to people reading this, thanks!
Twitterfeed is a little dated agreed. After testing quite a few, including IFTTT – I went back to it, and it has never failed and it’s quite flexible. It’s my favorite tool for RSS to Tweet. I only use it for Twitter though, not for Facebook.
IFTTT has the disadvantage that you are not able to reference the twitter account of the publisher “via @nfn4good” – They omit the @ sign and make attribution much harder. That’s the primary reason why I went back to Twitterfeed.
IFTTT isn’t perfect but you can overcome its shortcomings by working on website structure and other details.
Like you can set Twitter Cards and in them fill in these fields
twitter:site (your website’s twitter handle)
twitter:creator (the author of the blog post)
Read this post to know how to set them up on WordPress.
Very informative post! I am going to look into these 3 methods because I am trying to use less plugins also. Thank you so much! I appreciate this. 🙂
Thanks for the compliments. I personally use Method 1, it is most effective 🙂
Method #1 seems to work for me. One question though, when it tweets to twitter how do you get the article/post’s featured image to tweet also?
Mark, you’ll need to setup your Twitter Cards before any tweet can automatically show the featured image.
Mark as AJ said you will need to configure and verify Twitter Cards. I have written about it here.
hi there,
does jetpack publicize exist as standing alone plugin, or does we need always upload entirely jetpack ?
I’m not sure. Have you looked on WP.org?
These ways is great i use Method 3 HootSuite is nice for me…thanks Ahsan Parwez for tthis post..
less plugins definitely help with reducing load times. thanks for the tips, Ahsan
Also less time to worry about maintenance and updates of plugins 🙂
Excuse me if this is a dumb questions, for the sake of completely clarity, if I use, lets say the first method (i.e. Method 1: Using IFTTT, Buffer, and Feedly) then everytime I post something it will be shared with my Twitter, Facebook, LinkedIn, Google+ accounts?
You will need to integrate all those social platforms in Bufferapp. Only the one’s you activate in Bufferapp will get synchronized sharing.
i’m searching this as loong as i can, than i faound here, thanks…
Two things I don’t understand about the first method.
First of all, Buffer does not support Google+ (see ) so I don’t even know where you guys took the screenshots from.
Second of all, IFTTT supports Feed so why bother with Feedly anyway?
i have some question . If i create that the content on the blog by wordpress, and then share the meat to a Facebook profile, Facebook fanpage, Google plus profile, Google plus for business, Twitter, .Intagram, Pinterest .. Youtube and Line Application or Line @ Or What App. But the header. each of sharing content on Social Media channels do differ header , some social media channel differ Content and differ Schedule time with you. in this program can or not . and How to do it by use plugin or How to do by script it.
Buffer, and Feedly then everytime I post something it will be shared with my Twitter .
Nice plugins, I vote for nextscript
I want to throw Blog2Social in the ring. It is perfect to share your new WordPress blog articles with your social networks, because you can customize your postings before you send them to your networks. You can schedule your postings. Blog2Social can deliver blog articles with comments, hashtags, tags and handles to following networks: Facebook, Google+, Twitter, Tumblr, Storify, Diigo, LinkedIn, Xing, Pinterest and Flickr.
You can even post to Facebook pages, Google+ pages and grups and to LinkedIn pages. Just try it out at blog2social.com You can use it for free.
Kind regards Severin Henkes
I used to use the Jetpack Publicize to automated the post sharing work in my WordPress site but now I have switched to NextScripts as I need to share my post in more social platform and It’s such a nice plugin to do this work.
That’s awesome!
I was looking for this guide. Thanks a lot for sharing.
Thanks a lot for help