OptinMonster Popups How-To Guide
Gaining and maintaining readers is a huge part of running a successful website. But how do you do that? A while back we covered 15 ways to engage visitors and turn them into readers. One of the ways to get people to return to your website again and again is to send out periodic newsletters linking to new content and promotions. To get people to signup you could always just pop a newsletter widget into your sidebar or footer, but that’s a bit boring. Instead you could add a completely customized newsletter optin form that appears on the page and demands attention.
OptinMonster is a fantastic newsletter subscription plugin that gives you the ability to create awesome optin forms as lightboxes, sticky footer bars, and slide-ins. We were lucky enough to give this plugin a test drive, so keep reading to find out more about how the plugin works and what options are available. Or you could just dive into it yourself by getting a copy of the plugin for yourself (don’t worry, there’s a 30-Dayguarantee so if you don’t gain more subscribers you’ll get all of your money back – no questions asked)!
Get OptinMonster NowVideo Overview
Take a guided tour of the plugin. We’ll walk you through each step. Of if you’d prefer, there’s a complete and through transcript below that covers more than the video.
Install & Activate OptinMonster
Getting started is easy since it’s just like any other plugin. Just download the zip files to install and activate the OptinMonster plugin. Click on the new OptinMonster dashboard menu item, and then click to Create New Optin.
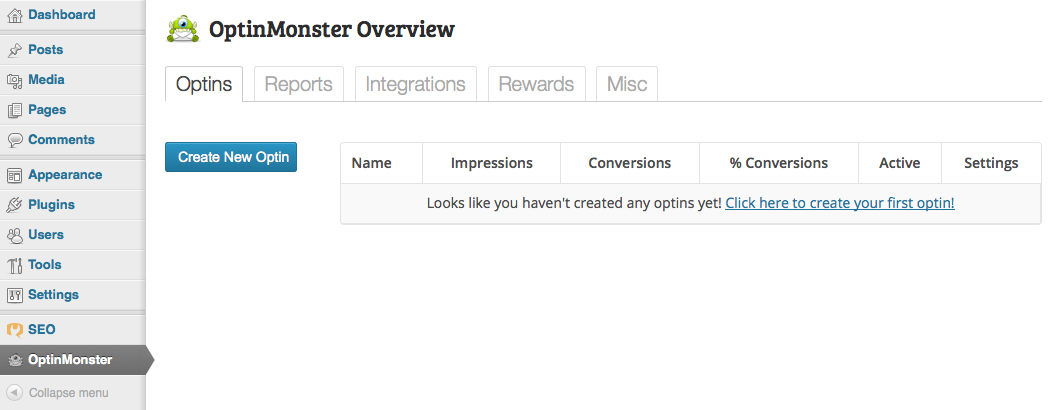
Now just follow the steps to create your Optin.
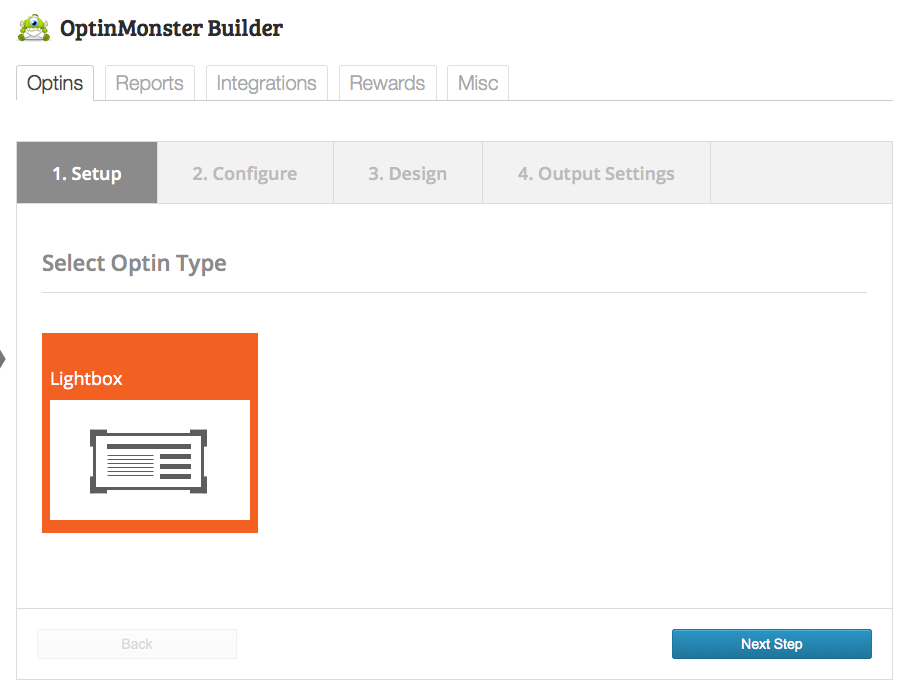
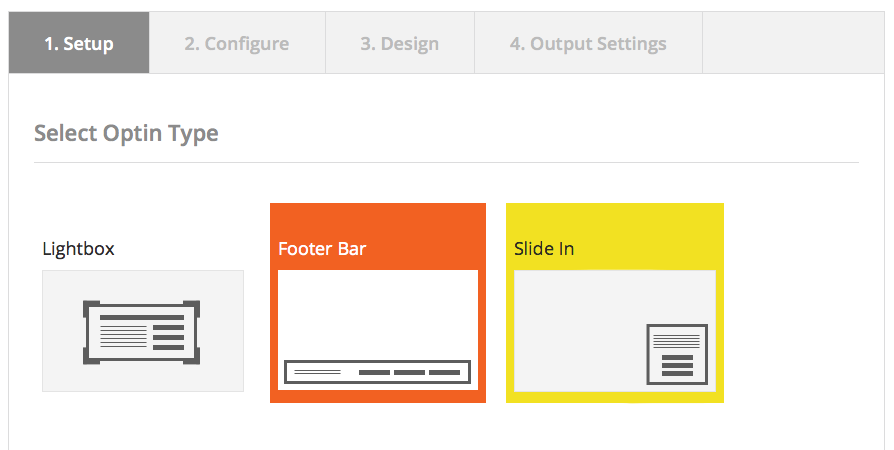
Create an Optin
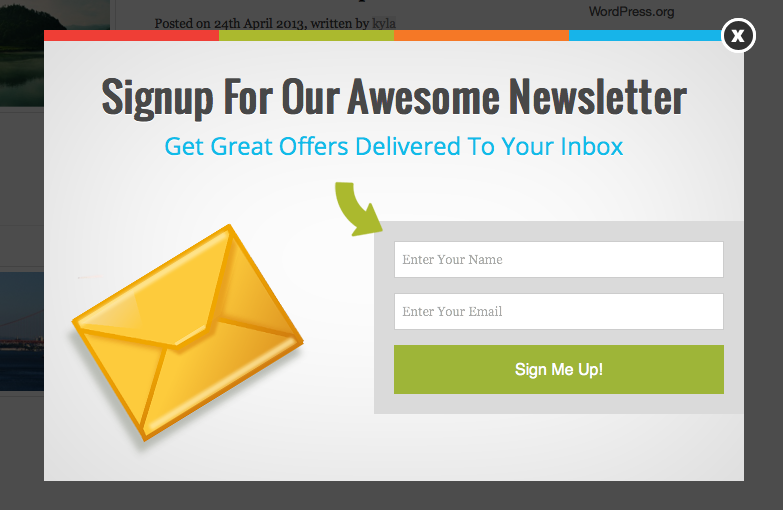
The first Option You’re given is to select your option type. Lightbox is the default option and will open a lightbox in the middle of your visitors’ screen, and it’s the only option available unless you upgrade to one of the extensions (Footer & Slide-In are the two extensions available at the moment, which you can read more about below, but more options are in the works).
General Settings
Configure your general settings, starting with giving your optin a name.
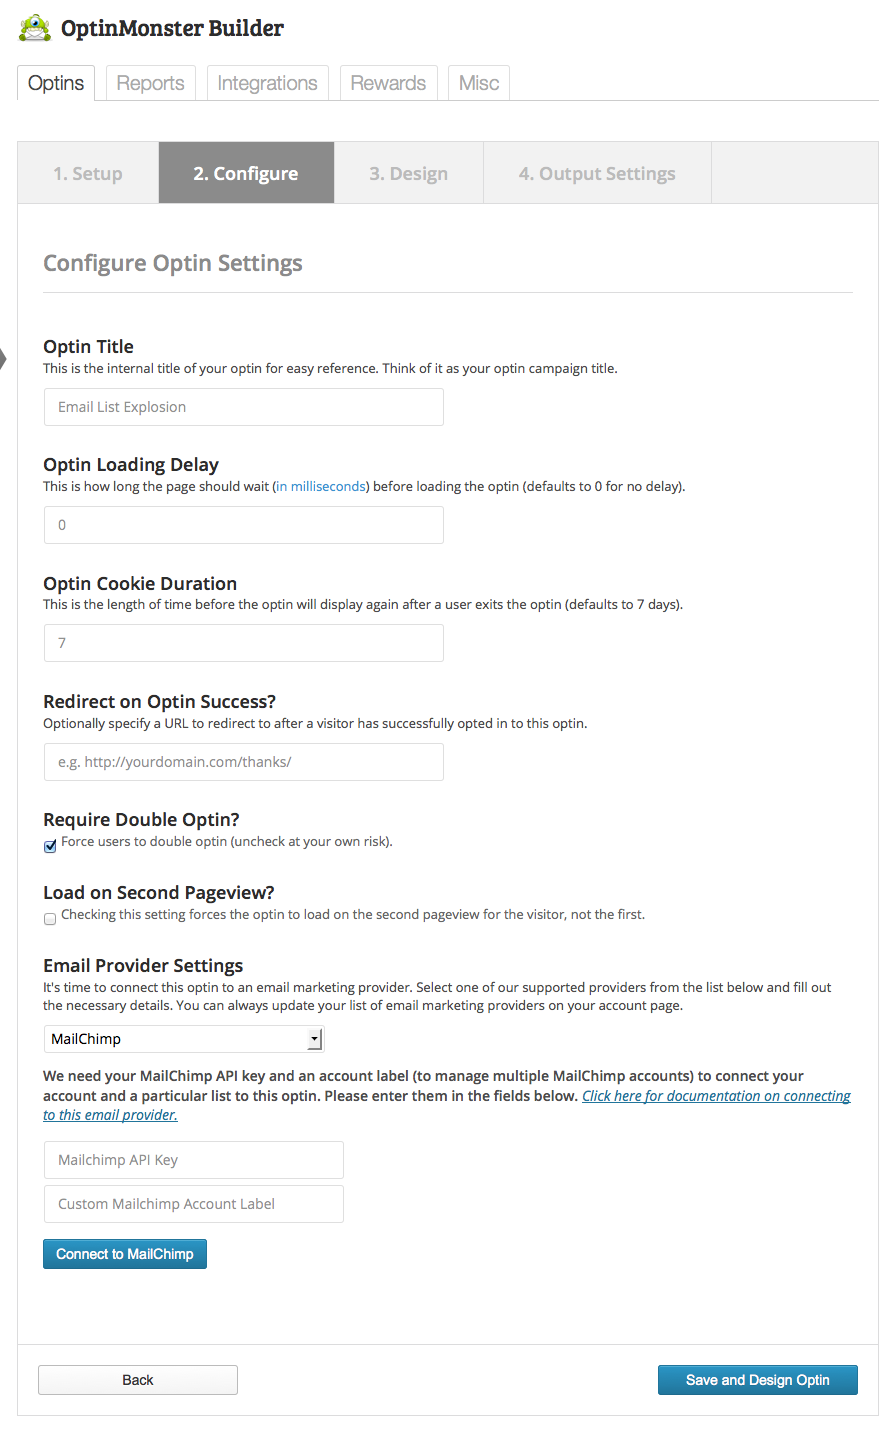
From here you can also set the load delay time. This might be useful when using the optin on posts to give visitors time to read the article before loading the optin. Or for product pages, you might want to load a specific optin if they’ve been looking over the product for more than 10 seconds.
Make sure to set the cookie duration so that members who have viewed and closed your optin won’t see it again until they’ve clear their cookies or the time you set is reached (default is set to 7 days). This way visitors don’t get annoyed by seeing the same optin every time they come to your site.
You can also add in a redirection URL so that when users complete your opt in they’re taken to a thank you page, success confirmation, completion page or even another offer page. For example, you could redirect users to a special coupon page when they complete the optin.
The option for double optin should already be selected for you. This makes users confirm that they do in fact want to opt in to your newsletter.
There is also an option to load the optin on the second page viewed by a user. This way you can target higher quality readers who view more of you site.
Next select your email provider (AWeber, Campaign Monitor, Constant Contact, GetResponse, iContact, InfusionSoft, MadMimi, or MailChimp). Depending on your provider you will need to provide an authorization or API key, or register the plugin with your provider, so that OptinMonster can access your mailing list. Don’t worry – for any option that you select, the plugin provides a helpful how-to link showing you exactly where to find the information you need.
Click Save Design & Optin. Give it a minute, it could take a few seconds or a few minutes to save your optin.
Design
Now you get to choose a design for your optin.
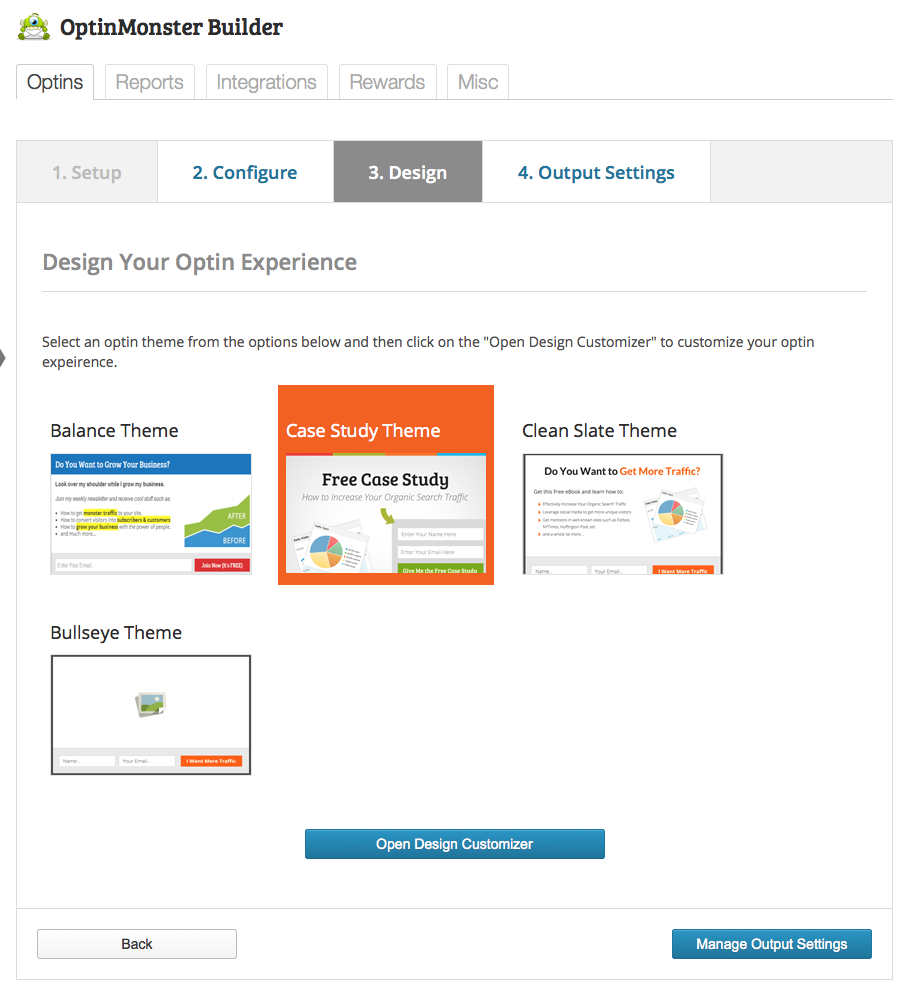
There are four default themes included for the Lightbox type. Pick one and click to Open the Design Customizer.
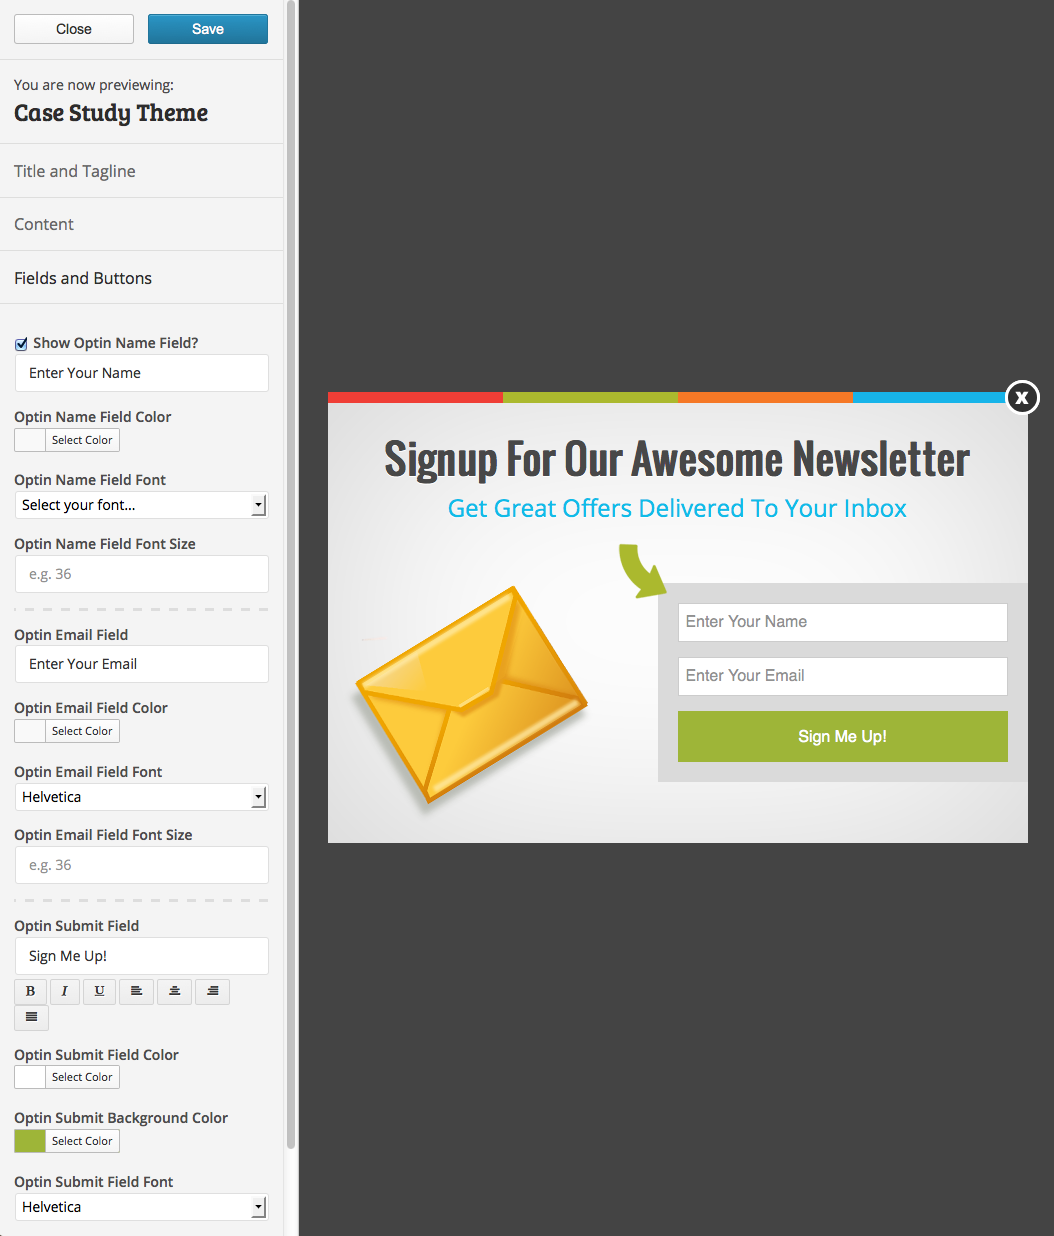
There are lots of options to use custom fonts, colors, text and images to create the perfect optin. Edit the Title & Tagline, Content, and Fields & Buttons categories to design your optin. Once you’re done, click Save and then Close.
Output Settings
The last step to setup your optin is to Mange Your Output Settings.
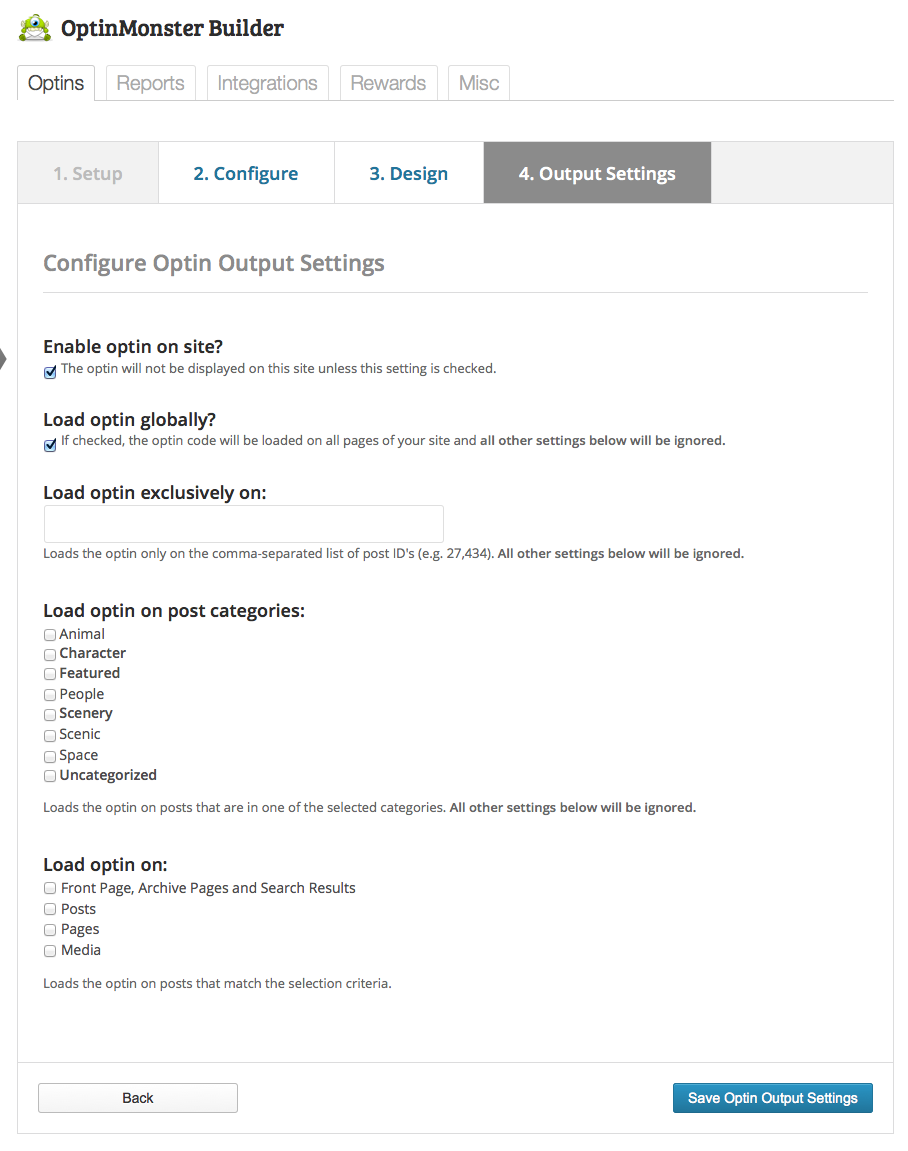
First make sure to check the option to enable your optin so it will appear on your site.
Enable your optin on your entire site by checking to load it globally, or use the other options available to load it only on specific posts by adding in the post IDs (to get a post ID, go to a post as if you were going to edit it, in the URL of the post you will see “post=#”, that number is your post ID), on specific post categories, or specific pages. Once you’re finished click to Save optin Output Setting.
If you need to make any changes to your optin, you can access it by clicking on the OptinMonster dashboard menu item and clicking on the Settings gear icon next to the optin. Click on the Modify option to edit the general settings or design, or click to edit the Output Settings or to view a Report.
That’s it! Congratulations – you’ve got your first optin all setup. Now we can move on and have a look at the great reporting feature included with the OptinMonster Plugin as well as some of the extensions that are currently available.
Reporting
Adding in the optin should help you grow your mailing list in no time. But if you’re at all curious just how well it’s working, you can use the Reports tab.
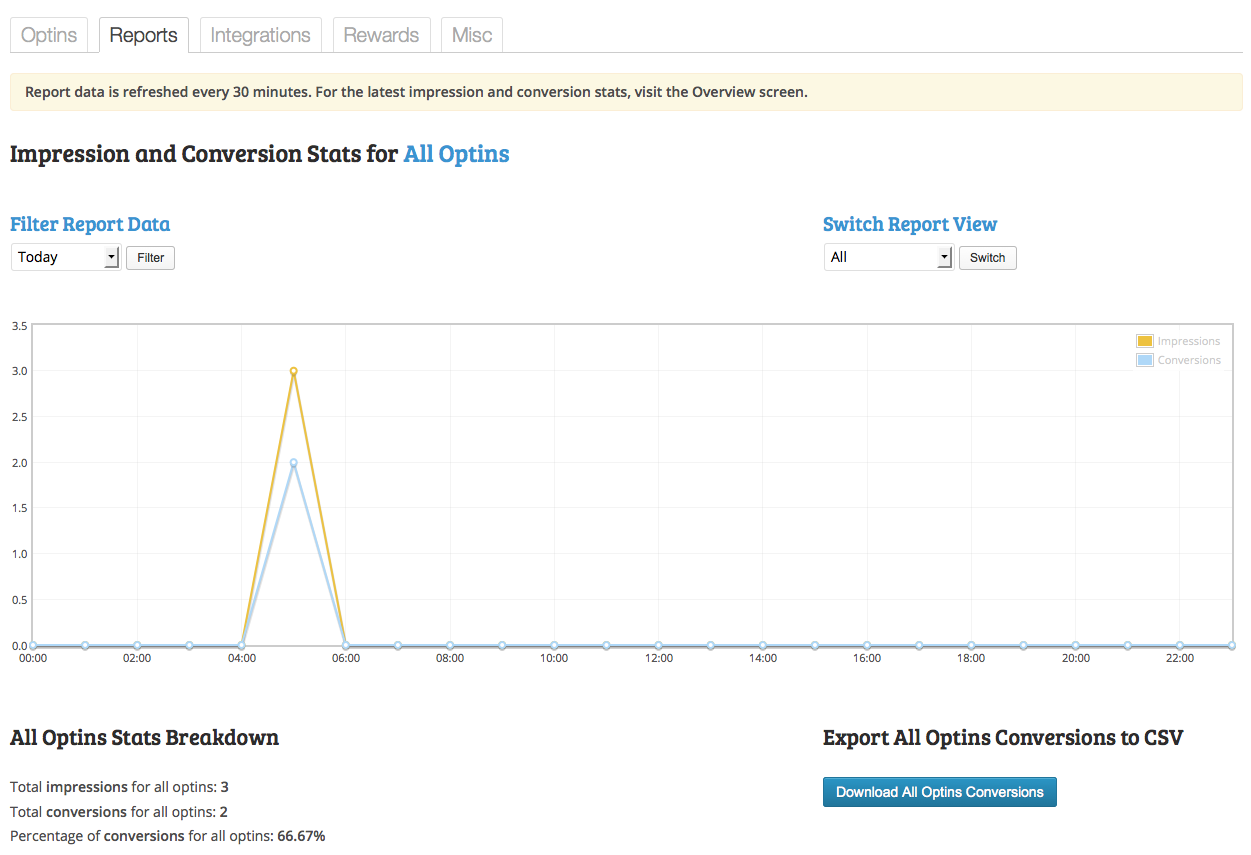
From here you can see statistics for your options based on the day week, quarter or year. You can also view reports for all your options combined, or use the Switch Report View drop-down to select a specific optin to review. This is a grew way to keep track of how many people are successfully completing your optin, which optin campaign is doing the best, and which posts or pages have the highest conversion rates.
A/B Split Testing
If you really want to optimize your optins, OptinMonster has A/B Split Testing built right into the plugin. On the main OptinMonster screen simply click on the Settings gear icon and click on the “Split Testing” option. This will create a clone of your optin. Click on the Settings gear icon for the clone and select Modify to tweak your type, general settings and/or design. The plugin will randomly display the optins and track the conversion rates of both so you can quickly compare which is working better for you. To delete an optin
OptinMonster Extensions
Footer & Slide-In
These extensions to the OptinMonster Plugin will give you more optin Type options.
The footer option is a notification bar that sticks to the bottom of the reader’s screen as they scroll through your site. The slide in option is a toggle in the bottom right corner of the screen that slides up and down into the user’s vision without obstructing their view of your content. These are both great and more subtle options to display your optin.
Exit Intent
This extension analyzes a visitor’s cursor movements to determine when they are about to leave your website. This way the plugin can display an optin you create specifically to keep readers interested, and to get them to subscribe to one of your campaigns.

Conclusion
OptinMonster is a great plugin with truly useful features. No only can you create targeted campaigns, but you can see if they’re working right from your dashboard. Plus the plugin seamlessly integrates into your WordPress installation and is very user friendly so you shouldn’t have any troubles getting your optins up and running in a matter of minutes. OptinMonster is a huge asset when it comes to building up your mailing list, and you should definitely have look!
Get OptinMonster Now


Great detailled article, thanks!
Can you put more than one option on your site? For example the lightbox AND the footerbar? This isn’t very clear to me
Yes you can! And using the output settings you can have them appear on different posts and pages. The plugin does also support multiple optins on a post/page – although I wouldn’t really recommend it since it can look a bit messy 🙂
This doesn’t allow you to make html/css optins?
It does! There are lots of color and font options built right into the Design Customizer when creating your optin. But you can also enter your own html code when adding in your optin content.
Hey!
Oh wow thanks for the lovely review on Optinmonster. When I saw WPBeginner using it, I knew it must be good!
Definitely something to look at since I am eyeing on the $199 version.
Haha!
Reginald
We still haven’t integrated it into our sites, but its definitely an awesome plugin!
Seems useful features, will surely buy this plugin, thanks for the review.
But with the builder you can only have 2 OPT-IN fields.. Not ideal when I need to collect more information such as what plastic surgery procedure they are interested in… Better for CALLS.. Now it has to be custom, which DOESNT upload to your e-mail provider and then has to be styled accordingly based upon the field and sendmail or however you configure it to do. This is my only knock…
Yes, I would say OptinMonster is best for bloggers who are more interested in collecting newsletter subscribers.
Just sucks building a custom form — until th ey get their new feature.. We need to collect more information for a surgical practice — and Constant Contact has a terrible form builder. The custom feature with the “css” is pretty useless with the way it’s setup.
If youre going to target just emails – it’s gold.
Exactly, OptinMonster was created for the only purpose of getting newsletter subscribers.
If you guys need something more advanced for your business, why not hire a developer to create such a plugin? Then not only can you use the plugin yourselves, but now you can also sell it.
Locate a problem, provide a solution and that’s how you make money. 🙂
I use optinmonster for last 1 year & had suggested it to many of my clients. The latest version has good number of templates & compatible with almost all the major browsers.
And the response from their team is awesome.
I use MyNewsletterBuilder to generate my RSS-linked newsletter. Can OptinMonster handle the subscription form from this vendor? And how much does the Exit extension cost?
I am big fan of optinmonster and i recommend every blogger must have this plugin.
how do i add a picture to my optin for mobile? feeling frustrated 🙁
I’m not sure, but if you purchased the plugin you should contact the plugin developers for support. I’m positive they’ll have the best answer for you 🙂
Optinmonster is one of the best email list builder in recent times. The best part about the plugin is the cost which is simply affordable. Thanks for sharing this useful review. A must use for all serious bloggers.