Creating Highly Customized Post Types with Custom Meta Boxes
In the last few years, WordPress truly has evolved into a fully-fledged Content Management System, and it’s when you really unleash some of its functionality that you realize that WordPress can be used to power just about any kind of website.
My eureka moment came when a client asked me to build him an order tracking system. Historically, he took orders for medical equipment from reps and did all of his paperwork manually. He would then spend all day on the phone, answering calls from reps either to place new orders or check on the status of an existing order.
Well, he sought to change all of that by creating a website where he could input all of his orders, and his clients could then check their status at will, and even get email updates as the order was updated with new information. The idea was that he would then have more time to actually grow his business, instead of spending all day on the phone, doing admin work.
CUSTOM POST TYPES
The answer to his problem lay in the power of custom post types. Standard WordPress sites have two kinds of post types: posts and pages, but you can add on as many as you want. You may even have some on your site from themes or plugins that support things like events, real estate listings, products or sliders.
In this case, I needed to create a custom post type for his Orders. These would then house the information for each order, to be displayed on the front end, for his clients to view.
I won’t go over the process of creating a custom post type, because I already covered that in another tutorial: Registering Custom Post Types.
What I want to discuss here is how to organize your data and display it the way you need. For example, the standard WordPress editor did not lend itself to recording these orders, because it does not have individual areas for all the small pieces of information that formed the order, such as the patient name, order number and order rep that would need to be called upon both on the front end of the site and in emails to the rep on file.
That’s where Custom Meta Boxes came in. Custom Meta Boxes allow you to create new “windows” in your editor to store specific pieces of information. So while the post editor has a huge box for your post content, you might not need that for your custom post type, as I didn’t with my orders custom post type. As such, I turned off the editor when I registered the custom post type, so that I was fully in control of the data entry screen, as you’ll see below.
CUSTOM META BOXES
Custom Meta Boxes is a script that makes the process of creating these meta boxes incredibly easy. Furthermore, it’s taken some of the more complex field types (such as color pickers, date pickers and WYSIWYG editors) and done all the coding for you, so that all you have to do is dictate what type each field should be, and it will magically appear.
Including it in your theme or plugin is a very easy process. All you need to do is download the files from the GitHub repository and copy them into your own theme or plugin folder structure. I recommend putting the files in a library or includes folder, for better organization. In my plugins, I upload all of the files into /wp-content/plugins/my-plugin/includes/metabox/.
Once all of the files and folders have been uploaded to your chosen location, all you need to do to “activate” them and make them available for use is to include init.php from your plugin. For example, in my example, the following function was included in the main plugin file to call upon init.php in the /includes/metabox/ folder:
function be_initialize_cmb_meta_boxes() {
	if ( !class_exists( 'cmb_Meta_Box' ) ) {
		require_once( 'includes/metabox/init.php' );
	}
}

add_action( 'init', 'be_initialize_cmb_meta_boxes', 9999 );
Now you’re in a position to actually use the functionality that the script provides. The example-functions.php is a great place to start learning how the script works. It provides an example of the syntax needed to include each type of field that the script allows for. The types of fields you can choose from include:
- Title (for organizing your meta boxes in the dashboard)
- Text (small, medium & large)
- Date picker (standard, or UNIX timestamp)
- Currency
- Text area (small and large)
- Dropdown
- Radio buttons (inline and standard)
- Checkbox (single and multiple)
- WYSIWYG editor
- Taxonomy pickers (dropdown, checkboxes or radio buttons)
- File uploader
- File list
You just need to decide what information you’re trying to record and which field type would be best in each case.
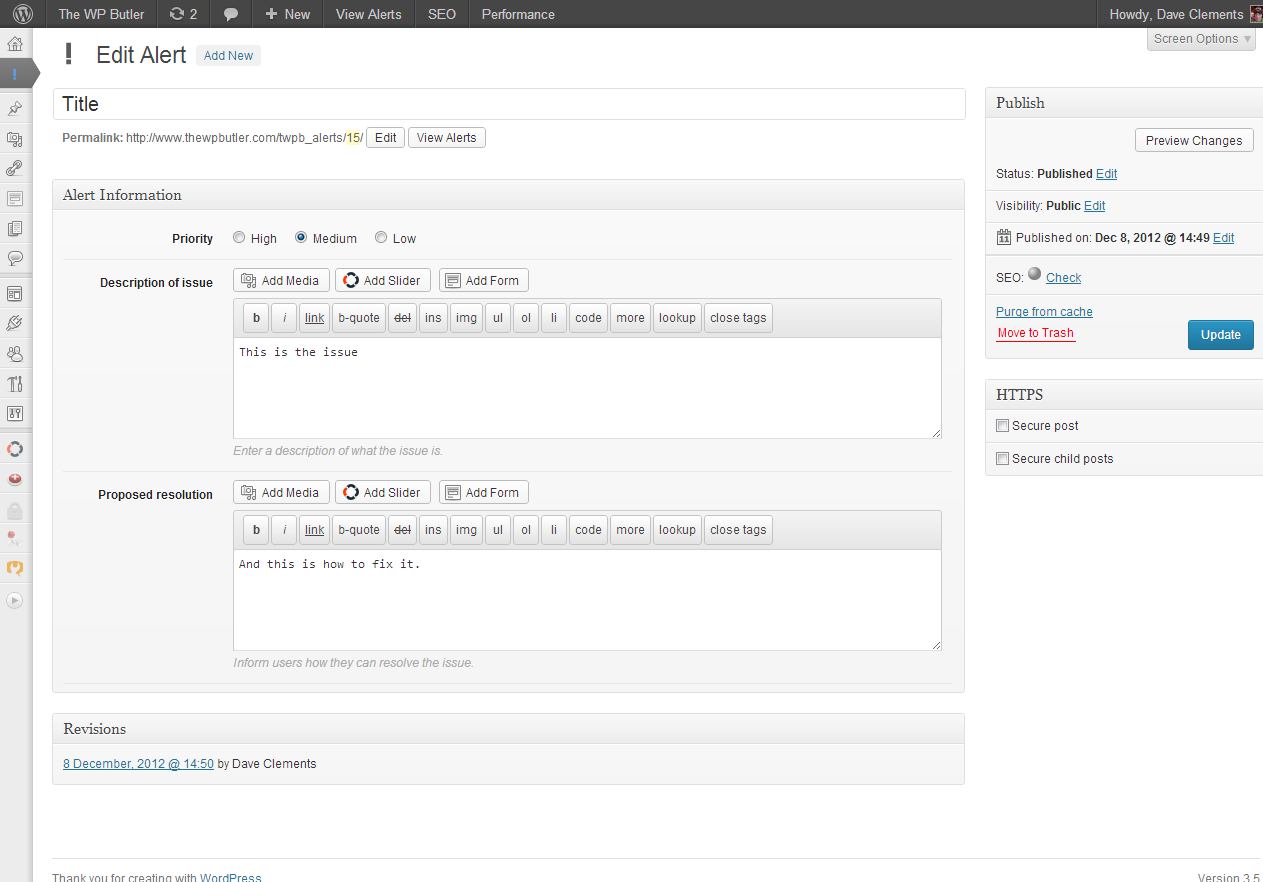
To demonstrate this script to you, I’m going to use a simpler example than the ordering system I mentioned earlier, as it’s more complex. I recently wrote a plugin where I was creating a simple alerts system, where the administrator could specify the title of the alert, its priority, what the description of the alert was and how to resolve it.
To handle this, I used the post title for the alert title, inline radio buttons to set the priority and WYSIWYG editors to write the description and resolution (allowing for easy rich editing, such as bulleted lists and text formatting).
The following function is all of the code that achieves it: you’ll note that it follows the format of the example-functions.php file. I’ll describe each part of the code after:
function twpb_alerts_metaboxes( $meta_boxes ) {
	$prefix = 'twpb_alert_'; // Prefix for all fields
	$meta_boxes[] = array(
		'id' => 'alert_metabox',
		'title' => 'Alert Information',
		'pages' => array('twpb_alerts'), // post type
		'context' => 'normal',
		'priority' => 'high',
		'show_names' => true, // Show field names on the left
		'fields' => array(
			array(
				'name'    => 'Priority',
				'desc'    => '',
				'id'      => $prefix . 'priority',
				'type'    => 'radio_inline',
				'options' => array(
					array( 'name' => 'High', 'value' => 'high', ),
					array( 'name' => 'Medium', 'value' => 'medium', ),
					array( 'name' => 'Low', 'value' => 'low', ),
				),
			),
			array(
				'name'    => 'Description of issue',
				'desc'    => 'Enter a description of what the issue is.',
				'id'      => $prefix . 'description',
				'type'    => 'wysiwyg',
				'options' => array(	'textarea_rows' => 5, ),
			),
			array(
				'name'    => 'Proposed resolution',
				'desc'    => 'Inform users how they can resolve the issue.',
				'id'      => $prefix . 'resolution',
				'type'    => 'wysiwyg',
				'options' => array(	'textarea_rows' => 5, ),
			),
		),
	);

	return $meta_boxes;
}
add_filter( 'cmb_meta_boxes', 'twpb_alerts_metaboxes' );
In line 2, I set a unique prefix for the custom fields to avoid a conflict with any other plugins, and in line 4, I gave a unique id to the metabox that will appear on the custom post type in the dashboard. Line 5 sets the title of the metabox and line 6 sets which custom post types to show these metaboxes on. Since it’s an array, you can include it on as many post types as you like, including posts and pages if you’d like.
Line 10 starts the array of the fields that I want to create. In this example, there are just three fields (lines 11-21, 22-28 and 29-35). Each field includes basic information about what the field is, a unique ID for it, and a description, as well as some options where appropriate.
Then line 39 makes the metaboxes display, and line 41 hooks into the script that we originally uploaded, to make it work.
THE RESULT?
So what does this look like? Well, in the editor window, you’ll end up with something like this:
So we’ve now established how to build the metaboxes and use the different field types to collect the information needed. Now we need to display it on the front end.
DISPLAYING THE INFORMATION
The information is now being stored against each post in the database. But unless we call upon it, it will just stay in the database and remain useless. To display the information, we need to make use of the get_post_meta function, which retrieves post meta for a given post from the database.
To take this simple example, we can use the get_post_meta function in three separate instances to pull in each piece of information that we stored (the priority, description and resolution).
<h2>Priority: <?php echo get_post_meta( $post->ID, 'twpb_alert_priority', true ); ?></h2>
<h3>Description</h3>
<?php echo get_post_meta( $post->ID, 'twpb_alert_description', true ); ?>
<h3>Resolution</h3>
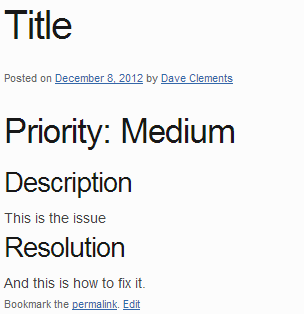
<?php echo get_post_meta( $post->ID, 'twpb_alert_resolution', true ); ?>In each case, we pass the post ID and the unique ID of each piece of metadata that we want to retrieve (recall that we set these in the previous function).
This will then yield a result on the front end along the lines of this:
TAKING IT FURTHER
This has been a very simple example, but with just a little imagination, you can see how powerful this can be. To go back to my original example of the order tracking system, that plugin was used to record patient information (name, address, date of birth) and order information (items ordered, price, order number, shipping carrier, tracking number, order notes and order documents, such as invoices). Coupled with email notifications, it can be a very comprehensive tool.
Once you start unraveling powerful features like this that are built into WordPress, which can seem a little overwhelming at first, you realize just how powerful it can be. Hopefully, tools like Custom Meta Boxes will encourage you to take the dive and start developing your own highly customized sites.


Very thorough post, thanks for sharing it with our community Dave!
My pleasure AJ. Hope it’s helpful to people.
Very nice tutorial,wordpress is so good…thanks Dave.
I’ve did a similar project, but used metabox in a different way. Your code is cleaner than mine though, this is gonna be helpful in the coming projects that I have. Thanks Dave!
Well, this is a great example of taking the hard work out of a repetitive task, and wrapping it in a script for someone else to use over and over again, by just adding the small bits of information specific to their site: makes modifying custom post types very simple indeed.
Hi,
Very nice tutorial! I’m working with meta boxes very often. That’s why I created a Helper Class myself too. Maybe you can have a look – WordPress Cuztom Helper
Gijs
I checked out your classes. Not a bad idea. The only thing that bugs me is for things like post types and taxonomies, since there isn’t any filters (that I could see) a user couldn’t easily change the labels/slugs/etc via a child theme…or am I wrong?
Maybe you can create an issue on Github, because I don’t understand completely and I don’t work with child themes very often.
But I would like to build as many support as possible.
Thanks
Gijs
I love the Custom Box Meta repository, the only thing missing is the ability to add a repeating custom field, add that and it takes it to an even more awesome level 🙂
You can try this alternative meta box script with repeating filed support
Great post, Dave! Interesting perspective on how to use the custom post types and meta. I see a LOT of opportunity to expand WordPress beyond the traditional Web/Blog applications with these tips.
Cheers!
–Sean
Couldn’t agree more Sean. It’s functionality like this that really allows you to dream big and make anything with WordPress
can this meta boxes codes be used in the bbpress forum? like to modify the post form?
You should be able to use metaboxes with forums, they are just a custom post type.
Thanks Dave for this wonderful piece of Information.
I need to add one more field for uploading multiple files or images with a preview like the ‘file’ field you currently have.
The ‘file_list’ is not of my use because its displaying all the images or attachments to the post and not only the files attached using the field.
Can you pls help me out with some code.
Thanks & regards
I would recommend you have a look at how this plugin works: http://wordpress.org/plugins/easy-image-gallery/
Simply magnificent tutorial, works an absolute treat and is a massive piece in my WordPress jigsaw puzzle 🙂
This is really clear thanks. One quick question been trying to figure this out and struggling. How would you output options for a multiple select checkbox i.e.
array(
‘name’ => ‘Product Sizes’,
‘id’ => $prefix . ‘product_sizes’,
‘type’ => ‘multicheck’,
‘options’ => array(
‘size-s’ => ‘S’,
‘size-m’ => ‘M’,
‘size-l’ => ‘L’,
)
),
Have a look here: https://github.com/jaredatch/Custom-Metaboxes-and-Fields-for-WordPress/issues/279
I liked this thorough tutorial. Thanks
have you compare with other plugin, eg. advanced custom field pro?