How to Add Custom Attributes (fields) to WordPress Menus
They are so many tutorials on the web to explain “how to add a custom field to WordPress menus” but most of them treat about how to use the default CSS field of the default Description field. None of them gives a real method to add a new field to menus.
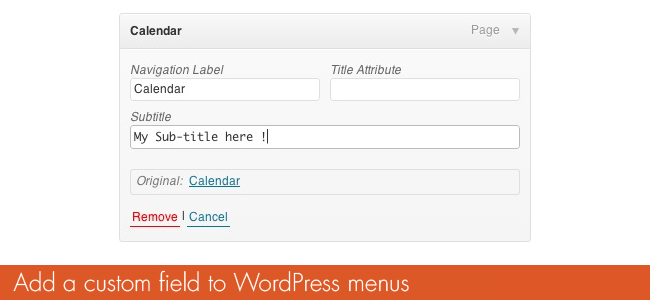
So, today we will create a simple WordPress plugin that will add a “Subtitle” field that you can display on any menu item. This guide is specifically for adding custom fields to the “classic” WordPress menu dashboard. If you are looking to add custom fields to the Navigation block in Gutenberg that would be a completely different tutorial.
Here is what the final result is in the WordPress administration:
Skip the tutorial and view the full code here.
Step 1: Create a Subtitle Menu Field Plugin
Alright, let’s get started by creating a plugin, which isn’t complex. You just need to create a new folder on your server under wp-content/plugins and call it “subtitle-menu-field”. Inside this folder create a file named “subtitle-menu-field.php” and add the following code:
<?php
/**
 * Plugin Name: Subtitle Menu Field
 * Plugin URI: https://www.wpexplorer.com/adding-custom-attributes-to-wordpress-menus/
 * Description: Adds a subtitle menu field to the WordPress menus.
 * Version: 1.0
 * Author: WPExplorer
 * Author URI: https://www.wpexplorer.com/
 * Text Domain: subtitle-menu-field
 * Requires at least: 6.1
 * Requires PHP: 8.0
 */
This code is all we need to define a new plugin. Next we are going to define our namespace and add a a line of code for security reasons:
namespace WPExplorer;

defined( 'ABSPATH' ) || exit;
This code should go right below the previously added code in the subtitle-menu-field.php file. The first line is used to define a PHP namespace which I prefer to use so that I don’t have to prefix my classes or functions. The second line is an added security check to make sure your plugin file can’t be accessed directly.
Prefer using a child theme? If you don’t want to create a custom plugin no worries! You can skip the last couple steps and instead add the code to your child theme.
Now we are going to create a custom PHP class containing a constructor and the methods/functions we will need to make the plugin work well.
Here is how to create the class:
class Subtitle_Menu_Field {

	/**
	 * Constructor.
	 */
	public function __construct() {
		// action hooks will be added here.
	}

	// class methods will be added here

}
new Subtitle_Menu_Field;
The class __construct is where we will add our hooks and filters, below it we will place our class functions that will run on those hooks and the last line of code starts the class to make everything work.
Step 2: Add the Custom Field
Now that we have our class, we are going to create custom functions. The first function to add is the one that will register the “Subtitle” custom field we want to be included as an advanced menu attribute. To do so, place the following code instead of // class methods will be added here.
/**
 * Hooks into wp_nav_menu_item_custom_fields to add a new menu field.
 */
public function add_field( $item_id, $item ) {
	wp_nonce_field( 'subtitle_menu_meta_nonce', '_subtitle_menu_meta_nonce_name' );

	$subtitle = get_post_meta( $item_id, '_menu_item_subtitle', true );

	?>
	<p class="field-subtitle_menu_meta description-wide">
		<label for="edit-menu-item-attr-subtitle-<?php echo $item_id; ?>">
			<?php esc_html_e( 'Subtitle', 'subtitle-menu-field' ); ?><br />
			<input type="text" id="edit-menu-item-attr-subtitle-<?php echo $item_id; ?>" class="widefat edit-menu-item-attr-subtitle" name="menu-item-attr-subtitle[<?php echo $item_id; ?>]" value="<?php echo esc_attr( $subtitle ); ?>" />
		</label>
	</p>
	<?php
}
Then, we need to tell WordPress to take our function into account, so place the code below inside the __construct() function:
add_action( 'wp_nav_menu_item_custom_fields', [ $this, 'add_field' ], 10, 2 );Step 3: Save the Custom Field
Even if the custom “subtitle” field doesn’t really exist we must create a function that will save its value on menu edition. To save our custom field we’ll need to hook into the “wp_update_nav_menu_item” filter. So here is the next function we’ll add to our class:
/**
 * Hooks into wp_update_nav_menu_item to save our custom field.
 */
public function save_field( $menu_id, $menu_item_db_id ) {
	if ( ! array_key_exists( '_subtitle_menu_meta_nonce_name', $_POST )
		|| ! wp_verify_nonce( $_POST['_subtitle_menu_meta_nonce_name'], 'subtitle_menu_meta_nonce' )
	) {
		return $menu_id;
	}
	$subtitle = $_POST['menu-item-attr-subtitle'][$menu_item_db_id] ?? null;
	if ( $subtitle ) {
		update_post_meta( $menu_item_db_id, '_menu_item_subtitle', sanitize_text_field( $subtitle ) );
	} else {
		delete_post_meta( $menu_item_db_id, '_menu_item_subtitle' );
	}
}
In this function, we are first checking our security nonce to make sure it exists then we check to see if the Subtitle field was sent by the WordPress menu form when saving the menu and if so we save the value in a hidden post meta field named “_menu_item_subtitle”.
Again, to make things work we need to add the action hook in our class __construct() function.
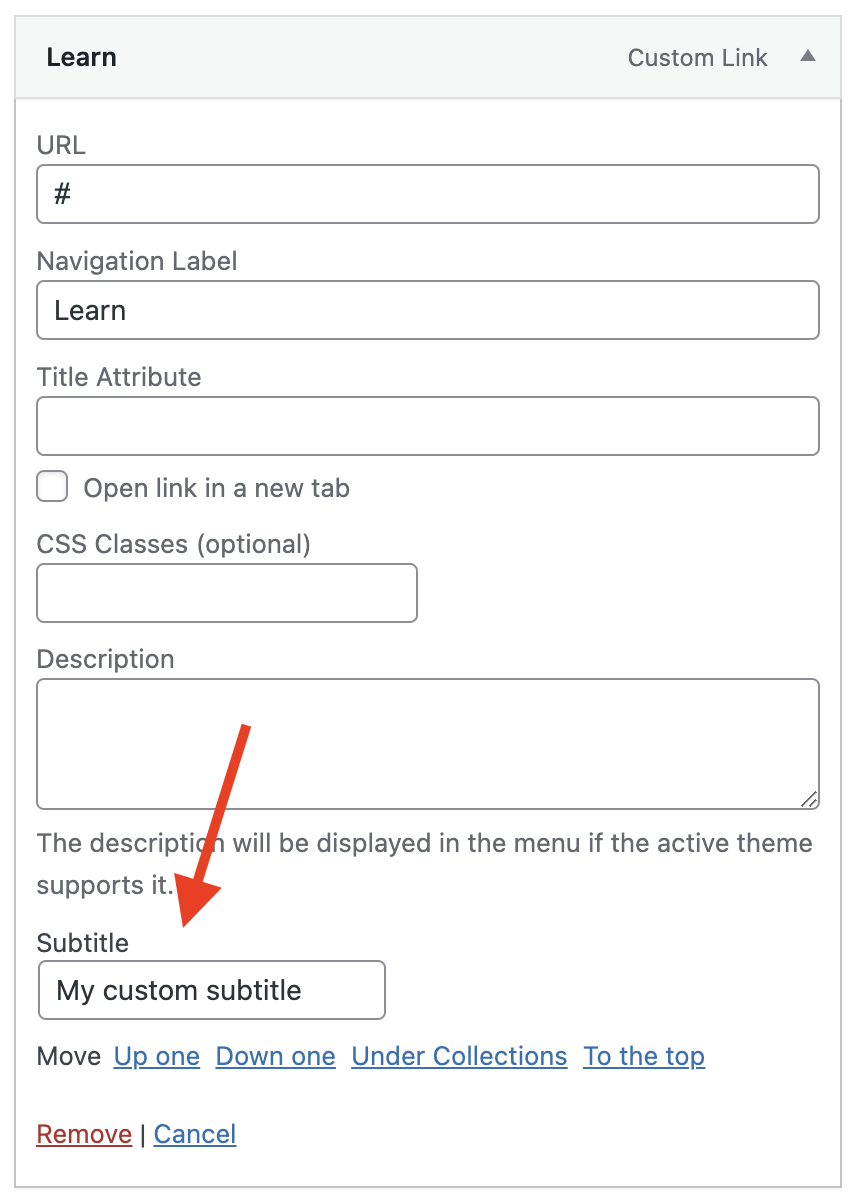
add_action( 'wp_update_nav_menu_item', [ $this, 'save_field' ], 10, 2 );At this point you should now be able to see the new “Subtitle” field when adding a new item to a menu. You should also be able to enter data into the field and save it. If it’s not the case, make you followed the tutorial step by step. It’s now time time to output the subtitle value on the frontend.
Step 4: Display the Subtitle
Now that we can add subtitles to our menu items the last step is to display them on the front-end. There are a couple ways you can do this: you can create a custom walker for your menu or you can hook into the menu title (aka text) to modify the output.
For the purpose of this tutorial I will be showing how to hook into the menu item title and modify the output so we can insert our subtitle after the title text. This is the fastest and easiest method of showing our custom field on the frontend.
Here is the next function we’ll be adding to our class:
/**
 * Hooks into nav_menu_item_title to display our subtitle on the frontend.
 */
public function render_subtitle( $title, $item ) {
	if ( is_a( $item, 'WP_Post' ) && isset( $item->ID ) ) {
		$subtitle = get_post_meta( $item->ID, '_menu_item_subtitle', true );
		if ( ! empty( $subtitle ) ) {
			$title = '<span class="menu-item__title">' .  $title . '</span><span class="menu-item__subtitle">' . esc_html( $subtitle ) . '</span>';
		}
	}
	return $title;
}
If you look at the code you can that we check to see if the subtitle meta exists and if so we modify the default menu item title so it includes a span around the title and then inserts the subtitle with a span around it as well. This will allow you to use CSS to style the title differently from the newly added subtitle.
To make the function work we need to add the action hook into the class __construct() once more:
add_filter( 'nav_menu_item_title', [ $this, 'render_subtitle' ], 10, 2 );Now you should be able to view your menu Subtitles on the frontend of your site! If you aren’t seeing your custom subtitle(s), most likely your theme isn’t using the native wp_nav_menu function to display your menu, your theme is using a custom walker to modify the menu output or you are using Gutenberg to display a Navigation block.
Full Code Snippet
Below is what your complete class should look like in working order:
class Subtitle_Menu_Field {

	/**
	 * Constructor.
	 */
	public function __construct() {
		add_action( 'wp_nav_menu_item_custom_fields', [ $this, 'add_field' ], 10, 2 );
		add_action( 'wp_update_nav_menu_item', [ $this, 'save_field' ], 10, 2 );
		add_filter( 'nav_menu_item_title', [ $this, 'render_subtitle' ], 10, 2 );
	}

	/**
	 * Hooks into wp_nav_menu_item_custom_fields to add a new menu field.
	 */
	public function add_field( $item_id, $item ) {
		wp_nonce_field( 'subtitle_menu_meta_nonce', '_subtitle_menu_meta_nonce_name' );

		$subtitle = get_post_meta( $item_id, '_menu_item_subtitle', true );

		?>
		<p class="field-subtitle_menu_meta description-wide">
			<label for="edit-menu-item-attr-subtitle-<?php echo $item_id; ?>">
				<?php esc_html_e( 'Subtitle', 'subtitle-menu-field' ); ?><br />
				<input type="text" id="edit-menu-item-attr-subtitle-<?php echo $item_id; ?>" class="widefat edit-menu-item-attr-subtitle" name="menu-item-attr-subtitle[<?php echo $item_id; ?>]" value="<?php echo esc_attr( $subtitle ); ?>" />
			</label>
		</p>

		<?php
	}

	/**
	 * Hooks into wp_update_nav_menu_item to save our custom field.
	 */
	public function save_field( $menu_id, $menu_item_db_id ) {
		if ( ! array_key_exists( '_subtitle_menu_meta_nonce_name', $_POST )
			|| ! wp_verify_nonce( $_POST['_subtitle_menu_meta_nonce_name'], 'subtitle_menu_meta_nonce' )
		) {
			return $menu_id;
		}
		$subtitle = $_POST['menu-item-attr-subtitle'][$menu_item_db_id] ?? null;
		if ( $subtitle ) {
			update_post_meta( $menu_item_db_id, '_menu_item_subtitle', sanitize_text_field( $subtitle ) );
		} else {
			delete_post_meta( $menu_item_db_id, '_menu_item_subtitle' );
		}
	}

	/**
	 * Hooks into nav_menu_item_title to display our subtitle on the frontend.
	 */
	public function render_subtitle( $title, $item ) {
		if ( is_a( $item, 'WP_Post' ) && isset( $item->ID ) ) {
			$subtitle = get_post_meta( $item->ID, '_menu_item_subtitle', true );
			if ( ! empty( $subtitle ) ) {
				$title = '<span class="menu-item__title">' .  $title . '</span><span class="menu-item__subtitle">' . esc_html( $subtitle ) . '</span>';
			}
		}
		return $title;
	}

}
new Subtitle_Menu_Field;


Remi, This is awesome! I had no idea you could do this. Thanks for the great tutorial.
Thanks Gregg, this tutorial is just a simple example, but you could do much more using this method. I’m currently working on an awesome plugin related to WordPress menus that should be really handful!
Can’t wait to see what you’re working on!
All i can say is that i am doing it in parntership with the codecanyon top seller!!!
Sounds good but missing a showcase. And got a question: Could I add in this way some more targets (_top) in menu link?
Hi Mark, i sent the plugin to the WordPress official repo, so you can downolad and use it easily. And to answer your question, yes you can use this method to add links target (even id wordpress gives you by default a checkbox to open a link in a new window)
I tried this using a twenty-twelve child theme and get this error when I add the walker parameter to headers.php:
Fatal error: Using $this when not in object context in …/wp-includes/class-wp-walker.php on line 185
I’m pretty sure I followed the instructions that came with the plugin correctly.
I recently ran into the same problem and could fix it.
You have to use wp_nav_menu(array(‘menu’ => ‘main’, ‘walker’ => new rc_scm_walker));
Thanks!
Hi,Remi
I got these notice after using debug bar plugin : Trying to get property of non-object online : 39 41 42 44 please help please.
Best regards,
Decneo
Where did you place this code ?
Hi, Remi
I’ve placed this code on my theme_functions.php
Best regards,
Decneo
This might be asking a lot, but this is the closest I’ve come across in my research so far.
I’m looking to add a data-reveal-id=”” field to my menu items (specifically one of them) to trigger a PopPop! (http://wordpress.org/extend/plugins/poppop/) modal window.
I added the additional section to the edit_custom_walker.php file like you recommended:
<label for="edit-menu-item-subtitle-“>
<input type="text" id="edit-menu-item-subtitle-” class=”widefat code edit-menu-item-custom” name=”menu-item-subtitle[]” value=”data-reveal-id ); ?>” />
And the attribute item appears in my Menu screen now, but I’m not sure how to modify this part to ensure that it actually outputs the field’s contents into the front-end of my site:
$item_output .= ‘ ‘.$item->subtitle.”;
Also, currently, whatever I type in the field reverts to a value of 0 when I save and replaces the subtitle value. Could be related to the above unmodified section, but I thought I’d post that too, in case it was indicative of me missing something else along the way.
Thanks in advance if you get the opportunity to answer this.
– Steven
Never mind, I just used a ‘JQuery var newHTML =’ function to find and replace the menu item in question.
Sorry no one ever got back to you for the initial comment! Glad you got it working though 😉
I think it’s easier to edit the custom_walker.php file and remove $item_output .= ‘ ‘.$item->subtitle.”; (make sure to leave the close in) and then add a new line for $attributes above that (e.g. copy and paste $attributes .= ! empty( $item->xfn ) ? ‘ rel=”‘ . esc_attr( $item->xfn ) .'”‘ : ”; and then change xfn (two instances) to subtitle, and rel to data-reveal-id. Then in edit_custom_walker.php you can change the label “Subtitle” to “Data Reveal” or whatever you want, so that the label is appropriate in the form in the wp admin menu section
The plugin is not working. Like already said above it gives an error: Fatal error: Using $this when not in object context in /wp-includes/class-wp-walker.php on line 185.
Do you have a working version?
Just to let other know, the description at http://wordpress.org/extend/plugins/sweet-custom-menu/installation/ is wrong, you should define the walker in wp_nav_menu like this: ‘walker’ => new rc_scm_walker
Hi Alex, thanks for mentioning the error. You’re totally true. I have to update the description.
awesome! now I can have everything I want on my menu
I´m writting ‘walker’ => ‘rc_scm_walker’ and I get the error: Using $this when not in object context in /wp-includes/class-wp-walker.php on line 185.
What I need to write or to change to make functional this plugin?
Make sure you are using the same type of single quotes that are already being used in the other values/keys in the array, and then change ‘walker’ => ‘rc_scm_walker’ to ‘walker’ => new rc_scm_walker
Thank you very much for your post! It really helped me out to build a color picker for each menu item.
Cheers!
Nice! Would love to see what you came up with, is this for a theme/plugin available somewhere?
‘walker’ => new rc_scm_walker” is causing a parse error.. Can you post the code intact inside the wp_nav_menu() ?
Navtive Imaging: you are using the wrong type of quotes (not your fault, the code in the tutorials is using the wrong type). Make sure you manually type it in instead of copying and pasting. Or copy and paste an existing key/value from the array and just change the values to walker and new rc_scm_walker.
The issue is that when we updated to 3.6 recently it appears our syntax highlighter has stopped working. I’ll get that fixed up.
Try:
[code]$walker = new rc_scm_walker;[/code]
and add that as
[code]'walker' => $walker, [/code]
This sholt fix it
This may be a dumb question but can you call TWO Walkers or not? I mean one would be for your tutorial and the other I need for a description of the menu item.
Possible?
You should combine them into one walker.
Hi, I have been trying to add a custom checkbox but it isn’t working, any tips creating the custom meta or updating the custom meta for a checkbox would be awesome.
Thanks in advance
Its nice to to add sub-menu field , same way we can add thumbnail-image url input field to menu items , As we know on menu edit admin page ,we mostly shuffle the position of items by sorting menu list. so parent menu ,sub-menu relation changes on every instance of sorting. so how can we add custom field to top-level items only and not the sub-menu items.
Hi Vivin, I’m not actually sure how to do that, but if you find out, please let me know! That sounds really handy.
Thanks for a great write-up. I used this tutorial to create an enahanced “Target” field that uses a dropdown to target FooBox from the menu. I also updated the code to use WP 4.0 Walker class. Check it out here:
https://github.com/mathetos/target-foobox
That looks nice! Good work Matt and thanks for sharing 😉
I used this instead of rewriting all that html, I haven’t tested it yet, but I hope it works 🙂
Cheers!
[code]
include_once( ABSPATH . 'wp-admin/includes/nav-menu.php' );
class CustomAdminMenuWalker extends Walker_Nav_Menu_Edit{
public function start_el( &$output, $item, $depth = 0, $args = array(), $id = 0 ) {
parent::start_el($output, $item, $depth, $args, $id);
$needle = '';
$pos = strrpos($output, (string)$needle);
$start = substr($output, 0, $pos-1);
$end = substr($output, $pos-1, strlen($output)-1);
$output = $start.$this->addCustomFields().$end;
}
public function addCustomFields(){
return "Baaam";
}
}[/code]
Can use this in my theme in commercial use?
Of course, this is a tutorial – do as you wish with the code 😉
Hello, thanks for this great plugin but I think it is not compatible with wordpress 4.1 because I got a fatal error at front end after installing this plugin. Can you fix it please? I downloaded the plugin from wordpress.org. thanks
What is the error?
Hi, Thank you for this tip, very good. I would like to know if there’s any way to repeat this way to make more menus? I tried but it’s bring me an error. Thanks in advance!
Please fix the code.:
‘walker’ => ‘rc_scm_walker’
is supposed to be
‘walker’ => new rc_scm_walker
Thanks for the heads up!
“As the “edit_custom_walker.php” is a bit long, i am not going to paste the whole code. You can download the file here.”
Sorry, where can I download it?
I updated the link, thanks! The plugin is on WordPress.org for you to download.
Hi and thanks for this, i am using wp_bootstrap_navwalker in my theme and this code have conflict. Please help me, how i solve it.
That’s because you are already using a walker “wp_bootstrap_navwalker” so following this guide won’t work. You will have to instead modify the existing “wp_bootstrap_navwalker” to work with your custom attributes.
Hey, i tried this great tutorial on one of my website.
when im trying it on a default wordpress theme it works, but when im trying it on a premium theme it doesnt work.
i didnt got to the part when i try to execute the custom field in the frontend, for now im just trying to display the custom field in the backend.
when checking in the theme header.php i noticed that there is already a walker (‘walker’ => new Pojo_Navbar_Nav_Walker() ), is this the reason why it ignores the input display in the backend?
is do, how can i overide it?
thanks, and keep going with great tutorials!
If the theme is using a custom walker than it won’t work because the guide shows you how to create a custom walker to show your fields. Since you are using a premium theme though you should be able to contact the developer so they can assist you either modifying the current walker or at least showing you how you could replace it via a child theme wiht your custom one.
Awesome tutorial! Sent me in the right direction.
Hey, a new action is coming to WP core wp_nav_menu_item_custom_fields. It might be worth an update to this post when it is released.
I know it’s been a long time since you posted this comment, but we finally updated the post to use the new filter!
And if you need to put a get parameter in this field, how to add it to the link?
?param=tratata
publish menu-item-product_cat – a link is formed
and added a get from the field to this link
If you want to use a field for adding custom parameters what you need to do is hook into the “nav_menu_link_attributes” filter to modify the default menu item attributes (in this case the href). Sample code:
[code]
add_filter( 'nav_menu_link_attributes', function ( $atts, $item, $args, $depth ) {
if ( $paramValue = get_post_meta( $item->object_id, 'YOUR_CUSTOM_FIELD_NAME', true ) ) {
$atts['href'].= "?param=$paramValue";
}
return $atts;
}, 10, 4 );
[/code]