Studiocart Sales Funnel Manager for WordPress

As an online business owner your end goal should be to turn site visitors into customers. But how?
One tried and true method used by many marketers is called a sales funnel – a path that you gently guide users along to get them to make a purchase. This is typically broken down into 4 stages: awareness, interest, desire and action (aka purchase).
WordPress is a great platform to create a website or landing page for your business, which can bring awareness to your product. You can even use your site to pique interest. But to add a complete sales funnel you’re going to need a targeted tool. Which brings us to today’s plugin highlight – Studiocart.
Meet Studiocart

In case this is your first time hearing about it, Studiocart is a smart way to create sales funnels with WordPress and boost overall conversions. At first glance it’s a helpful ecommerce plugin that allows you to sell goods, courses, memberships, services and more from your website… but it can do so much more than that.
Sales Funnel Made Easy
Studiocart is an end to end solution for all of your sales funnel needs. With Studiocart you can add your product(s), enable payment settings (one-time, recurring, payment plans and free trials), promote upsells and downsells to maximize sales, offer discounts, capture lost leads, add customers to a mailing list, and more with the help of integrations.
Studiocart is also GDPR compliant and white label ready. So you stay in charge of your data, and if you do use Studiocart for a client project you can add custom branding, dashboard menu icon and author info.
Ready to Use Templates
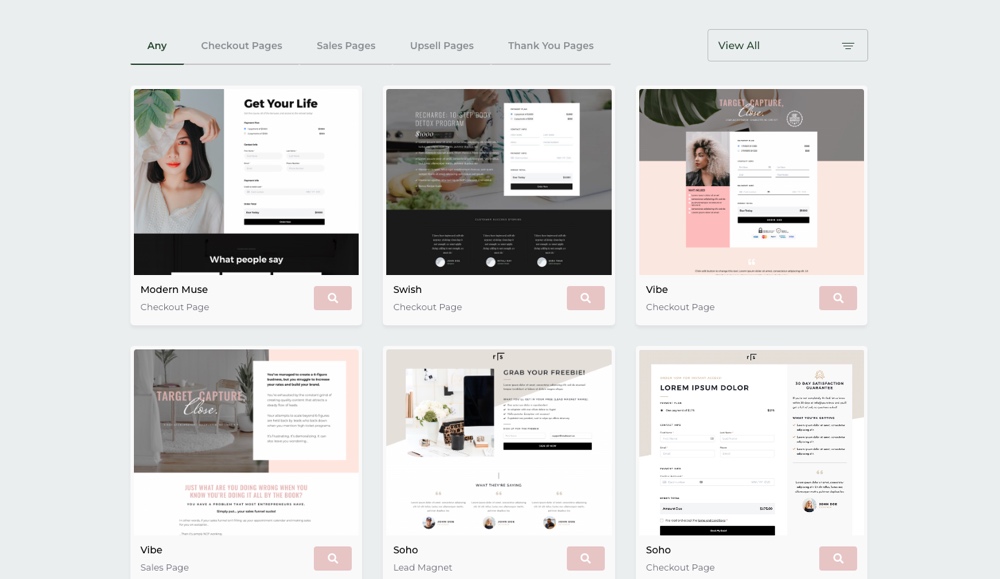
In addition to customizable features for your sales funnel, there are ready made templates that you can use to add important pages fast. Choose from expertly designed templates for your sales page, upsells, checkout and thank you page.
Best of all, the templates are available for 5 different popular page builders – so whether you use Elementor or prefer Divi you can still have key funnel pages setup in minutes. Just navigate to the Studiocart “Template Library” from your WordPress dashboard, then select and download the pages you’d like to use.
But if you want to add a product purchase form to another page on your site, or design your own thank you page from scratch you certainly can. Just use your theme and page builder of choice along with Studiocart’s useful shortcodes and Gutenberg builder block that make it easy to add order forms, order details, receipts, product pricing and payment plans anywhere on your website.
Studiocart Integrations
While the plugin is pretty great already, for more features you’ll be happy to know that there are a number of Studiocart integrations.
Use integrations to automate user interactions, for example sending a welcome email when a new user makes a purchase. Or take advantage of advanced features, like allowing students to access to an exclusive forum after purchasing a specific course.
At the time of writing there are 35+ integrations including (but not limited to):
- Popular page builders, for instance Gutenberg, Elementor, Divi, Qubely and Oxygen
- LearnDash, MemberPress, TutorLMS, WP Courseware and other popular course systems
- Google Recaptcha spam prevention
- Email marketing services such as MailChimp, ConvertKit, Mailpoet, ActiveCampaign, etc.
- SliceWP affiliate program manager
- Restricted access via Wishlist Member, Groups by itthinx and Restrict Content Pro
- 3rd party automation services like Zapier, Uncanny Automator, Integrately, Thrive Automator and more
And there’s lots more in the works – both in terms of plugin features and third party integrations. You can check the Studiocart Trello page to see a realtime summary of pending feature requests, those in progress and what’s been released.
Small Business Friendly Pricing
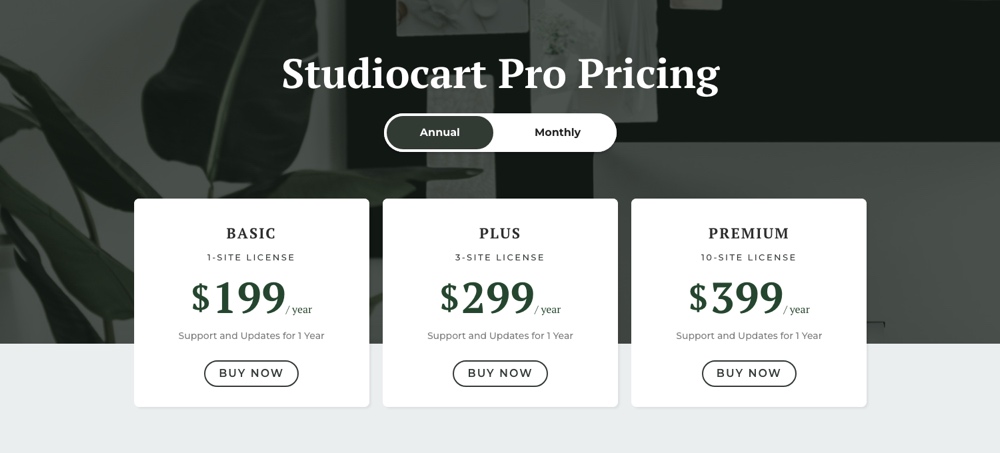
So what’s all this cost? Getting straight to the point, plans start at $199/yr for a single site license. This includes all of Studiocart’s awesome features, templates and integrations for unlimited funnels as well as 1 year of support from the developer.
But you can also grab a slimmed down Studiocart lite version on WordPress.org which offers fewer features but is still a great option if all you need is a quick way to add an order form, checkout, thank you page and newsletter integration (note there are 6 integrations available for the free version – checkout the info page to learn more of what’s different in free vs pro).
How to Build a Sales Funnel with Studiocart
So, how do you actually create a WordPress sales funnel with Studiocart? It’s easy – we’ll show you! You can also follow along with their own quickstart guide, but this is our own condensed version.
So first step – get the plugin. Head over to the Studiocart website and purchase a license for your website, then download the plugin and install and activate per usual via the WordPress dashboard (Plugins > Add New > Upload Plugin and choose the Studiocart zip file).
Studiocart Settings
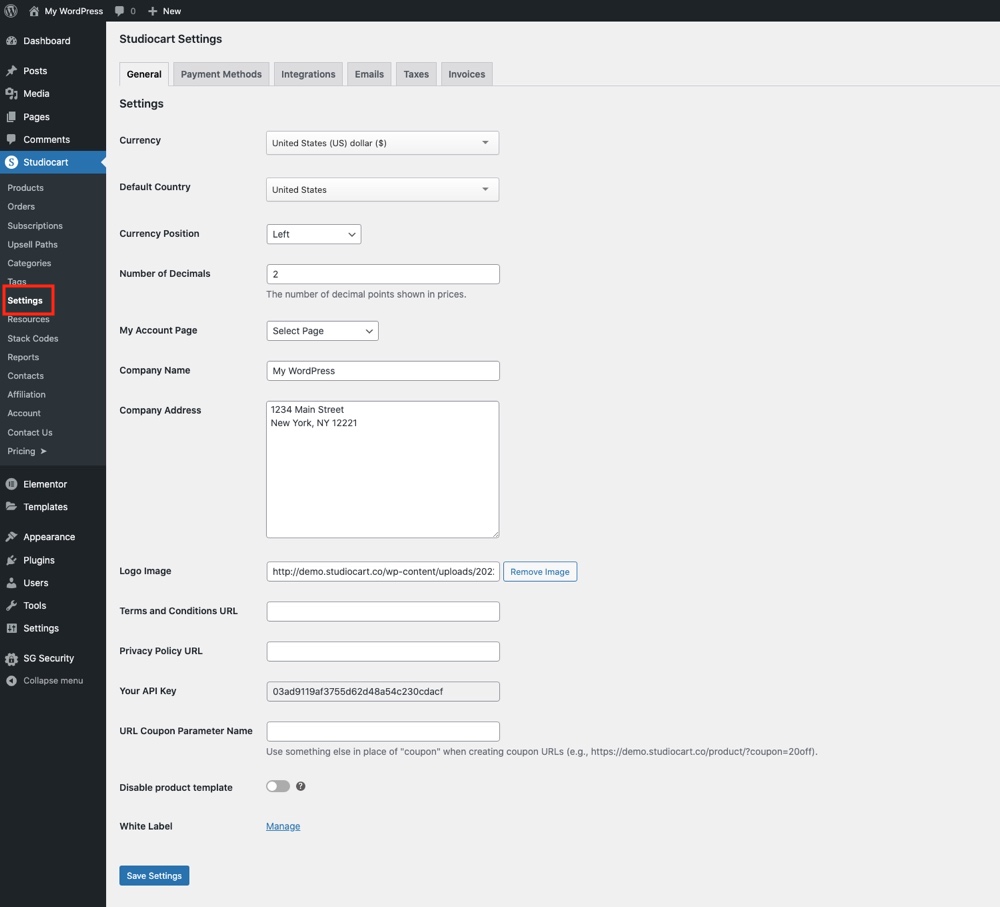
With the plugin installed and ready to use your first step is to add your business information under the Studiocart > Settings section. This includes your branding, privacy policy and terms links, currency format, payment methods (Stripe, PayPal or Cash options), email contact information (which will be used for all automatic emails related to Studiocart’s processes), tax rates (and VAT) and general invoice format.
Note – this is also where you will find the section to enter in API keys and URLs for various third party integrations. Required information varies by integration (For example, MailChimp requires an API key to connect while Teachable needs your login information), but for this guide we’re not going to be connecting. So let’s add a product!
Create Products & Customize Your Funnel
Adding a product is as easy as creating a blog post (we’re using the term “product” but remember you can sell services, digital or physical goods, courses and so much more).
Just navigate to Studiocart > Products > Add New. Whether you’re using Gutenberg or the Classic editor, you’ll want to first give your product a name and add a bit of content to be used on the product page.
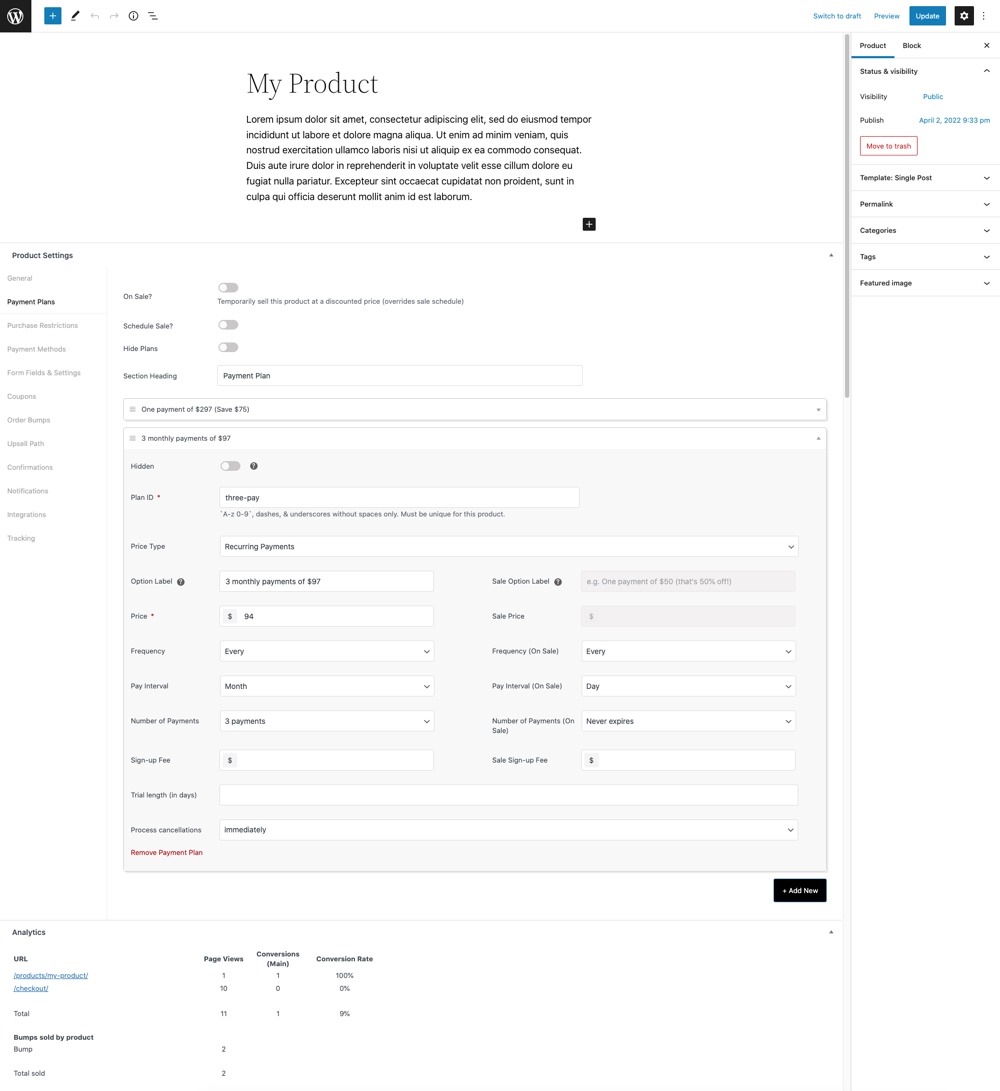
Next use the Studiocart Product Settings meta box to add important information. This includes:
- General product information for page colors, background image, template and tax status
- Enable Payment Plans (one time, recurring, name your price or free) which includes sales and sale schedules
- Purchase Restrictions for a set number of sales or sales per customer along with what to do when a product is no longer available (e.g. display message or redirect)
- Allowable Payment Methods (reminder that this is based on the methods you’ve setup in the main Studiocart settings)
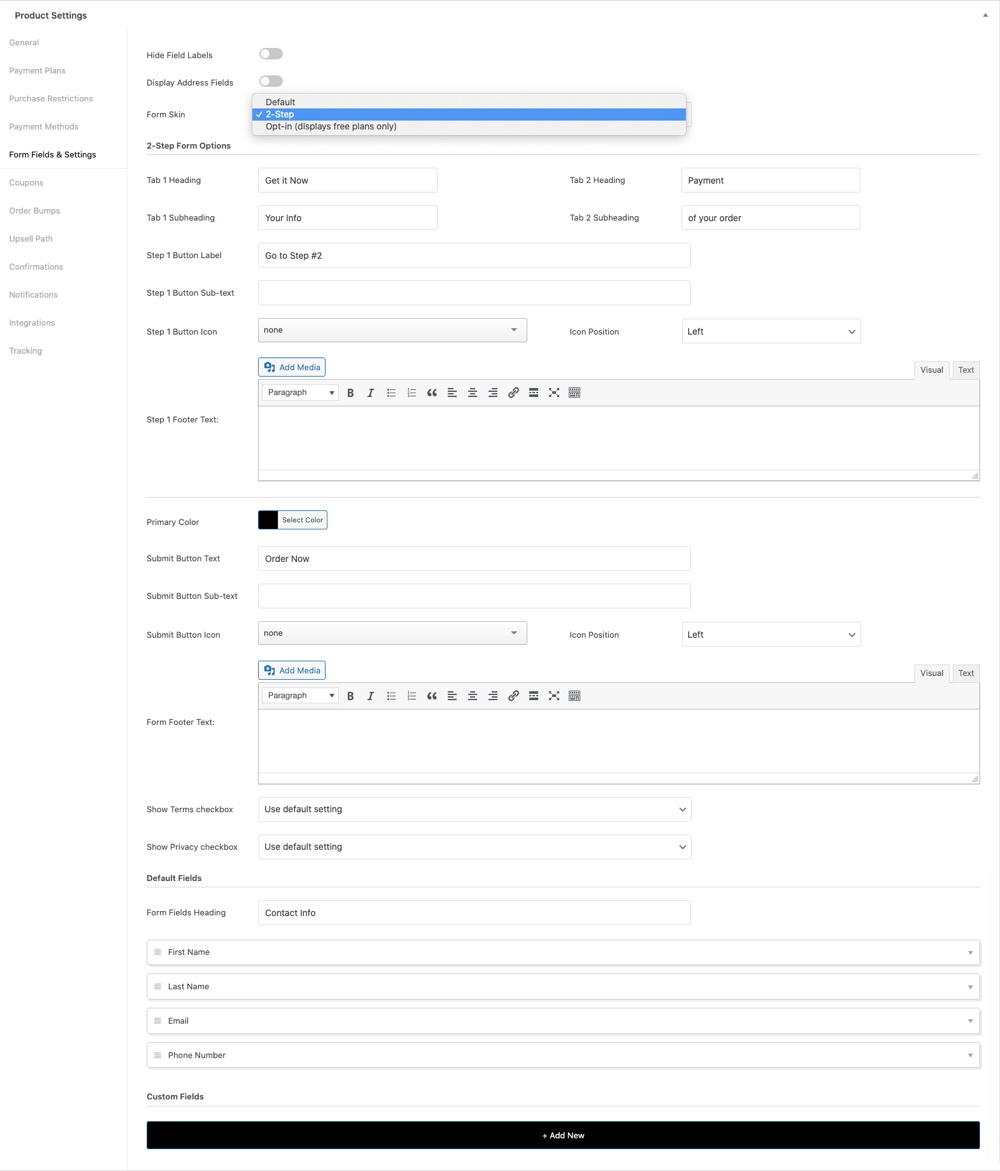
- Drag and drop Form Fields builder to add a one page, 2-step or opt-in form for your products (see image above)
- Enable and create Coupons
- Allow for Order Bumps (addons or upsells once a user proceeds to purchase) and a specified Upsell Path (for paths see our note below)
- Specify a thank you page, redirect or message as a purchase Confirmations
- Create Notifications to be sent on purchase or enable a welcome email for opt-ins
- Enable third party Integrations and choose the service, trigger and action (for example you could add LearnDash, a trigger after purchasing and an action to then add the user as a student)
- Add Tracking codes for lead captures and/or purchases
You might have also noticed that there is an Analytics section here too. Once your product is live you’ll be able to view quick statistics here for your page views, conversions, conversion rate and bump sales. It’s a convenient way to gauge product performance and make adjustments to your product page or funnel as needed.
When you’re done just be sure to save. We suggest also testing your products once their live to be sure any settings for upsells, lead capture, notifications etc are all working as they should be. But once you’ve done a quick run through you should be ready to start selling!
Creating an Upsell Path
If you do decide to enable upsells, you’ll also need to create an Upsell Path. This determines the upsell product, special offer, landing page and where the user is taken if they accept or decline the offer.
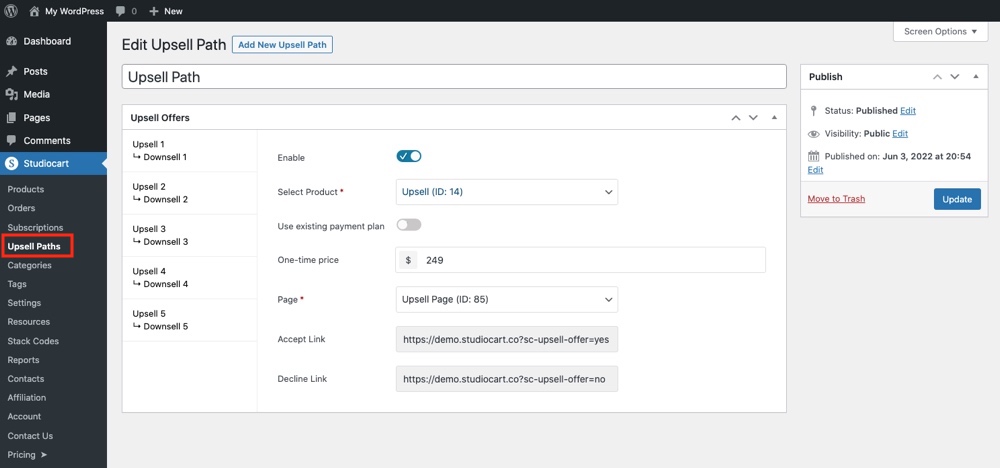
To do this head to Studiocart > Upsell Paths > Add New. Here you can add layers of upsells/downsells with specific pages. When you’re done be sure to save your work, then you can assign the Upsell Path when creating/editing a product.
Studiocart Reports
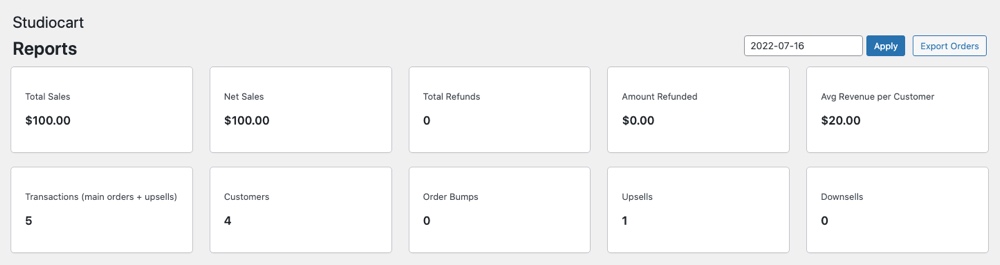
And the last section we wanted to touch on is the reports. Under the main dashboard if you navigate to Studiocart > Reports you’ll find quick information about your store that can be filtered and exported.
As you can see – there is no shortage of options! Everything you need to add products, create a funnel and even capture leads is right there at your fingertips.
Why Choose Studiocart?
Bottomline – we think you should give Studiocart a try. There are multiple plugins you can choose from, and we’ve tried quite a few, but Studiocart was easy and definitely a product we’d recommend. Just to summarize here are a few reasons why we think Studiocart stands out.
Easy & Automatic: With Studiocart you can have your sales funnel up in a day. Seriously. The included templates look great and with a few small tweaks to colors and images you can have a sales page, checkout and thank you page that matches the rest of your site and your branding (there’s even white labeling available for the backend). And integrations with email marketing platforms and workflow software means you can setup automations to make managing tasks a breeze.
Lightweight: This is a one and done plugin, no need for large and cumbersome ecommerce plugins or tons of add-ons. Studiocart has everything you need to walk visitors through your site and right to your checkout page.
Lead Capture: Don’t let customers get away! Where many traditional e-commerce platforms fail is at checkout, but with Studiocart you can enable 2-step checkout and lead capture, so when users enter their email before proceeding to purchase they’ll also be added to a mailing list of your choosing. So you can follow up with them as needed and recover those abandoned carts.
Affordable Pricing: Studiocart is currently set at a regular price of $199/yr making it a budget friendly option for entrepreneurs and small businesses on a budget. We’re going to assume that if you’re looking to build a sales funnel for your WordPress site you’ve probably also researched WooFunnels ($299/yr), Cartflows ($239/yr) or ThriveCart ($495 limited offer, regularly $97/mo). And it’s pretty apparent that their price points range from a little to a lot higher than Studiocart (and often with out a significant addition of services to make the price increase worth it).
Support: The Studiocart development team is very responsive (they even have a perfect 5-star rating on WordPress.org) plus there is an active Studiocart group on Facebook where you can ask others for help. So whether you’re looking for help with setup or just advice about sales funnels in general, there will be someone in the Studiocart community that can help.
So whether you’re an expert planning to launch a coaching program, or a developer with a WordPress theme to sell, Studiocart is an excellent solution for your small business. But what do you think of Studiocart? Is it the right solution for your WordPress site? Anything else you’d like to know about sales funnel creation? Feel free to leave a comment below!