Slider Revolution WordPress Plugin Review & How To Guide
Slider Revolution is a premium slider available as a WordPress plugin and Magento extension. It’s gained huge popularity in the WordPress community due to it’s wide range of features and ease of use.
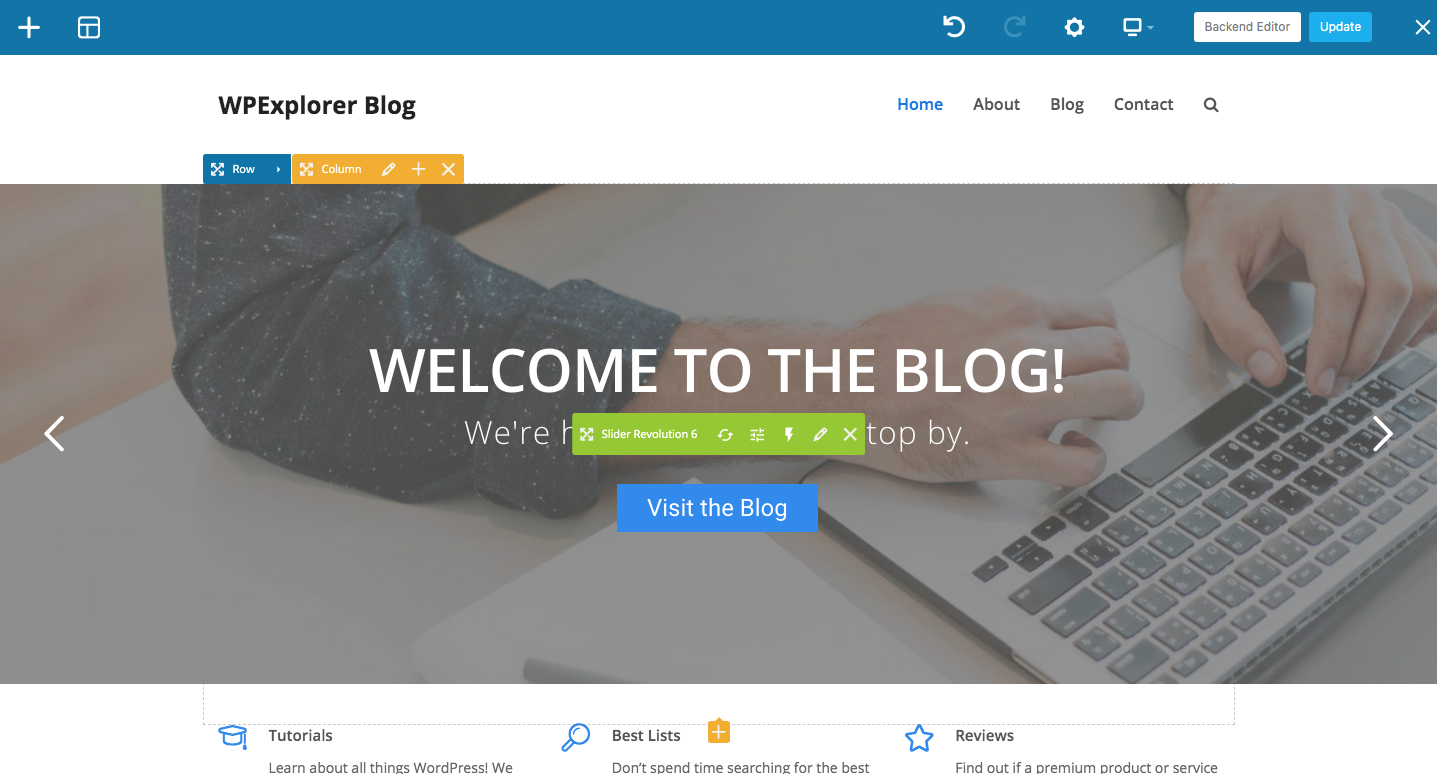
In this overview we’re going to cover the main features of the Slider Revolution WordPress Plugin, and then we’ll show you just how easy it is to make your own sliders from scratch.
Get Slider Revolution with your theme! The Slider Revolution plugin is included for free with the purchase of our Total WordPress Theme as a bundled plugin. So not only do you get an awesome plugin you will also get the Total theme as well as the WPBakery page builder plugin! (Please see notes about installing and using your bundled plugins below).
Slider Revolution: What Makes This Plugin So Great
There are tons of great features built into Slider Revolution to make creating custom sliders for your website easy. Here are a few of our favorites.
Layouts & Responsiveness
Slider Revolution has changed it’s focus a bit to be more than just a slider. Since the version 6 update you can of course create stunning animated sliders, as well as carousels and scenes (a single slide used like a page builder row). The plugin is also responsive ready with a new intelligent inheriting option. So rather than your slider simply shrinking on mobile devices elements will resize or shrink so that your within your slider or module is legible and optimize according to device.
Multiple Content Sources
Want to create a slider for your posts? Or for your WooCommerce products? Not a problem – choose from 9 different content sources when creating your slider.
As of writing this post Slider Revolution supports content based on:
- Default/custom: upload your own images/video
- Posts: choose from your blog posts, custom post types, specific post IDs, or use the current post/page (great if you want to add a featured slider to blog post or portfolio item)
- WooCommerce: display your products
- Social media: specifically Flickr, Instagram, Twitter, Facebook, YouTube or Vimeo
Easy Options
Slider Revolution makes it easy for your to create custom sliders by adding in options for just about everything. Choose your slide delay, navigation arrows, custom fonts, add parallax backgrounds, slider location (add margins), add media layers, insert buttons, select slide transitions and more all using the drop-down menus throughout the plugin.
And on top of that you can customize just about everything and even save your own presets to make reusing font styles, slide transitions, layer animations and more super easy.
Media Support
Add text, links, images, videos and audio with a few clicks of your mouse. This gives you the ability to create information rich slides that your readers and clients will be able to identify with. Plus each of these media types is added as its own layer with unique animations, timing and styles that you set using Slider Revolution’s super options.
Slider Revolution Installation
First you’ll need to get a copy of the Slider Revolution WordPress Plugin. There are a few different methods to install the plugin depending on if you purchased your own copy of the plugin or if it was included with your premium theme.
1. Install Your Copy of Slider Revolution
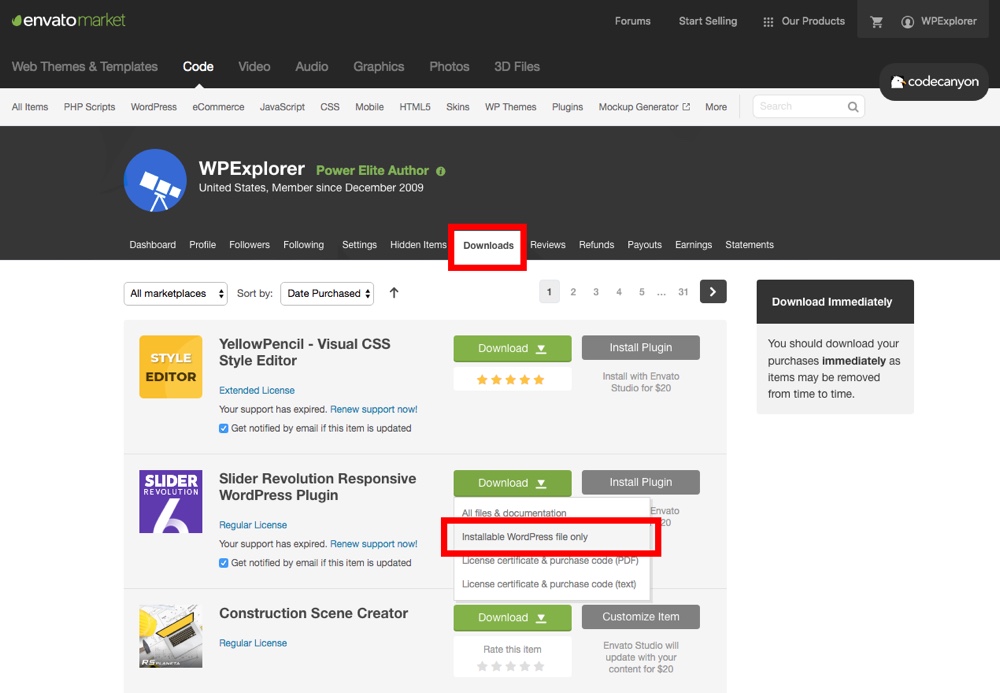
If you purchased your own copy of Slider Revolution from CodeCanyon you’ll need to install the plugin yourself. To download the plugin files log into your Envato account and go to your downloads page (you can get to this page by hovering on your username). Then locate your copy of Slider Revolution and select the download option for “Installable WordPress file only.”
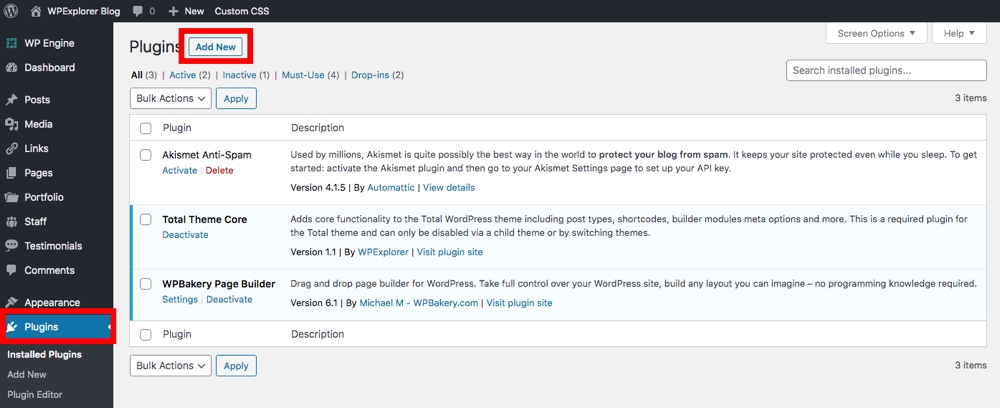
Next, log into your WordPress site and navigate to Plugins > Add New.
Then click on the “Upload Plugin” button at the top left of your screen.
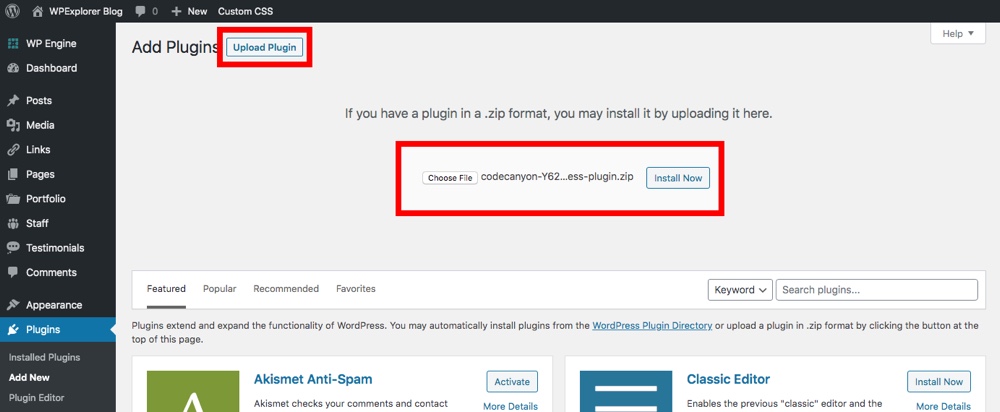
From here, use the “Choose File” button to select the plugin file you just downloaded from CodeCanyon, and click the “Install Now” button.
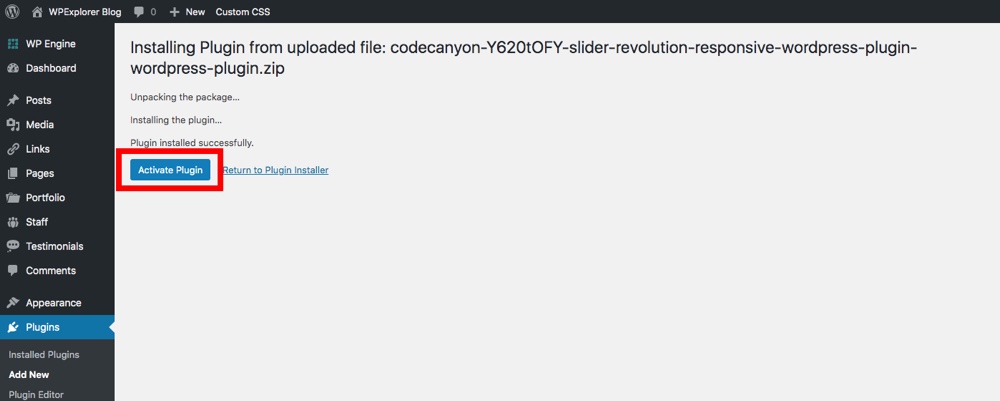
After that just activate the plugin and you’re ready to start building sliders!
Note: You can also install your plugin via FTP by logging into your server and uploading the extracted (unzipped) plugin to your folder located at wp-content/plugins.
2. Install Slider Revolution Included with a Premium Theme
Many premium themes include copies of premium plugins with the theme download. If this is how you want to install your copy of Slider Revolution then you will need to reference your theme’s documentation.
Most theme developers do their best to make the bundled plugin installation process easy. For example, by including a notice bar or activation panel.
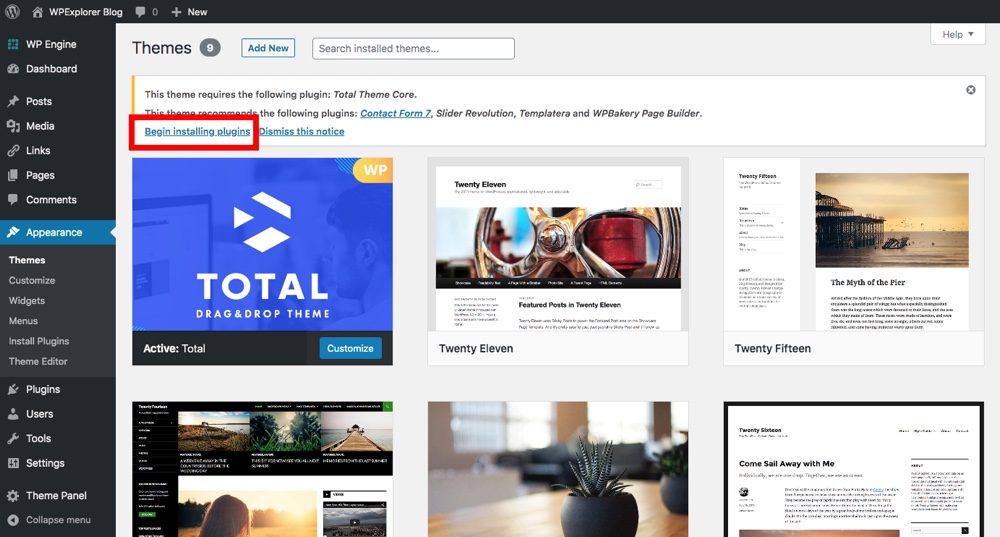
In our guide we’re using the Total WordPress theme. After installing and activating Total you should see an onscreen prompt that recommends you install Slider Revolution (and other plugins included with the theme).
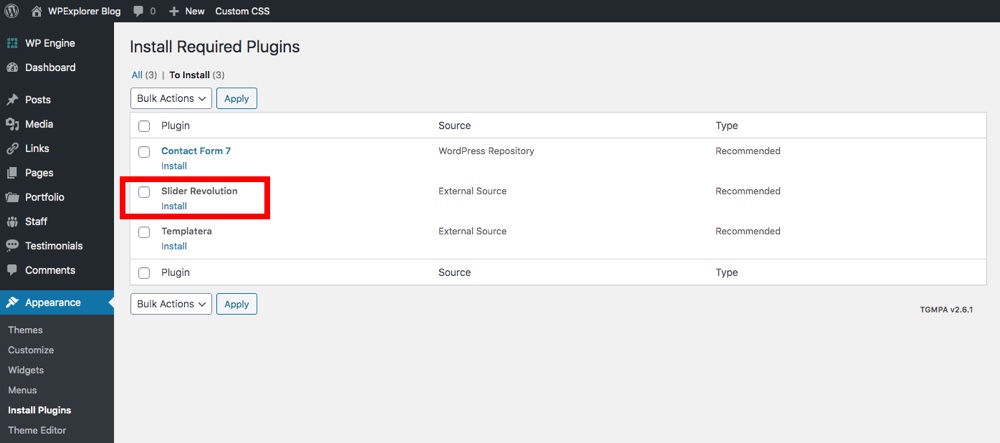
Just click the link to go to the recommended/bundled plugins page, then click to install and activate your plugins.
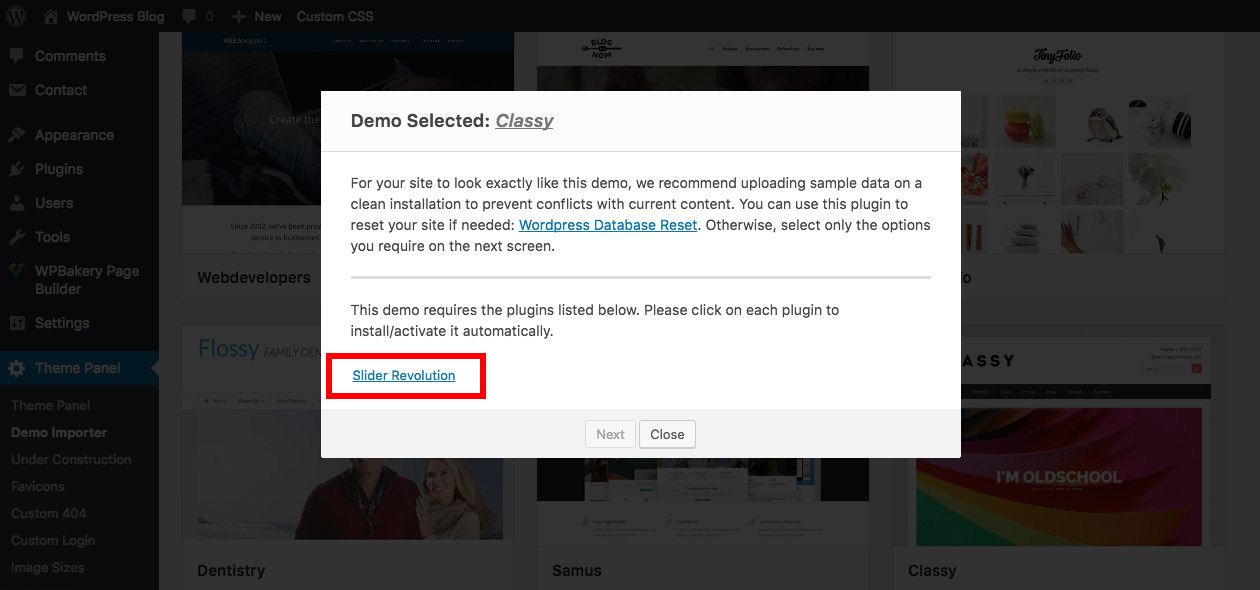
Total also includes a custom option in the demo importer to install and activate Slider Revolution when importing sample data. If Slider Revolution was used to create the demo you’re importing you should be prompted to install the plugin as seen above.
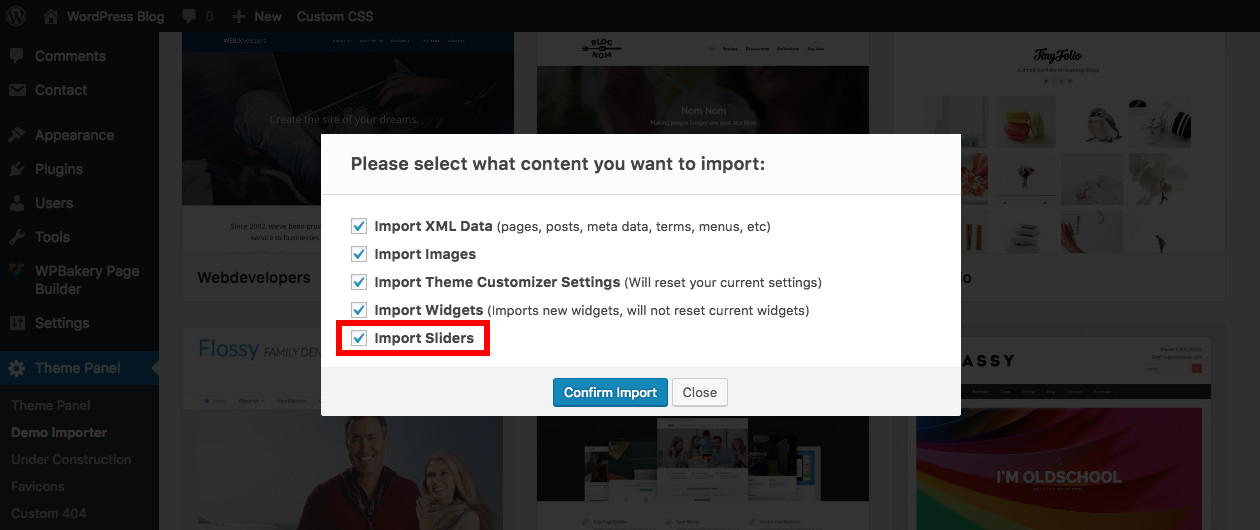
Then just be sure the option to “Import Sliders” is selected, and the theme will automatically import any custom sliders from the demo. Easy!
Slider Revolution User Guide
After you’ve installed the plugin, it should add a menu item to your main WordPress dashboard. Click on this to be taken to the main Slider Revolution slider management page.
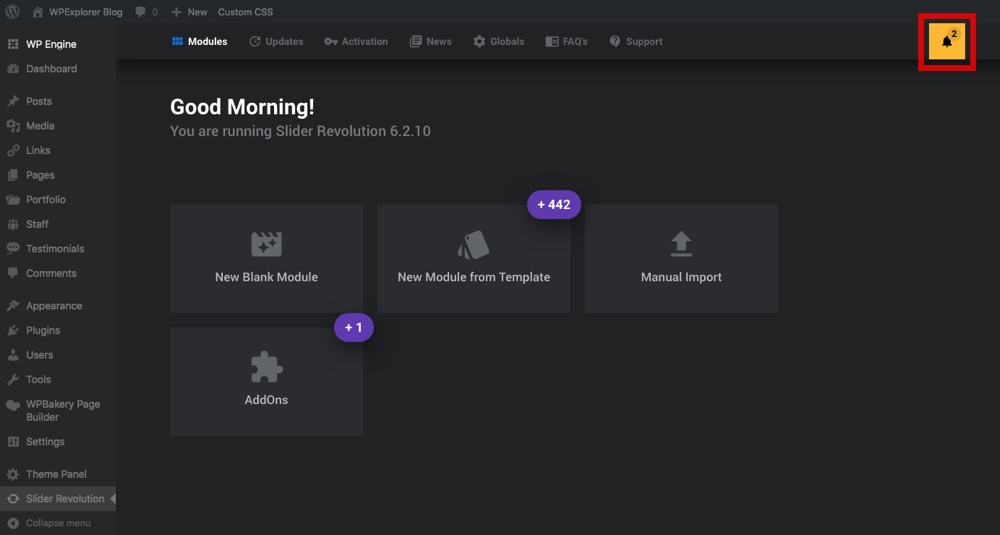
From here you can create or edit sliders, import templates, activate your license if you purchased your own copy of the plugin.
Slider Revolution Plugin License Activation
If you purchased Slider Revolution yourself you can activate it to unlock all of the slider features. To locate your license you’ll need to go back to CodeCanyon and visit the Slider Revolution plugin page.
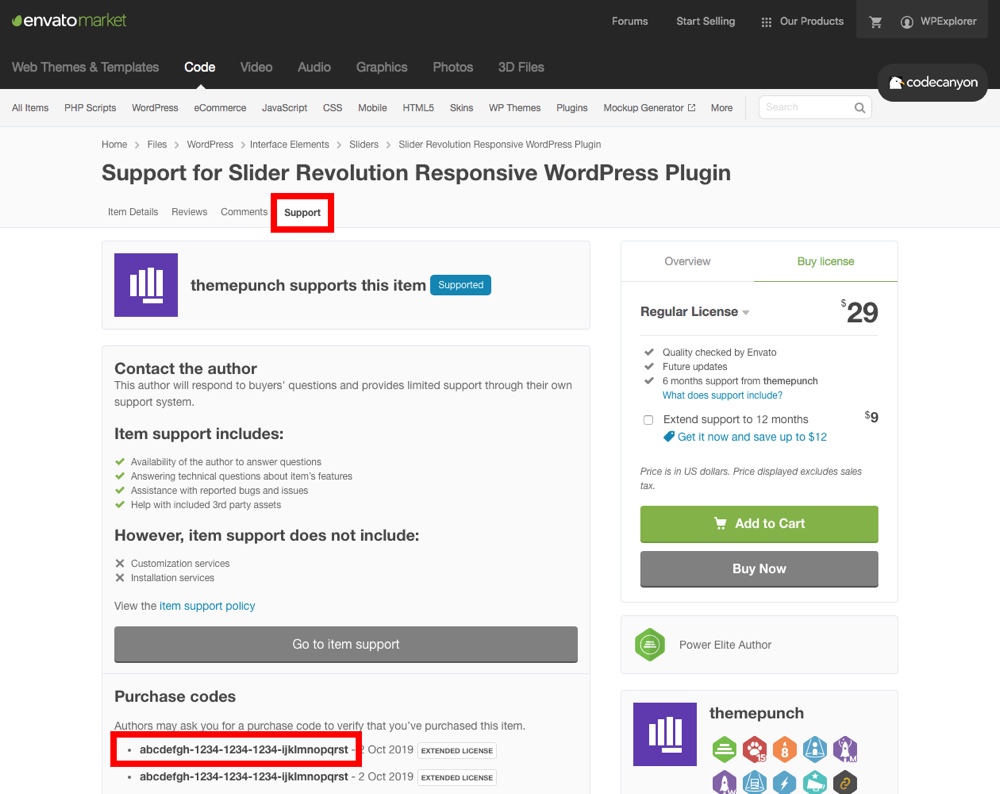
From here click on the “Support” tab to view all of your purchased licenses. Copy your license key and go back to your WordPress dashboard.
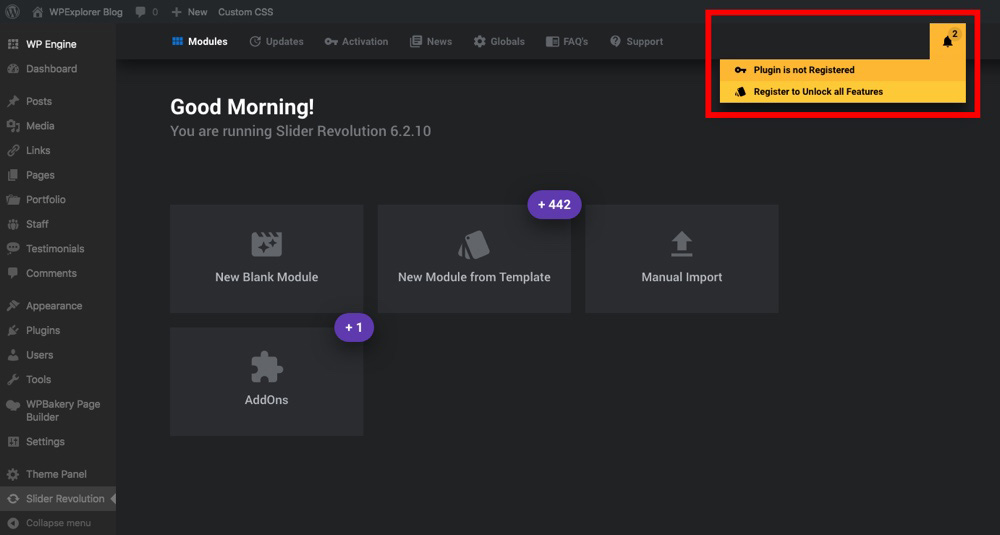
Clicking on the bell icon.
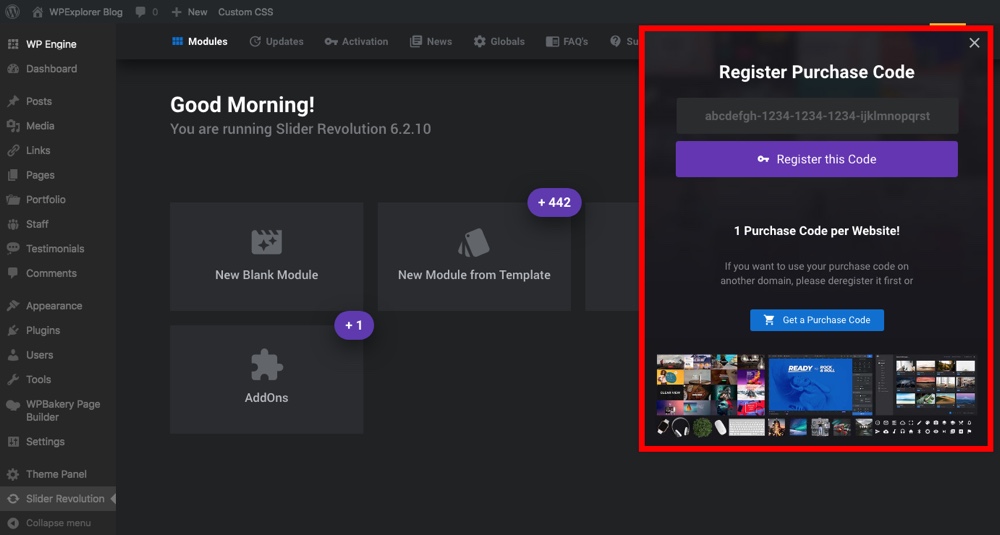
Then enter your license key. To receive support from the plugin author as well as unlock the premium Slider Revolution Module Templates & Addons you will need to purchase your own license.
IMPORTANT, Bundled Plugin: If your copy of Slider Revolution was included with your theme you can ignore this section. There is no need to activate a plugin license as bundled plugins do not have one. Instead it is up to your theme author to ensure your copy of the plugin is updated within your theme updates. While sometimes this means you might have to wait a little for a slider update it ensures the plugin is fully compatible with your theme.
Slider Revolution Global Settings
Before you begin building we recommend visiting the Global Settings option (which is a submenu item underneath Slider Revolution).
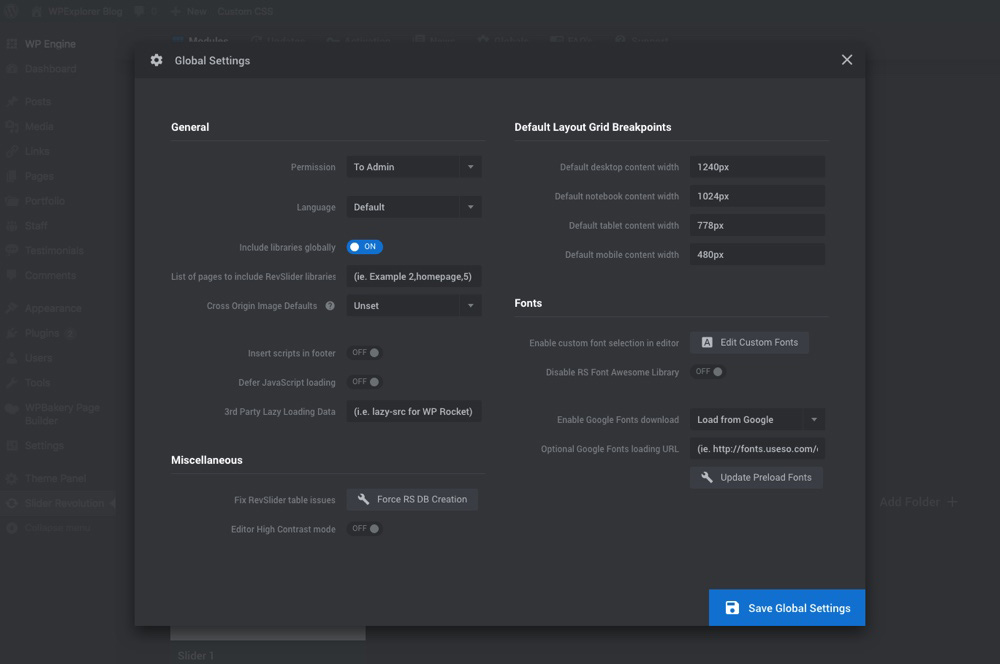
There are plenty of important options here for default responsive grid settings (which are applies when building new sliders), custom font loading URL, database creation for the plugin and more. But there are two options we recommend you tweak.
The first option your should consider editing is the Permission which you can use to restrict plugin access to admins only. This is an easy way to ensure you, your web designer or other admins are the only ones creating sliders on your site (especially useful if you have guest authors on your blog).
The second option you might want to edit is the Default Layout Grid Breakpoints option. These are the pixel widths according to device for your responsiveness settings.
This is also where you can enable custom fonts, 3rd party lazy loading and force database creation (if you you’re having Slider Revolution Table issues). Once done, make sure to save your settings.
Now you can start building your sliders! You have three options – begin from scratch, snag a free export file from the Slider Revolution “usage examples” or import sample sliders included with your theme.
Manual Import of a Slider
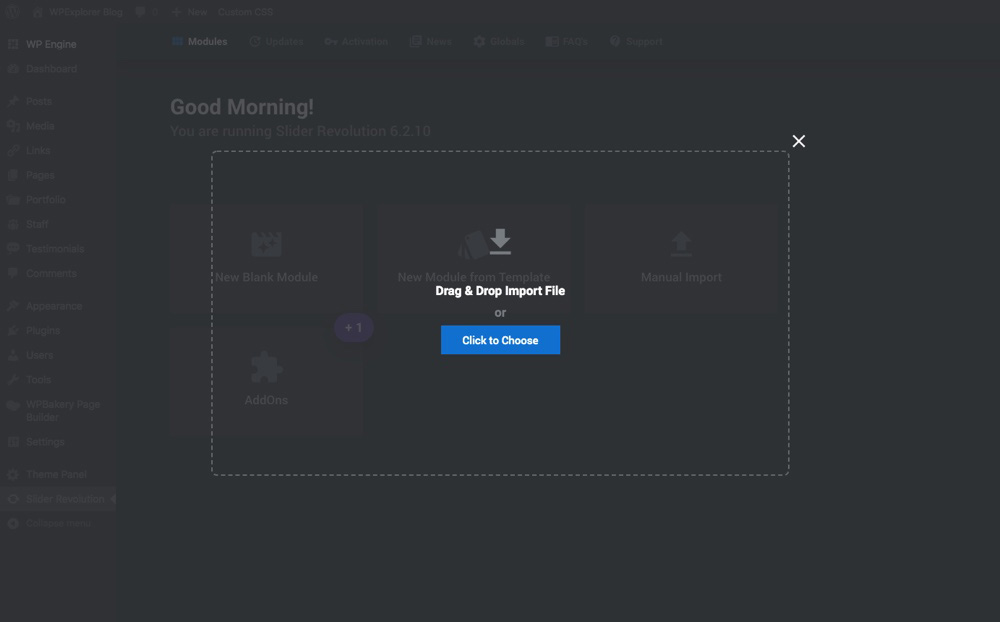
To import a slider you’ve downloaded from another website from Slider Revolution’s usage examples first download the slider file from their site, then navigate back to your WordPress the click on the Import Slider option. From here browse for the sample file you downloaded and click on Upload. This should add the sample slider and all of it’s settings so you can use it as a base for a new slider.
New Module from Template
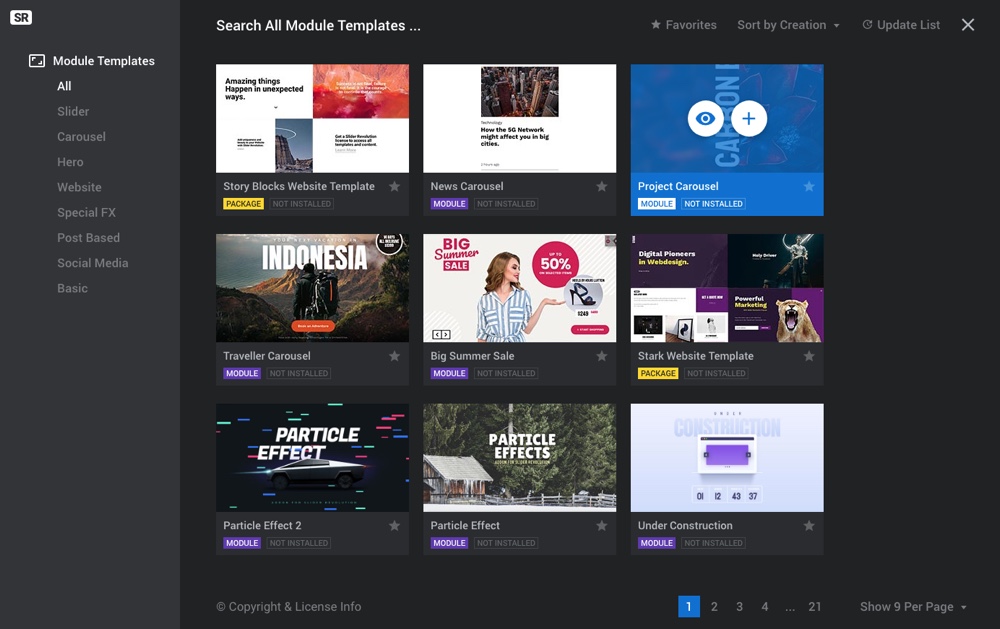
If you’ve purchased your own license for Slider Revolution you’ll have access to all of their pre-made layouts (there are more than 180+ to choose from). To use a template just hover on the one you like, click the Eye icon to preview or the Plus icon to install the template.
Note: If your copy of Slider Revolution was bundled with your theme you will not have access to these templates. However, many theme authors include their own slider templates that they’ve created to go along with their theme demos that you can import manually.
Create A New Slider
If you’re making a slider from scratch, click on the New Blank Module option. Now let’s get to work!

First you’ll see a welcome message with an option to use their quick start guide. Click to get started and follow along with our guided walkthrough below.
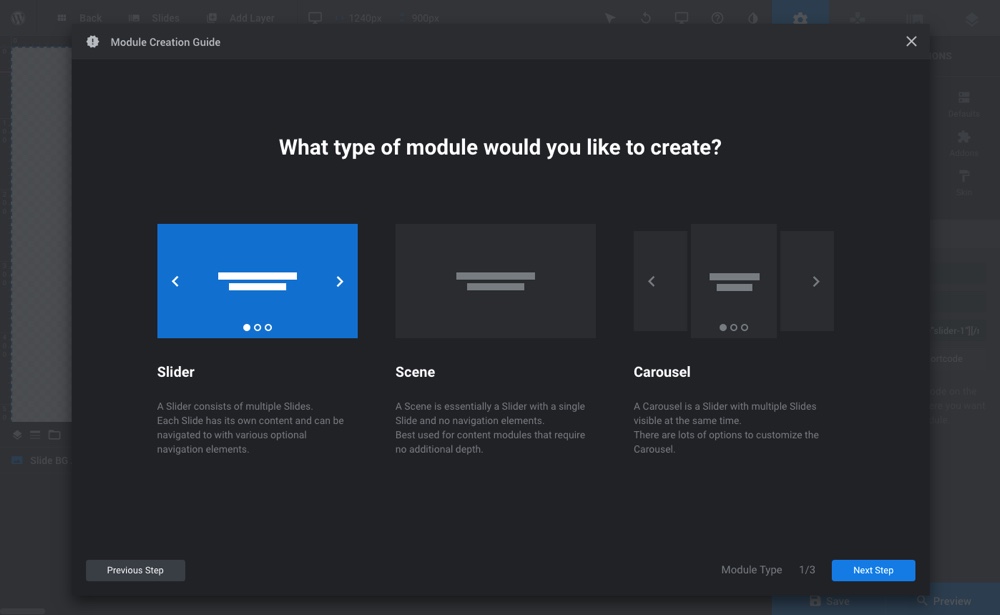
Choose a slider type – you have the option to choose your module:
- Slider: exactly what it sounds like, multiple animated slides that rotate to display one slide after the other
- Scene: a single slide that can be used a content module (like a row when using a page builder)
- Carousel: many slides with multiple visible at the same time
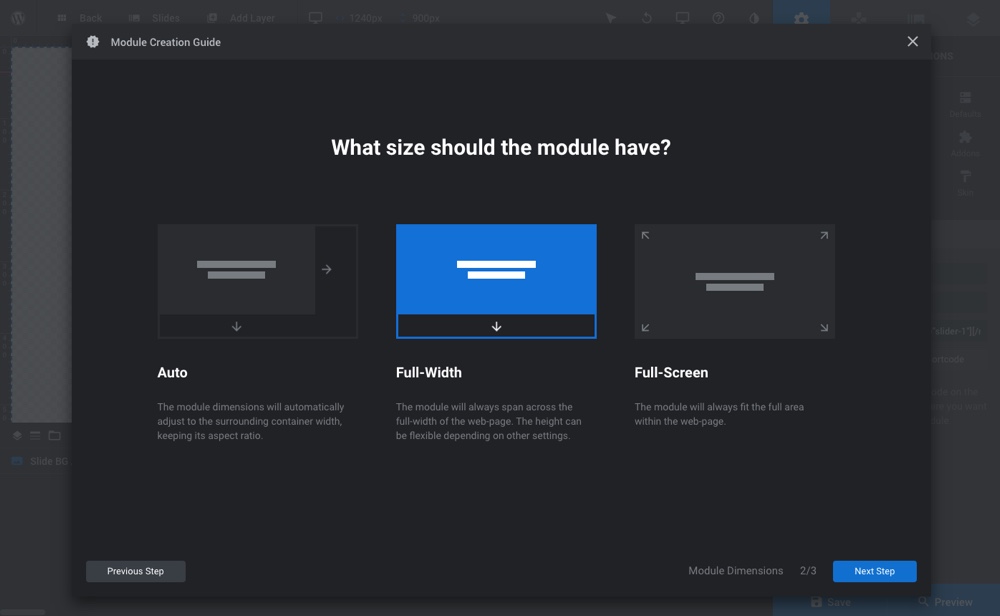
Then select a layout:
- Auto: this is the default setting which will stretch your slider to the main container width as defined by your WordPress theme, but you will still define the height.
- Full-width: exactly what it sounds like – a full width slider option that will full stretch across from left to right. You will still need to define the height of your slider.
- Full-screen: use this to create large sliders that literally fill the entire screen, no matter the size of your browser or device (you can even use this option to add full screen sliders with videos for even more impact).
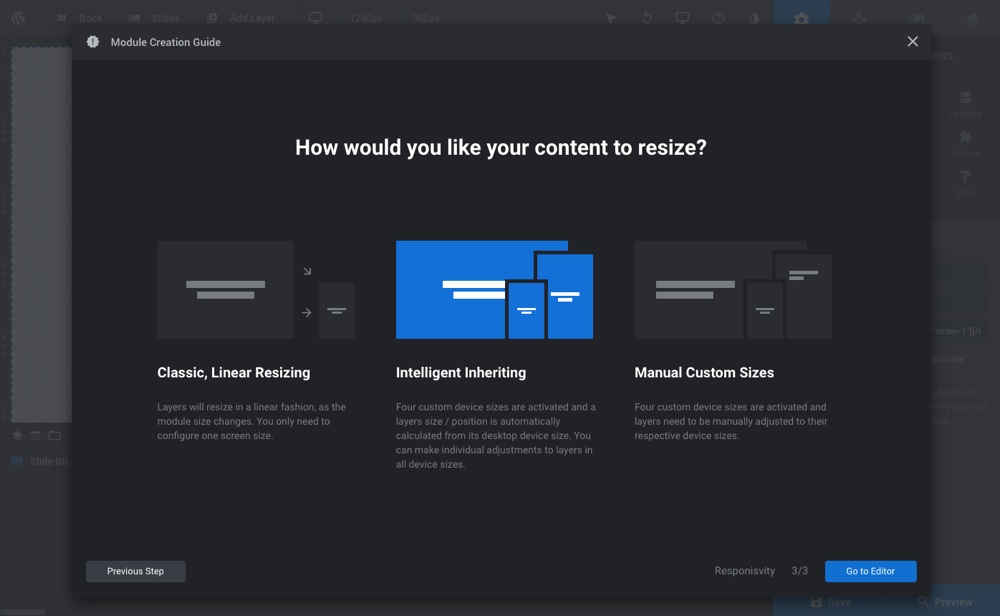
And as a last step you’ll need to choose and customize your responsiveness or “resize” settings:
- Classic (linear) resizing: after configuring your main screen size settings your slider will compress accordingly (so a 1000x400px slider will compress to a 500x200px slider with the fonts, images and other slider elements shrinking proportionally as well).
- Intelligent inheriting: four device sizes are automatically created based on the desktop settings you choose, with the option to make adjustments as needed.
- Custom (manual): allows you to set your slider size using exact pixels, with additional options to set the slider sizes at various screen width (desktop, laptop, tablet and phone).
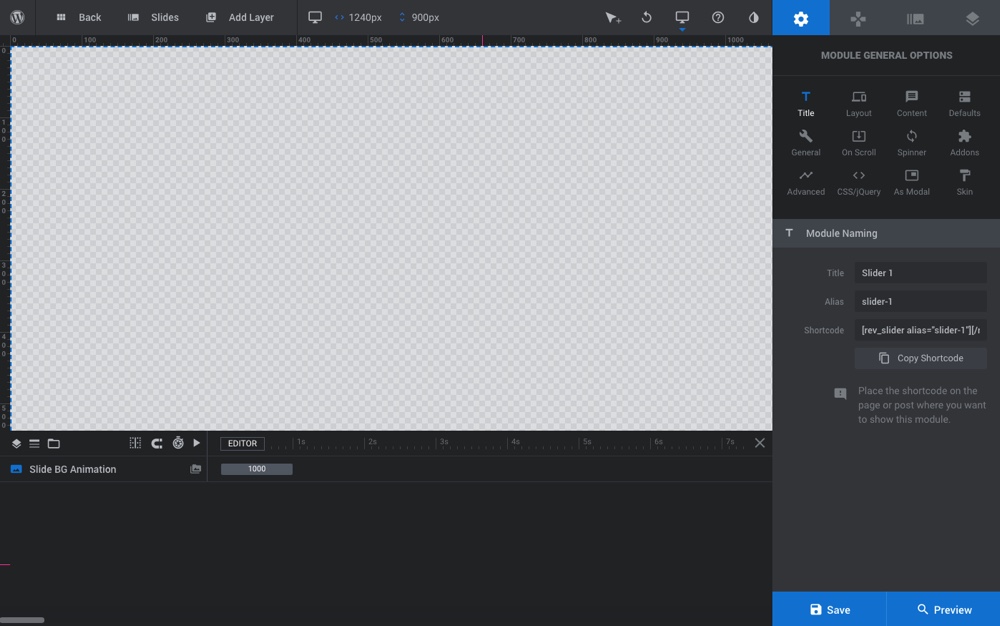
After choosing your main slider settings you’ll be taken to the Slider Revolution builder. This is where you’ll actually create all of your slides.
Slider Revolution General Options
Before building, you should take care of some of the basics. On the right hand side is all of your slider settings. Starting with the Gear icon for General Settings, here is a quick look at what you’ll find.
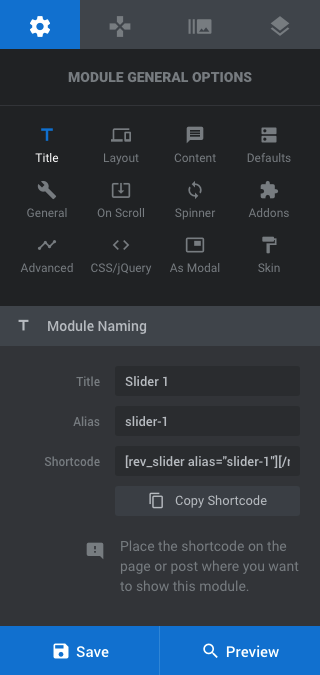


Title: Give your slider a name. Of course, you can just leave the default Slider 1 title and alias but we recommend changing this to a unique naming convention according to the slider’s purpose. Select a name for your slider that will help you remember what it contains or what page you’re using it on. For example home if you’ll be using the slider on your home page. This is also where you’ll find the easy shortcode for your slider to insert it into posts and pages.
Layout: Choose your slider type (slider, scene or carousel) and sizing (auto, full-width or full-screen). If you used the quick start guide you’ve already selected this. However, this is also where you can edit the widths and heights for your layer area (where you’ll be adding slider elements), the position of your module (center is default), a default background color or image for your slider (note – this is separate from individual slide backgrounds), custom border, drop shadow and a handful of advanced options (for wrapper max height, overflow, layer perspective, etc).
Content: Select how you would like to add content to your slider. There are 9 content sources to choose from, but for the most part you’ll want to select the Custom option to build your slider yourself (though the Post-based and WooCommerce options are also super handy).
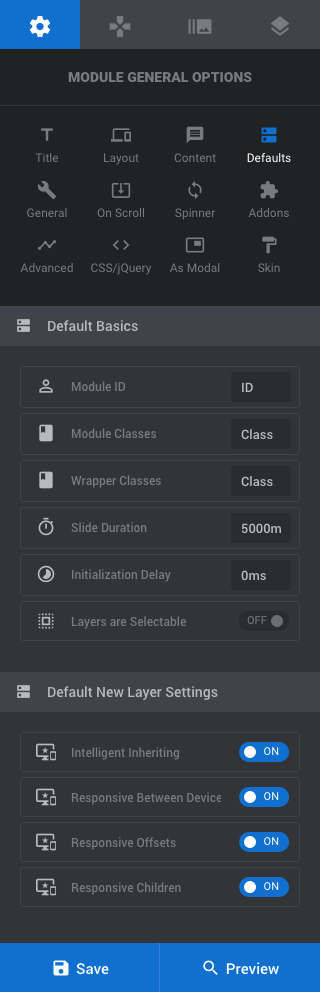
Defaults: The most important option in this section is for default Slide Duration – which is how long each slide will last by default (note – you can customize this on a per slide basis later on, but it’s nice to have a default). You can also set a Initialization Delay, which will make your slider wait a specified amount of time before animating. There are other defaults for custom module ID, classes, and responsiveness and more but most users won’t need to change these.
General: Some of the options you might want to use in this section include slideshow settings for auto-rotate, stop on hover, looping slides, and selecting a designated first slide (if different from the slide you added first when building your slider). This is also where you’ll find options to hide or disable your slider on mobile or under specified pixel widths.
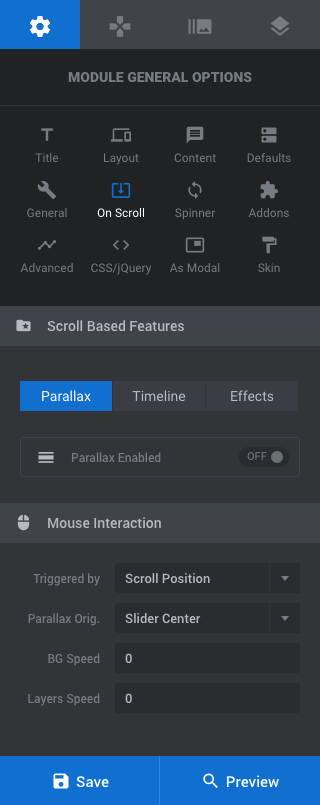
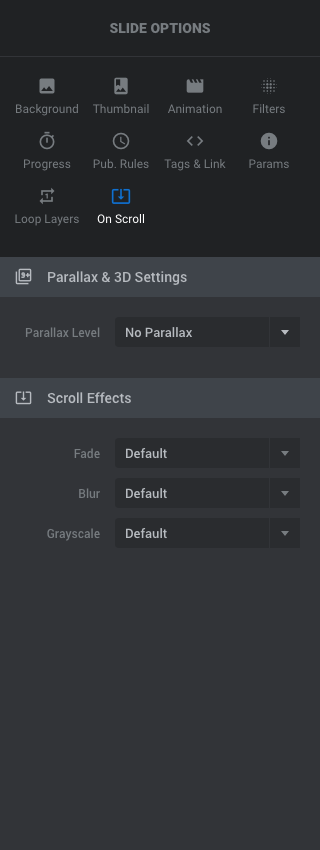
On Scroll: Slider Revolution includes a number of advanced scroll effects such as parallax, 3D depths, timeline, fade, blur, grayscale and more. All with customizable settings for scroll speed, offset/tilt, etc. We’re not going to dig into these as they can take quite some time to master, but if you’ve purchased your own slider license we’d recommend playing with some of the ready made options from the template library to learn how these different scroll effects behave.
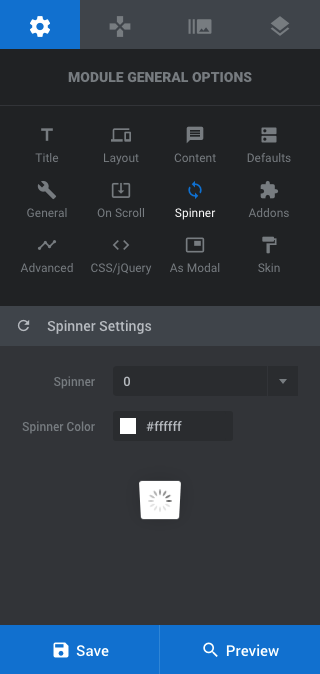
Spinner: This is your preloader – so as your images and animations are loading on your server, visitors to your page will see the slider background you’ve selected along with the spinner you’ve chosen. There are currently 15 unique spinners to choose from all with customizable colors.
Advanced: If you’d like to enable lazy loading you can do so from here as well as select a fallback image or simplify your slider on old browsers (specifically for iOS4 and IE8).
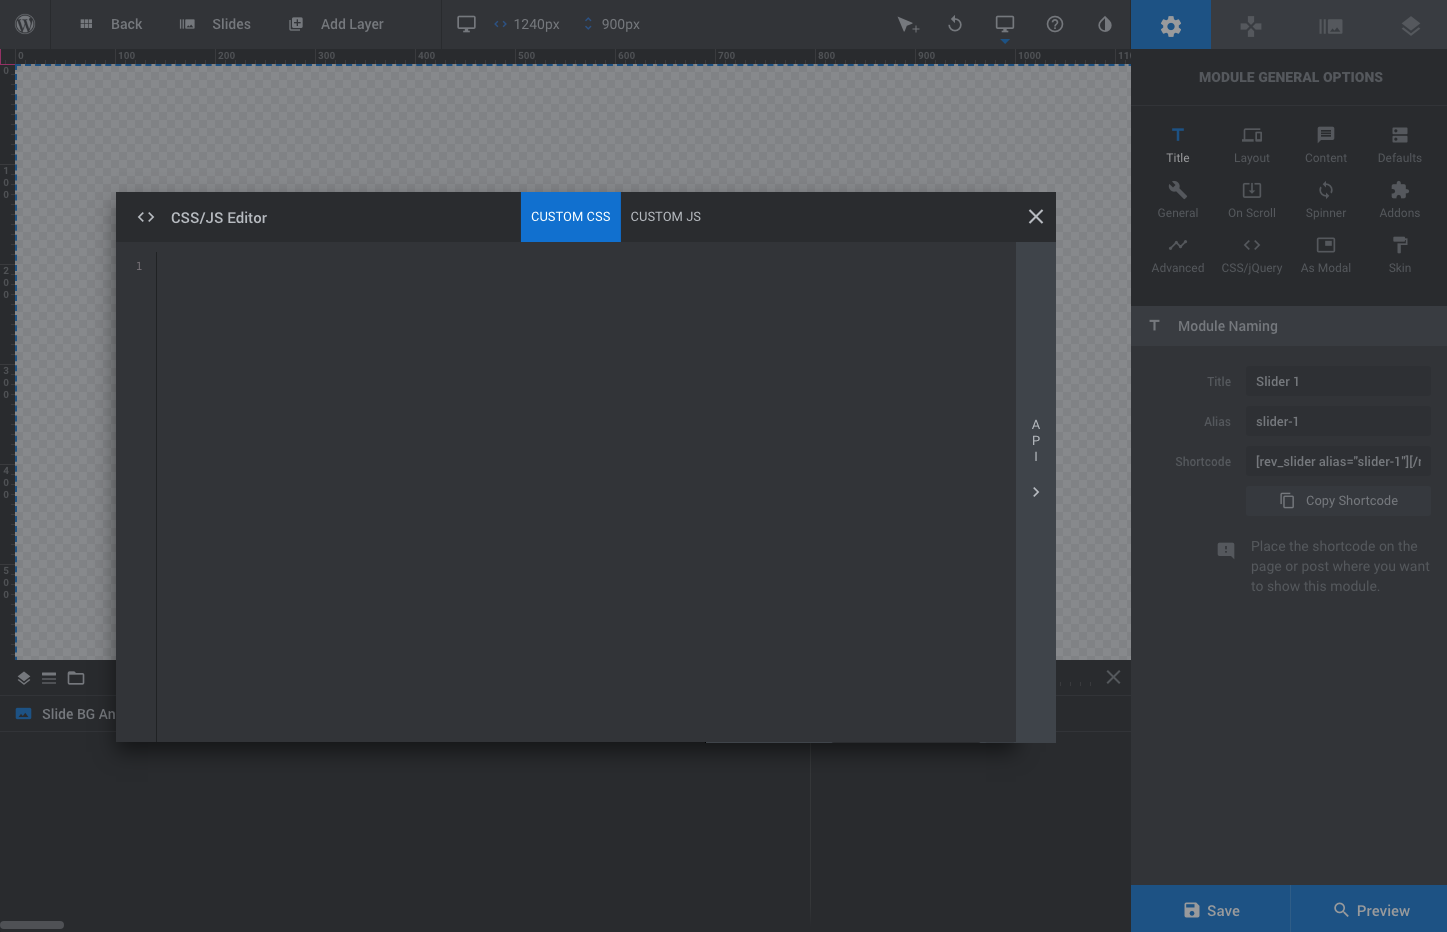
CSS/jQuery: You can add your own custom code to sliders, but tempting as this is we recommend leaving this option alone unless you’re comfortable with coding languages.
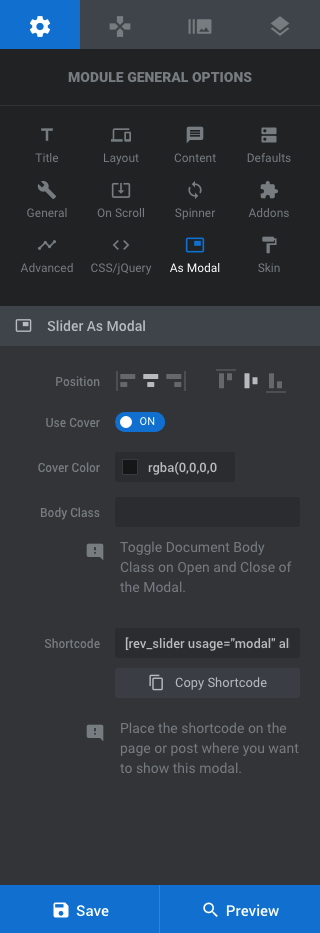
As Modal: If you’re creating a slider you want to appear as a popup or lightbox this is where you’ll find options for slider position, if you’d like to use a cover color, and the shortcode to use when inserting your modal slider in pages (note – this is different from the main slider shortcode as it add a usage attribute).
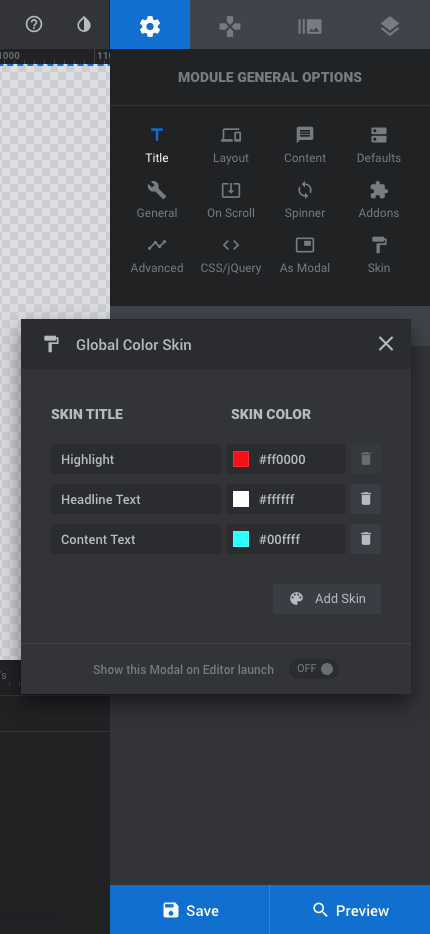
Skin: The skin option is essentially a preset you can create and then assign to text layers as you’re building slides. This a great tool if you want to keep your branding the same across layers.
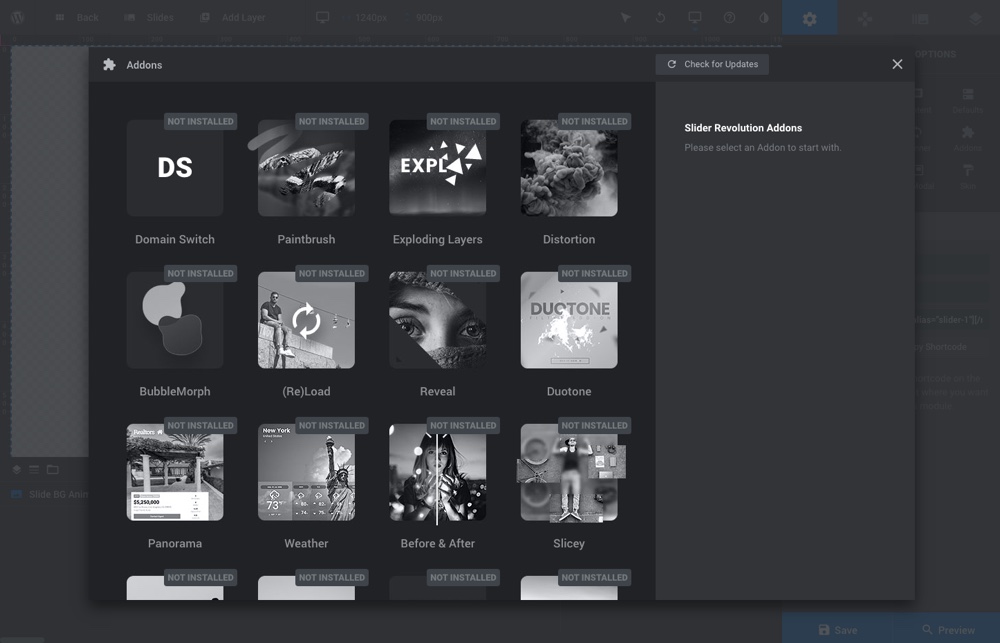
Addons: This section allows you to enable and access addons (note – addons are only available if you purchased your own slider license, they are not included with versions of Slider Revolution bundled with themes).
Slider Revolution Navigation Options


Next is to decide what you’d like to utilize for navigation under the Keypad icon. There are plenty of options you can use for your slider. All of the options below include easy to customize settings for position/alignment, sizing, visibility and global styling/presets.
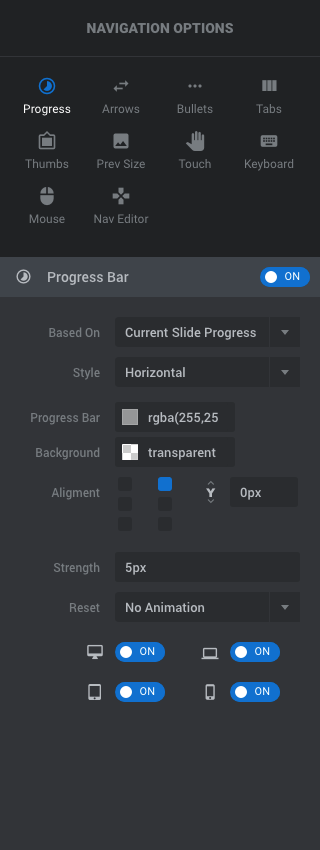
- Progress: Add a progress bar or circle that visualizes current slide progress (or full slider/module progress).
- Arrows: Add arrows to make it easy for visitors to click through your slides with you choice of 13 different styles (note – custom is typically based on your theme).
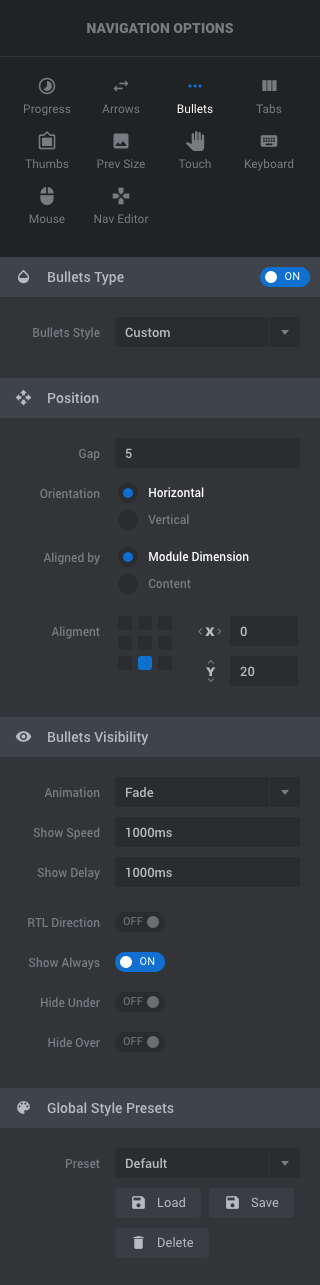
- Bullets: To add navigation dots to your slides enable the bullets, and pick from 14 styles.
- Tabs: If you’re creating a content slider based on your blog posts you might want to look at the tabs navigation. This displays a thumbnail, title and any parameters (as defined under Slide Options) – very similar to a recent posts widget for example.
- Thumbs: To display a thumbnail image as a navigation option select thumbs and choose from 5 styles.
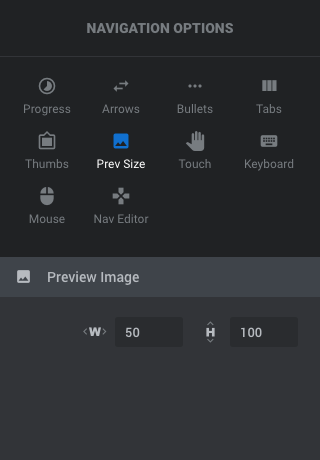
- Prev Size: Define the size of your preview images used for navigation.
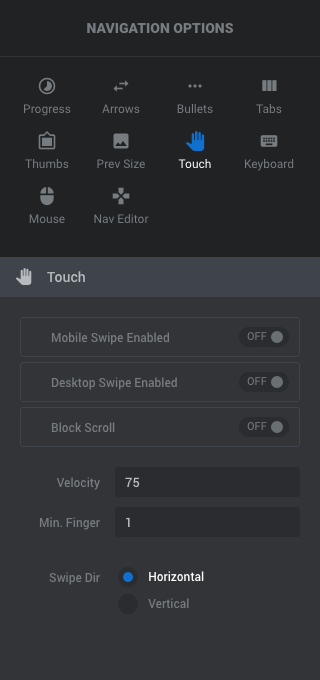
- Touch: Enable and customize touch-swipe navigation, including options for block scroll, velocity and direction.
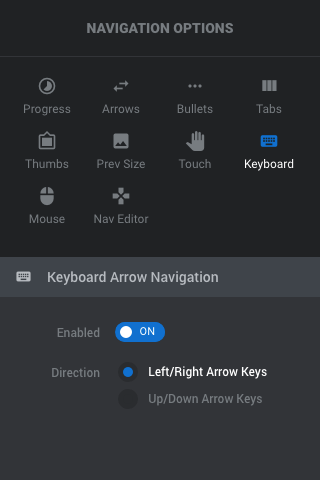
- Keyboard: Enable keyboard navigation (recommended for accessibility).
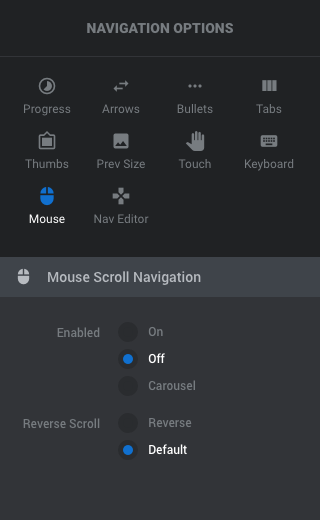
- Mouse: Edit mouse controlled navigation to use a carousel function or reverse scroll.
- Nav Editor: This section is for customizing arrows, bullets, tabs or thumbs with your own custom code. As mentioned before, unless you are comfortable with coding we recommend using the slider’s built-in options.
Slider Revolution Slide Options
And finally, your Slide Options.
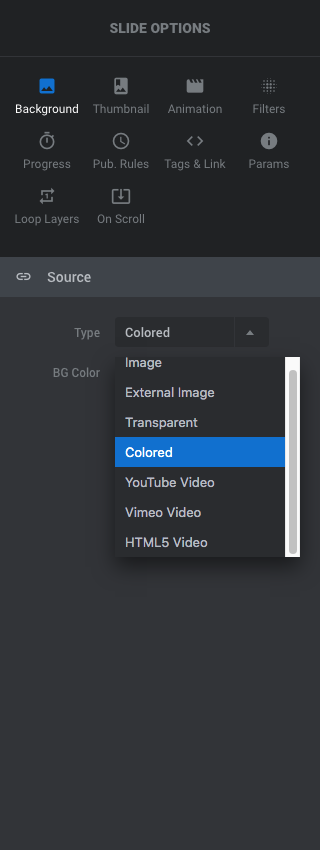
- Background: Choose the background for your slide. Choose from transparent, colored (you can add a gradient), image, external image, or a video (YouTube, Video or HTML5).
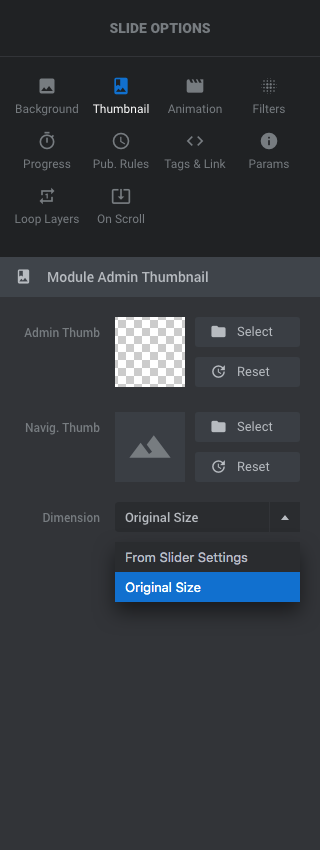
- Thumbnail: Define the thumbnail visible by the admin and the thumbnail used for navigation.
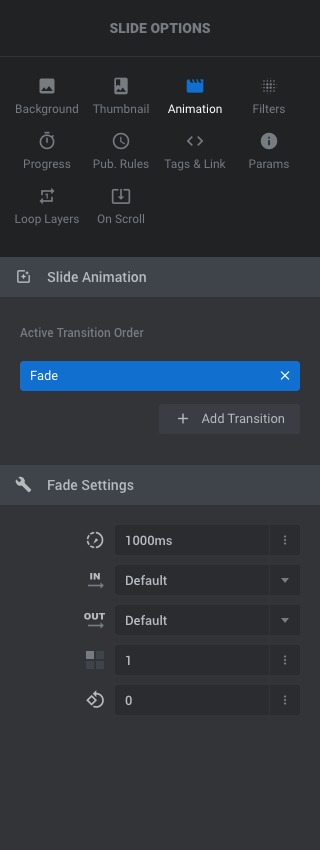
- Animation: Choose the transition animation for your slides.
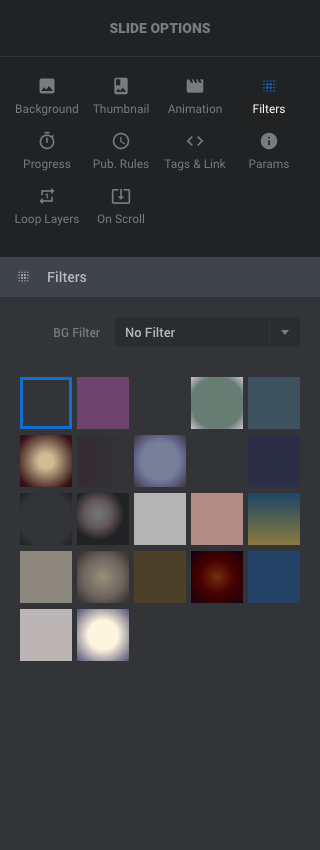
- Filters: You can add filters to your slider. In my opinion these make more sense for slides with an image background but it’s up to you. There are currently 22 presets to choose from.
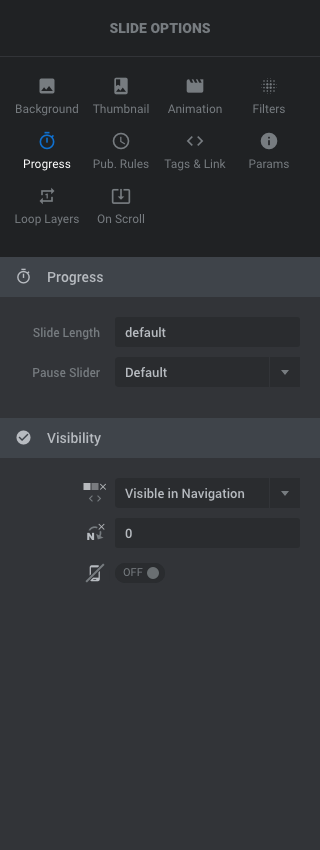
- Progress: You can customize the slide length (time in ms), pause and visibility on a slide by slide basis.
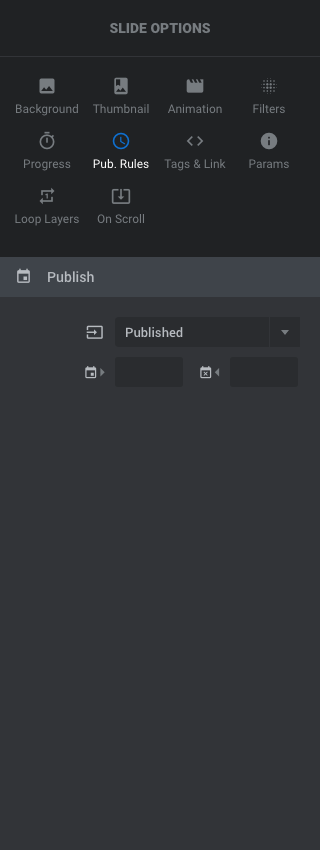
- Publish Rules: Define if your slide is published or unpublished. This is great if you’re working on seasonal or limited time slides that you want to slowly build, publish, and later remove.
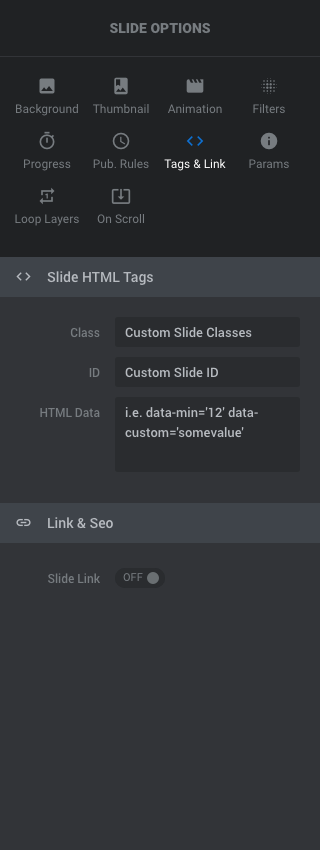
- Tags & Link: IN this section you can add custom class, ID and HTML data for your slide as well as enable a link (if you want to add a link to your entire slide).
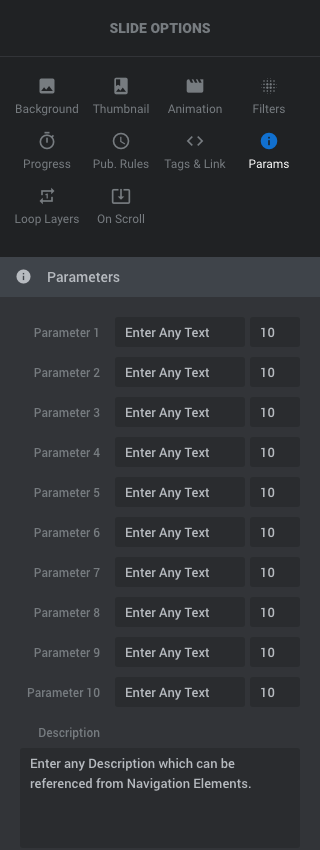
- Parameters: Add up to 10 custom parameters to use within your slides and navigation.
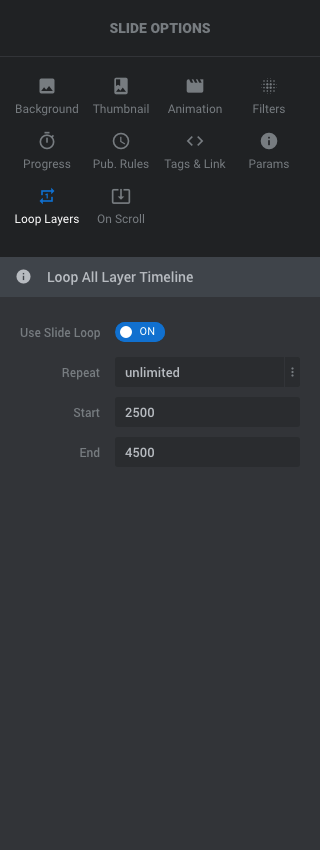
- Loop Layers: Create and customize you slide loop settings if your slider only has one slide (especially helpful if you’re using your slider as a welcome mat or page section).
- On Scroll: You can also customize your parallax and scroll effects (fade, blur or grayscale) per slide.
How to Make a Slider with Slider Revolution
Now that you’ve seen the features (wow there are a lot!) I’ll give you a quick summary of what we think are the most important options. Specifically by showing you how to build a simple slider.
General Options
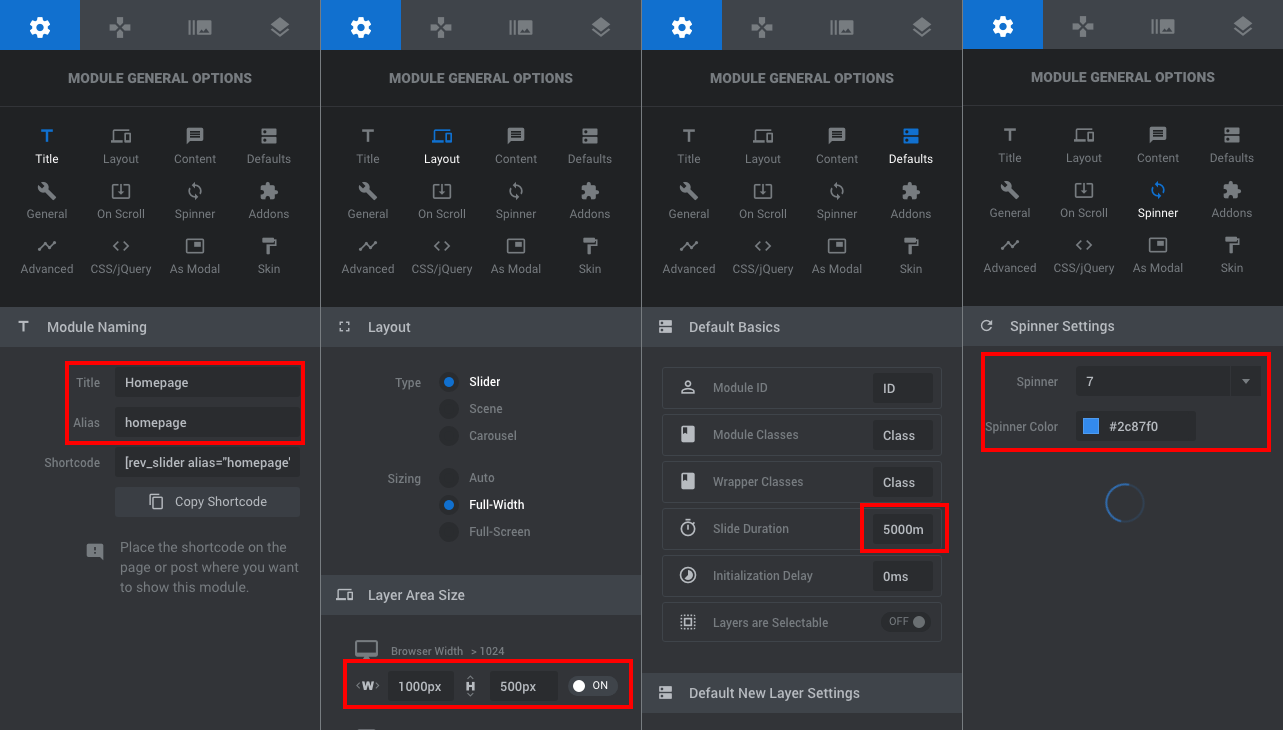
First we selected a few General Options:
- Add a custom title and alias in the Title section
- Customize the desktop layer area height and width under Layout (we set ours to 1000px wide to match our site width and 500px tall)
- Choose a default slide duration (we used 5000ms which is 5 seconds) under Defaults
- Select a Spinner to use for your pre-loader (we’re partial to option 7)
Slider Navigation
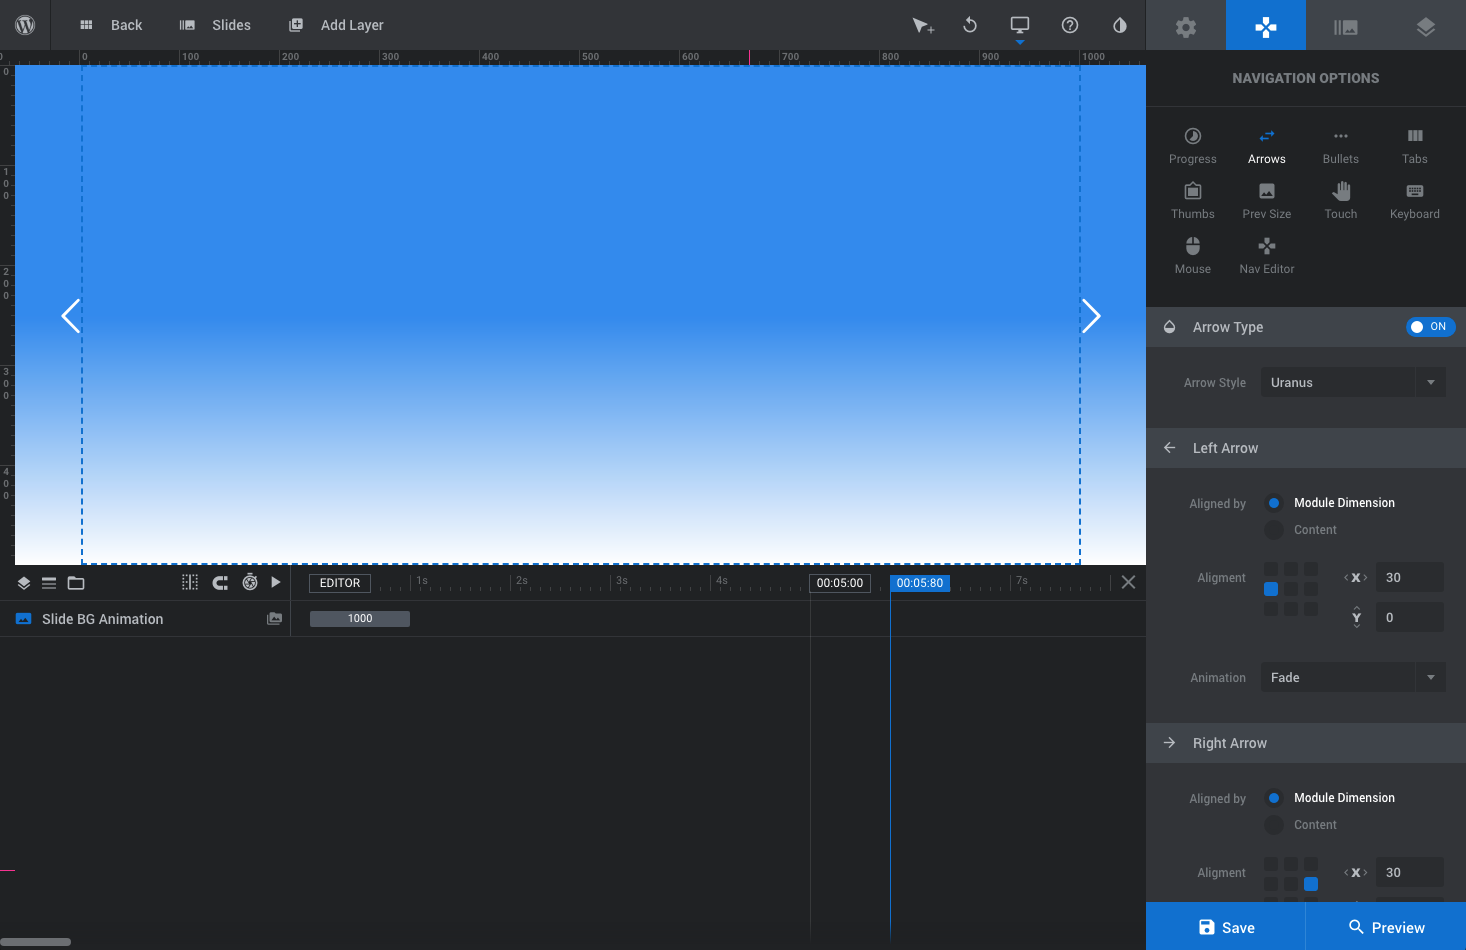
Then, we choose our Navigation Options. In our example we selected the “Uranus” style which is simple arrows.
Adding Slides
That’s all we wanted to set for our slider, so the next step is to add a couple slides. When creating a new slider you’re already on slide #1 by default so you can start adding settings and layers right away.
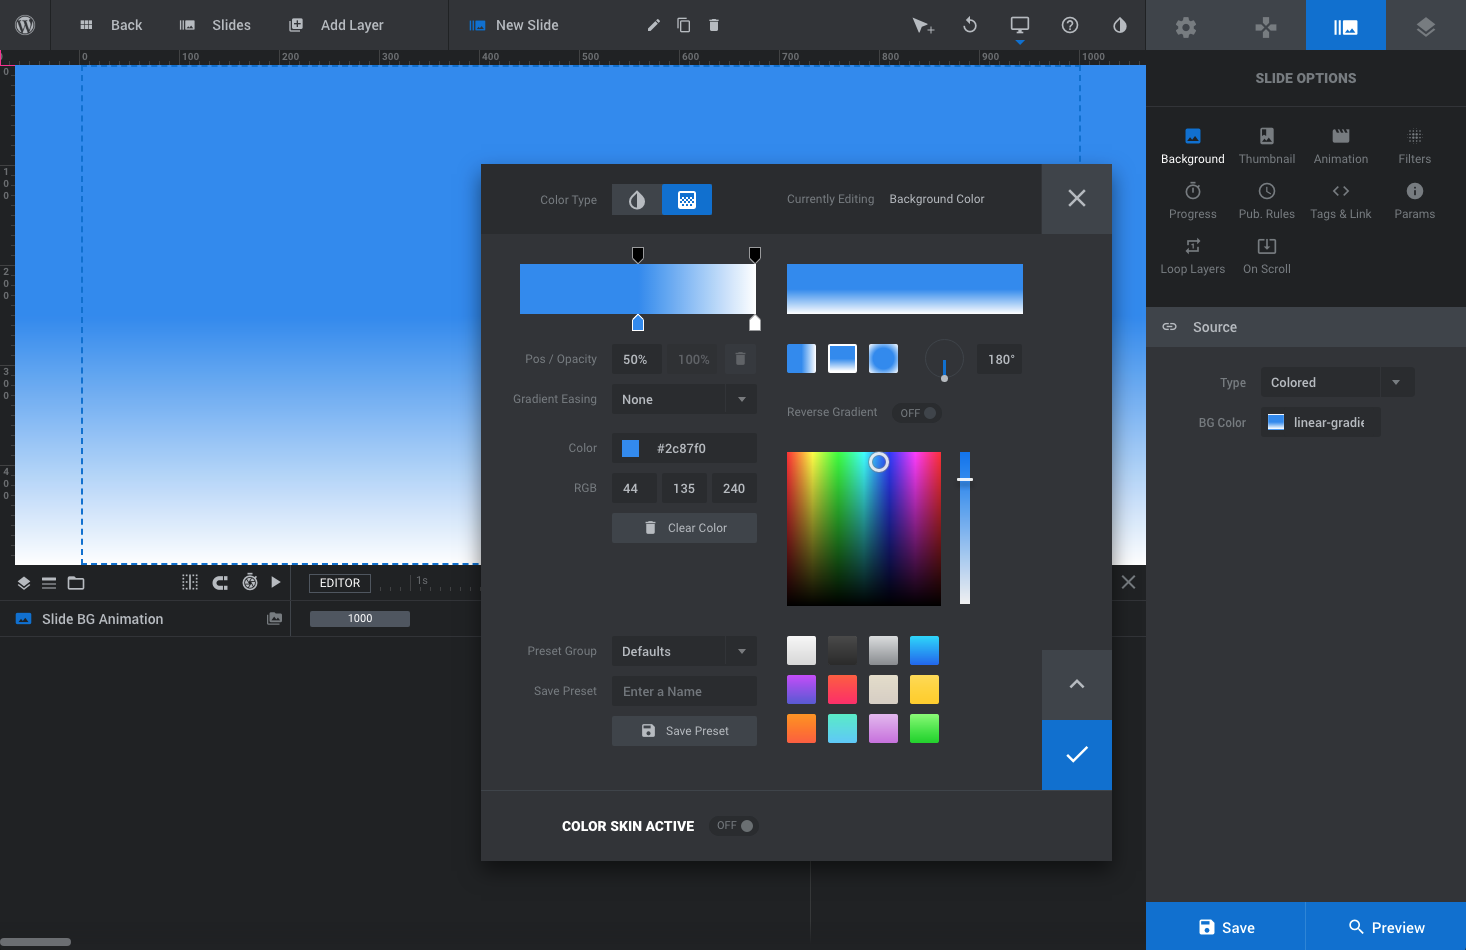
You can add a background color, image or video. If you choose to add a color you can also add a gradient.
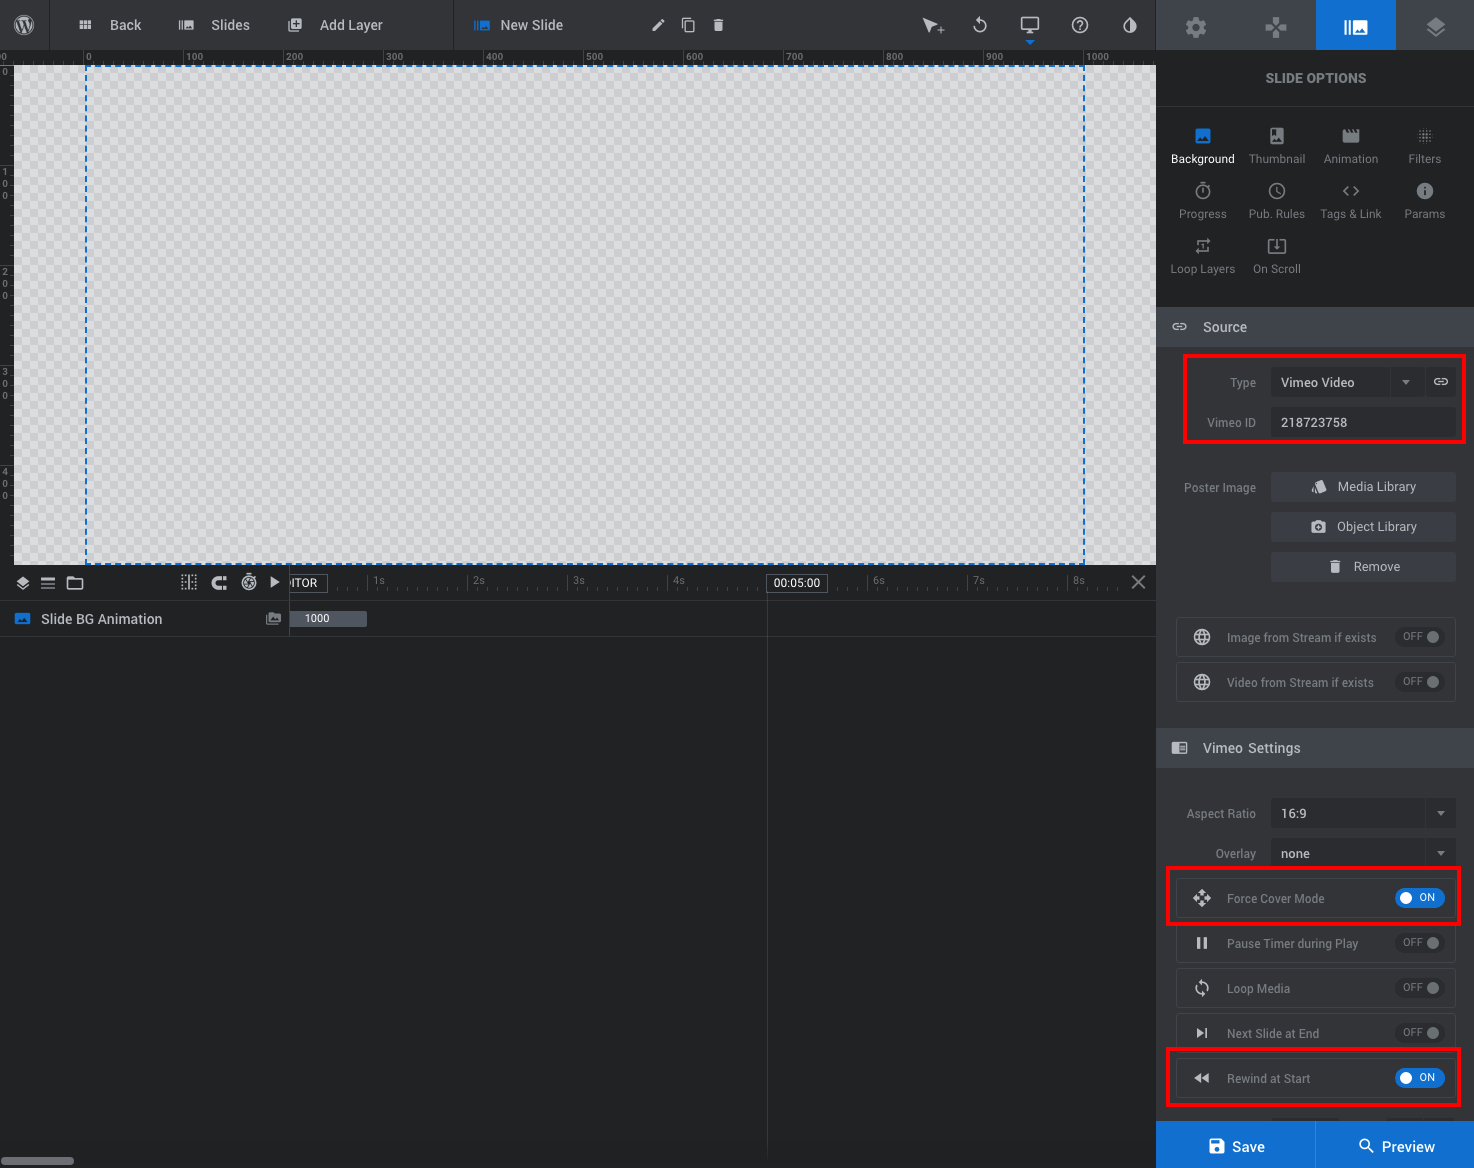
For a video you’ll simply add the source and make a few selections. In the screenshot above we’ve set the slide to force Cover Mode (so the video fills the entire slider) and to rewind on start (so it plays from the beginning each time the slide starts).
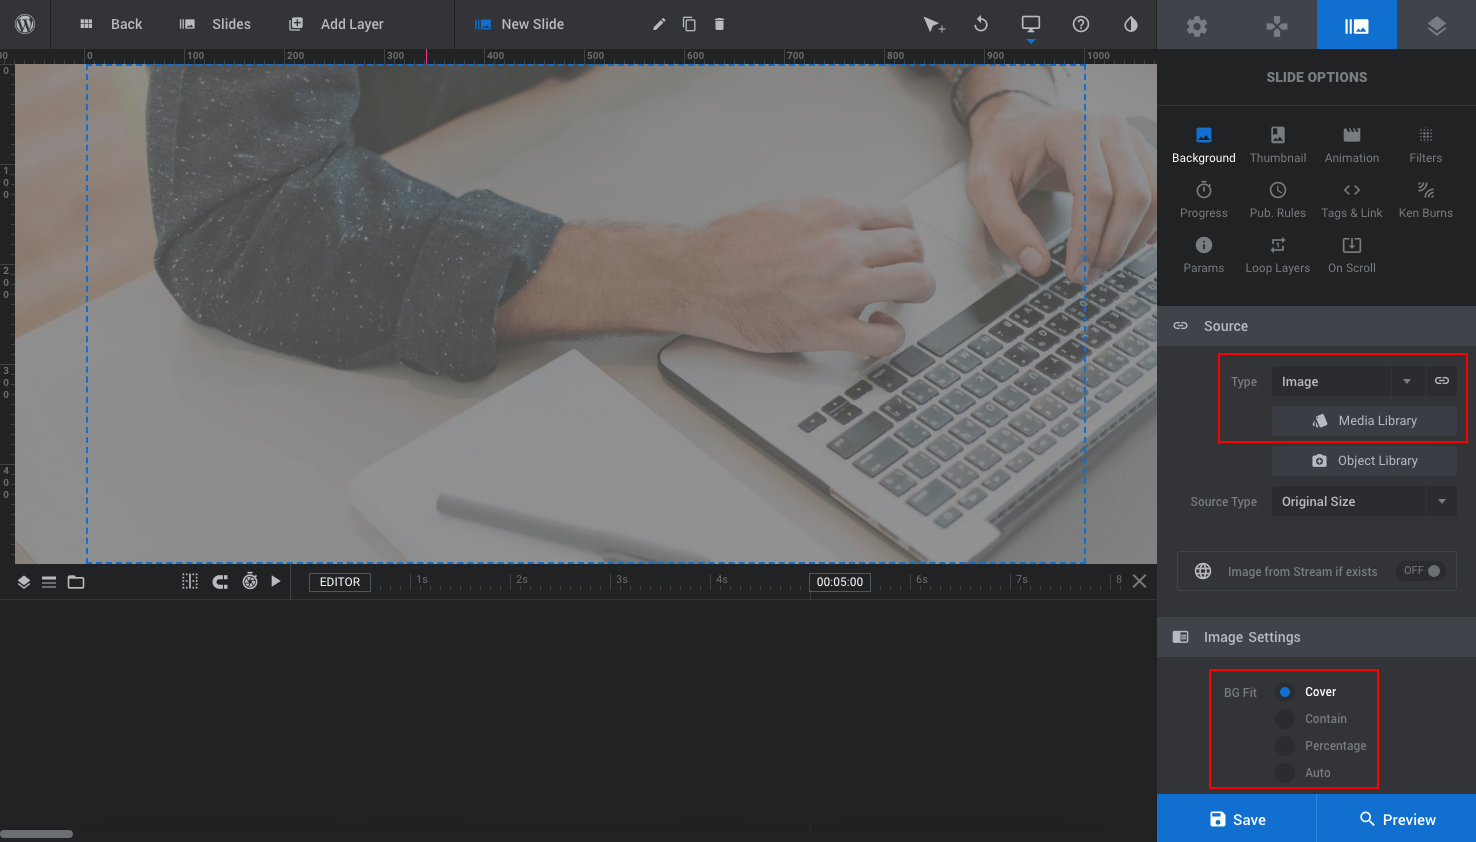
For our example we’ve added an image from our Media Library. We left the image with the default Cover setting (which stretches the image to cover the full slider, as opposed to Contain which shrinks the image to fit within your slider constraints).
Adding Layers
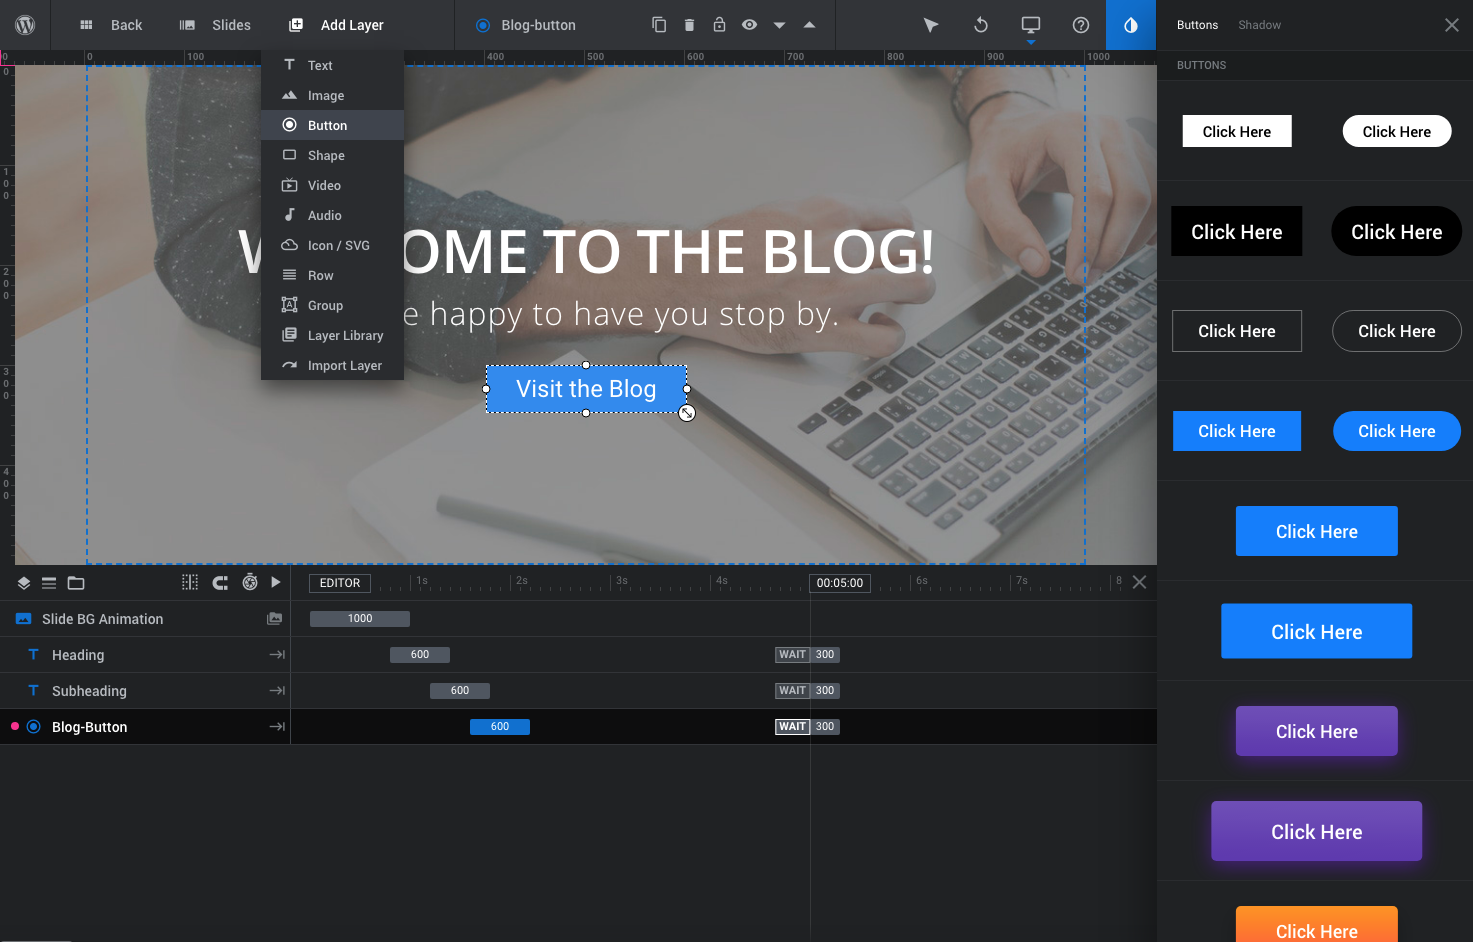
Now to add layers! At the top of the screen you’ll notice an option for “+ Add Layer.” This is where you’ll find tons of options to add to your slides. You can choose from 8 different Add Layer options:
- Text layers are perfect to add headings, descriptions or even simple links. Add whatever it is you want to say on your slide.
- Images are great for inserting your logo, adding depth on parallax slides, inserting before/after sets, and more.
- Button layer options include tons of size and border radius combos for which you can edit the color, background, border color, font, hover state and text. In addition there are a number of helpful pre-sets for social links animated mouse scroll icons, hamburger menu or even play/pause.
- Shapes can be used to add effects (like pulsing or radiating a color behind a button), to define a part of a text layer (use a shape to highlight just one word or phrase) or to add visual interest. Select your background, border color/size, shape border radius (0 for a square, 100 for a circle), shape size in pixels and padding.
- Audio & Video layers are fairly straight forward. Choose the media you’d like to insert and select a file from your media library or insert a link (YouTube, Vimeo, SoundCloud, etc.). Then add settings to enable looping, autoplay, next slide on end, base volume, segment start/end and preloading. This is an easy way to add real testimonials to your slider, an intro video or a tutorial.
- Icon / SVG are exactly what they sound like – include icons or add custom SVG images that scale beautifully with your slider across devices.
- Rows can be inserted and are just like any other page builder, complete with column settings. This is a great way to organize layer elements or to build a single slide module.
- Group is used to create a group of layers so it’s easier to position and move related layers.
- Layer Library is only available if you have your own license for Slider Revolution and is a collection of ThemePunch’s ready made resources.
- Import to copy a layer or slide from another slider in your library. Quick and simple!
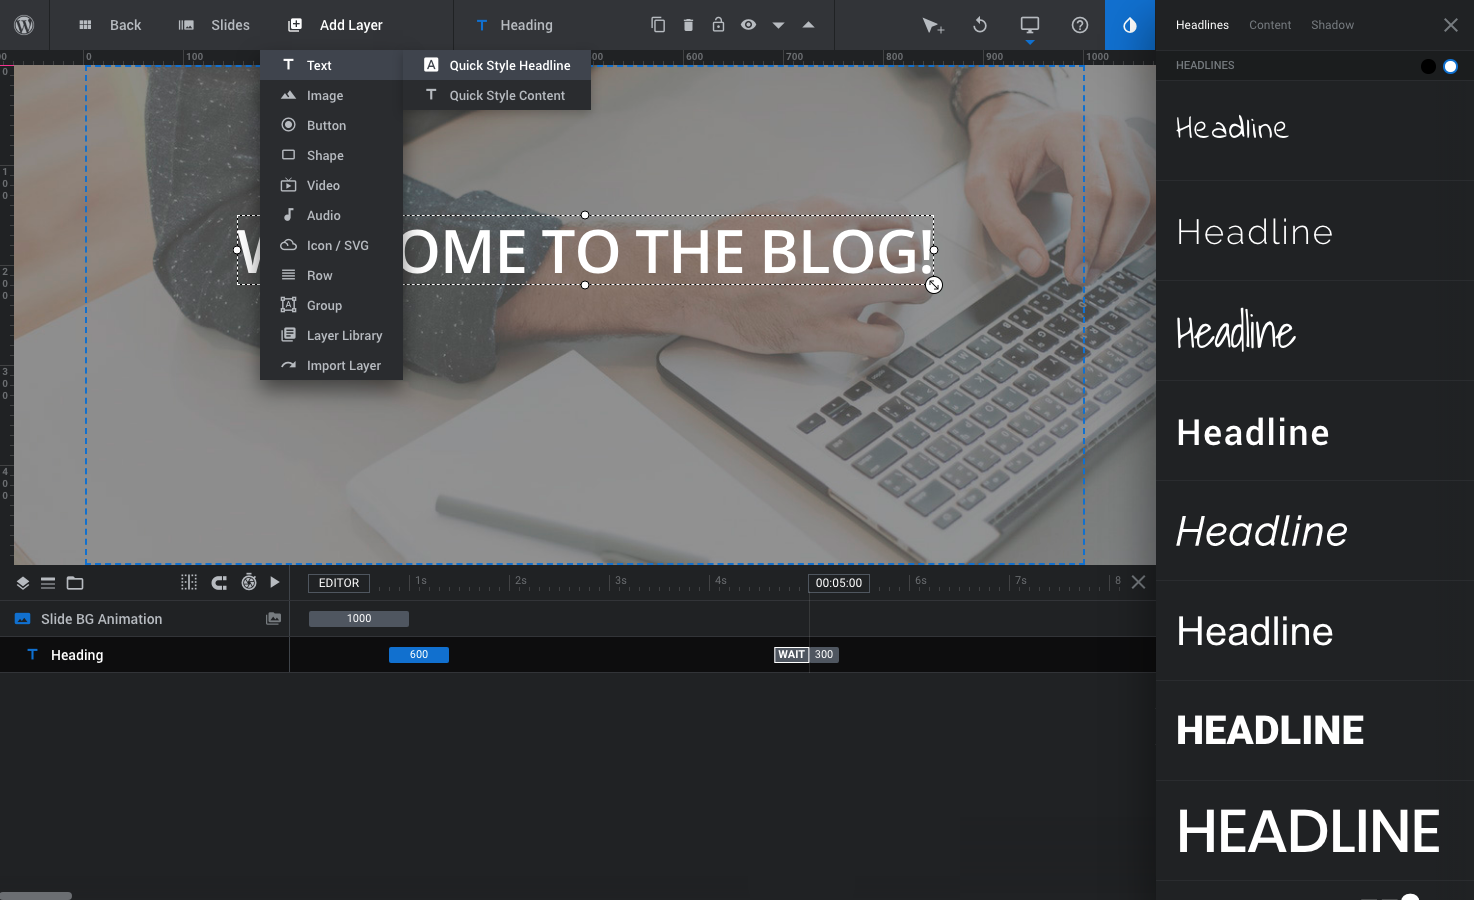
First let’s add a simple Text layer. You’ll have the choice to add a Quick Style heading or content – both are text layers, the only difference is the pre-styled options you’ll see on the right hand side. You can choose one of these styles or click the X in the top right corner to go to the layer settings.
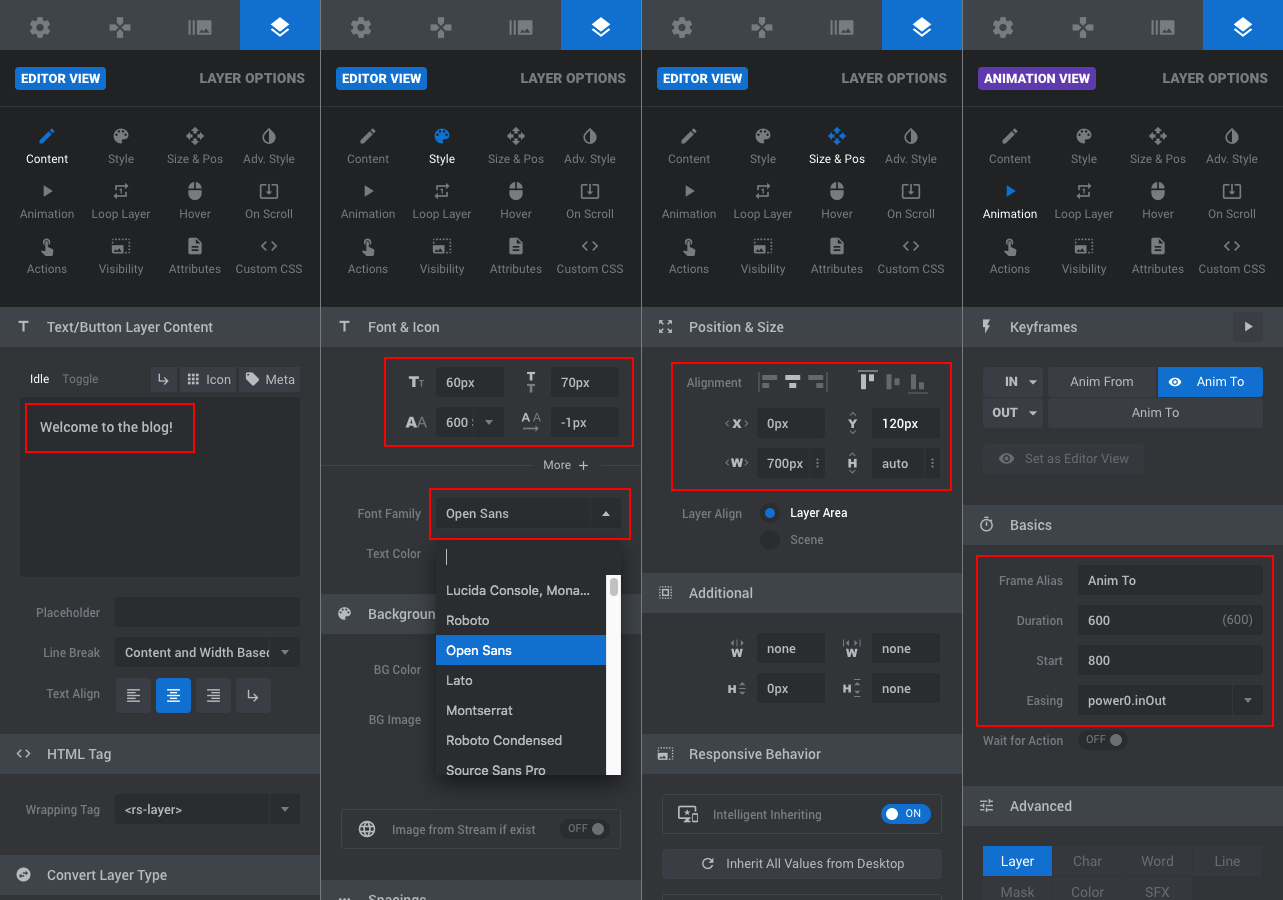
For our example, these are the options we chose for our heading as well as a subheading for our slide:
- Added our text in the Content section, as well as centered our text
- Selected a Style for the font size, weight, line height and Google font
- We customized the Size & Pos to change the location of the layer within our slider container (remember – our container is 1000 x 500 px)
- And last added an Animation effect and speed for our text to fade in at 800ms (IN : Anim To) and the same animations for our text to exit (OUT : Anim To).
We also added a button. To do so, hover on the “+ Add Layer” link and click the button option.
Just like the text, there are some Quick Styles you can use to get started.
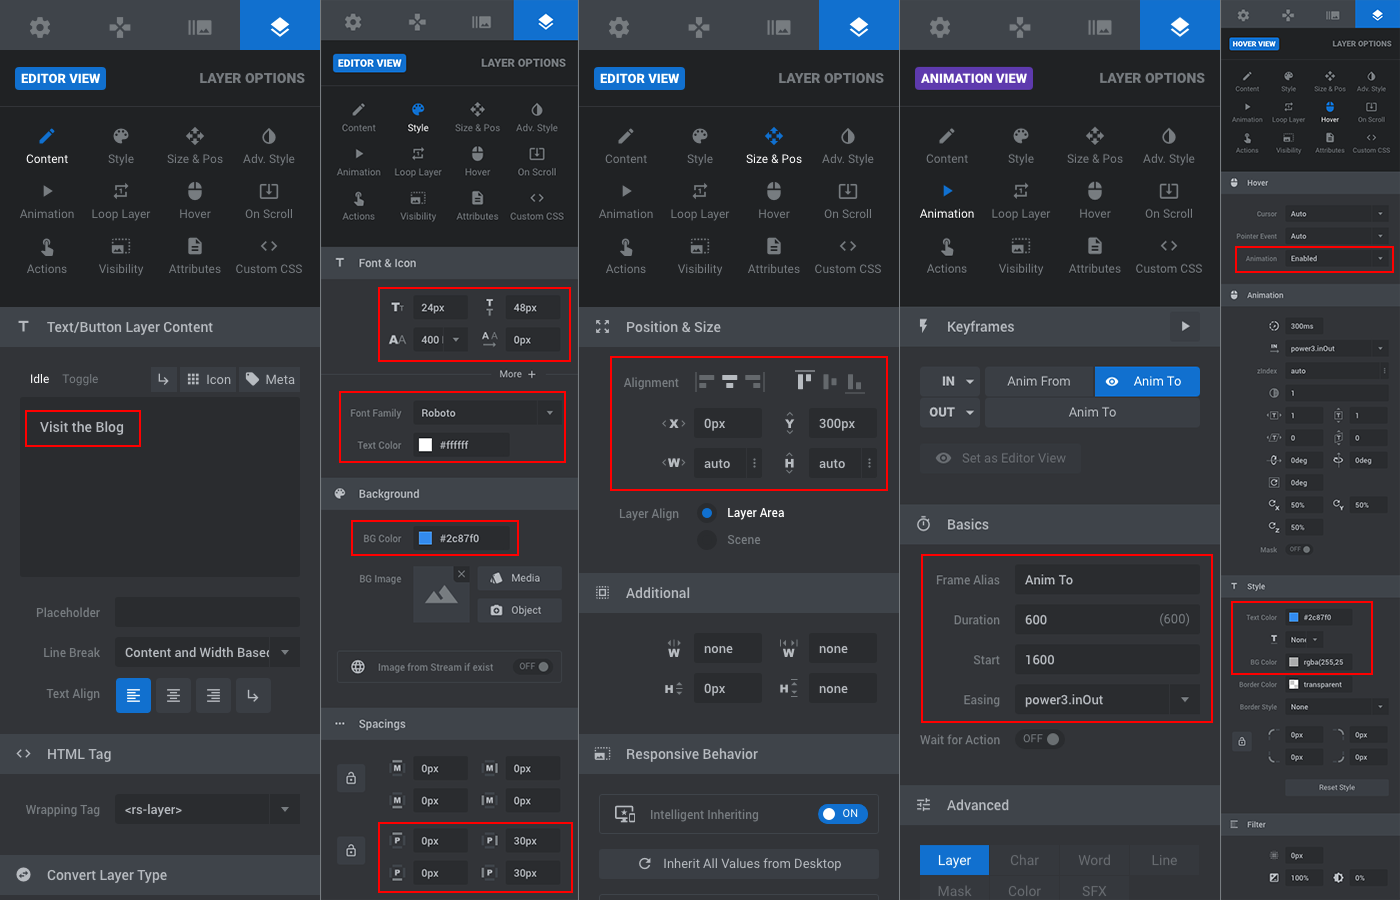
For our button, we used the following. Again, very similar to the text options (but with a couple important differences):
- For the Content we added our button text.
- From the Style section you can add your text and button colors, font options and add space to your button with padding (within) or margins (outside). Our button uses left and right paddings to make it wider.
- We again used the Size & Pos options to center our button layer on the slide.
- And added an Animation for the button to enter and exit the slide.
- Since this is a button layer we also added a Hover effect so visitors intuitively know that there is a link. So we chose an animation and made our button a little transparent on hover.
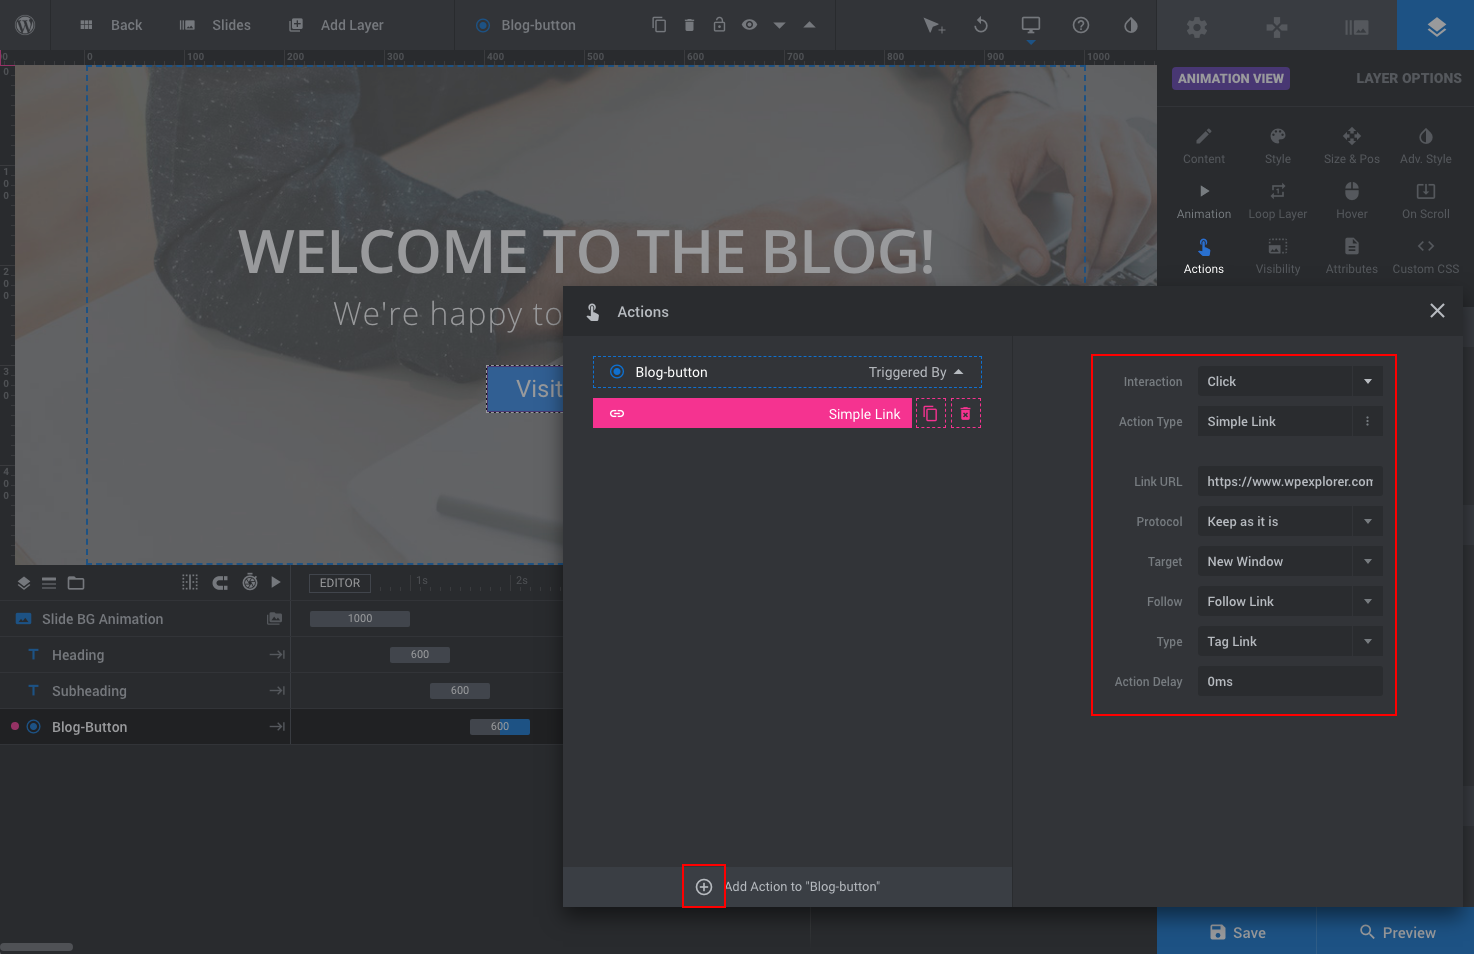
For a button, or any layer that you want to add a link to, you must add the Action. For out example we’ve added a Simple Link as well as defined the settings (on click, the URL and a target to open in a new window). But there are a ton of options other than a Simple link, such as scroll to ID (local scroll), jump to slide (to skip through your slides), play slide (for example if you’ve added an interactive feature), open a slider modal, play media (great for a video), etc.
That’s our first slide done! Now let’s add a second to show you a few more features.
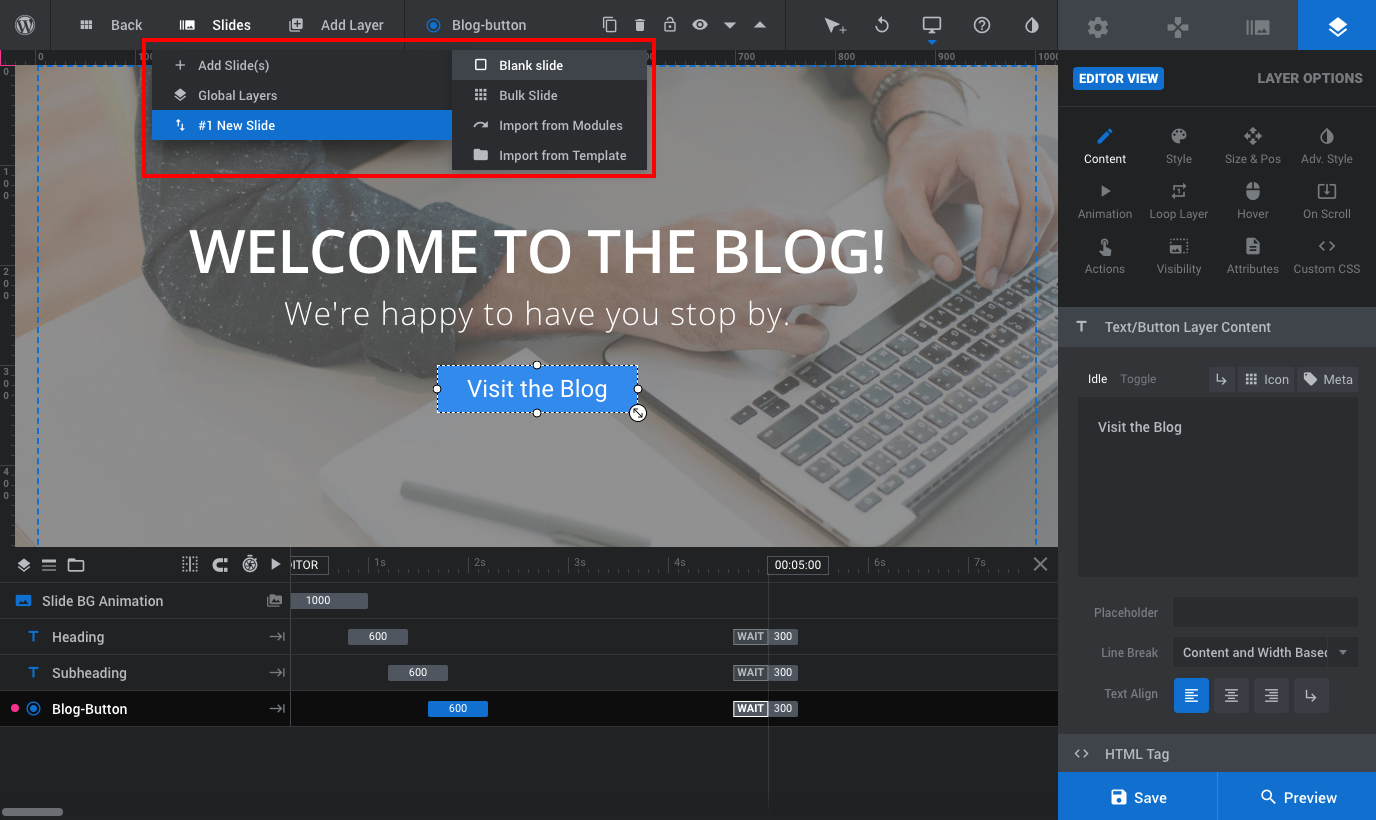
If you hover on the “Slides” option you’ll see a drop down for:
- Add Slide(s): Click to add a new blank slide, bulk slide to add multiple slides with the same background, or import a slide.
- Global Layers: These will be seen as an overlay on top of any slides you create. It’s is a great way to add a logo or watermark, include a “Buy Now” button for your product or even a link to subscribe to your newsletter.
- All of your current slides (our finished slide is #1 New Slide).
Now just repeat your slide building process as many times as you’d like!
There are many, many more options within Slider Revolution that you can use to further customize your layers. For example, you can add a loop to your layer (you could use this to create a flashing “sale” text), add on scroll effects, edit the visibility to hide on small devices, and more. We recommend checking out the official Slider Revolution knowledgebase to find more info on available features.
![]()
And lastly I just want to point out a few more helpful links at the top and bottom of the slider builder. Starting at the top, you’ll find the following quick-links (in order):
- Back: to go back to the main Slider Revolution page in your WordPress dashboard
- Slides: to add and manage slides within your slider
- Add Layer: to add new layers to your current slide
- The Name of the layer you have selected
- Duplicate icon to duplicate or copy your current layer
- Trash icon to delete your current selected layer
- Lock icon to lock your layer to prevent accidental edits
- Eye icon to show or hide layers
- Up & Down Arrows to navigate between layers
- Over a bit bring you to the Cursor to select layers
- A Rewind icon to undo and review a list of recent changes
- The Computer icon to preview your slider’s responsiveness on standard device sizes
- Question mark icon help link
- And finally a Droplet icon to access quick style presets for your layer

And beneath your slider preview you should see a timetable. From here you can edit the delay for when your layers will animate on your slide (for ours the end time is 00:05:00 or 5 seconds – just click on it to edit for your slide). You can also see a visual timetable showing the layer timing in comparison to the overall time length of the slide. The blocked sections are your layer animation times that you can simply click and drag to change.
Once you’ve added multiple layers you can also use this section to reorganize your layers by drag and dropping the layers into order. Plus on the upper left side you can find a useful link to play your slide to preview your timing as you make edits.
Preview & Save Your Slider

As you’re working you can preview your slider by clicking on the blue Preview button in the bottom right corner.
And don’t forget to Save your slides as you work! Make sure you Save your slide after making any changes. If you navigate away from your slide (even if it’s to another slide) you may lose all of your hard work. So be sure to save, save, save!
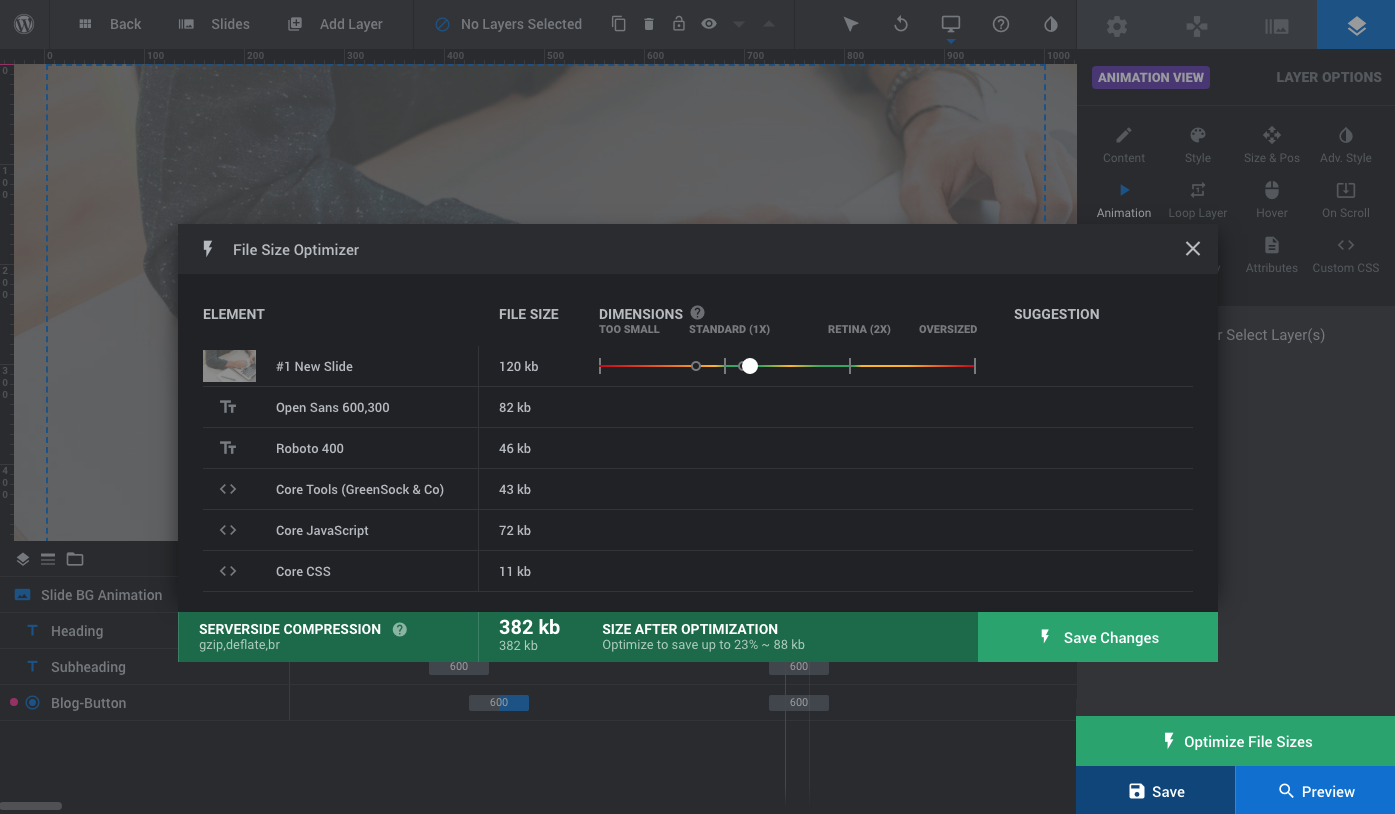
Slider Revolution also offers an option to Optimize File Sizes when saving that offers some server-side compression and optimization recommendations.
After saving, you can move on and work on other slides or sliders, or use your finished product on a page.
Using Your Slider
To add your fabulous slider to any post or page use the Slider Revolution shortcode that you created earlier. This shortcode can be found by clicking on the Slider Revolution menu item in your dashboard.
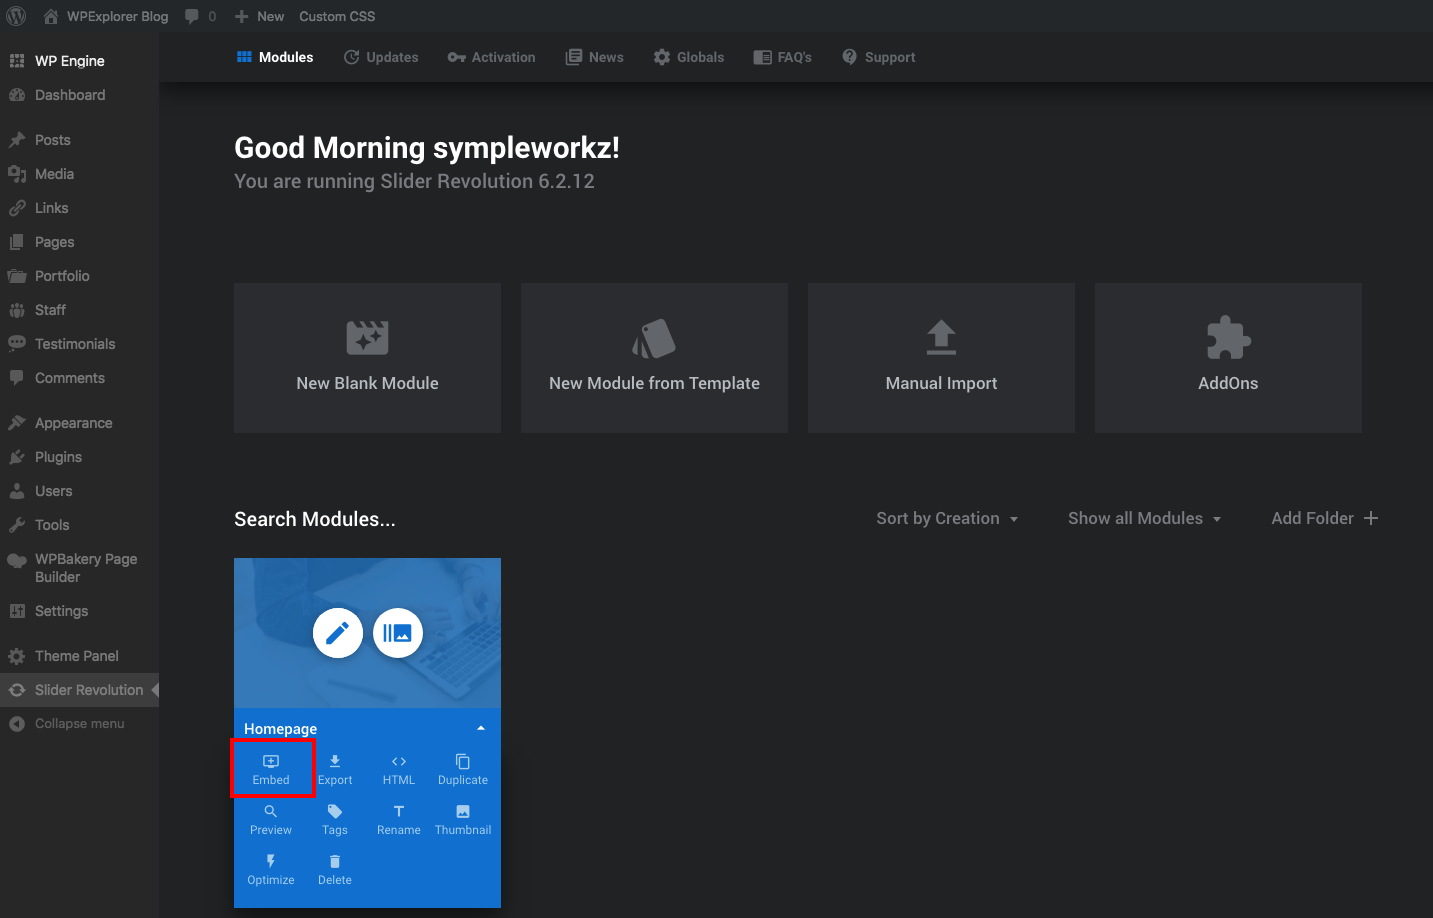
The shortcode should look like [rev_slider alias=”title”][/rev_slider] with the “title” based on the alias you gave the slider when you first created it.
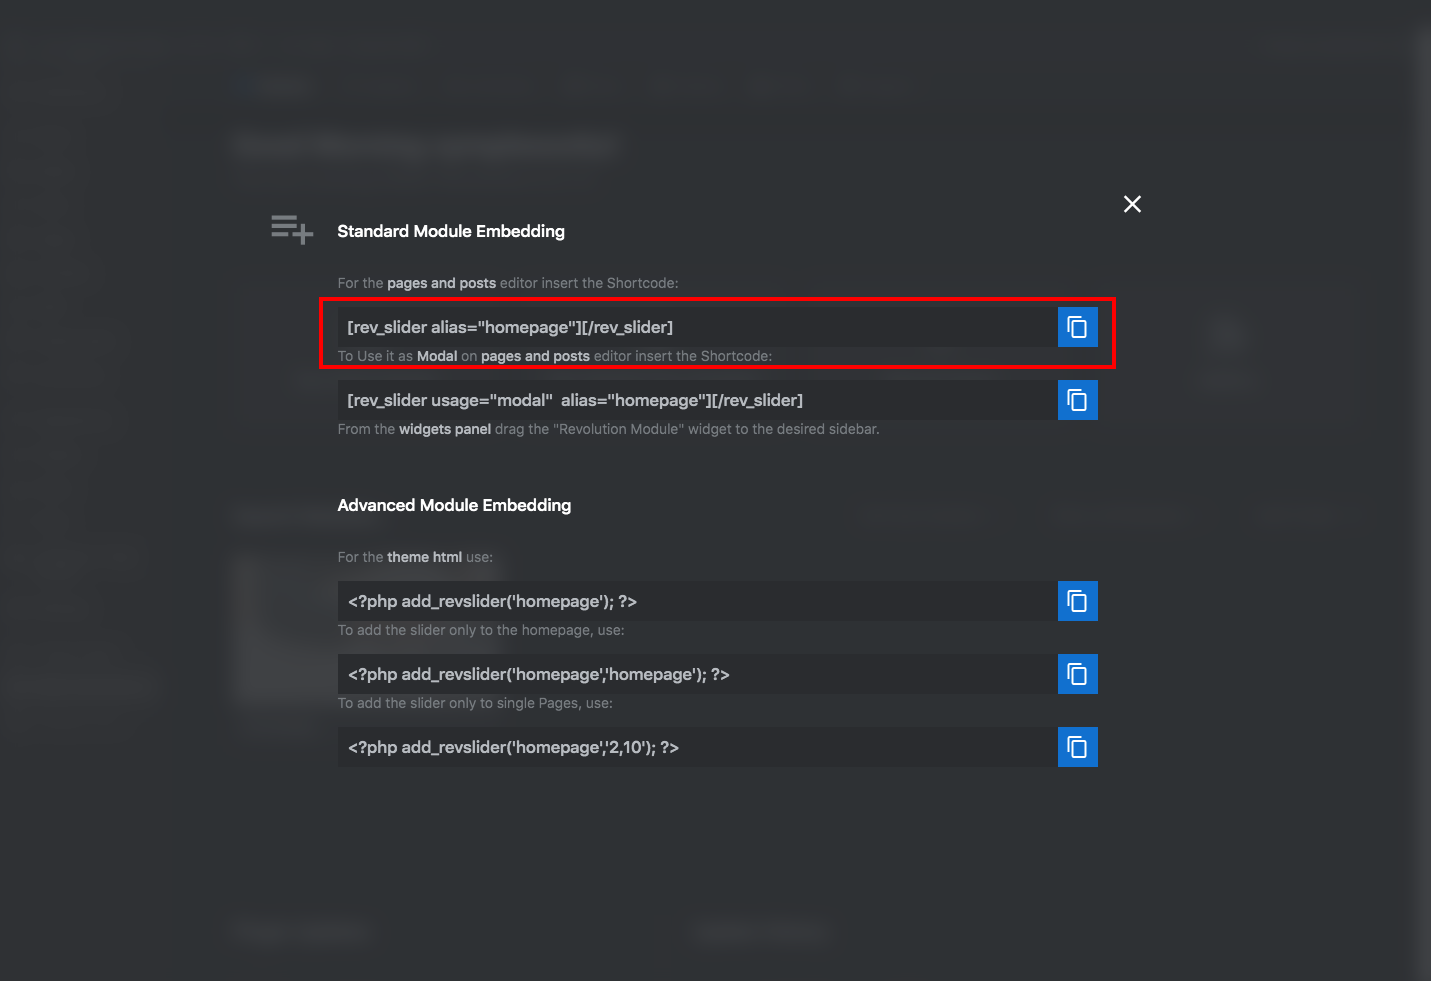
Just paste the shortcode into your post or page content. Or if your theme supports additional slider locations you can add the shortcode there too.
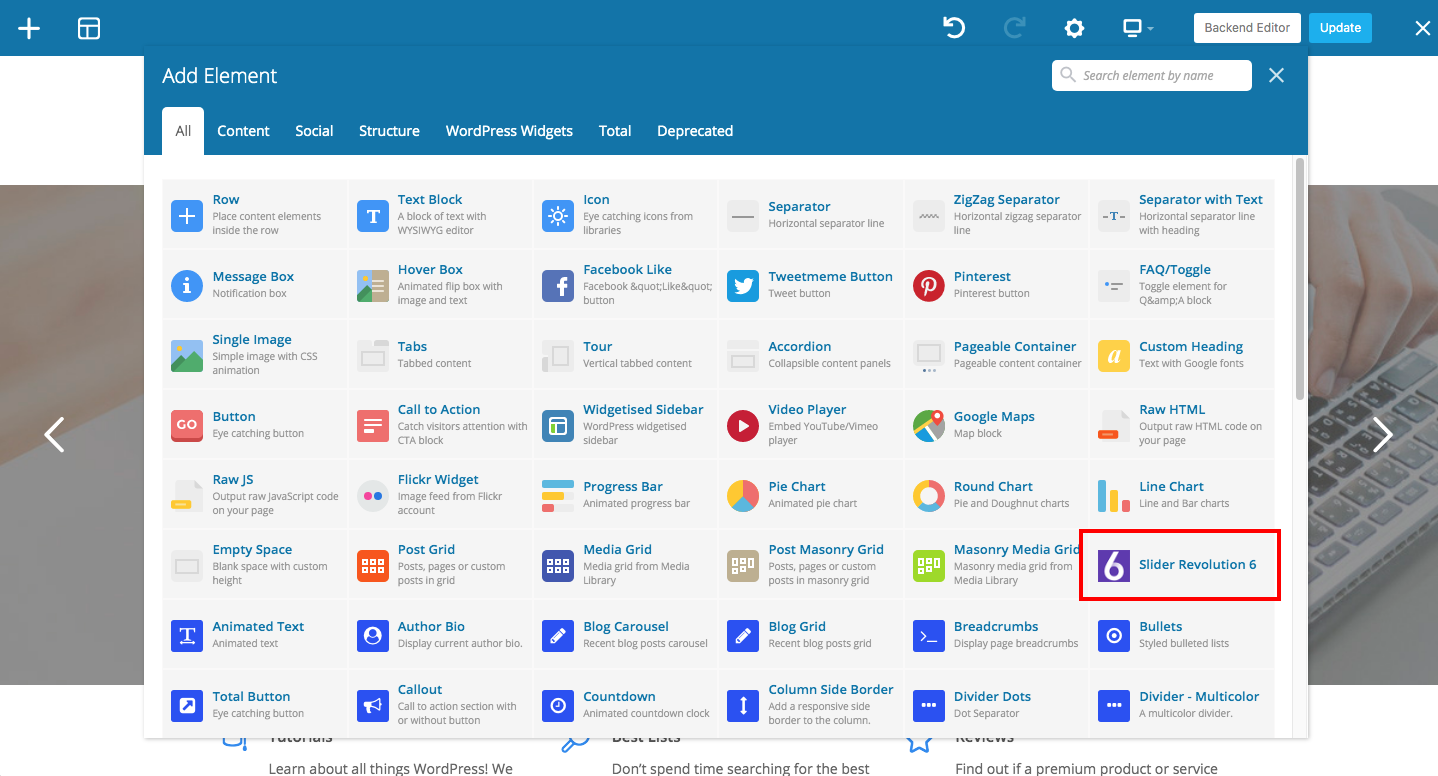
If your theme uses the WPBakery page builder (for example, like the Total Multipurpose WordPress Theme) then you can use the included Slider Revolution page builder element.
All you have to do is add the module, select a slider from the grid (it will show a list of all the sliders you’ve already created), insert and then drag & drop the slider into place. Easy right?
Final Thoughts on Slider Revolution
We believe Slider Revolution is one of the easiest premium slider plugins to use, especially since they offer an easy to use visual editor and tons of built-in features so you don’t have to know CSS to style your slides (buttons, fonts, colors and more are already there!). It get’s a solid 5 stars and in our opinion you’ll be hard-pressed to find a better slider plugin.
Hopefully our guide helped walked you through the process of getting started, but to learn more (or to grab your own copy) visit ThemePunch’s main Slider Revolution page. They show great examples of their slider as well as link to the live demos where you can see what Slider Revolution can do.
But we’d love to hear from you. Let us know what you think of Slider Revolution in the comments below, or feel free to ask us any questions you might have. We’re happy to help!


Hi,
I like the revolution slider, I have already worked with it and wouldn’t mind to have a free copy so I can use it on another theme and make a nice website 😉
Nice giveaway, I would love to use if in my blog
Revolution slider has some AWESOME features & powerful functionality. Love to win a license of this great slider plugin.
The best slider end so good…very good information presented here.
I’d love to test this one on my personal website !
I have played around with this plugin while performing maintenance on a site. It would be a great addition to a new site. Good luck to all who enter.
I love how beautiful this plugin is. I get too excited about such things!
Just makes your blog look good, simply and easily. 🙂
This slider looks great – would love to give it a go!
WOW – looks simply amazing with so many awesome features that make it a must to have in my ‘toolkit’ 🙂
This slider is super sleek and versatile. I’ve been using it in the Thunder theme and would love to have a copy to use on another site.
this looks great
Simply put if I don’t win it I’m going to buy it.
I have used Revolution Slider on another site and not only is it easy to setup and maintain, but it works exactly as I expect it to! I’ll be using it again on a forthcoming site, whether I win it in a raffle or not.
Love WPExplorer themes and would love to just solidify on one slider I use all the time rather than a crap shoot for every different site. Thanks!
Looks easy to use.
I’ve used the Revolution Slider in projects, but always as part of themes.provided by clients. I want to be able to use it without being limited to just themes that have it built-in already.
to see if it works as it says 😉
I am not a huge fan of sliders, because most WP slider plugins lack options and elegance. I’m impressed with Revolution. And it would be nice to use just one across all WP installations. Thank you for this opportunity!
Great write up. I’ve been hearing quite a lot of good things about this slider recently.
I am new in WordPress world but I’m falling in love with it. And Revolution slider is such a dream slider plugin.
Revolution slider appears to be the Ferrari of the premium sliders. Could definitely use this slider in my next website development project.
Would love to try out this slider for a brand new organization’s website. We organize hikes for students and professors, and this slider would be perfect for displaying both aspects of our club.
I’ve used this slider in themes for clients.. It would be great to have a copy for my own site.
A really nice bit of software for WP.
One of my favorite plugins / sliders. I would love to win a license to use on my upcoming personal site.
I really like this slider plugin, and it would be really nice to get it for free…
Hi! I love this plugin! Hope I win! :3
This is a really great slider plugin…would be perfect to win it 🙂
Super dit is een hele leuke plugin, deze slider kan ik goed gebruiken op één van mijn sites!
I really love this slider. For me is a chance to get it for free
It is one of the best sliders out there and normally it comes bundled along with a theme. A gadget like this is handy as a standalone. Can use with any theme u want…and u get the valuable updates.
Some really interesting effects. If the management stands up to your usual efficiency I would be really pleased to receive your free offer. Our Kids First Enterprise Charity website build would look great with this slider installed. Thanks.
I really love this slider. would be perfect to win it 🙂
I’m not entering the competition, as I have been lucky enough to win a previous competition (thanks). Just wanted to say, I’ve used this slider that comes with the impact theme (nice versatile theme), and the slider is top notch, really advanced, and versatile (different slider types for different pages, etc.).
Out of all the sliders I have tried, this is my most favourite and can really make a visual change to a site, so anyone considering it, should just enter and try their luck. If you win, I doubt you will be disappointed with the slider.
Excellent giveaway and good luck to everyone.
Looks good… would like to have it..
This plugin look super awesome! Hope l will win and use it for my mom blog magazine 🙂
Because it be great for my site, my readers would be happier and I would be an even more enthusiastic fan of yours 🙂
I don´t Know this slider, want to test it ! 🙂
Would love this!
Interesting giveaway. I would love to use it on on of my clients websites!
It looks gorgoues, and very flexible!
I would use this on my sites for sure!!!
great!
Great plugin with some amazing features! Would love to win a copy 😀
I am a photographer and a good slider is a must to show my work!
Revolution Slider is amazing!
Looks very functional
Currently customizing a WordPress theme and would love to incorporate this amazing slider plugin.
Greta review, i want to test this amazing slider.
It will be perfect for my personal projects!
Very thorough showcase of Revolution Slider! I use revolution slider and it is awesome. I would like a copy so I can donate it to a someone who would/will need it. I already have Revolution Slider included with every website I make. So if I win, I would just donate that copy, to one of these lucky people, if that is possible. Or I would have to keep it to myself… {evil grin} 🙂
OOh, thanks for the chance to use this plugin. I need a slider.
I have yet to find the perfect slider. Perhaps this will be the one.
I want to get these plugins, because every product that’s recommended by wpexplorer.com is cool
Hoping Revolution Slider is the one that will work for me.
Lazy load actually does the opposite of what you said it does, instead of pre-loading, it only loads when the image is needed. This speeds up site loading times.
Ah – thank you! I was thinking post-loading and typed something completely different 🙂
I’ve already bought it and love it. One question: is it possible to give each text layer its own link? It seems to be, looking at the options, but I haven’t been able to make it work yet.
You can surround your text by a link using HTML.
Yeah, that’s what I’m doing now. Just wondered if I was missing something in the “layer links and advance parameters” box.
No, I think the HTML way is the way to do it. I’ve heard they are working on a big update so hopefully this is something that would be built-in.
Hi,
Its a nice slider to be use but One thing I get stuck that I want to put a link on every image in slider . So help me out how I put it in my code with dynamic functionality. If my client want to change image and url so he can change easily on wordpress dashboard. Note: My client can’t familiar with coding but he know how to use wordpress dashboard.
Thanx in advance… Have a nice day 🙂
Best regards,
Amad zahid
Hi Amad,
This is something you should ask the developer – they’ll be able to provide you with a much better answer. I am actually not quite sure what would be the best way of doing it for a client not familiar with code.
Nice article with lots of pics and explanation. My view is bit different.
I find the slider works pretty well when composed of shades or plain colors. Use images and it falls flat. I used it in grid of 750 x 300 and below 700 px screen width, it dropped the slider.
BTW, do you have any idea what values should go into the Layers under Mobile options? Thanks
Hi there,
Actually Slider Revolution just updated with a lot more options. So if your screen looks different then maybe you have the most recent version yay!
The mobile options depend on your website design. If you are using a premium theme ask the theme developer, otherwise you might need to hire someone to assist you.
Awesome slider very easy to use and looks super too. But for some reason I just cant get the video to play in the slider it keeps showing error occurred please try again later. Anyone else facing this issue??
This is a premium slider, so it includes support. I suggest you leave a comment on the slider page or contact the plugin author. I personally have not seeing this issue before.
Can I set the Slider Revolution WordPress and transfer to an html site?
I’m not sure, you’ll need to ask the developer.
Hi it was very helpful tutorial for me. Really it’s very helpful for beginner persons who want to learn word press in better way.
This plugin can really come in handy when you need to make a sweet slider on the fly, but the only drawback is the lack of mobile support. It IS responsive, but things either move when you size the window, or completely disappear on mobile devices. In an increasingly mobile world, I think this needs to be implemented. Especially when it’s advertised as responsive and mobile friendly. Just an opinion.
Pretty sure there is an option built-in to replace the slider with a static image on mobile, personally I think this is the best solution as opposed to keeping the slider and making it responsive. You really don’t NEED a slider on a given page anyway (especially on mobile devices) so swapping out the slider for static content in my opinion is the best solution – no matter what slider plugin you are using 😉
Unfortunately people buying/using WordPress themes still “demand” sliders, personally I don’t like them. And sliders aren’t even good for conversions anyway.
I completely agree but I can not hide the slider. Do You know what is the size for the slider to not display on mobile devices?? Thanks!
This depends on the responsive design of your theme. Contact your theme developer or the plugin developer to see if they can assist you.
Ok! Thank you so much!
Great article Kyla,
I have a question! hope you don’t mind.
I’m trying to insert a custom form that I built but am unable to add the css to the edit styles, for the life of me I cant find anything on this. With the slider accept the form css or should I hook to it externally?
regards: Wayne
Humm..I personally would just add the CSS for your slider form via a child theme or custom CSS plugin. Have you tried this?
Hello,
I am using the slider in full wide but i can’t see it in the the small devices as smart phone?
Thx
You should contact the author for support on this plugin, especially if you paid for it!
anyone an idea how to add a textual layer with perspective?
a typical example would be like the beginning of the starwars movie, telling the story of what has happened. i only need a static but perspective text, a dynamic text / markee is not necessary. any help or ideas welcome.
best regards, Klaus
is it possible to add a mouseover dark opacity change to certain areas to a slide area, essentially i want to animate this effect as you scroll over areas.
dropbox.com/s/6121nqnvee6vafv/SIRT365%20Lifestyle.png
I think you can do that with custom CSS just using the opacity tag.
wonder why sometimes the slider does not appear on my home page until I reload the whole page? makes no sense
Might be a cache or CDN issue. If you are using either try disabling and testing.
Having some trouble with features in the revolution slider. who do I contact? Or can someone send me an email please?
Contact the plugin developer. If you purchased the plugin you should be able to receive support, simply leave a comment on the plugin page.
Thanks for all this great info – It may be super simple but for some reason I just can’t seem to figure out how to use the link functionality of a slide. I would like to be able to have someone click on a slide and have a URL open in a new window.
I checked out your site and it looks like you’ve got links in your slider, so I’m assuming you figured it out 😉
Yes, thank you very much for the follow up. The support team Themepunch was really and I mean really helpful. They had me add:
.slidelink {z-index:9999!important;}
.yt-video {z-index:999999!important;}
to the Stylesheet css.
The .slidelink corrected the problem perfectly but created a smaller problem, (Which the .yt-video fixes) of making the whole slide a link which prevents a video to work. Adding the ht-video code and modifying the class for video from within the admin panel to yt-video works like a charm.
Scott
Awesome, I’m glad you received good support from them and things are working well now. I’ve purchased Slider Revolution about 10 times already (developer version) and they have always been quick at fixing bugs and responding!
Good luck with your site!
I recently started using the revolution slider. It looks great on the website version, but so small and very hard to read on the mobile version, and we want to keep it on the mobile version. How do we set a bigger size for the mobile version?
Hi Kara,
If the slider is full-width on your mobile device you can’t make it any bigger (besides flipping your phone over to portrait mode). I mean you can’t make the slider pop outside of the phone, although that would be bad-a*s 😉
The best thing to do in (my opinion) is to hide the slider for mobile devices and display a static image as an alternative. I think there might be a way to do this already built-in. Sliders aren’t too good for mobile devices anyway and a static image should convert much better. Actually, sliders aren’t really good for conversions ever, they just look pretty.
I love this slider – its smooth, easy to work with and loads of fun! –
I did purchase Slider Revolution Responsive WordPress Plugin from Envato and I tried to uploaded using WordPress and it say that there is no plugin so I tried also to upload it using FTP and when I go to the plugin section to activate it, it is not there
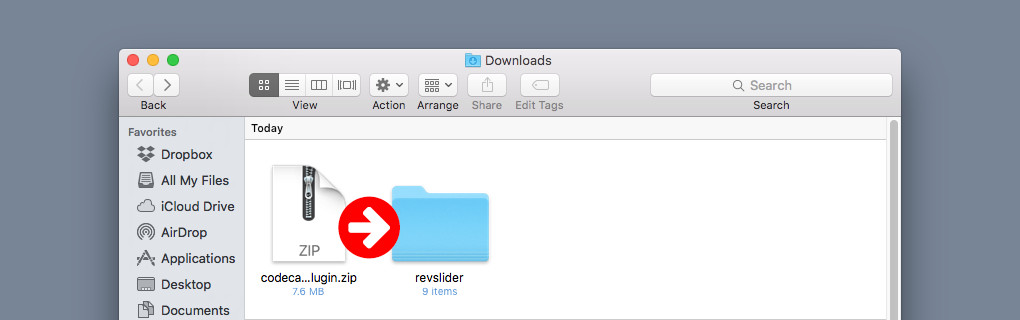
Extract the zip and upload only the file called revslider.zip. The purchased product includes documentation and other important files inside the main download.
How do you create a slide with a video background? What elements are involved in making that happen. I can’t find a step by step tutorial anywhere.
Hi Earl, if you purchased the product seek support from the developer. Leave a comment on the plugin page or click on the support tab on the plugin page to see how they handle support.
Yes, Earl is correct. Envato has, based on my experience, a brilliant support staff and are extremely helpful. I am just a novice user but do not believe that the slider has the ability to show a video in the background, (Like what you would see with PayPal’s new front page look). You can have a solid image show as a Ken Burns effect so long as the image is physically larger than the size of the slide. Of course you can also have a YouTube video window placed in the slider. But, for a video to play in the background I suspect your are looking for something more powerful and robust than a slider like this.
My bad, Earl…. I meant AJ Clarke was correct 🙁 more coffee please!