How To Optimize WordPress Blog Content for Pinterest

As a WordPress user, you’ve likely heard talk of Pinterest and the almost other-worldly power it possesses to drive FREE traffic to your website. And if you haven’t heard yet, please check out this epic post discussing how you can boost traffic to your WordPress site with Pinterest.
There’s a reason why bloggers and WordPress enthusiasts in the know talk about Pinterest as if it’s a mythical being. Part of the magic lies in it being a visual search engine and social media platform. Meaning savvy users can harness the power of both SEO and social sharing opportunities in one place. Still not a Pinterest convert? Well, you’re about to be!
Now we’ve piqued your Pinterest attention… Pinterest is one of the fastest-growing social sites (having around 322 million active users every month) and one of the most significant sources of free website referrals. Plus, people generally flock there in droves to pin valuable information or products they want to spend money on later.
Whether you rely on a set number of monthly website views to achieve ad revenue, affiliate sales, or sponsorship opportunities or use blog content to spread the word about your physical or digital products and services, there’s but one question you need to ask Pinterest:
“Hey, Pinterest! Did we just become best friends?!”
Why Optimize Blog Content for Pinterest Anyway?

There are oodles of comprehensive guides about optimizing an entire WordPress website – setting up Rich Pins is an important step. It’s best to follow a guide, but for a quick summary, first you must create a Pinterest Business account or convert your current personal account to business. Then you just need to confirm your website URL. If you’re using a plugin like Yoast SEO this is super easy – just copy the code from Pinterest and paste it in the “Pinterest” tab under Yoast’s social settings. After you head back to Pinterest and finish confirming your site you’ll be ready to start using rich pins!
However, to make this initial hard-work payoff, WordPress users also need to optimize individual blog posts. Think of it this way; you wouldn’t optimize your website for SEO only to forget to SEO-up your subsequent blog posts.
It doesn’t take much extra work to optimize a WordPress blog post for Pinterest. By taking the steps suggested below, your content will be pinnable, and more likely to increase virtual footfall to your post, and likelier still to increase conversions. Plus, you’ll avoid wasting that initial effort you put into ensuring your WordPress site is uber Pinterest-friendly as a whole.
It’s All About the Image Honey
Pinterest is predominantly a visual search engine, and users can’t distribute content via the platform unless it includes an image. Meaning, if your content doesn’t have a picture and can’t be added to the site, you’re missing out on the opportunity for free web traffic. It’s kind of an “if a tree falls in the forest, does it make a sound?” deal.
To reiterate, you can’t add your content to Pinterest without an image, and neither can anyone else.
Also, people pay attention to the graphic first and the written description below the image second because it’s a visual platform. To solve the above, you could include any old image so that users can pin your content to Pinterest. But why would you when you could use an image optimized for Pinterest within your post? By doing this, people are more likely to re-pin your Pinterest image because it grabs their attention and advertises what you have included within the post.
How To Craft a Pinnable Image

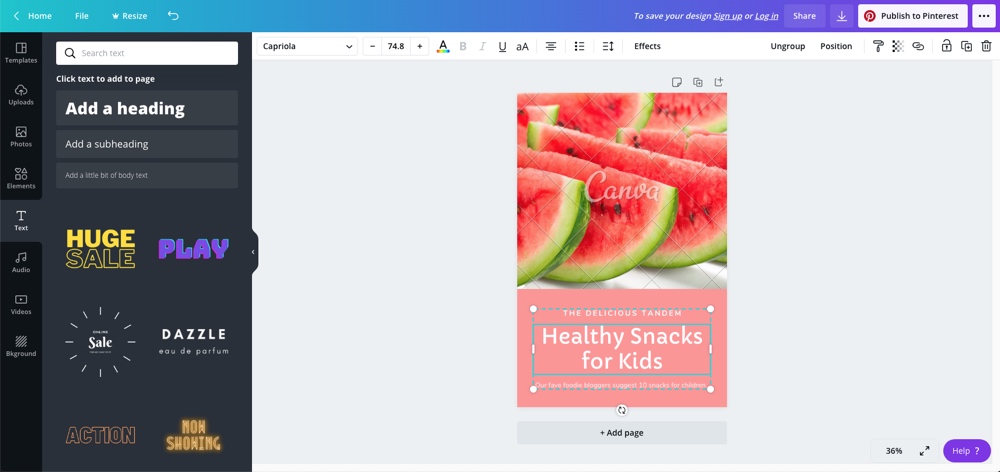
What makes a pinnable image? The right dimensions, a relevant image, including the title of your blog post, adding your WordPress website details, and keeping the entire image on brand. Praise be to the Pinterest Gods because it’s way easier to achieve than it sounds. You can use existing Canva templates and source free images from stock websites like Unsplash and Pexels. Give Canva a try yourself.
Using a customizable Pinterest template means all you have to do is edit the text, add your WordPress details, and amend the colors. You can also change the image if you’d like to, which is especially helpful if you wish to include a specific product photo. Either way, the groundwork has been done for you, which is a massive time-saver. Woop!
Additional Pin Graphic Considerations
If you’re feeling extra creative and want to make the image yourself, the recommended dimensions (straight from Pinterest themselves, no less) are 1000 x 1500 pixels. An ideal pin image is vertical, and following the recommended sizes will ensure your pin image is of the highest quality.
The image should include easy-to-read text, which could be a replica of your blog post title or variants of the same theme. You can add your logo, providing it doesn’t overcrowd the image or detract from the title. However, it is highly recommended that you include your WordPress website domain name on the image. You should also use colors strongly associated with your brand.
Where To Place Your Pinnable Image
When you upload your Pinterest image to a blog post, it’s tempting to make it the first image on the page. While it is best to include it towards the start of the post to remind readers to pin your content. You’ll still want a general featured image first that will be used as a part of your default Open Graph Meta Data (this is the image that will be used for thumbnails on your site, as well as site previews when sharing your link on other social sites like Facebook or Twitter). For your pinnable image, aim for within the first two paragraphs of your post. You can also edit the caption to say something like “Hey, friends, don’t forget to pin me for later.” Or whatever you’d prefer, of course. Ahem.
If you’ve already written a post relevant to your current entry, add another pinnable image to refer people back to this previous post. You can include this within the post or at the end to keep folks binge-reading content on your site.
Psst, Don’t Forget About the Alt Text.
Don’t forget to amend the alt text of your pin image! The alt text is what shows underneath your pin on Pinterest as the description. If you’ve used a stock image, it will likely say something like ‘someone holding a phone on a sunny day.’ While that sounds fun and all, does that description have anything to do with your post?
Instead, include a juicy introduction to the post that will get people excited when they see it distributed via Pinterest. Plus, if you have some keywords, you’ll also tick that SEO box like a champ. Here are two final tips on your alt-text situation:
- A Pinterest description can have up to 500 characters. If you go over that number, no one can pin your content. Jeepers!
- Include a few hashtags at the end of your text. Pinterest is a hashtag friendly site, so don’t waste the opportunity to pop up in specific hashtag searches.
Encourage People To Share Your Content

It’s a simple formula. The more people share your blog content on Pinterest, the more potential for increased traffic referrals back to your WordPress site. So aside from including the all-important pinnable image within your post, you need to remind readers to share your content politely.
Like so many things on WordPress, you can achieve your goal with a plugin. Praise be to the old plugin Gods and the new. The jQuery Pin It Button is a popular choice because the phrase “Pin It” appears as if by magic when readers hover over your images. Woop! If you already use the Social Warfare plugin, enable Pinterest as one of the shareable platforms.
A Final Word on Optimizing Your WordPress Blog Content for Pinterest
It’s pretty much content creation 101, but sometimes we all need to go back to basics. Remember to make your content valuable. Think about your target audience, and create content that will benefit them.
If you take the above steps to optimize your WordPress blog post for Pinterest, but your content is low quality or doesn’t do what the title suggests, people will go elsewhere without saving your content to Pinterest.
Finally, be consistent. Don’t take the above steps on a single post and expect the magic to happen. Instead, replicate them on every piece of blog content. By staying consistent, you will reap the rewards.


Thanks so much for letting me contribute to your awesome site 🙂 I hope this post helps some folks!!