Mouseflow Heatmap Analytics for WordPress Review

Analyzing heatmaps is a scientific approach to conversion rate optimization for your online store or website. It is a data-backed way to measure the effectiveness of your landing pages, contact forms and purchase funnels. Mouseflow is a freemium heatmap analysis, session replay and recording tool. In this article, we’re going to review Mouseflow by integrating it with our favourite CMS tool – WordPress.
What is a Heatmap?
For those of you who are new to the topic of heatmap analysis, here’s a simple rundown.
Heatmaps are a visual representation of the most active areas of your website. A region which is clicked the most (for example, the Start Here menu item of a blog), would appear red in a heatmap.
Heatmaps in Search Engines
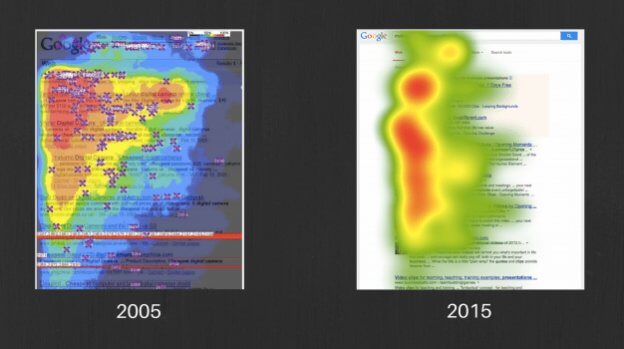
The evolution of heatmaps in 10 years, source: Two Octobers
Let’s take the example of a heatmap in a search engine.
In Google (or any search engine for that matter), the first three search results are the most clicked links. As a result, that region is represented in red in a heatmap, since it’s the “most active” or “hot” region in the heatmap. The links that follow (i.e. the fifth, sixth, etc.) links have diminishing number of clicks, and have “cooler” colours (orange to yellow to green to blue) in the heatmap.
The screenshot above is a representation of how heatmaps has evolved over a period of ten years. Back in 2005, they used to call it the “holy triangle”, which meant that the first few letters of the first two links commanded most of the searcher’s attention.
Ten years down the line, we’ve trained our eyes to scan the first few words of the top 5-6 links. This gives us the rectangle-like heatmap that we see in the right hand side of the screenshot.
What is Session Recording and Replay?
Heatmaps give us a good look into the most active or most clicked regions of the website. Wouldn’t it be to cool to actually see how a visitor interacted with your website?
The movement of the mouse is a strong indicator as to where the attention of the visitor is, in the website.
Session Recording is the perfect solution. A session is essentially the entire activity done by the visitor in a single visit. This includes the time from which the website was loaded to the time the tab (or window) was closed. Mouseflow records the the individual sessions of your website visitors and allows you to play them, anytime from your browser.
Playing a recorded session is called Session Replay. It’s actually a video of the entire interaction of the visitor with the website. This includes typed information (passwords are always hidden), form interactions, clicks and all other activity.
The Benefits of Session Recording and Replay
Session Recording and Replay is an indispensable tool in user-interaction testing, A/B testing and usability testing – all with the live users.
Let’s take an example of an ebook download page. It’s a classic use-case in lead generation, where you give the user something (in this case the ebook), in return for their email address and permission to send emails to them. A session recording would show how your users are interacting with the form, how many people actually end up filling the form, the number of fields a user fills, before dropping off, etc.
There are tons of other use cases where session recording, replay and heatmaps are used for conversion rate optimization. In this review, we’ll cover the top five features Mouseflow has to offer:
- Heatmaps
- Session recording
- Session replay
- Form session recording
- Feedback gathering
We’ll cover each of the topics in detail in the following sections.
The Mouseflow Dashboard
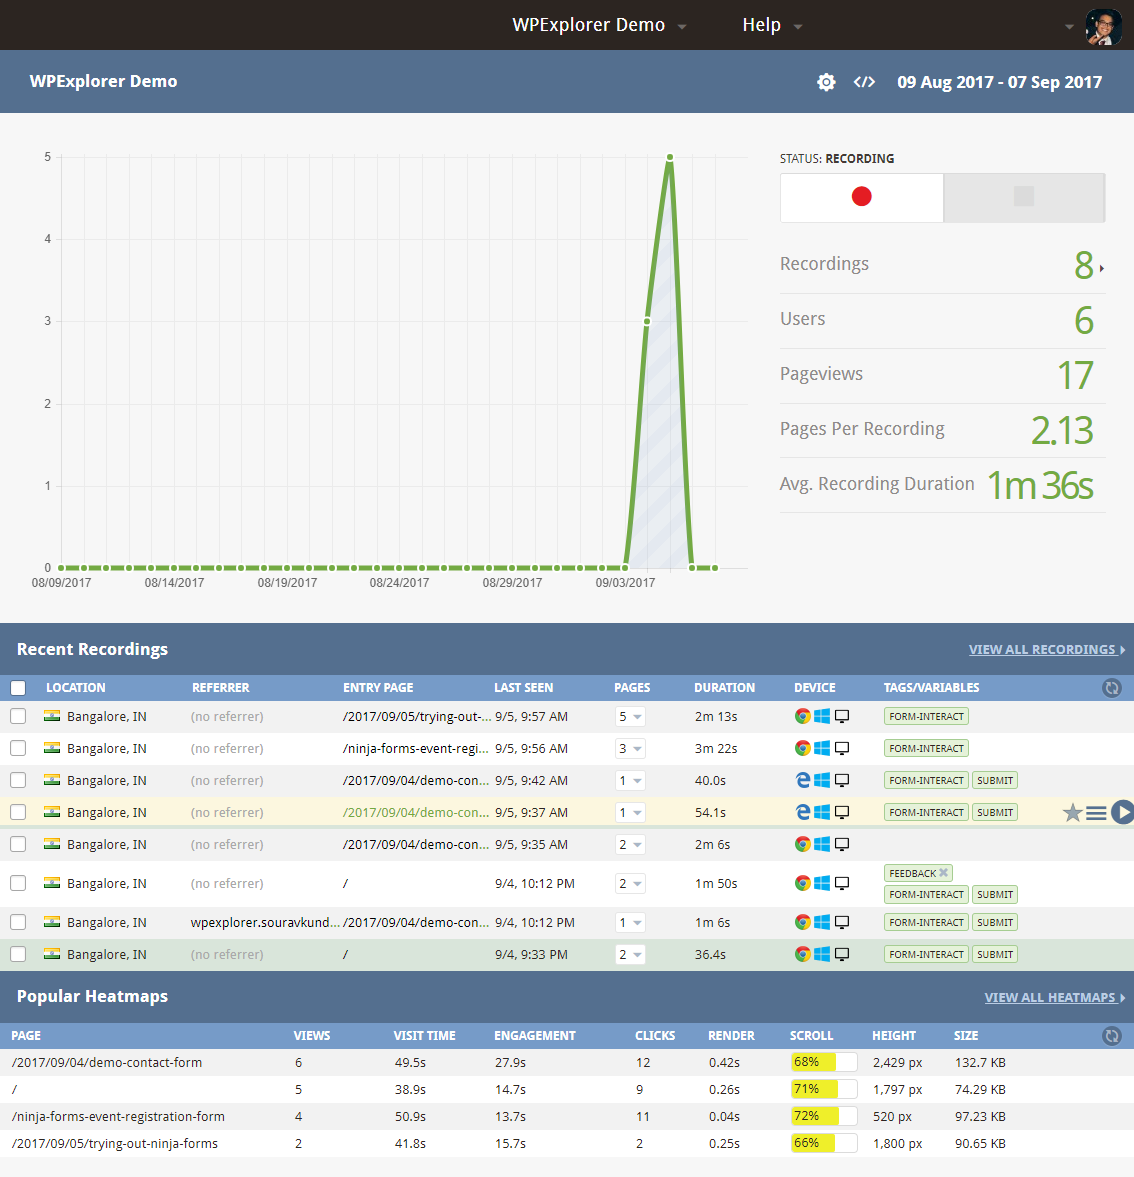
A bird’s eye view of the Mouseflow Dashboard
Mouseflow’s dashboard gives you a bird’s eye view of your recent session recordings and your popular heatmaps. The chart represents the number of sessions recorded, and is proportional to the traffic your website gets.
Heatmaps
Mouseflow’s heatmaps analytics supports five distinct dimensions, including click heatmap, movement heatmap, scroll heatmap and geographic heatmap. We’ll evaluate a single page containing a contact form, and test it across each of the five types of heatmap.
Click Heatmaps
A click heatmap represents the regions that receives the highest number of clicks. Each page will have its own unique heatmap representation. For example, in page containing a contact form, the Submit button would register the highest number of clicks.
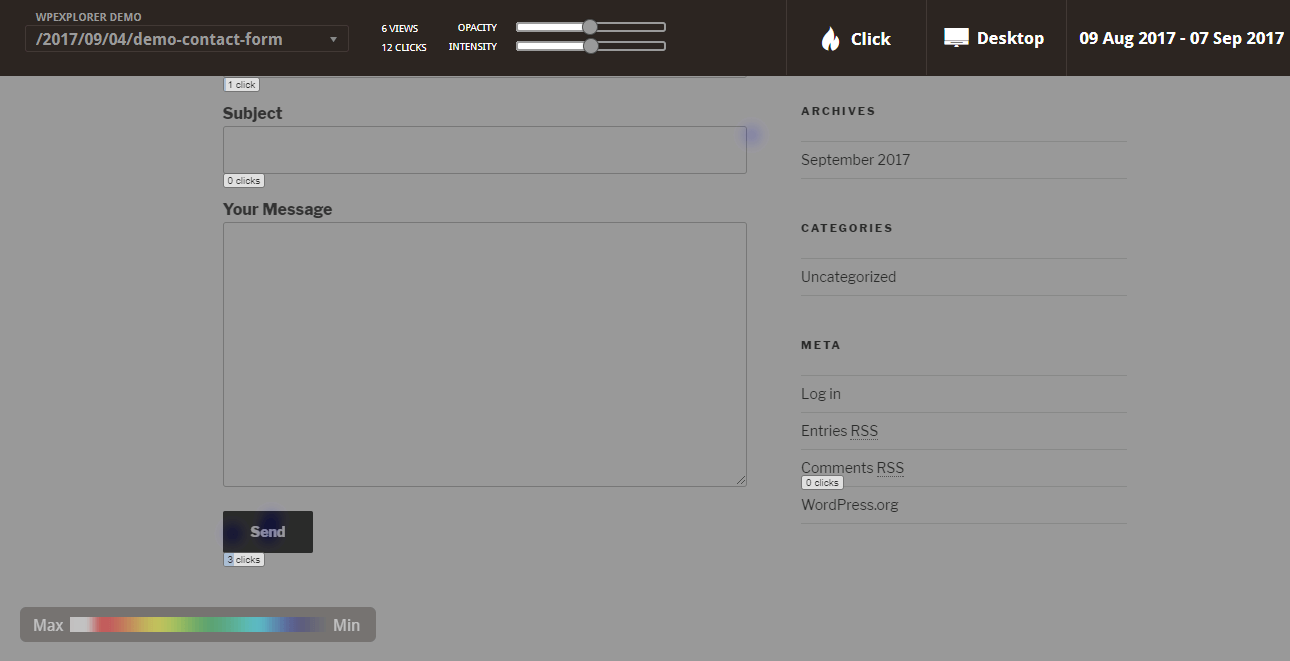
Screenshot of a Click Heatmap in WordPress, created using Mouseflow
This is a screenshot of the click heatmap of a demo website, I built for this tutorial. Since I’ve only submitted the contact form thrice, it registers three clicks. Three is a very small number to be considered in a heatmap, which is why it’s highlighted in blue.
Movement Heatmap
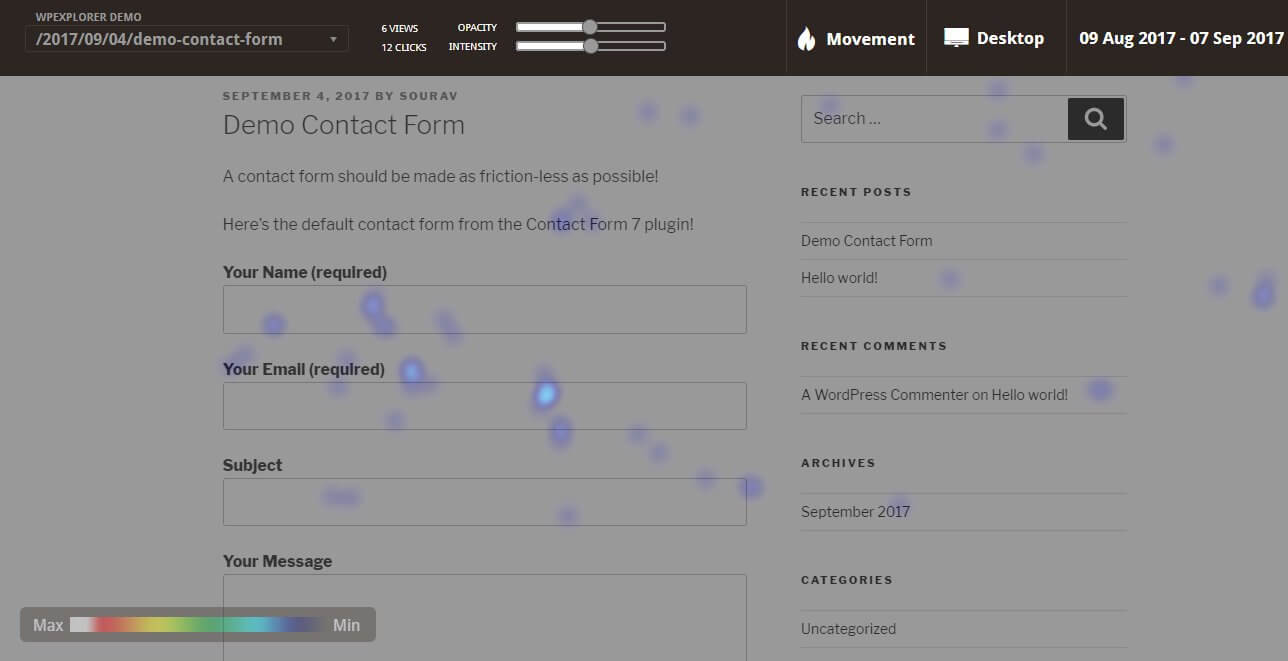
Screenshot of a Movement Heatmap in WordPress, created using Mouseflow
The movement heatmap represents the regions of the website with the highest movement. In the screenshot, you’ll notice the blue patches, which represents low activity.
Attention Heatmap
The Attention Heatmap is an interesting metric. It represents those areas where users spends the maximum amount of time.
Let’s take this screenshot to explain.
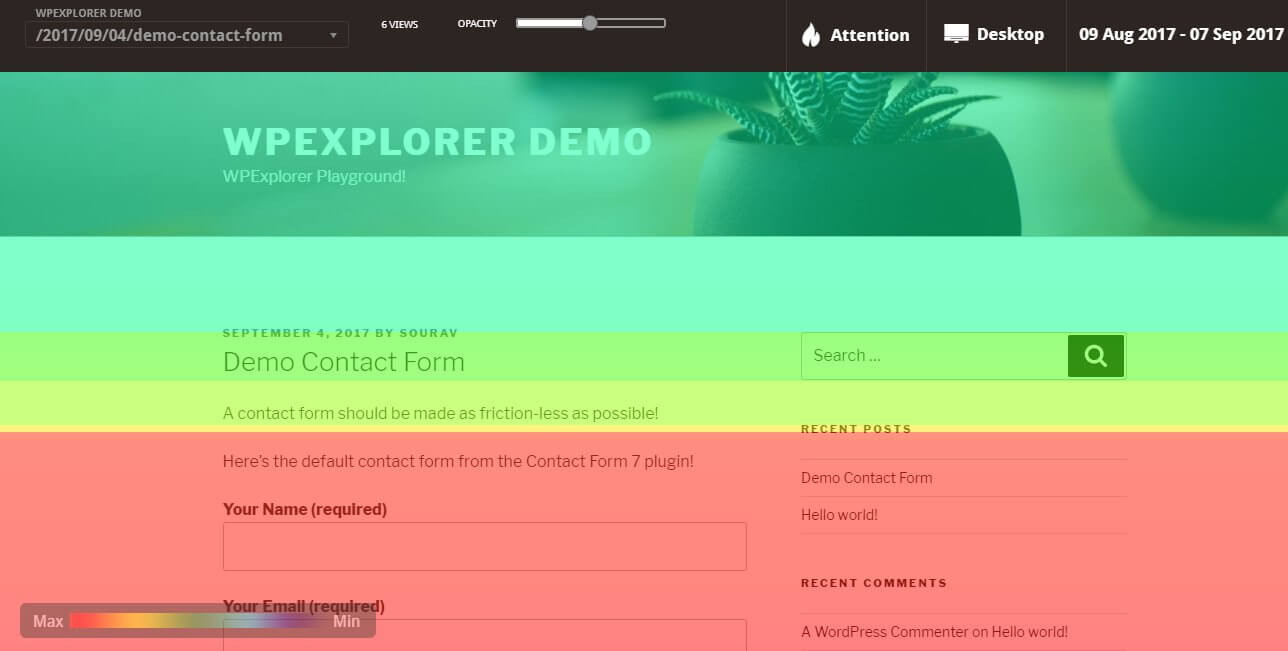
Screenshot of an Attention Heatmap in WordPress, created using Mouseflow
The region in green has an average time spent of 10.2 seconds, whereas the regions in red have an average time spent of 21 seconds. This suggests that the site visitors are spending a significant portion of their time on site in the red region. In our case that’s the contact form.
How to Use Attention Heatmaps to improve Sales Page Copy?
The attention heatmap can be an excellent tool to measure where your visitors are spending most of their time. If you’re writing a long sales page, you want your readers to actually read the page from the top (spend most of their time there), followed by the testimonials, and click on the Buy Now button.
Hence, the top bit of your sales page should ideally be red, in an Attention heatmap.
If your visitors are not reading the first few lines of your sales page, it’s a clear indicator that your pitch and copy needs work.
Scroll Heatmap
A scroll heatmap represents the most scrolled regions in your website. Your website visitors would tend to quickly scroll down from the header and reach the bit where the content it.
The scroll heatmap is complementary to the attention heatmap. When the attention is high, the scroll is low. You know someone has skimmed through your copy when you see a red region in the scroll heatmap. The yellow to green regions in a scroll heatmap indicates the bits in your copy which your visitors find interesting or useful. Used correctly, the scroll heatmap can be an excellent tool to improving your landing page copy.
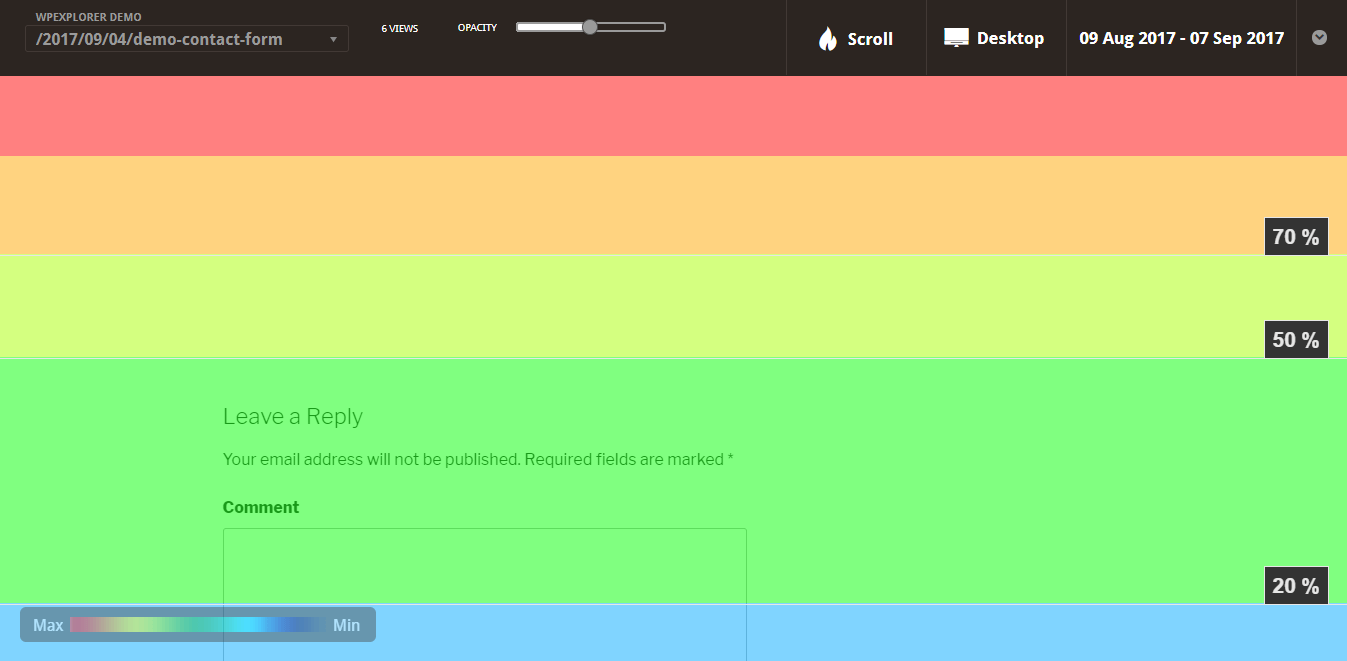
Screenshot of a Scroll Heatmap in WordPress, created using Mouseflow
However, in our tutorial, I’ve scrolled all over the place, which is why it’s all marked in red. You’d notice that the footer region is in blue, indicating minimal scroll activity.
How many sessions should I record?
Mouseflow gives you the option of choosing how many sessions are recorded, out of the traffic. For example, if your input is ⅓, then one out of every three visitor’s session will be recorded. In other words, 30% of your traffic’s session would be recorded.
This is important in terms of planning your usage. Each recorded session is a credit. Depending on the plan you purchase, you would have to adjust the percentage of recorded traffic, from your total traffic.
A simple way to estimate this number is to lookup your Google Analytics traffic report. For instance, if you get 1000 unique visits per month, and you want to record, say 500 sessions, then you would configure Mouseflow to record one out of every two visitors, i.e. 50% of the traffic.
Geographic Heatmap
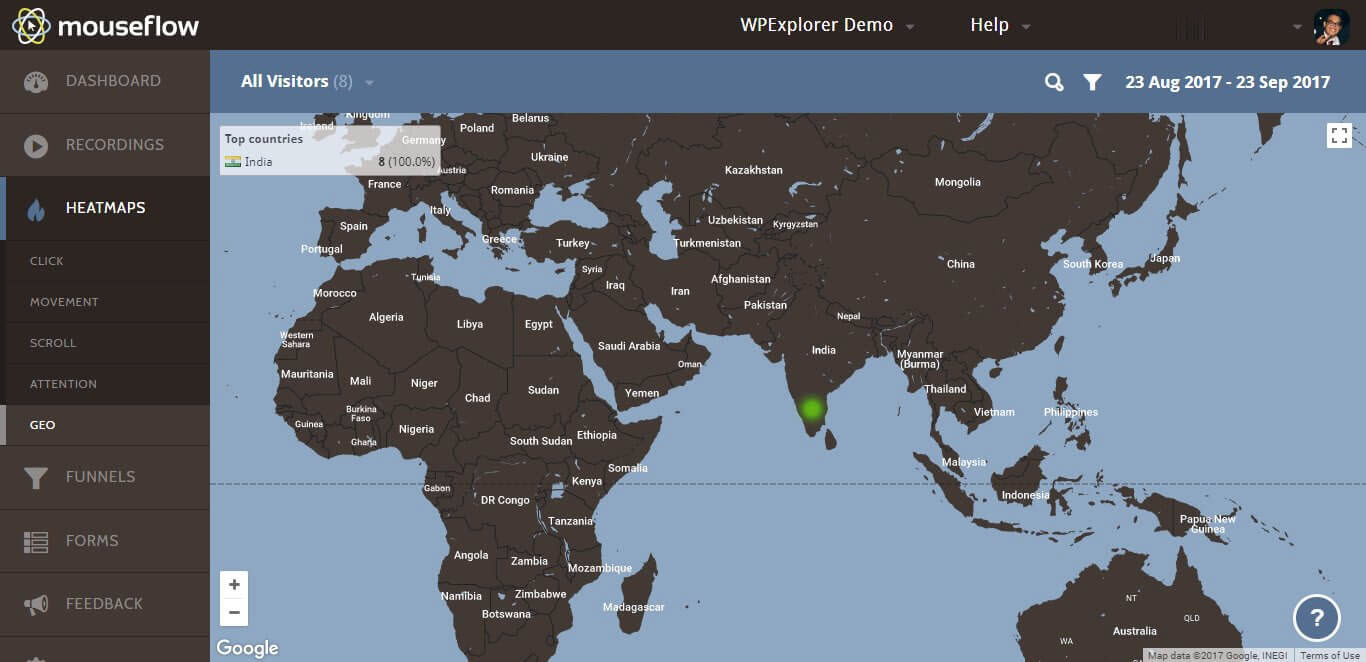
Screenshot of a Geo Heatmap in WordPress, created using Mouseflow
The geographic heatmap highlights the countries where most of your visitors come from. This data is available in most analytics software such as Google Analytics or Kissmetrics. The screenshot above is from the demo site, which is why only India is highlighted.
Funnels
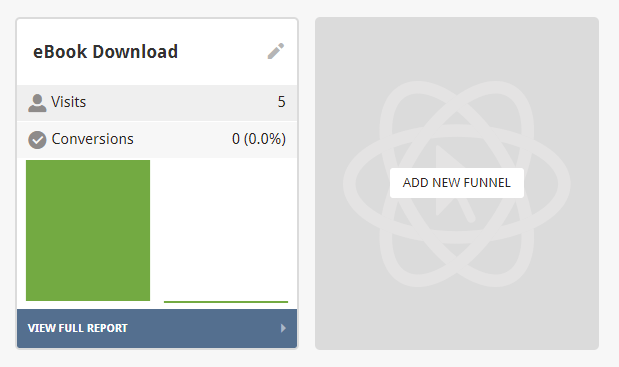
Example of an eBook download funnel in WordPress, created by Mouseflow
A funnel is a series of steps a visitor takes in order to complete an action in your website.
Let’s say that you want your visitors to download a copy of your latest ebook, in exchange for their email address. That’s a classic lead generation campaign, aided by an ebook download.
The action you want your visitors to complete is downloading the ebook. This action has one or more steps involved.
To keep things simple, let’s consider two steps (or pages) in this action.
- The first page is where the visitor reads about the offering and enters the email address.
- The second page is a confirmation page, where the visitor sees download/ buttons for the PDF.
Thus, the funnel for the eBook download contains of two steps, as shown in the screenshot below.
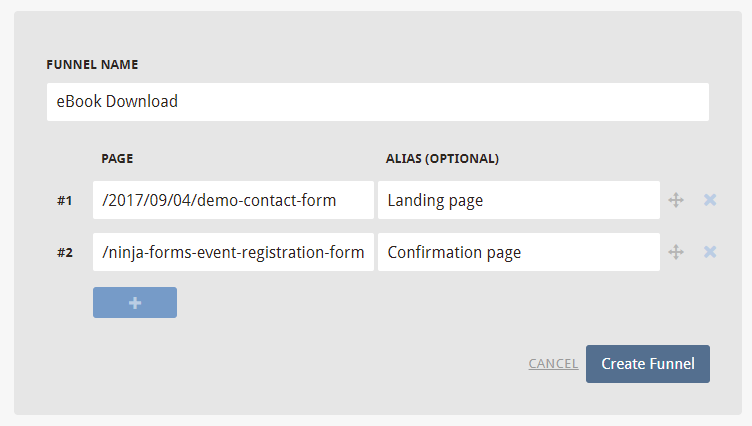
Creating a new funnel for ebook download in WordPress using Mouseflow
Mouseflow measures the drop-off rate at each stage in the funnel. In our example, we haven’t downloaded the ebook, and have left the website after viewing the first (landing) page.
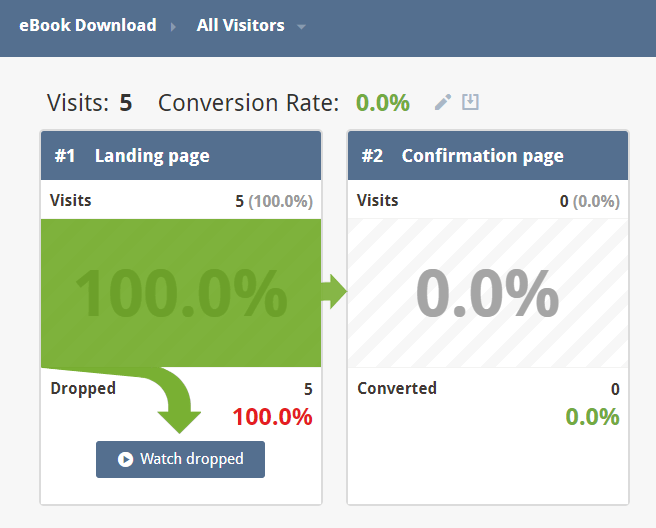
Conversion rate of an ebook download funnel in Mouseflow
This screenshot tells us that the landing page has received 5 visitors, none of whom made it to the confirmation page.
How to Optimize Conversion Rate using Funnels in Mouseflow?
Funnels enable you to track how your visitors are behaving in your site. They are incredibly useful in discovering the leaking areas in your conversion funnel. Once you identify the the leaking page, you know the area of your problem. You can then optimize the copy of the page (or in some cases, remove the page altogether) to see if the drop-off rates decrease.
Forms
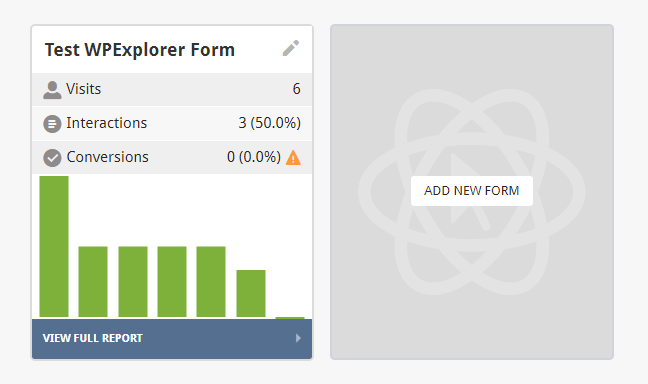
Tracking forms in WordPress using Mouseflow
Mouseflow enables you to track how visitors interact with your forms in WordPress. This is especially helpful in B2B lead generation and content marketing, where the cost per lead is significantly higher, compared to B2C website/product.
Let us consider the WPExplorer Test Form that I’ve built for this tutorial.
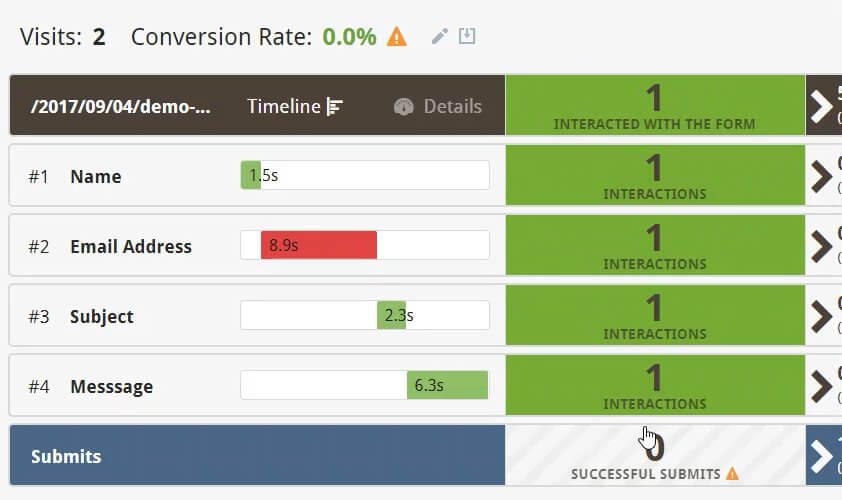
Segmentation of fields in a tracked form in Mouseflow
This screenshot tells us that there were two visitors to the form’s page, and the maximum time was spent in the email address field. You’ll also note that the conversion rate is 0% since, I did not actually submit the form after filling it up.
How to Improve Form Completion Rate using Mouseflow?
Using Mouseflow, you’ll be able to figure out the data-intensive fields in your form, and measure the time taken to fill a typical form. If the number of fields in your form is too high, or worse, irrelevant, you might notice your visitors dropping off at those particular fields, within the form. With Mouseflow, you’ll be able to identify those fields and optimize around them, to ultimately increase the completion rate of your form.
How to Track a Form in WordPress using Mouseflow?
Tracking a form in WordPress using Mouseflow involves a few steps:
- First, setup your form in WordPress and copy the URL
- Goto the Forms page in your Mouseflow dashboard and click on New Form.
- Paste the URL you copied in Step 1.
- Mouseflow will automatically recognize the form from the page, along with all it’s fields.
- You can assign a name to each field in the form, such that it’s easier to track.
- Finally, hit Create Form to start tracking the form interactions.
Feedback
Mouseflow enables you to create beautiful, non-intrusive feedback campaigns for your website visitors. After all, listening to your readers/customers is a sureshot way of improving your site.
Here’s how a typical feedback campaign looks like:

Feedback campaign in WordPress created using Mouseflow
Once you complete the survey, this is the confirmation page.

Confirmation/Thank you page for the feedback campaign
How to Create a Feedback Campaign in WordPress using Mouseflow?
Now let’s see how one can create a feedback campaign in Mouseflow.
Login to you Mouseflow dashboard and click on Feedback from the left menu and click on Add New Campaign.
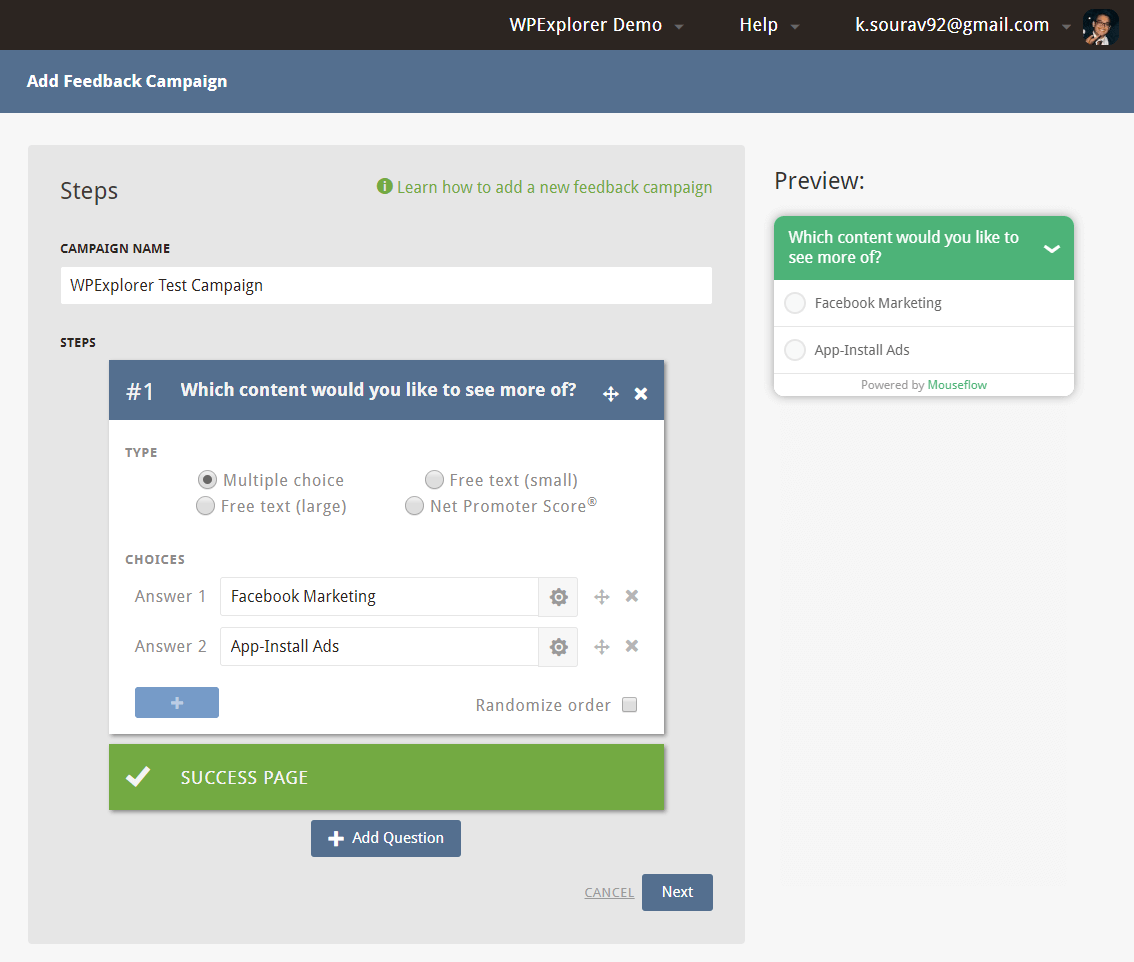
Creating a new Feedback Campaign in Mouseflow
You can add as many questions as you need, with a minimum of one question. The answer options include multiple choice, text paragraph (small/large) or a Net Promoter Score.
You can see a preview of the questions and answer options on the right.
Finally, you define the content of the success page and click on Next.
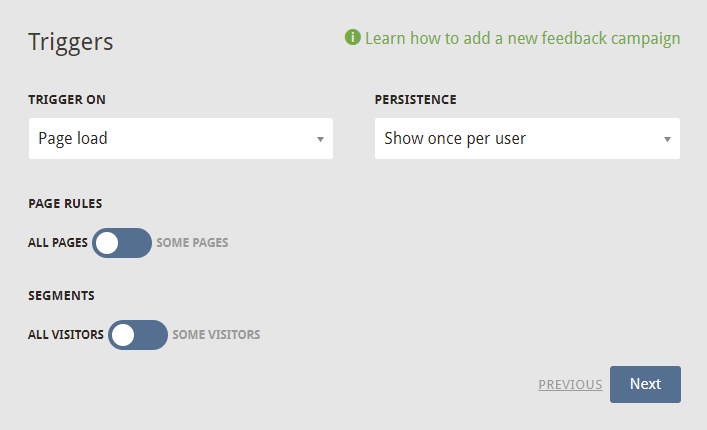
Triggers in the Feedback Campaign
Triggers define when and where each feedback campaign is shown. Mouseflow offers a range of options for you to define your triggers. For example, in the above screenshot:
- The feedback campaign would load as soon as the page loads.
- It would load for all visitors, regardless of the fact whether they are registered or other segmented users.
- The campaign loads in all pages (although it’s a good idea not to show it in the login page!)
- An important option – the campaign form is shown only once per user.
Once you’ve defined the triggers, click Next to proceed.

Kill switch for a Feedback Campaign in Mouseflow
Finally, you can choose activate the campaign, immediately after creation.
However, it’s a good idea to first test the campaign in the live site, by limiting it to a non-indexed, or least-popular page, and see if the data is collected properly. Once you’ve verified that the campaign works, you can deploy it site-wide.
What I like about Mouseflow
Mouseflow’s intuitive interface and multiple tracking options makes it a great start for heatmap analytics.
The Freemium Model
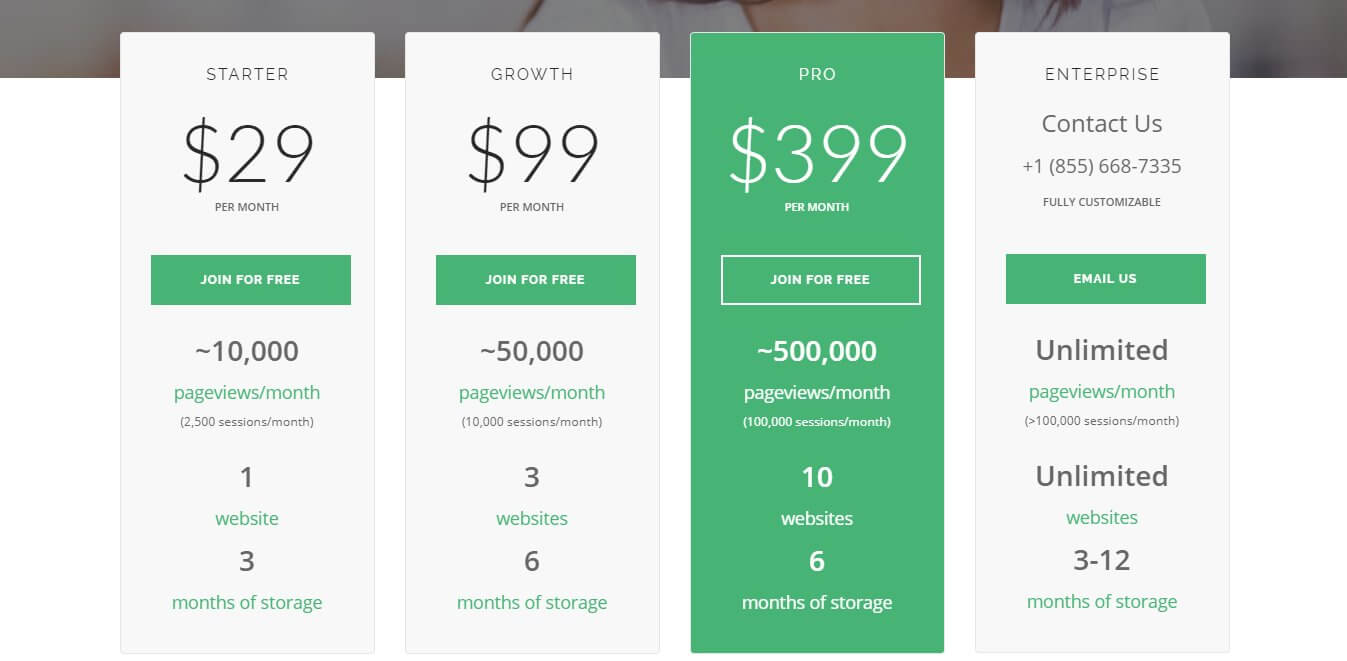
Mouseflow Pricing Model
Mouseflow operates on a freemium model, providing you with 200 free credits, every month.
Each credit is equivalent to one recorded session. However, credits are capped at 200 per month, which means if you haven’t use it, you lose it.
Similar to MailChimp (my favourite email service provider), Mouseflow gives me the flexibility to try the service before committing to it. Also, compared to the other heatmap analytics services, Mouseflow has a pretty competitive pricing strategy.
Built-in WordPress Compatibility
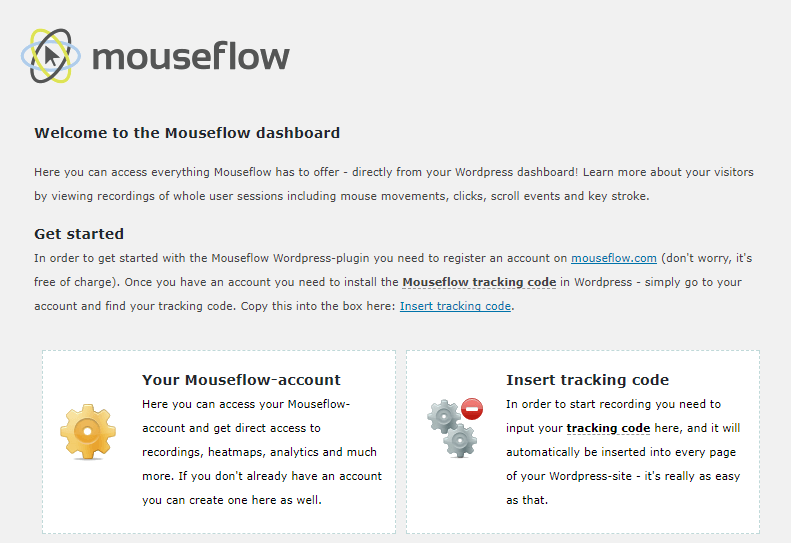
Mouseflow plugin dashboard in WordPress
Mouseflow supports integrations with multiple tools (more on this later), including WordPress. To start tracking your WordPress site with Mouseflow, simply download the Mouseflow for WordPress plugin and activate it.
A new entry called Mouseflow should appear in the left bar in your WordPress dashboard.
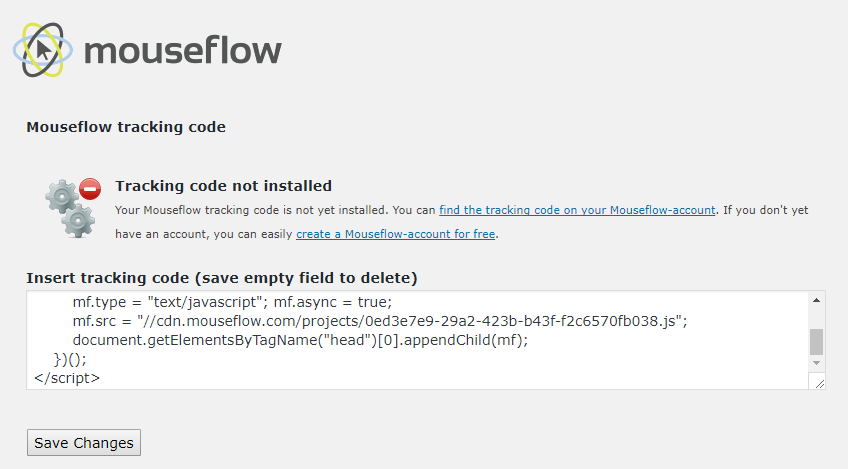
Inserting Mouseflow’s tracking code in WordPress
Click on Tracking Code to insert the tracking code in your WordPress site. You can find the tracking code information for the site from your Mouseflow account, under Settings.
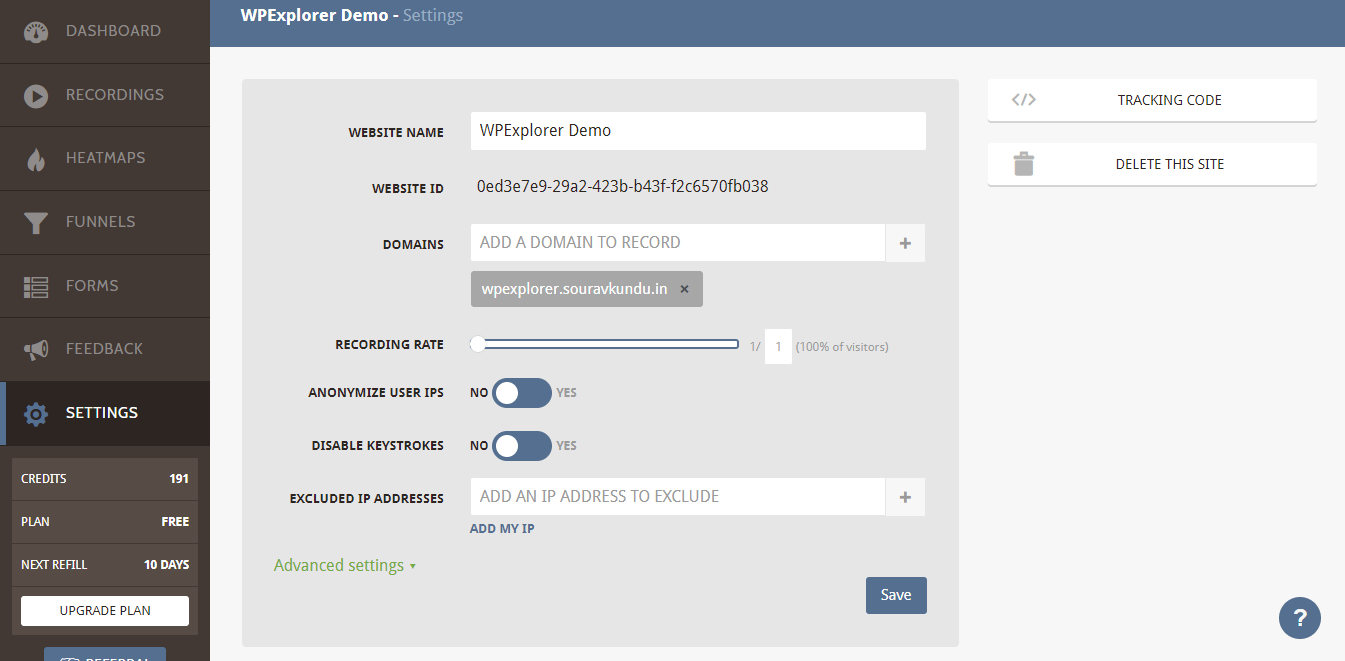
Site information in Mouseflow
Once done, Mouseflow will start recording your sessions in your WordPress site.
Other Cool Stuff
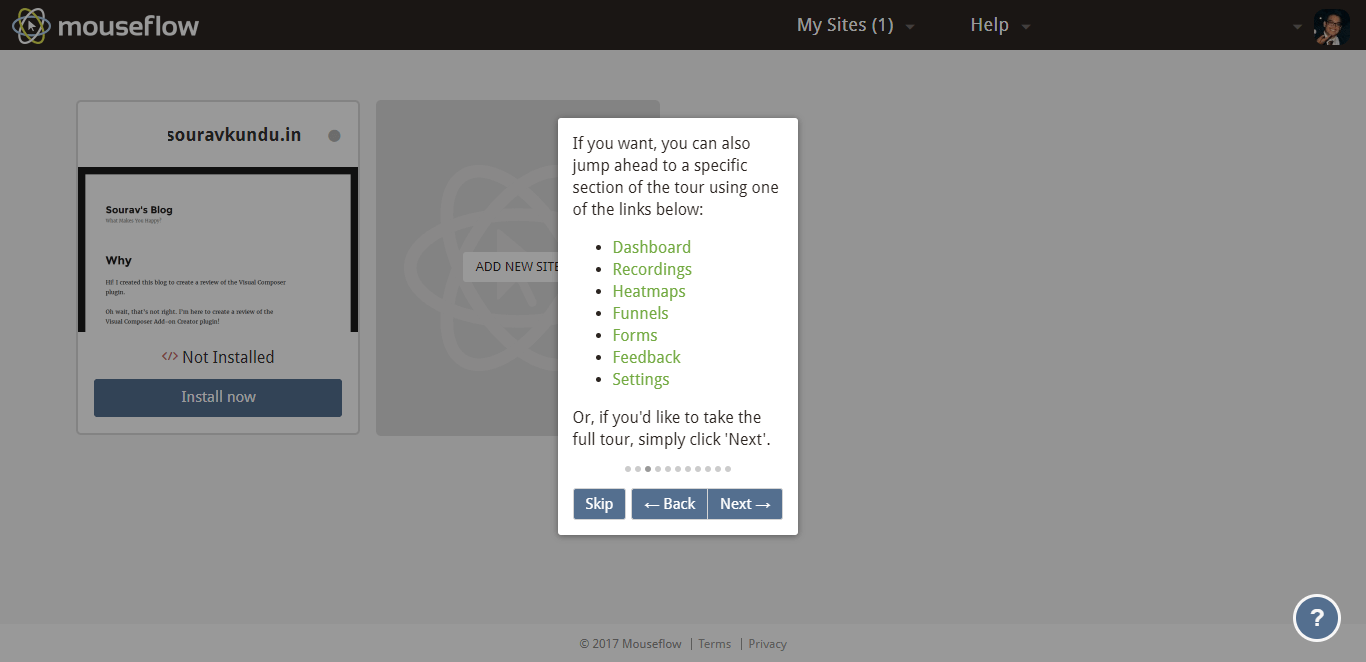
Mouseflow’s New User Onboarding Process
I like Mouseflow’s new user onboarding process, which acquainted me to all the various options in the dashboard. I was up and running in less than 10 minutes, without referring the knowledge base. They also have some cool training videos, neatly organized under six categories.
Third-party Integration 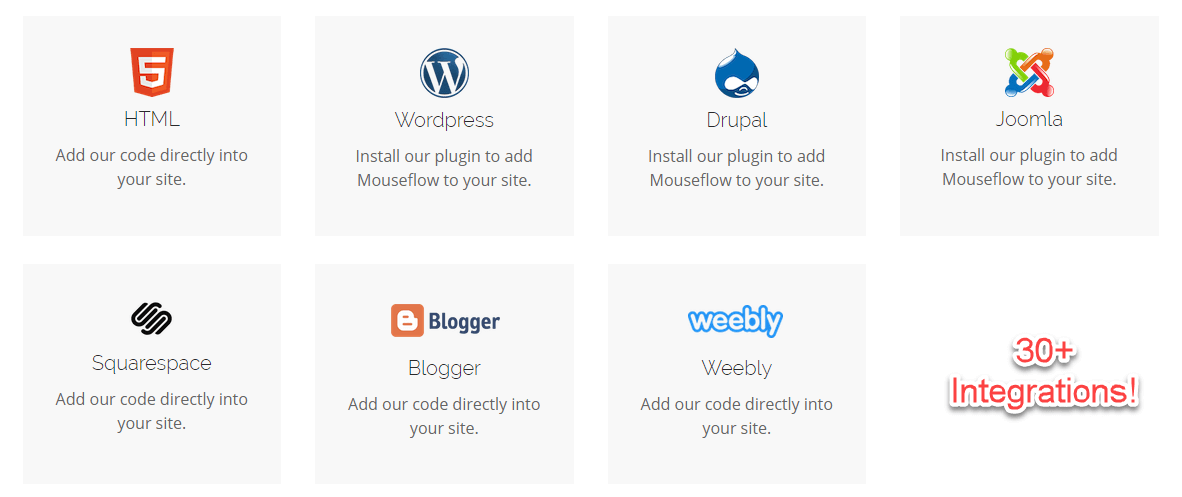
Mouseflow integrates with over thirty third-party software
Mouseflow supports multiple third-party integrations, ranging from CMS to marketing software to advanced tag management software. At the time of writing, Mouseflow supports 30 native integrations, grouped under six major categories:
- Content Management Systems: Other than WordPress, Mouseflow integrates with Joomla, Drupal, Blogger, and good ol’ HTML5 websites. It also integrates with popular site-builders such as Squarespace and Weebly. Wix is yet to get a dedicated integration.
- E-Commerce: Mouseflow integrates with leading open-source e-commerce software such as Prestashop, Magento, 3dcart and popular paid solutions such as Shopify.
- Analytics: You can integrate Mouseflow’s data with popular analytics software such as Google Analytics, Adobe Analytics, and specialised ones such as Kissmetrics and Coremetrics.
- Marketing: Mouseflow supports leading marketing software such as Hubspot, Instapage, Unbounce, Optimizely, and others.
- Customer Service: Real-time, helpful customer support is a cornerstone requirement for a successful business and its long-term stability. Mouseflow also integrates with leading customer support and helpdesk software such as Zendesk, Olark, Freshdesk and Zopim.
- Tag Management: Attribution is key to measuring your marketing efforts and ROI. There are advanced tag management software such as Segment.io and Google Tag Manager. Mouseflow natively integrates with these, along with Ensighten and Tealium.
Besides this, Mouseflow also has a powerful REST API, using which you can access data from any custom portal.
Mouseflow Clientele

Mouseflow has some kick-ass clientele
Mouseflow is used by some of the biggest names in the industry including Hubspot, Optimizely and Intuit. At the time of writing, their customer base is over 100,000.
Website analytics is a booming field in today’s attention-deficit economy. Millions of dollars are poured into funding new research and solutions for analytics and attribution. Mouseflow is a perfect start for any marketer to get acquainted with the basics of heatmap analytics.
As always I leave you with a question. Are you using heatmap analytics in your site? If so, which software are you using? Is is functionally better than Mouseflow? Let us know in the comments below!


Thanks for sharing such a great information. You have written it very well and easy to understand.
Glad you found this useful!
A really good article, thank you. I think Mouseflow is a pretty good tool and works well with its integrations. It makes my work much easier. It collects many data that I can analyze quick and easy in AnswerMiner.
Great article – very indepth. My question is, “What kind of speed hit does a site take to have Mouseflow running on it all the time?
Here’s the thing – literally anything you add to your site will increase your load time. I think it’s more so a matter of it’s a meaningful or noticeable amount. Since Mouseflow is loaded asynchronously and utilizes a CDN to load their script it shouldn’t slow your site down a noticeable amount or keep pages from loading.
However – an important factor is going to be your hosting as well. I haven’t tested this theory myself, but I could guess you’ll notice more of a difference if you’re using Mouseflow on a site with $1/mo shared hosting as opposed to a dedicated server… I strongly believe that if your website is your business or a main source of income it’s worth it to invest in good hosting. But that’s just my opinion 🙂
Though it’s worth noting that you also have the option to install Mouseflow on specific pages or site-wide (in the footer for example). So you can always give it a try and just limit it to specific landing pages if you want to be cautious about site speed.