Media Temple Managed WordPress Hosting Review & Startup Guide
Notice: We no longer recommend Media Temple. Instead we suggest checking out this list of recommended WordPress hosting.
Even though Media Temple has been in the hosting business for a long time, their managed WordPress hosting is still relatively new (it was only just released in March 2014). But don’t let that hold you back – their new WordPress specific plans are better than ever. In this post we’ll talk about what’s included in Media Temple’s managed WordPress hosting plan and show you step by step just how easy it easy to get setup.
Managed WordPress Hosting Features
Ok, time to dig into what comes with a managed WordPress hosting account from Media Temple. Many of the hosting plans from Media Temple include great features you’d want for any website: unlimited bandwidth for data transfers, 20GB of SSD storage, a lovely custom all-in-one Account Center, super fast SSD servers, 1000 email addresses and of course awesome 24/7 support. But the beauty of their managed WordPress hosting plans is the added features you get that were created specifically for WordPress users.
WordPress & Security Auto-Updates
WordPress already includes the option for automatic updates for maintenance and security fixes, but with Media Temple’s managed WordPress hosting you don’t have to worry about any updates. They meticulously test and implement each update for you, so your installations are always up to date.
Auto Malware Scans
Security should be a top priority for any webmaster, and Media Temple makes it even easier for you to add an extra layer of protection to your WordPress websites. Their managed WordPress hosting plan includes automatic Malware scans that can help protect your sites from phishing and hack attacks.
Daily Backup Snapshots
Another security bonus is the automatic daily backups of your sites. For each of your installations Media Temple stores 30 days worth of backup snapshots. If something happens and you ever need to restore you site, all you have to do is go to your Account Center Settings and select one of your backups from a drop-down list. The one click restoration makes it easy to fix your sites fast.
1-Click Staging
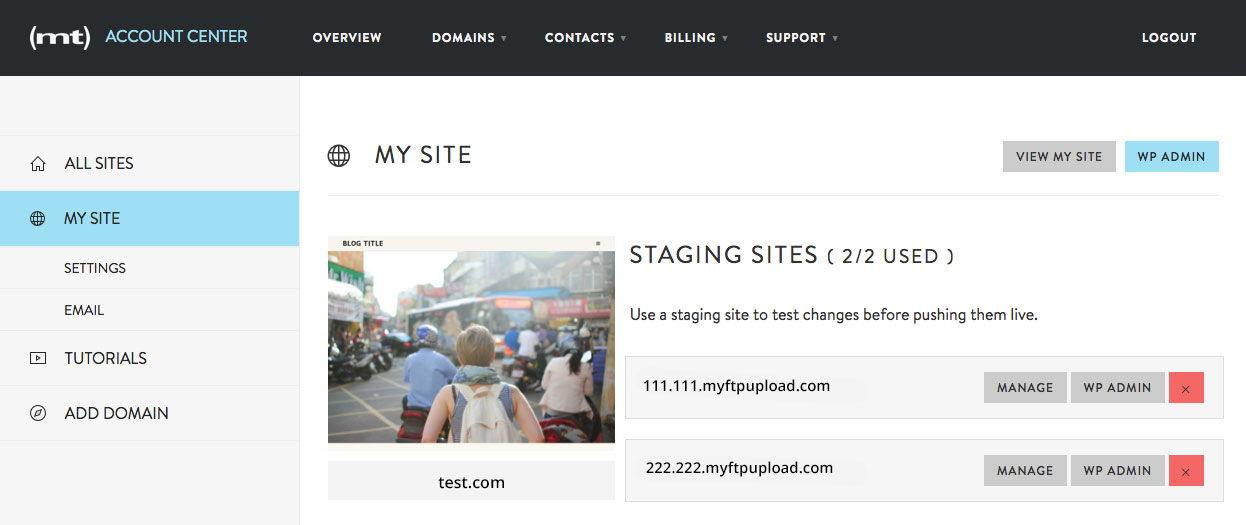
So you get 3 installations with your plan, but you can also create 2 stagings sites for each. This means you can safely test new themes, make changes, add custom post type and more all without having to create a local installation of WordPress or mess with your live site. For developers this is a huge asset. Plus there is a custom Site Stager plugin that is automatically activated on each of your WordPress installations, so merging your live site with one of your staging sites is as easy as a few clicks.
Site Cloning
Another one click feature, you can clone any of your sites to create a brand new, pixel perfect duplicate as a new site. This could come in very handy if you plan on developing a group of similar blogs, stores or other sites where you want the same theme, plugins and even settings.
Exclusive Themes
Who doesn’t love a nice free theme? Of course we have plenty of awesome free WordPress themes here at WPExplorer, you do get a couple nice free themes when use Media Temple’s managed WordPress hosting. These are great options for your blog or portfolio site, or to use temporarily while you search for a premium WordPress theme that meets your needs.
So just to recap, this is fully managed WordPress hosting. You don’t have to lift a finger to manage your server or to update your core installations of WordPress. Media Temple techs take care of this for you. Plus you get tons of awesome features like 1-click staging, email accounts, non-stop support and more. There are just a few caveats you should be aware of.
Managed WordPress Hosting Limitations
For some, the starting price of $20/month for the personal plan may seem a bit pricey compared to other hosting plans that start at lower prices (generally other shared hosting plans are very cheap – but also slow). But you have to remember that the extra expense you’re paying for is fully managed WordPress hosting. If you want to save some cash, you can always checkout a shared hosting plan elsewhere but you won’t get the features, speed and support you find with managed hosting.
There are a also good number of disallowed plugins with Media Temple, but this really shouldn’t impact you too much once you take a look at the list. For the most part plugins are disallowed because they are duplicating functions already performed by Media Temple, or because they can cause performance issues due to they way they work or the amount of resources they require.
The other feature you might miss is multisite. I did try to enable it, and I went through all the steps just fine. I accessed my site via FTP (you can grab your SFTP information right from your Account Center Settings page), edited my .htaccess and wp.config files, and activated it via my WordPress dashboard. I even created a few sub-sites, but unfortunately none of them worked – I was just taken back to my main site dashboard each time I tried to go to a new sub-site. But maybe this is a feature Media Temple could consider adding in the future.
Other than these few limitations, Media Temple’s managed WordPress hosting is awesome. It has tons of great features you (or your clients) are sure to love.
24/7 Media Temple Support
One feature worth taking a closer look at is support. Media Temple offers round the clock support via tickets, chat, phone and Twitter – you can get help anywhere and any time your need it. So as I was attempting to enable multisite I decided to seek support. Just log into your Account Center to access ticket, chat or phone support links. The support ticket wait was just under 5 hours, and I wasn’t really ready to wait that long…
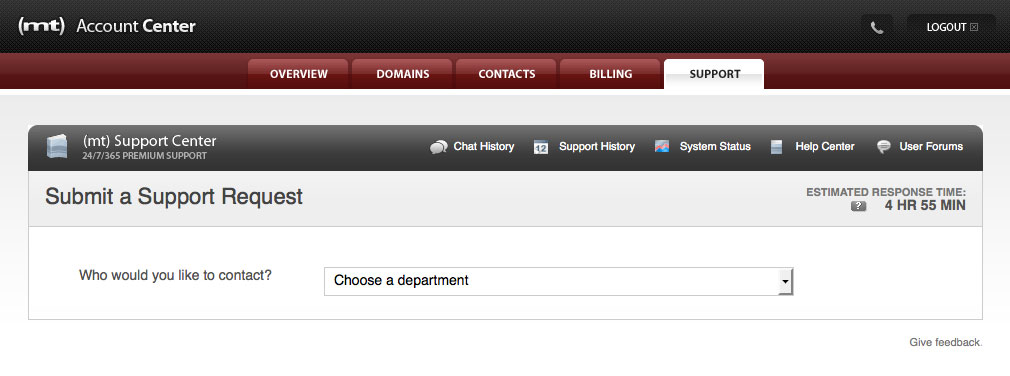
So instead I opted for their chat support. With a mere 4 minute wait time I was happy to see if they could help.
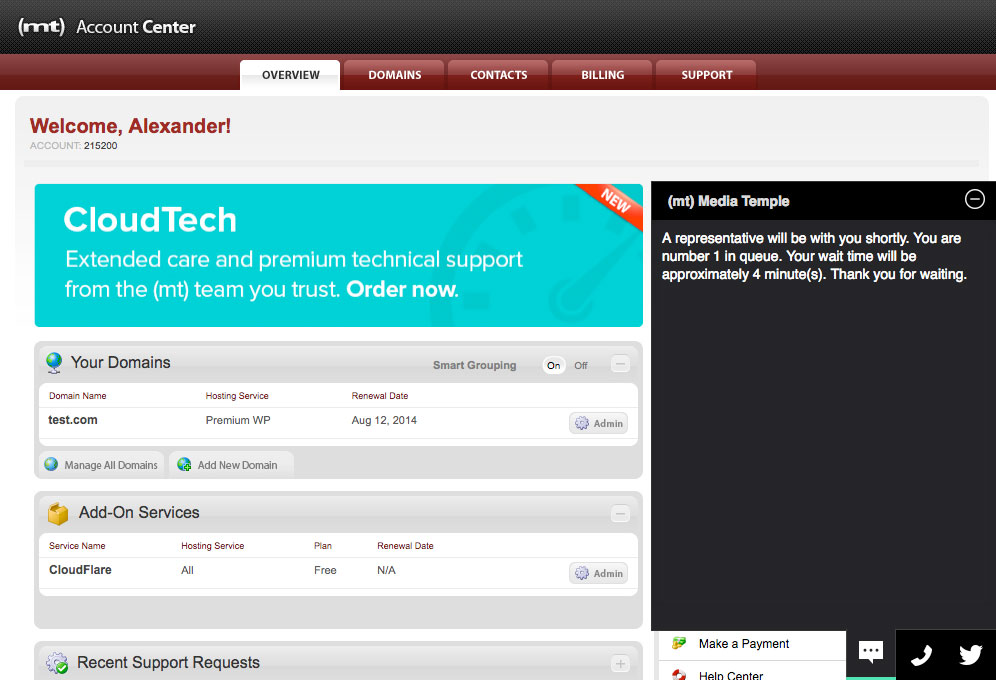
Well they did! And I didn’t even have to wait the whole 4 minutes. A very helpful support staff assisted me with my multisite confusion and answered my questions in record time. So the chat support definitely gets an A+ in my opinion.
Media Temple Quick Start Guide
Now that you know about all the goodies you’ll get with managed WordPress hosting from Media Temple, let’s get you all setup! First log into your Media Temple account. From your account homepage click on the Admin button.
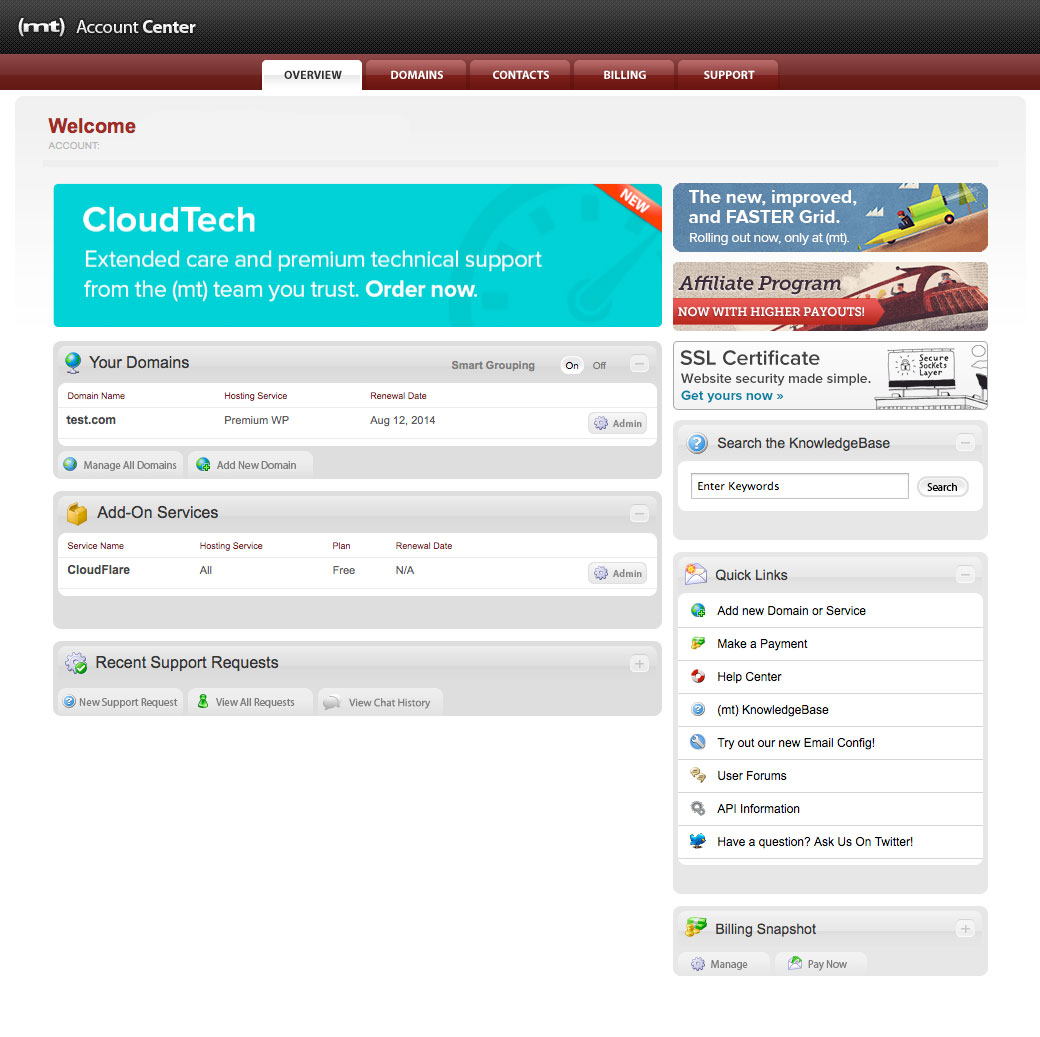
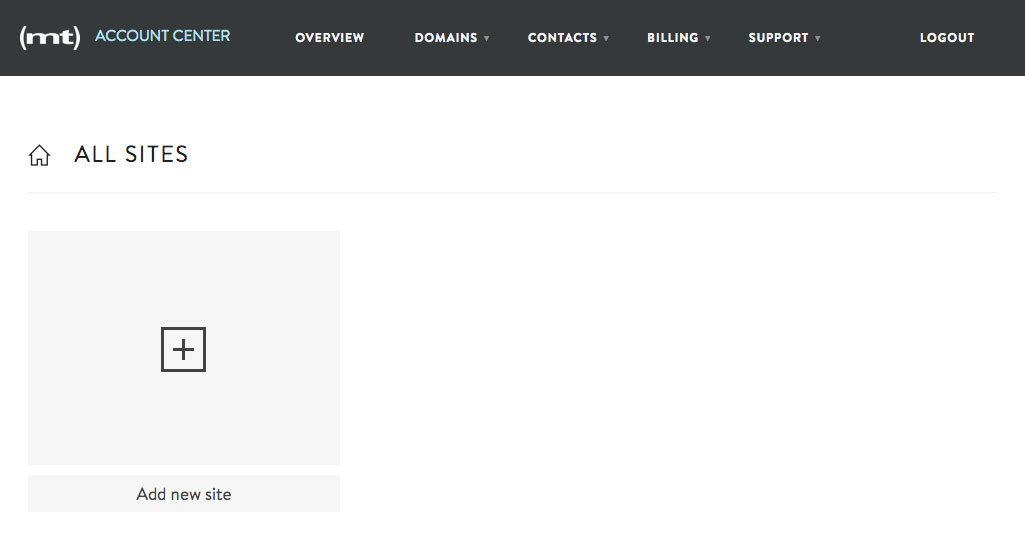
This is where all of your WordPress sites setup on this account are listed. Click on the Add New Site button.
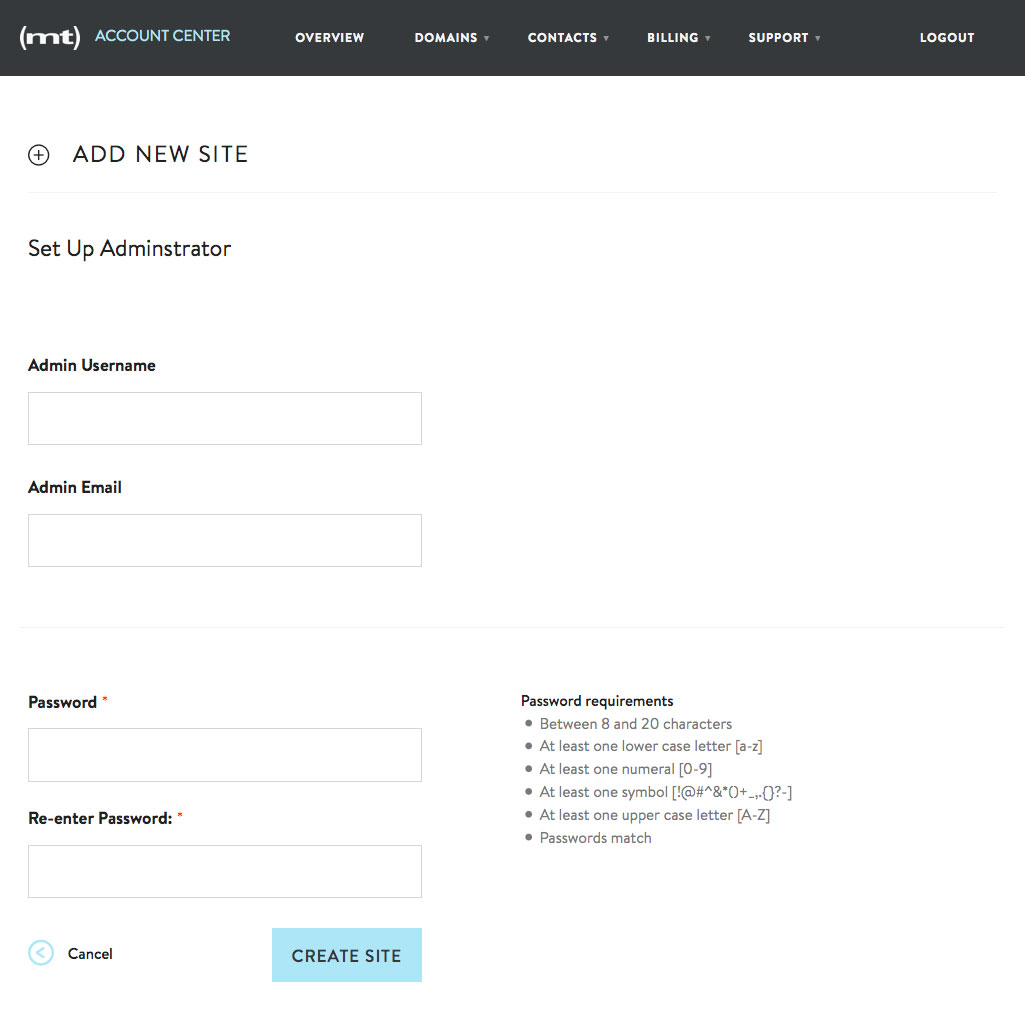
Now you should see a screen similar to the one below prompting you to setup your admin account. One thing we mention time and time again (and in just about every blog post we write about WordPress security) is that you should not have an admin account with the name Admin. We strongly suggest creating an admin account with a different name – you name, you job title, you company name, just pick something you’ll remember. Double check that the correct admin email is listed, then enter you password and click Create Site.
Next Media Temple will do all the hard work of installing WordPress, configuring settings and adding your admin user for you. While all of this is going on in the backend you’ll see an in progress screen like this.
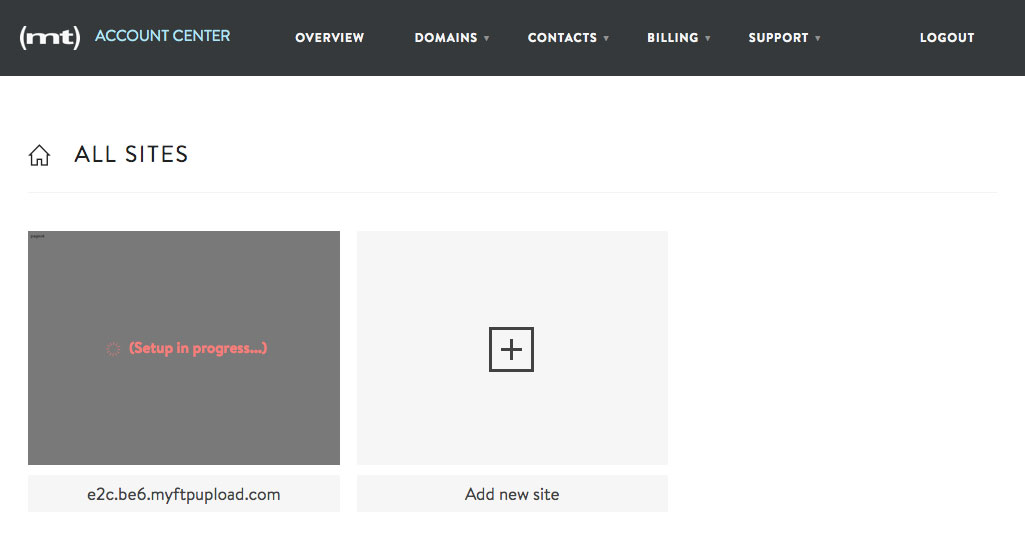
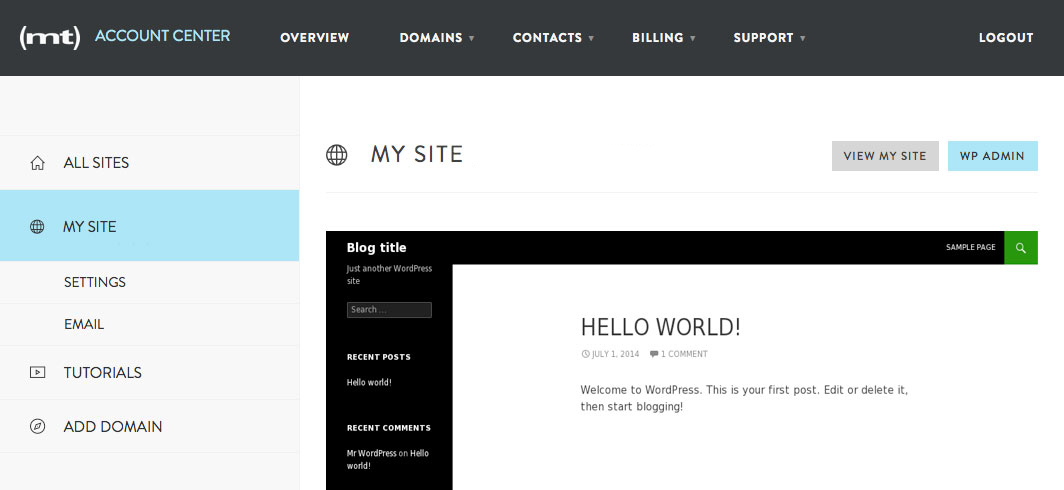
It’ll only take a minute. Just go check your email or watch a funny YouTube video for a minute, then come back and refresh your page. Your site should be good to go. Just click on the temporary domain name or click on the website snapshot (which is empty at the moment since you haven’t added theme or content just yet).
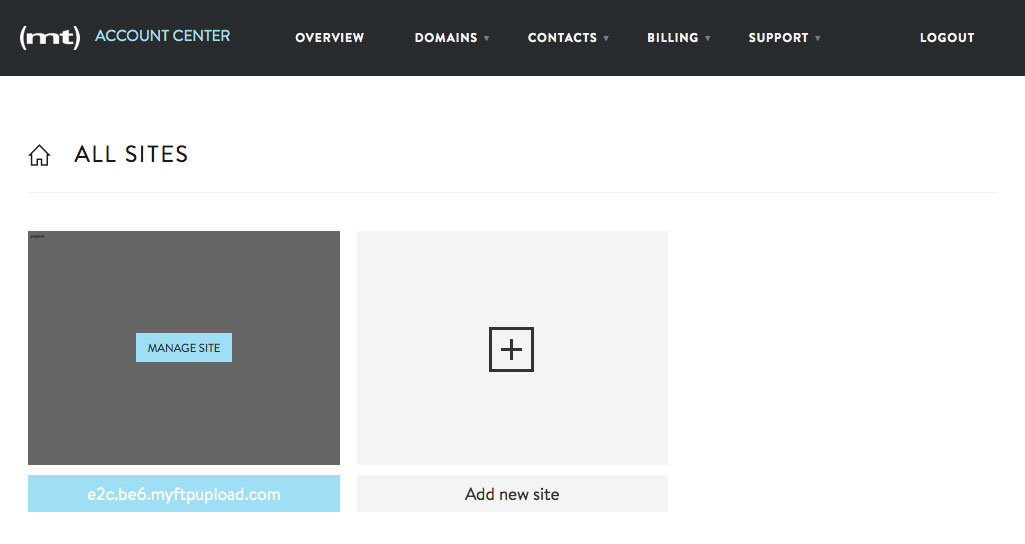
From this screen you can manage all of your awesome website features that come with your Media temple Managed WordPress hosting. First up – staging site. You can add 2 staging sites for each of your WordPress sites. This is great for building sites before you want them to go live, or for use as a testing area so you can tweak a new theme before activating it on your live site.
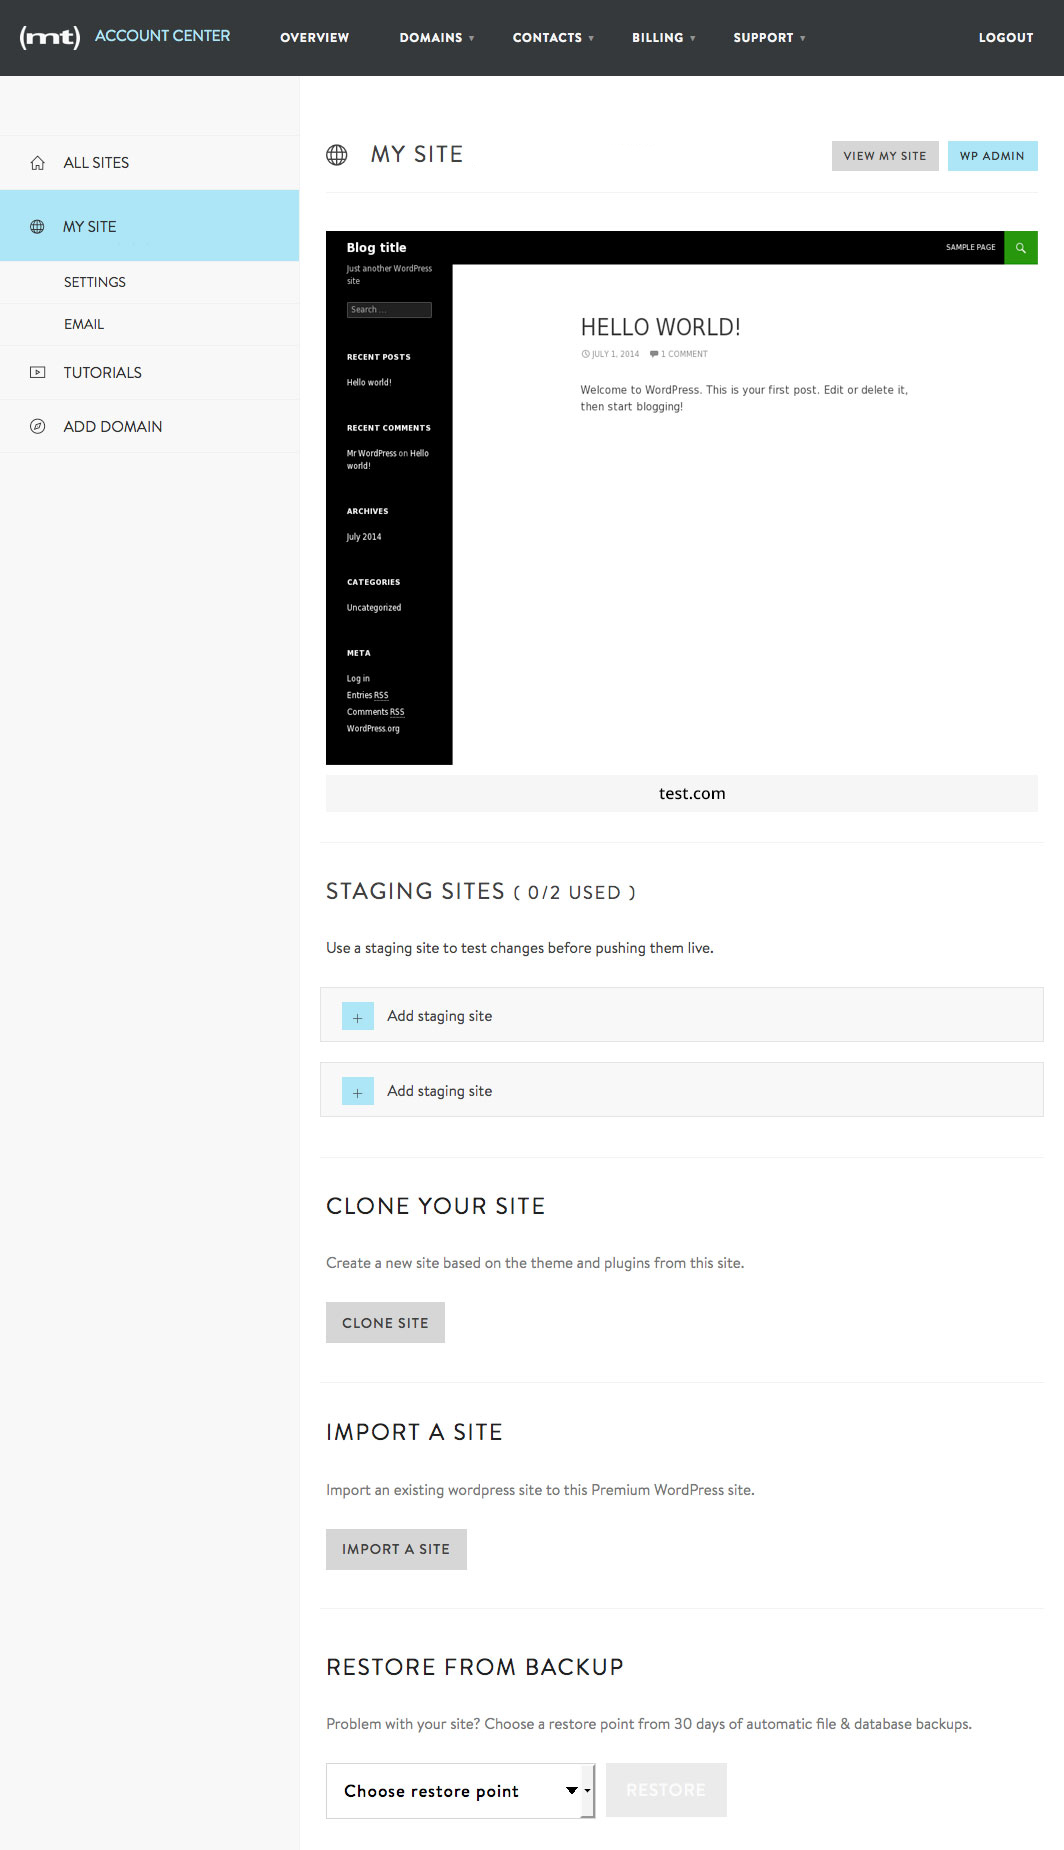
On this page there is also the option to clone your entire WordPress site. You might want to do this for testing purposes to make sure a new theme plays nice with all of your required content and plugins, or if you want to reuse your current site to build a new one.
The next option you’ll see as you scroll down is to import a website. If you already have a WordPress site on another installation, or even on another host, you can import it via FTP. All you need is a bit of information (including the FTP server/IP address, FTP username & password, WordPress server path, and your admin username & password of the site you want to import) and you can move all your site information over (themes, plugins, content, comments and all).
NOTE: You cannot migrate a site from WordPress.com to self-hosted WordPress using this option on Media Temple.
The last feature on this page is for one click site restorations. With Media Temple automatically takes a backup snapshot of your sites each and every day, and then they save the last 30 days for you right here. If for some reason your site breaks and you need to restore it, all you have to do is select one of your backups from the drop-down list and click Restore. It’s that easy.
There are a few other useful links you might want to take advantage of. If you click on Settings you’ll find your domain and SSH/SFTP information, a link to log into your phpMyAdmin, and a link to delete your entire site. This is also where you can change your primary domain. If you purchased your domain name from Media Temple you’ll see them displayed as a part of your drop down list. If you purchased your domain name elsewhere you’ll need to point it over to your Media Temple Server (GUIDE???). If you click on Email you can manage any emails accounts you’ve setup on this account, and the Tutorials link includes helpful video guides for using options within the (mt) themes.
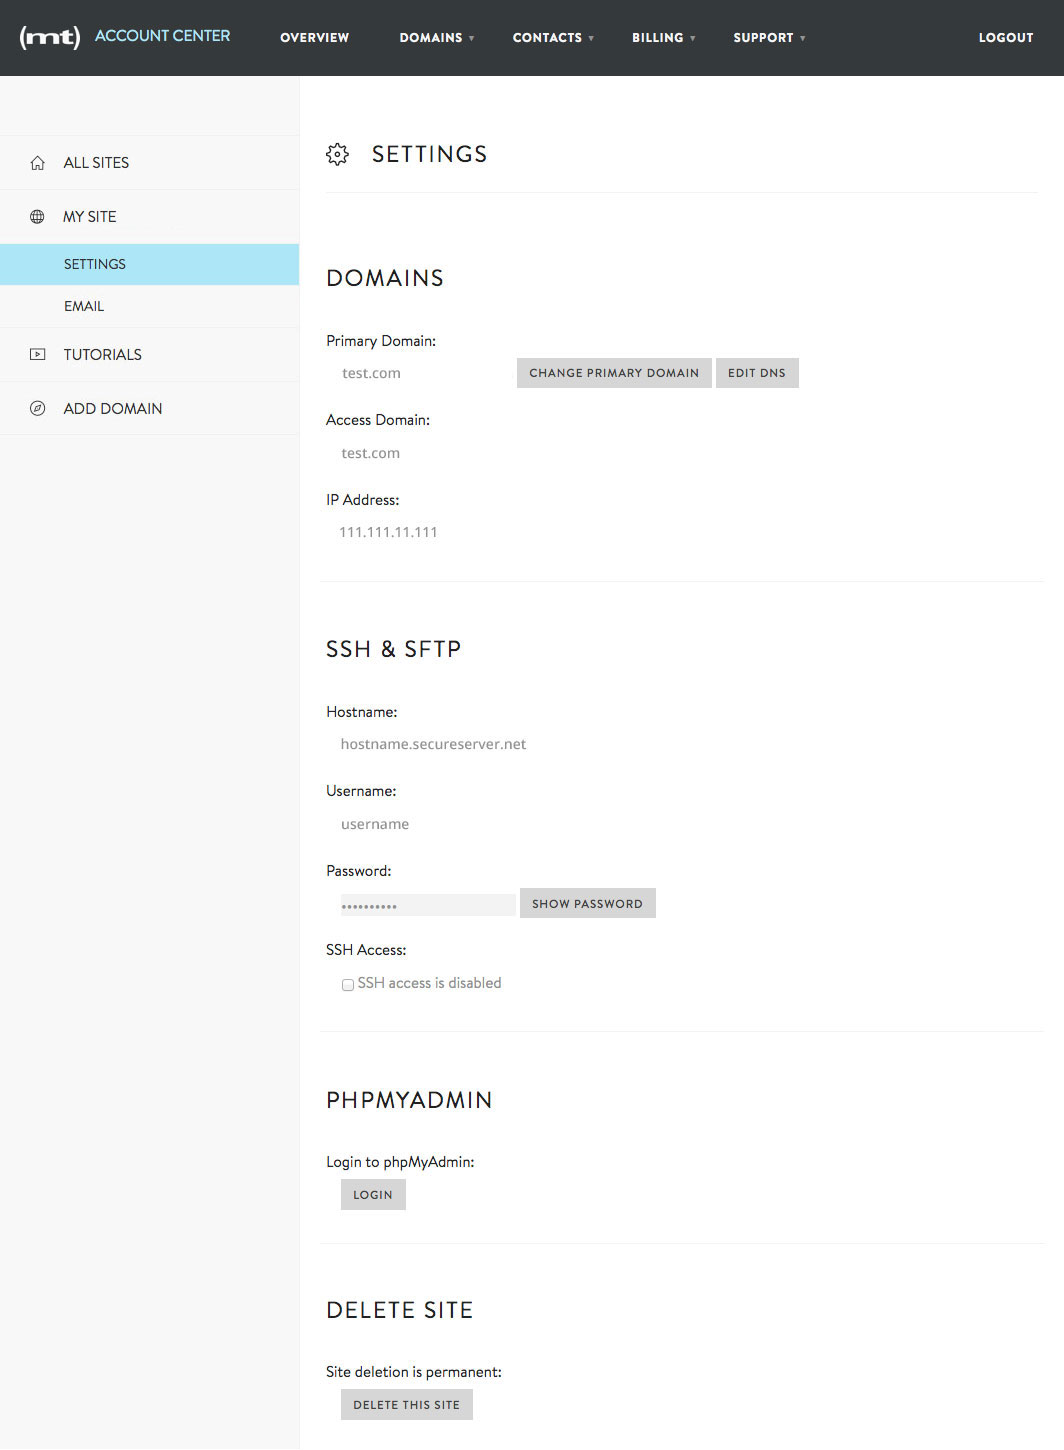
Now that you’ve seen your Account Center let’s keep chugging along and click on the WP Admin button up in the top right corner to go to our WordPress dashboard.
If you’re still using your temporary domain name there will be notice just to remind you. You can ignore it for now, or click on the link to change your primary domain name. Other than that you’ll notice that your WordPress site is all setup and ready to go!
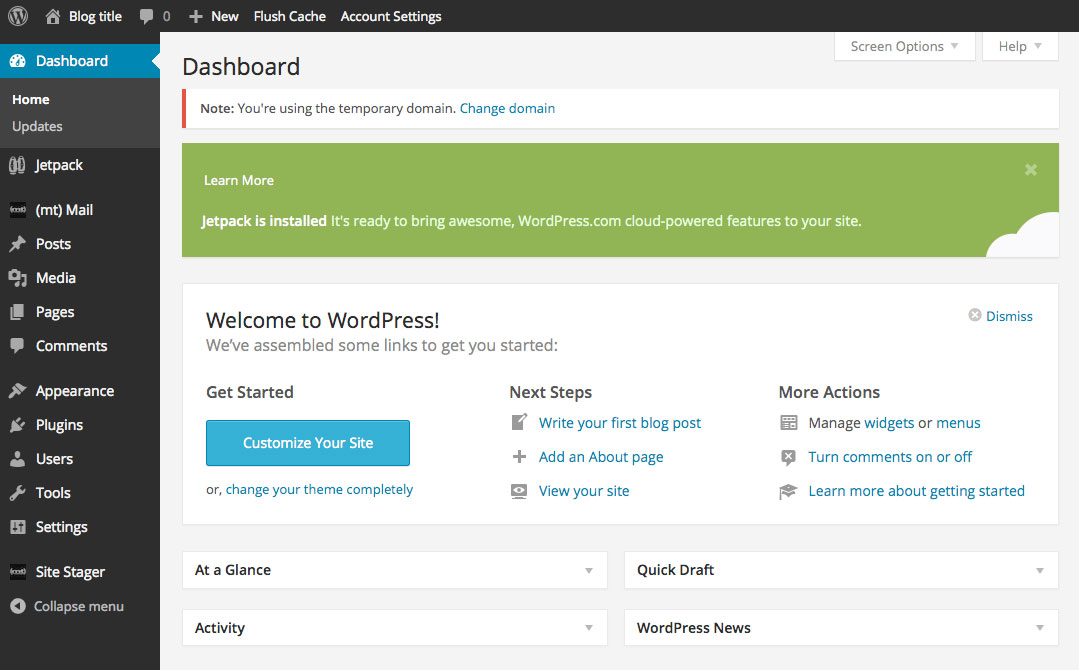
There are a few extra links you won’t find on all WordPress installations through other hosts. Media Temple adds their own (mt)Mail plugin to give you quick access to your email accounts, as well as their Site Stager plugin (which is still in the works) that makes creating a staging site and later merging it with you live site easier than ever (have no fear, there are detailed instructions on the main page when you click on the Site Stager menu item). The other feature that I really like is the Flush Cache link in the top admin bar. When I add new content to a site I like to flush the cache, just to be sure that everyone is seeing the proper recent posts and what not. This Flush Cache link is much more convenient than having to navigate to a different part of the WordPress dashboard.
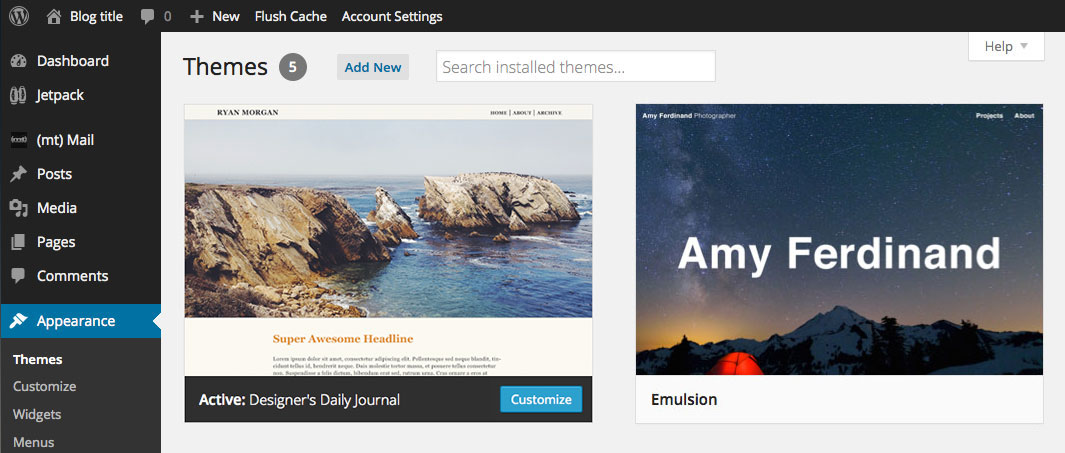
To setup your WordPress site, you’ll first want to select a Theme. Navigate to Appearance > Themes where you can use one of the preloaded themes by hovering on a theme and clicking the Activate button. Or upload your own by clicking the Add New button at the top of the screen to upload a zip file for a WordPress theme you’ve downloaded elsewhere (our top selling Total WordPress theme is great for any site thanks to the super flexible, built-in, front-end drag & drop page builder and other great customization options).
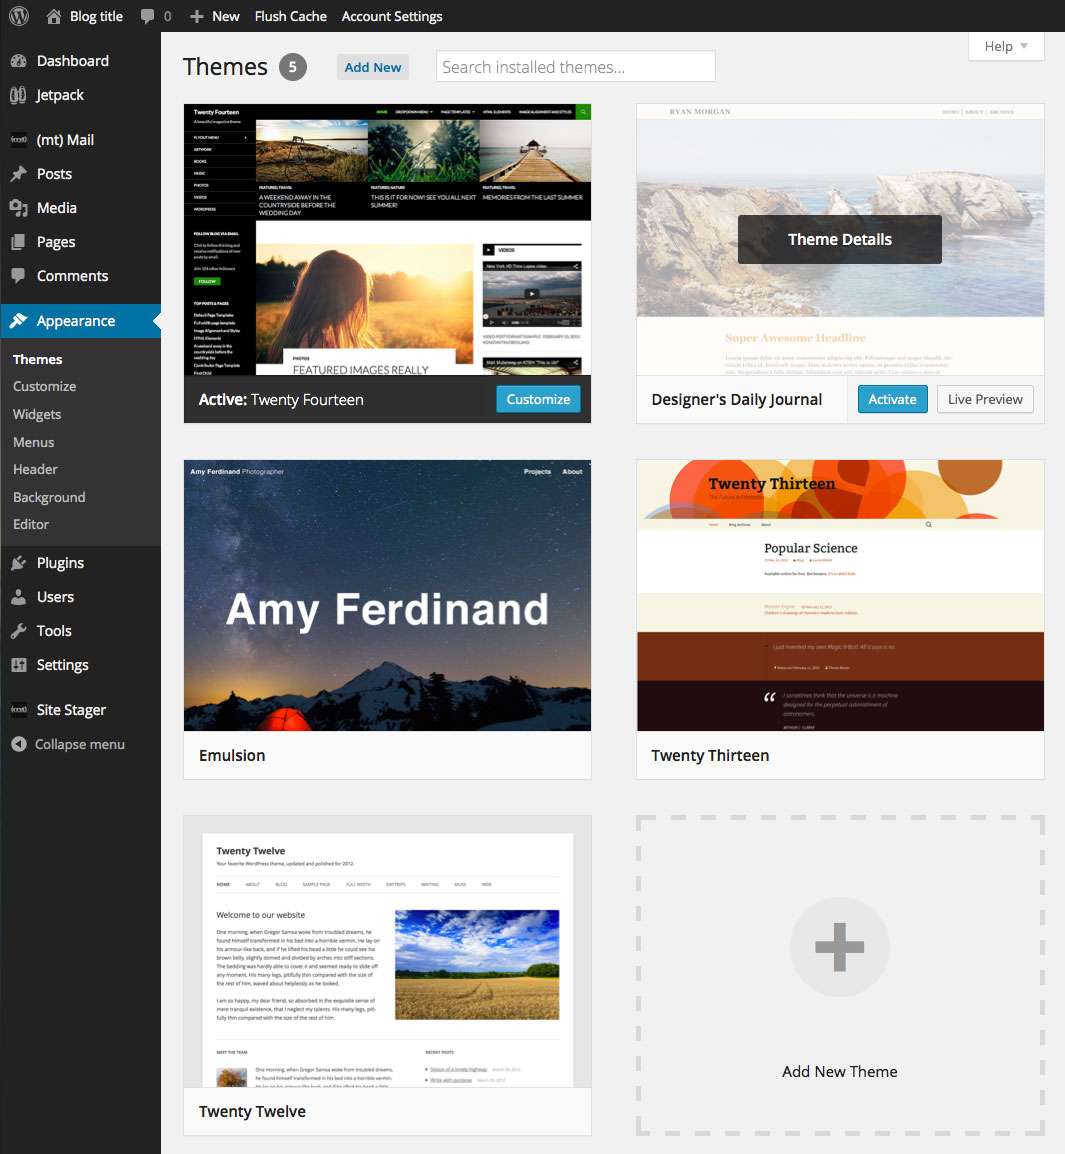
After choosing a theme you should also go to Settings > Permalinks to make sure your links slugs have the formatting you want for your website. If you want to install any plugins just go to Plugins > Add New where you can browse the WordPress.org plugin library for free plugins like Contact Form 7 or WordPress SEO, or upload any premium plugins that you’ve purchased.
Once you’ve fine tuned all of your website settings you can start adding content! Depending on the theme you’re using you might have a blog, portfolio, staff, testimonials or other custom post types. After you’ve started adding posts, categories and pages, don’t forget to setup your menus and add widgets to any sidebars or footer areas you might have. Other then that you’re all done! If you haven’t switched over from the temporary domain name your website isn’t live just yet. Either use the link in the WordPress dashboard notice, or go back to your Media Temple Account Center Settings page to select the active domain you want to use for your site.

And that’s it! In (hopefully) less than an hour you have a fully-functioning WordPress site (go you!). Media Temple makes it easy for any user, beginner to pro, to get their WordPress sites setup fast. And managing your sites couldn’t be easier thanks to the awesome Account Center.
Media Temple Review Wrap Up
So now that you know what Media Temple has to offer, and you’ve seen how easy it is to get started with their managed WordPress hosting, what’s stopping you? Dive right in and signup for an account today! Managed WordPress hosting is not only going to save you time, but with all the added boys features for speed, security, email, 24/7 support and everything else it’s sure to save you money in the long run. Media Temple knows websites, and they know WordPress.
Do you use Media Temple’s managed WordPress hosting? Or have you? We’d love to know what you thought, and for you to share your experiences with our other readers in the comments section below.
Notice: We no longer recommend Media Temple. Instead we suggest checking out this list of recommended WordPress hosting.
Even though Media Temple has been in the hosting business for a long time, their managed WordPress hosting is still relatively new (it was only just released in March 2014). But don’t let that hold you back – their new WordPress specific plans are better than ever. In this post we’ll talk about what’s included in Media Temple’s managed WordPress hosting plan and show you step by step just how easy it easy to get setup.
Managed WordPress Hosting Features
Ok, time to dig into what comes with a managed WordPress hosting account from Media Temple. Many of the hosting plans from Media Temple include great features you’d want for any website: unlimited bandwidth for data transfers, 20GB of SSD storage, a lovely custom all-in-one Account Center, super fast SSD servers, 1000 email addresses and of course awesome 24/7 support. But the beauty of their managed WordPress hosting plans is the added features you get that were created specifically for WordPress users.
WordPress & Security Auto-Updates
WordPress already includes the option for automatic updates for maintenance and security fixes, but with Media Temple’s managed WordPress hosting you don’t have to worry about any updates. They meticulously test and implement each update for you, so your installations are always up to date.
Auto Malware Scans
Security should be a top priority for any webmaster, and Media Temple makes it even easier for you to add an extra layer of protection to your WordPress websites. Their managed WordPress hosting plan includes automatic Malware scans that can help protect your sites from phishing and hack attacks.
Daily Backup Snapshots
Another security bonus is the automatic daily backups of your sites. For each of your installations Media Temple stores 30 days worth of backup snapshots. If something happens and you ever need to restore you site, all you have to do is go to your Account Center Settings and select one of your backups from a drop-down list. The one click restoration makes it easy to fix your sites fast.
1-Click Staging
So you get 3 installations with your plan, but you can also create 2 stagings sites for each. This means you can safely test new themes, make changes, add custom post type and more all without having to create a local installation of WordPress or mess with your live site. For developers this is a huge asset. Plus there is a custom Site Stager plugin that is automatically activated on each of your WordPress installations, so merging your live site with one of your staging sites is as easy as a few clicks.

Site Cloning
Another one click feature, you can clone any of your sites to create a brand new, pixel perfect duplicate as a new site. This could come in very handy if you plan on developing a group of similar blogs, stores or other sites where you want the same theme, plugins and even settings.
Exclusive Themes
Who doesn’t love a nice free theme? Of course we have plenty of awesome free WordPress themes here at WPExplorer, you do get a couple nice free themes when use Media Temple’s managed WordPress hosting. These are great options for your blog or portfolio site, or to use temporarily while you search for a premium WordPress theme that meets your needs.

So just to recap, this is fully managed WordPress hosting. You don’t have to lift a finger to manage your server or to update your core installations of WordPress. Media Temple techs take care of this for you. Plus you get tons of awesome features like 1-click staging, email accounts, non-stop support and more. There are just a few caveats you should be aware of.
Managed WordPress Hosting Limitations
For some, the starting price of $20/month for the personal plan may seem a bit pricey compared to other hosting plans that start at lower prices (generally other shared hosting plans are very cheap – but also slow). But you have to remember that the extra expense you’re paying for is fully managed WordPress hosting. If you want to save some cash, you can always checkout a shared hosting plan elsewhere but you won’t get the features, speed and support you find with managed hosting.
There are a also good number of disallowed plugins with Media Temple, but this really shouldn’t impact you too much once you take a look at the list. For the most part plugins are disallowed because they are duplicating functions already performed by Media Temple, or because they can cause performance issues due to they way they work or the amount of resources they require.
The other feature you might miss is multisite. I did try to enable it, and I went through all the steps just fine. I accessed my site via FTP (you can grab your SFTP information right from your Account Center Settings page), edited my .htaccess and wp.config files, and activated it via my WordPress dashboard. I even created a few sub-sites, but unfortunately none of them worked – I was just taken back to my main site dashboard each time I tried to go to a new sub-site. But maybe this is a feature Media Temple could consider adding in the future.
Other than these few limitations, Media Temple’s managed WordPress hosting is awesome. It has tons of great features you (or your clients) are sure to love.
24/7 Media Temple Support
One feature worth taking a closer look at is support. Media Temple offers round the clock support via tickets, chat, phone and Twitter – you can get help anywhere and any time your need it. So as I was attempting to enable multisite I decided to seek support. Just log into your Account Center to access ticket, chat or phone support links. The support ticket wait was just under 5 hours, and I wasn’t really ready to wait that long…

So instead I opted for their chat support. With a mere 4 minute wait time I was happy to see if they could help.

Well they did! And I didn’t even have to wait the whole 4 minutes. A very helpful support staff assisted me with my multisite confusion and answered my questions in record time. So the chat support definitely gets an A+ in my opinion.
Media Temple Quick Start Guide
Now that you know about all the goodies you’ll get with managed WordPress hosting from Media Temple, let’s get you all setup! First log into your Media Temple account. From your account homepage click on the Admin button.

This is where all of your WordPress sites setup on this account are listed. Click on the Add New Site button.

Now you should see a screen similar to the one below prompting you to setup your admin account. One thing we mention time and time again (and in just about every blog post we write about WordPress security) is that you should not have an admin account with the name Admin. We strongly suggest creating an admin account with a different name – you name, you job title, you company name, just pick something you’ll remember. Double check that the correct admin email is listed, then enter you password and click Create Site.

Next Media Temple will do all the hard work of installing WordPress, configuring settings and adding your admin user for you. While all of this is going on in the backend you’ll see an in progress screen like this.

It’ll only take a minute. Just go check your email or watch a funny YouTube video for a minute, then come back and refresh your page. Your site should be good to go. Just click on the temporary domain name or click on the website snapshot (which is empty at the moment since you haven’t added theme or content just yet).

From this screen you can manage all of your awesome website features that come with your Media temple Managed WordPress hosting. First up – staging site. You can add 2 staging sites for each of your WordPress sites. This is great for building sites before you want them to go live, or for use as a testing area so you can tweak a new theme before activating it on your live site.

On this page there is also the option to clone your entire WordPress site. You might want to do this for testing purposes to make sure a new theme plays nice with all of your required content and plugins, or if you want to reuse your current site to build a new one.
The next option you’ll see as you scroll down is to import a website. If you already have a WordPress site on another installation, or even on another host, you can import it via FTP. All you need is a bit of information (including the FTP server/IP address, FTP username & password, WordPress server path, and your admin username & password of the site you want to import) and you can move all your site information over (themes, plugins, content, comments and all).
NOTE: You cannot migrate a site from WordPress.com to self-hosted WordPress using this option on Media Temple.
The last feature on this page is for one click site restorations. With Media Temple automatically takes a backup snapshot of your sites each and every day, and then they save the last 30 days for you right here. If for some reason your site breaks and you need to restore it, all you have to do is select one of your backups from the drop-down list and click Restore. It’s that easy.
There are a few other useful links you might want to take advantage of. If you click on Settings you’ll find your domain and SSH/SFTP information, a link to log into your phpMyAdmin, and a link to delete your entire site. This is also where you can change your primary domain. If you purchased your domain name from Media Temple you’ll see them displayed as a part of your drop down list. If you purchased your domain name elsewhere you’ll need to point it over to your Media Temple Server (GUIDE???). If you click on Email you can manage any emails accounts you’ve setup on this account, and the Tutorials link includes helpful video guides for using options within the (mt) themes.

Now that you’ve seen your Account Center let’s keep chugging along and click on the WP Admin button up in the top right corner to go to our WordPress dashboard.

If you’re still using your temporary domain name there will be notice just to remind you. You can ignore it for now, or click on the link to change your primary domain name. Other than that you’ll notice that your WordPress site is all setup and ready to go!

There are a few extra links you won’t find on all WordPress installations through other hosts. Media Temple adds their own (mt)Mail plugin to give you quick access to your email accounts, as well as their Site Stager plugin (which is still in the works) that makes creating a staging site and later merging it with you live site easier than ever (have no fear, there are detailed instructions on the main page when you click on the Site Stager menu item). The other feature that I really like is the Flush Cache link in the top admin bar. When I add new content to a site I like to flush the cache, just to be sure that everyone is seeing the proper recent posts and what not. This Flush Cache link is much more convenient than having to navigate to a different part of the WordPress dashboard.
To setup your WordPress site, you’ll first want to select a Theme. Navigate to Appearance > Themes where you can use one of the preloaded themes by hovering on a theme and clicking the Activate button. Or upload your own by clicking the Add New button at the top of the screen to upload a zip file for a WordPress theme you’ve downloaded elsewhere (our top selling Total WordPress theme is great for any site thanks to the super flexible, built-in, front-end drag & drop page builder and other great customization options).

After choosing a theme you should also go to Settings > Permalinks to make sure your links slugs have the formatting you want for your website. If you want to install any plugins just go to Plugins > Add New where you can browse the WordPress.org plugin library for free plugins like Contact Form 7 or WordPress SEO, or upload any premium plugins that you’ve purchased.
Once you’ve fine tuned all of your website settings you can start adding content! Depending on the theme you’re using you might have a blog, portfolio, staff, testimonials or other custom post types. After you’ve started adding posts, categories and pages, don’t forget to setup your menus and add widgets to any sidebars or footer areas you might have. Other then that you’re all done! If you haven’t switched over from the temporary domain name your website isn’t live just yet. Either use the link in the WordPress dashboard notice, or go back to your Media Temple Account Center Settings page to select the active domain you want to use for your site.

And that’s it! In (hopefully) less than an hour you have a fully-functioning WordPress site (go you!). Media Temple makes it easy for any user, beginner to pro, to get their WordPress sites setup fast. And managing your sites couldn’t be easier thanks to the awesome Account Center.
Media Temple Review Wrap Up
So now that you know what Media Temple has to offer, and you’ve seen how easy it is to get started with their managed WordPress hosting, what’s stopping you? Dive right in and signup for an account today! Managed WordPress hosting is not only going to save you time, but with all the added boys features for speed, security, email, 24/7 support and everything else it’s sure to save you money in the long run. Media Temple knows websites, and they know WordPress.
Do you use Media Temple’s managed WordPress hosting? Or have you? We’d love to know what you thought, and for you to share your experiences with our other readers in the comments section below.


Great article thank you! But as far as the Media Temple managed hosting goes: no multisite? Really? What developer kept on reading after that? And disallowed plugins? Media Temple is great but it doesn’t sound like this service is in the line of WordPress at all.
Hi Nick,
Multisite is very important for some people, but for the average user that wants a blog or simple business site, it’s perfect. Most people actually don’t even know what Multi-site is. We developers are pickier 😉
It’s only a select few plugins that are disallowed, and most of them for good reasons. If not, you can always shoot them an email and have them reevaluate that particular plugin. I know that for a fact, since I’ve done so myself;)
They were very welcoming about reevaluating the plugin in question (Slimstat) but I ended up following their suggestion to look into Mixpanel as a replacement. I’m very glad I did.
Hi Kyla,
Can you tell me if Media Temple allows database access through PHPMyAdmin?
Thank you!
Rick
Yes Rick,
Have a look at this screenshot.
Which hosting are you guys using?
I personally use WPEngine. We have a premium account with them. But we used to use Media Temple Dedicated, we only moved because we like the that WPEngine manages everything for us. Both are good hosts 😉
I really want to move to media temple or wp engine, unfortunately they do not offer migrations
Migrating is pretty easy though 😉 If you check out WPEngine they have a guide here and Media Temple has a guide here.
Hi Srikar
Media Temple’s Premium WordPress comes with a DIY migration tool that, according to people who’ve used it; works well:)
It is actually very easy!
Today I signed up with Media Temple Premium WordPress but my experience has not been so good so far. I had four chat conversations within a few hours because their system doesn’t work the way it should.
The ‘Import A Site’ function worked but connecting the WordPress website to the domain name is what got me into trouble. An unexpected error showed up when I tried to add a new domain, because the domain was already in use at GoDaddy. GoDaddy shares uses the same IP as Media Temple’s Premium WordPress’s IP.
Deleted the domain DNS pointer at GoDaddy and tried to add it again at Media Temple. This worked but when the system tried to change the domain name to make it the primary domain instead of the temporary URL, another error occurred. Now my website is broken on the primary domain.
The support people at Media Temple are now trying to fix it because they didn’t know what the error was about and what caused it.
Also, just like with GoDaddy Managed WP, transferring files via sFTP is very very slow. Which makes moving a website with 10.000 media files a total nightmare.
I would not recommend this WordPress hosting based on this experience so far. I Think I’ll stay loyal to WP Engine.
Hi Rick,
I am a loyal WPEngine fan as well. We currently have a Premium account there, but we did use Media Temple in the past and didn’t have any real issues. From what it sounds like though you have only signed up today and within 24 hours have had four chats with customer support, in my opinion that actually is a sign right there of a good host, the fact that they are willing to help you and help you in a timely manner. It is a bummer though that the site has been down, but even when we moved over to WPEngine our site was down for 3-4 days! Issues due happen, but of course it’s not the intention of the host. I think you may have just gotten a mix between bad luck and the “shit stick”. I really hope you can get things resolved quickly and your site up and running in no time.
Did you sign up for the Managed WP hosting? I used to have a Dedicated environment, but prefer WPEngine because I don’t have to monitor anything on my own 😉
Has anyone had trouble with the built in cache plugin that comes with MT wordpress hosting? For whatever reason, it causes my posts to not be recognized by RSS subscribers until I automatically clear the cache plugin, and MT support said there is no way around the plugin since it’s built in. It’s become a real issue since I schedule posts 4-5 times a week.
I even asked if I could pay Cloud Tech support to help resolve the issue and they won’t since it’s not a standard service. I have no idea what to do besides switch hosting.
How often are you publishing posts? If you are only publishing 1-3 a day then it’s not hard to just clear your cache. I’m guessing there has got to be a way to exclude the RSS from the caching (but I am sure it requires a custom function), strange that they would not help with that.
I’m having the exact same problem. RSS feed takes hours to be updated unless I use the Clear Cache link.
Besides that it seems that some users are having trouble accessing scheduled content in some browsers. They complain (articles not working in FF but working in Chrome) but as soon as I clear the cache they manage to see the posts in any browser.
We use scheduling a lot as we have around 8 to 10 posts a day and clearing the cache manually is clearly not a solution.
Any idea on how fixe this? Support say that the caching system is working fine and won’t do anything…
That’s very strange Pedro. The Cache should clear itself after every published post. My guess is their system maybe isn’t taking in consideration scheduled posts? May have to bug them a bit more, unfortunately cache issues are sooo hard to troubleshoot because a support staff may see one thing and think it’s fine while someone else may be seeing something else 🙁 Also it could be a caching issue on the user’s browser and not specifically on your server.
Hi Pedro!
I’m still having the same issues and haven’t found a solution other than clearing the cache EVERY time I post. It’s super annoying. I had the same exact site template/plugins/coding before switching to MT and it only started once I got the WordPress hosting from them. It’s definitely a built in cache issue, but I don’t have the means of paying someone to try and solve that problem.
Please let me know if you find any resolutions!
Hi Ashley. Unfortunately I no longer have a Media Temple account to test out. I use WPEngine (Enterprise) which is freaking amazing!
This is an extremely incomplete staging to production system. You mention in your review that you can test out new custom fields, ect. However when you transfer the staging version to live site, none of the added custom fields are transferred thus none of the content is transferred either. Transferring the post meta data is absolutely crucial.
WP Migrate Database Pro can do this, but when you are paying Media Temple for their wordpress solution they should have this capability baked into their site sync feature. For me there is really no point to use this service. I am going to back to the DV, unless there is some way to transfer the most important part of a wordpress website. The content!!
Hi Charlie,
The purpose of staging is for testing, not for adding content. For example if you are developing a new theme for your website you can test out the custom fields to make sure they work properly. If you want to add content you wouldn’t use staging, you would use the live site. Staging is mostly for developers, if what you want to do is add content then transfer it to the live site, the best solution would be to add a coming soon plugin to the live site so it isn’t visible and then add it there (also removing the extra step of moving the content over).
This is also mentioned in the knowledgeable. You are right though, it’s not for everyone. I personally like the DV accounts better on MT as well 😉