How to Manage Sales Tax for WooCommerce Stores

When you are opening an online store, there are a lot of things you need to overlook and manage to make sure things run smoothly. Managing a WooCommerce store requires you to take care of inventory, product management, payment and shipping, and much more. But one of the most tedious tasks that we forget to mention is managing taxes on your WooCommerce store.
There are many government rules and regulations associated with sales tax. Thus, we have prepared this guide to walk you through the process of understanding sales tax, managing it on your online store, and automating the process. So without further ado, let’s get started!
IMPORTANT: We are not accountants or lawyers, we are simply sharing general information about sales tax and options available to you when using WooCommerce. Using the tips or plugins in this post does not guarantee you will be in compliance with all applicable local, county, state or country tax laws. Please consult an accountant or tax lawyer to be sure your business is in full compliance.
Defining Sales Tax
If you have a physical store, sale taxes are slightly easier to manage because of the predefined location. But when it comes to an online store, sales tax can be a hassle as you ship all over the world. When it comes to the rules and regulations set by the US government, the sale tax laws are different for every state and locality, which makes the job even harder. And if you have multiple stores in more than one state, you have to register in each state for collecting and filing taxes.
For eCommerce stores, you have to collect taxes in states where you have a sales tax nexus. Now, what is meant by sales tax nexus? Nexus means a presence that is created when you have a physical store in other localities and states or you reach a sales threshold. Let us give you a few examples of sales tax nexus and how it binds you to the rules and regulations of that state.
Employee
The employee nexus enables you to collect sales tax from buyers from the state where your employees are working from. This is regarding businesses or multinational companies that hire from all over the world. They are required to register and collect sales tax from the employee’s state.
Home
One of the most common types of nexus that requires you to collect and remit sales tax on states where you have a physical presence/store.
Inventory
This is for businesses that don’t keep inventory in their home states or use third-party sellers. A sales tax nexus is created in the state where your inventory is located.
Economic
A sales tax nexus is also created when you reach a certain sales threshold in a state. This could be decided by the number of sales, transactions, or amount.
After you have figured out which states you have sales tax nexus on, it’s time to register and start collecting.
Collecting and Filing eCommerce Taxes
Once you have understood the sales tax nexus and registered for a permit, you need to start collecting and filing taxes. When it comes to collecting, every state has different rules regarding sales tax, this can become quite complex when you have multiple sales tax nexus. Thus, it is required to automate the tax process or hire a professional to carry out this work for you. The tax rates are divided into two categories, the location of the store and the location of the customer. The customer location tax is least applied due to added difficulties.
After collecting, now it’s time to return taxes because they don’t belong to you. Every state has different rules regarding filing sales tax as well, thus this is a very complex and tedious job, which cannot be easily handled by a person. Some states require you to physically remit the taxes while others prefer to do it online. The date for filing taxes could be quarterly, monthly, or yearly, thus you need to stay up-to-date in case of any changes.
Tax Settings on WooCommerce
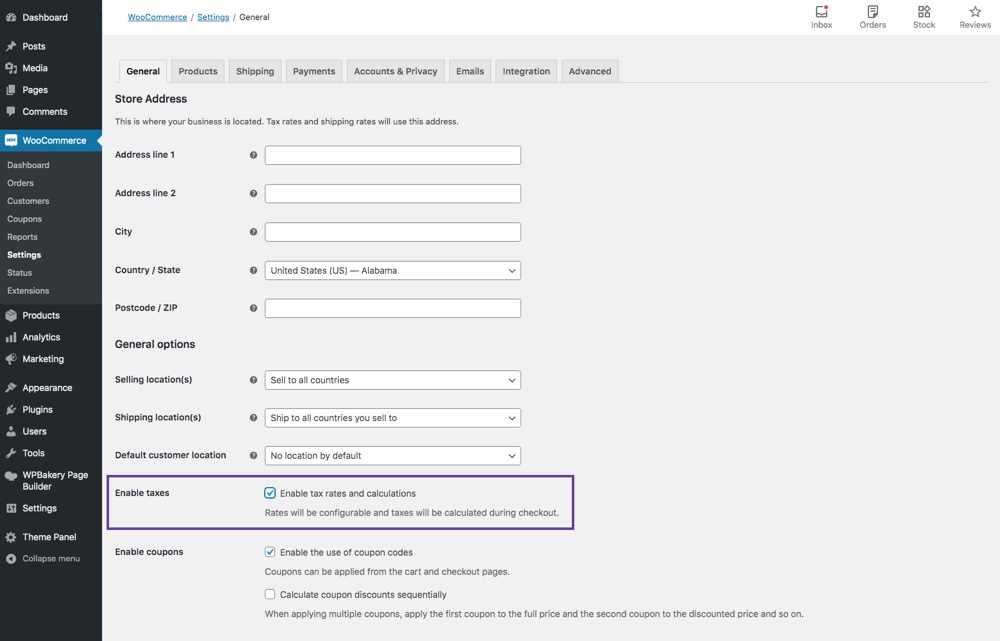
WooCommerce offers a straightforward guide for setting up taxes on your online store. First, you need to enable the tax rates option in general settings. Then go to WooCommerce> Settings> Tax and configure taxes on your eCommerce store.
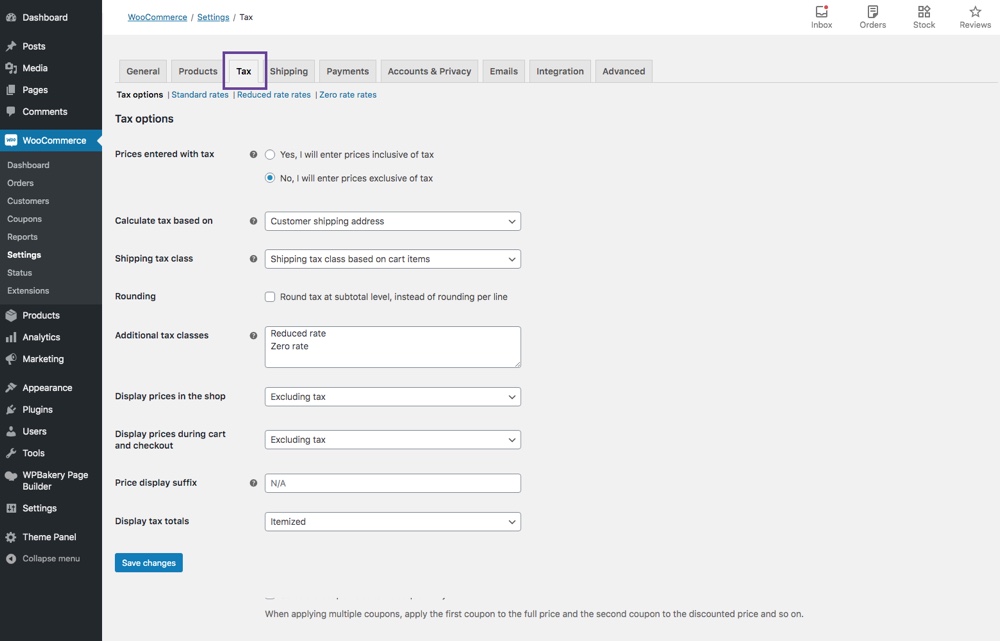
WooCommerce offers multiple options for your site such as if you want to add taxes with your price, shipping class, additional classes, and much more. WooCommerce offers to calculate taxes in 3 different methods, such as store location, customers’ billing location, or customers’ shipping location. You can also assign classes to your products, so when a customer buys a product, a standard or additional tax class is applied to it.
You can also enable tax prices on your product page, in the checkout, or cart page. There are also multiple settings available for setting tax rates and how to update or remove them, which you can find on their official website.
Automating the Tax Sales Process
As you can see above, there are a lot of rules and regulations surrounding sales tax and these rules are different for every state! That’s of work and hassle and could lead to multiple errors which a business cannot afford due to legal complications. Thus, there are many WooCommerce sales tax plugins available that can automate the whole process and reduce the work to nothing.
There are no chances of errors and the plugins automatically calculate the collecting and filing taxes based on each state’s rules.
Here we have shortlisted some of the best WooCommerce sales tax plugins to help you set up, collect, and return taxes easily. Many businesses have converted to the best WooCommerce Sales Tax plugins to automate the process.
1. TaxJar

TaxJar is the ultimate sales tax plugin for WooCommerce. It automates and streamlines the whole process and makes collecting and filing taxes a breeze. It easily connects to your WooCommerce store and automatically calculates taxes based on customer location or sales threshold. It also automatically files taxes and you don’t have to miss a deadline ever again.
- Connect with the TaxJar API and calculate taxes automatically.
- Maintains 99.99% uptime.
- The TaxJar AutoFile features return taxes automatically.
- Saves time and reduces errors with AI-driven tax categorization.
- The Economic Nexus Insights dashboard provides information regarding existing nexus, approaching nexus, and much more.
- Provides top-notch security to its clients by data encryption, monitoring, and Incident Response feature.
- Also provides detailed reports regarding sales tax.
2. Simple Sales Tax

The Simple Sales Tax plugin simplifies the tax process on your website by integrating it with TaxCloud. TaxCloud is a cloud-based service and keeps track of all updated rules and regulations in every jurisdiction, so the chances of error are completely eradicated. This plugin is filled with features such as real-time tax calculation, tax reports, tax exemption, and much more.
- Installation guide provided for easy setup.
- Provides detailed tax reports in table format and can also be exported.
- Calculates real-time taxes.
- Files sales tax automatically within 24 hours.
- You can also exempt certain users from tax.
- Rules and regulations are updated regularly to reduce errors.
3. WooCommerce Taxamo

The WooCommerce Taxamo plugin enables you to connect your store with the Taxamo API which will automatically calculate the tax based on your customers’ location and items in cart. It’s an EU VAT calculation service and is extremely easy to use.
- EU VAT calculation service.
- Calculates taxes for any digital and downloadable product based on the customers’ location and the items in the cart.
- Also supports evidence collection and registration of payments.
- The payments made are collected at MOSS (Mini One Stop Shop) registered in the EU.
- $79 billed annually.
4. WooCommerce Tax Exempt

The WooCommerce Tax Exempt plugin enables you to exempt taxes from certain customers or user roles from the backend. Customers can fill out a request form for tax exemption that you can easily review and accept/reject from the admin account. You can also personally select customers for tax exemption without the need to fill out a request form. You can add the tax exemption button on the checkout page. Let’s check out more features:
- Create a request form for tax exemption for customers to fill.
- Admins can approve or reject the pending tax exemption request.
- Customers can check the status of their request on the “My Account” page.
- Select certain customers and user roles for tax exemptions.
- Notify customers about their requests through emails.
- Set an expiration date on tax exemption.
5. Avalara AvaTax

Avalara AvaTax is a fully automated sales tax experience that is filled with amazing features to apply the right tax at the right time. With Avalara AvaTax, leave the hard work to them and reduce the chances of error greatly.
- Calculate taxes for different conditions such as location, product, prices, etc.
- Assesses tax rates based on geolocation.
- Keeps you updated regarding approaching economic nexus.
- Creates detailed reports regarding tax exemptions, sales tax, and much more.
- Cloud-based service and supports multiple channels.
- Advanced-transaction rules enable you to add taxes on bundles, grouped products, etc.
Managing sales tax on your WooCommerce store is a complex process and requires a professional to take care of things, but even then the chances of human error are higher than ever. The rules surrounding sales tax are ever-changing and it’s difficult to keep up. Thus, by using the WooCommerce sales tax plugin, you can automate the whole process and collect the right taxes and file returns without missing a deadline.