Improve WordPress Login with CM Registration Pro


Have you ever thought about what it’s like to log into your WordPress site? If your business is focused on users, whether they be customers or community members, having a functional login is important. It’s one of the first interactions a user might have on your site, especially if content is locked behind a login. So you should give it as much attention as other aspects of your site!
Taking the time to optimize your site login UX can improve user satisfaction, leads and conversions. You want to be sure the experience is seamless, which is where today’s plugin comes in. For online courses, forums, e-commerce stores, social networks, online coaching and more – CM Registration and Invitation Codes is an excellent solution to level up your login.
In this article
CM Registration and Invitation Codes Plugin
As mentioned, the CM Registration and Invitation Codes plugin offers helpful features to improve your WordPress login. And even better – there is a “lite” version of the plugin that you can use for free.
CM Registration Free

The free CM registration plugin readily available on WordPress.org and can be installed directly from your WordPress dashboard. This helpful plugin includes the following key features:
- Login and registration popup
- Ajax login (so the user stays on the same page)
- Redirect on login to a different page
For sites with multiple authors, basic subscriber/customer accounts or perhaps for a company intranet the lite version offers an engaging popup as well as redirection on login that is certainly helpful. It makes it easy for users to login and then gets them to where they need to be on your site.
But do keep in mind – since this is a lite version, there is also a Pro version with more features. And to be honest, it’s got lots more to offer. So let’s take a look!
CM Registration Pro

If you want to create a more customized registration and login form experience on your WordPress site, then CM Registration and Invitation Codes Pro is a great choice. When you upgrade from the lite version, you’ll have tons more options available to you. This includes:
- Registration/login layouts: popup, embedded box or widget
- Registration form builder with custom profile fields (text, number, dropdown, date, radio, checkbox)
- Invitation codes (with expiration date and use limit)
- Password free social login via Google or Facebook
- reCAPTCHA support
- Limit login attempts
- Custom redirect on login or logout
- Email verification
- Whitelist and blacklist specific IP addresses for your registration or login
- User role manager – manage users, add new roles, assign users, etc
- Easy shortcodes for all login and registration functionality
- And more!
This is of course just a quick run through of available features, and we’ll do our best to showcase a number of them below!
Addons
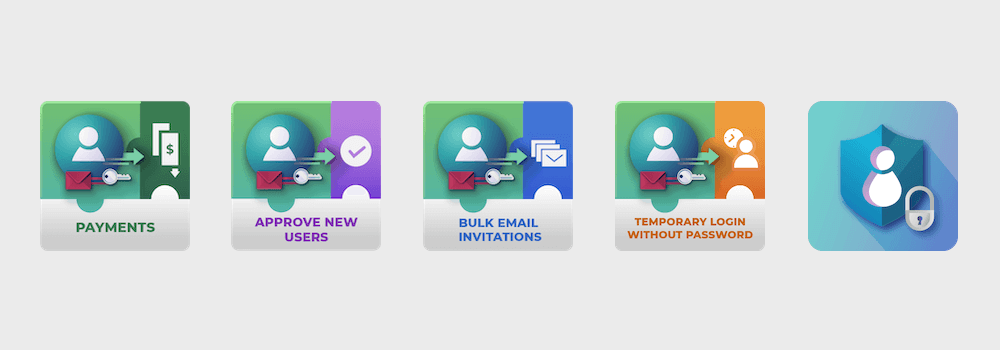
In addition to core features there are a handful of key add-ons you should be aware of. These have niche uses, but depending on how you want to improve your WordPress login they might just be essential.
Registration Payments: Charge for registration packages and subscriptions via either WooCommerce or Easy Digital Downloads. This is the perfect add-on for a membership based site where login is regulated with a paywall.
Approve New Users: Manually approve (or deny) registration requests. This allows you to keep your site exclusive, as you may not want every person on the internet requesting an account. For example, if only employees should be logging in.
Bulk Email Invitations: Mass upload email addresses (using a csv file), create custom invitation codes for each address and email the codes to users. Take advantage of your existing audience and send them all an invite! This is a great way to reach your community when launching a new website, product or service.
Temporary Login without Password: Create custom links to log into your WordPress site that expire after a set period of time (and track their usage). This is an essential feature if you sell digital goods and offer a live test site, or if you want to provide clients with a way to preview a project (such as photo proofs).
Restrict User Account: Block, restrict and delete user accounts (as well as create custom temporary ones that are only available for a short amount of time) to boost overall site security.
Pricing
Before taking a look at how to actually setup and put CM Registration to good use, you should have an idea of what the plugin costs. Budgets are important, but luckily the CM Registration and Invitation Codes plugin is available at 5 price points (note – Pro versions are only available on the developer’s website):
- Free: $0, perfect for persons with limited budgets or those who simply want to add a login popup and redirect to their WordPress site
- Pro: $39, includes all the features listed above and is a great choice for businesses or professional sites where additional options for customizations and security are a must
- Deluxe: $69, adds the Payments addon making this an excellent fit for membership or community sites
- Ultimate: $199, adds the Payments, Approve Users, Bulk Email Invites and Restrict Content Access addons which gives you the ultimate control over your login system
- Plugin Suite Bundle: starts at $249, this is for all 99+ CM plugins – the best choice if you plan to use multiple CM plugins or if you run a web design agency (just be sure to choose a plan with an accurate number of license activations)
To be honest, if you’re considering the Ultimate package I’d recommend just going with the Plugin Suite Bundle. For an extra $50 you’ll have access to 99+ CM plugins and extensions including CM Registration and all of its add-ons. Even if you don’t use all 99 plugins, if you install a few it makes the investment more than worth it. But you can view all CM Registration packages yourself on the developer’s site if you want to see a side by side feature comparison.
All pricing is accurate at the time of publication but may change. Visit the official site for the latest rates and plans.
CM Registration Setup
With an idea of what CM Registration can do, let’s take a look at the actual plugin. First up is a walk through of a quick setup and important settings, then we’ll cover a couple practical usage cases as well as our final thoughts.
As mentioned, there is a free version of the plugin with a few easy to use options – but we want to show you as much as possible. So for the purposes of our guide we’ll be using the Pro version and a few of the add-ons as an example.
Installation
To install the plugin, you first need to purchase it from CreativeMinds and download the plugin zip file (hint- stay logged in, you’ll need to grab your license code later). Then log into your WordPress site and go to Plugins > Add New and click on the “Upload Plugin” button. Select the “cm-registration-pro” zip file you just downloaded and follow the prompts to install and activate.
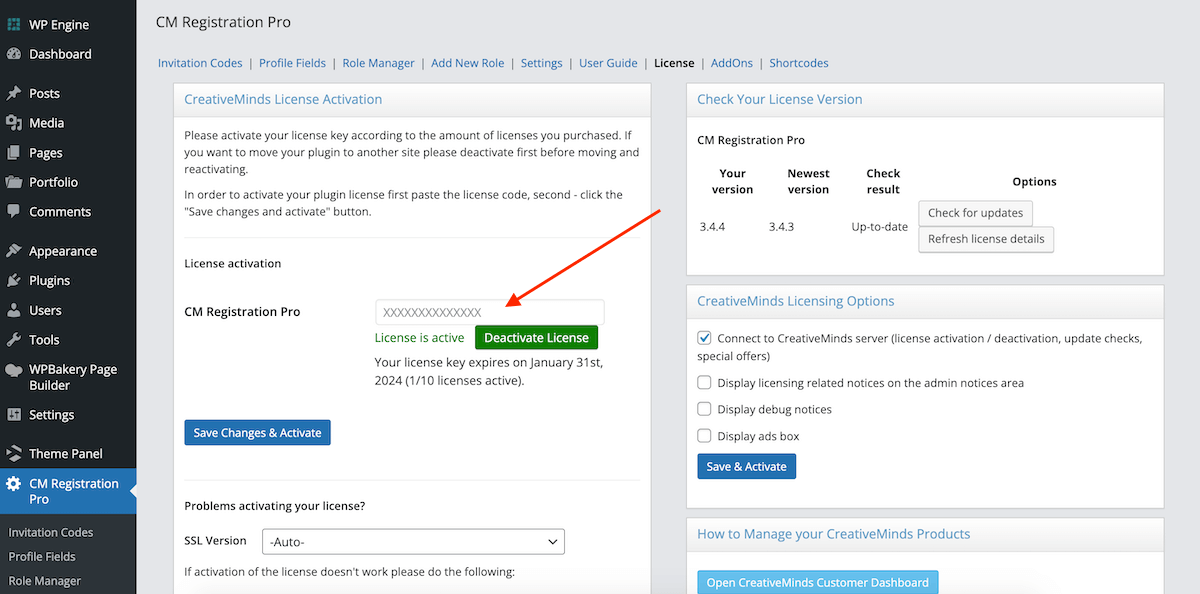
Before getting into the plugin settings, you’ll need to activate. Go back to your CreativeMinds account and click to copy your license key. Then paste it into the License Activation field for CM Registration Pro in your WordPress dashboard. We had no issues with validation, but if you’re not sure where to find your key or if yours isn’t validating right away, there are some help docs right below the field.
And if you’ve purchased any of the CM Registration Pro bundles with additional add-on plugins just be sure to repeat the process and install/activate them in the same way.
Now it’s time to get to work with important CM Registration Pro settings and options!
Key Settings
There are a lot of settings – like a LOT. Which is great! This is how CM Registration Pro is able to give you such complete control.
Starting with the CM Registration Pro > Settings section let’s look at important options you should set!
General
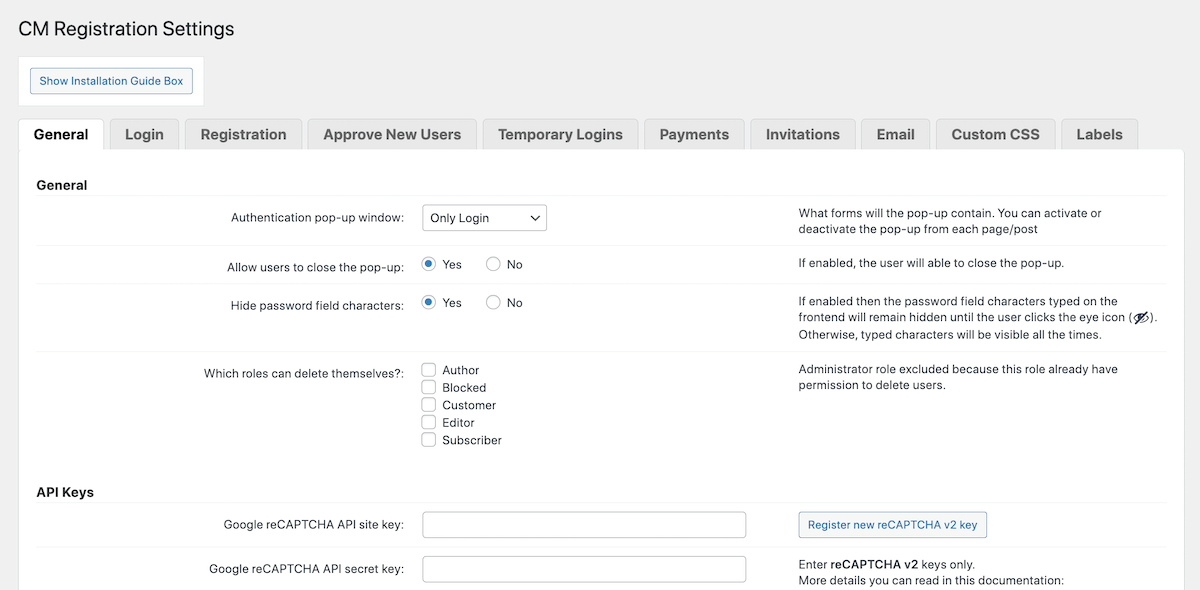
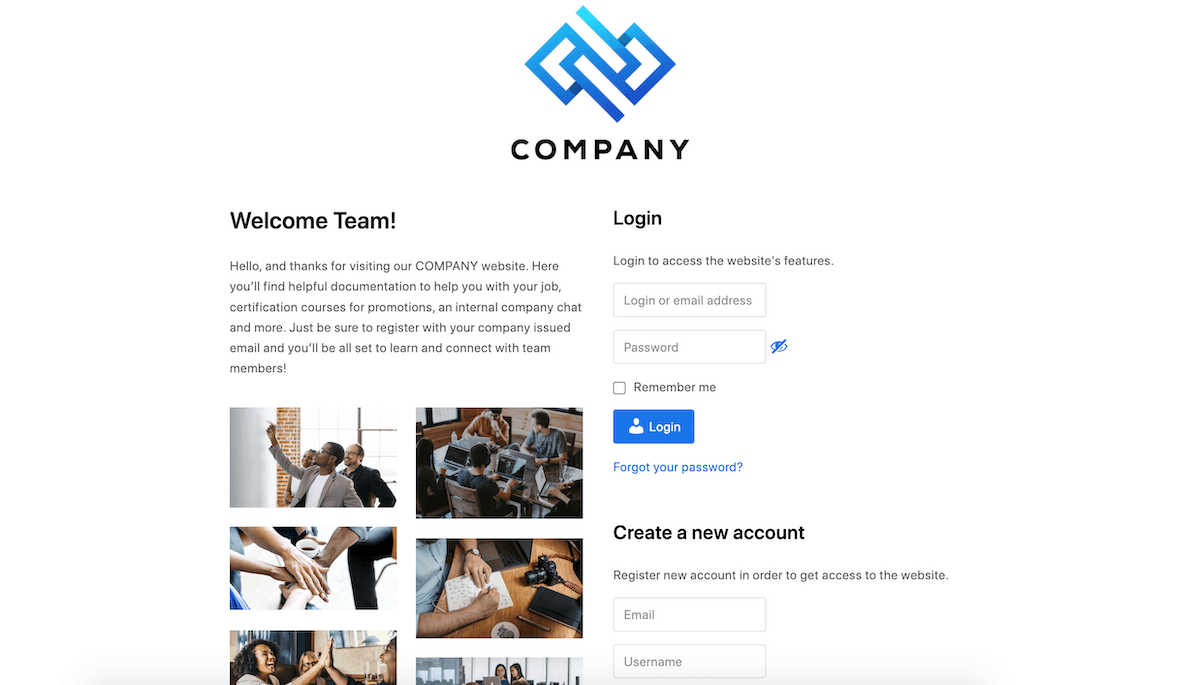
From here choose what you want your popup to contain. This is shown to site visitors who aren’t logged in, and you can choose from login or register forms (or both!), add a popup close button (which we recommend setting to yes), add reCAPTCHA, select form fields to be displayed, set your overlay opacity (this is behind your popup to make it standout) and enable a logout redirect to a specific page, such as your homepage.
Login
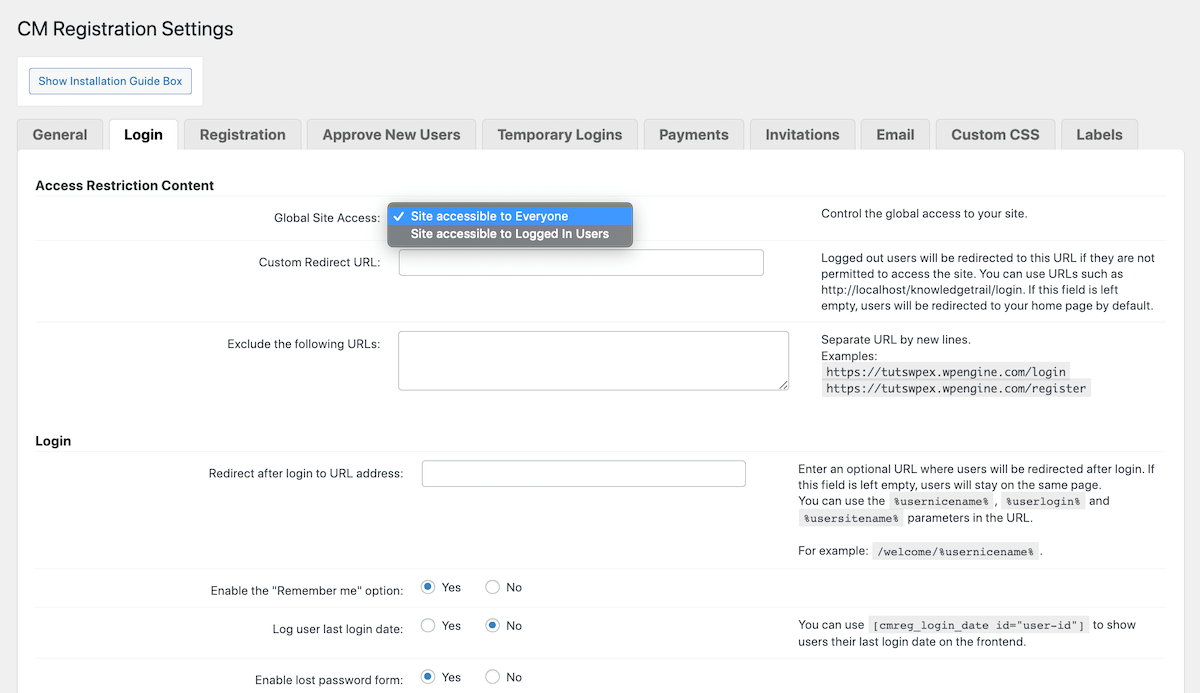
In this next tab you’ll find login options. A neat option here is for Global Site Access, so you can require users be logged in to view your site. This is an excellent way to create a private or “member-only” style website, and you can even redirect non-logged in visitors to an about or registration page.
Other options to check out here include url redirect on login, custom redirects according to user roles (great if you want to have general subscribers/employees go to one page but have your managers/admins go to a reports page), enable “remember me” and reCAPTCHA, add a TOS checkbox and enable and connect social logins (great for a faster, more convenient registration or login). This is also where you’ll find security features for limit login attempts and IP white/black labelling to help keep your login form strong against malicious visitors.
Registration
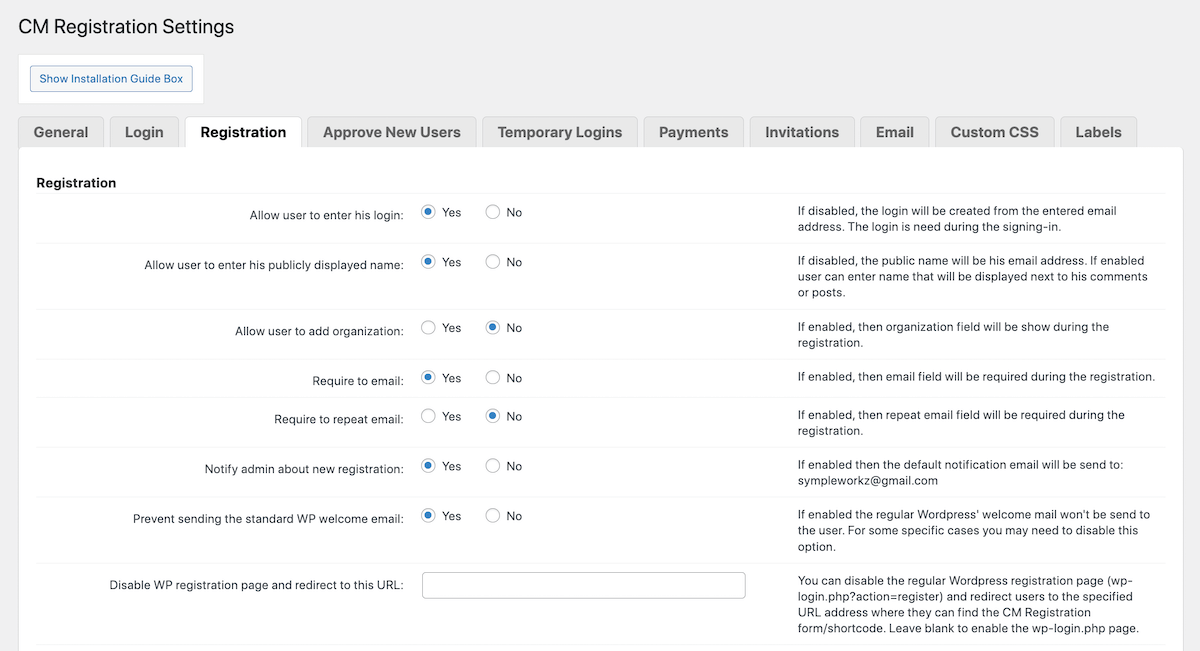
Like the Login settings, under Registration you’ll find similar options for registration form fields and required info, default WordPress or custom welcome email, admin notifications for new registrations, redirect on form submission, email verification requirement (as well as a time limit), plus security features for TOS, IP restrictions and age verification.
And if you’re planning on adding memberships to your site, this is also where you’ll find the plugin’s s2Member Pro integration and default member registration level (note – we’re not going to cover s2Member setup in this guide – but you can learn more in the s2Member documentation).
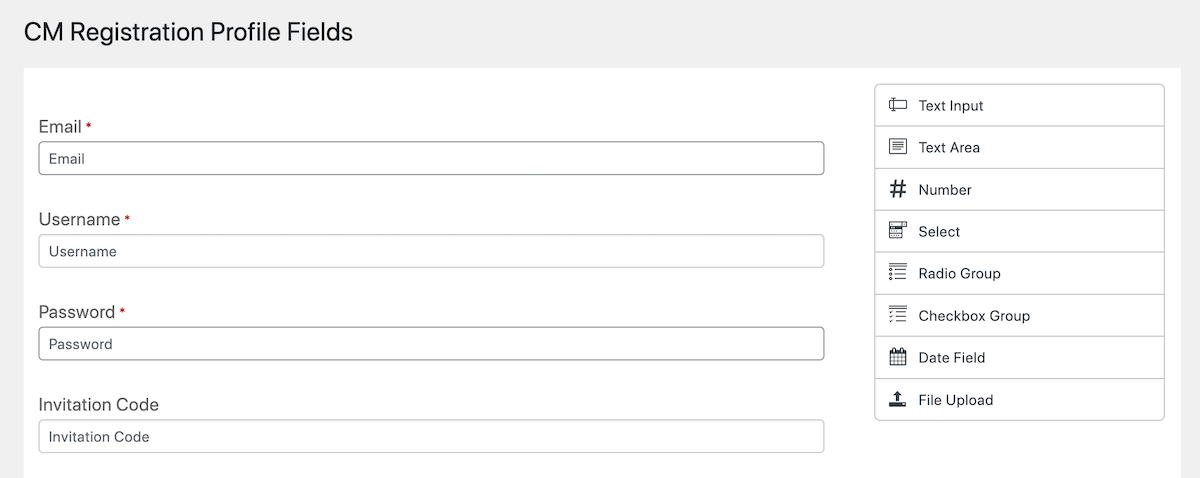
Note: After choosing the form fields you’d like to be displayed, you can further edit them if you go to CM Registration Pro > Profile Fields. From here you can edit the fields display order, add placeholder text, and much more.
Approve New Users (Add-on)
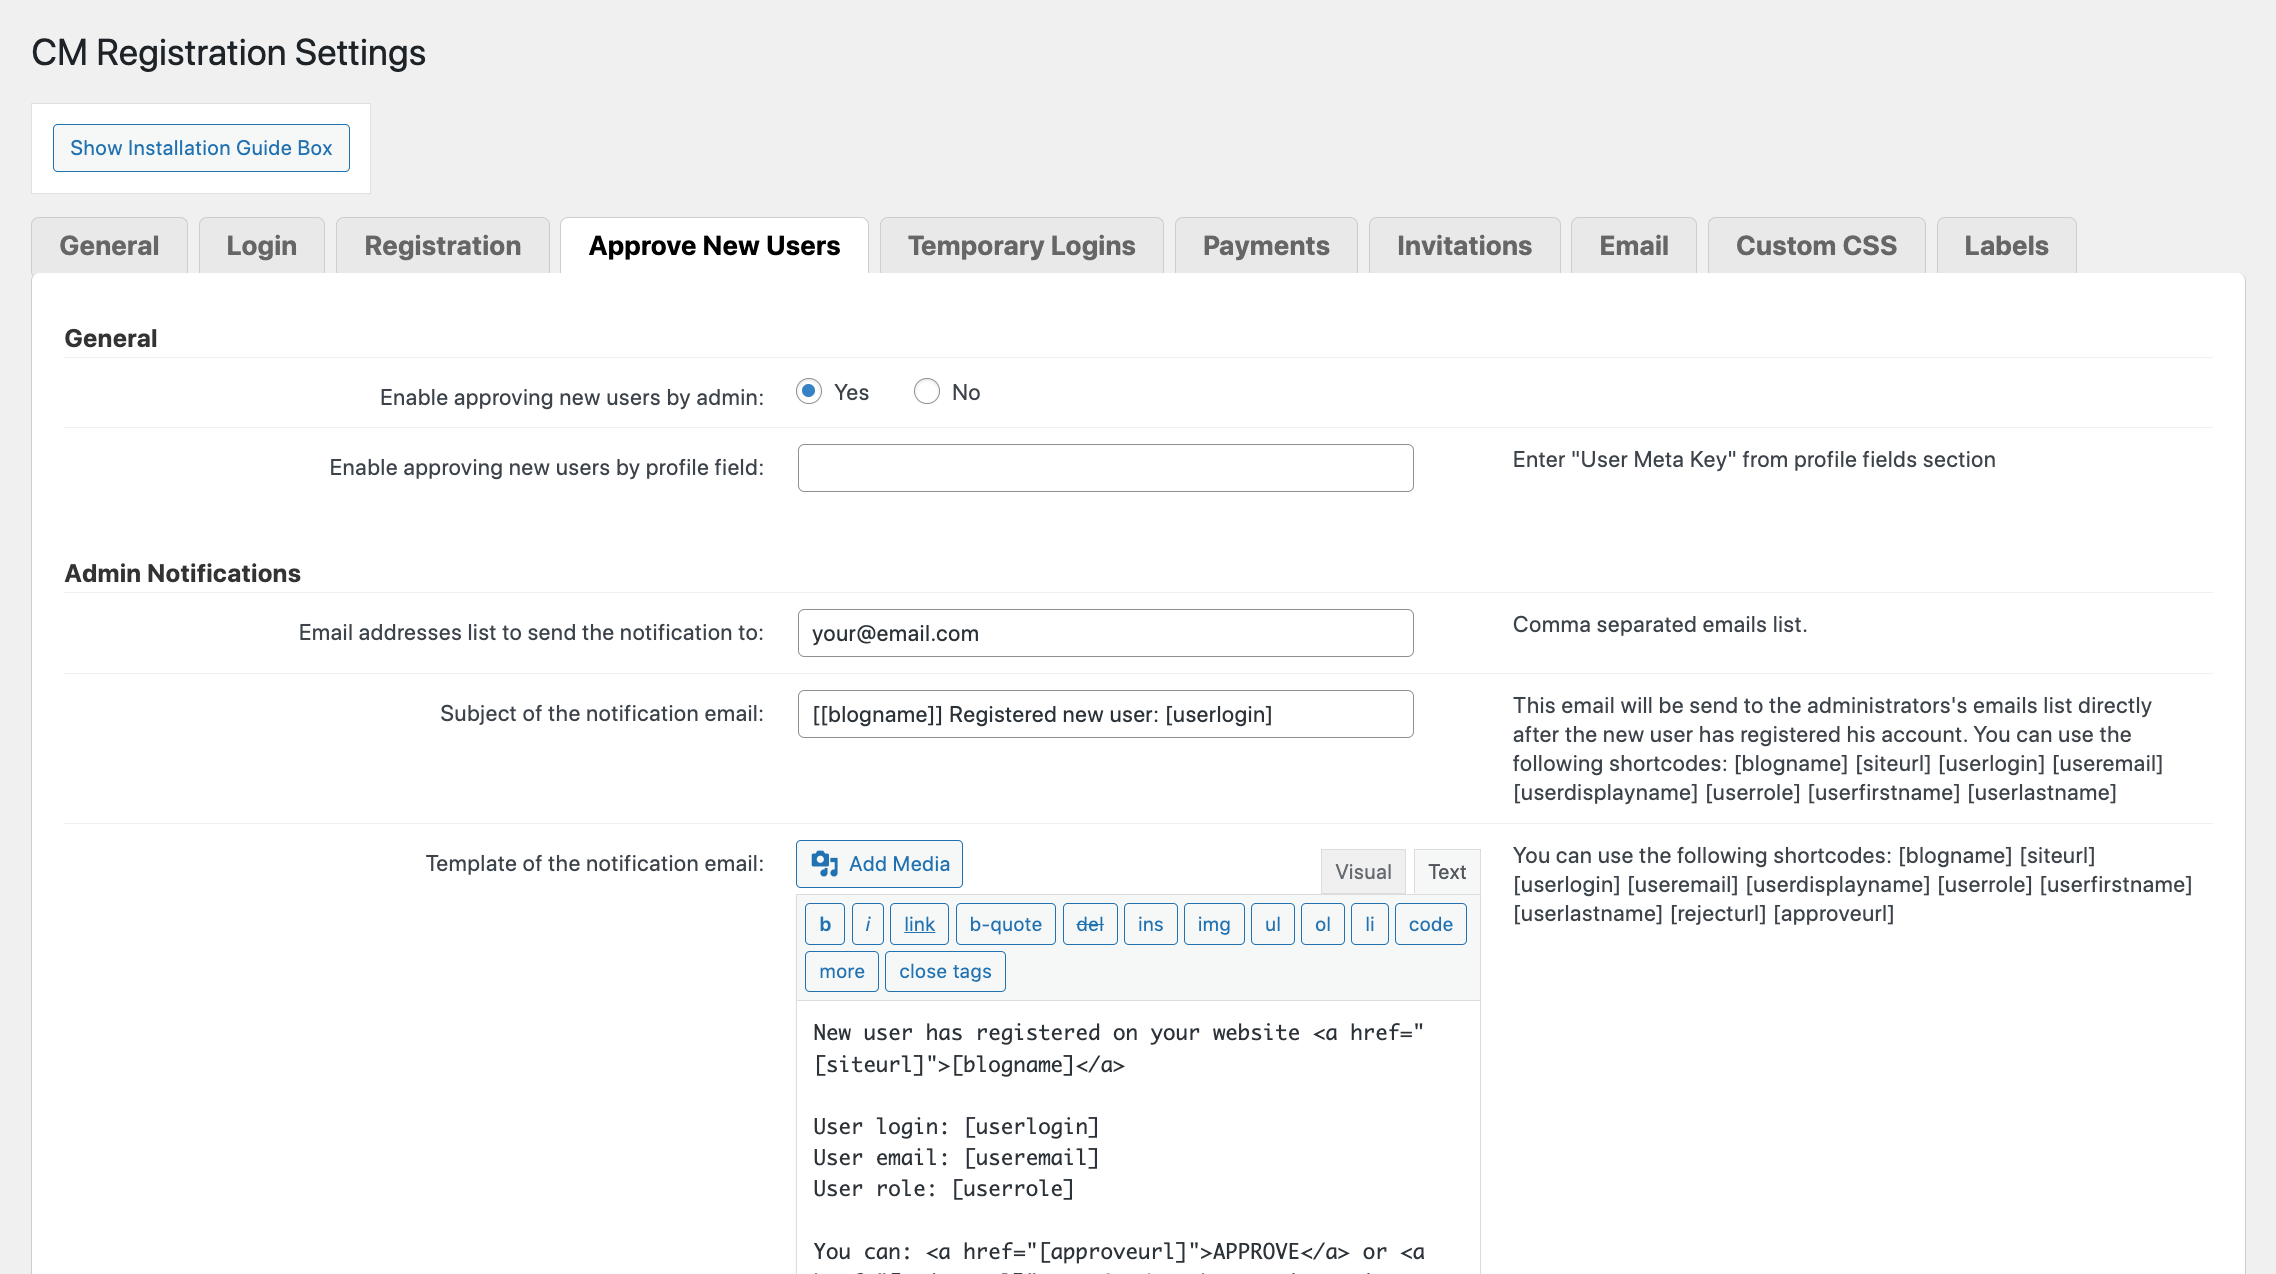
If you’d like to manually approve user registrations, then you’ll need the Approve New Users add-on. Once active a new “Approve New Users” tab will be added to the CM Registration Pro Settings.
Options here include required approve by admins, email notification templates for admins/owners to approve new users, user email notification template after approval (or rejection) and an option to allow automatic approval for users with invite codes or with email accounts from specific domains.
Temporary Logins (Add-on)
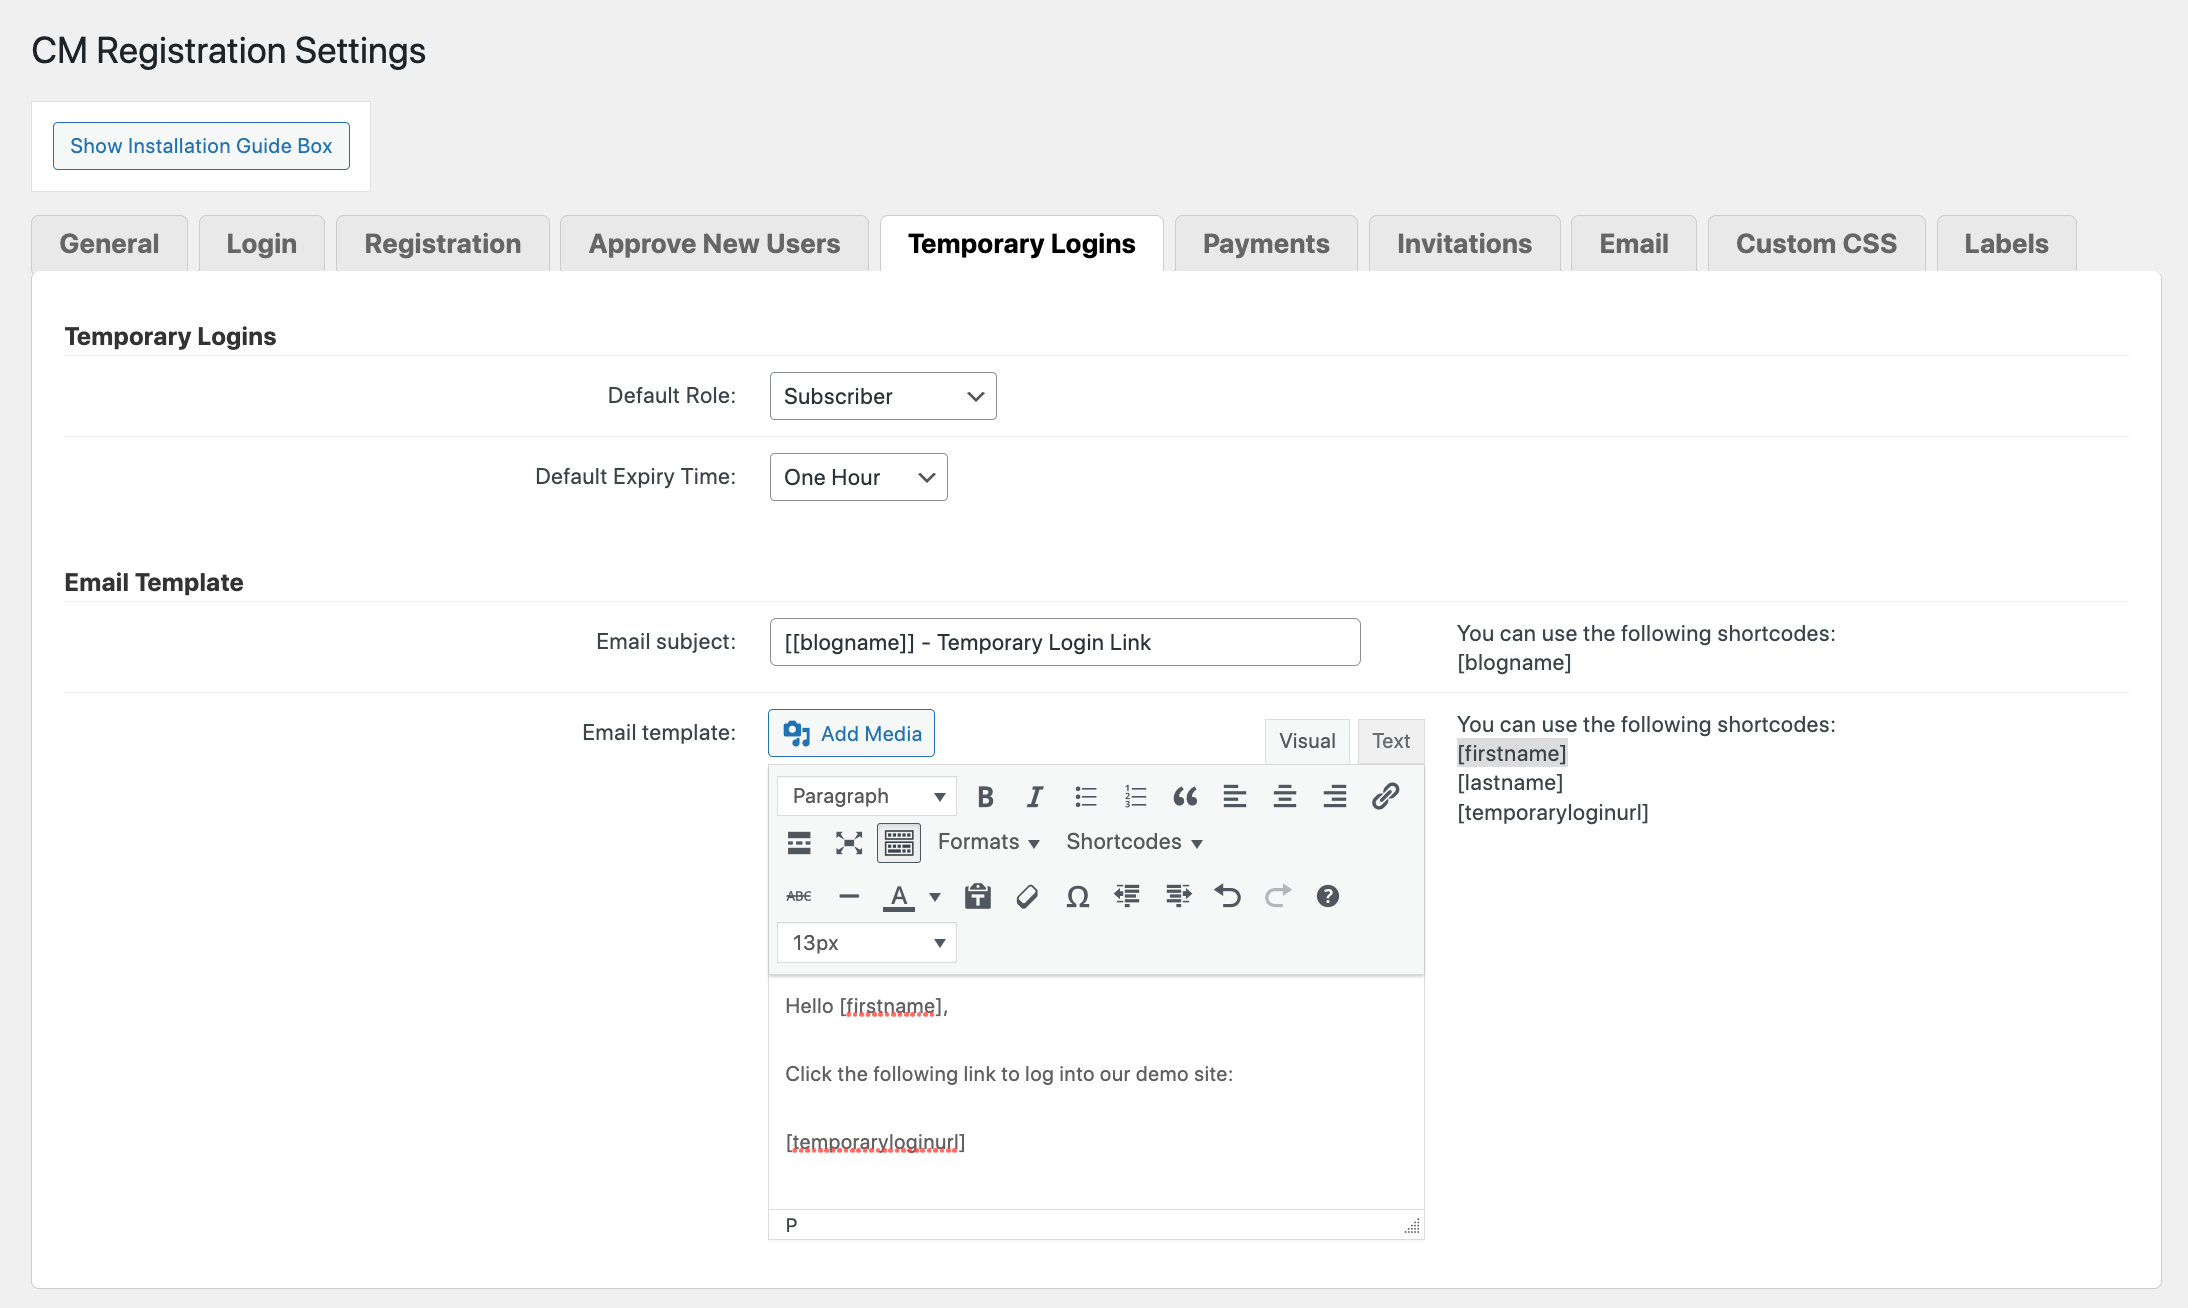
Another premium add-on, this tab will only be available if you have the Temporary Login add-on installed and activated. From here you can customize the email and information to be sent out along with a direct login link (no password needed).
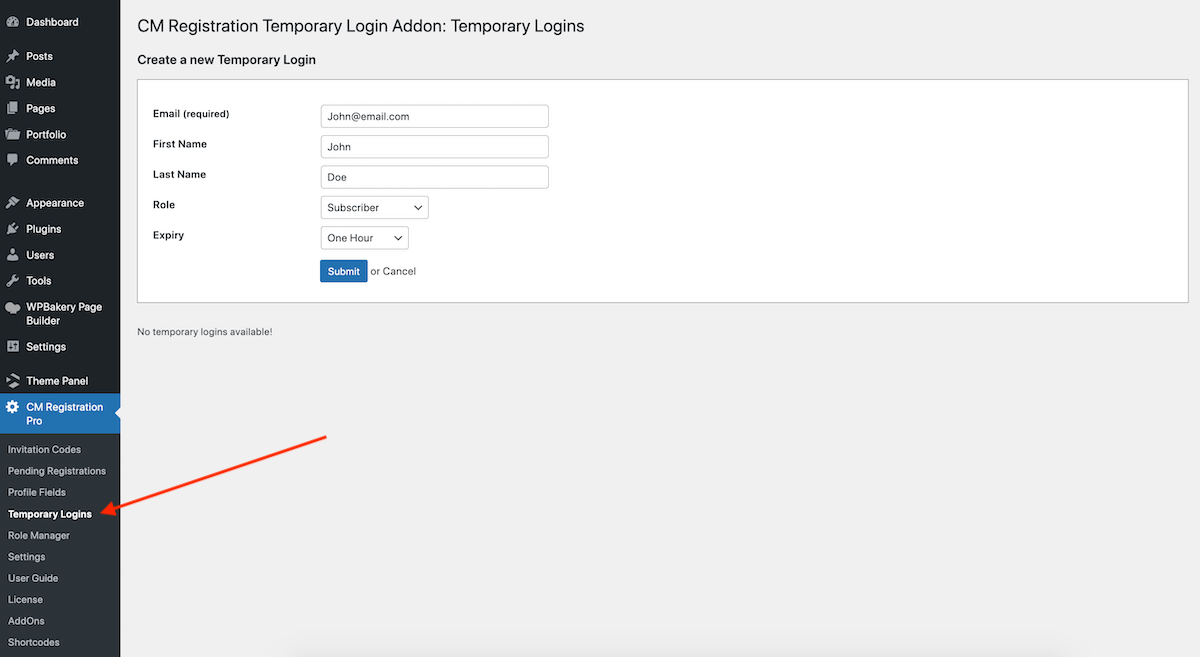
To send a temporary login to a specific person you’ll then need to navigate to CM Registration Pro > Temporary Login and click the button to “Create New.” This will open a simple form to fill out. Once you’ve completed the form for a person you’ll have the options to send them an email, copy the link yourself and disable, edit or delete the person from your temporary logins list.
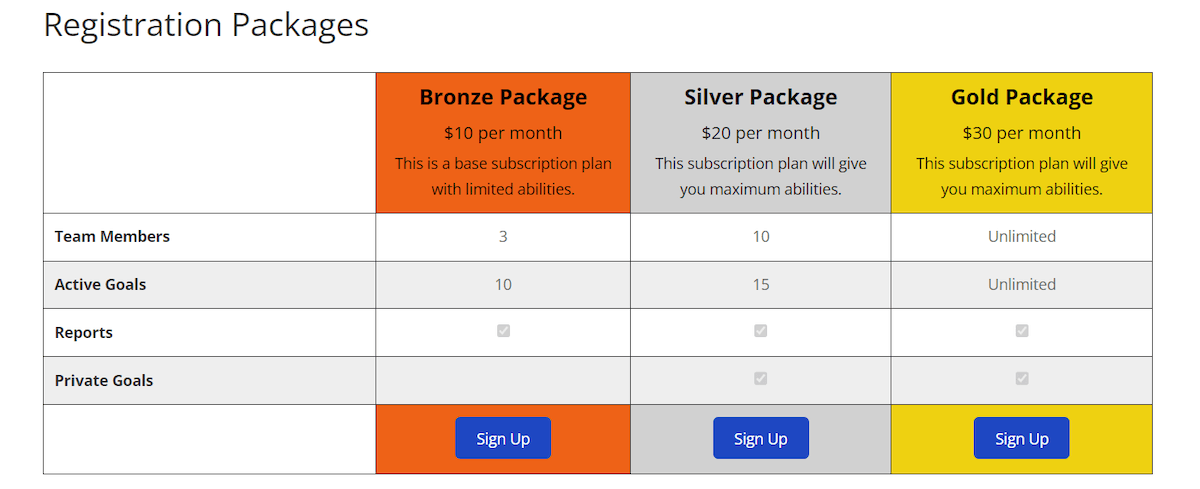
Payments (Add-on)

The Payments add-on, if active, will display an option for a Custom Payment URL by default in addition to other supported payment plugins you have installed such as WooCommerce or EDD. You can learn more about creating registration payment packages in the CM Registration Pro documentation, but essentially you can create a table like this:
Invitations
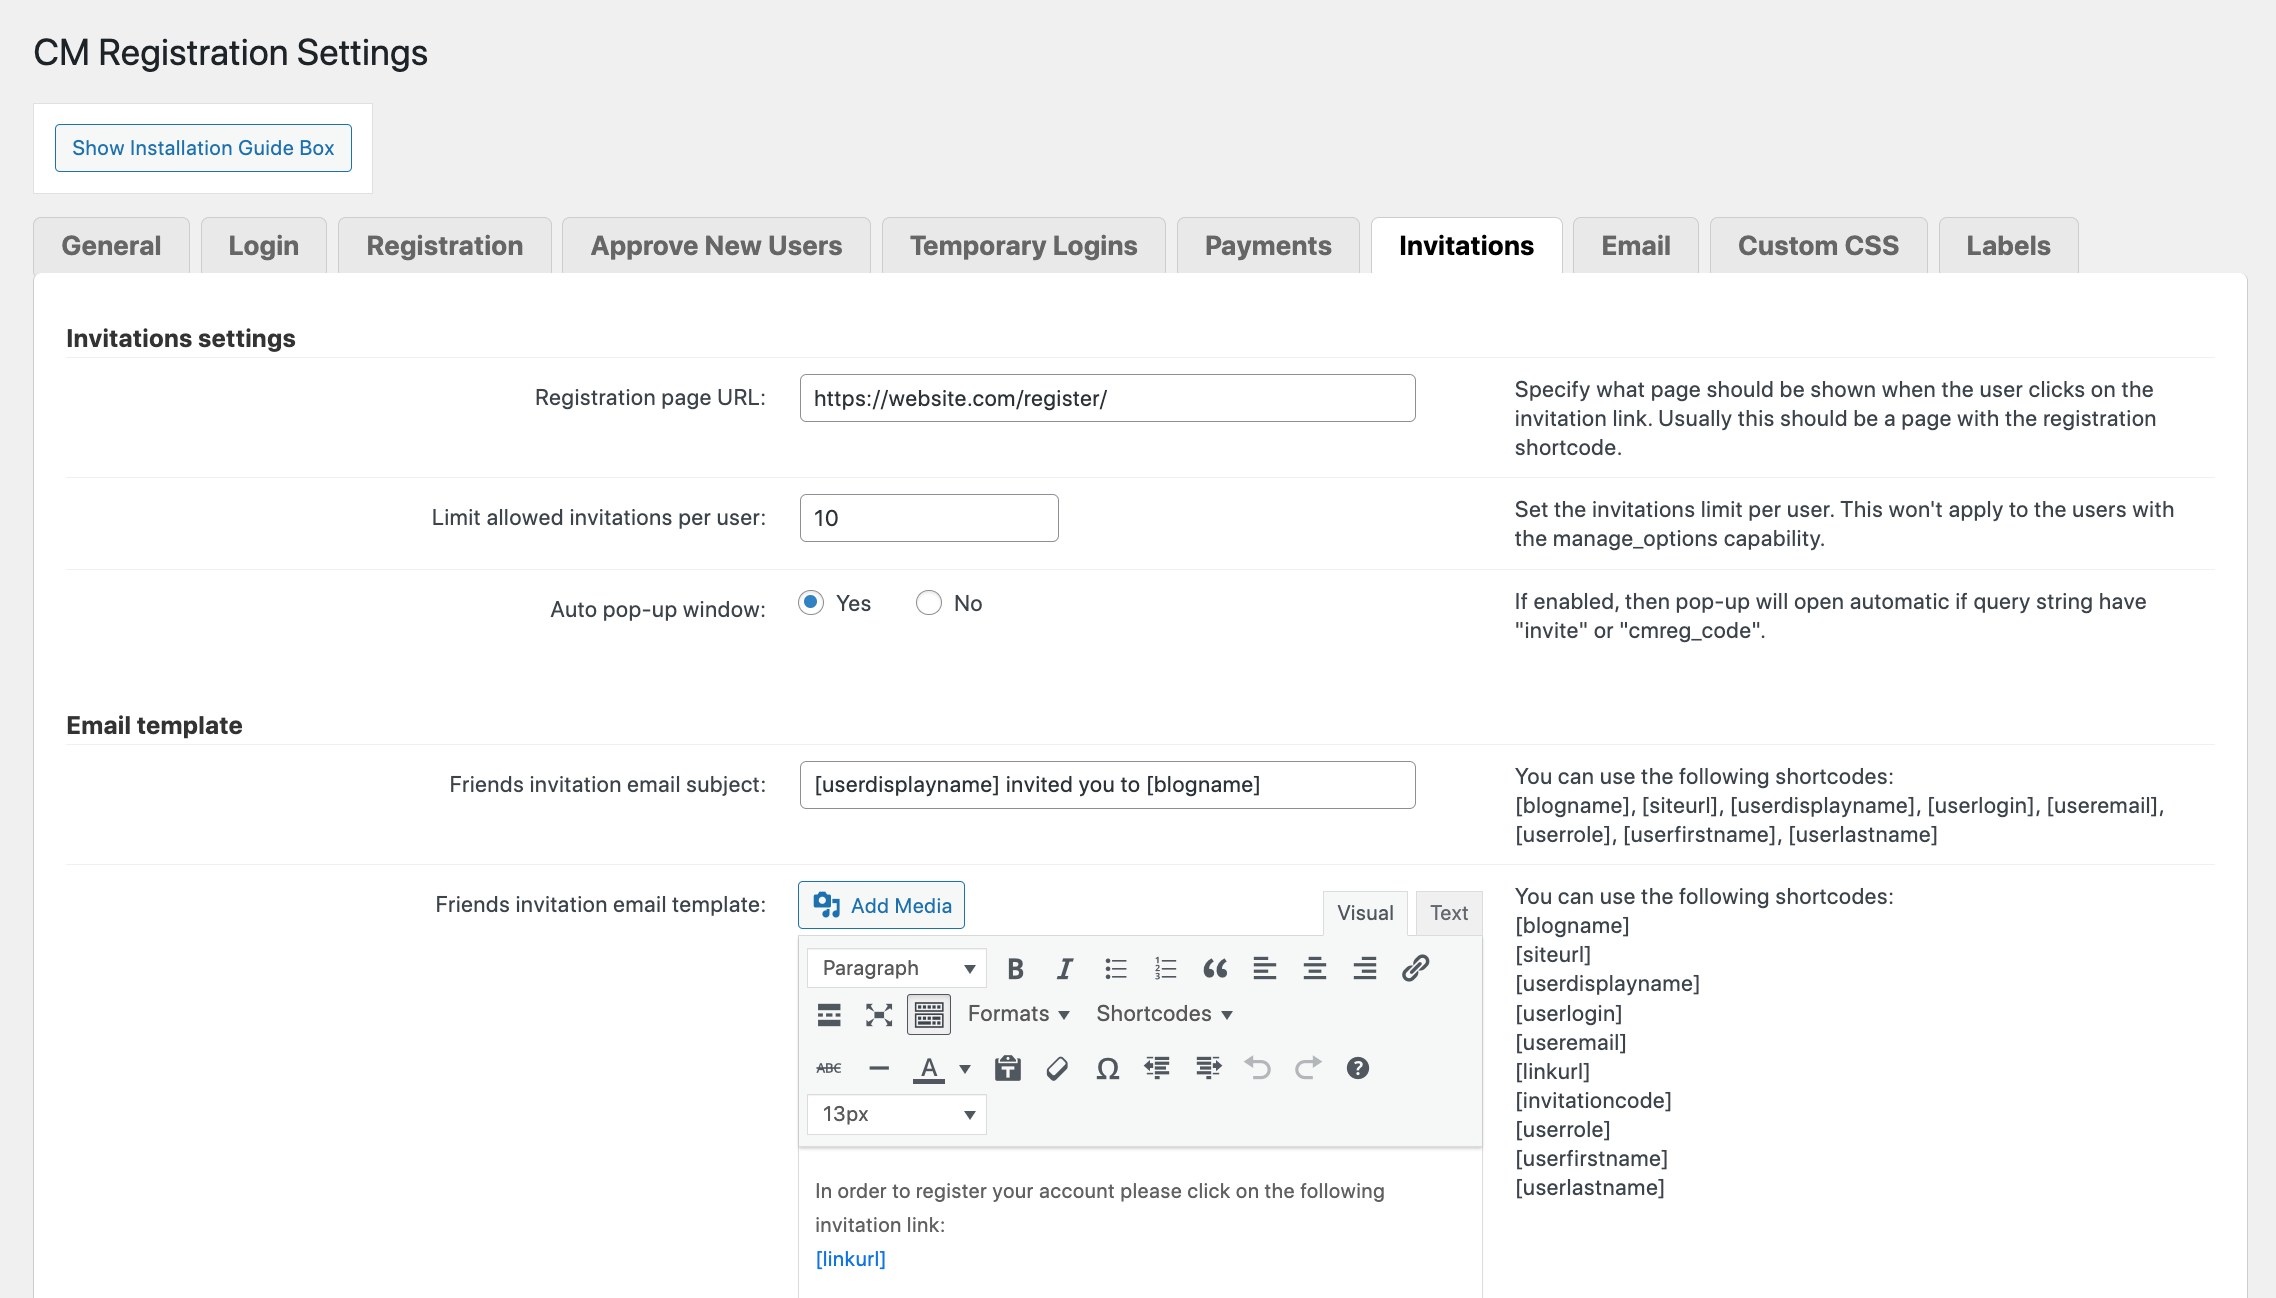
Moving along, the Invitations section allows you to set a custom registration page on your site (just be sure to create the page and add the registration form shortcode to), set a default usage limit for invite codes, edit the invite email content and a few other options.
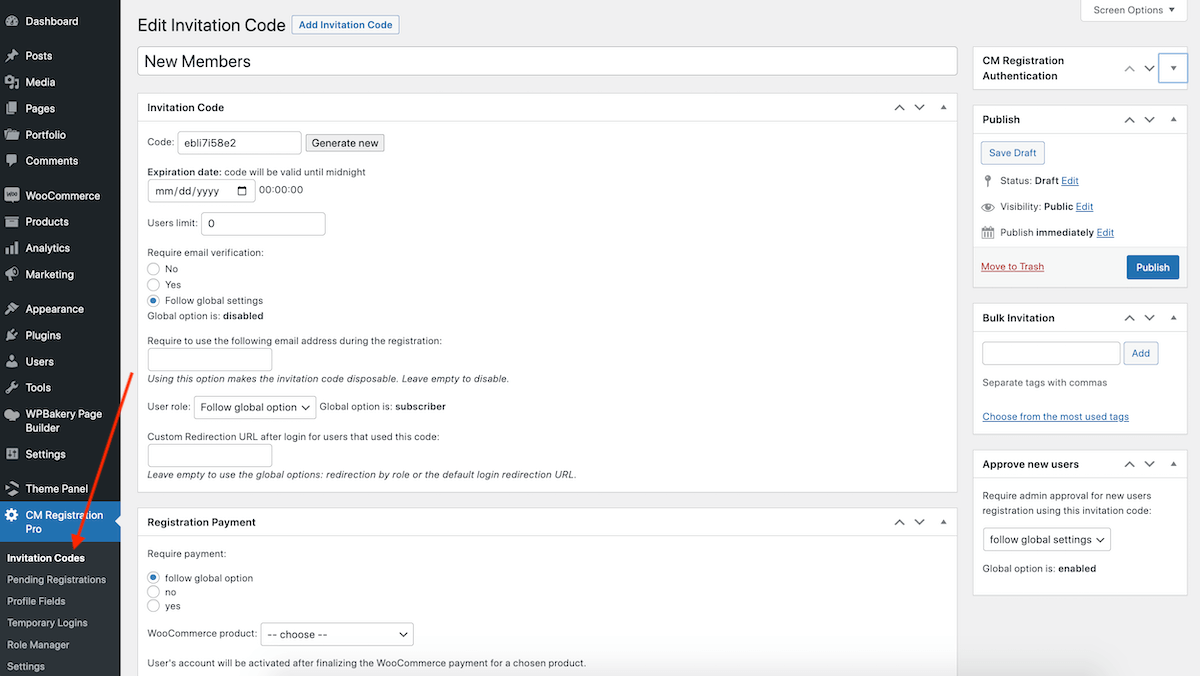
Then to start creating custom codes go to CM Registration Pro > Invitation Codes. Create a new code and be sure to set options for expiration, linked payment option, if you’d like to approve users manually and add multiple recipients with the Bulk Invitation section (or to speed things up you can use the Bulk Invitations Add-on which allows for CSV upload).
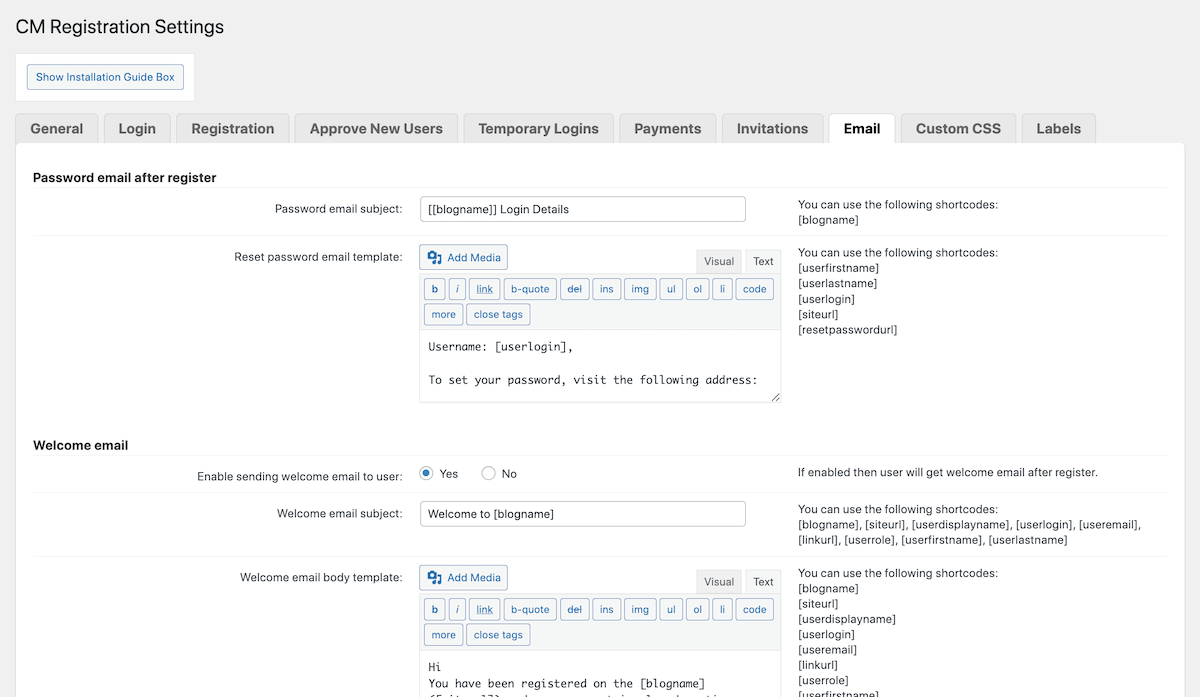
The Email tab is fairly straightforward, but if you’d like to customize the default messages sent for set password, welcome, activation, account delete, edit profile, etc then this is where you’ll find all the templates.
CSS
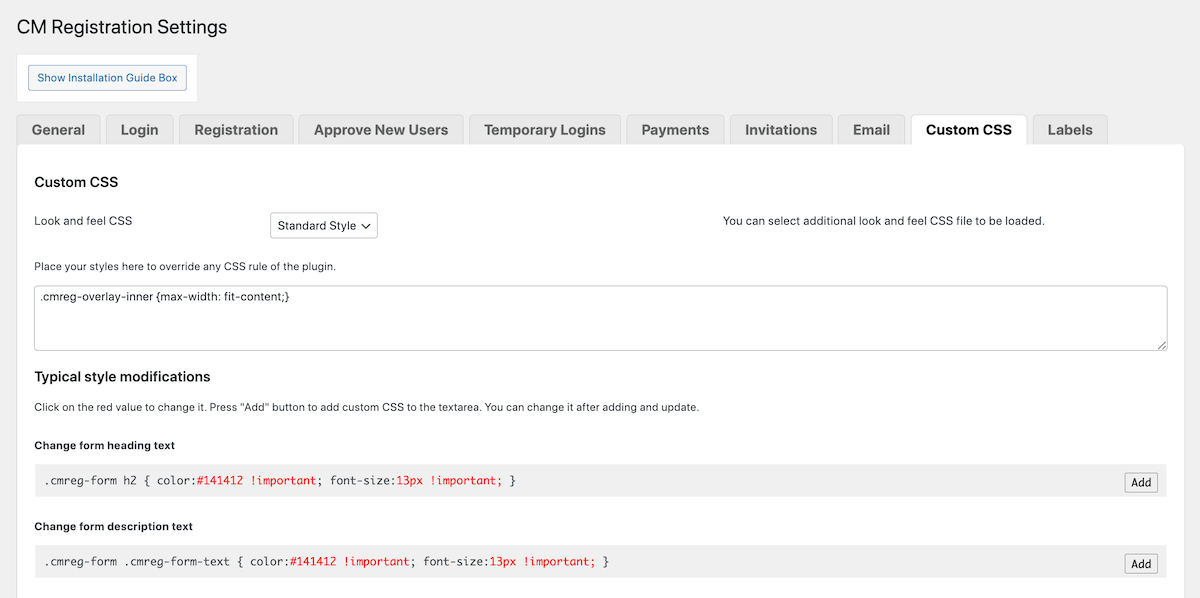
The plugin offers a “Fancy” pre-styled setting as well as a “Standard” option (which is what we’ve selected) that will match the style of your active WordPress theme. But to further customize the appearance of your login and registration elements all you need is a bit of CSS.
Thankfully it’s an easy process, as the plugin includes a number of CSS generator that you can use to customize elements. Just plugin in the hex color values, font sizes, etc and click “Add” to insert the code (just remember to save).
Labels
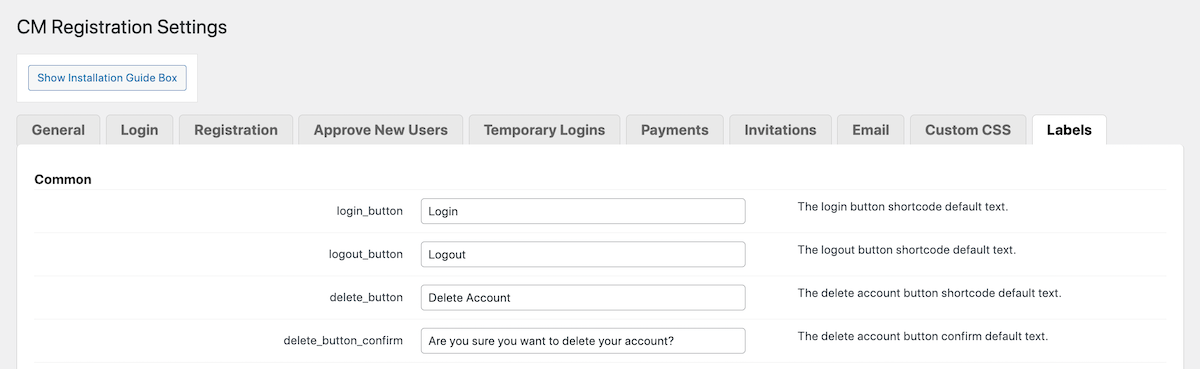
If you’d like to customize any of the form labels you certainly can. The defaults are likely great as is for most folks, but if you need to edit them this is where you’ll find them all. Though two sections are worth noting.
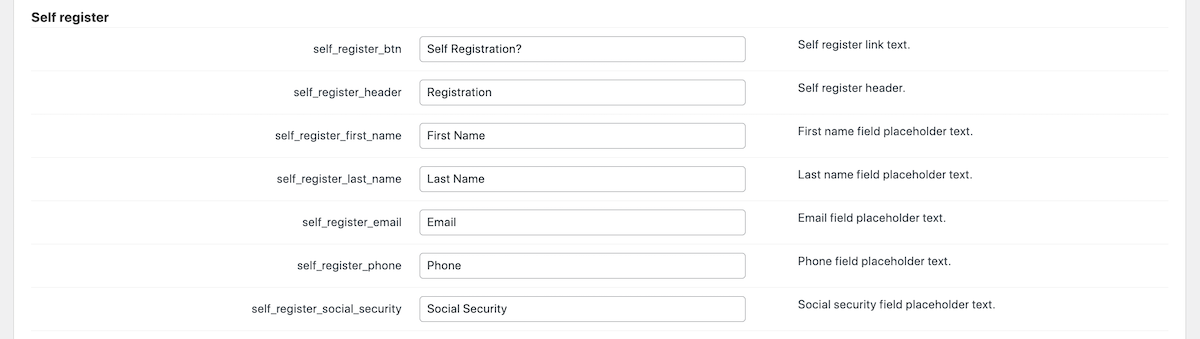
The first would be for Self Register. Self Register is an option you can enable at the very end of the Settings – General tab. This is a great tool if you’re using your site for a specific group of people, such as students enrolled in a course or employees registering for a company resource. There is a “Social Security” field listed, however this could be edited for “Student Number” or “Employee ID” or another relevant value.

Second is the very last section for Payments. Here you’ll find the label for “Membership Plan” to be used as your package field label, which you may want to change depending on your site.
Role Manager
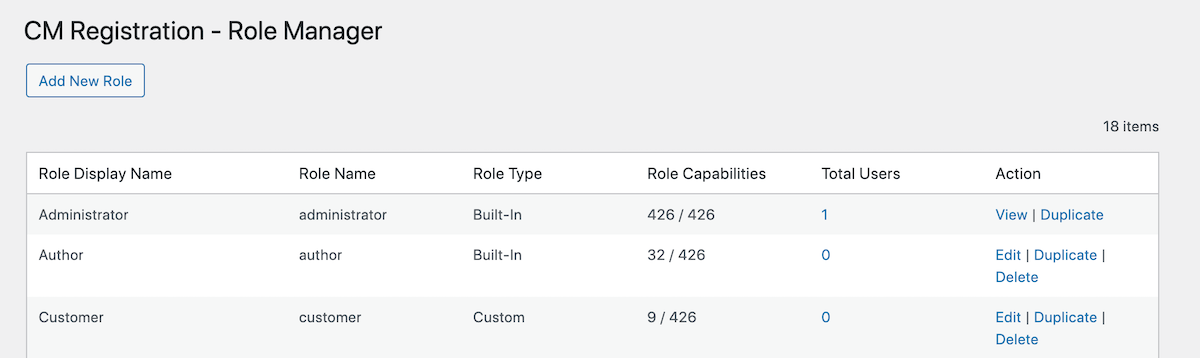
And last – we wanted to point out that you can edit user role from CM Registration Pro as well. You may have noticed that there are various plugins settings where you can select specific user roles or add custom redirect urls based on role. To add, edit or remove roles simply navigate to CM Registration Pro > User Roles and get to work fine tuning what roles your site uses and what privileges they should have.
For the most part default user roles are likely sufficient as is, so we would recommend duplicating a user role if you would like to edit it.
That should be the most important settings. With that done you can start adding login and registration elements to your WordPress site with the included shortcodes.
Shortcodes
There are plenty of ready to use shortcodes you can copy and paste into your content or a Gutenberg shortcode block.
And as mentioned, if you’d like to customize the look of a shortcode simply add a bit of custom code to the CSS settings panel.
Use Cases
So why would you purchase CM Registration Pro? There are many potential reasons, but we would guess that you’re reading this post because you’re in the market for a plugin to improve your site login. Perhaps you’re in need of an attractive popup login solution, or a way to bulk invite many people to register on your site, or maybe a better method to redirect users on login/logout.
1. General Popup Login or Blog Registration
If you’re looking for a more attractive way for users to register for your site and log into their account, CM Registration Pro has you covered.

Just confirm your settings – for example, we’ve selected to use a login form only that is shown on all pages (this is the default, which you can edit by disabling the pop-up on a per page basis) to not-logged-in visitors. We also added a tiny bit of custom CSS:
.cmreg-overlay-inner {max-width: fit-content;}This simply altered the width of our popup.
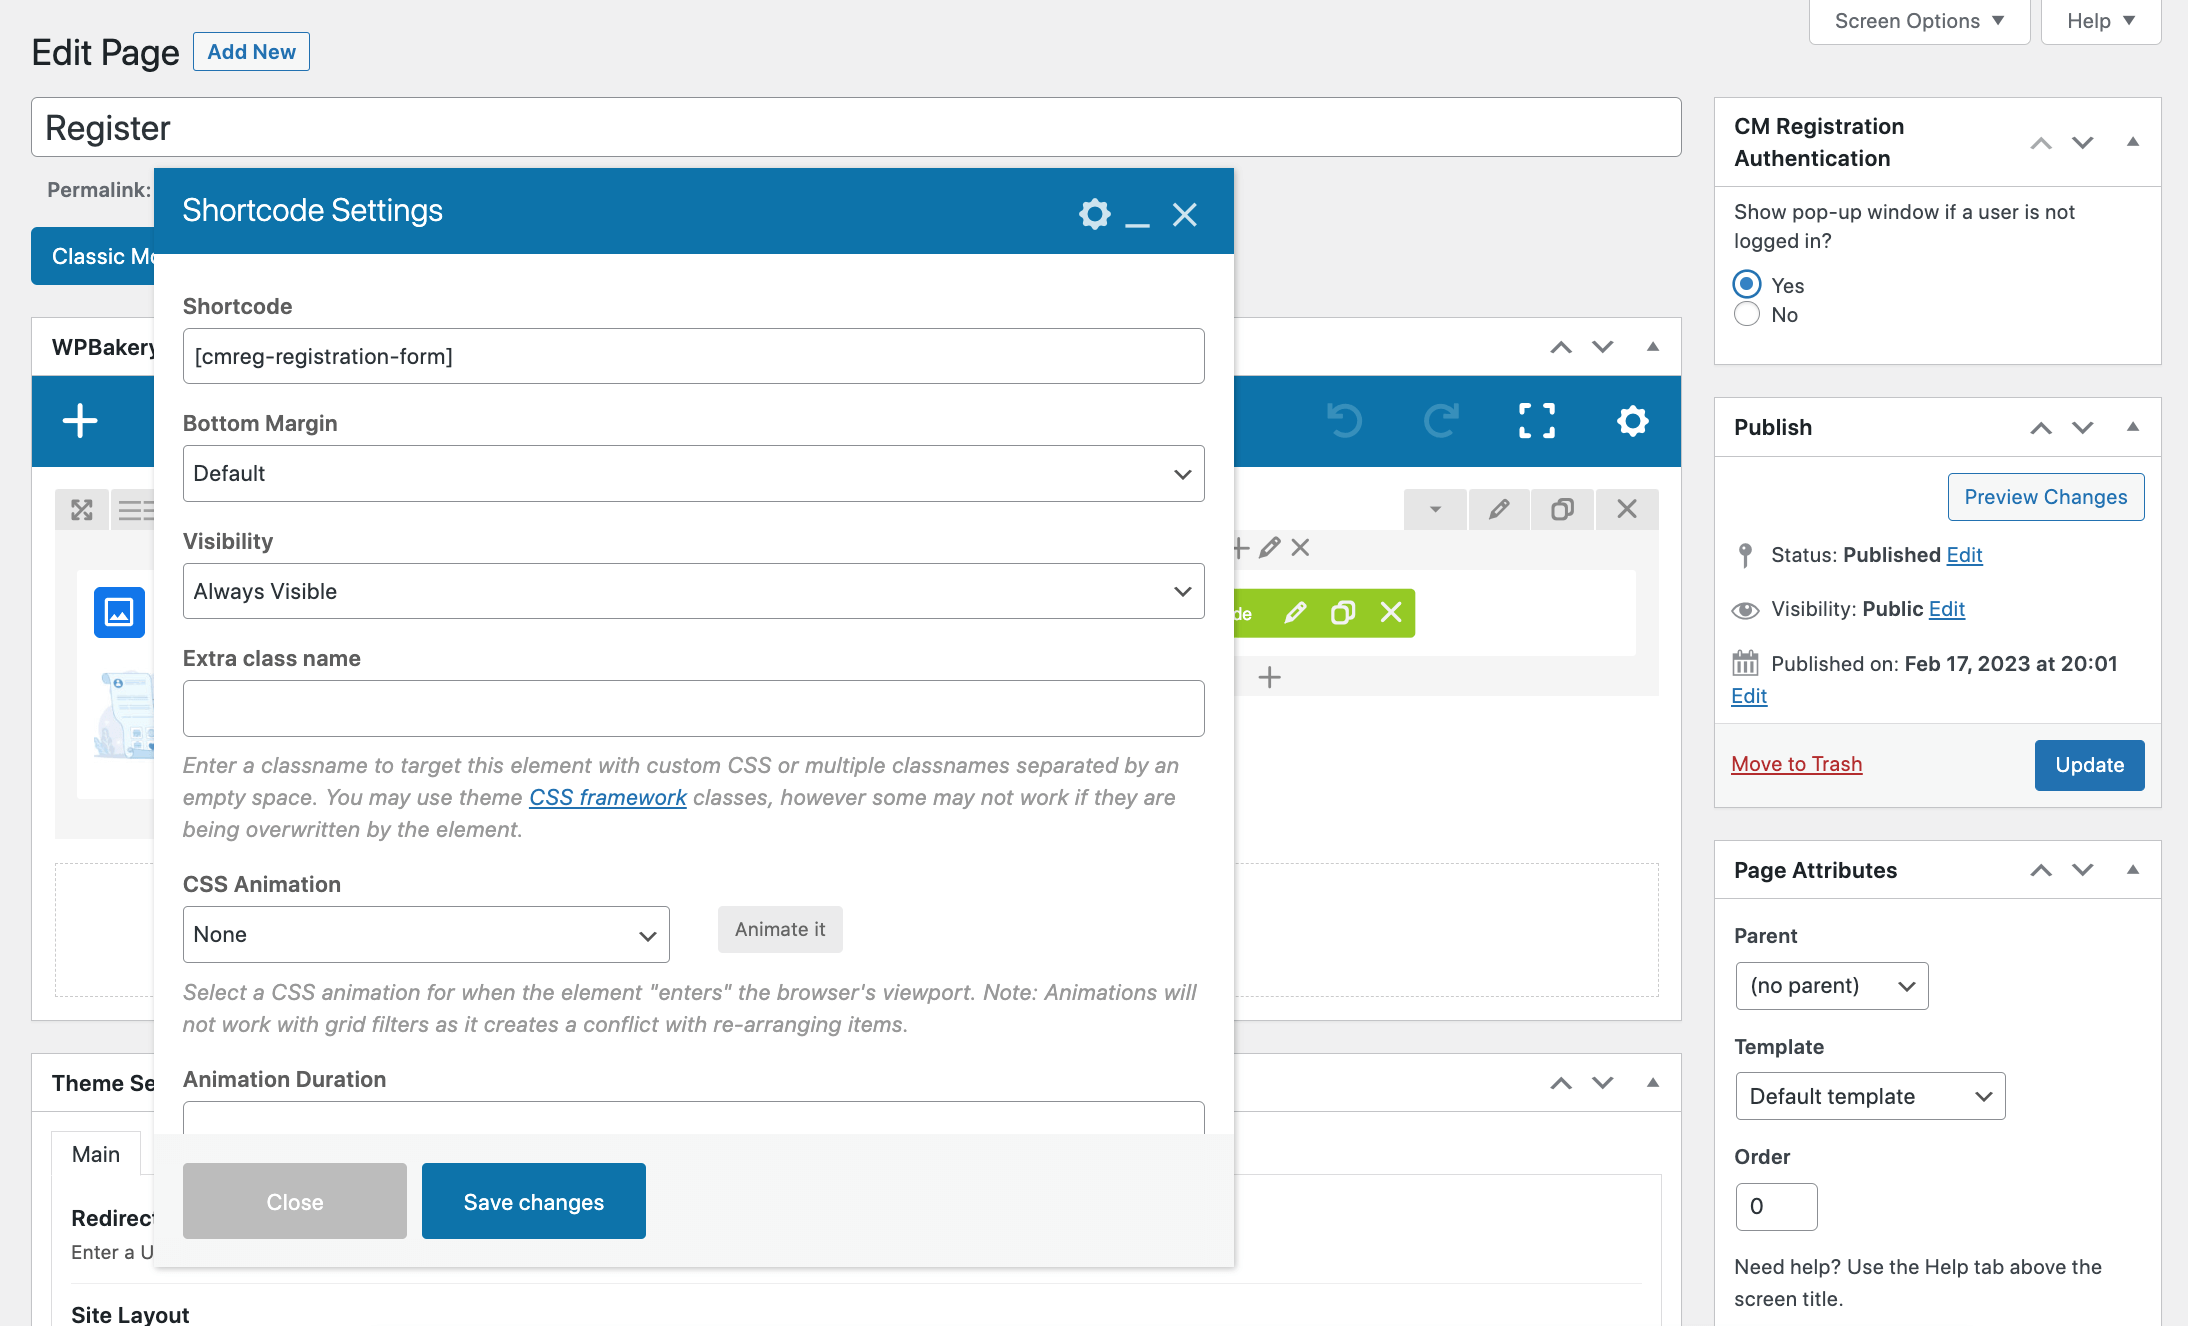
Then use the included shortcodes to build your registration page, like above (which happens to be using the WPBakery page builder).
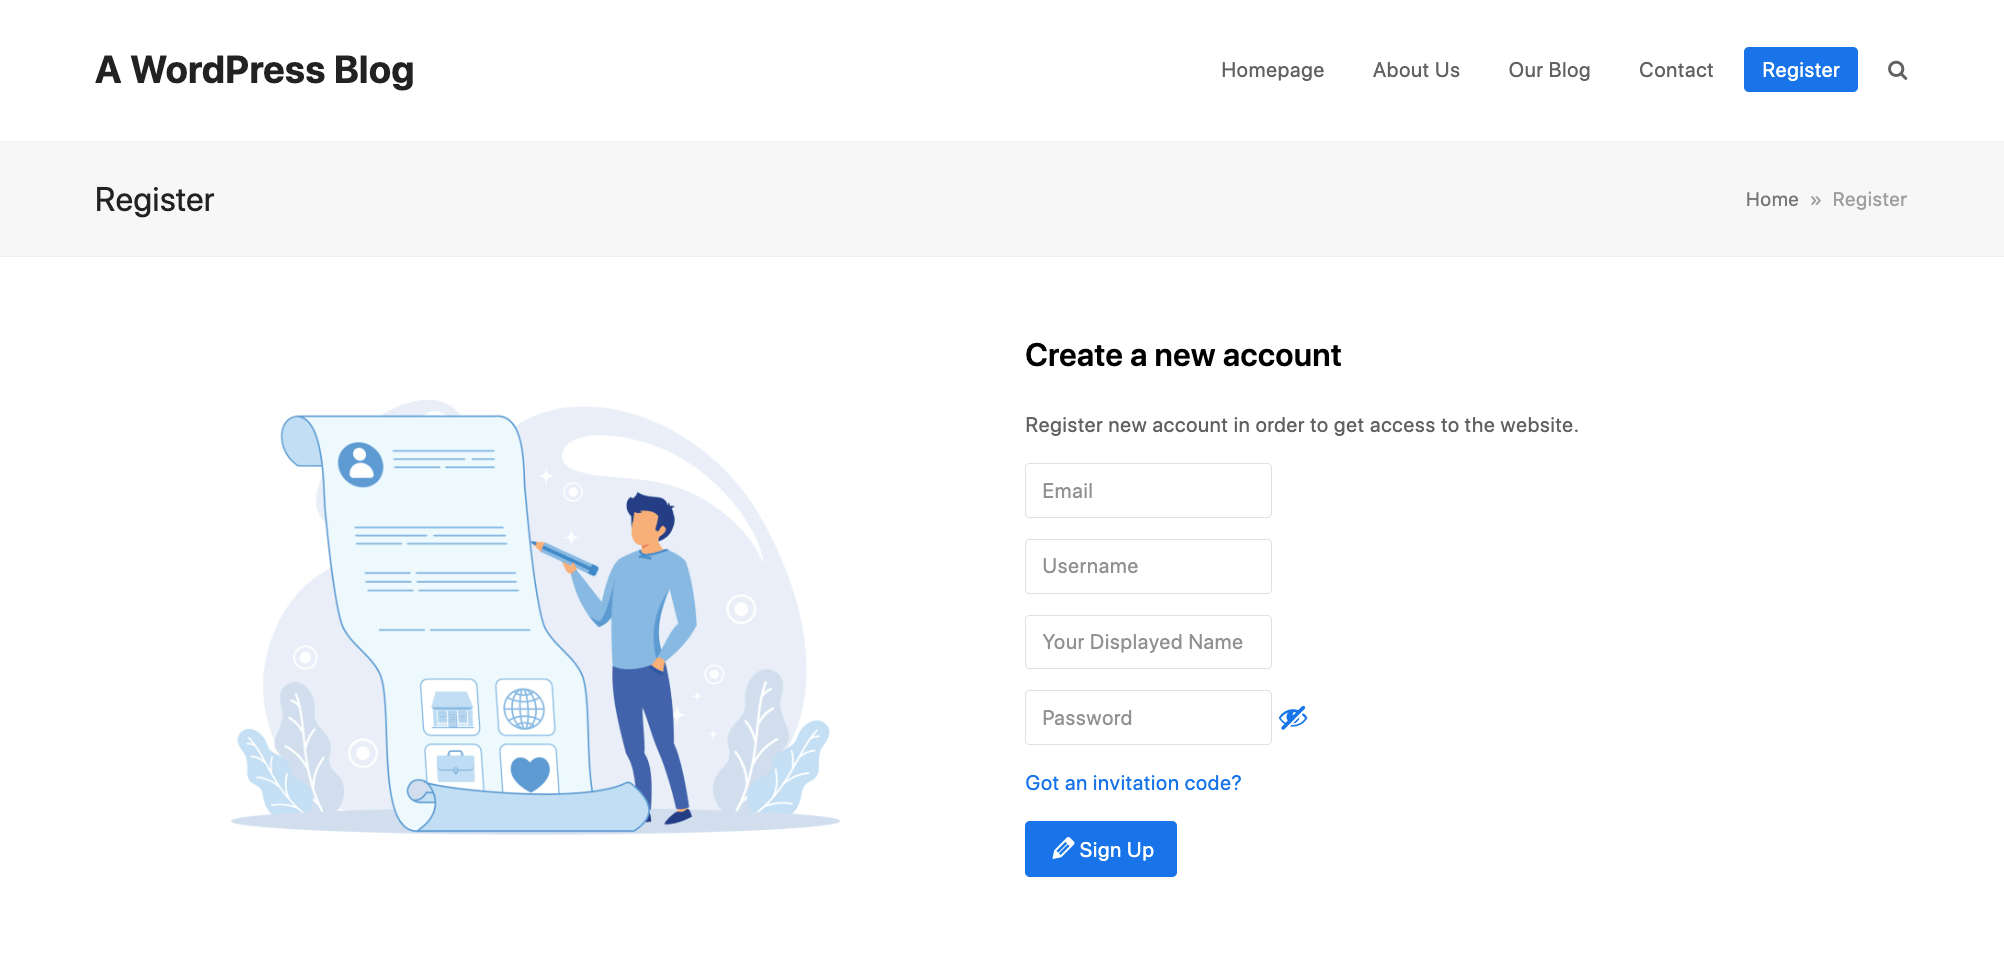
Which will look like so on the frontend. As a reminder – this example is using the “Standard” CSS style, so the form fields, fonts and buttons color all match our active theme automatically.
2. Early Access for Newsletter Subscribers
Launching a new product or service and want to give your loyal newsletter subscribers first access? Easy! You will need the Bulk Email Invitations add-on, but it’s a quick and simple process.
- First build your e-commerce store with your products and services
- Pages: Create a coming soon page for your site that includes a registration form shortcode
- Newsletter Provider: Next export a CSV list of your contacts.
- CM Registration Pro > Bulk Invitations: Choose the option to Invite users by email then create your invite codes by completing the fields and uploading your CSV file.
- CM Registration Pro > Settings > Login: Set the Global Site Access to “Site accessible to Logged in Users” (which you will change back once your product/service offering goes live) and then add a link to your coming soon page for the Custom Redirect URL option for not logged in users. Next in the Redirect after login to URL address add the link to your storefront.
- CM Registration Pro > Settings > Registration: Set the Ask for invitation code option to required.
- CM Registration Pro > Settings > Approve New Users: Last, scroll down and set the Automatic Approval Allow by invitation code option to Yes so that all of your invited newsletter subscribers will be added right away!
That’s it! Now your subscribers will all receive invite codes pre-launch, and you could even add a custom discount code in the Email template along with the invite.
3. Private Website for Business (e.g. intranet, training courses, etc)
Another great use of CM Registration Pro is as a gateway for your private, company intranet. This way a section of your website (or an entire subdomain preferably) can be protected and only accessible by your employees.
Here are a few quick steps to help visualize this use case:
- Pages: First, build custom a landing/login page using the included CM Register Pro shortcodes to add a login and a registration form to the page.
- CM Registration Pro > Settings > Login: Set the Global Site Access to “Site accessible to Logged in Users” and then add the link to the Custom Redirect URL option to direct not logged in users to. Next in the Redirect after login to URL address add a link to your main company homepage (or optionally add custom Redirect per role urls to send different staff groups to different landing pages).
- CM Registration Pro > Settings > Registration: Set the Require email verification to Yes. This way employees will have to log into their company email account to complete registration.
- CM Registration Pro > Settings > Approve New Users: Set Automatic Approval Allow by domains to include your company domain, so only email addresses using your company url will be approved.
There might be additional settings you’d want to select, but now your entire site is login-protected! Sticking with the intranet example, you can now add company training videos, important document templates or even a social/chat plugin so that employees can interact safely on a site without external users.
Of course these are just three quick examples – there are certainly tons more ways you can put CM Registration Pro to good use!
Wrapping Up: CM Registration Pro Review
The CM Registration Pro plugin offers a powerful way to enhance WordPress login and registration functionality. It goes beyond the default WordPress options, letting you create custom registration forms, Ajax-powered login popups, and invitation-only access. With its intuitive interface and built-in shortcodes, you can implement these features quickly, without needing custom coding or advanced technical knowledge.
Pro users gain access to even more advanced tools, including payment integration for premium memberships, temporary logins, bulk email invitations, and detailed access control options. These features make it easy to manage who can access your site and for how long, which is particularly useful for membership sites, e-commerce platforms, and sites offering digital products. Compatible add-ons further expand functionality, giving you flexibility to tailor registration and login workflows to your exact needs.
Overall, CM Registration Pro is a reliable solution for WordPress site owners who want enhanced login and registration capabilities. It balances ease of use with powerful features, helping you provide a smooth user experience while maintaining control over access. Whether you run a membership site, sell digital products, or just want a more polished registration system, this plugin deserves serious consideration.