Install WordPress On Ubuntu Locally With LAMP

- 1. Installing WordPress On Mac Locally With MAMP
- 2. Installing WordPress On Windows Locally With WAMP
- 3. Currently Reading: Install WordPress On Ubuntu Locally With LAMP
We’ve covered how to install WordPress on a Mac and Windows environment. So why should our favorite Linux based OS be left out? Here’s a tutorial that will show you how to install WordPress on Ubuntu. Please note that this installation is valid for all flavors of Ubuntu including 10.02 LTS and later. (If you’re using an even older version, its time for an upgrade!)
For a greater part of the installation process, we’re going to use an excellent terminal based editor called Nano. Chances are your already have it installed. In case you don’t, you can install it by typing the following command in the terminal:
sudo apt-get install nano
There are a lot of codes to be copy pasted. I would recommend copy-pasting them instead of typing them. You could use Ctrl+Shift+V to directly paste the content of the clipboard onto the terminal.
Knowing your Software and Environment
We’re going to use LAMP to install WordPress on Ubuntu. LAMP is an acronym for an open-source software bundle consisting Linux, Apache, MySQL and PHP.
- Apache: This is the web server software that we’re going to use. We could’ve used LiteSpeed or NGINX but they are quite complicated to setup.
- MySQL: This is our database software.
- PHP: It is an open source web scripting language that is widely use to build and run dynamic web pages.
As for our tutorial’s OS environment, I’m running Ubuntu 12.04 LTS x86, with all software updated to their latest version. You are free to use any flavors of Ubuntu, be it Lubuntu, Kubuntu or Mubuntu – the process should be the same. To update your software to the latest version, open the terminal and type:
sudo apt-get update
Installing and configuring the Software:
1. Apache
sudo apt-get install apache2
Press Y and let the installation roll. The following lines mark the end of a successful installation:
Setting up apache2-mpm-worker (2.2.22-1ubuntu1.2) ... * Starting web server apache2 [ OK ] Setting up apache2 (2.2.22-1ubuntu1.2) ... Processing triggers for libc-bin ... ldconfig deferred processing now taking place
2. MySQL
sudo apt-get install mysql-server libapache2-mod-auth-mysql php5-mysql
During the installation, you’ll asked to set a root password for MySQL.
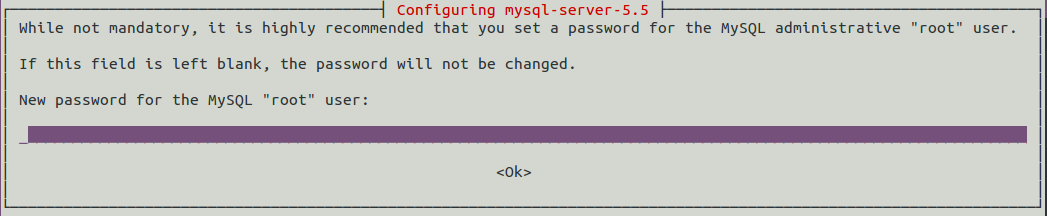
Enter something that’s easy to memorize. Let us use “qwerty” as our password. Once the installation completes, we should activate the database using the following command:
sudo mysql_install_db
The following piece of information comes pretty handy in case we forget our password.
sourav@ubuntu:~$ sudo mysql_install_db<br />
[sudo] password for sourav:<br />
Installing MySQL system tables...<br />
OK<br />
Filling help tables...<br />
OK</p>
<p>To start mysqld at boot time you have to copy<br />
support-files/mysql.server to the right place for your system</p>
<p>PLEASE REMEMBER TO SET A PASSWORD FOR THE MySQL root USER !<br />
To do so, start the server, then issue the following commands:</p>
<p>/usr/bin/mysqladmin -u root password 'new-password'<br />
/usr/bin/mysqladmin -u root -h ubuntu password 'new-password'</p>
<p>Alternatively you can run:<br />
/usr/bin/mysql_secure_installation</p>
<p>which will also give you the option of removing the test<br />
databases and anonymous user created by default. This is<br />
strongly recommended for production servers.</p>
<p>See the manual for more instructions.</p>
<p>You can start the MySQL daemon with:<br />
cd /usr ; /usr/bin/mysqld_safe &</p>
<p>You can test the MySQL daemon with mysql-test-run.pl<br />
cd /usr/mysql-test ; perl mysql-test-run.pl</p>
<p>Please report any problems with the /usr/scripts/mysqlbug script!
This marks the end of MySQL database installation.
3. PHP
sudo apt-get install php5 libapache2-mod-php5 php5-mcrypt php5-gd php5-xmlrpc php5-curl
It is necessary to add php to the directory index, to serve the relevant php index files. This is the first time we’re going to use nano.
sudo nano /etc/apache2/mods-enabled/dir.conf
This opens nano in the same terminal window. Overwrite the contents of the dir.conf file with the following text:
<IfModule mod_dir.c><br />
DirectoryIndex index.php index.html index.cgi index.pl index.php index.xhtml index.htm<br />
</IfModule>
Press Ctrl+O to save and Ctrl+X to exit nano.
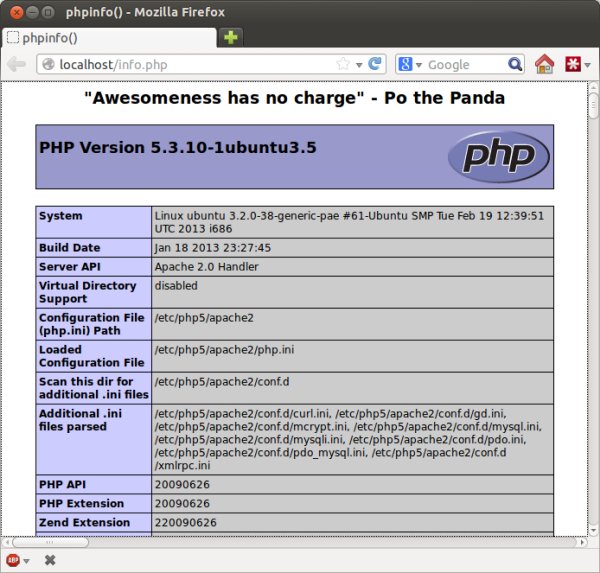
Now we create a test php file to make sure everything is running fine:
sudo nano /var/www/info.php
This should be content of the info.php file:
<?php<br />
<h3 align="center">"Awesomeness has no charge" - Po the Panda</h3><br />
phpinfo();<br />
?>
Restart the Apache web server by typing the following command:
sudo service apache2 restart
Open your browser and type the following URL:
https://localhost/info.php
And you should get something like this:
This concludes our preliminary setup.
Setting up WordPress
Part 1: Download and installation
Run the following commands in the terminal.
cd /var/www<br />
sudo wget https://wordpress.org/latest.tar.gz<br />
sudo tar -xzvf latest.tar.gz
This set of commands downloads and extracts the WordPress files inside the www directory (that’s the base directory of the Apache webserver). The installation of WordPress is accessible under https://localhost/wordpress.
Part 2. Creating a new MySQL database
We will now create a new MySQL database called “wpubuntu”. Remember we set the root password to “qwerty” in our tutorial. Let us login to the MySQL terminal:
mysql -u root -p
Enter your root password and the MySQL terminal should open, which is indicated by the prompt “mysql>”.
Next, we type the MySQL command for creating a new database:
CREATE DATABASE wpubuntu;
Followed by:
FLUSH PRIVILEGES;
And finally we exit the MySQL terminal by entering:
exit
Here is an overview of the entire process:
sourav@ubuntu:/var/www$ mysql -u root -p<br />
Enter password:<br />
Welcome to the MySQL monitor. Commands end with ; or \g.<br />
Your MySQL connection id is 44<br />
Server version: 5.5.29-0ubuntu0.12.04.2 (Ubuntu)</p>
<p>Copyright (c) 2000, 2012, Oracle and/or its affiliates. All rights reserved.</p>
<p>Oracle is a registered trademark of Oracle Corporation and/or its<br />
affiliates. Other names may be trademarks of their respective<br />
owners.</p>
<p>Type 'help;' or '\h' for help. Type '\c' to clear the current input statement.</p>
<p>mysql> CREATE DATABASE wpubuntu;<br />
Query OK, 1 row affected (0.00 sec)</p>
<p>mysql> FLUSH PRIVILEGES;<br />
Query OK, 0 rows affected (0.00 sec)</p>
<p>mysql> exit<br />
Bye
Now you have successfully created a new MySQL database ready to be used by WordPress.
Part 3. Configuring WordPress
Open the following URL in your browser:
https://localhost/wordpress
You should see this image:
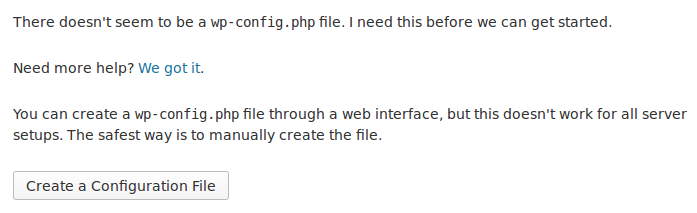
Click on Create Configuration File, followed by Let’s Go in the next step. In the 3rd step, enter the details as follows:
Database Name: wpubuntu<br />
User Name: root<br />
Password: qwerty (or whatever password you've used for the root user)<br />
Database Host: localhost<br />
Table Prefix: pxa_
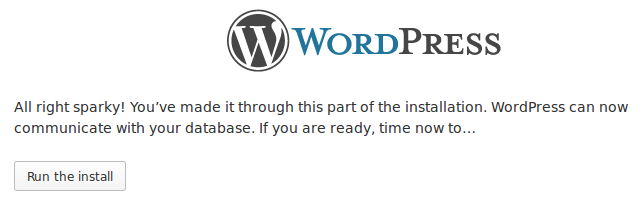
Click on Submit. If you’ve followed the steps correctly, you should get this message:
In the following step, setup your site title, user and password. I would recommend un-checking the “Allow search engines to index this site” box since we don’t want our offline/experimental site to be crawled by search engines.
And voilà, you have a fully working offline installation of WordPress on Ubuntu!
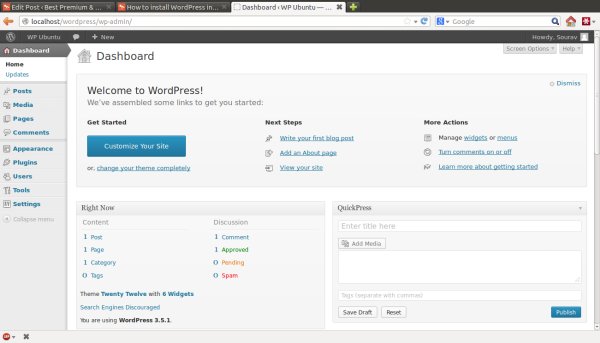
Happy blogging!


someone will need to change the group permission of www directory to www-data maybe. So, Apache2 can read or execute it properly, Me always change it to :
$ sudo chown my_username:www-data -R /var/wwwHey, thanks for the great tutorial. It helped me install WordPress locally.
You rock. Totally rock in the utmost Heavy Metal way. Like Tool, rock. Thank you for putting in the details that so many other people used to using Ubuntu forget. Little details that if they are not there leaves maroons like me sitting here with a stupid look on our faces all night… I’m your new biggest fan! Seriously. I might even blog about you… Thanks, Sourav.
Wow, I’m honored mate. Glad I could be of assistance.
\m/
Thanks for the tutorial
Very useful post, thank you. I did run into a few minor issues, but I was able to overcome them not being a total n00b, but the me of a few months ago would not have been able to.
The trouble I encountered revolved around the nano If module and creating the info php file – also you say create one called “test” but have us open one called “info”. Still, very awesome post. Thanks.
This is a great tutorial and I was able to follow it to the end. My only issue is right at the end and I’m hoping someone can help me.
In part 3, configuring wordpress, when I go into the browser to configure it, I get the below error message. How do I fix this?
Sorry, but I can’t write the wp-config.php file.
You can create the wp-config.php manually and paste the following text into it.
Hi Carmen,
There is a very simple fix for this. I’m assuming you’re running Ubuntu Desktop. Here’s what you do:
Go to your WP installation folder. In all probability it’s going to be present inside the ‘www’ folder.
Now right-click on it, and goto Permissions and set it to 777, i.e. check all of the boxes.
Here’s the important part. Make sure you check the option where all the files and sub-directories are also assigned with the same permissions.
You can also do this via command line (CMD):
[code]cd "/your/www/directory/"
sudo chmod -R 777 "wordpress-folder"[/code]
Perfect tutorial. Thanks.
carmen you can also use nano to create the file in terminal with the code : (remove quotes) “sudo nano /var/www/wordpress/wp-config.php”
one other thing i’d like to point out is that for some strange reason, my phpinfo test file wasn’t working with that h3 tag in there, but when i removed it it was just fine.
Great tutorial, thank you!
I have a problem, though: when I try to install new themes I’m asked for my hostname, FTP user and FTP and… I don’t know these credentials!
I searched for information online but I wasn’t able to find anything really related to a local installation of WP. Any help, please?
*FTP password, sorry
Sounds like the permissions aren’t set correctly either for your files and/or user.
Hi Simona, there’s a quick fix for this. I’m assuming you have a GUI based version of Ubuntu and that WordPress is installed under /var/www/wordpress
Simply goto
[code]/var/www/wordpress/wp_content/themes/[/code]
using the File Explorer/Manager and extract your themes here.
And as for plugins, goto:
[code]/var/www/wordpress/wp_content/plugins/[/code]
and extract the plugins there.
Make sure to extract the folder and not the files of the plugin/theme in the respective directories.
As for “why” the problem is happening; might be because of some improper configuration, or as AJ pointed out – permission error.
Let us know if this worked for you!
Hi, thanks for both your replies.
@AJ I think that is exaclty the case, but – after a bit of research – I still couldn’t figure how to set them correctly so…
@Sourav …I extracted themes and plugins directly in the wp_content folder and it worked 😉
thanks again
Glad it worked out! 😀