Installing WordPress On Mac Locally With MAMP
- 1. Currently Reading: Installing WordPress On Mac Locally With MAMP
- 2. Installing WordPress On Windows Locally With WAMP
- 3. Install WordPress On Ubuntu Locally With LAMP
Since I’m still learning when it comes to WordPress theme development, I wanted to share my experiences with all of you. I know there are lots of other people out there just beginning their WordPress journey and thought you might have some of the questions (or run into a few of the problems) that I have.
This is the first in a series of posts that will cover basic WordPress theme development from start to finish. I hope you’re able to learn something from these posts – even if it’s something small.
Installing WordPress on a Mac
I recently released my very first WordPress theme, but before I could start coding I had to get my local host up and running.
Below are the steps I used for locally installing WordPress on a Mac. Why am I only writing about local installation on a Mac? Because that’s what I have. If I ever install WordPress on a PC I’ll be sure to update this post. So for those of you with Macs – let’s get started!
Download & Setup MAMP
I recommend using MAMP for local installations of WordPress on a Mac. First things first, you need to download MAMP (Mac Apache MySQL PHP) which you can get for free from their website by clicking on the nifty button below.
Once you have it downloaded, install MAMP like any other program by dragging the folder into your applications folder.
MAMP Settings
Now that you have Mamp installed on your computer you will have to to adjust your default MAMP settings.
- First you’ll want to open MAMP, and you should get a start up (see img below -left)
- Click on the “Preferences” button.
- This should open a second screen (see img below – right)
- Click on the “Ports” button to update the values selected.
- It’s recommended you use 80 for your Apache Port and 330 for your MySQL Port.
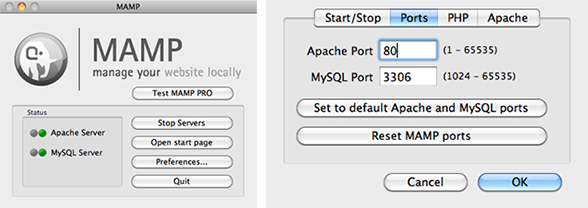
The adjustments to the ports will allow you to exclude the port number from your localhost URL and protect your local host respectively. Even thought using port 80 requires you to enter your admin password each time your start your servers, it really doesn’t bother me and it makes me feel more secure about my secret theme creations.
While you’re in your preferences you’ll also want to set your PHP to the latest version and choose a document root location for Apache (100% your choice – I made a new folder in my docs just to keep things organized).
Servers/Database
Now it’s time to start up your servers and add a database.
- >Open Mamp
- Click on “Start Servers”
- You will see a welcome screen such as below
- Click on phpMyAdmin
- You should be taken to a new screen where you are given the option to create a new database. Think about what you want to name your database. Test, wordpress, wp, wpdev – whatever works for you (just remember the name because you’ll need to use it for another step later on).
- Enter the name and click create.

Bam! You are now all set up to install WordPress locally! Look at you – being all tech savvy.
Download WordPress
WordPress is famous for their easy installation. To start – download the latest version of WordPress from their site by clicking on the button below.
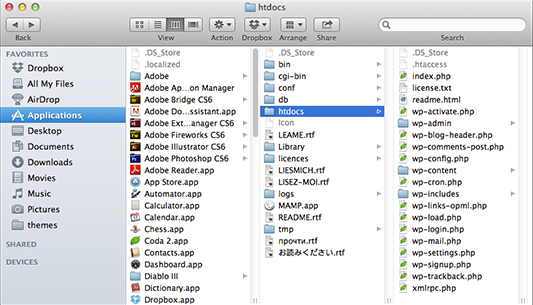
Once downloaded, double click to extract the folder. Open the “WordPress” folder and drag all of the other contents into your Applications/MAMP/htdocs folder.
Step 1: Edit Your Hosts File
 This is an important step to be sure you can later enable multisite. In order for mutlisite to work, you need to remove the post number from the localhost URL. So we are going to map a brand new URL to our localhost. First open Terminal and type the following:
sudo nano /private/etc/hosts
You might be prompted for your admin password, so just type it and hit enter. Then you will be taken to the screen below. Use the down arrow to go to the bottom of the list and add (with a tab in between, and where “test” is the name you gave to your MAMP database):
127.0.0.1 test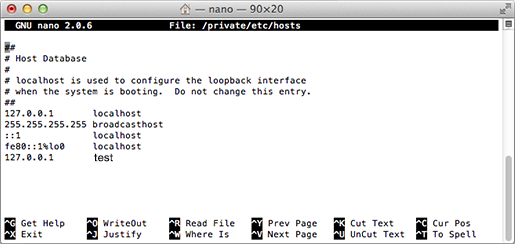
Hit “control + x” to exit the menu. Make sure to enter “Y” when asked to save your changes.
Step 2: Edit wp-config-sample.php
Go to MAMP/htdocs and rename the “wp-config-sample.php” file to “wp-config.php” and open it up. Now edit the files using the name of the database you created as well as “root.”

Save the file. Now go to your home directory (which should be https://whatever-your-database-name-is) and follow instructions to complete installation.
Step 3: Complete The WordPress Installation
When your local host URL, you should see a screen such as the one below where you will enter your main info for your WordPress installation. Fill out the form and hit “Install WordPress”.
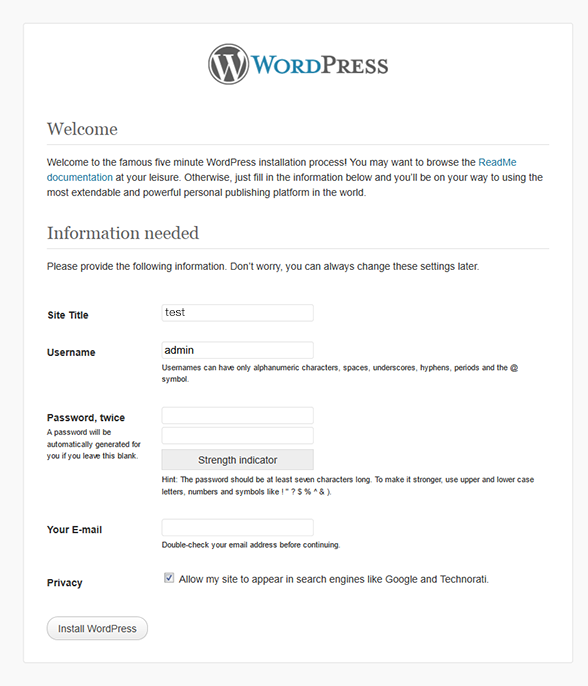
Now you should have WordPress installed locally!
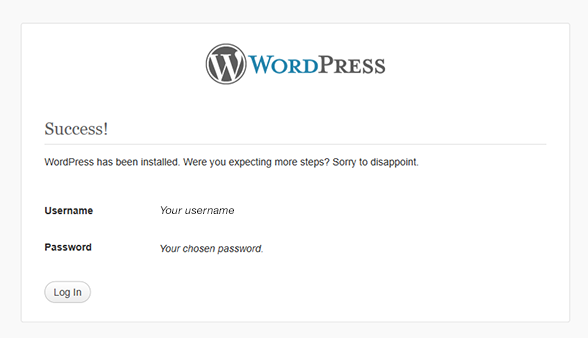
Setup A Multisite WordPress Installation
Multisite is a great functionality you’ll want to use with your localhost when developing WordPress themes. This way you can create many test site environments where you can immediately see changes you make to your themes without having to use a live site. There is no time like the present to install multisite, and since you have a fresh WordPress install from the steps above there is nothing to backup (but if you choose to enable multisite at a later time, you should backup your site before starting this step).
Show Hidden Files – Important!
Part of Multisite will include editing the .htaccess file which happens to be a hidden file. I spent a while looking for it, then felt like a complete noob when I finally realized it was hidden. Open Terminal again and enter the following code to show all hidden files:
defaults write com.apple.Finder AppleShowAllFiles true

killall Finder
This resets Finder to show all of your naughty hidden files, and will give you less of a headache when we move on to later steps.
Edit wp-config.php
Open up your wp-config.php file again. Now we’re going to add in the following code to turn on WordPress’ step-by-step instructions for adding multisite:

WP Install Network Settings
Make sure your MAMP servers are running. Now login to your localhost site. Under tools, there should be a network option. Here you can choose to use sub-directories or sub-domains (I used sub-directories but that’s just my preference) and continue with network setup. The next page should ask you to add a site name and admin email.
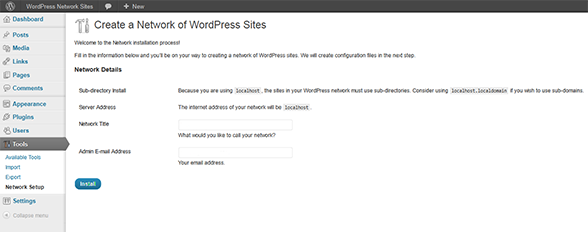
Then click install and let WordPress work it’s magic.
Edit .htaccess and wp-config.php files
Next you should be presented with a screen similar to this one:
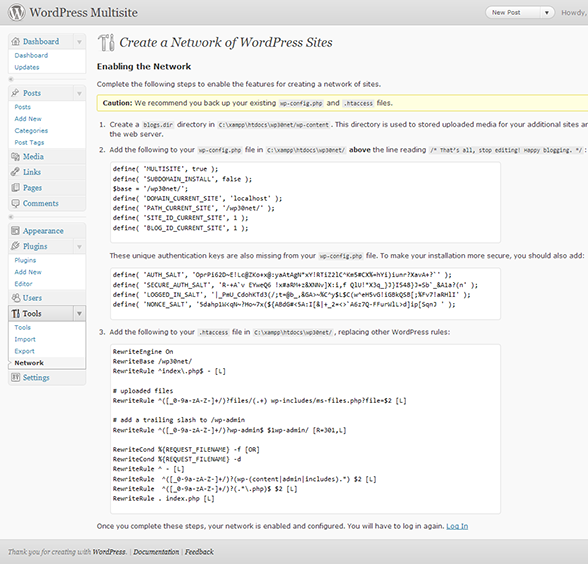
Just continue to follow the directions. You used to have to create a /blogs.dir file in your wp-content folder, however it appears that with WordPress 3.5 you no long have to do this step (I didn’t do it, and haven’t run into any problems yet ;-). Open up the wp-config.php file and paste in the related code:

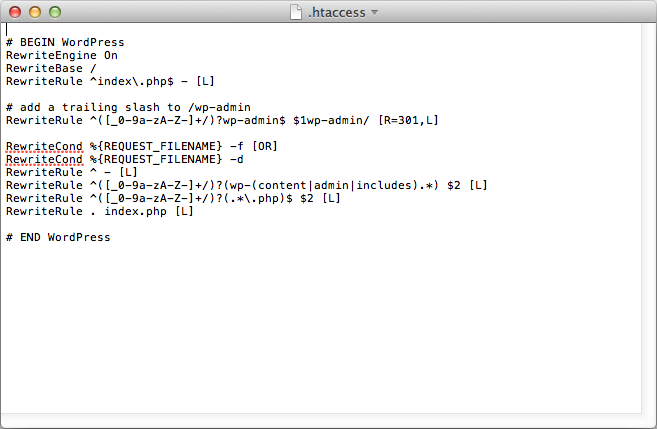
And do the same with the .htaccess file (which you made visible in an earlier step):
Add Sites To Your MultiSite
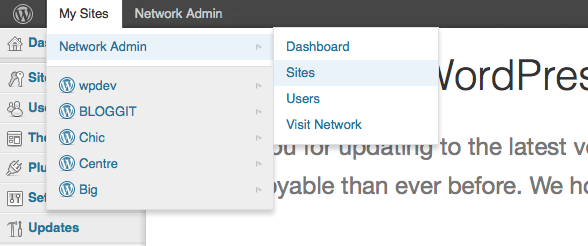
Now all you have to do is log back into your WordPress dashboard and go to “My Sites,” network admin and then sites to add new ones.
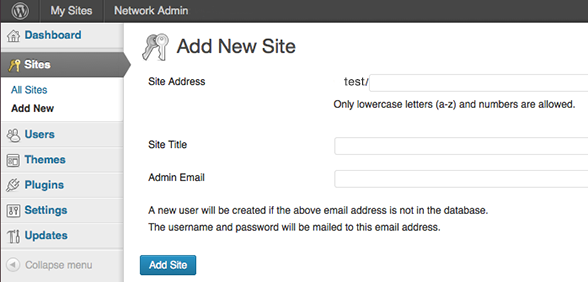
From here you can add you desired site name, title, and admin email.
Success! You can now install any network enabled themes on your new site(s) for testing. Create as many or as few sites as you’d like and get developing!


I want to recommend a fantastic tool I am now using after switching from MAMP. It’s DeskTop Server. (http://serverpress.com/products/desktopserver/) I don’t want to sound like an advertisement but it saves me a ton of time and makes it simple to create development sites locally. (and so much more.) They have a free version(3 sites) and a paid for only $50. It works on both PC and Mac. Support by the developer is excellent!
Hello Mr. Advertisement 😉 This looks like a pretty decent service, I’ll have a closer look when I get some time (as if).
Thanks for a detailed, clear description. I teach wordpress but I do it from a PC. I’ll reference this (and your blog) for students who use Macs. Best Wishes,
dawn
Thanks, Kyla, this helped me!
Didn’t see this post why I posted on the one about WAMP. I have used MAMP but have now switched to AMPPS http://www.ampps.com/ It is easier to install and set up – no terminal use, no editing of .php files – everything is down by a click and to get multisites is just a click in a box.
No, I’m not associated with AMPPS or Softaculous who provide this free services, just a very happy user
Looks like a nice software, thanks for sharing Karin!
I cannot get to STEP #3…. I completed Step#2… But I am not seeing the WordPress Screen pop up and it is killing me…. I am on a MAC running Mountain Lion… Is there something different here with this OS? Please help??
Hi Thomas! I’m running OS X Mountain Lion and everything seemed to be okay for me… There is no automatic popup, but when you open a browser window and enter the URL for your localhost (which for me happens to be http://test because I named my MAMP database “test”) the WordPress installation completion screen should come up.
If nothing is coming up when you go to your localhost URL I would suggest going back and double checking that your MAMP servers are running, making sure that all of the files from the WordPress download are in your htdocs folder, and look over your wp-config.php file to make sure that you used the correct database name.
Another possibility is that the port you are using for your localhost is already being used by another program (like skype). So make sure that both your Apache and MySQL servers are green/running when you start MAMP.
I hope this helps!
This part= “Now go to your home directory (which should be http://whatever-your-database-name-is) and follow instructions to complete installation.” <—- Does not make sense to me… What is 'my home directory'? HTTP:// myWordpress data base name? I tried it and nothing comes up…
I think I may have answered this in my other reply, but I just meant to go to your localhost URL (which for me is http://test) Sorry for the strange wording 🙂
Combine a locally run WP installation with CodeKit and LESS…BAM, mind blow, world changed.
+1 for ServerPress.com’s DesktopServer.
Kyla, I have been struggling with MAMP on Mountain Lion all morning and these instructions worked like a charm – many thanks. Great tutorial!
Actually, I have to amend my previous comment. (And this is not a criticism of the tutorial, which does work exactly as outlined.)
I got WordPress and multiple sites running on MAMP, however, when I tried to modify themes the WordPress dashboard threw all kinds of errors about changing the header. After spending hours troubleshooting MAMP I was done, so I uninstalled it and tried DesktopServer instead.
It’s like night and day. I was up and running in a few clicks. I’m developing two WordPress sites and I can keep them both open in a browser and tab between them.
I remember MAMP working just fine on Snow Leopard; maybe there’s some issue with it on Mountain Lion? Not sure.
After i enter my go to the directory and enter http://my-database-name, there is no instructions, the only thing i see is Index of /
Can someone help!
Unfortunately its nearly impossible to help with this issue…it can be sooo many different things. Try browsing the web to see if you can find a solution, really in order to help you I would have to be there sitting with you.
Great Tutorial! Made it 🙂
Thanks a lot!