How To Setup CDN77 for WordPress
Previously we explored the benefits of having a CDN service with WordPress and why CDNs are one of the best ways to speed up WordPress many times before on the blog. We observed how much the performance increases if your visitors are far away from your host server. We hope that sparked your interest because in today’s article we are going to do a step-by-step guide on how to create a CDN resource at CDN77 and how to properly tweak it. After that, we are going to install a specific set of plugins on WordPress and then check if everything is working fine.
The first step on our guide will be to create a CDN77 account. In case you don’t have an account yet, CDN77 offers a free 14-day trial. The registration takes only a few minutes. Then we will actually create a CDN Resource by clicking on Create new CDN Resource (under the CDN tab). For the purpose of this article, we are going to implement a CDN on a movie blog that is hosted on a Datacenter in Las Vegas.
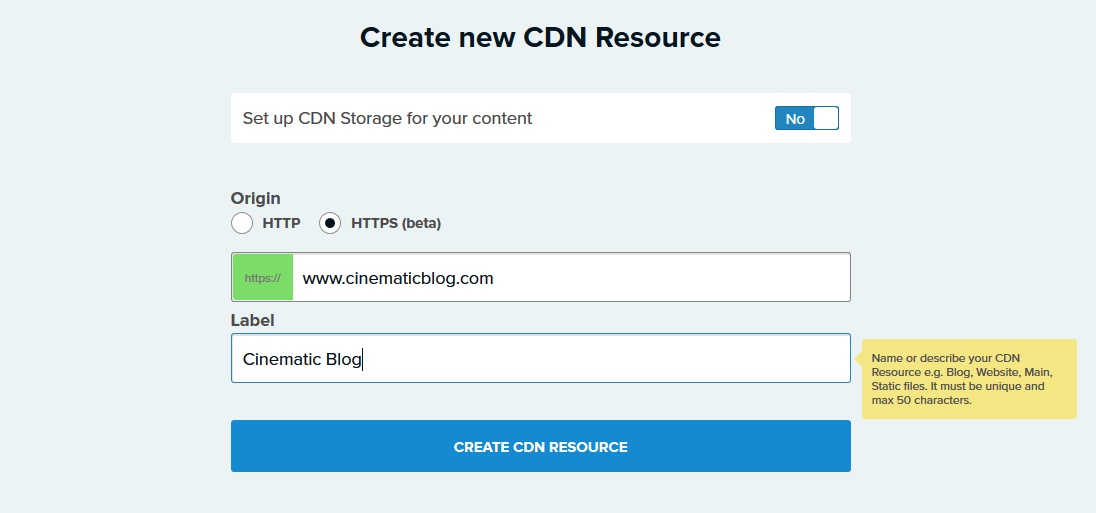
Since we are going to implement a full HTTPS solution, we will use the new “HTTPS” at CDN77. This option secures the data transfer from your host server to the CDN server.
If your site runs in an SSL mode, you absolutely need to create an SSL only resource at CDN77. Otherwise, you risk mixed-content errors. This kind of errors occurs when the browser is running in an SSL mode and suddenly tries to load a resource through an insecure HTTP request.
How to Setup an SSL at CDN77
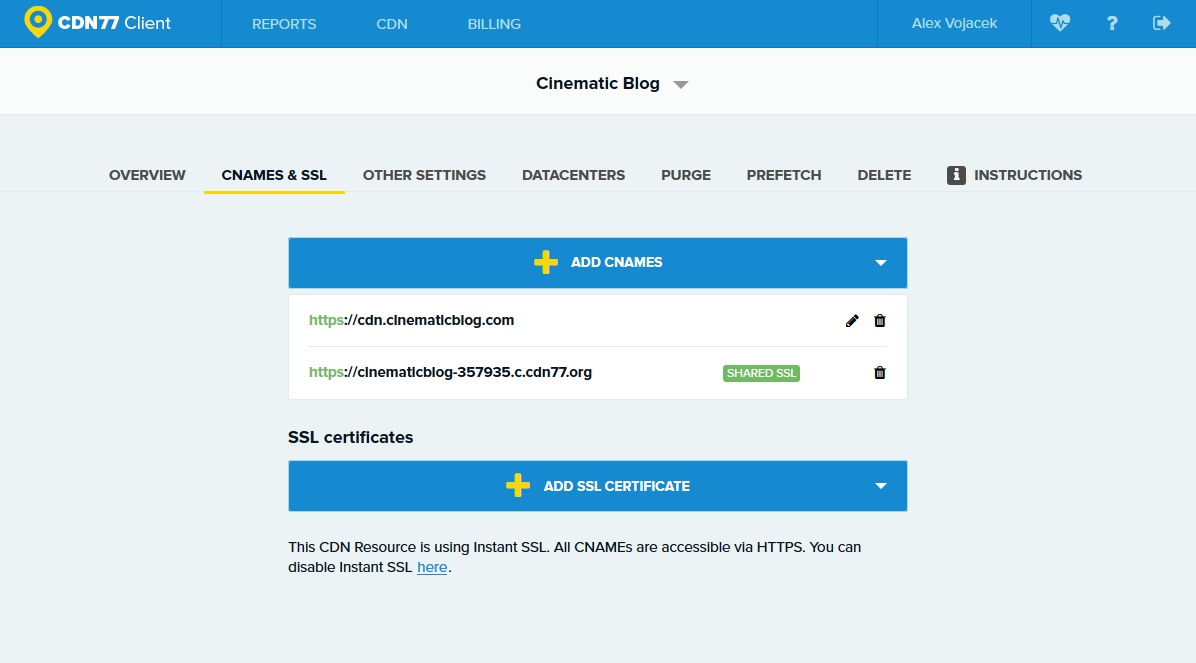
We can set up a free SSL certificate in 2 ways. We can either use a shared SSL certificate for a subdomain at xxx.c.cdn77.org or we can use our own CNAME (see the picture above). In general,we encourage to use a CNAME like cdn.yoursite.com.
If you go for the CDN77 shared solution, no further steps are necessary for the SSL subdomain to function properly.
In this case, we will set up a CNAME. This means that our website’s content will be accessible via HTTPS instantly if we replace our site with cdn.ourdomain. With CDN77, obtaining an SSL is a matter of few clicks.
Tweak it !
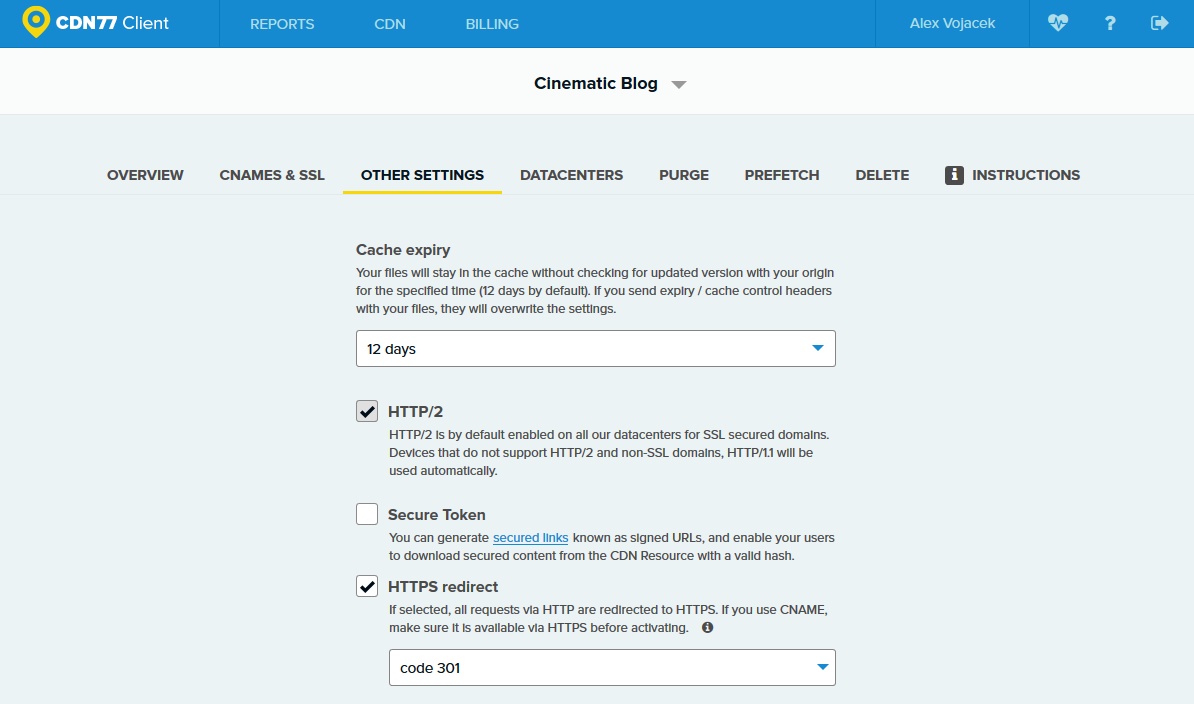
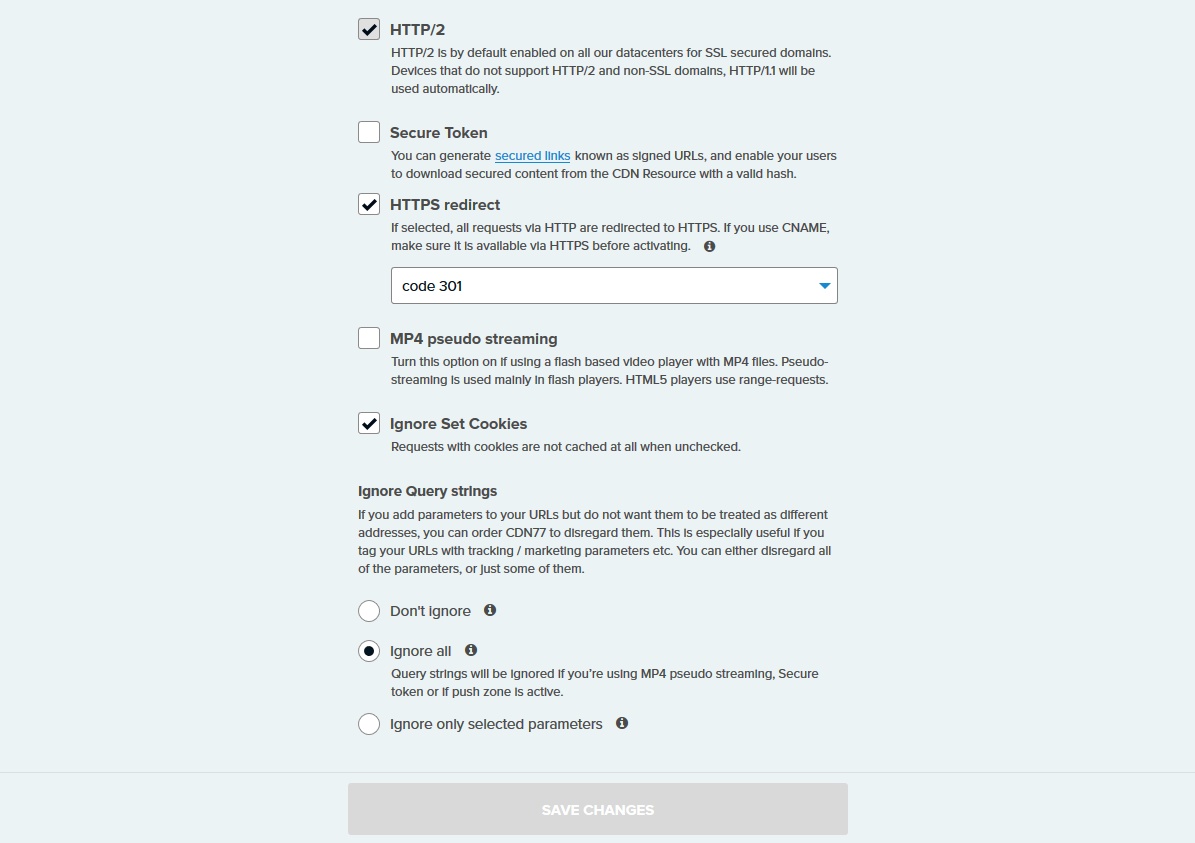
Once you create the resource, the first thing to look at is the Other Settings menu. If you’re going to use HTTPS, it is absolutely mandatory to keep HTTP/2 enabled. The speed improvement between normal HTTP/1.x and HTTP/2 is enormous. CDN77 will work at HTTP/2 mode in your HTTPS resource by default, cutting your time in half.
If you’re going via HTTPS, you also need to do a redirect 301 to comply with google standards for HTTPS, enable HTTPS redirect.
For the optimal performance, enable ignore all in the Ignore Query Strings. Unless your site is running dynamically loaded content that needs to be updated on an hourly basis, you can get away with the query strings and ignore all, this will tremendously increase the cache & site performance.
CDN77 also offers Cache Expiry option. In case you load a lot of pictures, this should be set to the highest setting possible, which is 12 days.
In this guide, we will consider speed in the first place. CDN will hence provide us only with the image static content, everything else will be loaded from the origin server.
Why not use CDN for Javascript & CSS, are you nuts?
Remember in our previous article, we talked about how CDN performance can vary when the content is not available on the requested node of the CDN network. Well, if the file not yet cached happens to be a CSS file, the load time will increase and it may impact your performance negatively. This might affect your site rendering speed much more than if you decide not to serve CSS with CDN.
CSS & Javascript files are vital for website loading on any browser and they shouldn’t be a subject of a cache mechanism like the one in CDN services. Although, you can create a static resource onto the CDN to dump this important files. This is a more advanced technique that will require you to tweak your WordPress to a level beyond the scope of this tutorial.
Once we have everything properly tweaked, we can proceed to the datacenters menu tab.
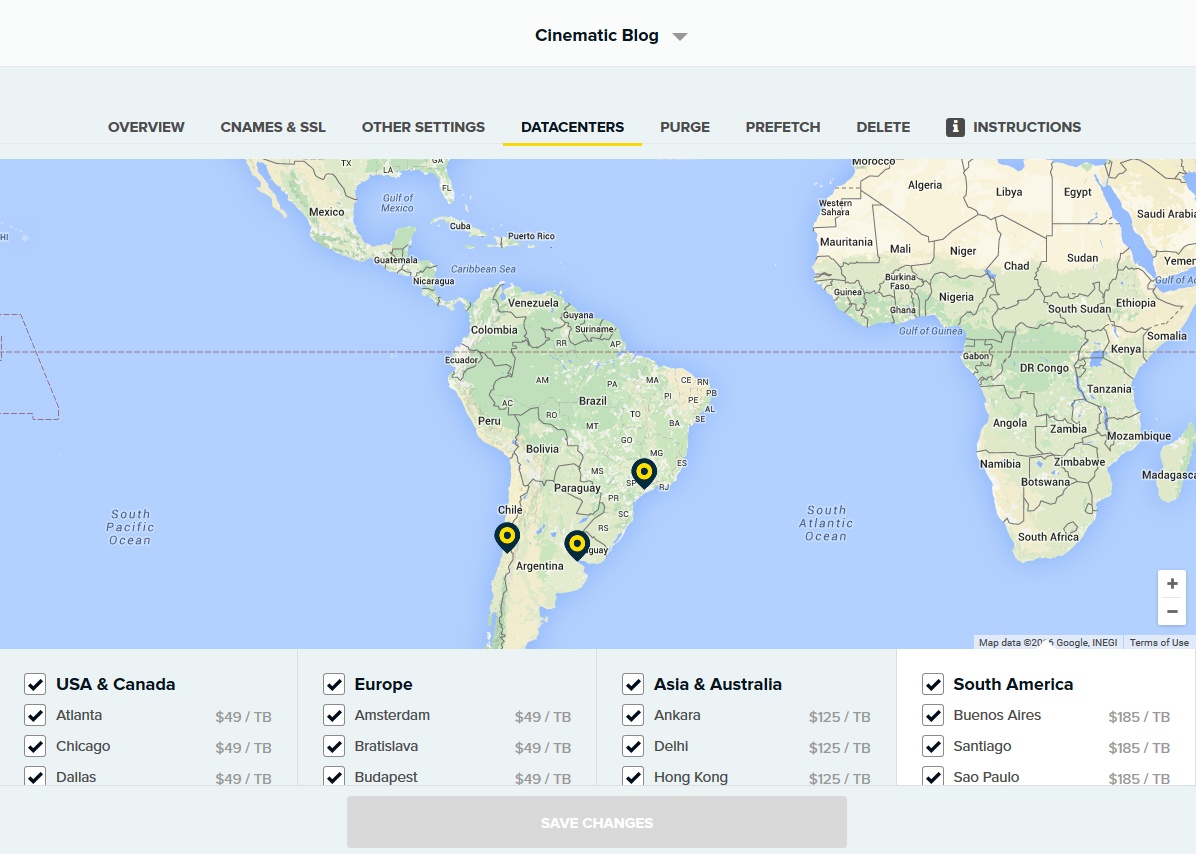
CDN77 provides a convenient way to enable/disable each node of their network. The point is to carefully select which nodes are the most actively used. This is easy to find out, just follow your readers.
Once you know which nodes you need, you are advised to disable all dispensable nodes. There is a simple explanation for this: The more nodes you have on your network, the more time it’ll take to update them all, hence, your performance suffers. As a general rule, when you reduce the number of nodes, you’re also increasing the cache performance. Choose wisely.
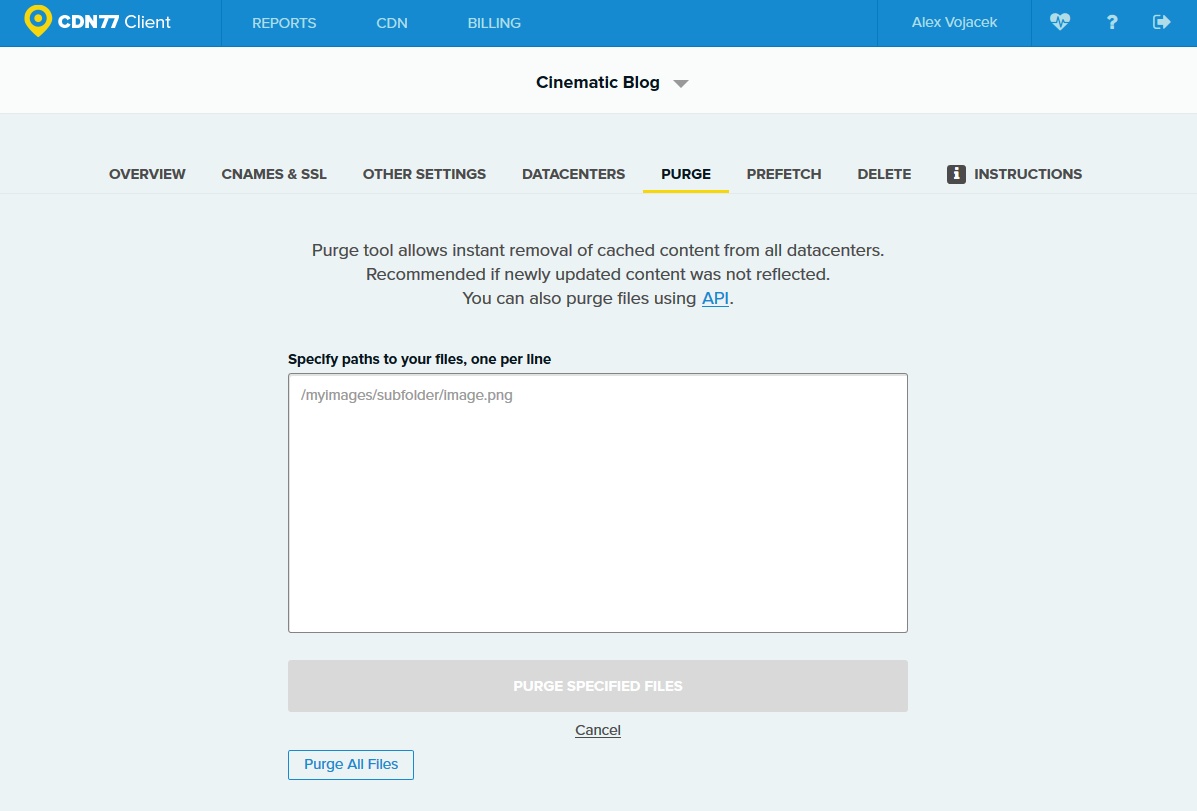
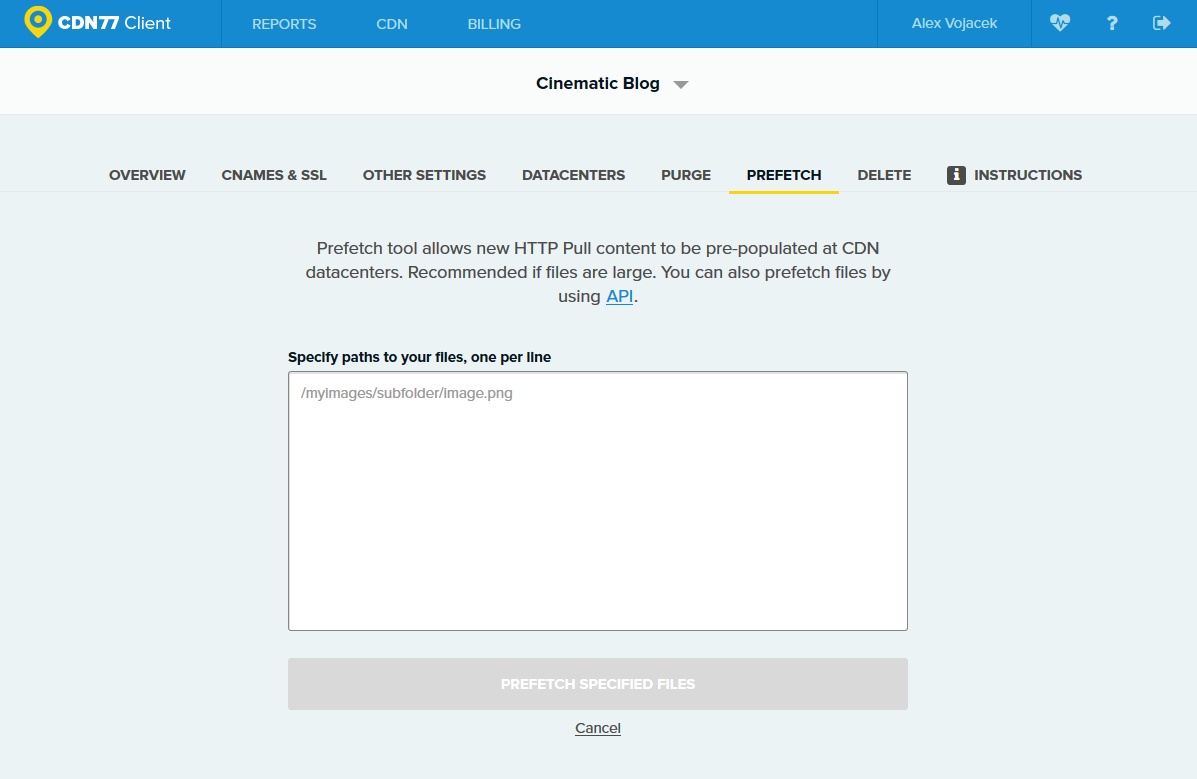
When you’re testing your site performance for the first time, purge and prefetch could be handy. Purge will push a specific content out of the CDN network, it’s handy if you change the content and need to flush the cache to update. Prefetch will do the opposite, it will force a specific content into the CDN cache.
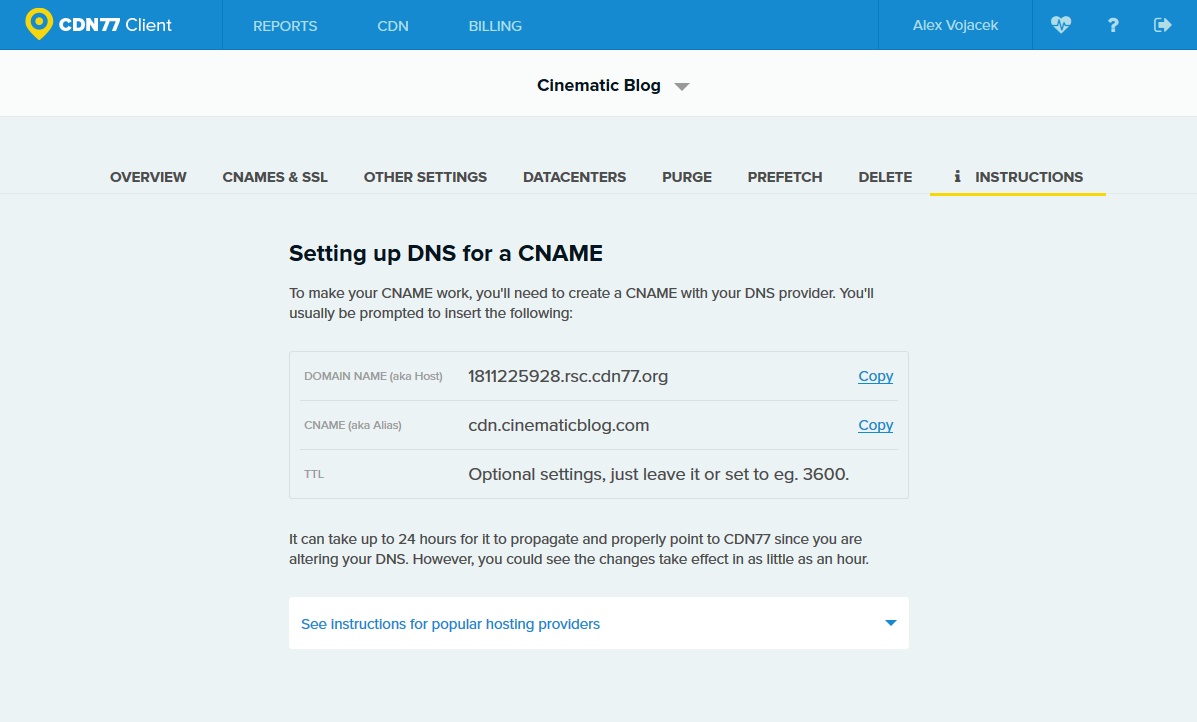
Once you have everything configured, you can point your CNAME to your own domain. In order to do that, you must create a rule in your registrar or your hosting panel in the DNS section and point your cdn.yourdomain.com to CNAME xxx.rsc.cdn77.org as shown in the picture, this will instruct the DNS to redirect all your subdomain’s traffic to the actual place it needs to be. Don’t worry, it won’t impact the performance. Additionally, it also serves the purpose of showing your readers that you’re using a cdn.yourdomain.com which looks fancy.
If you prefer to use the cdn77.org address, you don’t need to do anything, just use that address when replacing your content in WordPress.
WordPress Side
On the WordPress side, we need to add a plugin for this to work properly. We are going to use the CDN Enabler, a handy free plugin. The reason to use this plugin is simple – the majority of CDN plugins won’t allow such granular control over the folders you send to the CDN. This plugin does and it’s very important for our case since we don’t want to include any Javascript or CSS files, just the uploaded images.
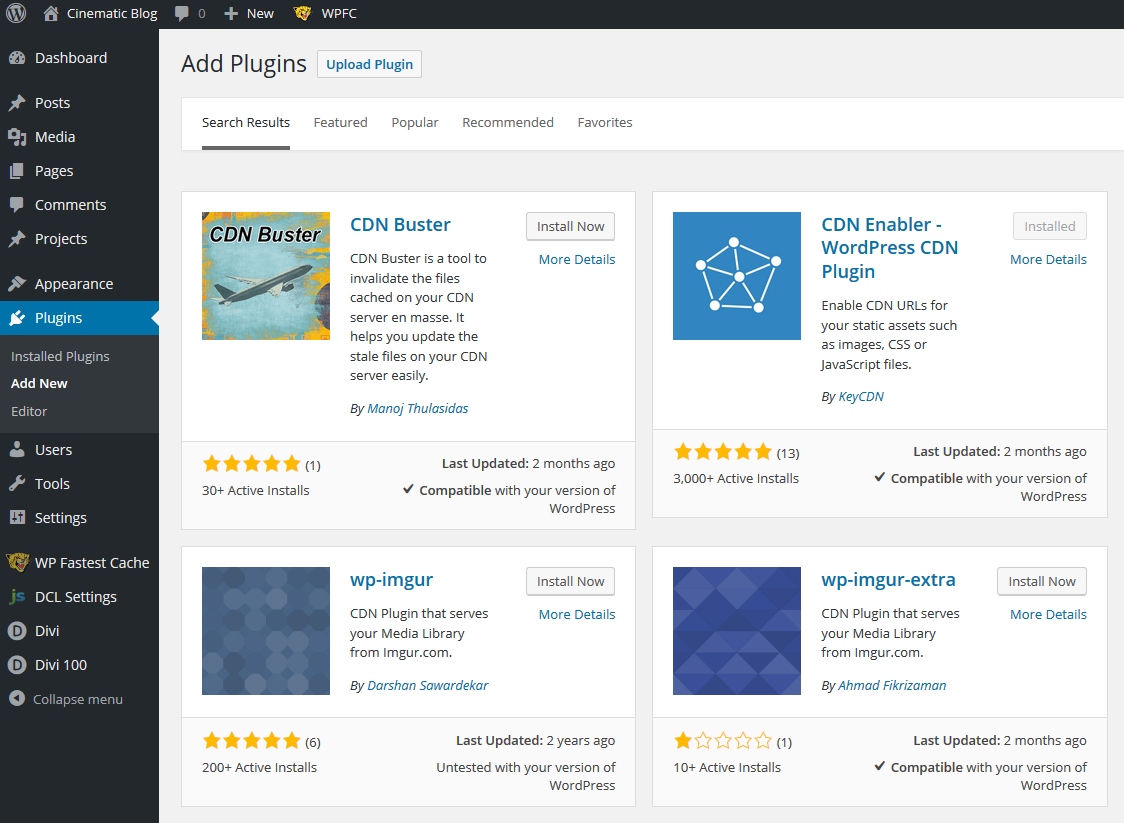
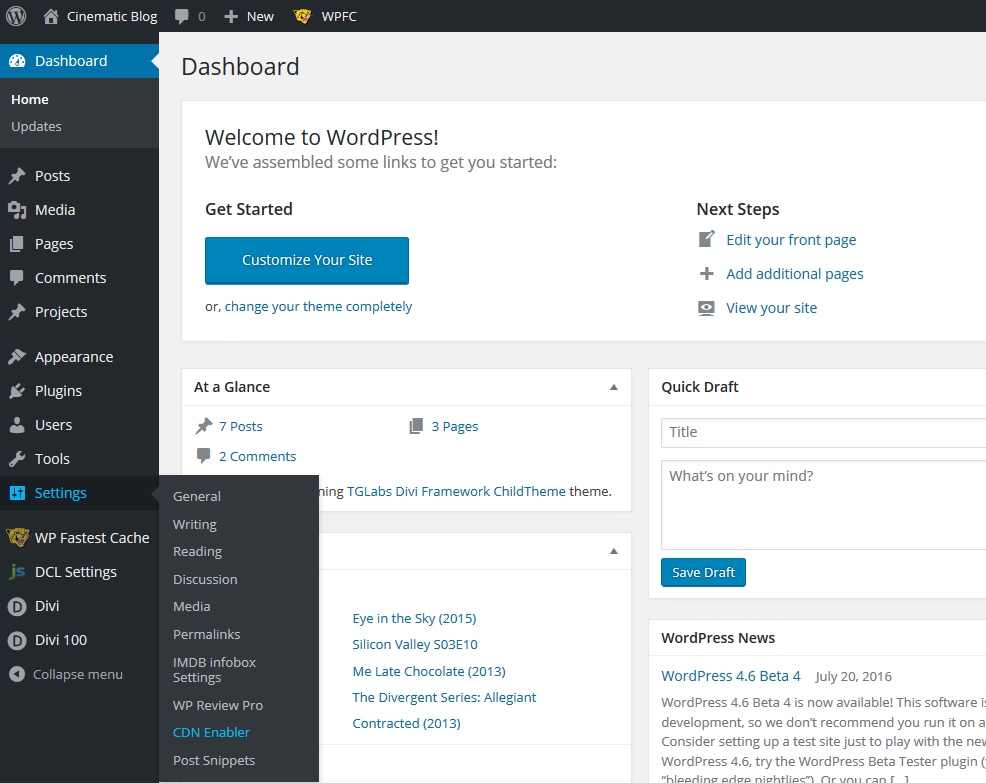
Once installed, you can find the plugin right here…
Let’s tweak it !
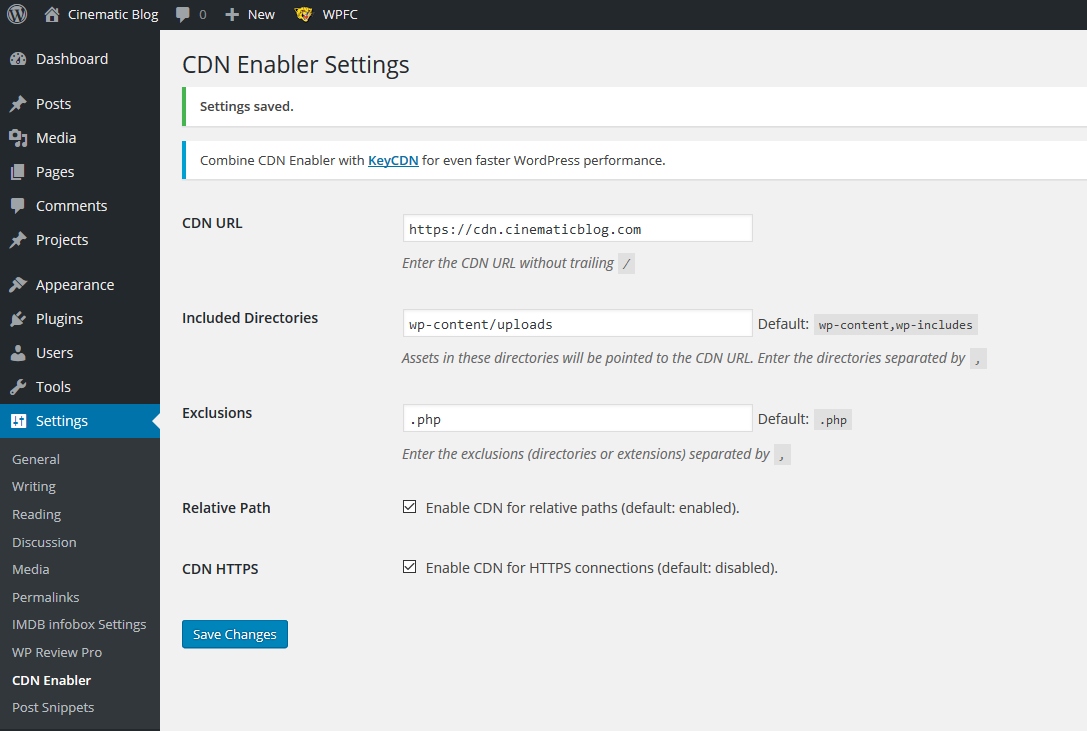
Remember when we talked about customization? Here’s the most important fact about how to properly setup a CDN on WordPress. The vast majority of CDN plugins will tell you to include a directory for the CDN to “replicate” and they usually tell you to include wp-content. That’s fine for a general setting but it’s not good for your performance because the wp-content folder is filled with another very sensitive folder, the plugins and themes folder, including tons of Javascript & CSS files. You may lose performance when they aren’t cached as discussed earlier.
So, how do we fix this? We simply include the folder wp-content/uploads. Such a simple solution!
Shocked as you may be, the vast majority of plugins that handle CDNs will not allow you to do this. Including solely this subfolder will instruct your CDN to your upload folder, i.e. your pictures only.
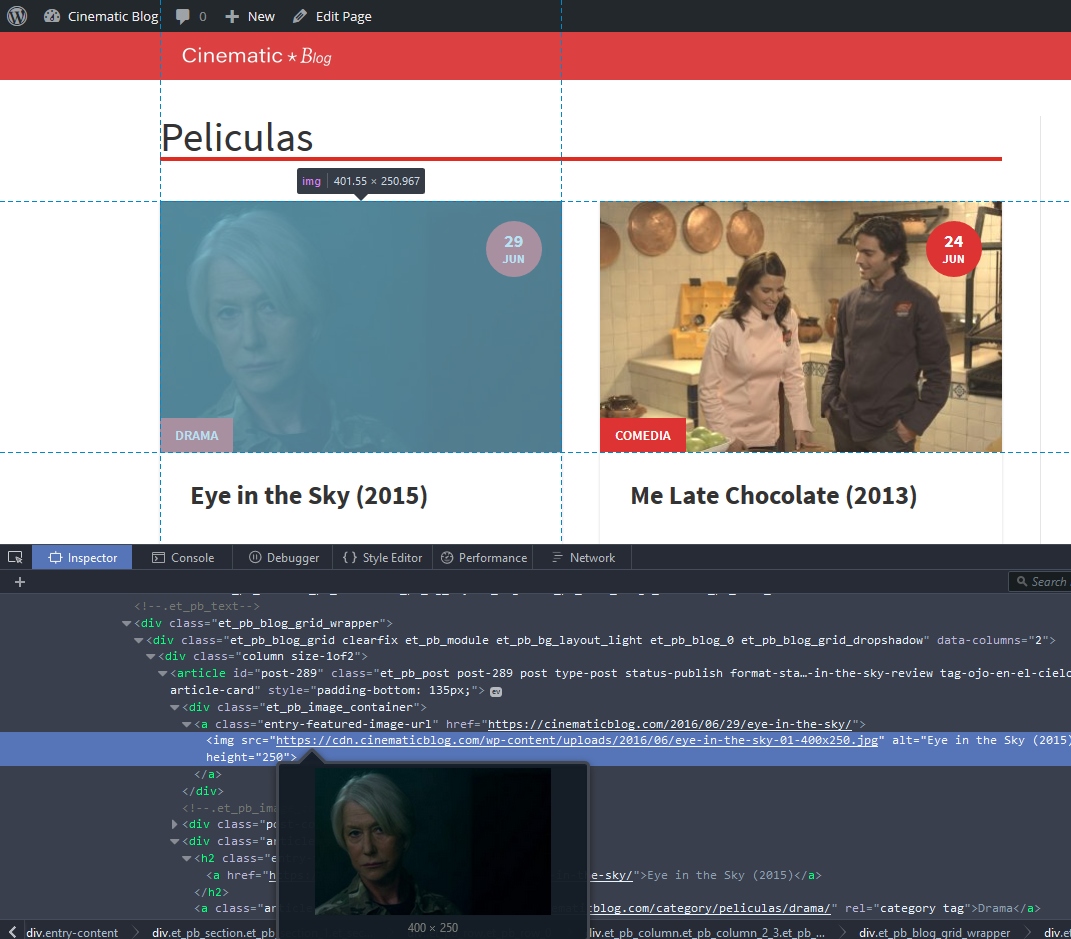
A simple refresh of the site will allow the CDN to get the contents for you. In this example, we opened a Firefox Developer Tab (F12) and searched for the first image. You can see clearly that the link was replaced and it’s now being loaded directly from the CDN instead of our host server!
Before and After
Let’s see how all this turned out !
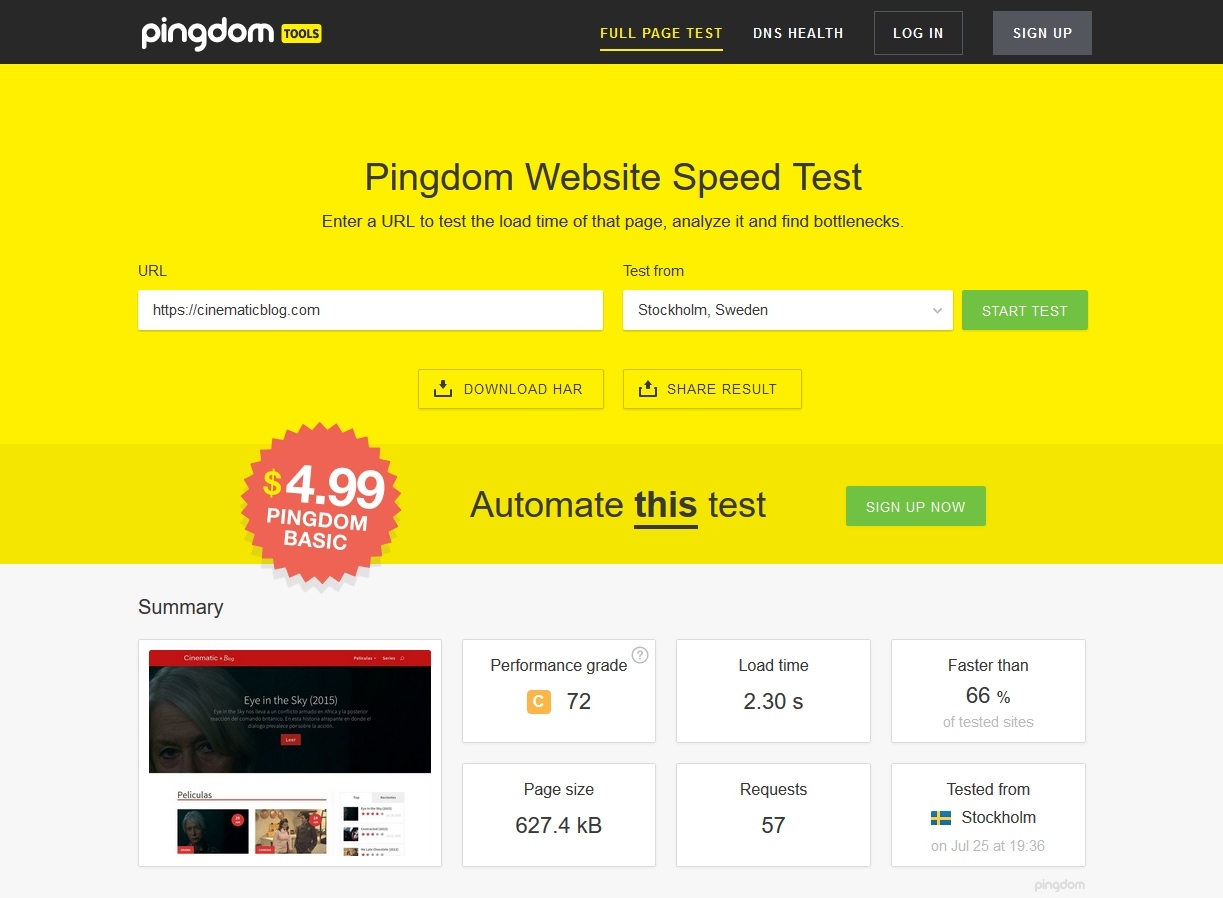

In the left screen, we can see the time it takes to load the site from Sweden (which is far away from our host server in Las Vegas, remember?) In the right screen, we can see that the performance increased, the time was almost cut in half! All the essential files are still loading from our server in Las Vegas but the heavy burden files, like the images are loading from the node in Sweden.
Wrapping Up
Hopefully, you learned a powerful way to implement a CDN into your WordPress site. Some technics are non-intrusive such as those CSS & Javascript files that are essential for site loading speed. You can now leverage every advantage of a CDN and at the same time minimize its drawbacks. We hope you’ll give the free CDN trial a go and use the tips in this article to see if you can speed up your WordPress site. We hope you enjoyed the article! As usual, leave any questions or doubts in the comments below.