How to Accept User Submitted Posts in WordPress


As an entrepreneur, you’re always looking for new opportunities to expand your business and generate sales. Having an effective and high-quality content strategy is one way you can increase your reach.
The most straightforward way to implement your content marketing plan is in-house. However, it’s not the only option. You can get people to submit content to your site. It’s a marketing strategy used with much success by sites like Business2Community.
Having users submit content is a great way to build a community and increase the volume of content you produce. This guide will walk you through how to optimize your WordPress site so you can accept user-submitted content.
Option 1: Create a Submission Form
One of the easiest ways to accept user-submitted posts is through a submission form. You can use pretty much any WordPress contact form plugin to create a submission form, though a couple options stand out.
Using the WPForms Plugin
Our first recommendation is to use WPForms to create the form. Follow the steps below to create a form using the plugin:
- Purchase a WPForms Pro license (since a premium add-on is required).
- Click WPForms from the menu and select “add ons”.
- Install the “Post Submissions” add-on.
- Click “Add New” and name your form.
- Click on the template named “Blog Post Submission Form”.
- Edit the blog post fields as needed. For instance, you may want to let people add images to your media library or have guests pick the content category.
- Click on “Settings” to edit the appearance of the form. For example, you can customize the button text, or enable AJAX settings, so the page doesn’t reload when the form is submitted.
- Set up submission form notifications. That means you’ll get an email, for example, when a person submits a piece of content.
- Save your form and copy the embed code. Add the embed code to your preferred page.
- Test that everything works as it should.
The process is straightforward. You can learn more about the plugin in this WPForms review.
Using the Gravity Forms Plugin

Another popular choice is Gravity Forms. If you plan to use Gravity Forms, you should purchase the elite license and upload the Advanced Post Creation Add-On. This license will give you access to the plugin add-ons.
Follow these steps to get Gravity Forms setup on your site so you can accept user-generated posts:
- First purchase a license, then upload Gravity Forms to your WordPress site from Plugins > Add New.
- Select “Activate Plugin” on your installation page.
- Hop over to “Forms” and click on “New Form”. Give it a name.
- Add relevant fields to your new form. Put in the title, and body content as these are essential. You may also include featured images, tags, categories, or custom fields.
- To gather the data above, consider using standard or advanced fields. These will allow you further customization options. For example, you may insert a “File Upload” field for your featured post images.
- Create a feed to enable your forms to send relevant data to other sources. Go on Settings > Post Creation > Add New. Next, name your feed.
- Next, fill in the Post Content field. It allows Gravity Forms to transfer the submission data to a new post. You should include title, content, featured image, and media library.
- Allow users to add tags and categories to their blog posts by adding taxonomies.
- Finally, attach the submission form to a page, and you’re good to go!
Again, the process is intuitive.
You should place your content submission form on a page that is easily accessible to site visitors. After all, you want people to find the form and submit content through the site.
Option 2: Allow Users to Register Through WordPress
A straightforward alternative to using a form is to allow people to register as authors to your WordPress site. You can set this up through the WordPress administration user interface.
On the WordPress dashboard, press Settings, and then select General. From this screen, you’ll see the following dashboard.
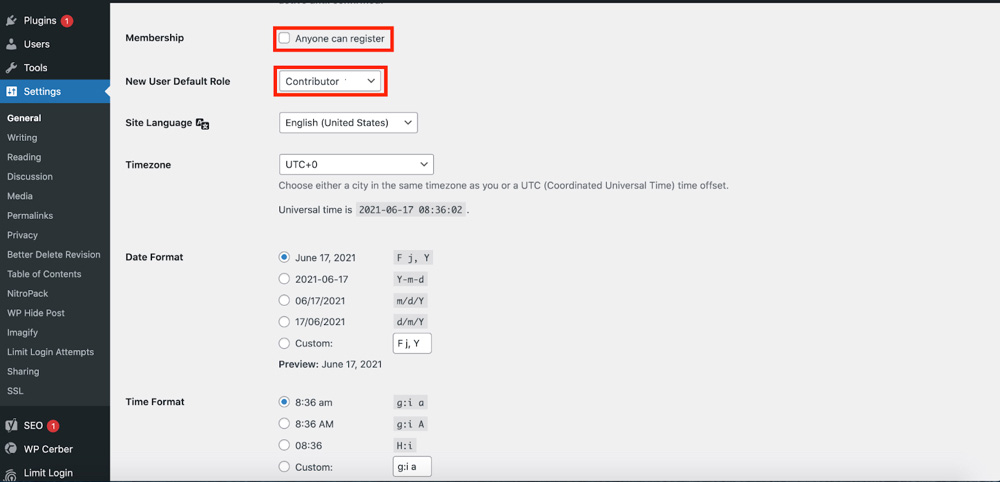
Click the checkbox next to Membership so that anyone can register to the site. You will need to change the new user default role to “Contributor”.
Save the changes by clicking the button at the bottom of your page. Now, all a person who wants to submit content has to do is access the WP-admin page. From the page, they sign up as a user. People will be able to submit content through the WordPress Administration dashboard.
Important: This method is great if you want to have a website like Medium, and if you aren’t concerned about your site SEO.
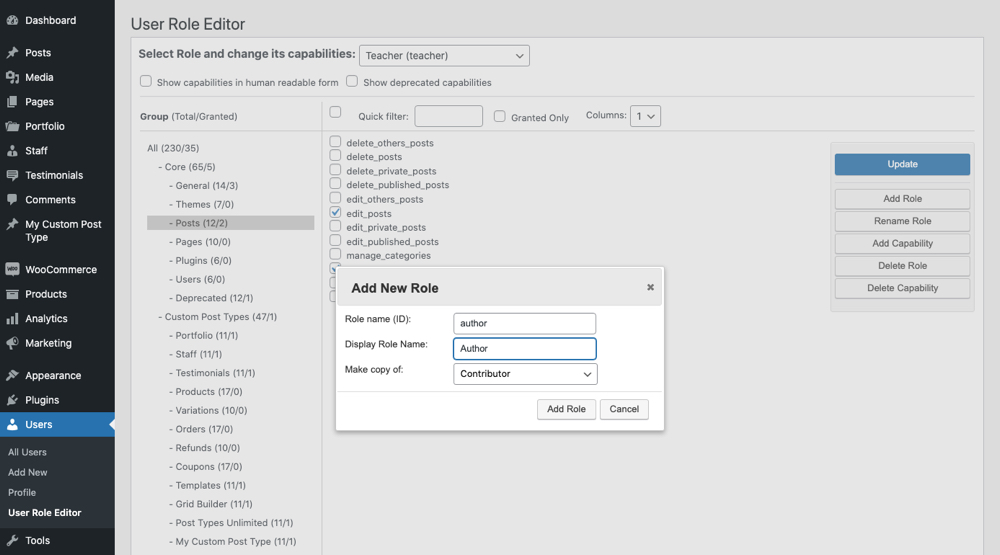
However for most sites we suggest installing the User Role Editor and creating a custom user role to maintain more control over your own website if you choose to use this method. For example, you could duplicate the Contributor role to create a new one called “Author” then remove access to capabilities like publish_posts, edit_posts, and delete_posts since the guest author really only needs to create a post draft once that you can later review.
For security reasons, you should also remove the upload_files capability (have authors add a link to images they want to include), unless you install another plugin to control what file types are uploaded to your site. The WP Upload Restriction plugin allows you to choose from 90+ file types, though for most websites just enabling jpg, png and possibly gif should be sufficient.
Option 3: Use An External Site For Content Management
The first two options discussed allowed users to submit content to your site directly. Of course, there are alternatives to this option. For example, you can use third-party project management tools to manage content submissions. While you can certainly use a simple email address, management tools can help you and contributors stay organized.
A nice example of a site that takes this approach is Simple Programmer. They utilize Trello to manage content submissions from contributors. The system they use is straightforward.
You first pitch ideas to the site editor. If they accept your pitch, you are added to the Trello board. They create one card per piece of content. You submit the content in a Google Doc and move the card through various stages as content is created, goes through an editorial review, and is finally published.
I’ve blanked out the cards, but you should still get an idea of how this process works in practice.
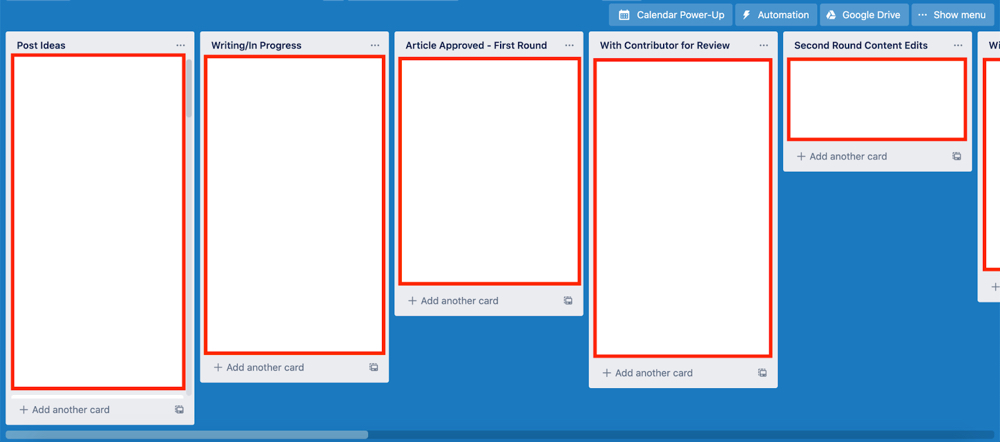
Site contributors never have direct access to the Simple Programmers website. Still, they have a great program for managing user-generated submissions.
The initial idea validation ensures that the content submitted to the site is relevant and hits editorial expectations and standards. Numerous sites use a variation of this strategy for managing content submissions.
For example, I know of several sites that will assign contributors content ideas rather than pitches. Such a system enables people running a site to increase the volume of content being produced without increasing the size of the in-house writing team.
Option 4: Create a Forum

If you’ve been paying attention to web development trends, you’ll know that forums have been around for a long time. It makes sense. Forums are a great way to build a community around your website.
There are various plugins and WordPress themes you can use for creating a forum. bbPress is one of the leading options (note – when installing the plugin you might want to also choose to install a bbPress ready theme like Total).
If you’re planning to have a forum on your site, and you don’t want it to be the site’s main focus, you’ll want to set up the forum on a sub-domain. For example, you might host your forum on forum.mywebsite.com.
You’ll need to decide if you want the content in the forum to be indexable. That means the content created by users appears in Google search results.
To set up bbPress on your site, do the following:
- Hop over to the admin section of your WordPress and select Plugins > Add New. Use the search bar to look for bbPress and select.
- Go to your WordPress admin and click on Forums > Add New. Next, write an appropriate title and concise description for your forum. After doing so, select “Publish”. Once you install bbPress, it automatically adds Forums, Topics, and Reply menu options in your WordPress site’s admin section.
- To showcase your forums onto your WordPress site’s main page, make a brand new WordPress page. Give it a suitable title.
- Insert the shortcode [bbp-forum-index] onto your page. Click “Publish,” and your forum will appear on your site. Moreover, to enable users to access forums on your site, insert a link to your forums page on your navigation menu by selecting Appearance > Menus.
- Make your WordPress site open for new registrations by clicking on Settings > General > Anyone can register. Create your registration page by opening a WordPress page, naming it, adding the shortcode [bbp-register], and finally clicking publish.
- Create a log-in form by clicking on Appearance > Widgets. Next, move the “Login” widget onto your sidebar.
You can manage your bbPress forum settings by selecting Settings > Forums. Moreover, note that bbPress also comes with a user role management system. The roles are as follows: Keymasters, Moderators, Participants, Spectators, and Blocked. Though you may still want to consider the WP Upload Restriction plugin, just to be sure only images are being uploaded to your forums.
You will get user-generated content on your site if you have a forum. However, it won’t be in the same format as a blog post. Still, it’s an effective way to grow your site.
Final Thoughts on User Submissions with WordPress
WordPress is a valuable platform for countless businesses around the world today. Content management is a significant aspect of business marketing in the modern world. However, finding the ideal in-house content team takes up a lot of time. Consistently putting quality content out there can be challenging, too.
That’s where user-submitted posts can help you. Accepting user-submitted content through your site enables you to increase the volume of content being published, build a community around your site, and get great contributions from talented writers.
This guide walked you through various methods for accepting and managing user-generated content. If you want the content users to submit to be directly uploaded to your WordPress site, consider using a tool like WPForms or Gravity Forms. Both options enable people to submit content without you having to give them access to your site’s admin area.
On the other hand, if you are open to accepting user submissions through your dashboard, enable the membership settings. This is straightforward.
Finally, you can use third-party applications or just an email address to manage contributions. I showed you how Simple Programmers do this using Trello. You could easily use another project management tool to achieve the same end goal.
Follow these tips to get the most out of WordPress site and user-generated submissions. The result? Trust me, your site will never run out of great content ideas, which means more leads and conversions for you.