How to Promote WooCommerce Products with Instagram

Ever wonder why so many eCommerce stores are using Instagram feeds throughout their websites? It’s all down to the power of social proof.
Social proof is a phenomenon where people are influenced by the actions, or purchases in this case, of others. One of the most effective types of social proof is that originating from users. User social proof is when your existing customers recommend your product or services by posting images on social media.
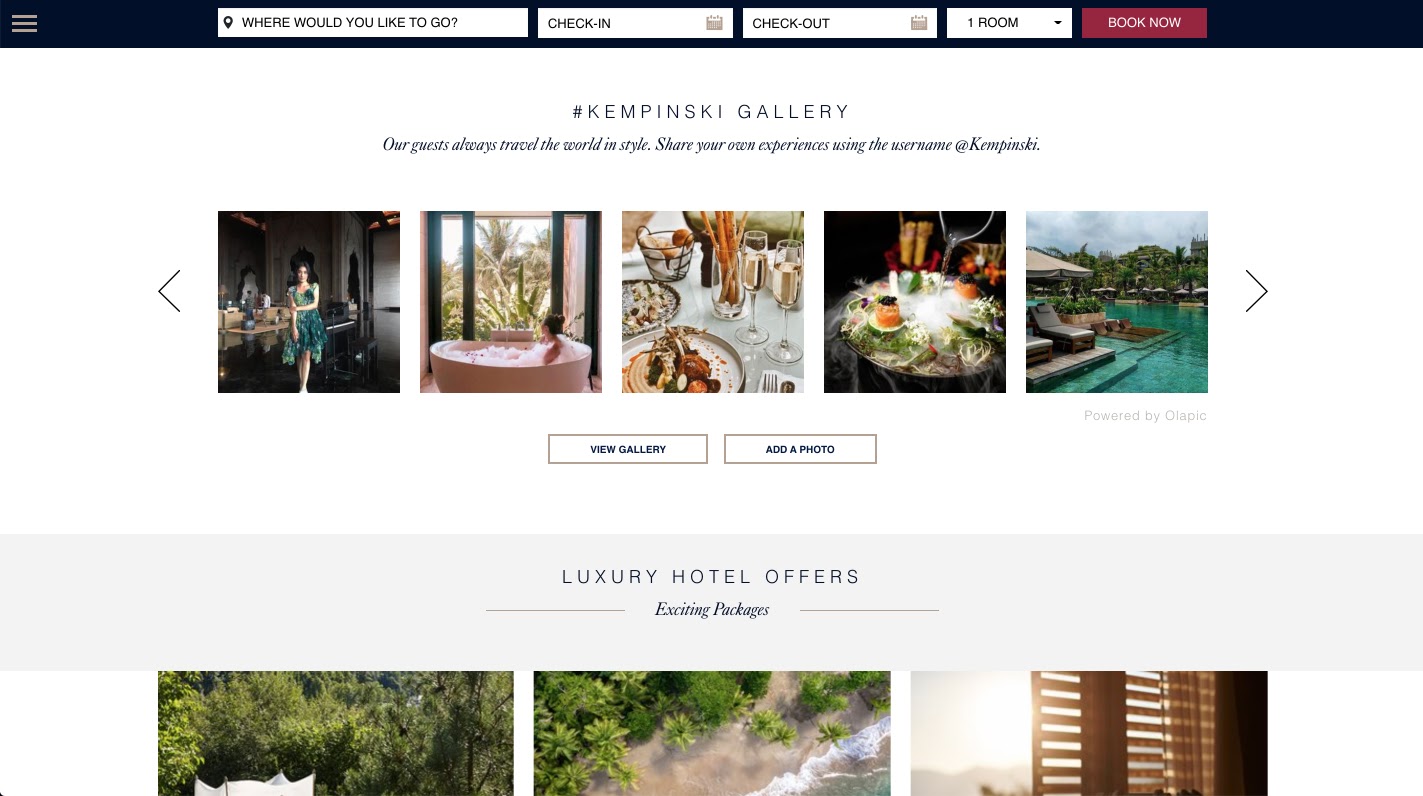
Explaining the power of social proof in words can be tricky, so I’ll let these screenshots speak for themselves. First, a look at Kempinski Hotels’ gallery:
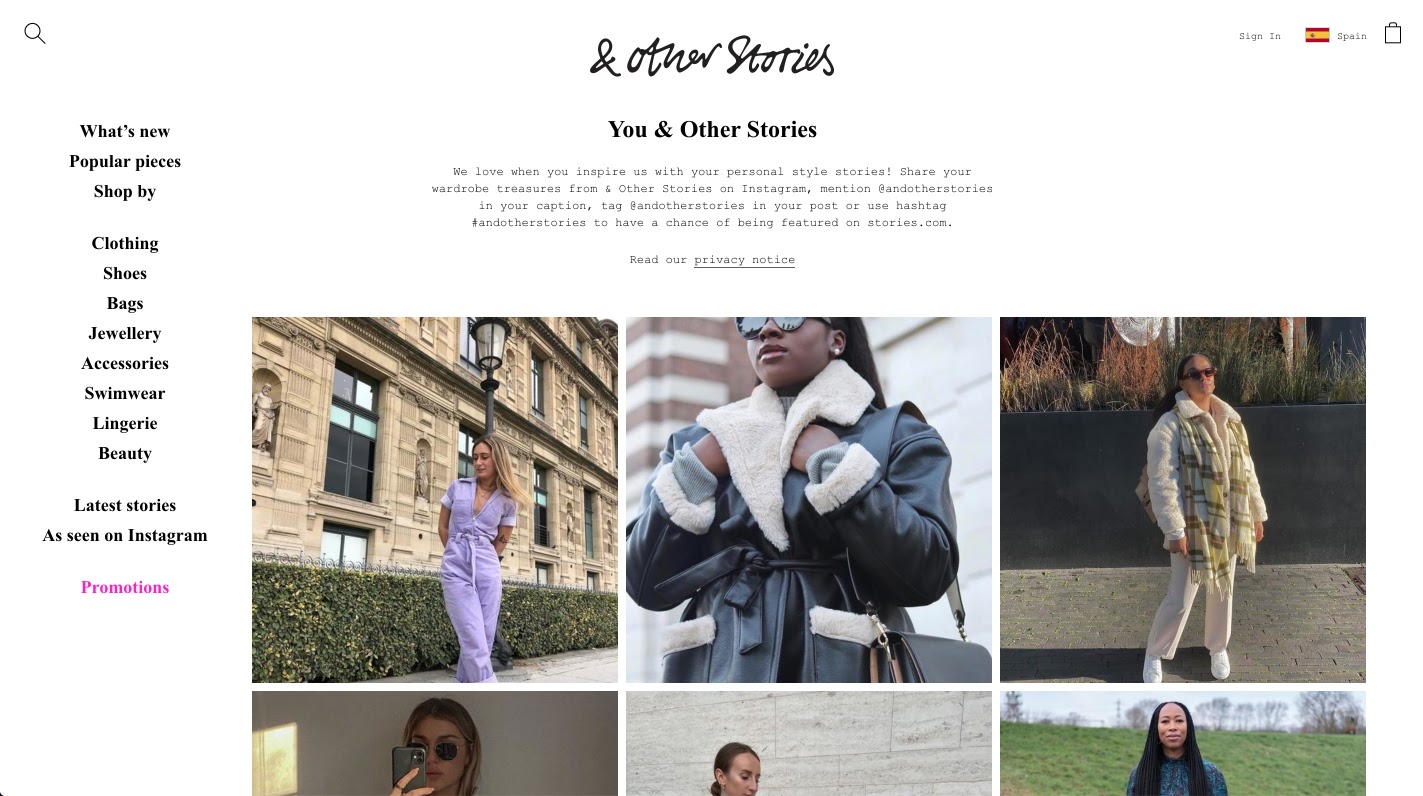
The & Other Stories fashion brand:
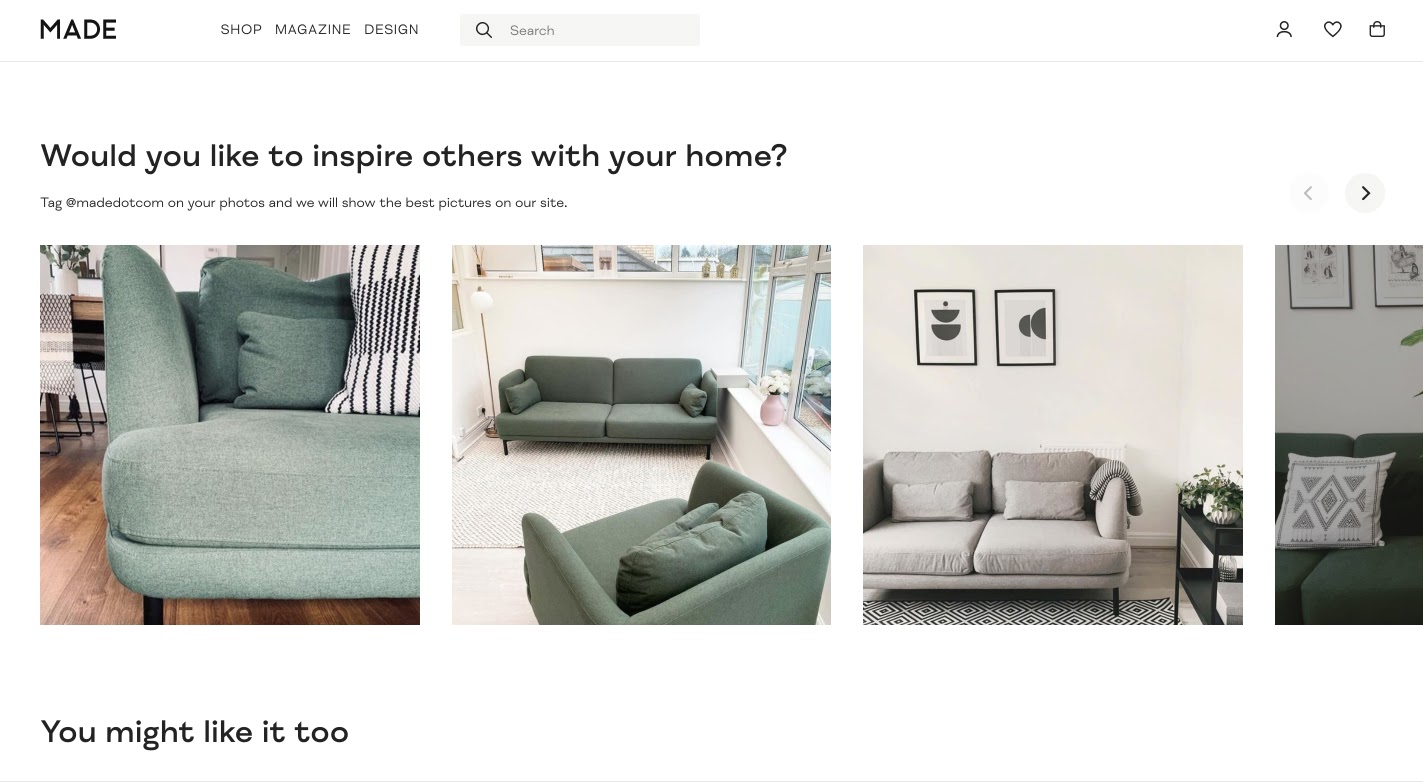
As well ask MADE furniture and homeware:
There’s nothing like word of mouth or visual testimonials to convince your potential customers of your products or services.
Take advantage of free user-generated content and display it on your website to increase your WooCommerce conversions.
How to Promote Your WooCommerce Products Using Your Customer’s Instagram Posts
First things first, you need to start with a solid Instagram account. Upload images of your products, add Instagram stories, and generate a following.
Pro tip: Use a Business account to get access to Instagram stats and insights.
Next, launch an Instagram campaign. Take a look at some of the previous examples:
“Our guests always travel the world in style. Share your own experiences using the username @Kempinski”
“We love when you inspire us with your personal style stories! Share your wardrobe treasures from & Other Stories on Instagram, mention @andotherstories in your caption, tag @andotherstories in your post, or use hashtag #andotherstories to have a chance of being featured on stories.com.”
An Instagram campaign can be done using a dedicated hashtag (aka hashtag campaigns) to generate buzz and interest in your product or service. Alternatively, you can ask customers to tag your account.
Once your customers’ posts start pouring in, it’s time to display them on your website!
How to Display Instagram Feeds on Your WooCommerce Website

In October 2020, Facebook’s API had a major change. This change now prevents WordPress users from displaying Instagram content within their posts using the default oEmbed or Embed blocks feature.
This means that if you want to display your Instagram feeds on your WooCommerce website, you need to use an Instagram feed plugin.
Although there are plenty of Instagram feed plugins, Spotlight PRO is one of the easiest to use (especially if you’re not an avid coder). It comes with a live interactive preview right in your WordPress dashboard, and can also integrate seamlessly with Elementor.
We’ll also be looking at a few other plugins which can boost your Instagram marketing campaign on your WordPress website throughout this guide.
How to connect your account and display hashtag or tagged feeds
Once you install and activate Spotlight PRO, connect your Instagram account. Click on “Connect your Business account” and in just a few seconds, your Instagram feed will appear in the Spotlight interface.
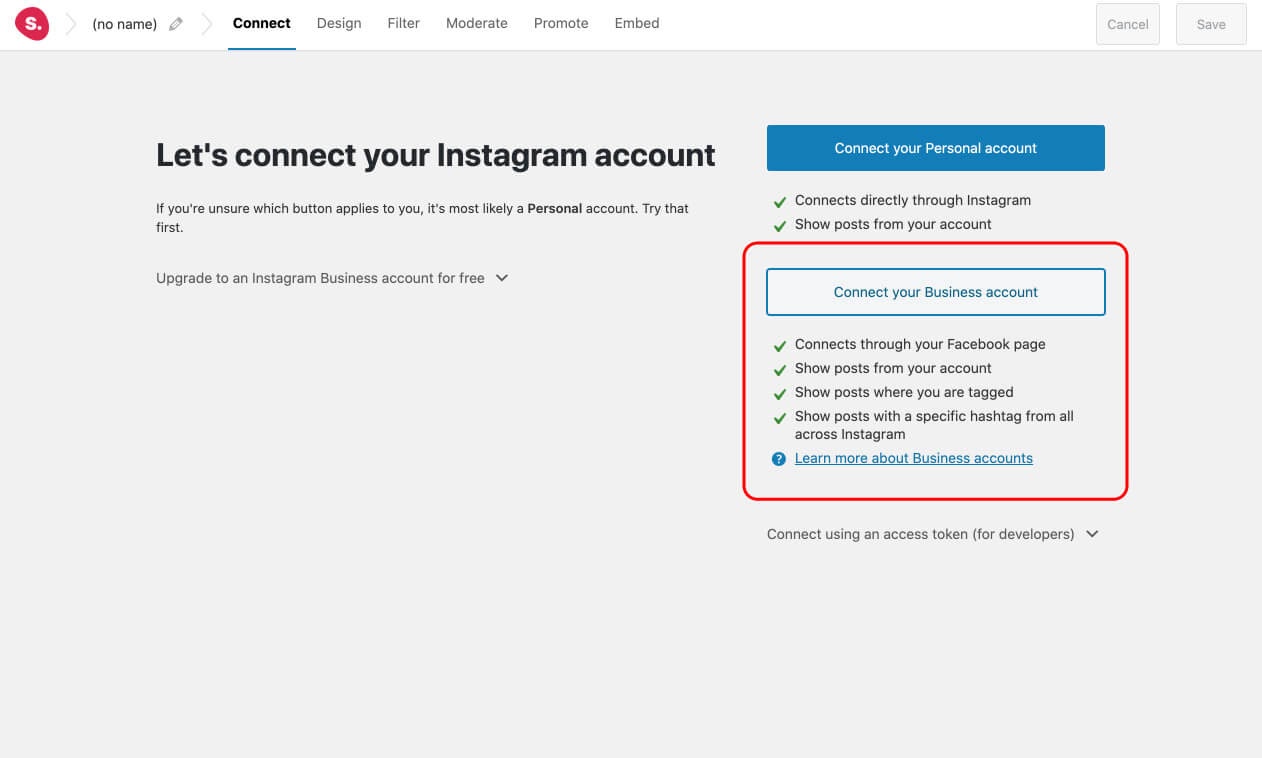
If you’re using Elementor, move to the Elementor editor once your accounts have been connected. Drag and drop the Spotlight Instagram feed widget into your desired location and follow the rest of the tutorial within the editor itself. The widget will provide you with an interactive preview of your feed, just like the default Spotlight interface.
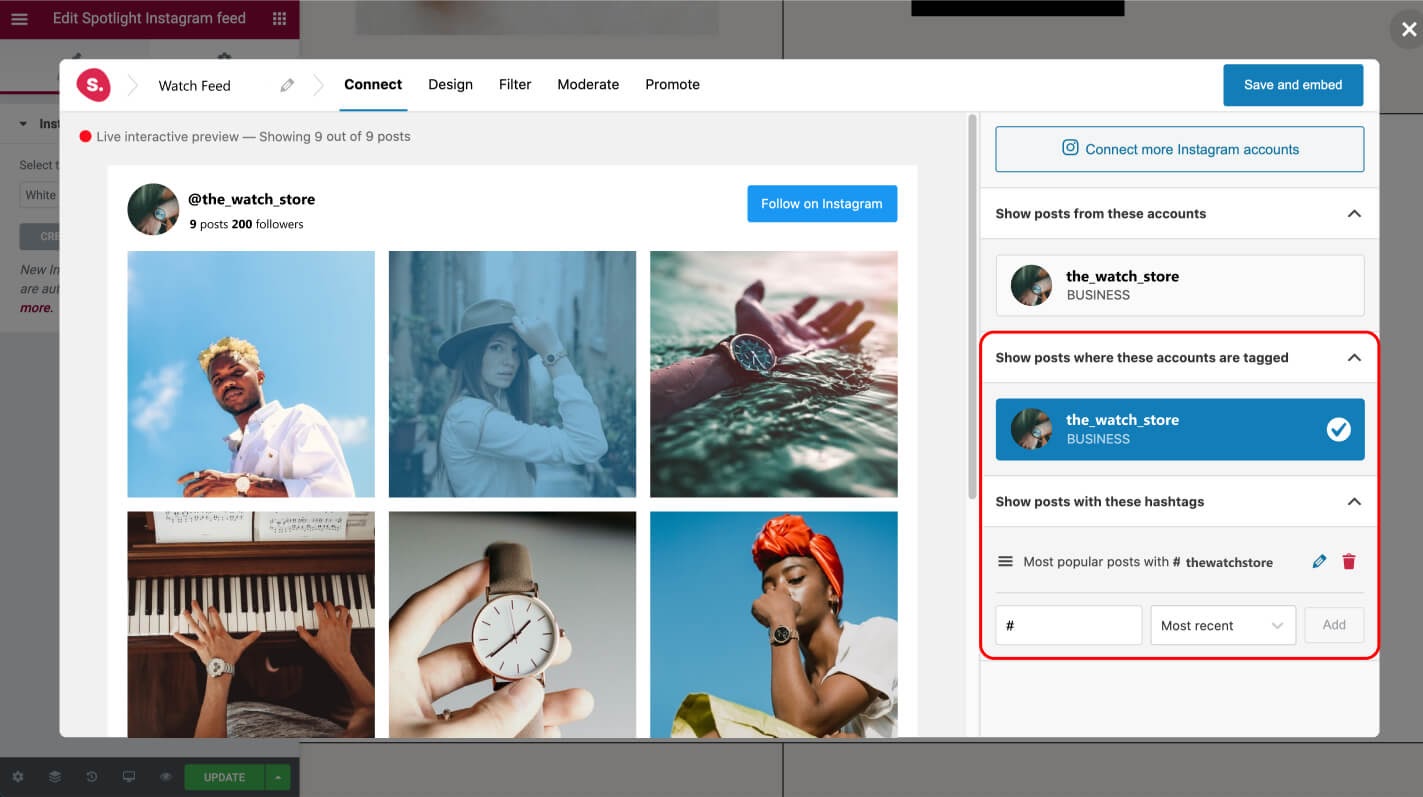
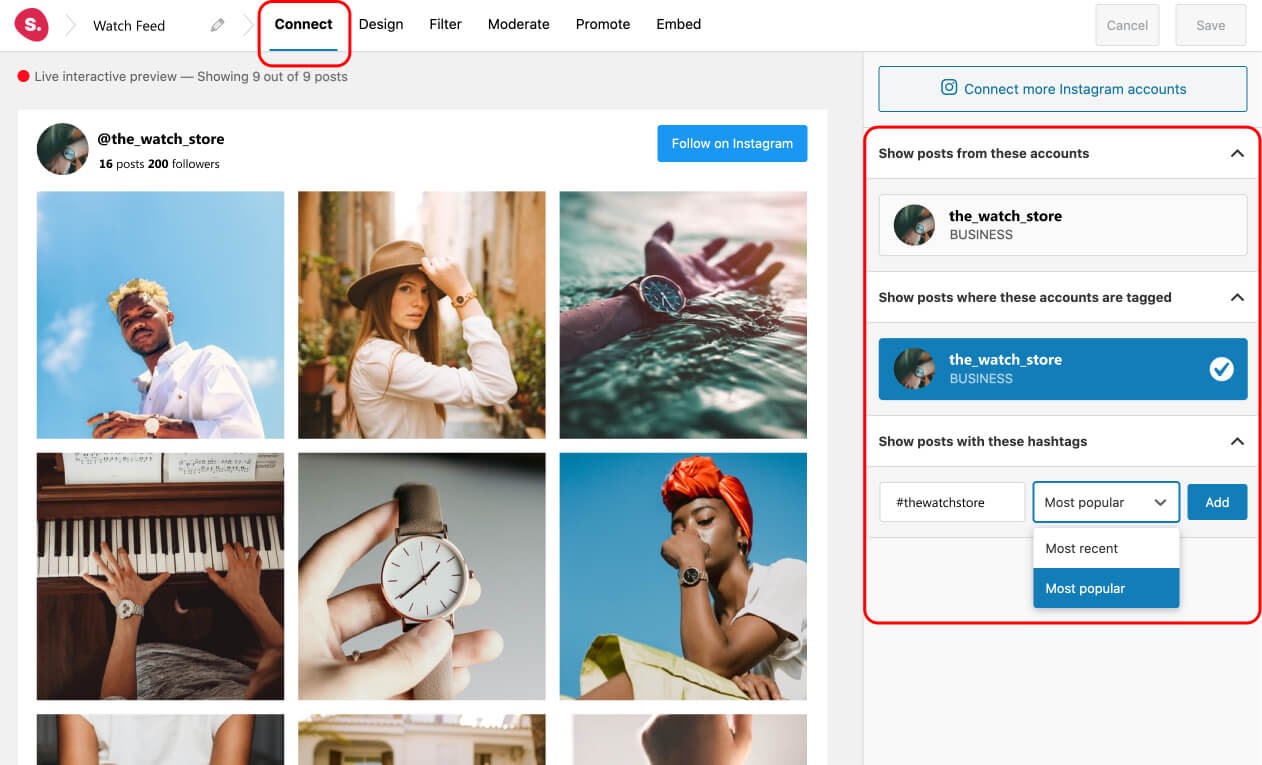
To import tagged feeds, go to the Connect tab and select your account under the section “Show posts where these accounts are tagged”. To import hashtag feeds, type in your hashtag under the section “Show posts with these hashtags”.
Finally, deselect your account under the section “Show posts from these accounts”. Your feed will be instantly populated with your customers’ posts.
How to design your feed
Go to the Design tab. First, choose your desired layout. Next, go through the many design options that Spotlight provides and adjust your settings accordingly.
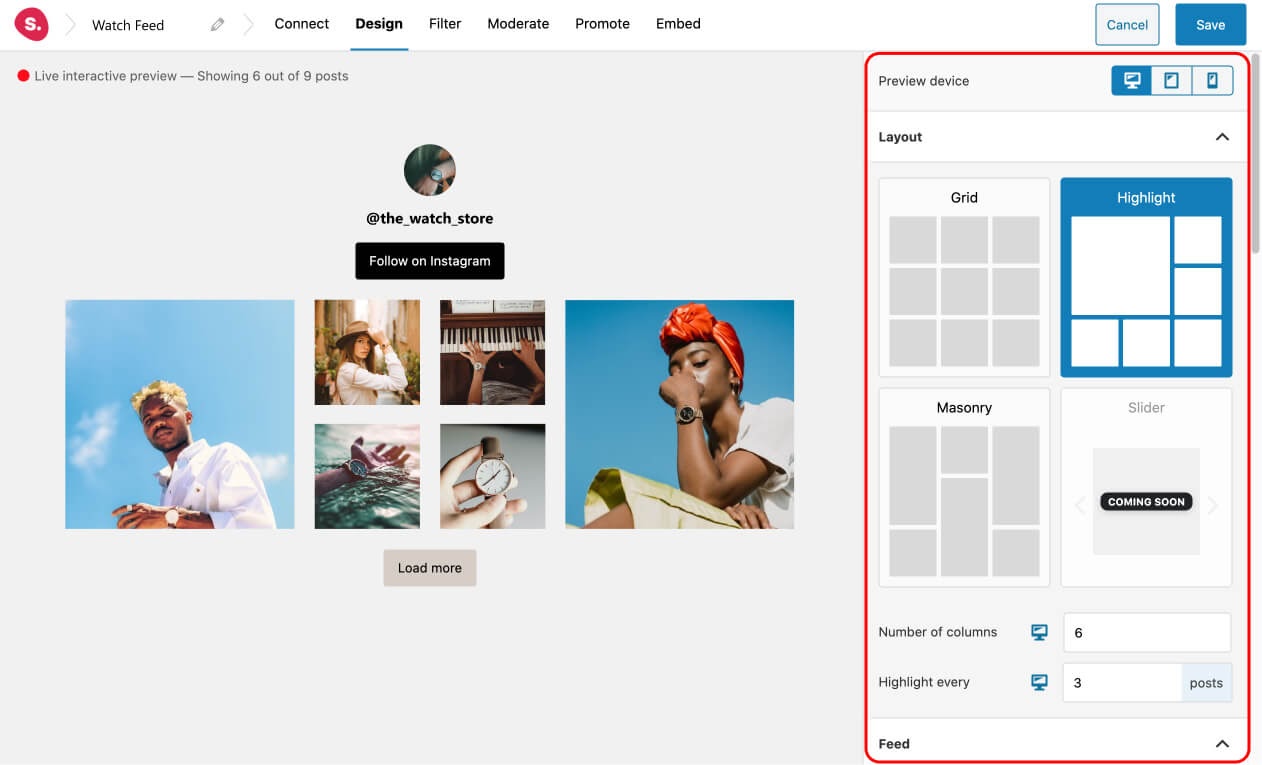
You can:
- Choose your feed background-color,
- Select the number of posts to be displayed,
- Increase or decrease columns,
- Adjust the spacing between posts,
- Add hover over effects,
- Opt for a header, or leave it out completely,
- Show Instagram stories,
- Add a popup box,
- and many more.
Remember to adjust your feed for mobile and tablet devices by selecting the icons at the top right-hand corner.
Although Spotlight is fully responsive right out of the box, it gives you even more control over the look of your feed on each device. For example, you can easily override the default settings and instruct the plugin to show 5 columns on desktop, 2 on tablet, and 1 on mobile devices.
When you’re happy with the look of your feed, hit the save button.
How to filter your feed
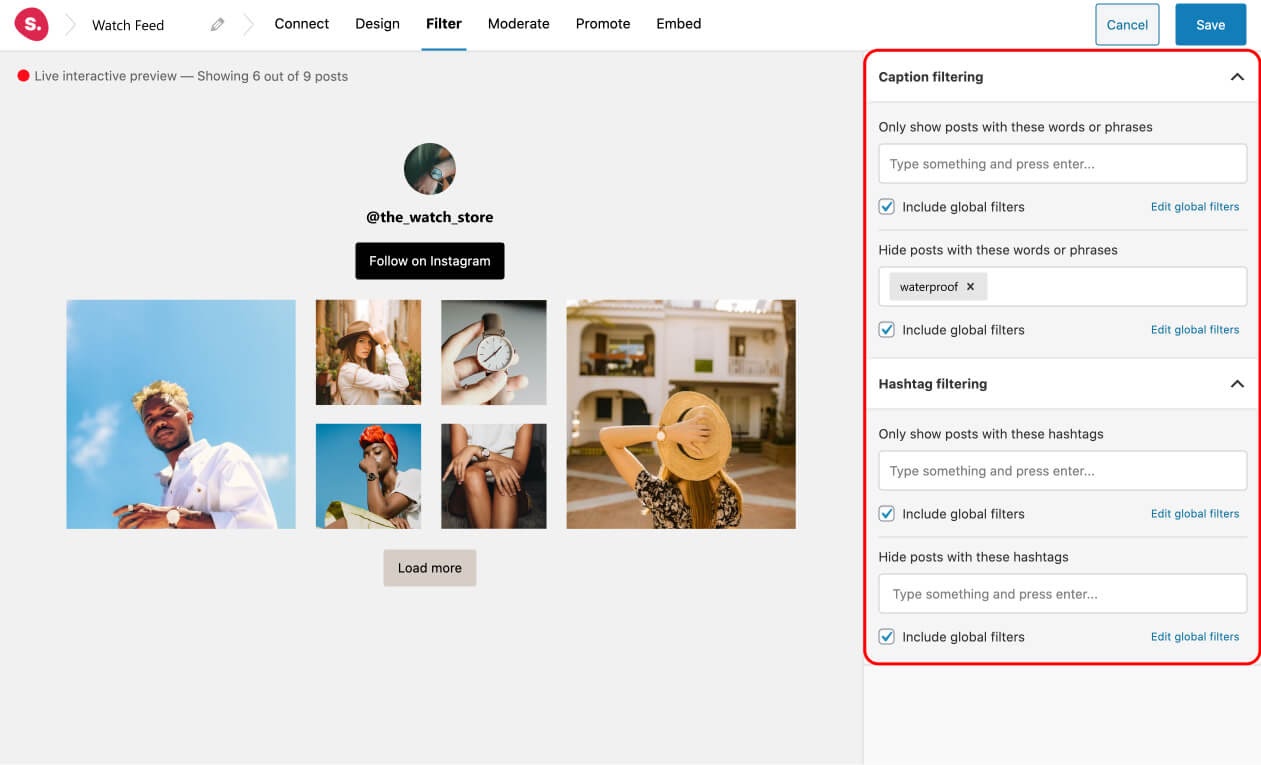
To filter your feed and remove those unwanted posts, go to the Filter tab. Here you can filter out posts by hashtag or by caption.
Alternatively, you can also filter your feed by going to the Moderate tab. Here you can manually select the posts you want to show or leave out.
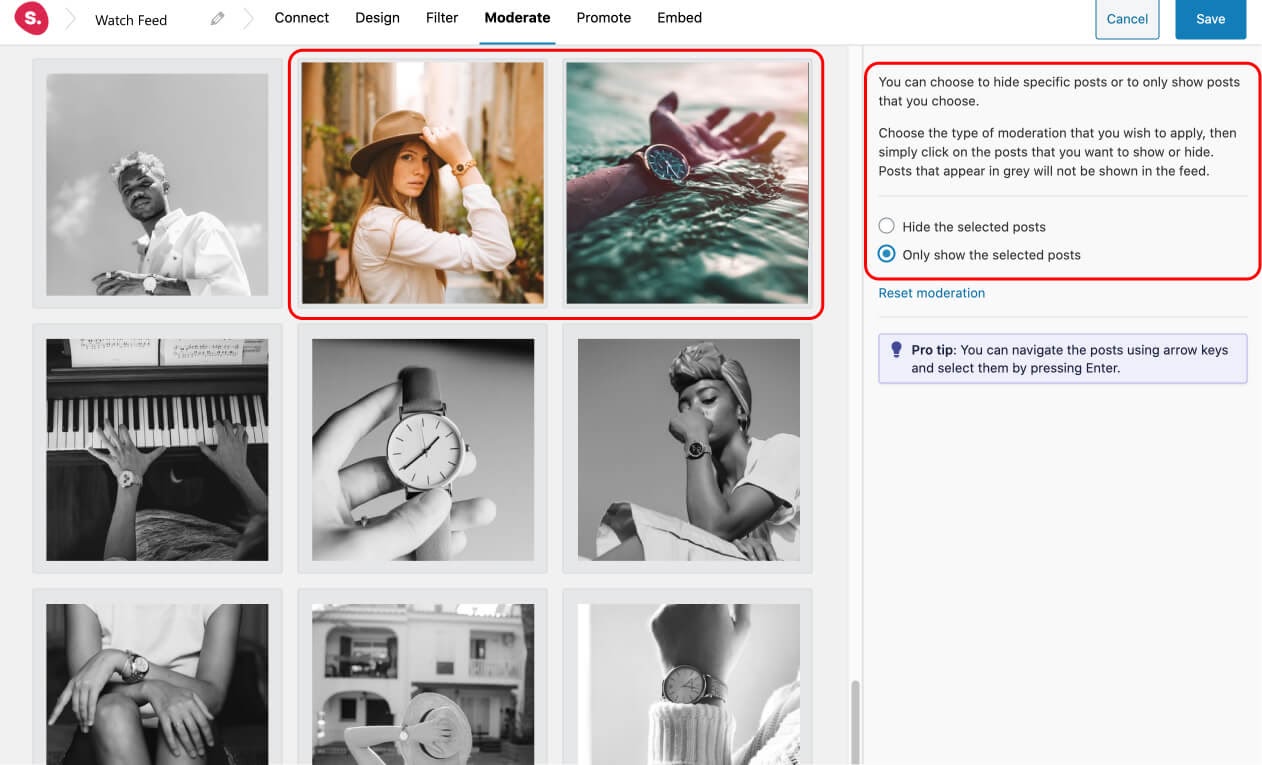
This process should be straightforward. You can also use the arrow keys on your keyboard to navigate through the many imported posts and select the ones you want by pressing Enter.
How to promote your WooCommerce products
The last step is to link your Instagram feed posts to your WooCommerce products.
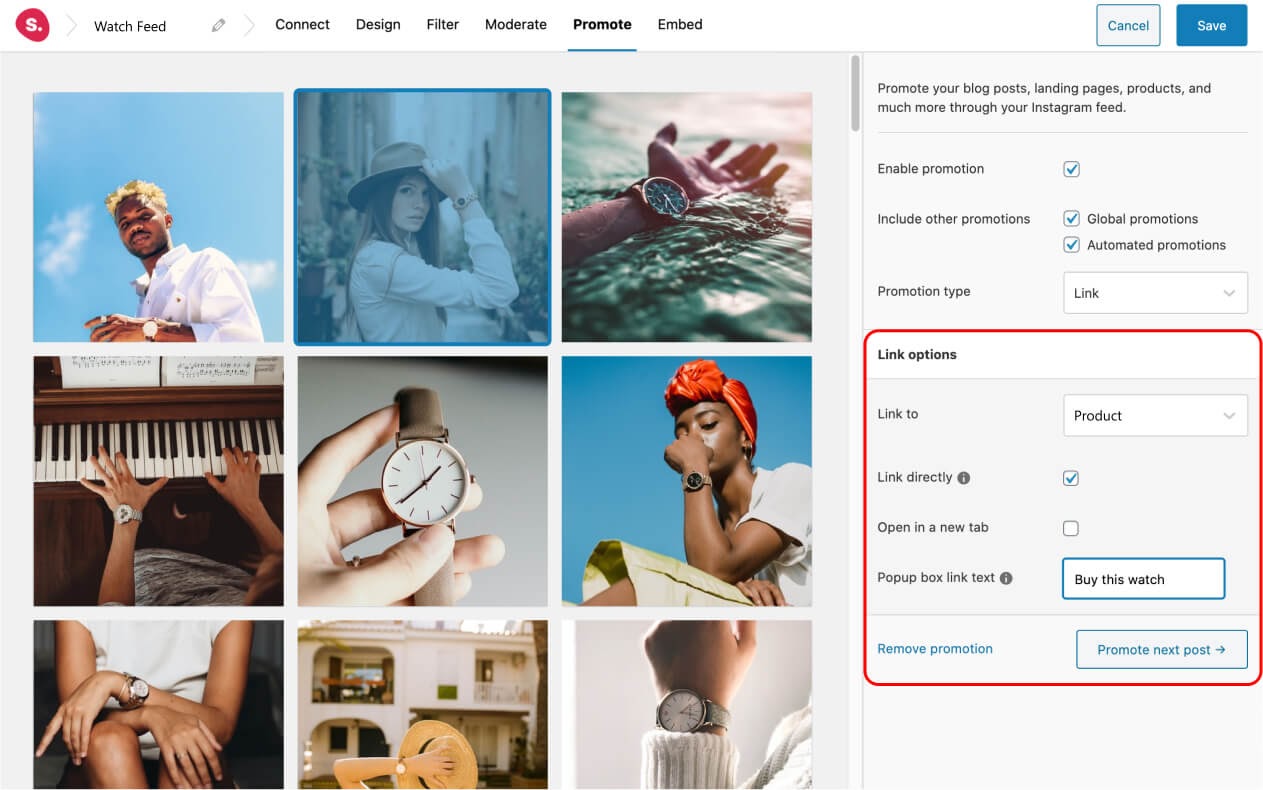
To do so, go to the Promote tab. Simply select a post and choose “Product” from the drop-down menu.
As soon as you start typing in a product name, Spotlight will retrieve your WooCommerce products automatically.
Select the product and then choose between linking to the product directly or have the post open up in a popup box. A popup box is a great way to feature your clients. With hashtag posts, the hashtag and caption will be displayed, while with tagged posts, their username will also be shown!
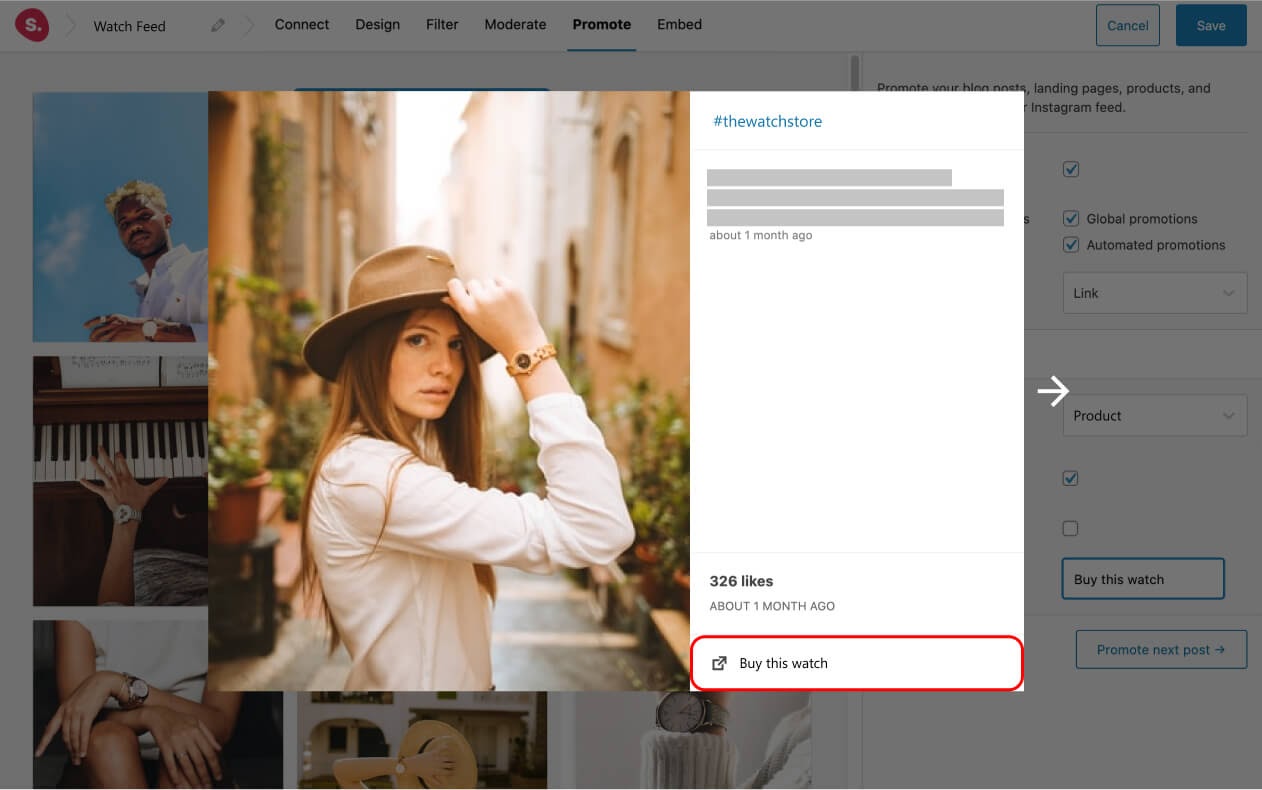
To add to this, you can also add your desired “link text” (for example, “Buy this watch”) which takes you to your specified product.
The link text will show up in the bottom right corner of the popup box:
Save your feed and you’re done!
Pro Tips

Urge customers to leave a testimonial in the form of an Instagram post with the chance of getting featured on your website and thank them by providing a discount. You can then monitor it using the WooCommerce Coupon Campaigns plugin.
With the plugin you can create coupon campaigns and view reports from your WooCommerce dashboard. Just make sure to have a page showing your terms and conditions for posts responding to your request.
How to Embed Your WooCommerce Instagram Feed
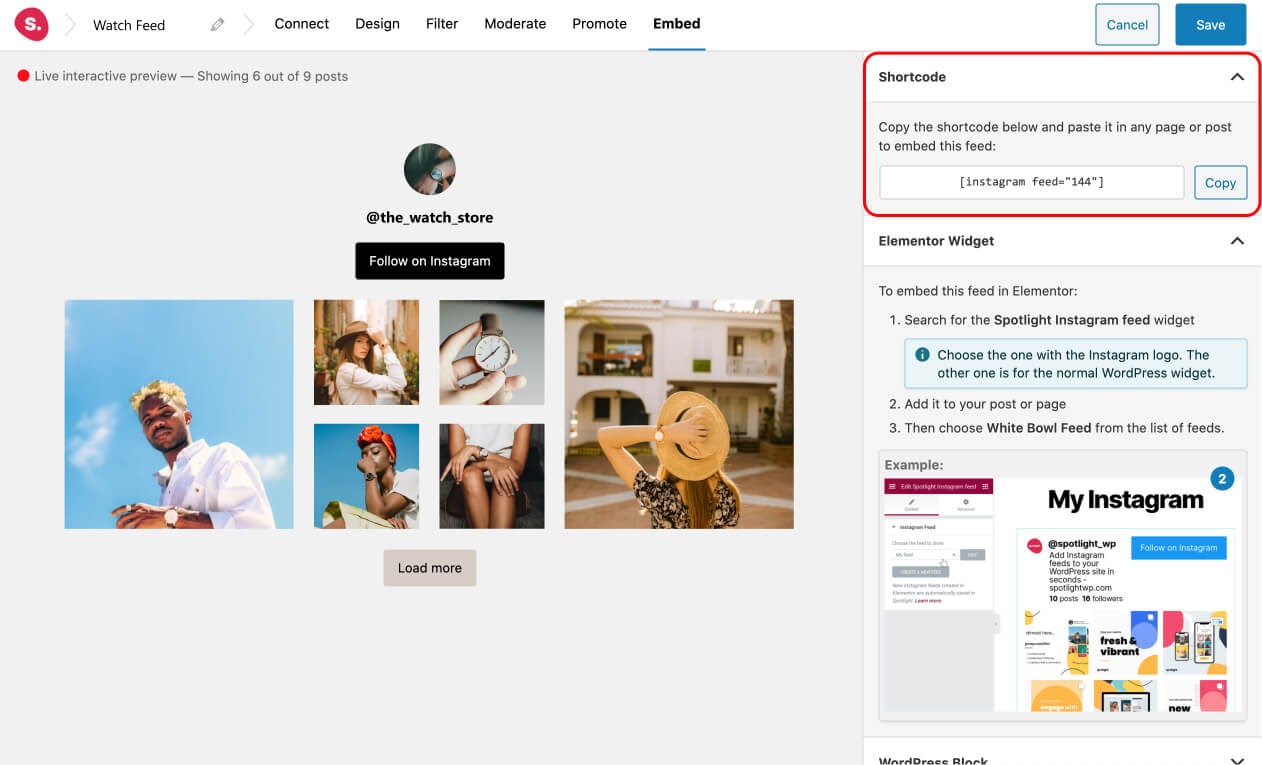
Now, it’s time to embed your feed on your website. You can do so by copying and pasting in the generated shortcode anywhere on your WordPress site. You can also use the Gutenberg block, as well as the WordPress or Elementor widgets.
1. Shortcode
If you’re using a page builder like Elementor, use Advanced Custom Fields to display filtered feeds under each specific WooCommerce product (just like Made.com in the examples above).
Once you’ve got ACF installed, create a custom field group that requests a shortcode.
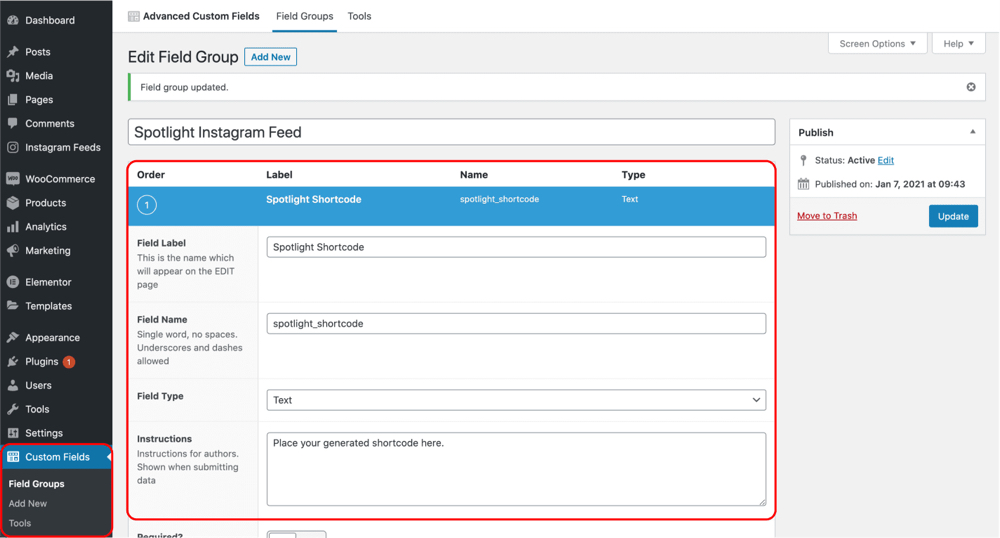
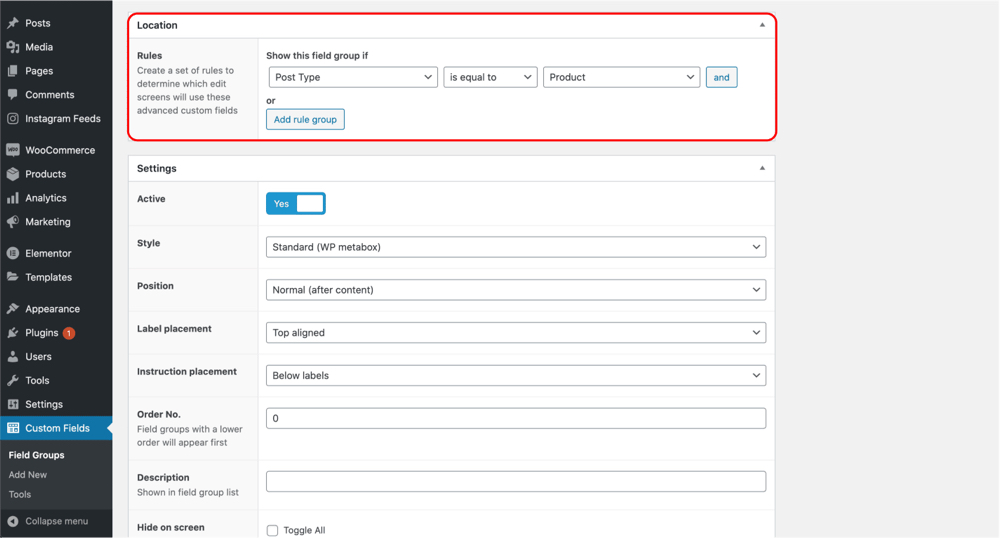
Set the Field Type to “Text” and adjust the rules to have it displayed on every product page.
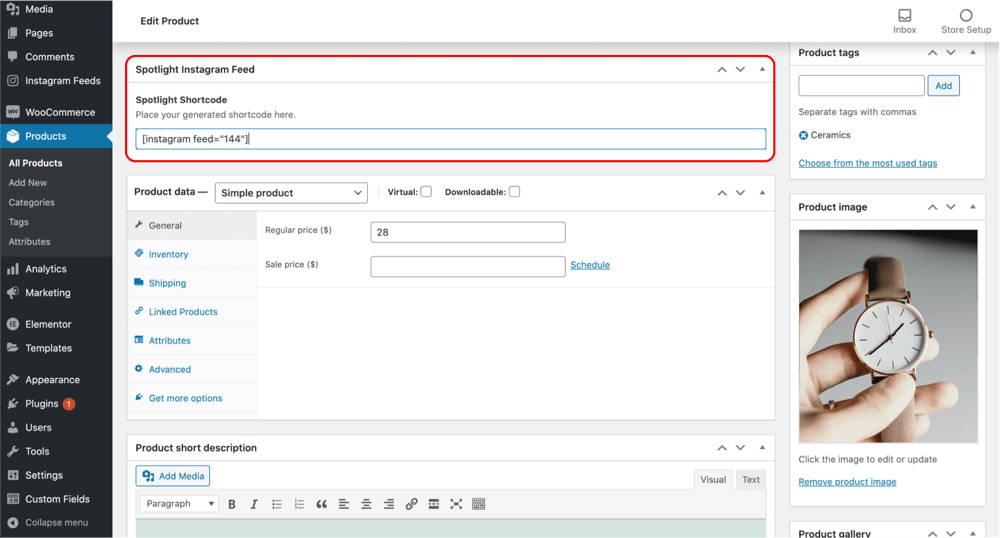
Give it a name and head on over to your product page. Your custom field should now show up beneath your product description. Next, paste in your Spotlight shortcode.
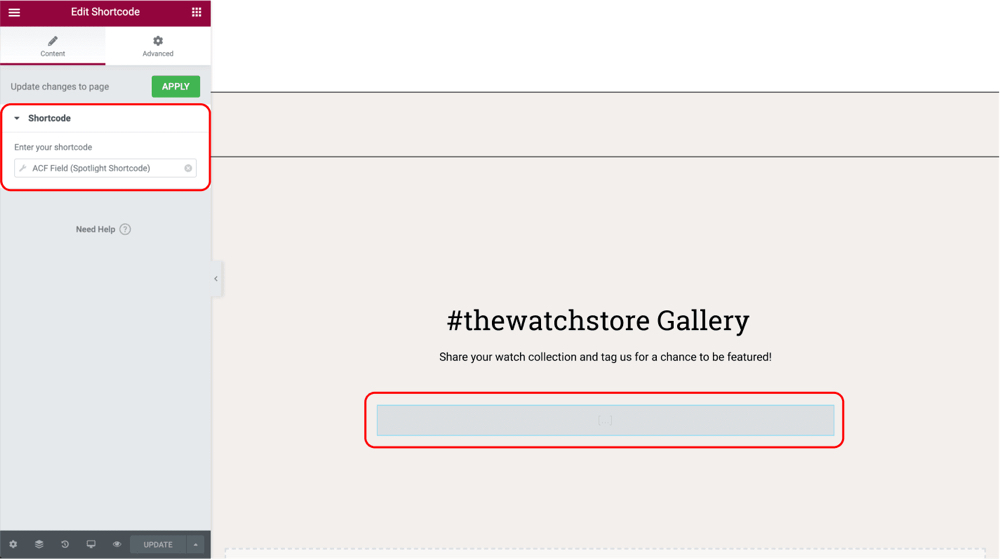
Back in Elementor, add a shortcode block using dynamic content to your product page template. Elementor will automatically bring in the shortcode you placed in your product’s custom field to display your Instagram feed.
Note: Spotlight is very versatile, so it will work beautifully with any theme or page builder you are using.
Alternatively, you can display your feed on your home page (just like Kempinski in the above screenshots) or create a landing page with a dedicated Instagram feed (like & Other Stories’ “Shop this look” page). Spotlight’s Promote feature will work brilliantly in such cases.
To achieve this, simply paste in the shortcode on your home page or dedicated page and Spotlight PRO will take care of the rest.
2. Gutenberg Block
If you’re displaying your feed in a post, opt for the Gutenberg block. In the WordPress editor, search for “Spotlight Instagram Feed”.
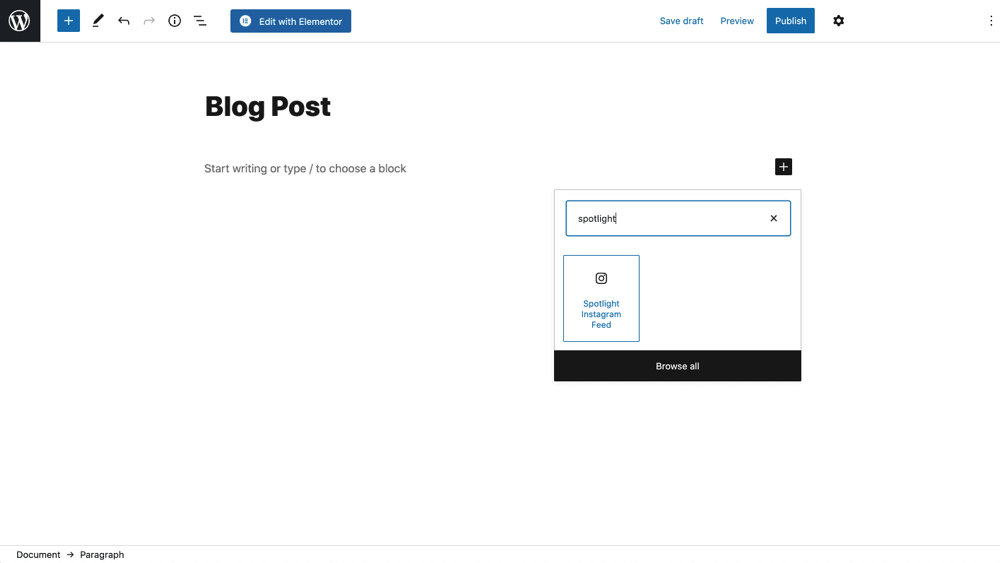
Next, simply choose your desired feed from the dropdown menu.

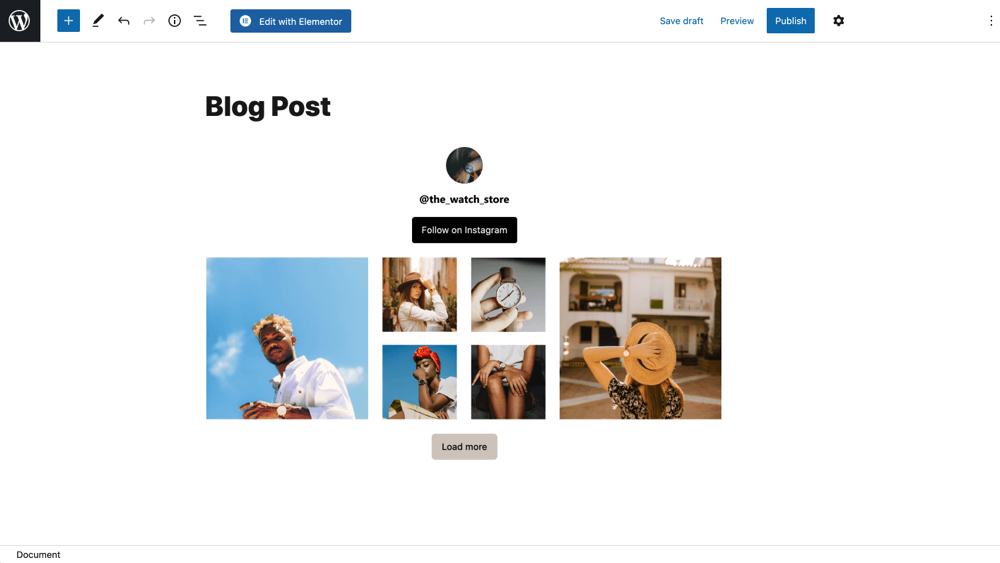
Your feed will then automatically appear right in your WordPress editor.
3. WordPress Widget
If you want to display your feed in your footer or sidebar, then the WordPress widget will probably be your best option. Most themes use widgets to allow users to easily edit areas of their website in a matter of seconds.
Go to Appearance > Widgets and locate the “Spotlight Instagram Feed” widget.
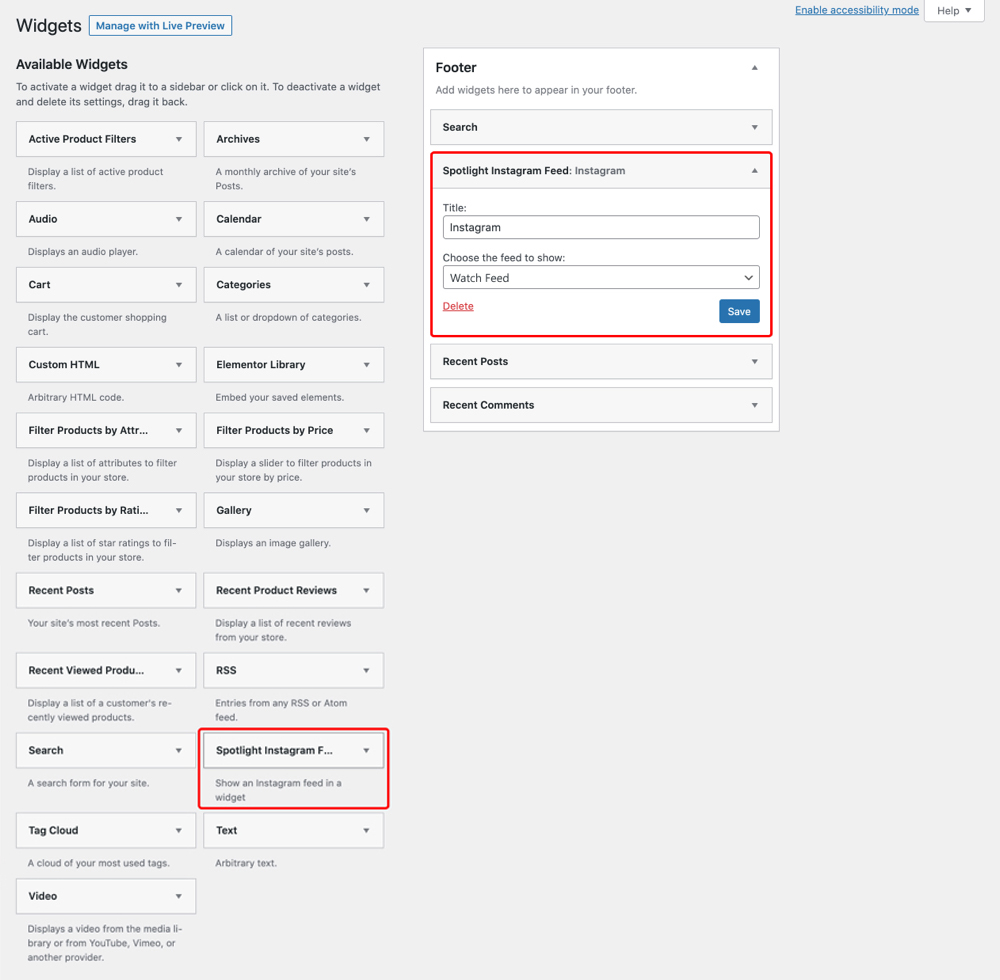
Drag and drop it in your preferred location. In this example, I’ve decided to display my feed in the footer, right after the search bar. Select the feed from the drop-down menu and save.

Your Instagram feed is now live! I’ve adjusted the feed slightly to hide the header
4. Elementor Widget
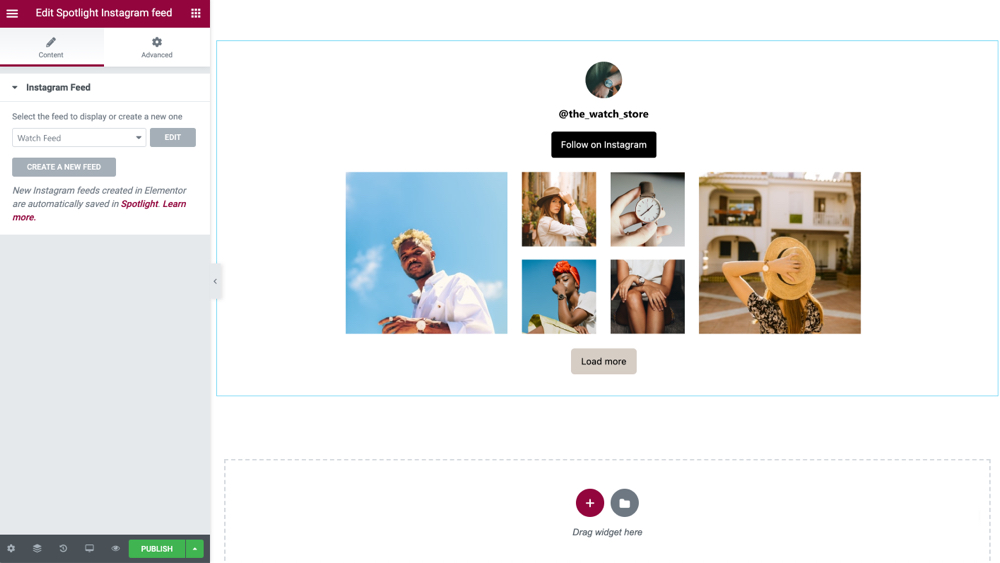
The fourth method is using the Elementor widget. As the name suggests, this only works for Elementor users. In the editor, search for “Spotlight Instagram Feed” and drag the widget into the desired area.
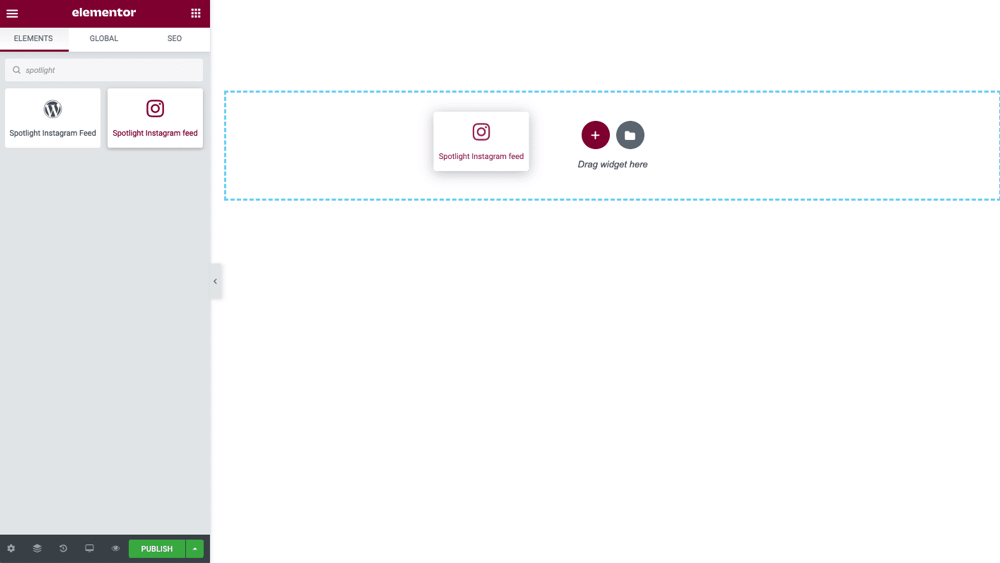
Select the feed from the drop-down menu in the sidebar and a live version of your feed will be displayed automatically.
Maximize your WooCommerce Conversions
In this article, we’ve seen how you can use Instagram feed plugins to activate high-performing visual content at scale. By using Instagram feeds throughout your WooCommerce store, you will enhance the buyer journey for your customers and increase conversions.
An Instagram feed plugin like Spotlight PRO has the power to:
- Create a direct link with consumers,
- Make use of free content that performs, and
- Drive sales for your business.
With this guide you’ll certainly be able to start promoting your WooCommerce products on Instagram in no time!


