Easy Digital Downloads Beginners Guide & Recommended Add-ons
So you want to sell a product online. We think that’s awesome! Now all that’s left is to decide how. Lucky for you WordPress makes it easy to start your own online store, and if you’re selling a digital good you can’t do better than Easy Digital Downloads – the free e-commerce WordPress plugin that makes selling digital goods easy.
Easy Digital Downloads Features
I’m sure you want to know what makes Easy Digital Downloads (EDD for short) such a great choice for WordPress, and why you should choose it over other e-commerce options. There are many reasons why your individual store might want to use EDD, but there are a few reasons that apply to everyone.
Free
First and foremost it’s free, meaning that the core plugin certainly fits into anyone’s budget. Don’t let the nonexistent price tag throw you off, EDD is a well maintained plugin with regular updates and security patches to ensure a safe shopping experience. Plus there are many free add-ons and extensions available directly from EDD as well as from third parties on WordPress.org.
Quick & Easy
The plugin is also easy to use. Even if you skip the documentation (although we do recommend using it for help if/when you need it) you can get your Easy Digital Downloads powered store up and running fairly quickly. The interface and options are all very intuitive and settings for the plugin are all clearly labeled.
Simple & Extendable
Lastly, EDD keeps things simple. There aren’t a ton of product options built-in like other e-commerce plugins. This makes EDD a much less overwhelming option when first getting started with your store, but it also means that there are endless possibilities for developers looking to extend the plugin. With less options to style developers can focus their attention on the features they want to add or highlight to create truly custom stores.
Easy Digital Downloads Setup Guide
Ready to get setup with Easy Digital Downloads and start selling your own digital goods? The process is simple and won’t take you longer than one afternoon. There are only a few resources needed, so without taking up any more of your time let’s get started.
Pre: Requirements for Creating an Online Store with Easy Digital Downloads
Wait just one second! Before getting started you will need to have a self-hosted WordPress installation. Self-hosted WordPress is managed on your own domain and hosted with your own web hosting plan (not to be confused with the free blogs offered by WordPress.com, you can learn more about the differences between WordPress.org and WordPress.com on our blog).
For your self-hosted WordPress installation you will need the following (of course, the brands and companies mentioned are simply our recommendations but you do still need each of these regardless of where you chose to purchase them):
- Hosting plan
Since you will be setting up an online store we strongly encourage you to purchase a good, managed hosting plan that can support the traffic your website will be receiving. Managed hosting comes with WordPress already installed, so once you pick your plan WordPress is already on your server ready to go. We highly recommend WP Engine – it’s what we use, and we’ve never had a problem. They take care of your servers for you, and if you browse our website or any of our WordPress theme demos you’ll see that it’s blazing fast. Plans start at $29/mo and offer plenty of resources for a new online store. - Domain name
This is your actual URL, and if it’s not included with your hosting plan you’ll need to purchase it from a domain registry (we also recommend adding privacy, especially to avoid all the annoying spam if your email address is public). We use GoDaddy for our domain names (where you can get your domain for just $4.99 for the first year). Once you have a domain name you’ll need to point it over to your server. Cross-reference your domain registry’s help docs with your hosting company’s instructions for guidance on how to do this. - SSL certificate
If you’re selling something you’re going to need to billing personal information from customers. This means that your website absolutely must have a SSL certificate. You can get a free SSL from Let’s Encrypt from most popular web hosts. Or you can use our free SSL guide if you’re using a host that doesn’t yet support Let’s Encrypt.
Once you have your domain name, SSL and hosting all ready you can start building your website and your store with EDD.
WPCrafter Easy Digital Downloads Video Guide
Adam of WPCrafter has put together this fabulous video tutorial to walk you through the process of setting up Easy Digital downloads for the first time. He covers all of the steps we talk about below. We recommend watching the video and using our guide to follow along with key points. By then end you’ll be an EDD pro! Also make sure to check out all of Adam’s other WordPress tutorial videos too – he covers tons of helpful WordPress tips, tricks and tweaks with new videos out every week (so subscribe to make sure you never miss out!).
Step 1: Download & Install Easy Digital Downloads
WordPress really does make everything easy, and installing EDD is just as simple as installing any other plugin. First, log into your WordPress installation. From the main dashboard navigate to Plugins > Add New.
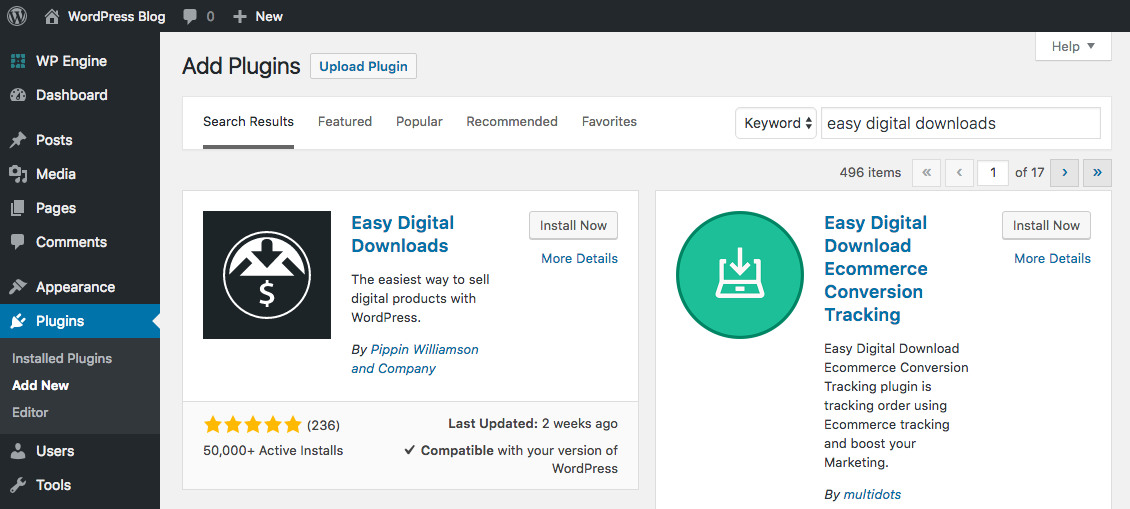
From here search for “easy digital downloads.” The very first result should be Easy Digital Downloads by Pippin Williamson. Click the Install Now button and then Activate.
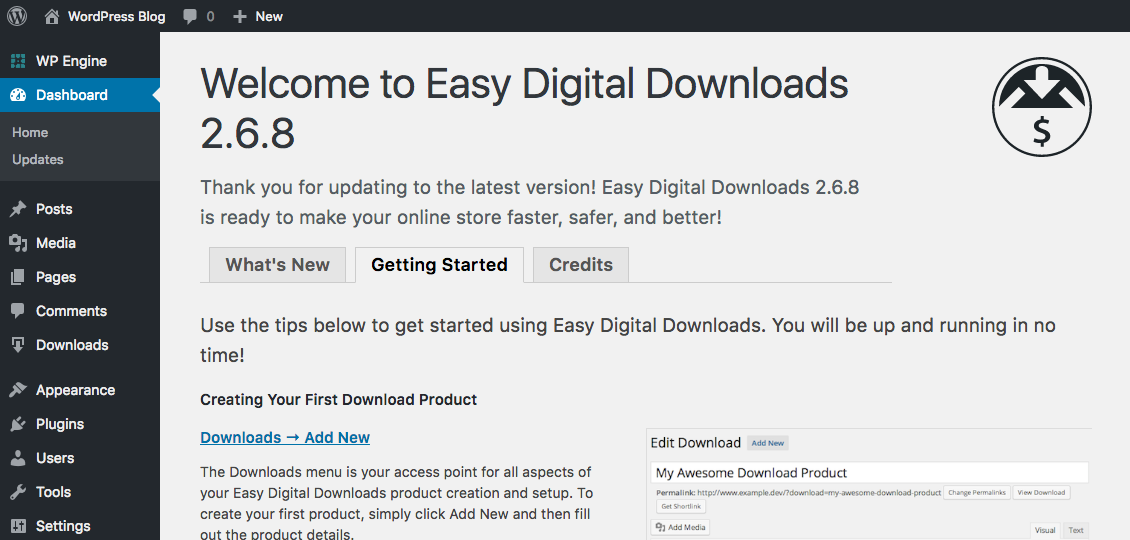
You should see a confirmation page similar to the one above. This adds a new dashboard option called Downloads. This is where you will be able to manage your online store and all of the digital goods you add for sale.
Step 2: Easy Digital Downloads Store Settings
Before adding products we feel it’s important to have the core options of your store set. There are of course tons of awesome options built-in so you can optimize your store however you’d like. We’re just going to touch on the options that we feel are most important, but that shouldn’t stop you from throughly reviewing all the settings to be sure the match up with your needs.
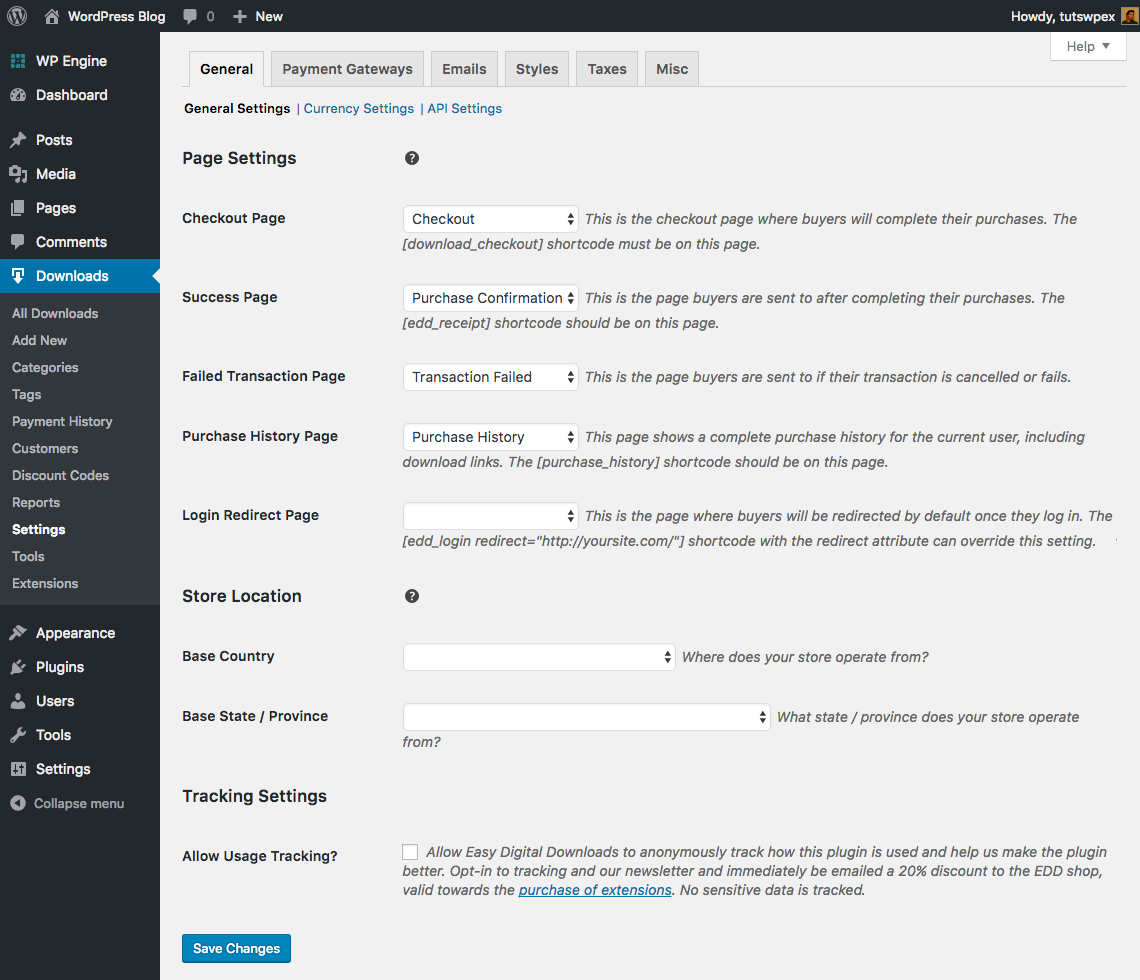
To get started click on Downloads > Settings. This will take you to your general settings page. When you install EDD your checkout, success, fail transaction and purchase history pages are all automatically created and assigned for you (easy right?). On this page all you have to do is add your Store Location: Country & State. Then click to save.
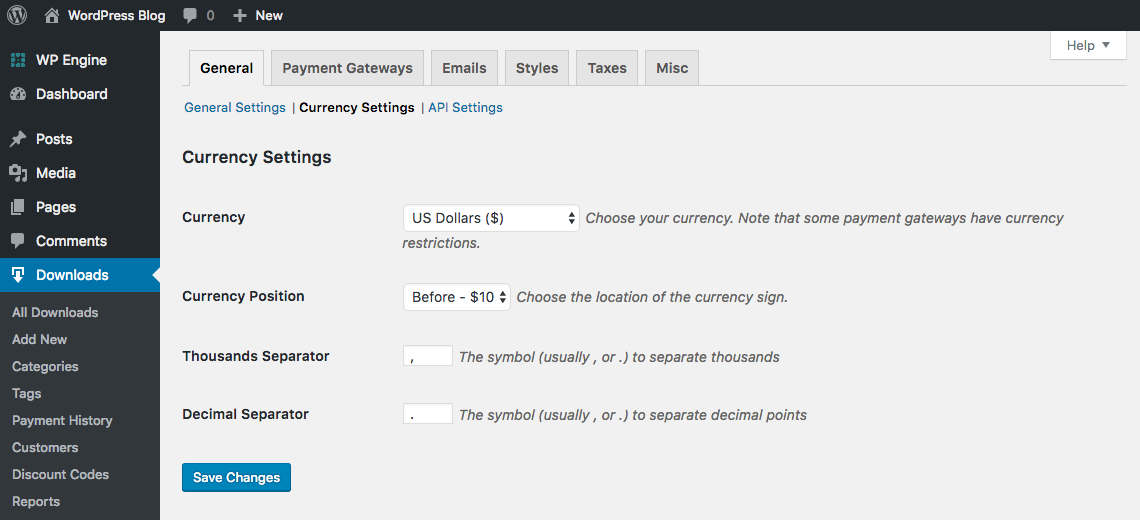
Next click on the blue Currency Settings link under the General tab. By default EDD will use standard US Dollar settings for your currency. If that’s what you use then no changes should be needed, but for any other currency edit the settings for your currency, currency sign position, thousands and decimal separators. Again, remember to save.
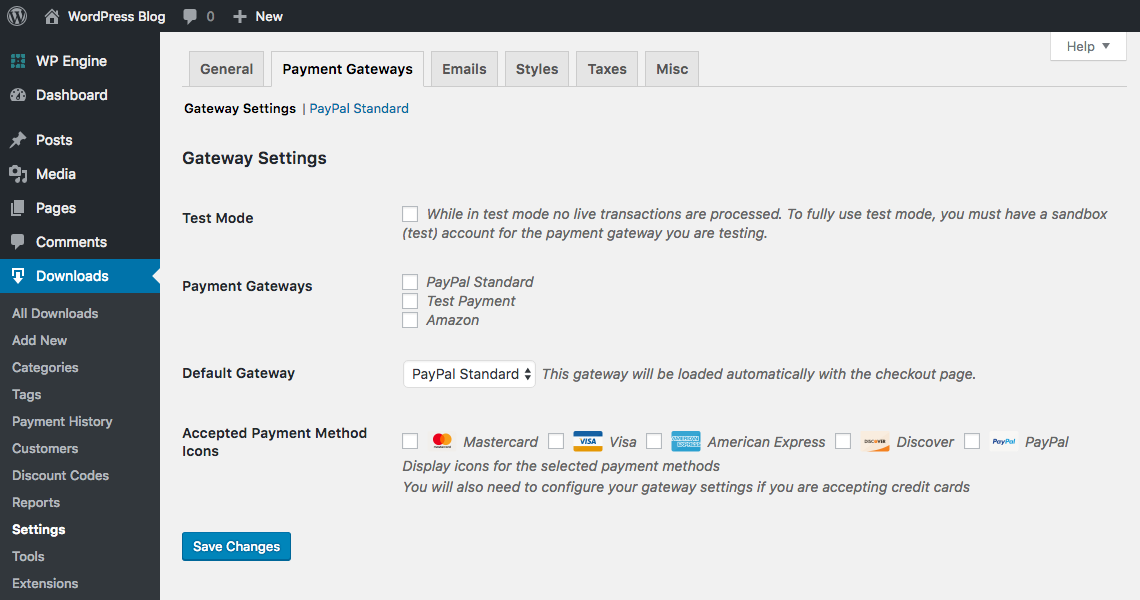
Now select the Payment Gateways tab. This section is where you can enable the payment methods you want to accept. By default EDD includes Paypal and Amazon, but it does support a number of other gateways including Stripe, BitPay, Braintree, NETbilling, Authorize.net and more. These gateways are all available as premium gateway add-ons for EDD for $49 per year.
NOTE: This is also where you can enable test mode. We recommend using test mode when first setting up your store to be sure you’ve correctly configured your gateway(s).
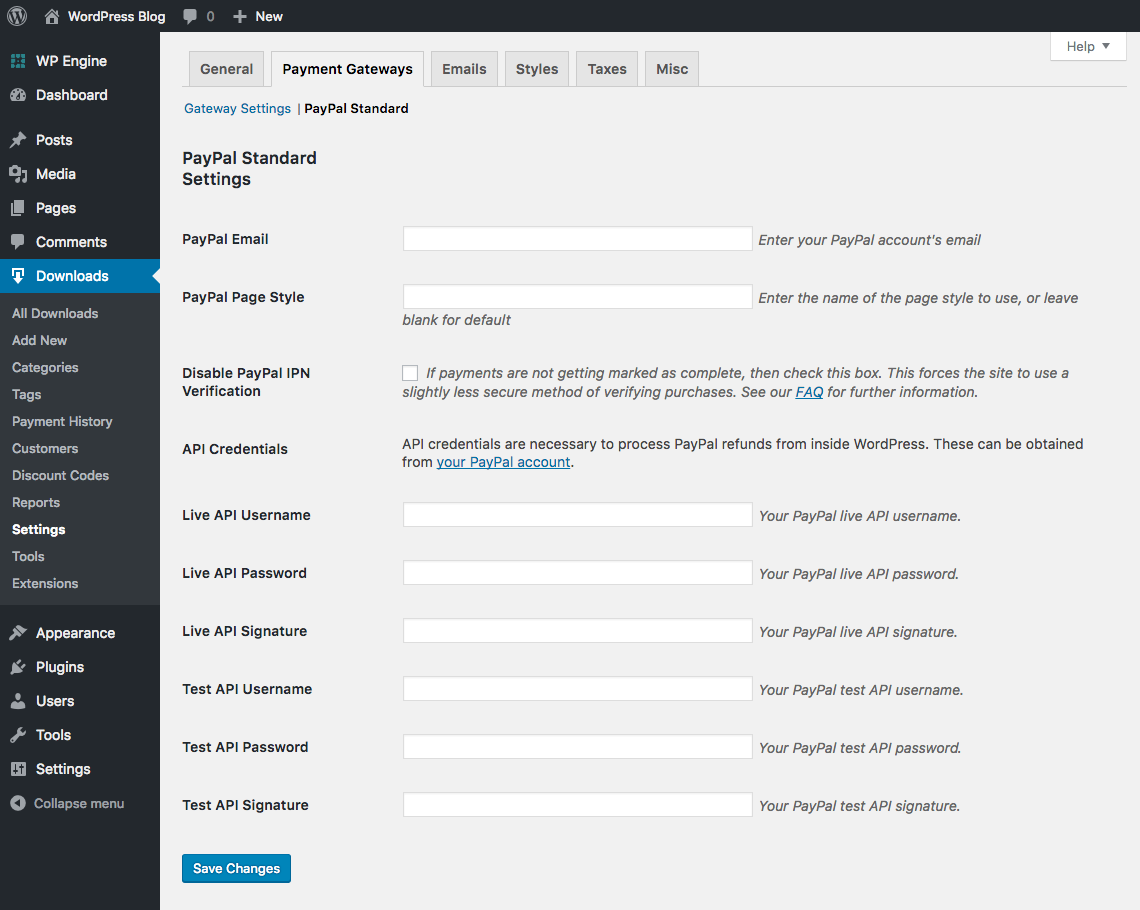
If you’re using PayPal, click on the PayPal Standard option under the Payment Gateways tab. For many stores PayPal is an easy and efficient way to accept payments. The setup is fairly straightforward. You’ll need to add your PayPal Email, API Signature credentials and then save.
If you’ve added additional gateway add-ons now’s the time to configure those as well. Each gateway will have different settings so reference each add-on’s documentation for help.
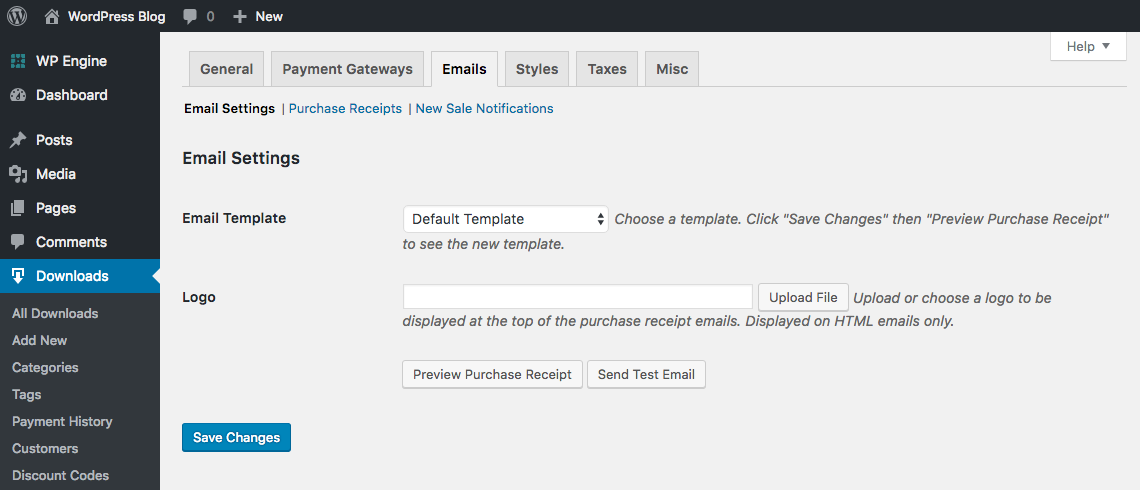
The next section to review is the Email Settings. EDD includes a default email template, so if you’re happy with that just add your custom logo and save. You can of course add your own custom template or use the Email Templates Add-on (which includes 12 email templates for just $15) instead.
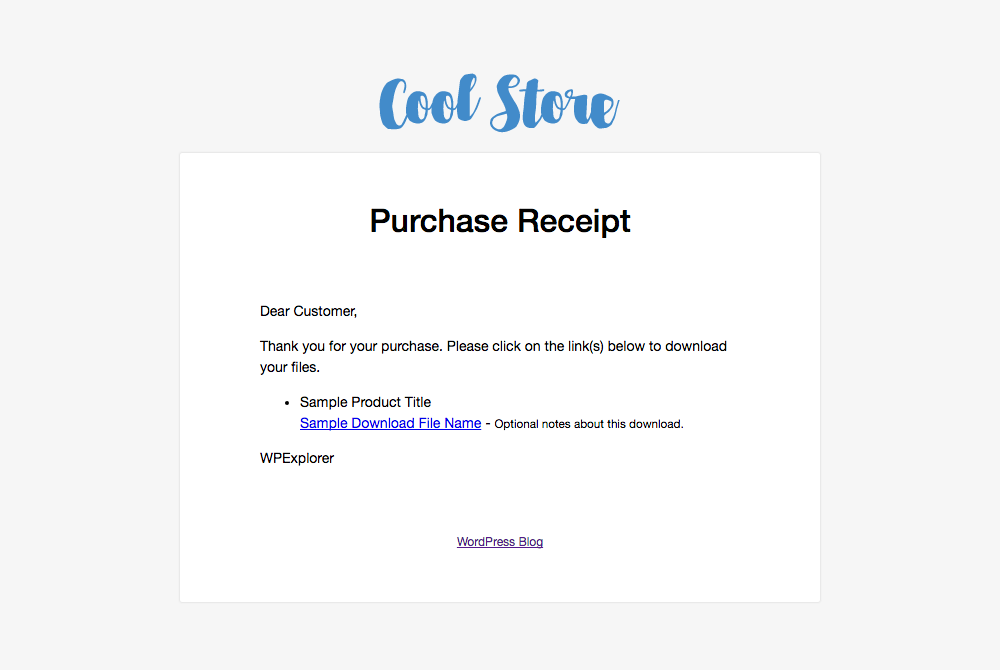
You can also click to Preview Purchase Receipt to see the email sent to your customers. If you want to make any changes use the options under the blue Purchase Receipts link under the Emails tab.
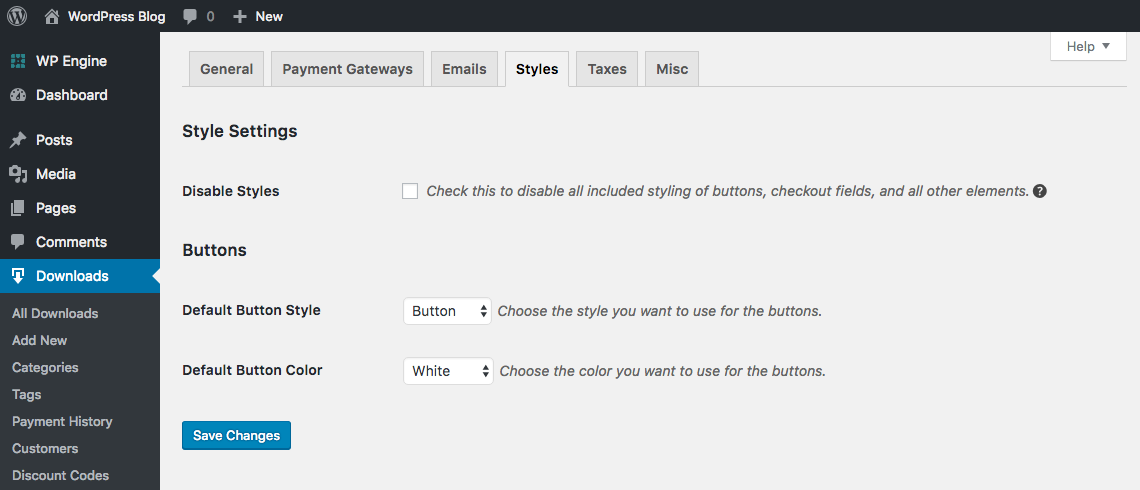
With your emails prepped, click on the Styles tab to select a default button style and color. If you’re using a WordPress theme without styling options this is a quick and easy way to make sure your shop at least fits the color scheme for your business.
If you want to really change the way your EDD store looks we recommend using a WordPress theme specifically designed for and integrated with EDD. This way you know there won’t be any compatibility issues and you’ll be able to style your store without much effort on your part.
If you’d rather tackle some custom CSS on your own make sure to check the Disable Styles buttons in this tab and click save. Then use the directions in the EDD help doc for customizing the plugin to get started with your own custom CSS.
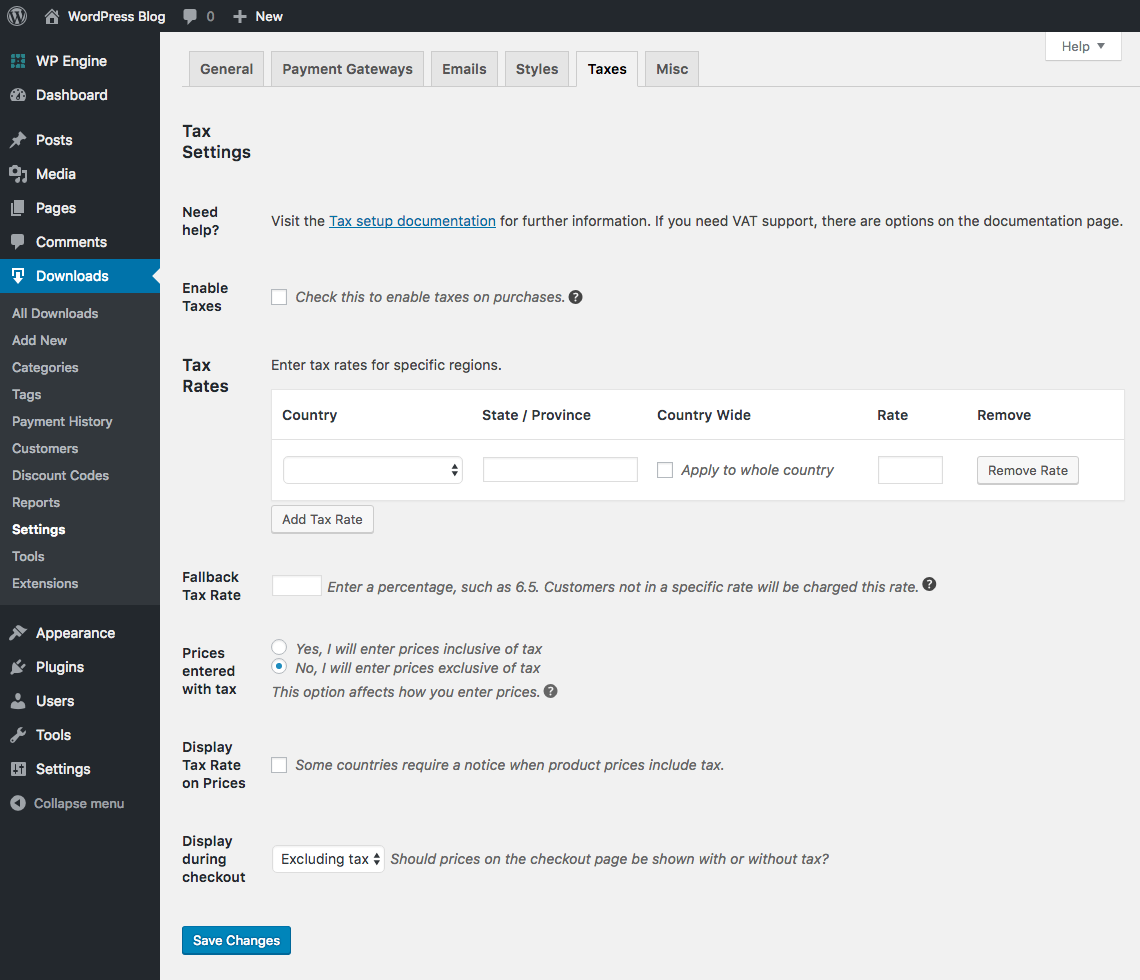
The Taxes tab is very important, and as much as we would love to give you free advice for this we’re not accountants. How you setup EDD taxes is going to depend on the regulations and rules that apply to your own individual location. Make sure to do your research, enable your required tax settings and then save your changes.
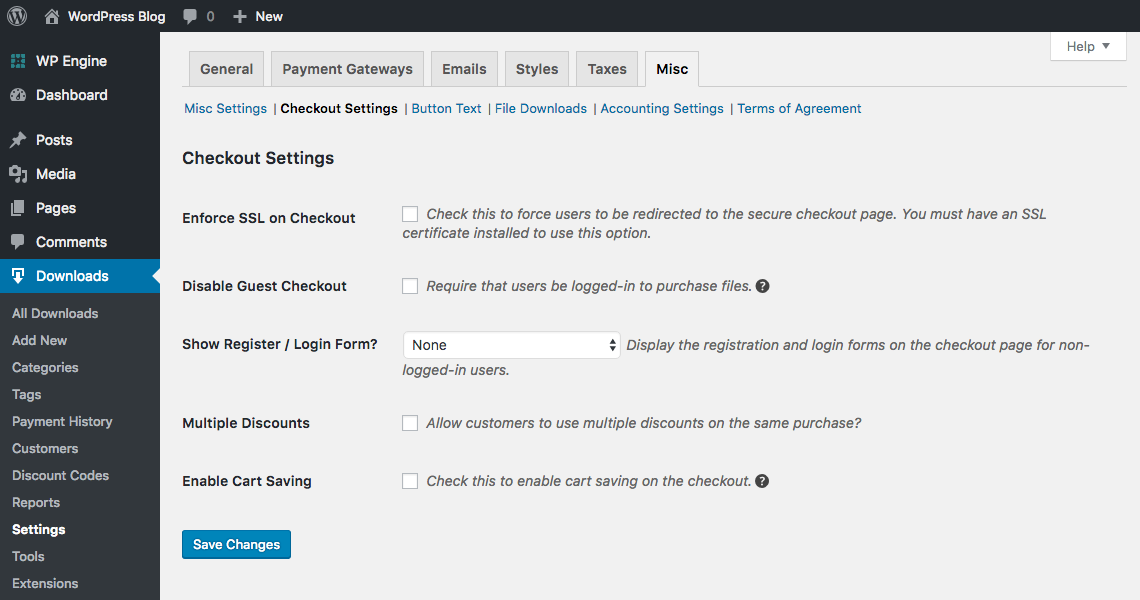
Moving on to the Misc tab, click on the Checkout settings. The most important option is to enforce SSL on Checkout. This encrypts website data sent between the customer’s browser and your server. As an online merchant accepting sensitive billing information it’s important to use reasonable security measures to protect your customers’ data, and that means using SSL for your checkout page.
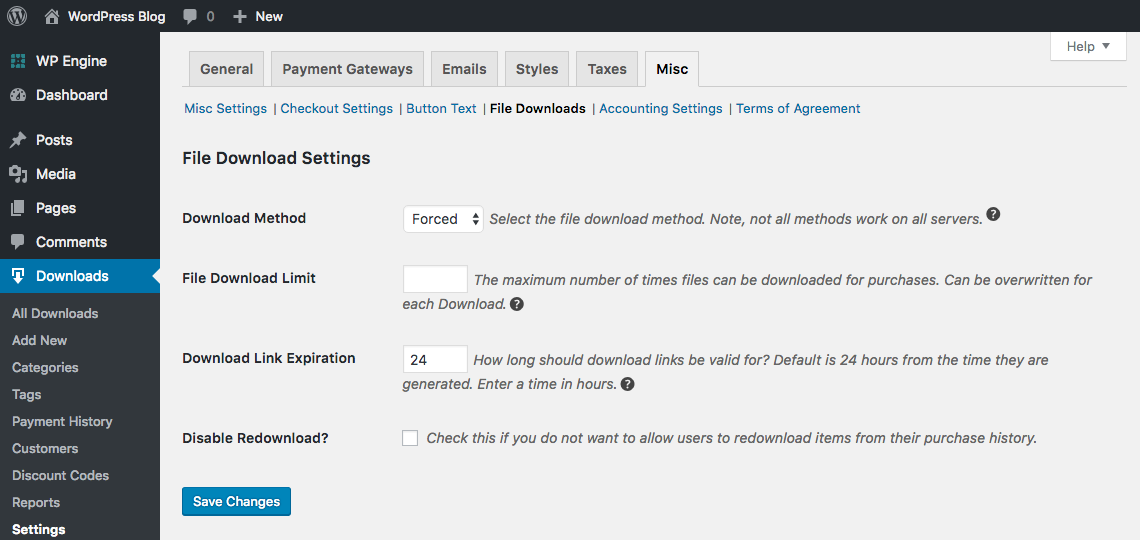
If you want to set limitations for how many times your products can be downloaded go to the File Downloads section to enable the File Download Limit option. This way you can specify if an item can only be downloaded once, twice, unlimited, etc.
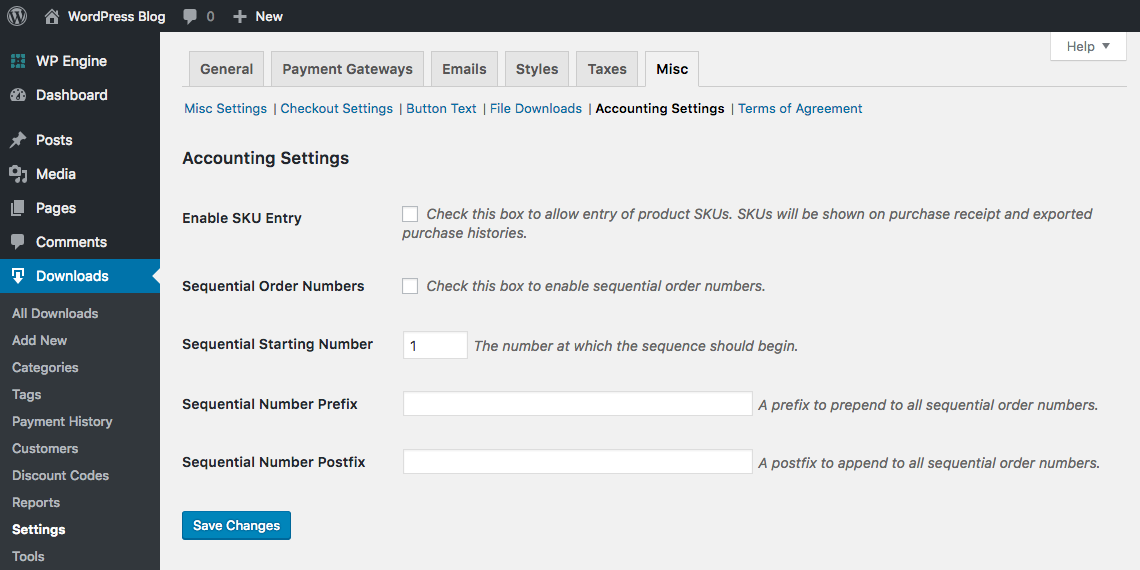
For the love of your accountant please enable the Sequential Order Numbers option under the Accounting Settings in the Misc tab. This will make keeping track of your financials and the reports associated with them much easier for your numbers person.
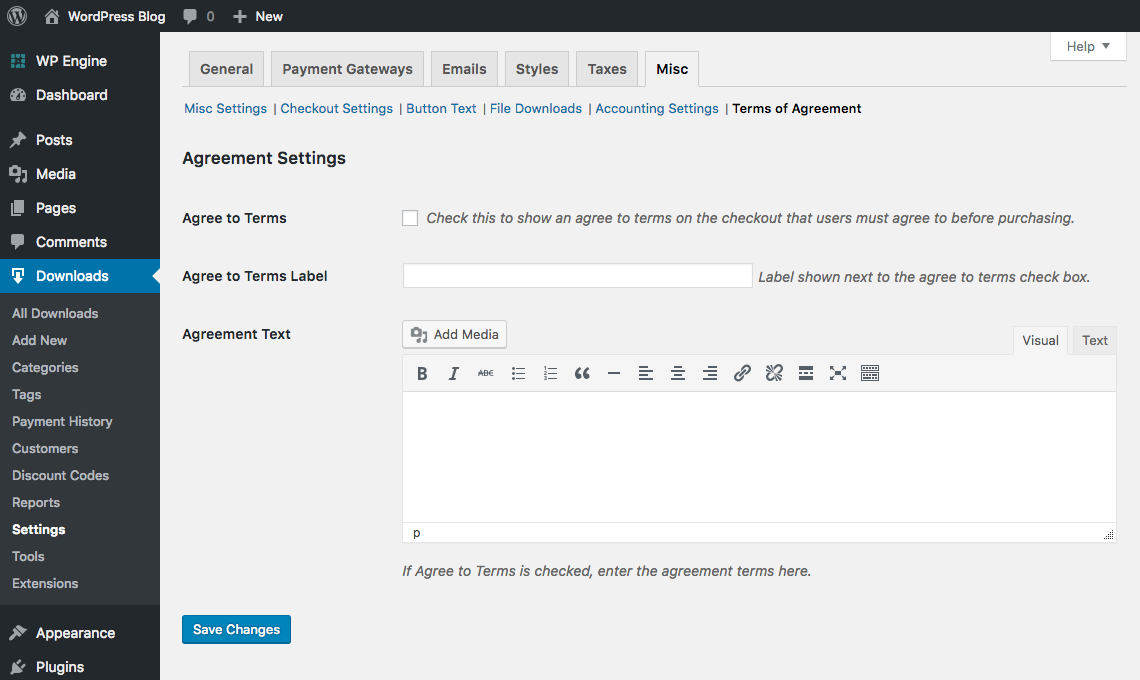
Lastly go to the Terms of Agreement section to create your terms that customers should agree to before checking out. If you need help creating your terms you can do a quick Google search.
Woohoo – your settings are all ready and you can now move on to adding product downloads to your store.
Step 3: Adding Easy Digital Downloads Products
With EDD installed and setup you can it’s time to add your downloads. The first step is to click on Downloads > Add New. This will open a brand new product page for you to add all of your download info.
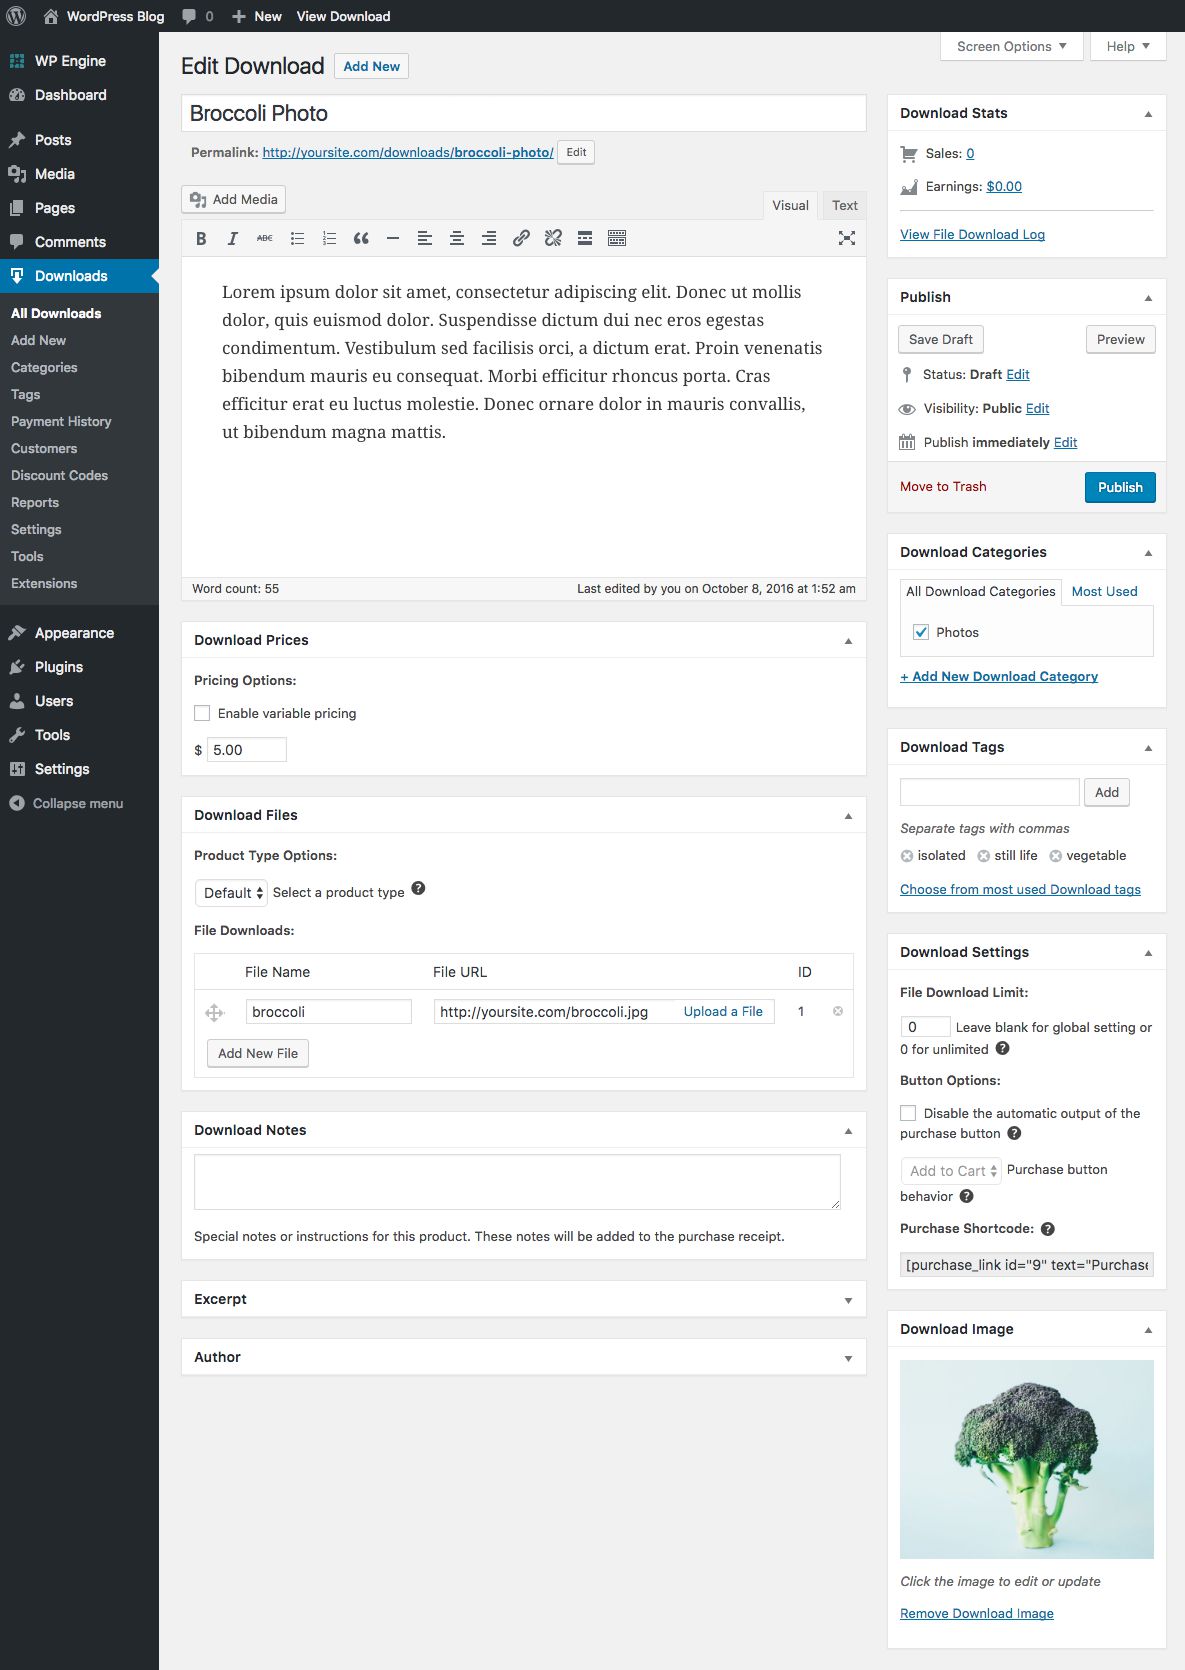
You can look at the screenshot above to see what your product might look like when you’re done adding in your content. You’ll want to fill in most of the sections.
Starting from the top you’ll need to add a product Title and a Description, as well as select any applicable Categories or Tags if you’ll be using them for your store.
Moving on down the page you should see a metabox for adding your Download Prices. This is where you enter your price, or enable variable pricing if you want to offer more than one download format (such as difference product licenses, different file sizes, etc.).
Next select your Product Type (default or bundle) and then upload your file(s) to the File Downloads section.
Lastly, you have the option to override the global Downloads settings you applied earlier, such as download limits and button options. You can also upload a featured Download Image if it makes sense for your products.
When your all done, publish your download and then repeat the process for all of your other products!
Step 4: Creating Your Main Shop Page
You’re almost done creating your shop! The last step is to create your main store page that showcases all of your products. EDD uses shortcodes to make inserting your products on any page easy.
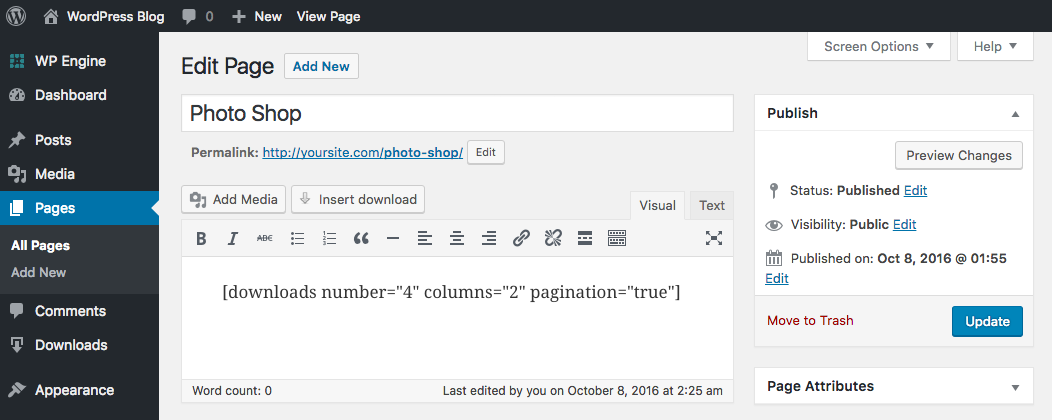
Just create a new page and inset the EDD “downloads” shortcode. You can see what we used in the image above. There are a ton of different shortcode parameters you can use to change how the downloads look when you insert theme (options for hiding the buy button, number of columns, showing the full item description, and more). We used the options for number of downloads per page, number of columns and for added pagination.
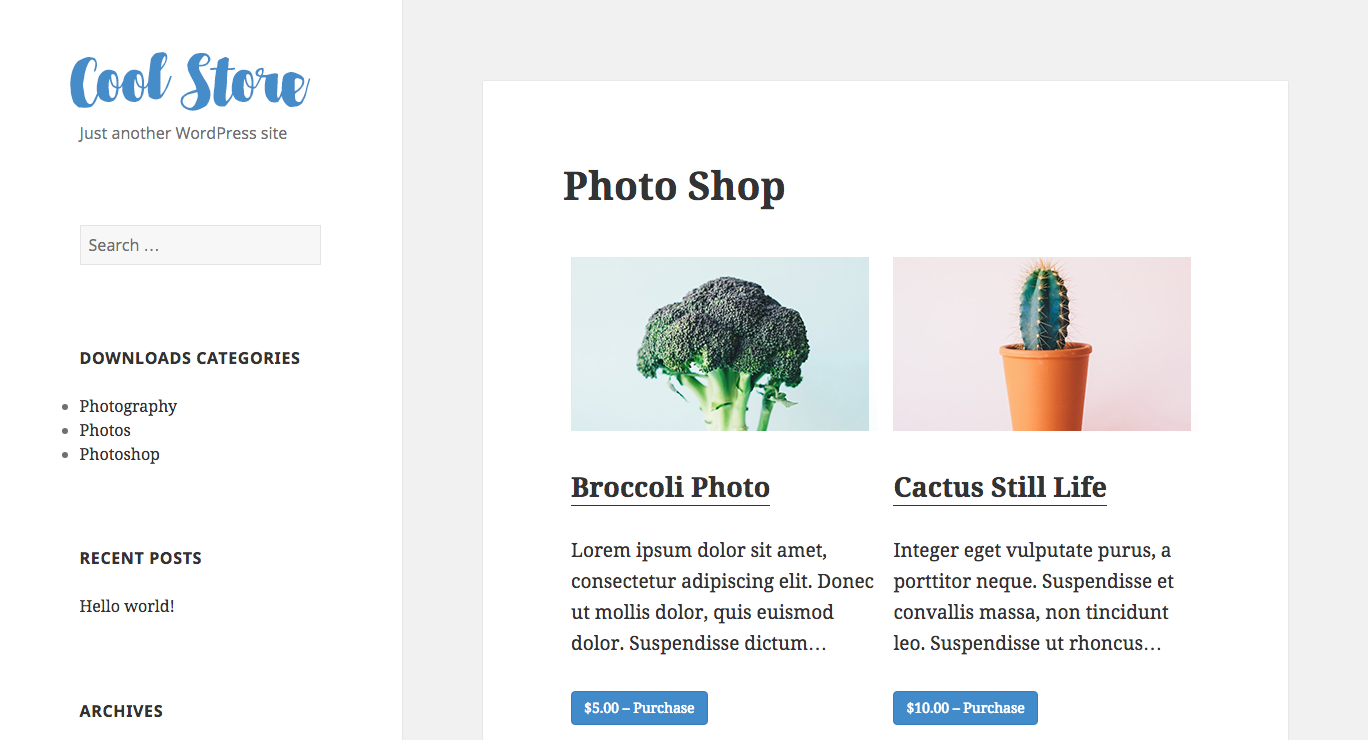
And this is what our shop looks like on the front end. Note, this is with the default WordPress 2015 Theme. The only tweaks we made were uploading a custom logo for our Cool Store (which can be added from the WordPress Customizer under Appearance > Customize > Site Identity) as well as changing the default thumbnail cropping (which can be changed from your WordPress dashboard under Settings > Media).
Customizing Your Easy Digital Downloads Store
Want an awesome looking EDD store without having to code a bunch of custom CSS yourself? Easy – that’s what themes and add-on plugins are for. With a good theme and a few helpful plugins you can create an awesome e-store with all the features you need for your business.
Easy Digital Downloads WordPress Themes
The quickest way to change how your EDD shop looks is with a theme. Theme developers have taken the time to target all the CSS elements throughout the e-commerce plugin so you can have a beautiful shop. While there are many great EDD themes available on the web and these are just a couple of our favorites.
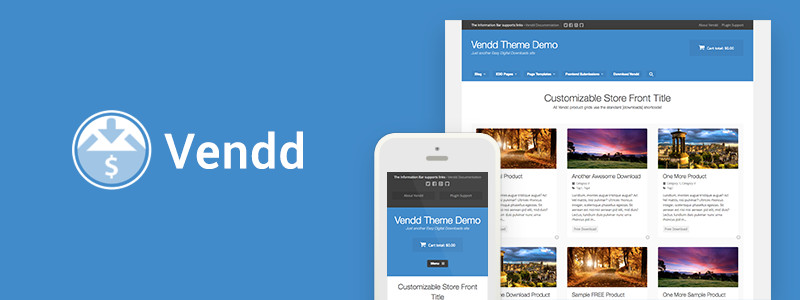
The Vendd WordPress Theme by Easy Digital Downloads is no only free, but also designed and developed by the same team behind EDD. This means you don’t have to worry about any compatibility issues as each and every aspect of the theme works seamlessly with EDD. There are plenty of built-in options for colors, backgrounds, page templates for front-end submissions, 3 page layouts and more.
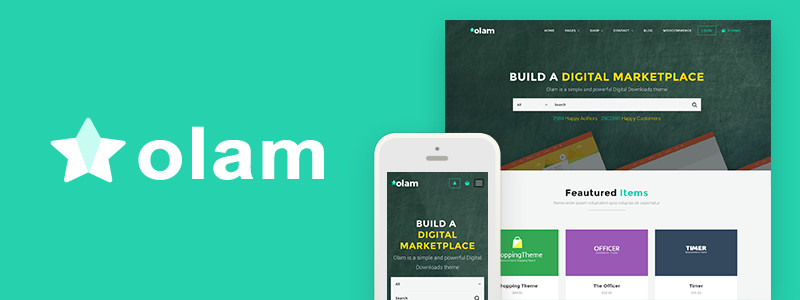
If you’re looking for a flexible premium theme then you should have a look at the Olam WordPress Theme by webNesters. Olam is an excellent option for creating an online store with WordPress as it supports multiple e-commerce plugins, including EDD. The theme also includes the Unyson page builder to you can create custom pages in addition to you powerful EDD store.
Easy Digital Downloads Add-ons
Depending on what you’re selling, if you want to have affiliates, or if you want to be able to sell memberships there are tons of awesome premium add-ons available on the EDD marketplace to help you add more features to your digital store. Currently there are more than 150+ free and premium add-ons to choose from. Here are just a few of our favorites.

The Reviews Add-on for Easy Digital Downloads makes it possible for your customers to leave ratings and reviews for your downloads. This is a great way to show proof that you make awesome products, and the add-on even includes an option to send your reviewers a coupon code as a thank you for leaving their opinion.

For a more professional checkout experience you should consider the PayPal Pro & Express Add-on for EDD. With PayPal Pro users an make a credit card purchase without leaving your site, and PayPal Express offers additional layers of security so your customers’ information stays safe.

Give your customers a reward with the Social Discounts Add-on for Easy Digital Downloads. With this add-on you can offer discounts when users share your products on various social networks. But you can also disable the discount feature, and use the add-on as an easy way to add social sharing buttons to your product pages.

The Dropbox Add-on for Easy Digital Downloads makes it possible for you to host your downloadable files on Dropbox instead of on your website. This can speed up the download processes as well as take a huge load off of your server, saving you money on hosting or transfer fees.

Want to offer your downloads as part of a premium membership? The Recurring Payments Add-on for EDD makes it possible for you to setup recurring payments that get charged to your customers on a daily, weekly, monthly, yearly, etc basis. Combine this with the Content Restriction Add-on to create members-only areas for your subscribers.
For many new stores the Easy Digital Downloads Starter Pack Bundle is perfect. You have the option to select all the add-ons that you want at one time. And when purchasing 5 or more add-ons you’ll instantly save 30% on your purchase. You can’t beat that deal!
If you’re planning to build your own marketplace then the Easy Digital Downloads Marketplace Bundle is a must. This pack of 8 premium extensions includes all of the add-ons you’ll need to all members to submit items for sale, manage commissions, collect customer reviews, offer rewards and more. Plus you’ll save $170 by purchasing all 8 add-ons as a bundle.
Lastly, if you simply want all the add-ons then get the Easy Digital Downloads Core Extensions Bundle. This includes and unlimited use license for each and every one of the premium add-ons currently available from EDD. This bundle is the most expensive, prices at $495, but if your a web developer who will be using many add-ons multiple times it’s a great deal (you”ll save nearly 80%).
There you have it – our full, in-depth guide on how to setup Easy Digital Downloads for the first time, as well as a collection of our favorite WordPress themes and EDD add-ons. Hopefully we’ve helped you hone your EDD skills so you can start selling your own digital products online.
Have a question that we didn’t cover in this article? Or more tips for new Easy Digital Downloads users? Leave us a comment below – we’d love to hear from you!


This is interesting article! I’m just wondering how much cost if you build a ecommerce store.
Hmm – the cost will depend on which add-ons you purchase for your store. You can checkout our article on The Real Cost of Building a Website with WordPress to see what it might cost you for your first year of running your own website, then decide which EDD (or WooCommerce) addons you think you might want to get a more accurate idea for your individual needs 🙂
hi there..please help me…struggle bout strore front…i cant find a way to make store front…all i have to know just bout every single post that i’ve made just end up on to the blog page style..what should i do to make store front page..
thank u..
No problem! Just take a look at “Step 4: Creating Your Main Shop Page” in our guide above. EDD uses shortcodes for inserting products, so you’ll need to create a new page then insert a shortcode to create your shop homepage 🙂
Don’t forget Easy Digital Downloads Customer Emailer extension. It lets you email your customers from the WP admin environment: jamestibbles.co.uk/edd-customer-emailer
I have been a happy user of the Olam theme with my EDD online store for more than 2 years. It’s an excellent product, very configurable and the support team behind it is responsive to my queries. Highly recommended.
Hello, I have a problem and that is that I use a different template than the ones provided by EDD. How can I get the shopping cart icon to work, since it doesn’t appear?
If you can, try to contact the developer of the theme you’re using. They should be able to help!
Easy Digital Downloads is not automatically sending customer receipt with downloadable links. The emails are coming to me as the administrator. What do I need to change in email settings to rectify this? Your tutorial does not show how to configure the settings. Thank you.
I would suggest checking this EDD documentation for email settings and this one for troubleshooting emails.