How to Add Custom Code to Your WordPress Site


Writing PHP, CSS, and HTML5 to modify a WordPress site can get pretty frustrating, but a good guide can make it easier. This is not that guide. This is just about how to add the code to your site once it’s already done. Don’t worry, though – that’s just as important. As there are quite a few ways to go about it, it helps to know the differences between the various options. But first, two warnings:
- Before you modify anything, back it up. In fact, keep backing up your work throughout the process. It also helps to have a separate file to paste discarded or soon-to-be-used code snippets into.
- If you installed someone else’s theme, never add code to your theme’s functions.php or style.css files. If you do, then when the theme gets updated, all your hard work will be wiped out.
Over the course of the rest of this article, I’ll explore some alternatives, arranged from the simplest to the most complex.
WordPress Plugins
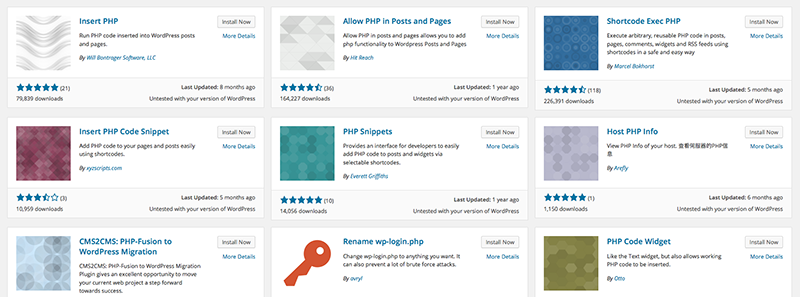
Just as there are multiple types of code modification, there are multiple types of custom code plugins. The 2 most common types are PHP and CSS. As you may know, PHP governs the architecture and function of WordPress. So, if you’re trying to modify your website’s core functions, add, or modify a feature, there are plenty of PHP plugins available for download to assist you with that.
Likewise, you probably know what CSS does, too – it pretties things up. And if that’s all you want to modify, a Custom CSS Plugin will let you do that with minimum hassle. Lurking in the background is JavaScript, which has a complex relationship with plugins. To clarify, it’s a bit different in that it works perfectly fine if you add it to the header, the footer, or a child theme – but in order to use it in a post, you have to use a special plugin. Something like CSS & Javascript Toolbox should do the trick. As a side note, for the sake of your page’s speed, it’s better to put it in the footer.
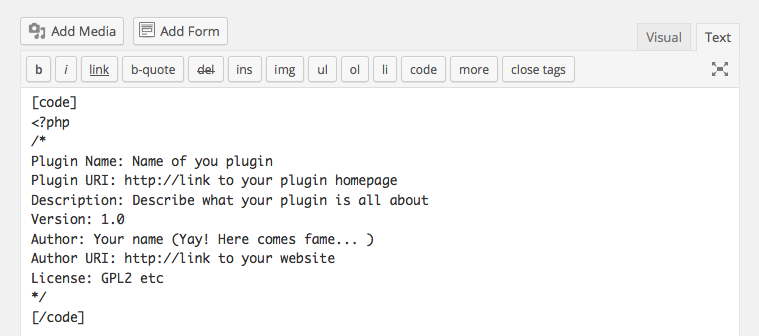
Writing Your Own Plugins
There are a ton of WordPress code snippets available on the internet to change, disable or modify certain feature. However, knowing where to put them is crucial for functionality. For example, if you have a snippet that modifies a plugin’s function, you’ll want it to work no matter what theme you have activated. The same goes for snippets that deal with site-wide alterations. So, in either case, it might be a good idea to create a new plugin for them. Don’t worry, it’s not as intimidating as it seems.
One of the primary benefits of creating a plugin is that it’ll allow you to activate or deactivate the plugin on demand. It also allows contextual information about the plugin to be viewed in plugin pages. The only major drawback is that it can be accidentally deactivated by anyone else who’s allowed to modify the site, but a stern warning to them should be able to prevent that.
As a side note, you can also create a folder called mu-plugins in your wp-content folder. Any PHP files inserted there will always be executed, and they can’t be activated or deactivated. This keeps custom code away from theme and plugin folders. But only do it with plugins that you’re always comfortable running in the background.
Custom CSS Files
If the changes you’re planning are minor, you could create a custom-style.css file. If you want to preview your changes before making them, you can always use DevTools if you’re running Chrome, or a similar application. Another possibility is to add custom CSS via your WordPress theme. Some premium themes, like our Total framework, include a theme panel option to add custom CSS where you can easily find and tweak it. Plus when you update your theme your theme panel settings should remain unchanged – so your custom CSS stays intact.
Remember that CSS cascades in reverse, meaning rules that appear later always take precedence over rules that appear earlier. So any CSS applied to a separate sheet will override the page’s default code. That also applies to CSS inserted into…
WordPress Child Themes

For the uninitiated, a child theme inherits the functionality of another theme, allowing you to modify your design at will (you can learn everything you want to know in our WordPress child themes guide). They were invented for the specific purpose of letting you modify a theme without losing your changes upon updating. Child themes mirror all the changes that you make to the outer, or ‘parent’, theme. So, like applying a Photoshop layer effect, you’re not actually editing the content; you can remove it at any time to get things back to the way they were.
Creating a child theme when you want to modify your code will save you a lot of headaches, and it’s fairly easy (as WordPress modifications go). Just access your site via FTP and create a folder, then create a style.css file that corresponds to that folder. It’s standard practice to name it theme-name-child. After that, all you need is one line in your new style.css’s header to define the template. But there’s also some stuff that it helps to have – which can be found on the WordPress Codex page.
Next, make any necessary changes to the current theme below the @import line. The one drawback to child themes is the amount of research you have to do on the parent theme before you can modify it, without causing any conflicts or weird side effects. And remember that with child themes, you only have to specify what will be different from the original theme. To apply the changes, just ZIP it, upload it via the Appearances > Themes page in your WordPress dashboard and activate it via WordPress. This is assuming your parent theme is also uploaded, of course.
Showing Code
There’s one more type of adding code that we haven’t covered: showing it. If you’re a web designer and would like to show how something’s done, presented it in a way that viewers can copy and paste, it’s important to notate it the correct way. The way your code will be interpreted by WordPress depends on whether you use the HTML section of Visual Post Editor. Entering it directly into the visual editor will work to neutralize it, but there’s no way of putting it in the proper formatting or a code box. The visual editor will just format it the same way as ordinary text. On the other hand, the HTML editor will turn it into code and ruin your website. Don’t worry, you can undo that.
However, there’s a compromise. You can highlight and put your code in a block using the <code> and </code> tags, but that won’t stop the code from activating. All it’ll do is put it in montoype font, in a box, to show that it’s officially code. In order to stop it from activating, you have to change the active symbols to what are called fun character entities. The most common versions of these, and the ones that are sufficient for neutralizing most code, are changing < and > to < and >, respectively (you can learn more about showing code in our post on writing custom code in your WordPress posts).
As you can see, there are plenty of ways to add custom code to WordPress, and I encourage you to experiment, play around with them and see which ones are right for you. Any additional ways to add custom code that I’ve missed? Let me know in the comments.