Custom Table Cell Colors in the WordPress Admin Panel

I always thought that it would be interesting to be able to change the background color posts rows according to different criteria in the WordPress administration. So, I’ve looked around and found some tutorials to do it. But the bad thing is that every tutorial had the same code, probably a simple copy and paste. And furthermore, after a few tests, i saw that all these posts were incomplete. That’s why i decided to go a bit deeper into the explanation of how to add specific background colors to posts row. And to do so, we are going to create a new plugin!
Step 1: The Plugin
Ok, so start we need to create a plugin, as we saw in my previous posts, this is the simplest part. Create a new folder in wp-content/plugins and name it “color-my-posts”. Inside of it, create a new file and call it…. “color-my-posts.php” (please don’t think i’ve no imagination!). Open this file and add this code:
<?php
/*
Plugin Name: Color My Posts
Plugin URL: http://remicorson.com/color-my-posts
Description: A little plugin to color post rows depending on the posts' status in the administration
Version: 0.1
Author: Remi Corson
Author URI: http://remicorson.com
Contributors: corsonr
tags: color, customization, administration, corsonr, remi corson
*/
What this does is simply telling WordPress that there’s a new plugin called “Color My Posts” inside its plugins folder. Now your plugin, even if it’s empty, should be listed in the plugins list under “Plugins” menu. In the next step we are going to create a simple class to instantiate the plugin.
Step 2: The Main Class
As we created a class in my tutorial about adding custom attributes to WordPress menus, we need to do the same and to create a class, here is how to do it:
class rc_color_my_posts {

	/*--------------------------------------------*
	 * Constructor
	 *--------------------------------------------*/

	/**
	 * Initializes the plugin
	 */
	function __construct() {

		add_action('admin_footer', array( &$this,'rc_color_my_admin_posts') );

	} // end constructor

	function rc_color_my_admin_posts(){
		/* Be patient ! */
	}

}

// instantiate plugin's class
$GLOBALS['color_my_posts'] = new rc_color_my_posts();
Here we are creating a class called “rc_color_my_posts that contains a constructor and a function called rc_color_my_admin_posts(). In the constructor we are hooking the rc_color_my_admin_posts() function to admin_footer. This means that our function will be taken into account during the administration footer loading. Now all we have to do is to add CSS code to our function. This code will be printed directly into the WordPress admin pages source code.
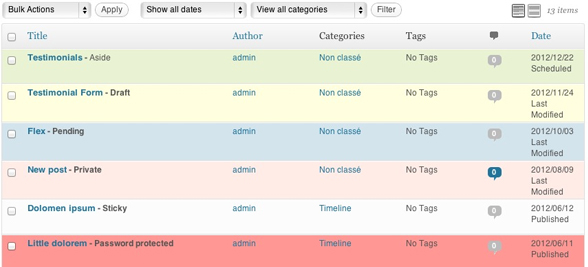
Step 3: Styling Posts
As i sais before, all tutorials talking about styling post row in the WordPress administration i saw, we dealing with post status only. That’s true, you can style posts row by post status, but not only. For those who are interested in, there’s a function called get_post_class() in the /wp-includes/post-template.php core file. Just in case – Don’t modify the code of this file (at least nor for now)!
Well this get_post_class() function is great because it’s the one responsible for determining a post classes. This function is used in the administration and in the frontend. Here is how to add custom CSS code for each class generated by get_post_class:
function rc_color_my_admin_posts(){
 ?>
 <style>
 /* Color by post Status */
 .status-draft { background: #ffffe0 !important;}
 .status-future { background: #E9F2D3 !important;}
 .status-publish {}
 .status-pending { background: #D3E4ED !important;}
 .status-private { background: #FFECE6 !important;}
 .post-password-required { background: #ff9894 !important;}
/* Color by author data */
 .author-self {}
 .author-other {}
/* Color by post format */
 .format-aside {}
 .format-gallery {}
 .format-link {}
 .format-image {}
 .format-quote {}
 .format-status {}
 .format-video {}
 .format-audio {}
 .format-chat {}
 .format-standard {}
/* Color by post category (change blog by the category slug) */
 .category-blog {}
/* Color by custom post type (change xxxxx by the custom post type slug) */
 .xxxxx {}
 .type-xxxxx {}
/* Color by post ID (change xxxxx by the post ID) */
 .post-xxxxx {}
/* Color by post tag (change xxxxx by the tag slug) */
 .tag-xxxxx {}
/* Color hAtom compliance */
 .hentry {}
</style>
 <?php
 }
As this code isn’t complicated i added comments in the code itself. So basically, to style rows by:
- Post status, use .status-xxx where xxx is the post status
- Author, use .author-self to target the posts you wrote, and .author-other for posts written by other authors
- Post format, use .format-xxx where xxx is the post format
- Post category, use .category-xxx where xxx is the category slug, you can target as many categories as you want
- Post type, use .xxx or .type-xxx where xxx is the post type slug, you can target as many CPT as you want
- Post ID, use .post-xxx where xxx is the post ID, you can target as many posts as you want
- Post tag, use .tag-xxx, where xxx is the tag slug, you can target as many tags as you want
- .hentry is used to target hAtom compliance
I haven’t set colors for all classes, but you can do it yourself and customize the plugin to make it look like what you really want to.
What About Sticky Posts ?
When i was working on this little plugin i noticed that there was no class added to sticky posts. Well, at least in the administration. So i went again in the post-template.php file and saw that there’s a .sticky class added to sticky post but only if is_home() && !is_paged()… why ? That’s really strange. That’s the reason why I created a ticket on WordPress core track to mention it. For those who really want be able to style sticky posts in the admin, simply add this code to get_post_class() function even if i recommend to never ever modify WordPress core files:
// sticky for Sticky Posts in administration
if ( is_sticky($post->ID) && is_admin() )
$classes[] = 'post-sticky';
Download The Plugin
For those who want to use the plugin directly out of the box without having to create it by yourself, i added the plugin to the repository, simply click here to download it.


Simply great!
Thanks Bruno!
Really nice plugin; coloring posts in the admin area should be built-in to WordPress, IMHO.
It would be interesting to expand this plugin to include filters for easy customizing of the post colors, or perhaps enqueuing the styles the WordPress way instead of just printing them into admin head.
Yes, we could improve this plugin, but i just wanted it to be a start of something. Who knows, i’ll maybe create a more complete version of it. I’d like to!
If I have multiple authors how can I edit the Php file so that I can give each authors post a unique color?
Oh, I just love this! Will be so handy on my larger sites. Thanks so much =D
Hi Remi
i want to set “Color by author data”, but it override me the “Color by post Status”.
then i`ve triet to leave the “Color by author data” as it is and only set a border for “author-self” to show better my posts…
but it doesnt display it…
/* Color by post Status */
.status-draft { background: #f0f294 !important;}
.status-future { background: #E9F2D3 !important;}
.status-publish {/* background: #daff7c !important;*/}
.status-pending { background: #D3E4ED !important;}
.status-private { background: #cecece !important;}
.post-password-required { background: #ff9894 !important;}
/* Color by author data */
.author-self { border-color:#FFFF00; border-width:2px; border-style:solid !important;}
.author-other {}
hope you know what i mean and can tell me how to do it? thanks for both
Brilliant. I have one questions though, I want to change the colour of a custom post category. I’ve tried all combinations of your above code, but not working. I can change based on custom post type, but not custom post category. Do you have any advice on how to change a CPT category color?
Hi, the coloration depends on a specific order. That’s why sometimes if do not respect the order the coloration won’t be taken into account. About custom category that’s a good question, to be honest, i haven’t tested it!
Hi,
Very nice plugin.
are we have a way to colorize custom post type category?
Thanks
Great plugin Remi, could this be used to colour code pages?
I have a large number of landing pages for desktop and mobile and I would like to easily identify these pages without ending the page titles with DLP (Desktop Landing Page) & MLP (Mobile Landing Page). I’ve looked for a solution but cannot find a plugin that lets you easily identify different pages.
Yes Tony, you can do this with pages as well. If you follow the guide the CSS will be applied to all posts, custom post types and pages. If you want to distinguish by mobile/desktop I would recommend adding “Tags” to your pages which can be done easily via a plugin or a little code. Then tagging your pages “mobile” and “desktop” and if you want to add colors you can easily targeting their CSS using “tag-mobile” and “tag-desktop”.
Thank you for the write-up and detailed explanation.
I’m not too keep on getting my fingers dirty in the code and went to download the plugin…It says it hasn’t been updated in 3yrs…although being something so simple, is it really necessary for the update…? or is everything still A-ok with WP 4.9?
Thanks
Hi Doug,
This is AJ the owner of the site. WordPress hasn’t changed in the way columns are created which is why it hasn’t needed an update. But I’ll go ahead and upload a fresh version to host on Github and run through all the code to make sure there aren’t any issues and link to the github instead. Remi, whom, we hired to write this post doesn’t write for us anymore since he got hired full time at WooCommerce so it’s best if I manage the script from now on 😉 Thanks for the heads up!