How to Export and Import Gutenberg Blocks in WordPress
At first, WordPress users had a bittersweet relationship with the WordPress block based builder. Then as we discovered in our guide to Gutenberg, the new editor comes with amazing features that make creating beautiful content easy and fun. Now, some can’t get enough of the editor.
Gutenberg offers you enough features to create remarkable pages and posts, without writing code. No matter the content you want to add, Gutenberg has just the block.
Want to modify and style each content block extensively? Gutenberg has your back thanks to a battery of customization options. Want even more blocks than what is available in the default editor? There are a ton of Gutenberg add-on plugins out there.
That’s why it’s sad many users don’t know about Reusable Blocks, one of Gutenberg’s brilliant features. If you have no idea what we’re talking about, reusable blocks are simply content blocks that you create, save and reuse at will.
Say you want to add a call-to-action, thank you note, signature, form or anything else at the end of each post or page.
In the past, you had to save the feature in a text file on your computer. When you needed it, you’d then copy-paste it into your post or page. Gutenberg has alleviated this problem. Now you don’t have to use text files or create the same blocks from scratch every time.
You can create a single reusable block and use it not only in your posts and pages but also on other WordPress websites.
Whether you create many websites or need to add special content to each post/page, Gutenberg reusable blocks can help you save a lot of time.
And in today’s post, we show you exactly how to create and export reusable Gutenberg blocks in WordPress. Our aim is to help you move and reuse custom content blocks on multiple posts/pages/WordPress websites easily.
Aside: If you create a block using a plugin such as Getwid or Ultimate Blocks, for instance, you must install the plugin on the other WordPress sites you want to reuse said block. Note, also, that your blocks might look slightly different from theme to theme, but it’s all good because Gutenberg offers you a lot of customization power.
That out of the way, grab a mug of coffee and enjoy reading.
Firstly, You Need Reusable Blocks
Unfortunately, you cannot export or import regular blocks. To export and import Gutenberg blocks, you must first create reusable blocks.
For illustration purposes, I will create a thank you note that I would like to add to the end of every post I publish. You know, without rewriting the note every time I need to add it to a post 🙂
My thank you note is nothing complex; just a simple paragraph block with links to Twitter and Facebook. Keep in mind that your block can be anything you want – a banner ad, image slider, quote, list, latest posts, MailChimp form, etc.
Later, I will show you how to export the note (read, block) to a second WordPress website. Sounds good? Great, let’s start.
How to Create a Reusable Block
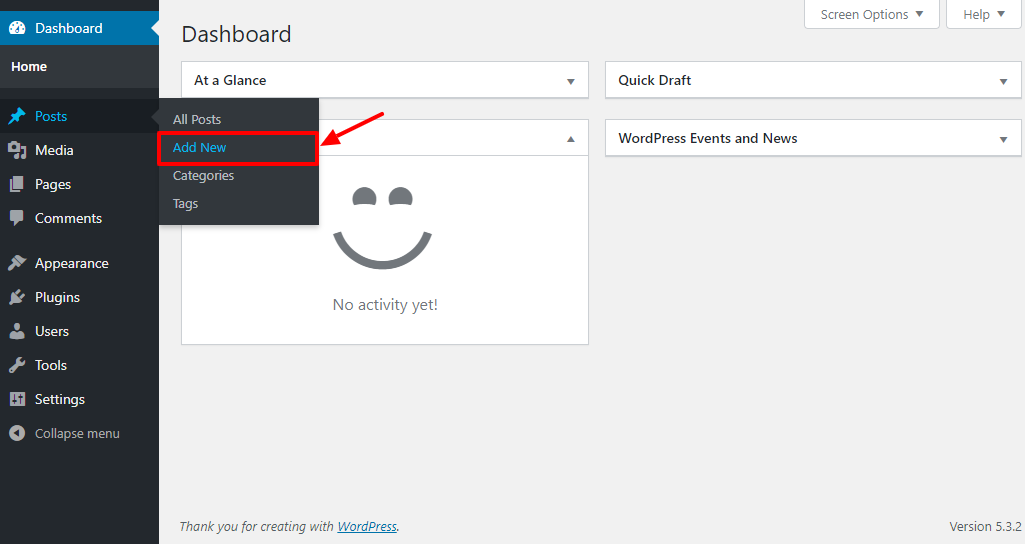
Creating a reusable block is incredibly easy. Navigate to Posts > Add New to launch the Gutenberg editor:
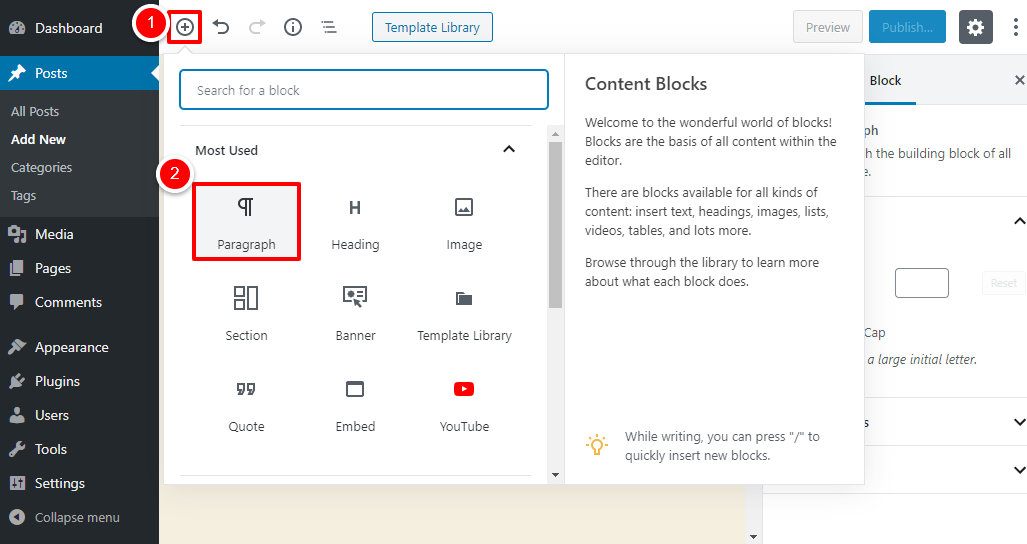
Next, click the Add Block (+) icon and then choose your content block. In our case, I added the paragraph block, as shown in the following image.
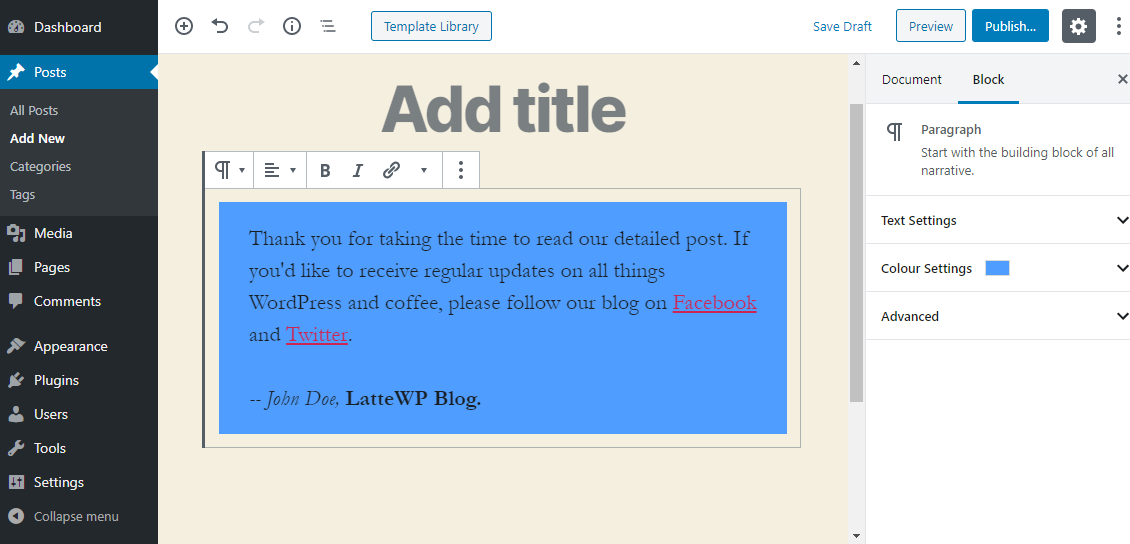
After that, customize and style your block as per your needs. I added some text, social media links, and background color. Here’s how our new block aka thank you note looks in my Gutenberg editor:
Very nice John Doe. Very nice. Now, I will probably follow your blog on social media 🙂 Moving on swiftly.
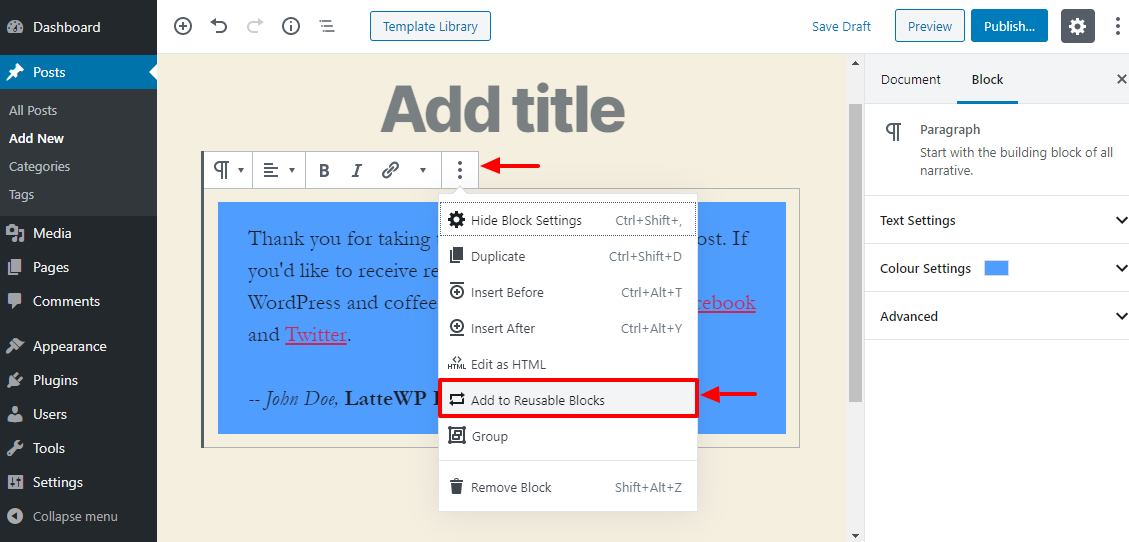
At the moment, the above note is a regular block. We need to convert it into a reusable block that we can export and import. To do that, click the More Options icon, and then Add to Reusable Blocks, as shown below.
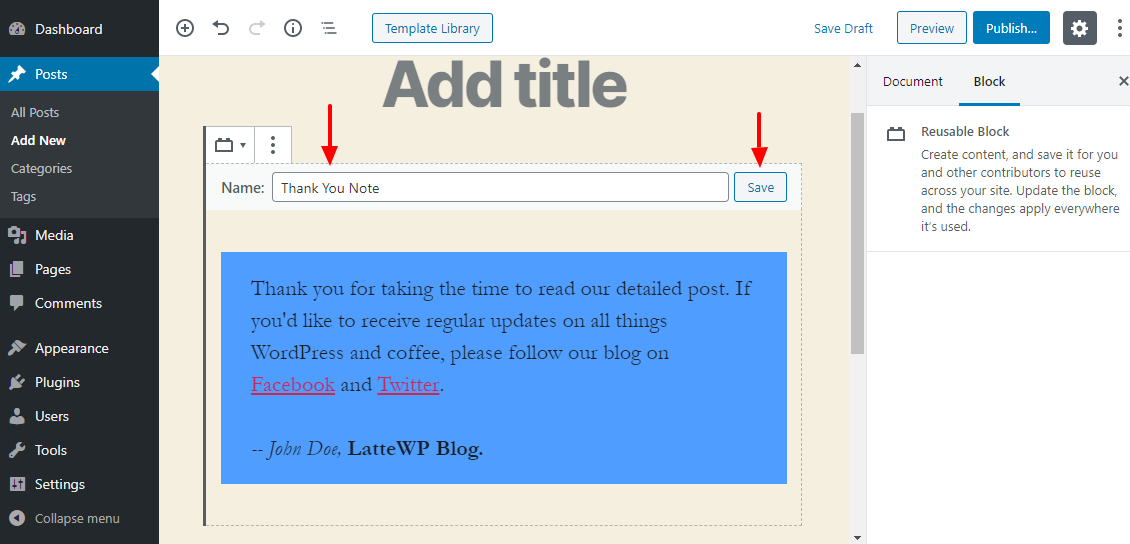
Next, name your reusable block and hit the Save button, as seen below.
And that’s it, you just created your first reusable block. Way to go amigo.
How to Use Reusable Blocks
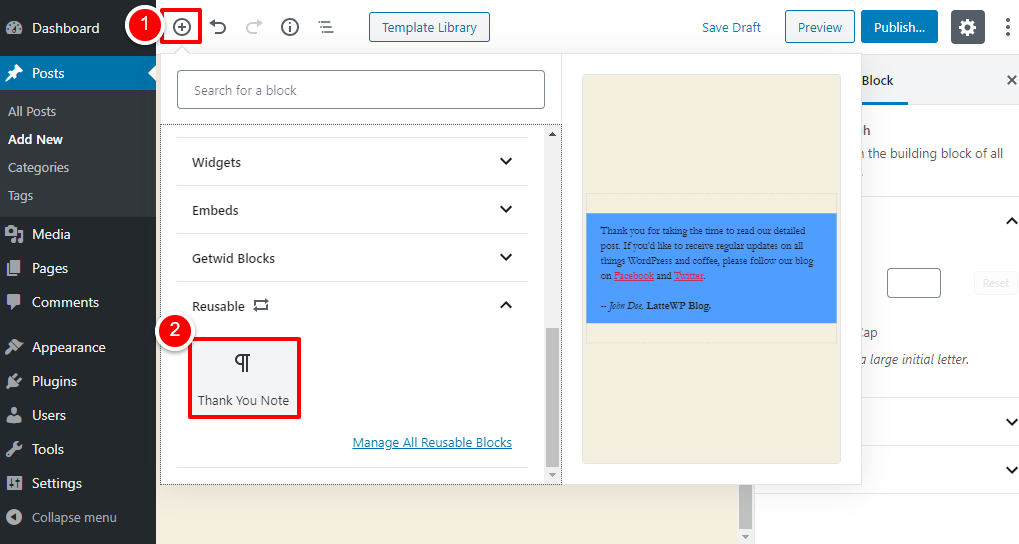
Adding the reusable block we just created to your posts or pages is extremely easy. Once you’ve added the required content to your post or page, click the Add Block (+) icon, scroll to the Reusable Blocks tab, and choose your block (Thank You Note in our case), as shown below.
After adding the reusable block to your post or page, hit the Preview/Publish button to view your results in the front-end. Here is what I got:
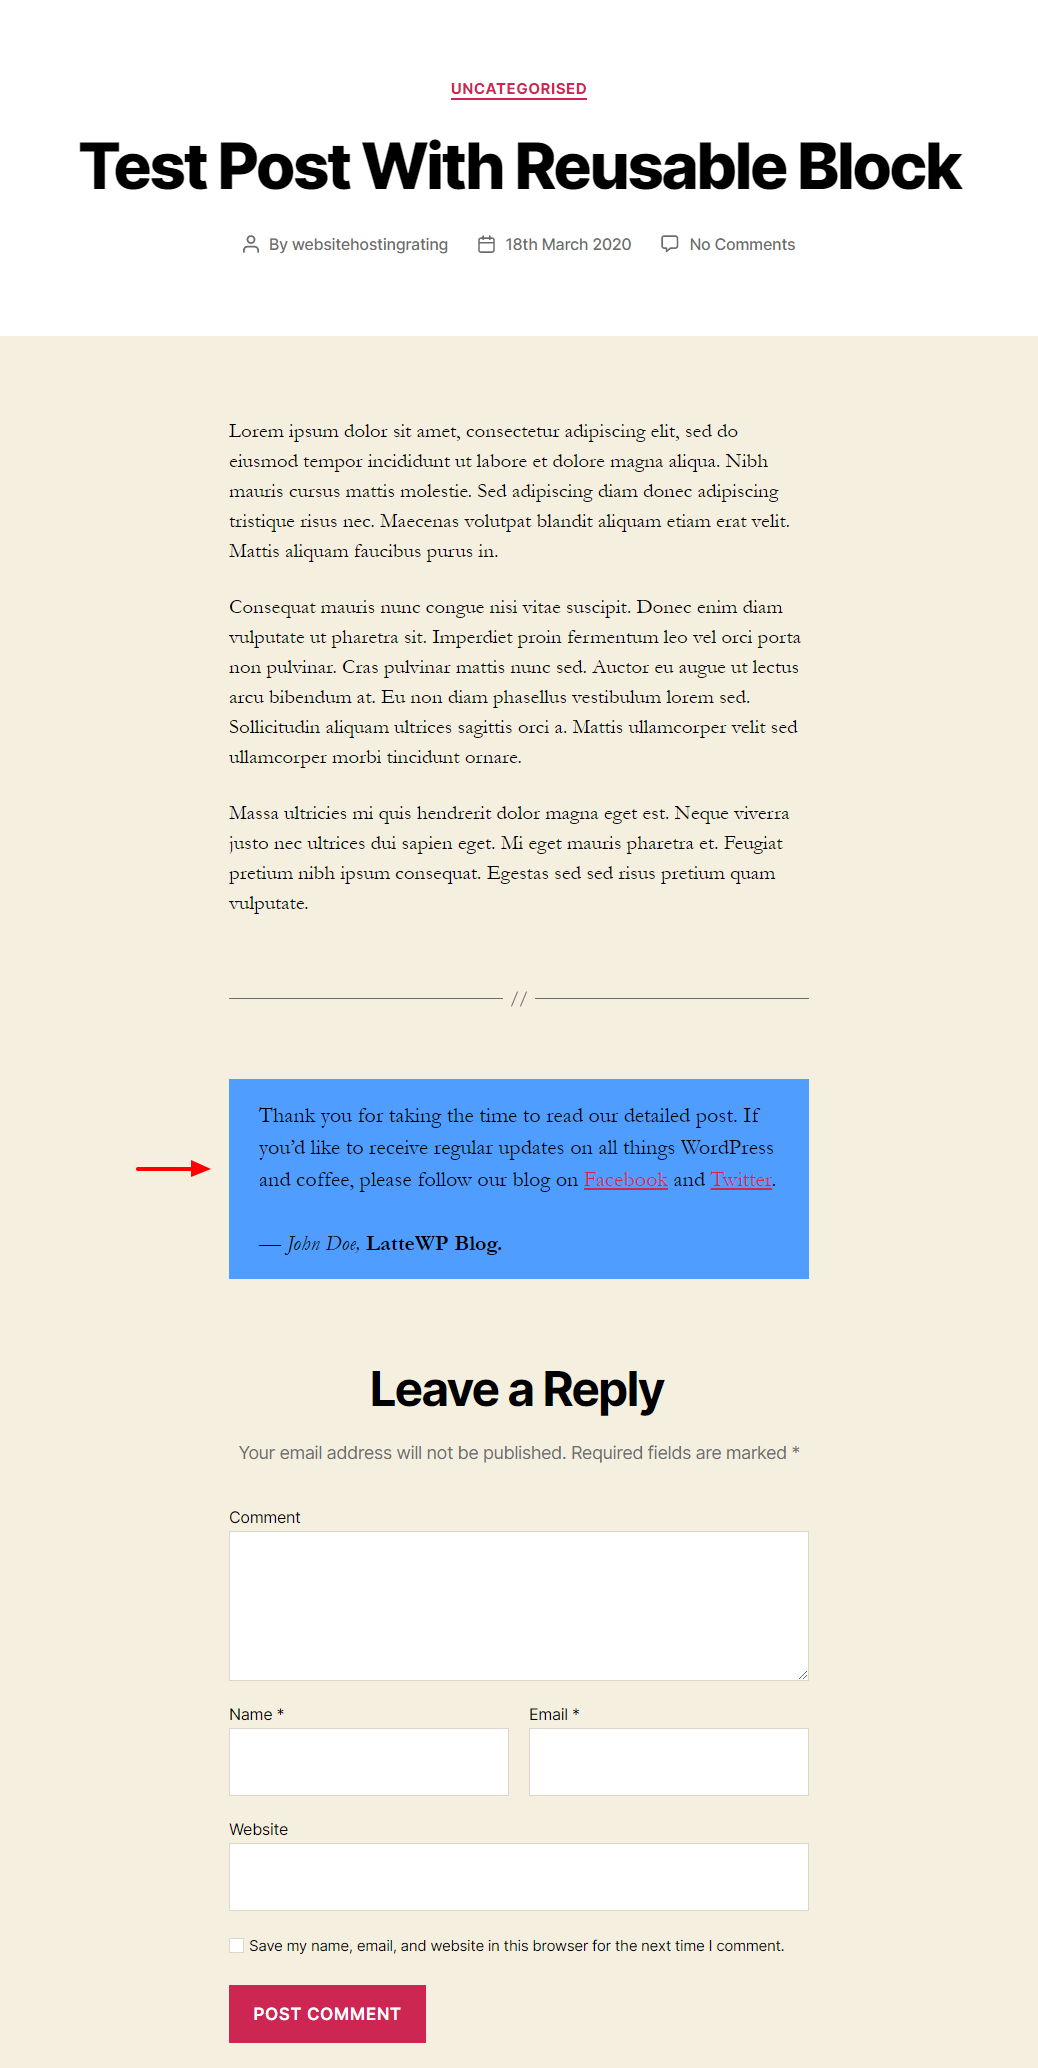
My test site is running the Twenty Twenty theme.
The best part is I can reuse my thank you note block anytime, without having to create it from scratch. I can add it to all post types that support Gutenberg blocks.
Now that you know how to create and use reusable blocks, let us learn more about exporting these blocks to another WordPress website. To avoid confusion, I will be using the same block we just created.
How to Export Gutenberg Blocks in WordPress
Exporting a reusable Gutenberg block is the stuff of fourth graders you will be done in no time.
What to do?
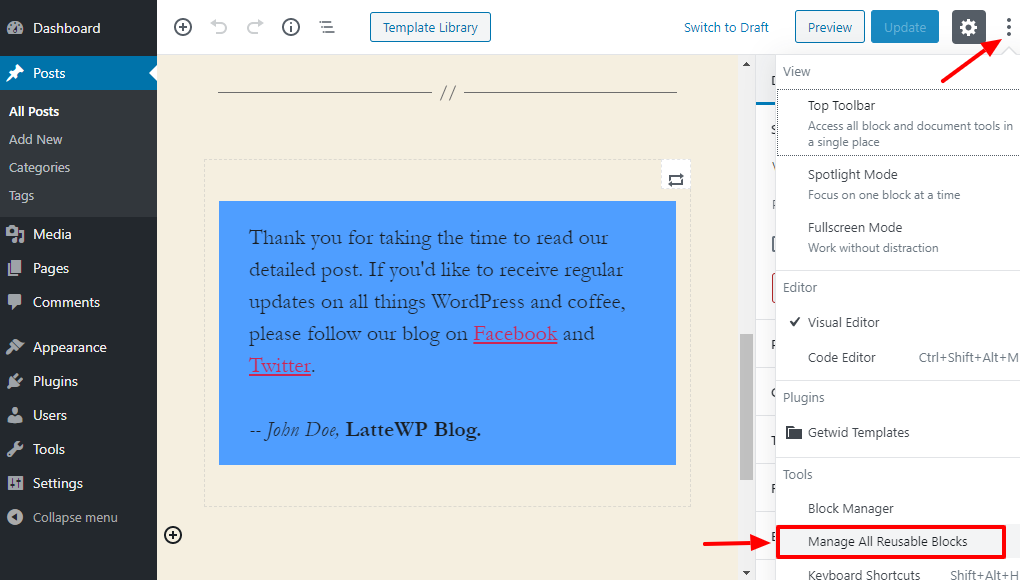
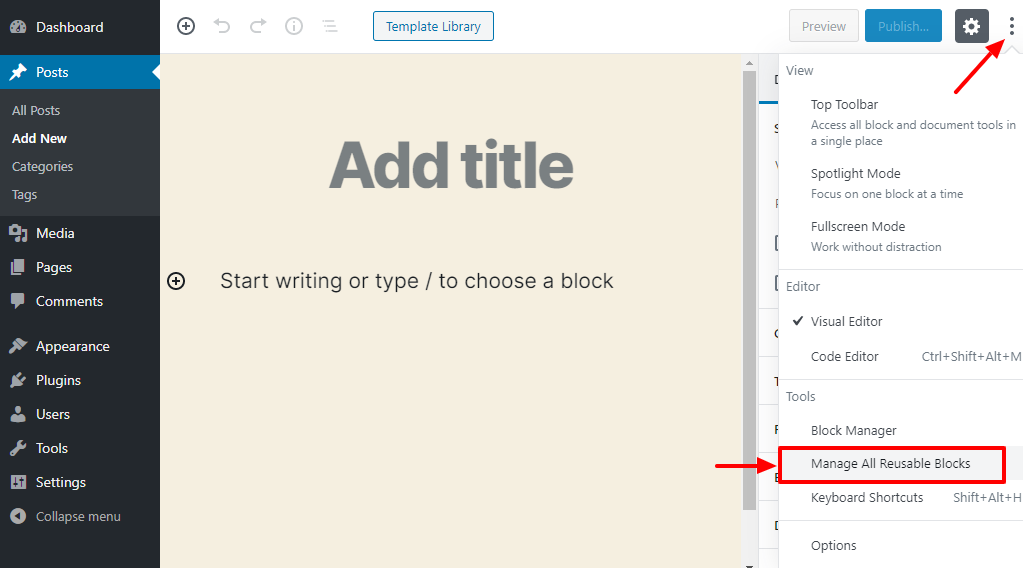
Inside the Gutenberg editor, click the More tools & options icon, and then Manage All Reusable Blocks, as we highlight below:
Doing so leads you to the Blocks screen where you can view and manage all of your reusable blocks:
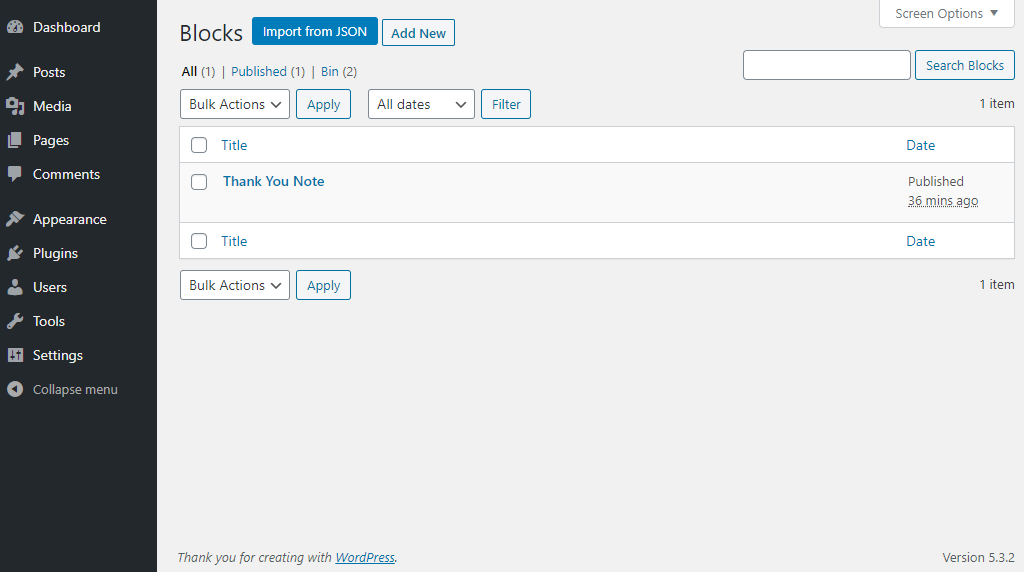
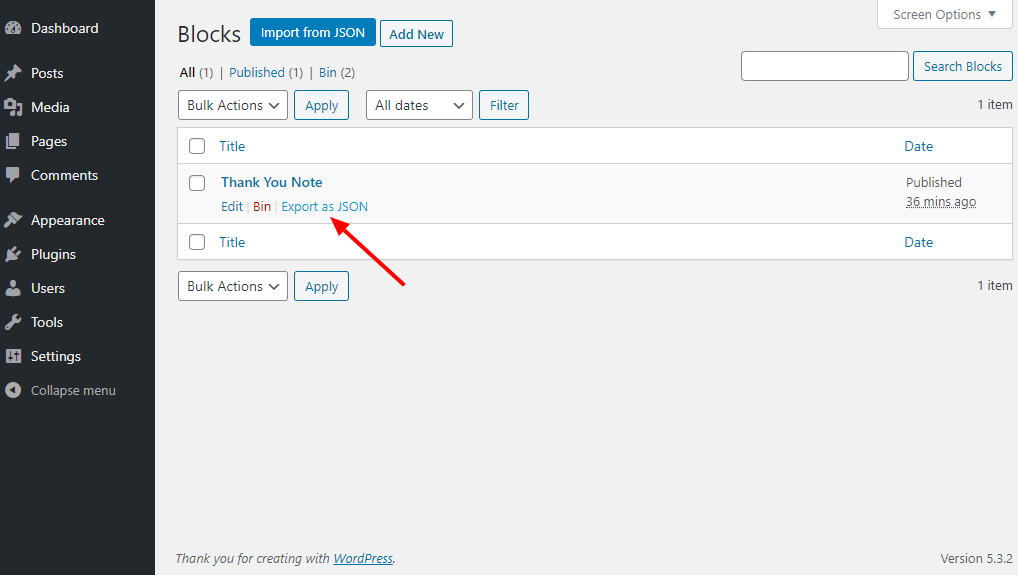
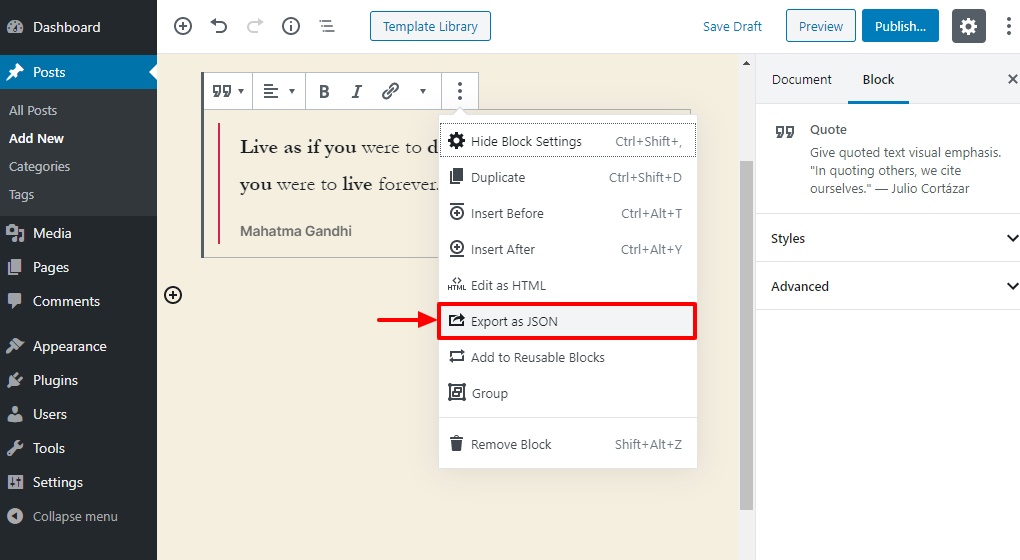
We only have the Thank You Note block, but the above screen will populate as you create more. To export, mouse over the title and click the Export as JSON link that appears. See the image below.
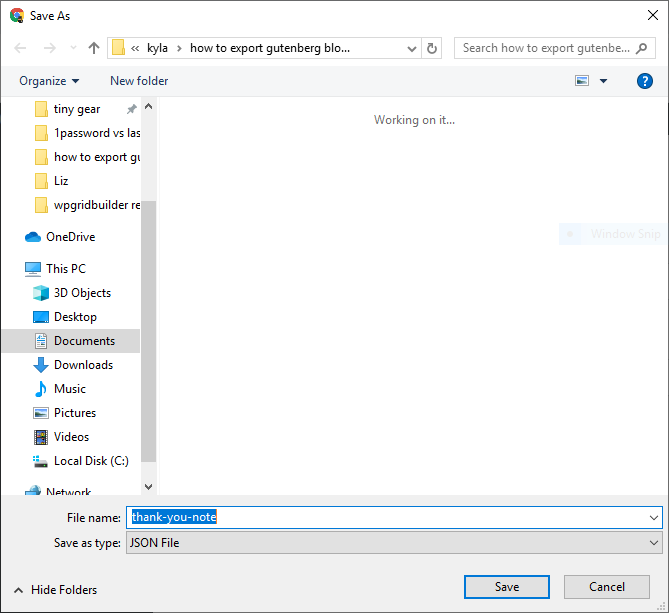
Next, save the JSON file to your computer:
Now that we have the JSON file on your computer, it’s time to import the block to our second test site.
How to Import Gutenberg Blocks in WordPress
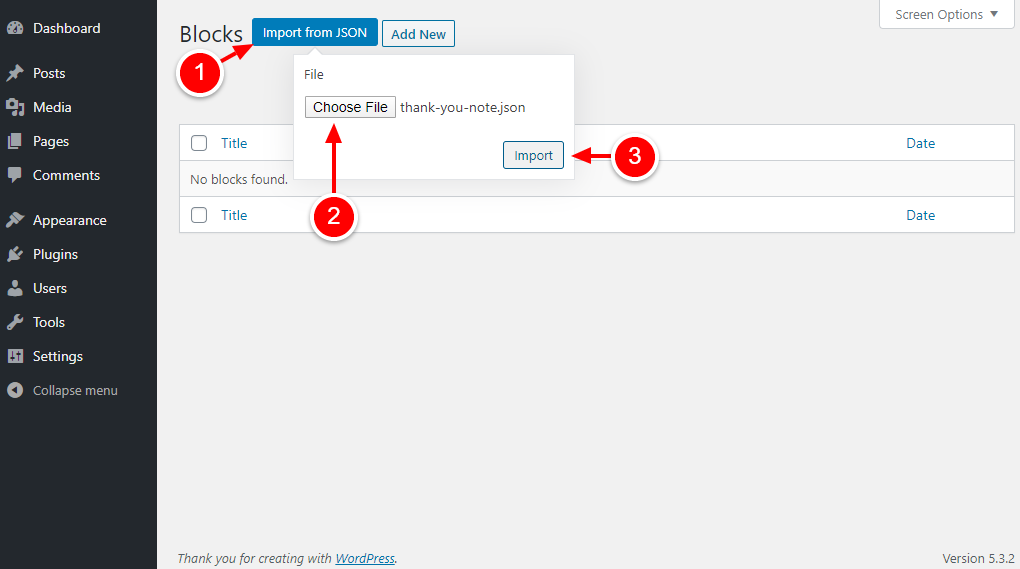
Importing your reusable blocks is as easy as A, B, C. Firstly, open the Gutenberg editor. Secondly, click the More tools & options icon, and then Manage All Reusable Blocks, as shown below.
On the Blocks screen that follows, click Import from JSON, choose the file you downloaded earlier, and then hit the Import button in that order:
And that’s it! Just like that, you’ve successfully imported a reusable Gutenberg block to your second WordPress site:

Wasn’t that easy? Afterward, you can use and reuse your Gutenberg block on the second website as many times as you wish.
Are There Plugins to Export Gutenberg Blocks?
Oh yes, and I found one by ThemeIsle, a reputable WordPress developer. It is a free plugin known as Blocks Export Import. Essentially, the plugin allows you to skip this entire tutorial. Yeah, that’s right; you don’t even have to create reusable blocks.
Install and activate the plugin, and then open the Gutenberg editor. Design your block as you desire then click the More options icon. Next, hit the Export JSON, as shown below. Here’s the screenshot:
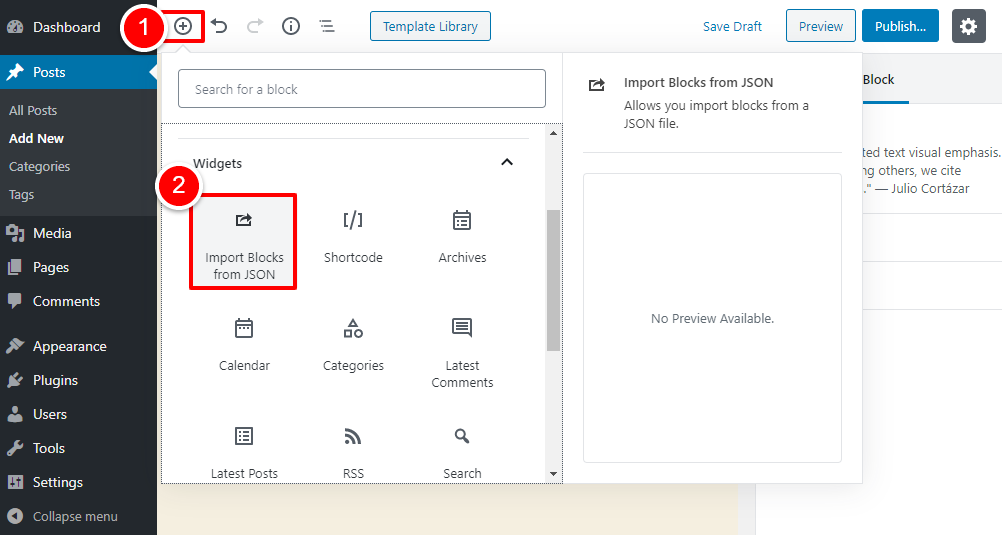
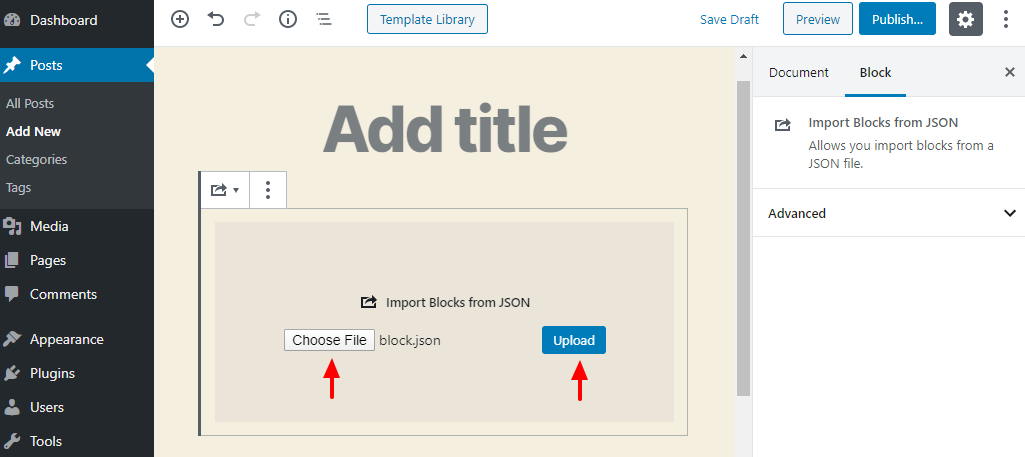
Doing so downloads the JSON file to your computer. To import the JSON file using the plugin, open the Gutenberg editor. Next, click the Add Block icon, and then Import Blocks from JSON under the Widgets tab:
After that, click Choose File to select the file from your computer and hit the Upload button:
The only problem with the plugin method is your blocks won’t be saved to your WordPress site. To save blocks to your WordPress database, you must use the manual method. Maybe that will change in the future.
Sadly, I couldn’t find another plugin. Still, the plugin can save you a lot of time if you don’t care about saving reusable blocks on your website. You will have the blocks as JSON files on your computer.
Reusable Gutenberg blocks are a lifesaver. They allow you to replicate templates and features quickly since you don’t start from scratch. If you create a lot of posts/pages and/or websites, learning how to export Gutenberg blocks will come in handy.
Have questions or suggestions about Gutenberg blocks? Please let us know in the comments below.


Comments
No comments yet. Why don't you kick off the discussion?