4 Simple Steps to Efficient Content Creation in WordPress
When all is said and done, content is what drives the success of a blog. Don’t get me wrong — design and promotion are integral, but without content they serve no purpose. That is why most WordPress users (developers and the like excepted) spend more their time creating content in WordPress than anything else.
As such, it pays to have an efficient process for creating content in WordPress. As someone who blogs for a living — writing upwards of 4,000 words for WordPress sites every day — I have over time developed what I consider to be a methodical and streamlined workflow for content creation. In this post I want to share it with you.
It’s made up of four steps that you should follow in order. Once you’ve got the principles down and installed the necessary plugins, you should find that your content creation process is far quicker and more effective.
Step 1: Clean Up Your Workspace
Don’t worry — I’m not talking about your physical workspace. For the purposes of this post, that can stay as messy (or clean!) as it currently is.
I’m actually referring to your “virtual” workspace — i.e. the WordPress “Add New Post” page. For many of us it is a mess of underutilized features and unused widgets. The first thing you should do is address that issue.
You probably already know about the “Kitchen Sink” feature in the TinyMCE text editor:
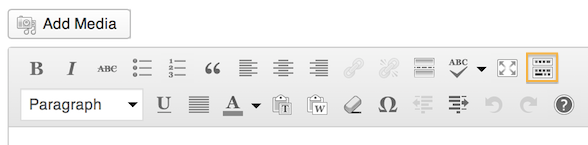
…but if not, make sure you enable it now. Why the WordPress development team would want to hide these valuable formatting functions by default is beyond me, but there you go. You probably won’t actually be using this text editor for the most part (more on that later), but it doesn’t hurt to have the options available for last minute editing, etc.
Now let’s move onto those unused widgets — what value are they to you? All they do is clutter up your page, and in my experience, a cluttered page is an obstruction to efficient writing. To get rid of the clutter just click on the “Screen Options” tab at the top right of the page and de-select whatever you don’t need:

Don’t worry — you can always come back and reactivate widgets you decide that you do need. As such, it pays to be aggressive — you might be surprised what you can do without.
I only have the following default widgets enabled on my blog:
- Categories
- Tags
- Excerpt
Then a few necessary plugin widgets:
If you’re feeling really zealous you can permanently remove widgets (including those you can’t remove via the “Screen Options” tab using this tutorial)
You’ll also want to take a minute to shuffle these widgets around so they are within easy reach. Now, doesn’t that feel better?
Step 2: Choose Your Writing Tool
If you’re still battling the default TinyMCE text editor, you should know that there are far better options available. The first (and a particular favorite of mine) is a default feature within the WordPress core. I am talking about the Distraction Free Editor (DFE):

Minimalist heaven
I cannot understate how much of an improvement this is over the standard text editor. You have a great deal more screen real estate to play with and benefit from — as the name suggests — a completely distraction-free environment. Try it out; you may well be surprised how much you prefer it.
One common complaint regarding the DFE is that it is missing many of the formatting options available within the standard text editor. However, I see that as an opportunity to greatly improve your efficiency by learning the numerous keyboard shortcuts that will enable you to write far more quickly in WordPress.
Now onto my preferred method. If you’re feeling particularly adventurous then I suggest you check out Markdown. It is an extremely intuitive markup language — like HTML (but far simpler). By using Markdown you avoid the irritating bugs present within TinyMCE and the DFE and have complete control over content creation. It is remarkably easy to learn — you may love it.
Depending upon your platform my recommendation is MarkdownPad (PC) or Byword (Mac). I’m using Byword right now to write this post:
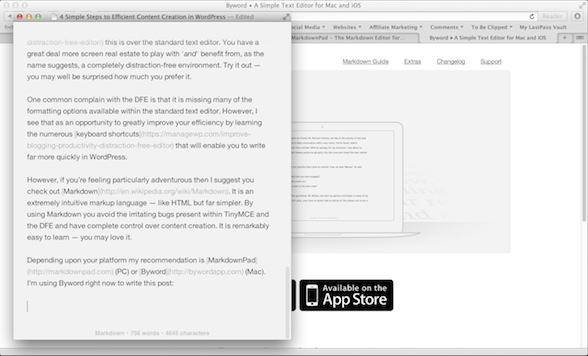
Once you’re finished writing a post in Markdown, just copy your content (as HTML) and paste it into the WordPress HTML editor. That’s all it takes!
Step 3: Optimize Your Posts for Search Engines
I am not going to get into the complexities of Search Engine Optimization (SEO) in this post — I actually covered that topic recently common SEO mistakes here. However, it pays to make sure that you are appropriately equipped to maximize your post’s onsite SEO.
I recommend that you install the following two plugins:
If you have read my aforementioned SEO posts then you’ll know all about the first plugin — as far as I am concerned, WordPress SEO by Yoast is a must-have for any WordPress user. As for Post Title Counter, it’s a simple plugin that enables you to quickly see how many characters your post’s title is made up of:
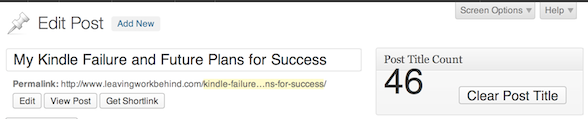
Since Google tends to truncate any post title that is greater than 65 characters, it is very helpful as a reference tool.
Step 4: Create a Checklist
Once you’ve got your post creation workflow down, I recommend that you create a checklist to work to. Because believe me — if you’re doing all of the right things, you’ll need a list to keep track of them.
Here’s a copy of my checklist:
- Choose a headline
- Check keyword competition and edit headline if necessary
- Research and plan article
- Add category and tags
- Fill in SEO information (focus keyword, SEO title, meta description)
- Write the first draft
- Edit and emphasize key phrases
- Add image(s) and attribution(s)
- Proofread
- Paste into WordPress
- Carry out page analysis (with the WordPress SEO plugin) and edit article as necessary
- Add excerpt
- Preview and final read-through
- Publish
That’s a lot to remember, right? Good thing I have a checklist to work through the whole thing efficiently. Implement something like this and you’ll be amazed at how much easier it is to publish content on WordPress.
Now Go Write!
You now know everything I do regarding content creation in WordPress, so what are you waiting for? It’s time to implement my measures and get cracking!
I’d love to know what you think about my methods. Any comments, suggestions and constructive criticism are welcomed!


Some great tips here Tom, thanks for sharing with the community!
Always a pleasure AJ!
Especially liking step 4. This is the kind of checklist that would do me a huge favour! Thanks for the post 🙂
No problem Glen 🙂
Thanks for the checklist. I can use it now to know if what needs to be improved 🙂
My pleasure Robert 🙂
I know that the above is published techniques.
Understanding the actual content is very wide and not just technical publishing. Basic understanding of the flow that the user and the author do not necessarily understand:
content types
post types
content modeling
field
I wanted to write about it, because it is very important than the basic understanding and technical fields such as SEO.
If you’d like to write a guest post please submit your info at wpexplorer.me – thanks!
The checklist is good, but most of the people will focus on SEO and forget about what’s important: the READER.
Thanks for the great info. I plan on writing about 400 articles this year, so streamlining is critical to be able to complete the task.