Make A WordPress Dashboard Widget Configurable
A few weeks ago we saw how to add a custom RSS dashboard metabox to the administration. Today, I’d like to show you how to add configurable options to this dashboard metabox.
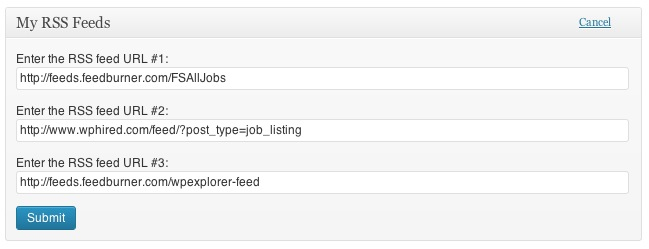
Here is the result of what we are going to do:
 The first thing to do is to obviously read the first part of this tutorial in order to create the metabox.
The most important function in this tutorial is wp_add_dashboard_widget(). It’s the WordPress function that registers a dashboard widget. We already saw that registering the widget and the function that outputs the widget on the dashboard is pretty easy, but we had not covered the last parameter of this function. Basically, wp_add_dashboard_widget() has 4 parameters:
$widget_id
(integer) (required) an identifying slug for your widget. This will be used as its css class and its key in the array of widgets.
Default: None
$widget_name
(string) (required) this is the name your widget will display in its heading.
Default: None
$callback
(string) (required) The name of a function you create that will display the actual contents of your widget.
Default: None
$control_callback
(string) (optional) The name of a function you create that will handle submission of widget options (configuration) forms, and will also display the form elements.
Default: None
As you can see, the fourth parameter is the one responsible for the “configure” options. When filling this parameter you tells WordPress to load a specific function to configure the widget. It automatically create a “configure” link in the metabox title when you place the cursor over it.
Step 1: Register The Configure Options Function
So, the first step is to modify the wp_add_dashboard_widget() call and add the name of the configure options functions in the last parameter. Your rc_mdm_register_widgets() functions, should become:
/**
 * Register all dashboard metaboxes
 *
 * @access      public
 * @since       1.0
 * @return      void
*/

function rc_mdm_register_widgets() {
	global $wp_meta_boxes;

	wp_add_dashboard_widget('widget_custom_rss', __('My RSS Feeds', 'rc_mdm'), 'rc_mdm_create_my_rss_box', 'rc_mdm_configure_my_rss_box');
}
add_action('wp_dashboard_setup', 'rc_mdm_register_widgets');
We simply added “rc_mdm_configure_my_rss_box” to the last parameter.
Step 2: Create The Configure Options Function
This step isn’t complicated. All we have to do is to create form fields stored into an array. To do so, we’ll use the update_option(). We don’t need to create a full form as WordPress creates it for us. We just need to register the fields. A very good point to mention, is that WordPress automatically adds to the form a nonce that makes the form secure and avoid potential security problems. Here is the code of our rc_mdm_configure_my_rss_box() function ( remember? It’s the 4th parameter we defined in wp_add_dashboard_widget() ).
/**
 * Creates the RSS metabox configuration settings
 *
 * @access      public
 * @since       1.0
 * @return      void
*/
function rc_mdm_configure_my_rss_box( $widget_id ) {

	// Get widget options
	if ( !$rc_mdm_widget_options = get_option( 'rc_mdm_dashboard_widget_options' ) )
		$rc_mdm_widget_options = array();

	// Update widget options
	if ( 'POST' == $_SERVER['REQUEST_METHOD'] && isset($_POST['rc_mdm_widget_post']) ) {
		update_option( 'rc_mdm_dashboard_widget_options', $_POST['rc_mdm_widget'] );
	}

	// Retrieve feed URLs
	$url_1 = $rc_mdm_widget_options['url_1'];
	$url_2 = $rc_mdm_widget_options['url_2'];
	$url_3 = $rc_mdm_widget_options['url_3']; ?>

	<p>
		<label for="rc_mdm_url_1-"><?php _e('Enter the RSS feed URL #1:', 'rc_mdm'); ?></label>
		<input class="widefat" id="rc_mdm_url_1" name="rc_mdm_widget[url_1]" type="text" value="<?php if( isset($url_1) ) echo $url_1; ?>" />
	</p>

	<p>
		<label for="rc_mdm_url_2"><?php _e('Enter the RSS feed URL #2:', 'rc_mdm'); ?></label>
		<input class="widefat" id="rc_mdm_url_2" name="rc_mdm_widget[url_2]" type="text" value="<?php if( isset($url_2) ) echo $url_2; ?>" />
	</p>

	<p>
		<label for="rc_mdm_url_3"><?php _e('Enter the RSS feed URL #3:', 'rc_mdm'); ?></label>
		<input class="widefat" id="rc_mdm_url_3" name="rc_mdm_widget[url_3]" type="text" value="<?php if( isset($url_3) ) echo $url_3; ?>" />
	</p>

	<input name="rc_mdm_widget_post" type="hidden" value="1" />
	<?php
} ?>
You can now reload your dashboard, and if you place your cursor on the the widget metabox you’ll see a “configure” link appearing on the top right. When you click on it the options form is loaded. And when filling the fields and saving the feed URLs are store in our options SQL table.
Step 3: Retrieving Options
The last step is to replace the feed URLs we hard coded in the first part of the tutorial. From line 14 to 18 in rc_mdm_create_my_rss_box() we added two URLs. Simply replace it by:
// My feeds list
if ( !$my_feeds = get_option( 'rc_mdm_dashboard_widget_options' ) )
    $my_feeds = array();
And that’s it! We managed to add custom options to a dashboard widget quiet easily.


I’m already using a custom function (similar to what you’ve already created), and judging by the screenshot in your other post, the feed’s being output within the widget just like yours.. (linked) Title, time ago, excerpt.
At the end of the excerpt there’s also that god damn awful […]
Do you have any idea how to get rid of this, or perhaps turn it into a (linked) ‘Read more…’?
Another enhancement that I’d love to be able to add it to insert the posts’ featured image beside the excerpt.
Do you have any idea of where to start with this?
Thanks
Tom
In my first post, you simply can modify this at line 68!
Thanks, it appears that it’s cached, so after changing that line you need to wait a while for it to appear inside the widget..
I recently purchased the Bloggit theme and have been very impressed. Just wanted to say thanks for delivering such a well polished product.
Glad you like it! Thanks for the kind words and the purchase 😉