Built-In WordPress Options You Should Be Using

When you discovered WordPress, you probably thought it was just a run of the mill blogging platform. But once you start to discover all the powerful built-in WordPress options and features you’re sure to be intrigued. If you’re still new to WordPress, you will grow to love it more and more as you enjoy reading this post. You just might feel inclined to fall head-over-heels in love with WordPress. As usual, this post will be a lot of fun but your own limited knowledge of WordPress might surprise you. Haha 🙂
That aside… Today’s post will quench the thirst – that strong yearning you have to learn about WordPress (and its options). The post will reveal lots of great WordPress options that you ought to know about in 2014. Let us start with the most common, just to build momentum.
WordPress Back-End Options
AKISMET
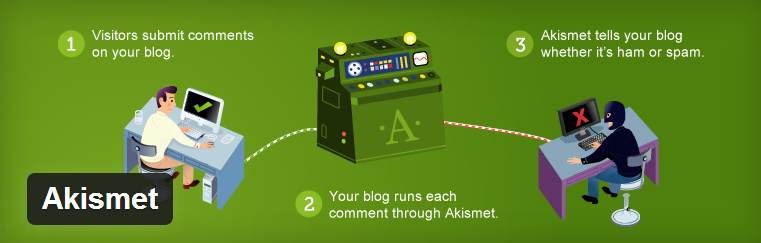
“Isn’t Akismet (A.kis.met) a WordPress plugin?”
“Yes it is a plugin.”
“How then are you going to turn around and call it a built-in WordPress option?”
Well, for starters, it’s built-in. You don’t install Akismet – you just activate it with an API key that is easy to acquire but that’s not the point. Akismet is one of the best spam plugins on the internet. It beats the competition ten points to zilch. Built by Automattic, Akismet is a superstar spam solution loved by some twenty (20) million WordPress users.
Before you do anything with your WordPress blog, activate Akismet for your own good. And between you and me, you can use the same API key to activate Akismet on several websites. Perhaps they built it like that, or it’s a flaw. Who knows? All in all, Akismet plays its role excellently as a built-in WordPress option.
JETPACK
Then there is Jetpack, which gives you a whole lot of exciting features. Once you connect Jetpack to your WordPress.com account, you will have have access to options such as:
- Improved stats courtesy of WordPress.com
- Notifications because, well, notifications are good
- Publicize feature that shares your posts automatically
- Jetpack comments
- Jetpack subscriptions
- Likes
- Carousel to add oomph to your image gallery
- Post by Email
- VaultPress
- WP.me shortlinks
- Google+ Profile Integration
- Selective widget visibility
- The list is virtually endless
In simple terms, Jetpack offers you plenty of WordPress options to supercharge your self-hosted WordPress blog.
PERMALINKS
Many times, you will see people using URLs with question marks and a lot of numbers. It’s easy to see something like: http://www.example.com/?p=123. That can’t be good for your WordPress SEO considering WordPress offers you plenty of permalink options including:
- Day and name – http://www.example.com/2014/05/07/sample-post
- Month and name – http://www.example.com/2014/05/sample-post
- Numeric – http://www.example.com/archives/123
- Post name – http://www.example.com/sample-post (Good for SEO)
- Custom structure (Good for SEO too)
You will find Permalink Settings under Settings in your WordPress Admin.
SEARCH ENGINE VISIBILITY
Let’s say you just installed WordPress. You don’t have any content on your website, so it’s unnecessary to invite search engine spiders. It is best to keep them waiting. Once you pool enough content, you can encourage the spiders to index your website.
Word of Caution: Disabling search engine visibility on a live website will remove your site from search engine indices for several days, which is something you don’t want. Another thing, “…it is up to search engines to honor…” your request to go incognito, according to WordPress. To enable/disable this WordPress option, navigate to Settings -> Reading and you will see “Search Engine Visibility.”
Word of Advice: Don’t mess around with this option if you have no idea what you’re doing.
POST VIA E-MAIL
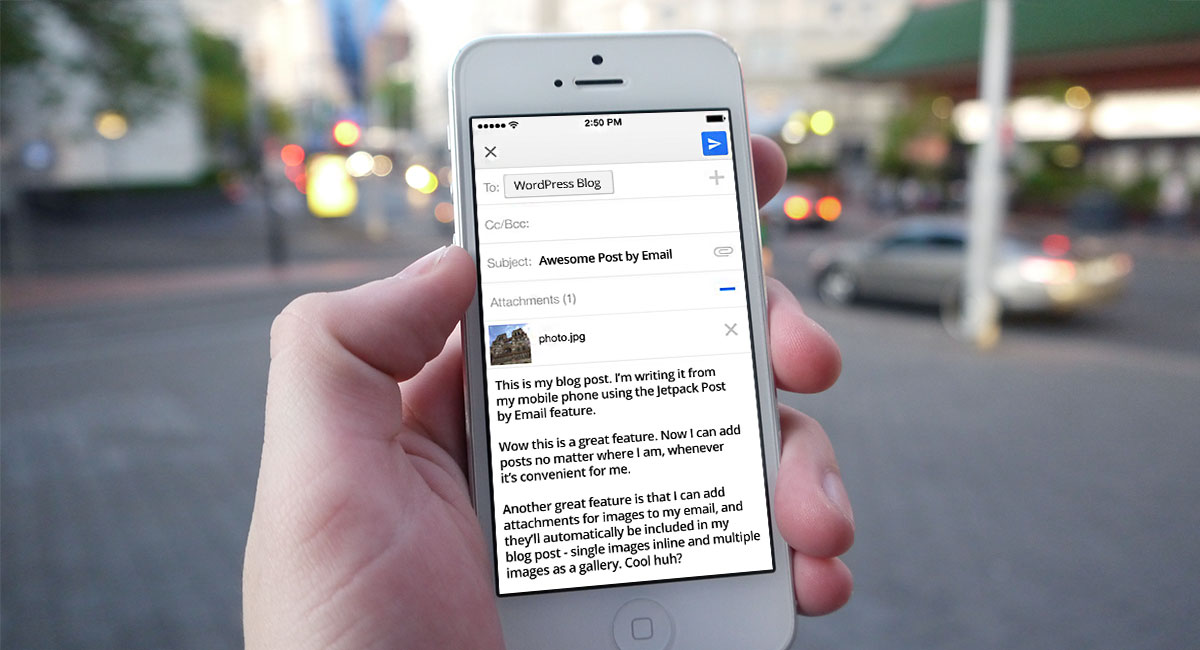
Would it not be fun and convenient to post from wherever via e-mail? Since you don’t need to login into WordPress, you could post from any device. This can work for you if you lack the time to login into your website perhaps because you travel a lot or something of the like.
In another post, you will learn how to publish WordPress blog posts via email, so I won’t go into that today. But provided you know your way around mail servers, you can take full advantage of this WordPress option by going to Settings -> Writing and proceeding to Post via email. You will be able to configure your settings here. There are also instructions on using Jetpack, Postie or the Post by Email plugin in the WordPress Codex.
WORDPRESS FEEDS
According to WordPress Codex, “…a feed is a function of special software that allows feedreaders to access a site, automatically looking for new content and then posting the information about new content and updates to another site.”
In other words, WordPress feeds allow your web visitors to keep up with your blog. WordPress comes with up to five (5) types of feeds namely:
- Atom feed
- RDF/RSS 1.0 feed
- RSS 2.0 feed
- RSS 0.92 feed
- RSS 2.0 comments feed
You can easily add feeds to your WordPress site (for your readers) via the Widgets Screen. All you need is your feed URLs. By convention, your post feed URL is http://www.yourdomain.com/feed/ and the comments feed URL is http://www.yourdomain.com/comments/feed/.
If you open these feed URLs in your browser, you will just see a document tree lacking in style. To view RSS feed items, use a feedreader such as Feedly or the easily available RSS widget in your Widgets Screen. Please don’t confuse the RSS widget with the RSS Links widget; the former displays feed items and the latter displays links to your feeds.
To learn more about WordPress feeds, please visit WordPress Feeds on Codex.
LIVE THEME PREVIEW
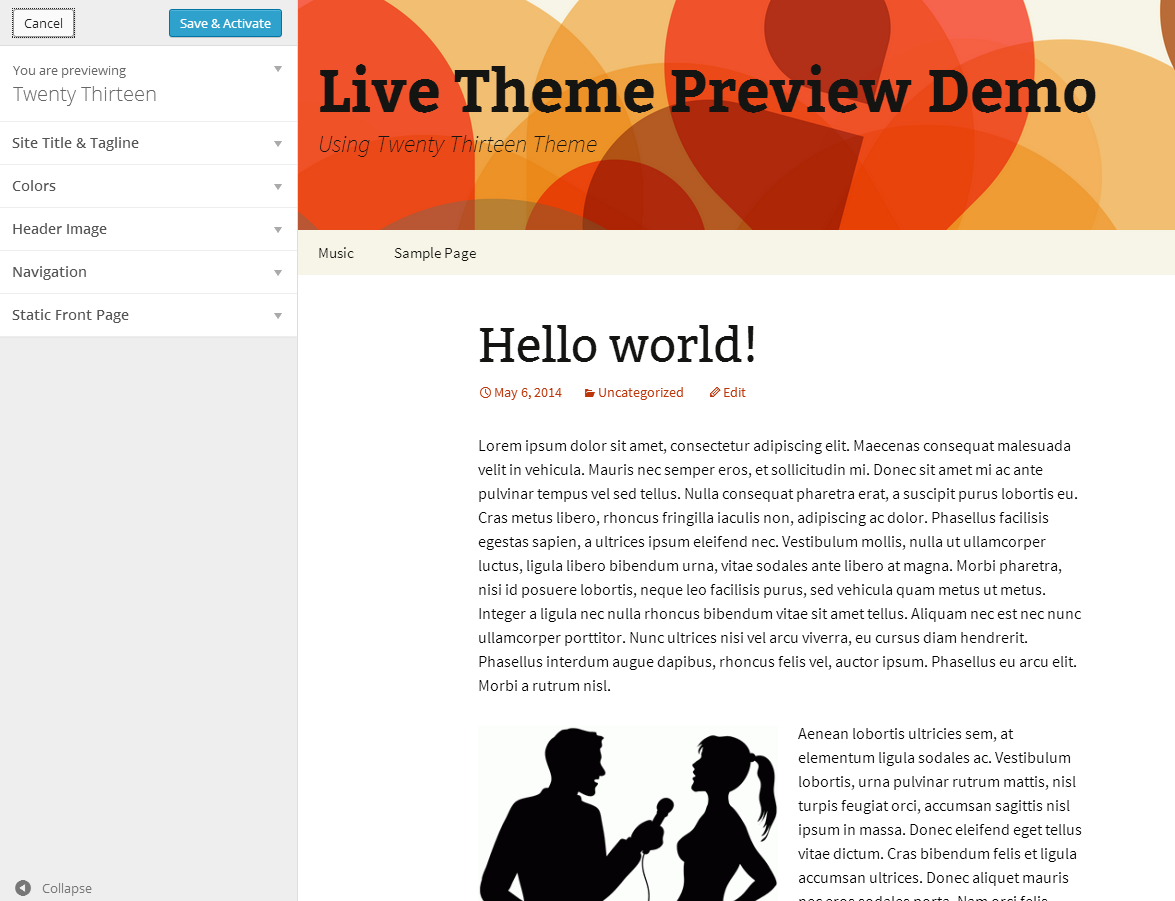
This WordPress option has been around since WordPress 3.4. You’ve used it at least once to change themes. Without a doubt, the Live Theme Preview option is great as it fastens decision making where themes are concerned. You get to see the full view of how the theme will look like after activation. Just go to Appearance -> Themes and hover over your choice theme (must be inactive). Click the Live Preview button that appears.
WORDPRESS THEME CUSTOMIZER
Before bidding the Theme Preview feature goodbye, let us say a few things about the WordPress Theme Customizer, which is an integral part of the Live Preview option. In the image above, the Theme Customizer will be the nav bar to the left (all the options listed below the name of the theme you’re previewing).
The theme customizer option allows you to customize your site title and tagline, colors, header image, navigation, static front page, footer and so much more depending on the options available in your theme. It has never been easier to customize your WordPress website appearance. Just click a few things, see your changes live, hit the Save & Activate button and your work is done. Many premium theme stores are switching over to using the WordPress theme customizer in their themes because of how easy it is to use.
WordPress Blogging Options
WordPress is a superior blogging platform but up to this point we’ve been talking about WordPress options that have nothing to do with actual blogging. In the upcoming section, we will talk about WordPress options that revolve around the post editor where much of the action goes down anyway.
MULTIPLE SCREEN OPTIONS
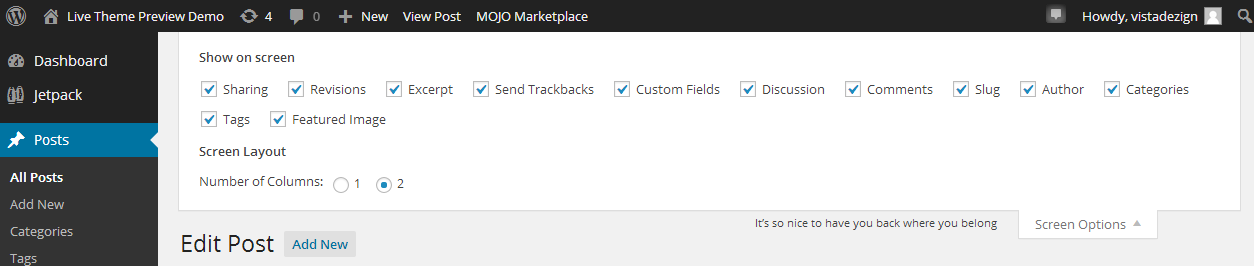
Screen Options is also available in your WordPress Home Dashboard (where you have features and widgets such as At a Glance, Quick Draft, Activity, Site Stats and WordPress News among others. It is also available in Pages, Comments, Feedback and several other places (including some plugins) but let’s go back to the post editor.
When creating a new blog post, you will find Screen Options drop down menu at the top-right hand corner of your screen. This option allows you to add any number of elements to your Edit Post screen. You can choose to show sharing options, categories, tags, discussion, excerpt and author among other things.
Other than that, you can change the screen layout by choosing the number of columns to display (either one or two). If you would like to see how your images fit in your text content, you can choose the single-column layout that comes with an enlarged post editor. On the other hand, if you would like a compact view and don’t have a problem with your images (perhaps you don’t mind previewing your post before publishing), you can choose the double-column layout. At the end of the day, whatever you choose depends on your own personal preferences.
EASY AUDIO PLAYLIST

Good example of WordPress Audio Playlist
WordPress is a wondrous platform. For instance, did you know you don’t need a plugin to create a professional looking audio player for your WordPress website? This matter is of great interest to people such as musicians and deejays who would like to host mp3 (and other audio) files on their websites. If you would like your web visitors to enjoy some music on your website, adding an audio player is quite easy.
To add your audio player to a post, open the post in the editor and click on the Add Media button. On the resulting page, select Create Audio Playlist. You can choose your previously uploaded audio files from the Media Library or upload them right there and then. Select your playlist by clicking on the files and then hit the Create a new playlist button on the bottom-right hand corner of your screen.
This will take you to a new page where you can edit your playlist prior to publishing. Edit your playlist if need be and click on the Insert audio playlist button. This will take you back to the post editor where you will be able to see your audio player. Publish or update your post to see the player in action!
ASIDE: You can use the same method to add audio players to your pages and widget areas on the sidebar (or anywhere else).
SIMPLIFIED TWEET EMBEDDING
Would you like to display your tweets in your content like this:
How To Translate Your #WordPress Website Into Multiple Languages http://t.co/4dmQiKPGpE pic.twitter.com/JpPaI9G8dz
— WPExplorer (@WPExplorer) May 5, 2014
If you answered yes, you should know embedding tweets is one of the simplest WordPress options you’re sadly not taking advantage of. Why is this a great WordPress option:
- It looks cool (It says you have mad WordPress skills)
- It can help you increase user engagement on your website and Twitter account
How to do it:
Just go to Twitter, copy the tweet URL and paste it in your post editor like this:
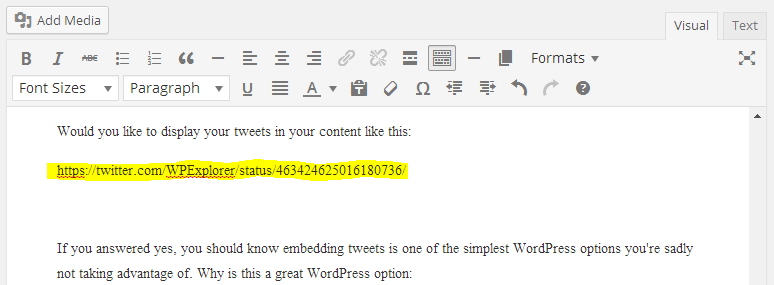
See the highlighted URL? You don’t need to toggle over to the HTML editor. Just paste the URL and save your post. Easy work.
YOUTUBE VIDEO EMBEDDING
Still on this embedding business, it’s similarly easy to embed your YouTube videos. Just paste the YouTube video link in your post and save your changes. The following video by AJ Clarke is a step-by-step guide that shows you how to use the amazing Total Drag & Drop WordPress Theme.
http://www.youtube.com/watch?v=zu80FX6mAQM
To embed the above video, I just pasted the YouTube link from my browser…
![]()
…into this post 🙂
Surely, this is a very easy way of embedding YouTube videos (and for more methods, checkout Tom’s post on how to add videos to your WordPress site). The only downside is you cannot control the size of the video with this method. If you know of a way, please share with us in the comments 🙂 I tried putting the link in a div element (which meant toggling over to the HTML editor) but it didn’t work.
LINKS IN IMAGE CAPTIONS
For a long time, it was impossible any HTML to image captions. As such, you could not add links to captions to credit the image sources. Moreover, you could not Italicize, bold or underline your captions.
Nowadays, you can add links to image captions easily. Just click on your image and select the ![]() icon that appears to access your Image Options screen. Here you can add HTML to the Caption box as you deem fit.
icon that appears to access your Image Options screen. Here you can add HTML to the Caption box as you deem fit.

May 9, 2014 – Astronomy Picture of the Day by Mike Taylor. Courtesy of apod.nasa.gov
DISABLING COMMENTS
Would you like to disable comments on your entire blog or per individual post? If so, you can disable comments across your entire WordPress website by navigating to Settings -> Discussion and deselect “Allow people to post comments on new articles.” This will disable comments for all new posts.
Alternatively, you can use Discussion in the Screen Options when creating a new post. The discussion widget gives you options to allow or disallow comments, trackbacks and pingbacks for that particular post.
TOGGLE BETWEEN VISUAL AND HTML (TEXT) EDITOR

By default, WordPress shows you the Visual (WYSIWYG) post editor. By the way, WYSIWYG is just short for “What you see is what you get.” The Visual editor is easy to use since it requires no knowledge of programming. Furthermore, it looks like the typical word processor you are used to.
Then we have the HTML (Text) editor which offers you extra flexibility to customize your posts. You need at least basic HTML skills to use this editor, but it can come in handy when you want to throw a few codes into your posts.
READ MORE OPTION
For many people, this WordPress option just sits in their post editor. Either they don’t know about it or how to use it. You can use the read more option to create excerpts for your front page.
If your theme doesn’t have an excerpt feature, your front page will display your posts in their entirety, which is unattractive. To take advantage of the read more option, open your post and just place your cursor where you want the excerpt to end. Click on the read more icon ![]() on the menu. You don’t need to toggle over to the HTML editor and you can create custom intros (excerpts) for your posts.
on the menu. You don’t need to toggle over to the HTML editor and you can create custom intros (excerpts) for your posts.
PAGE BREAK OPTION
You don’t need a plugin to split long posts into multiple pages. No, you don’t. The WordPress post editor is equipped with its own page break option. What, are you surprised? To end one page and send your readers to the next, toggle over to the HTML editor and add the following code:
<!--nextpage-->
This will create a new page just like this (in the editor of course – once you publish the post, users will see page numbers)…
![]()
REVISIONS
Every time you revise your post, WordPress saves a copy. This is one of the greatest WordPress options since it can mean the difference between a complete post and a very bad, bad day. This feature can save you a lot of time and frustration in case you lose your post due to one reason or another.
The revision widget is located two, three scrolls below your post editor. If you can’t see it, you probably haven’t checked Revisions in the Screen Options. It looks like this:
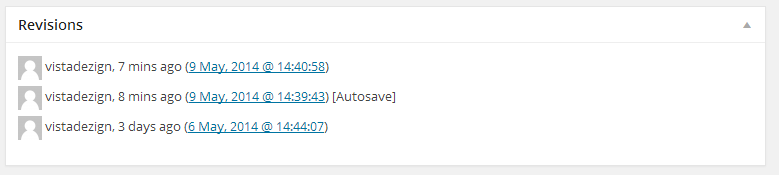
To restore an earlier version (or copy something from it) just click the blue link.
The Ball is now in Your Court…
These WordPress options will definitely make your life a little better as a WordPress user. We will keep updating this post with more WordPress options, so check in with us once a while. What WordPress options do you use frequently? Please share with us below!


This is a great post Freddy! We’re lucky to have you 😉 Thanks for sharing!
Thank you AJ! I’m honored to be part of the WPExplorer team 🙂
Wait what about Hello Dolly?
This is a plugin though 😉
VIDEO EMBEDDING
It’s no hazel. Both Youtube and Vimeo videos can be embedded using the “iframe” tag. And both services offers a code snippet witch contains the proportions of the video.
Youtube: Click the share link below the video. Clik on “Embbed” in the menu line above the icons. You wil se a form fiel with the code. Select the video size in the dropdown or put in you own dimentions. Copy the code and past i in to your post, with the editor in “Text” mode. Viola!
Vimeo: More simple. Click on the paper plane icon (Share). Click on “+ Show options” and configure your size and other parameters. Copy the code form under the “Embbed” label and past i in to your post, with the editor in “Text” mode. Viola!
The draw back with the iframe tag is that it dose not respond to responsive themes layout, so if you want your user to watch your videos on mobile devises, pick a low size. There are work solutions for this, but it will take a lot of code.
Thanks Anders for that tip. It will definitely help! 🙂
Informative post, particularly for newbies.
Thank you LeBlanc for your kind words 🙂
Is there a way to hide track numbers from automatically showing up in Excerpts? I have one sentence in the post, then the ‘Read more’ tag and then the audiio player. But the audio player track names still show up as a part of the excerpt. Help!
You should be able to, but the fix really depends on how your theme is setup/coded there isn’t a single magical way to fix it for any theme.
Thanks for the post AJ