How to Create a Custom WordPress Settings Page
WordPress Options pages are a great way to provide additional fields to your site users for defining global site settings. When creating a theme you should stick to using the Customizer for your main settings, however, you may want to create additional admin pages with extra settings. And plugins developers may want to add option pages so the user can control how their plugin functions.
This guide will give you an introduction to the WordPress Settings API, show you how to create custom option pages in WordPress and provide you with a helper class for automatically creating option pages that is much slimmer than some of the option frameworks out there, such as Redux (one of the most popular ones).
Skip the tutorial and view helper class
What is the Settings API?
The Settings API was added way back in WordPress 2.7 and it allows developers to create admin pages and define settings and sections to display in such panels. Basically, it provides the framework for creating admin pages, but like everything in WordPress it’s not so simple because you still need to create your own code for rendering the setting fields.
Why use the Settings API?
As a developer you could choose to not use the settings API and create your own admin panel from scratch and render/save the fields using your own proprietary code. This begs the question, “why use the settings API?“.
- Less Bloat: The code is already available so it requires less code to create a new admin panel.
- Consistency: You may see a bunch of plugins out there that all have their own admin panels and they all look different. Having admin panels that matches the WordPress UI is more user-friendly and you won’t need to worry about updating the design when WordPress updates.
- Future Proof: Using native WordPress functions is always best if you want to ensure your code is future proof and will work regardless of WordPress updates.
- Security: The Settings API also provides the nonces and sanitization measures needed to ensure the data being saved is safe.
- Easier: And of course using an existing API is going to be much easier then building your own API from scratch.
Registering your Settings Page
The first thing you’ll want to do before anything is to register your Settings Page. This is done via the core WordPress function add_menu_page or add_submenu_page. The first function would be used if you want your theme panel to be added separate from all the other WordPress admin tabs and the second function would be used if you want your settings page to be added inside one of the WP tabs such as “Appearance, Tools or Settings”.
The following code can be used to add a new admin page named “My Options“.
/**
* Add a new options page named "My Options".
*/
function myprefix_register_options_page() {
add_menu_page(
'My Options',
'My Options',
'manage_options',
'my_options',
'my_options_page_html'
);
}
add_action( 'admin_menu', 'myprefix_register_options_page' );
/**
* The "My Options" page html.
*/
function my_options_page_html() {
if ( ! current_user_can( 'manage_options' ) ) {
return;
}
if ( isset( $_GET['settings-updated'] ) ) {
add_settings_error(
'my_options_mesages',
'my_options_message',
esc_html__( 'Settings Saved', 'text_domain' ),
'updated'
);
}
settings_errors( 'my_options_mesages' );
?>
<div class="wrap">
<h1><?php echo esc_html( get_admin_page_title() ); ?></h1>
<form action="options.php" method="post">
<?php
settings_fields( 'my_options_group' );
do_settings_sections( 'my_options' );
submit_button( 'Save Settings' );
?>
</form>
</div>
<?php
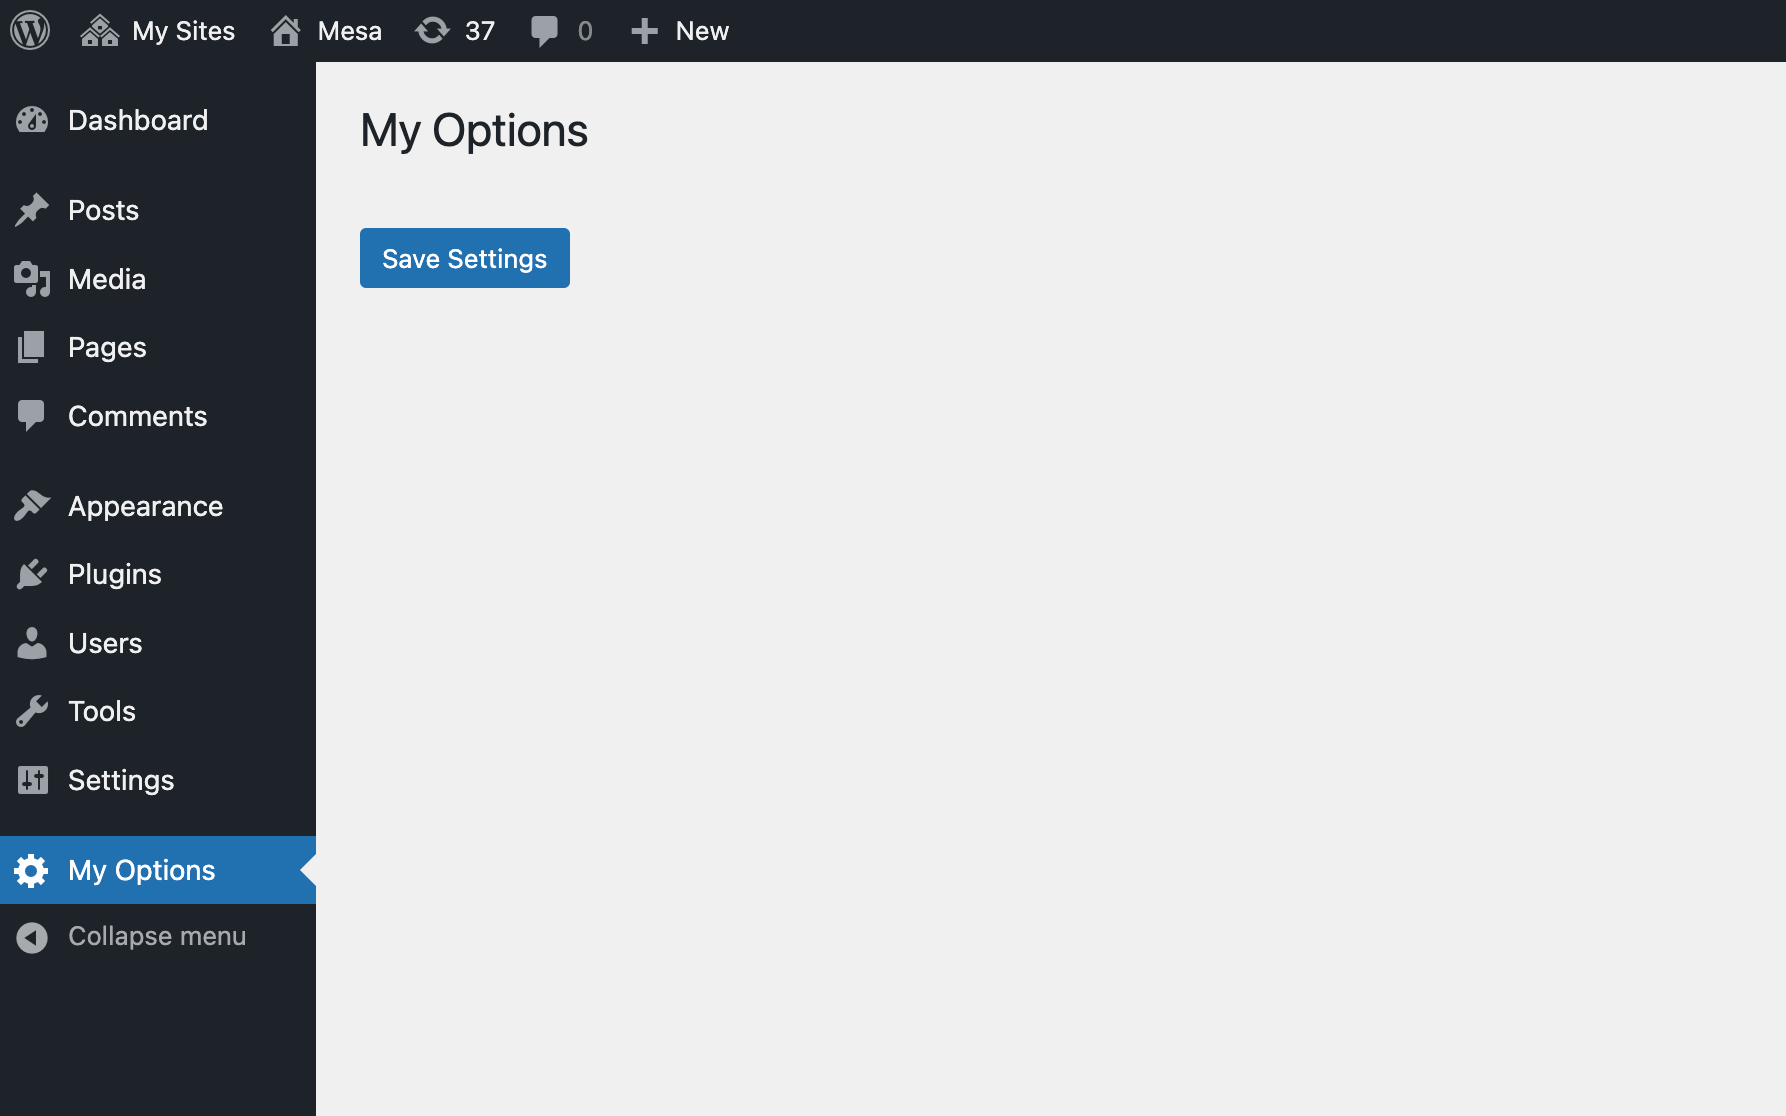
}Notice how we used the add_menu_page function to register our “My Options” page and then we used the my_options_page_html function to render the page content which makes use of a few core functions which will render our setting fields.
Below is a screenshot of what your panel should look like after adding the code.
Adding Settings to your Admin Options Panel
What good is having a custom options page without any settings! So now the next step is to register the settings our settings and display the fields on our settings page. To register our settings we’ll use the core function register_setting (be sure to read the codex to see how the function works)
Add the following code to register a new setting named “my_option_1” which will be stored as a part of the “my_options” settings group.
/**
 * Register our settings.
 */
function myprefix_register_settings() {
    register_setting( 'my_options_group', 'my_options' );
}
add_action( 'admin_init', 'myprefix_register_settings' );
In this example we are registering a new option named “my_options” which will be available via the WP options API and it’s assigned to the “my_options_group” settings group which is the option group name added in the settings_fields() function in the my_options_page_html() callback (make sure those two match).
Now, registering our setting doesn’t actually make the setting display on our admin page what it does is register the setting with WordPress to provide WordPress context/info about the setting. To add a field to our admin panel where you can enter the text for the option we’ll need to use the add_settings_field function along with the add_settings_section function. So lets update the function above like such:
/**
 * Register our settings.
 */
function myprefix_register_settings() {
    register_setting( 'my_options', 'my_options' );

    add_settings_section(
        'my_options_sections',
        false,
        false,
        'my_options'
    );

    add_settings_field(
        'my_option_1',
        esc_html__( 'My Option 1', 'text_domain' ),
        'render_my_option_1_field',
        'my_options',
        'my_options_sections',
        [
            'label_for' => 'my_option_1',
        ]
    );
}
add_action( 'admin_init', 'myprefix_register_settings' );
Wait, you still can’t see any fields in the theme panel? Correct, because after registering the setting field using add_setting_field we need to create a callback function to display the field html. If you look at the previous code you will notice one of the arguments of the add_settings_field last parameter is “render_my_option_1_field” this is the name of the function that will be used to display the field.
Here is the code for the field callback function:
/**
 * Render the "my_option_1" field.
 */
function render_my_option_1_field( $args ) {
    $value = get_option( 'my_options' )[$args['label_for']] ?? '';
    ?>
    <input
        type="text"
        id="<?php echo esc_attr( $args['label_for'] ); ?>"
        name="my_options[<?php echo esc_attr( $args['label_for'] ); ?>]"
        value="<?php echo esc_attr( $value ); ?>">
    <p class="description"><?php esc_html_e( 'This is a description for our field.', 'text_domain' ); ?></p>
    <?php
}
With this next piece of code added you should now be able to see your field in the admin panel like such:
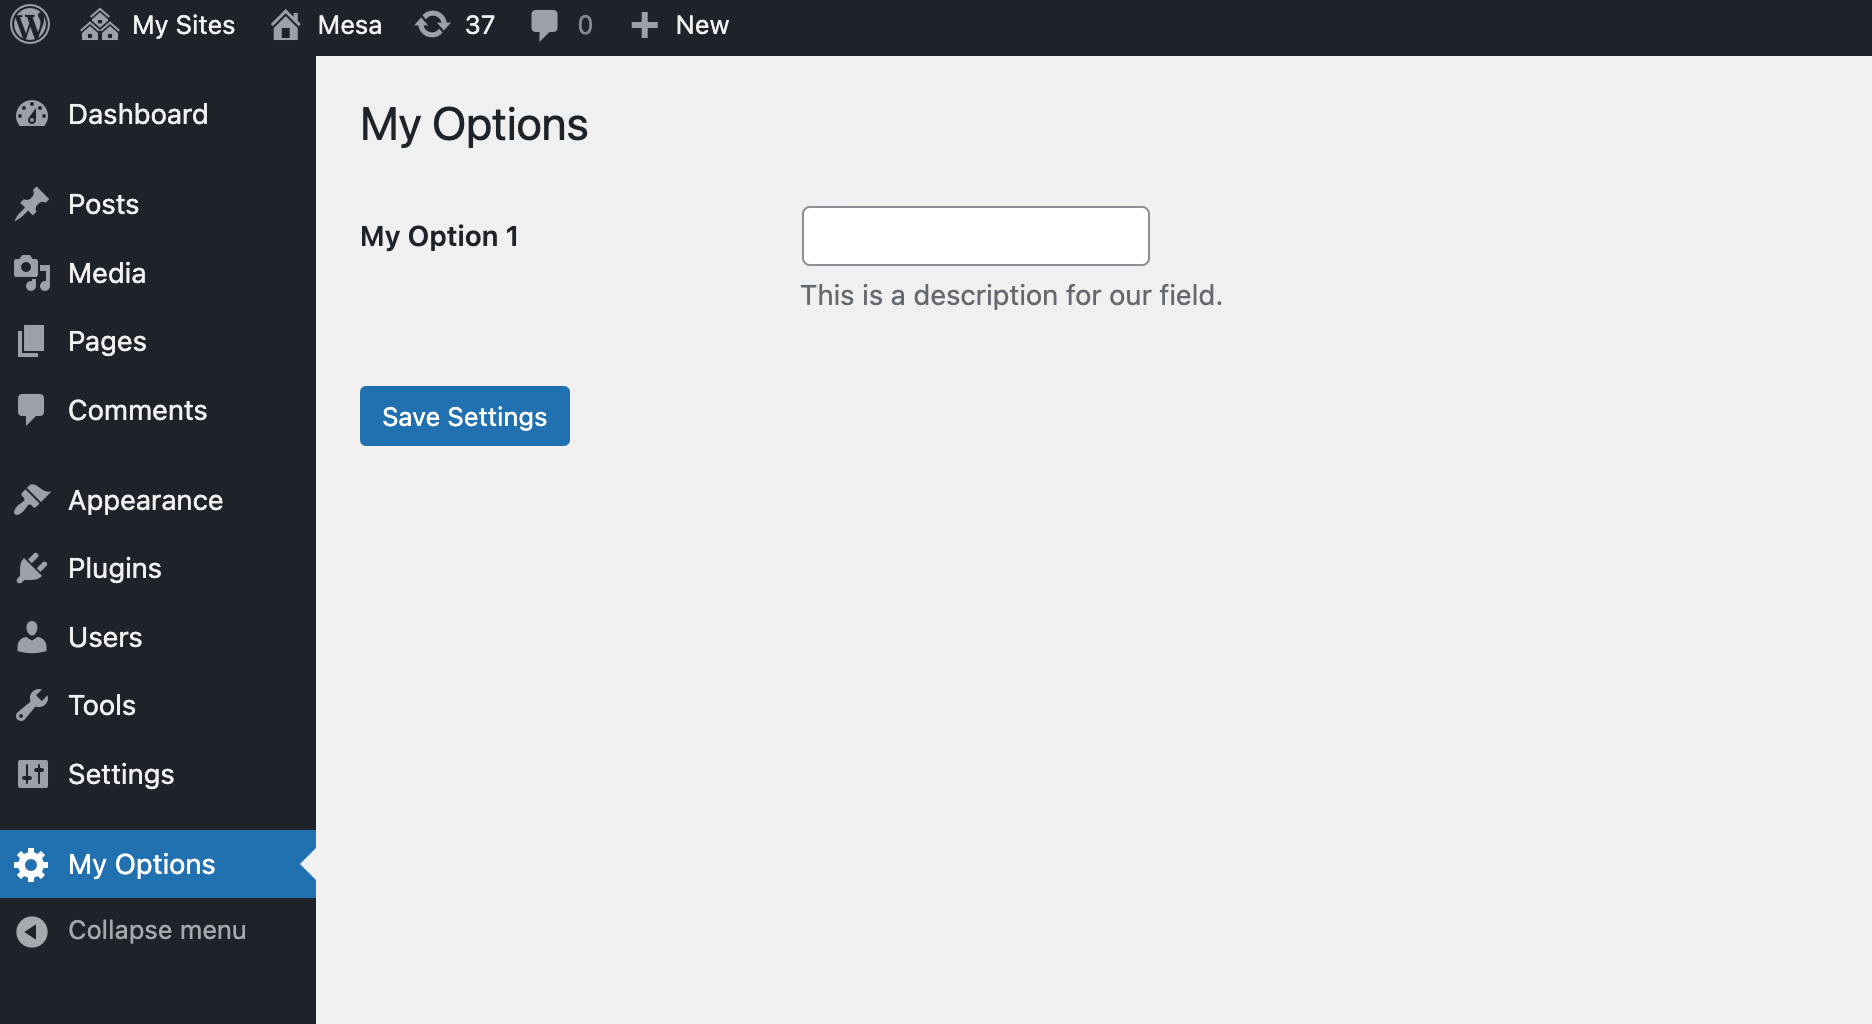
Awesome! Go ahead and add something to text field and save. After clicking the save settings button the page should reload and you should see your custom text in the input field.
Sanitizing Option Values
At this point we have a working options panel with an example field. But what about sanitization? It’s always important to sanitize data being saved to the database for security reasons. In order to add sanitization we’ll want to go back to our register_setting function and add some extra parameters:
register_setting( 'my_options_group', 'my_options', [
    'sanitize_callback' => 'my_options_sanitize_fields',
    'default'           => []
] );
So you can see we’ve added a new sanitize_callback parameter to the function arguments with a value of my_options_sanitize_fields, so the next step is to add the callback function:
/**
 * Sanitize fields before adding to the database.
 */
function my_options_sanitize_fields( $value ) {
    $value = (array) $value;
    if ( ! empty( $value['my_option_1'] ) ) {
        $value['my_option_1'] = sanitize_text_field( $value['my_option_1'] );
    }
    return $value;
}
This function checks the option value before its passed to the database, checks if the my_option_1 exists and sanitizes the value. If you want to apply the same sanitization to every option in the options group (your fields will be saved as an array) you can instead do something like this:
/**
 * Sanitize fields before adding to the database.
 */
function my_options_sanitize_fields( $value ) {
    return array_map( 'sanitize_text_field', $value );
}
How to Get Saved Option Values
Now that you know how to create your own custom options panel in WordPress the next step is making use of your custom option values. This will be done using the core WordPress get_option function. Example:
$my_option_1 = get_option( 'my_options' )['my_option_1'] ?? '';You may notice this code is familiar, that’s because we used similar code above in the render_my_option_1_field function to get the current value of our field.
You could also consider creating a wrapper function for your option. Example:
// Helper function for returning theme options.
function myprefix_get_option( $option_name = '', $default = '' ) {
    return get_option( 'my_options' )['my_option_1'] ?? $default;
}

// Usage.
$option_value = myprefix_get_option( 'my_option_1', 'default value' );
Admin Options Page Helper PHP Class
Knowing how to use the Settings API to create your own options page is cool, but to create a full blown page with a bunch of options and field types will require a lot more code registering every setting, creating callback functions for every setting and sanitizing all the different settings.
To speed things up and optimize your code to use a DRY approach I created a simple class that you can use for registering your settings via an array. This class supports text, textarea, checkbox and select input types and has built-in sanitization.
Note: This class could be expanded to support other fields types but that requires added javascript and the fields already included should be enough for most option panels.
The following helper class can be added to your theme or plugin so you can use it to create your admin panel easily by simply using a couple arrays. I would recommend placing this code in it’s own file and loading it via require_once or via PHP autoloading.
class WPEX_Options_Panel {

    /**
     * Options panel arguments.
     */
    protected $args = [];

    /**
     * Options panel title.
     */
    protected $title = '';

    /**
     * Options panel slug.
     */
    protected $slug = '';

    /**
     * Option name to use for saving our options in the database.
     */
    protected $option_name = '';

    /**
     * Option group name.
     */
    protected $option_group_name = '';

    /**
     * User capability allowed to access the options page.
     */
    protected $user_capability = '';

    /**
     * Our array of settings.
     */
    protected $settings = [];

    /**
     * Our class constructor.
     */
    public function __construct( array $args, array $settings ) {
        $this->args              = $args;
        $this->settings          = $settings;
        $this->title             = $this->args['title'] ?? esc_html__( 'Options', 'text_domain' );
        $this->slug              = $this->args['slug'] ?? sanitize_key( $this->title );
        $this->option_name       = $this->args['option_name'] ?? sanitize_key( $this->title );
        $this->option_group_name = $this->option_name . '_group';
        $this->user_capability   = $args['user_capability'] ?? 'manage_options';

        add_action( 'admin_menu', [ $this, 'register_menu_page' ] );
        add_action( 'admin_init', [ $this, 'register_settings' ] );
    }

    /**
     * Register the new menu page.
     */
    public function register_menu_page() {
        add_menu_page(
            $this->title,
            $this->title,
            $this->user_capability,
            $this->slug,
            [ $this, 'render_options_page' ]
        );
    }

    /**
     * Register the settings.
     */
    public function register_settings() {
        register_setting( $this->option_group_name, $this->option_name, [
            'sanitize_callback' => [ $this, 'sanitize_fields' ],
            'default'           => $this->get_defaults(),
        ] );

        add_settings_section(
            $this->option_name . '_sections',
            false,
            false,
            $this->option_name
        );

        foreach ( $this->settings as $key => $args ) {
            $type = $args['type'] ?? 'text';
            $callback = "render_{$type}_field";
            if ( method_exists( $this, $callback ) ) {
                $tr_class = '';
                if ( array_key_exists( 'tab', $args ) ) {
                    $tr_class .= 'wpex-tab-item wpex-tab-item--' . sanitize_html_class( $args['tab'] );
                }
                add_settings_field(
                    $key,
                    $args['label'],
                    [ $this, $callback ],
                    $this->option_name,
                    $this->option_name . '_sections',
                    [
                        'label_for' => $key,
                        'class'     => $tr_class
                    ]
                );
            }
        }
    }

    /**
     * Saves our fields.
     */
    public function sanitize_fields( $value ) {
        $value = (array) $value;
        $new_value = [];
        foreach ( $this->settings as $key => $args ) {
            $field_type = $args['type'];
            $new_option_value = $value[$key] ?? '';
            if ( $new_option_value ) {
                $sanitize_callback = $args['sanitize_callback'] ?? $this->get_sanitize_callback_by_type( $field_type );
                $new_value[$key] = call_user_func( $sanitize_callback, $new_option_value, $args );
            } elseif ( 'checkbox' === $field_type ) {
                $new_value[$key] = 0;
            }
        }
        return $new_value;
    }

    /**
     * Returns sanitize callback based on field type.
     */
    protected function get_sanitize_callback_by_type( $field_type ) {
        switch ( $field_type ) {
            case 'select':
                return [ $this, 'sanitize_select_field' ];
                break;
            case 'textarea':
                return 'wp_kses_post';
                break;
            case 'checkbox':
                return [ $this, 'sanitize_checkbox_field' ];
                break;
            default:
            case 'text':
                return 'sanitize_text_field';
                break;
        }
    }

    /**
     * Returns default values.
     */
    protected function get_defaults() {
        $defaults = [];
        foreach ( $this->settings as $key => $args ) {
            $defaults[$key] = $args['default'] ?? '';
        }
        return $defaults;
    }

    /**
     * Sanitizes the checkbox field.
     */
    protected function sanitize_checkbox_field( $value = '', $field_args = [] ) {
        return ( 'on' === $value ) ? 1 : 0;
    }

     /**
     * Sanitizes the select field.
     */
    protected function sanitize_select_field( $value = '', $field_args = [] ) {
        $choices = $field_args['choices'] ?? [];
        if ( array_key_exists( $value, $choices ) ) {
            return $value;
        }
    }

    /**
     * Renders the options page.
     */
    public function render_options_page() {
        if ( ! current_user_can( $this->user_capability ) ) {
            return;
        }

        if ( isset( $_GET['settings-updated'] ) ) {
            add_settings_error(
               $this->option_name . '_mesages',
               $this->option_name . '_message',
               esc_html__( 'Settings Saved', 'text_domain' ),
               'updated'
            );
        }

        settings_errors( $this->option_name . '_mesages' );

        ?>
        <div class="wrap">
            <h1><?php echo esc_html( get_admin_page_title() ); ?></h1>
            <?php $this->render_tabs(); ?>
            <form action="options.php" method="post" class="wpex-options-form">
                <?php
                    settings_fields( $this->option_group_name );
                    do_settings_sections( $this->option_name );
                    submit_button( 'Save Settings' );
                ?>
            </form>
        </div>
        <?php
    }

    /**
     * Renders options page tabs.
     */
    protected function render_tabs() {
        if ( empty( $this->args['tabs'] ) ) {
            return;
        }

        $tabs = $this->args['tabs'];
        ?>

        <style>.wpex-tab-item{ display: none; ?></style>

        <h2 class="nav-tab-wrapper wpex-tabs"><?php
            $first_tab = true;
            foreach ( $tabs as $id => $label ) {?>
                <a href="#" data-tab="<?php echo esc_attr( $id ); ?>" class="nav-tab<?php echo ( $first_tab ) ? ' nav-tab-active' : ''; ?>"><?php echo ucfirst( $label ); ?></a>
                <?php
                $first_tab = false;
            }
        ?></h2>

        <script>
            ( function() {
                document.addEventListener( 'click', ( event ) => {
                    const target = event.target;
                    if ( ! target.closest( '.wpex-tabs a' ) ) {
                        return;
                    }
                    event.preventDefault();
                    document.querySelectorAll( '.wpex-tabs a' ).forEach( ( tablink ) => {
                        tablink.classList.remove( 'nav-tab-active' );
                    } );
                    target.classList.add( 'nav-tab-active' );
                    targetTab = target.getAttribute( 'data-tab' );
                    document.querySelectorAll( '.wpex-options-form .wpex-tab-item' ).forEach( ( item ) => {
                        if ( item.classList.contains( `wpex-tab-item--${targetTab}` ) ) {
                            item.style.display = 'block';
                        } else {
                            item.style.display = 'none';
                        }
                    } );
                } );
                document.addEventListener( 'DOMContentLoaded', function () {
                    document.querySelector( '.wpex-tabs .nav-tab' ).click();
                }, false );
            } )();
        </script>

        <?php
    }

    /**
     * Returns an option value.
     */
    protected function get_option_value( $option_name ) {
        $option = get_option( $this->option_name );
        if ( ! array_key_exists( $option_name, $option ) ) {
            return array_key_exists( 'default', $this->settings[$option_name] ) ? $this->settings[$option_name]['default'] : '';
        }
        return $option[$option_name];
    }

    /**
     * Renders a text field.
     */
    public function render_text_field( $args ) {
        $option_name = $args['label_for'];
        $value       = $this->get_option_value( $option_name );
        $description = $this->settings[$option_name]['description'] ?? '';
        ?>
            <input
                type="text"
                id="<?php echo esc_attr( $args['label_for'] ); ?>"
                name="<?php echo $this->option_name; ?>[<?php echo esc_attr( $args['label_for'] ); ?>]"
                value="<?php echo esc_attr( $value ); ?>">
            <?php if ( $description ) { ?>
                <p class="description"><?php echo esc_html( $description ); ?></p>
            <?php } ?>
        <?php
    }

    /**
     * Renders a textarea field.
     */
    public function render_textarea_field( $args ) {
        $option_name = $args['label_for'];
        $value       = $this->get_option_value( $option_name );
        $description = $this->settings[$option_name]['description'] ?? '';
        $rows        = $this->settings[$option_name]['rows'] ?? '4';
        $cols        = $this->settings[$option_name]['cols'] ?? '50';
        ?>
            <textarea
                type="text"
                id="<?php echo esc_attr( $args['label_for'] ); ?>"
                rows="<?php echo esc_attr( absint( $rows ) ); ?>"
                cols="<?php echo esc_attr( absint( $cols ) ); ?>"
                name="<?php echo $this->option_name; ?>[<?php echo esc_attr( $args['label_for'] ); ?>]"><?php echo esc_attr( $value ); ?></textarea>
            <?php if ( $description ) { ?>
                <p class="description"><?php echo esc_html( $description ); ?></p>
            <?php } ?>
        <?php
    }

    /**
     * Renders a checkbox field.
     */
    public function render_checkbox_field( $args ) {
        $option_name = $args['label_for'];
        $value       = $this->get_option_value( $option_name );
        $description = $this->settings[$option_name]['description'] ?? '';
        ?>
            <input
                type="checkbox"
                id="<?php echo esc_attr( $args['label_for'] ); ?>"
                name="<?php echo $this->option_name; ?>[<?php echo esc_attr( $args['label_for'] ); ?>]"
                <?php checked( $value, 1, true ); ?>
            >
            <?php if ( $description ) { ?>
                <p class="description"><?php echo esc_html( $description ); ?></p>
            <?php } ?>
        <?php
    }

    /**
     * Renders a select field.
     */
    public function render_select_field( $args ) {
        $option_name = $args['label_for'];
        $value       = $this->get_option_value( $option_name );
        $description = $this->settings[$option_name]['description'] ?? '';
        $choices     = $this->settings[$option_name]['choices'] ?? [];
        ?>
            <select
                id="<?php echo esc_attr( $args['label_for'] ); ?>"
                name="<?php echo $this->option_name; ?>[<?php echo esc_attr( $args['label_for'] ); ?>]"
            >
                <?php foreach ( $choices as $choice_v => $label ) { ?>
                    <option value="<?php echo esc_attr( $choice_v ); ?>" <?php selected( $choice_v, $value, true ); ?>><?php echo esc_html( $label ); ?></option>
                <?php } ?>
            </select>
            <?php if ( $description ) { ?>
                <p class="description"><?php echo esc_html( $description ); ?></p>
            <?php } ?>
        <?php
    }

}
Helper Class Usage:
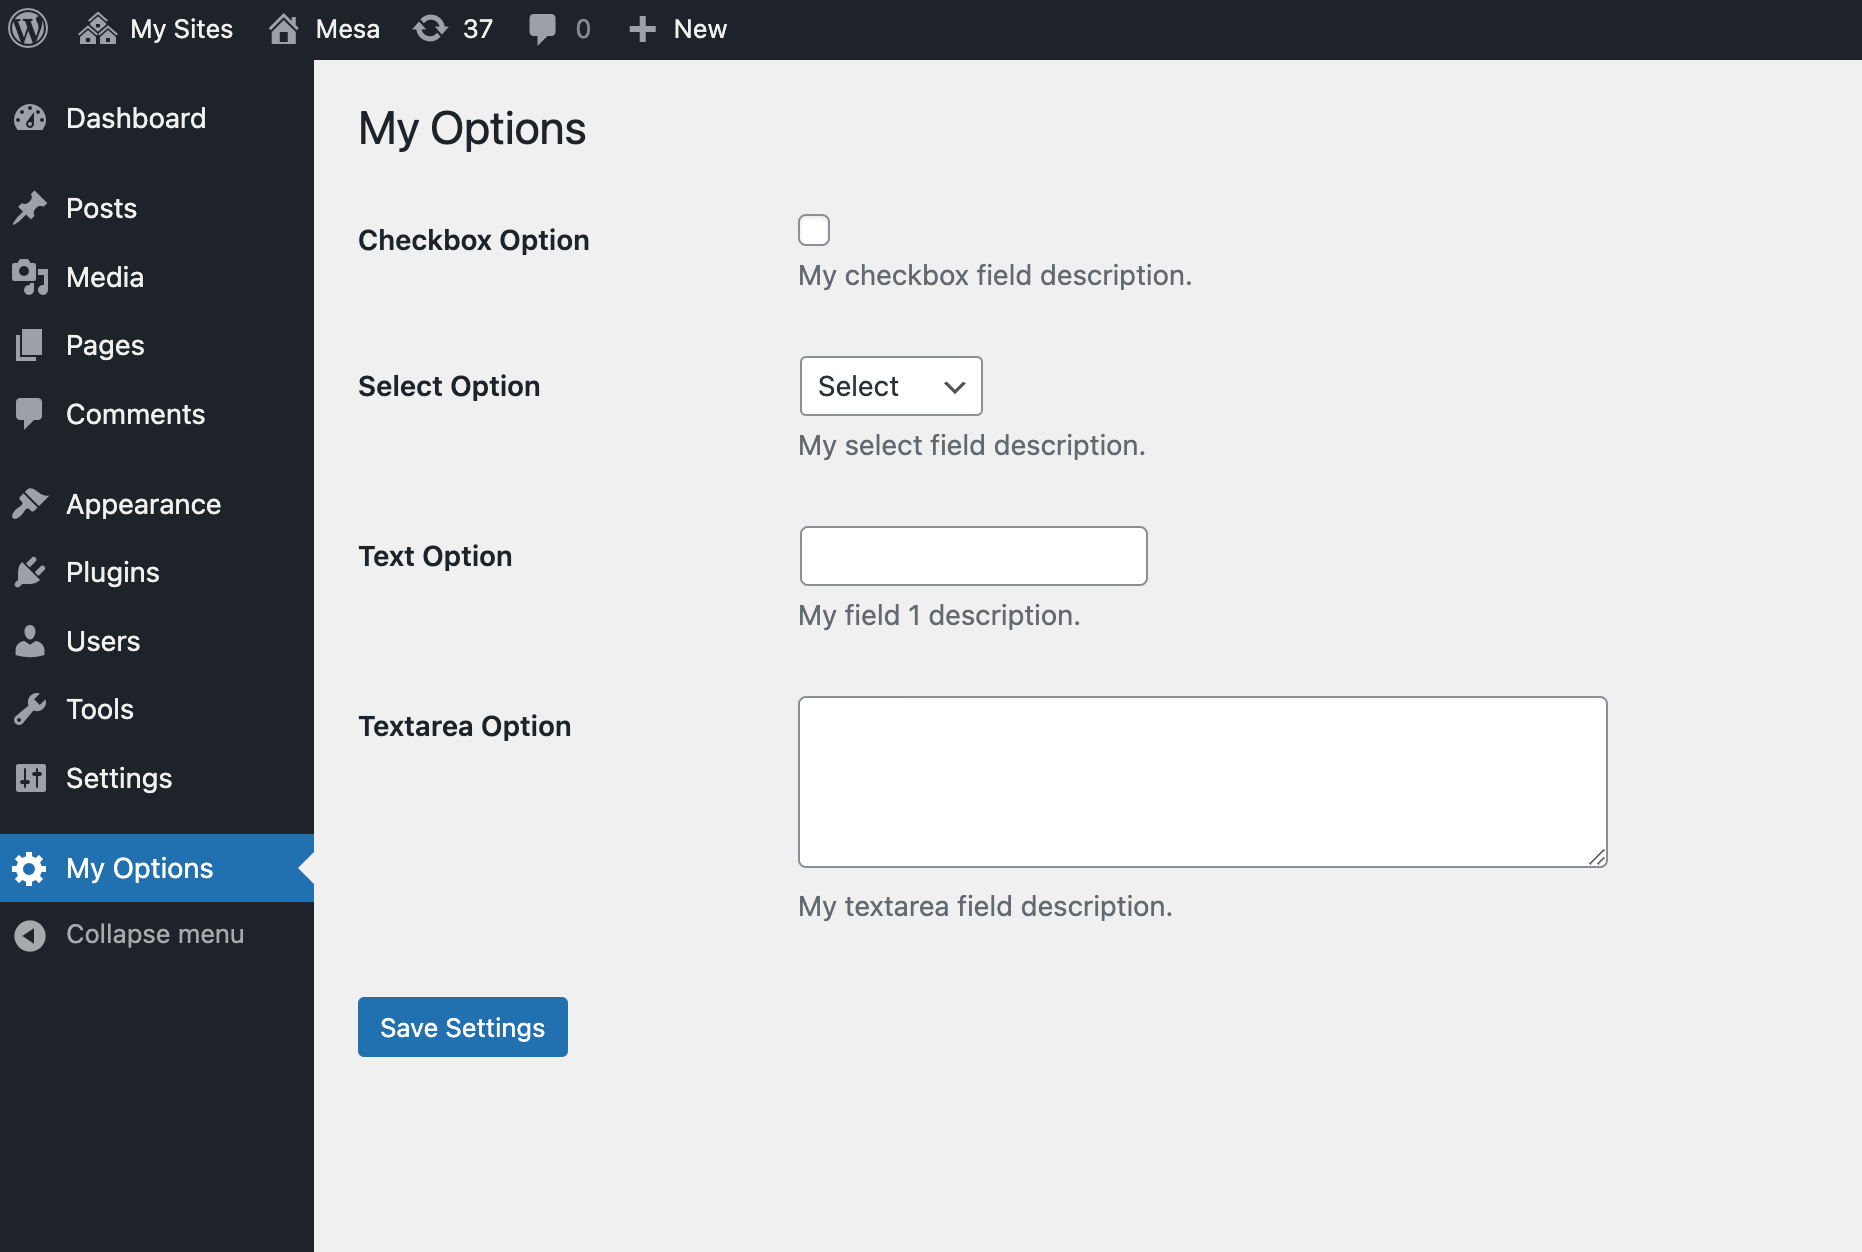
Here is an example of how you can use the classname to register a custom options page with various fields. So easy! You can now create unlimited option panels and let the class do all the heavy lifting.
// Register new Options panel.
$panel_args = [
    'title'           => 'My Options',
    'option_name'     => 'my_options',
    'slug'            => 'my-options-panel',
    'user_capability' => 'manage_options',
];

$panel_settings = [
    'option_1' => [
        'label'       => esc_html__( 'Checkbox Option', 'text_domain' ),
        'type'        => 'checkbox',
        'description' => 'My checkbox field description.',
    ],
    'option_2' => [
        'label'       => esc_html__( 'Select Option', 'text_domain' ),
        'type'        => 'select',
        'description' => 'My select field description.',
        'choices'     => [
            ''         => esc_html__( 'Select', 'text_domain' ),
            'choice_1' => esc_html__( 'Choice 1', 'text_domain' ),
            'choice_2' => esc_html__( 'Choice 2', 'text_domain' ),
            'choice_3' => esc_html__( 'Choice 3', 'text_domain' ),
        ],
    ],
    'option_3' => [
        'label'       => esc_html__( 'Text Option', 'text_domain' ),
        'type'        => 'text',
        'description' => 'My field 1 description.',
    ],
    'option_4' => [
        'label'       => esc_html__( 'Textarea Option', 'text_domain' ),
        'type'        => 'textarea',
        'description' => 'My textarea field description.',
    ],
];

new WPEX_Options_Panel( $panel_args, $panel_settings );
The following example would produce an options panel that looks like the following:
Adding Tabs to the Options Page
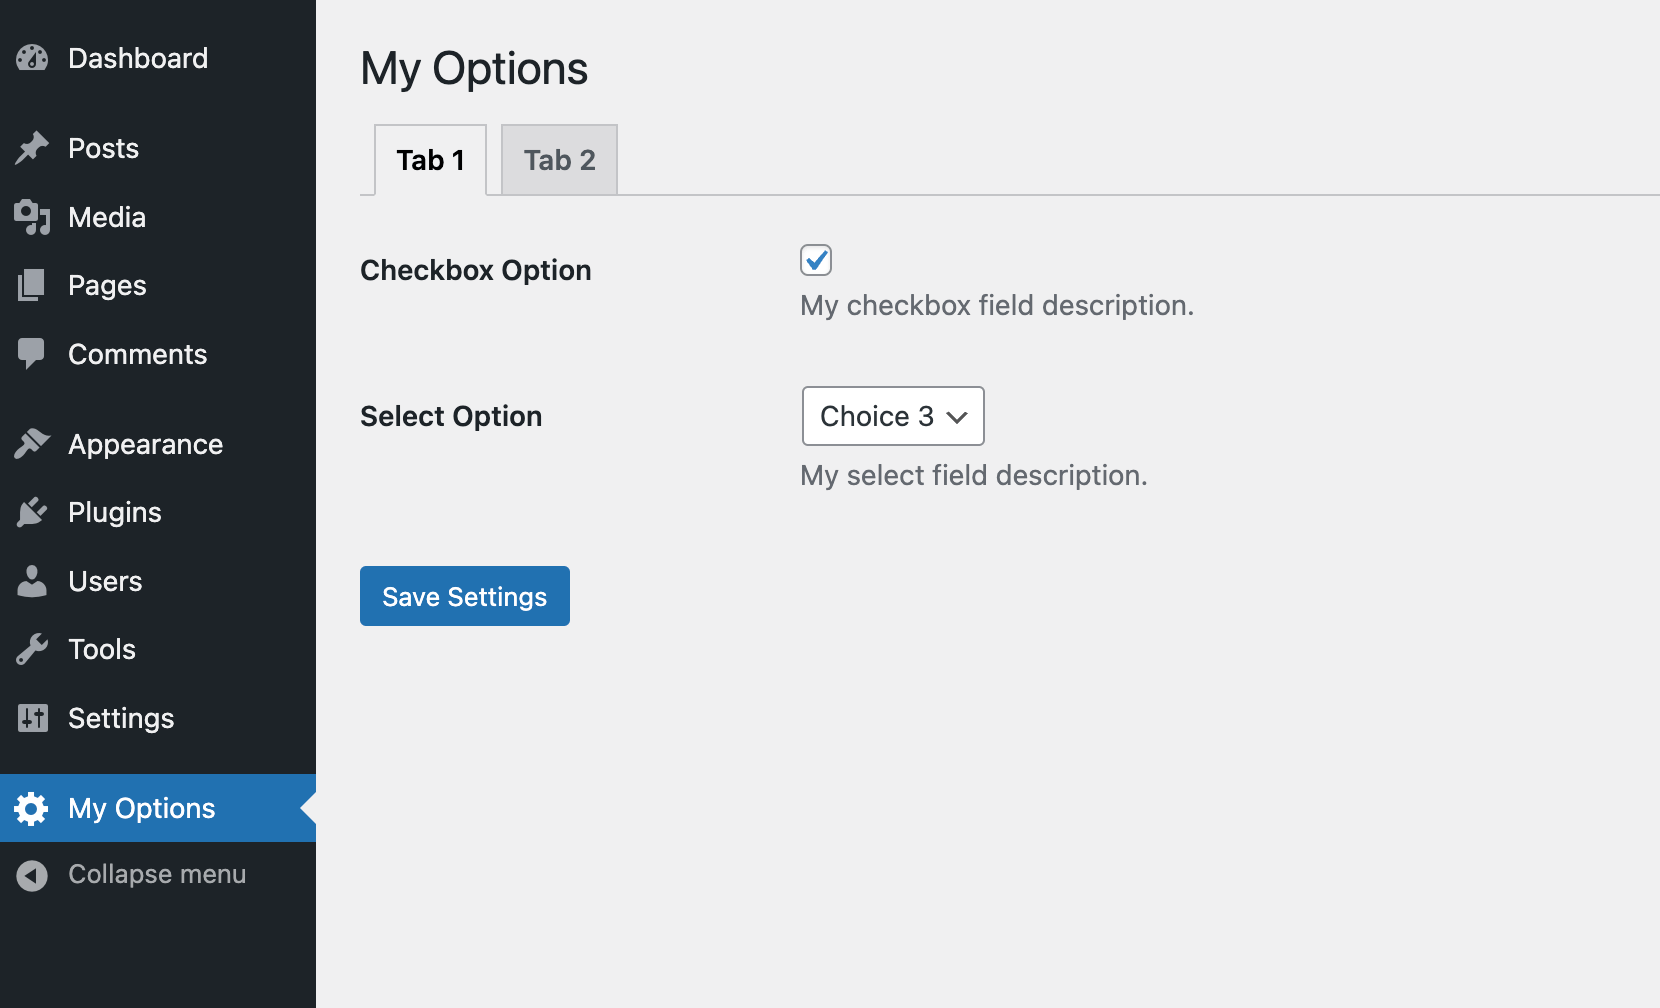
You may have noticed in the PHP class there is some code for tabs. This will allow you to slip your theme options page into multiple tabs. To create tabs simply define your tabs in the arguments array then define your tab for each setting. See the example below:
// Register new Options panel.
$panel_args = [
    'title'           => 'My Options',
    'option_name'     => 'my_options',
    'slug'            => 'my-options-panel',
    'user_capability' => 'manage_options',
    'tabs'            => [
        'tab-1' => esc_html__( 'Tab 1', 'text_domain' ),
        'tab-2' => esc_html__( 'Tab 2', 'text_domain' ),
    ],
];

$panel_settings = [
    // Tab 1
    'option_1' => [
        'label'       => esc_html__( 'Checkbox Option', 'text_domain' ),
        'type'        => 'checkbox',
        'description' => 'My checkbox field description.',
        'tab'         => 'tab-1',
    ],
    'option_2' => [
        'label'       => esc_html__( 'Select Option', 'text_domain' ),
        'type'        => 'select',
        'description' => 'My select field description.',
        'choices'     => [
            ''         => esc_html__( 'Select', 'text_domain' ),
            'choice_1' => esc_html__( 'Choice 1', 'text_domain' ),
            'choice_2' => esc_html__( 'Choice 2', 'text_domain' ),
            'choice_3' => esc_html__( 'Choice 3', 'text_domain' ),
        ],
        'tab'         => 'tab-1',
    ],
    // Tab 2
    'option_3' => [
        'label'       => esc_html__( 'Text Option', 'text_domain' ),
        'type'        => 'text',
        'description' => 'My field 1 description.',
        'tab'         => 'tab-2',
    ],
    'option_4' => [
        'label'       => esc_html__( 'Textarea Option', 'text_domain' ),
        'type'        => 'textarea',
        'description' => 'My textarea field description.',
        'tab'         => 'tab-2',
    ],
];

new WPEX_Options_Panel( $panel_args, $panel_settings );
Here is a screenshot of the result:
Further Reading on WordPress Admin Screens
I have seen tons of WordPress options pages all created in very distinct ways, but I personally like the method I showed you above. It’s very simple, straight to the point and uses core WordPress API’s.
There is no need to get so crazy and fancy with your theme/plugin options! If you need more information for creating admin screens you will want to check out the Administration Screens Codex.
thank you !
Awesome, Thanks. This helped me a lot.
You’re the best!! This is the first tutorial on the subject that I could actually follow. Very clear.
DUDE YOU ROCK!! Your post saved me a heck of a lot of trouble.
This tutorial is very helpful for me, Thanks.
Thanks, I’ve had a look at some of those. Your code above is simple, easy and quick compared to any of the others.
very helpful
Thanks a lot Sir, you are really awesome …. I really searched google but could not find useful to me … at last I came here and made my client happy 🙂 Loved your work … thanks again … wanna subscribe and follow you now ….
Nicely explained! Thanks for sharing.
hanks a lot Sir, you are really awesome …. I really searched google but could not find useful to me … at last I came here and made my client happy 🙂 Loved your work … thanks again … wanna subs
Thanks. This helped me a lot! =)
Nice, this is very helpful and useful for everyone thank you!
Thank you. works fine for me.
I would love to use the wp_editor( $content, $editor_id, $settings); with this, but can’t seem to get the value saved. Any suggestions on that?
You don’t have to do anything special for the wp_editor to save. Just make sure you are adding a correct textarea_name to the settings ( textarea_name => theme_options[editor_example] ). But this post is very old. I highly recommend you use the new Customizer API instead.
how to add media uploader in this theme option ?
You would need to use javascript for this, there are guide online if you search “Add Media Upload Button in WordPress” but if you are working on a WordPress theme do NOT add a theme panel like this, you should use the Customizer instead which already has built-in media options. And actually if you are creating a simple plugin with a few options you can use the Customizer as well. If you need to have a separate theme panel and not sure how to code it or extend this guide you can also check out the “Options Framework Plugin” which you can copy/paste into your project or the “Redux Framework”, both are really good theme panel frameworks.
Can’t figure out how to give proper right to Editor, so they can do some changes too. Changing ‘manage_options’, ‘theme-settings’, into ‘edit_pages’ gives enough rights to Editors to view the custom plugin, but when hitting the save button, WordPress returns that nasty “Not Allowed to Access this Page” message. Any suggestions?
I don’t think there is anything you can do when using this specific code since the the user checks are done on the WP side when saving the options. You would need to use a User Role Editor plugin instead to allow editors to save options. Otherwise instead of register_setting you would have to do manual saves on page refresh.
great tutorial. 🙂
Thank you so much for this tutorial! You’re a life saver! Just needed a simple page where the user can edit a few text fields for the theme and this tutorial did the job perfectly!
how i want to get data from database my_options
Hi,
You will use the
get_option()function. See the section above labeled “Fetching Custom Option Values” (I may rename that heading to “How to get your option values” so it’s more clear). I added a helper function in the code snippet above named “myprefix_get_option” that you can rename and use. Let me know if you have any issues or followup questions!The tutorial is just awesome, but I think if we can add a repeatable group here it will one of the best theme option builder.
Hi!
I’ve added
'default' => true, to checkbox, but after first saving, this field is unchecked… hot to resolve that?Thanks!
This is a known WordPress bug which you can read about from the core track ticket. The way I get around it personally is by saving an empty value for my option on plugin or theme activation. If you are working with a plugin you can do something like this:
register_activation_hook( __FILE__, function() {
	// Fixes issues with #https://core.trac.wordpress.org/ticket/21989
	if ( ! \get_option( 'my_options' ) ) {
		\add_option( 'my_options', [], '', false );
	}
} );
This way when your plugin is first enabled a default value will be added to your option and it will prevent that bug on first save. If you are adding this code inside a theme you can instead using code like this:
add_action('after_switch_theme', function() { // Fixes issues with #https://core.trac.wordpress.org/ticket/21989 if ( ! \get_option( 'my_options' ) ) { \add_option( 'my_options', [], '', false ); } } );How to add image upload option to this code please
This is intended to be a simple guide for developers that you can then improve on. Because there is no such thing as an image select field built-in to WordPress this will require custom javascript and I didn’t want to add any file dependencies in this tutorial. You could just display a simple text field for the user to add their image URL and then in the field description add a link to the media library. Otherwise, it’s fairly simple to create an image select field – there are plenty guides out there or you can look at the Options Framework plugin code to see how they implemented it.
Awesome, Thank you very much. This helped me a lot.